CONNECTING THE SERVER WITH MONGODB
To connect to MongoDB Atlas from a Node server, we need to ensure we have a secure internet connection. If you are learning this course on an insecure network (such as a public library or a coffee shops’ public wi-fi), MongoDB Atlas may reject your connection request .
There’s a few different libraries and tools that can be used to connect and interact with a MongoDB database from a Node server application. We’re going to use the official MongoDB Node.js Driver to make our connection. The Node.js MongoDB driver provides both callback and promise based interaction with MongoDB.
We’ll head to our terminal and install the mongodb driver as a dependency for our server application.
server $: npm install mongodb
The node MongoDB driver is written in native JavaScript so we’ll install the accompanying type definitions from the DefinitelyTyped repository.
server $: npm install -D @types/mongodb
With the node MongoDB driver installed, we’ll aim to connect our server with the collection in the database we’ve established in MongoDB Atlas.
CONNECTING TO THE DATABASE
CONNECTION URL
We’ll create a database/ folder in src/ that contains an index.ts file where we’ll set up and declare the connection between our server and MongoDB.
src/
  database/
    index.ts
  graphql/
  index.ts
  listings.ts
In the src/database/index.ts file, our goal is to export a function that when run will make the connection to our database. We’ll name this function accordingly and call it connectDatabase .
export const connectDatabase = () => {};
To connect with our database we’re going to need to import and use the MongoClient constructor from the mongodb library.
import { MongoClient } from "mongodb";

export const connectDatabase = () => {};
The MongoClient instance gives us access to a connect() function that takes a URL argument to specify a connection to a MongoDB instance. We’ll retrieve this connection URL from MongoDB Atlas.
- In the MongoDB Atlas console, we’ll find our cluster and click the
CONNECTbutton available in the cluster dashboard. - We’ll select
Connect Your Applicationand pick theNode.jsdriver option and the latest version (3.0 or later).
We’ll then be presented with the connection URL.
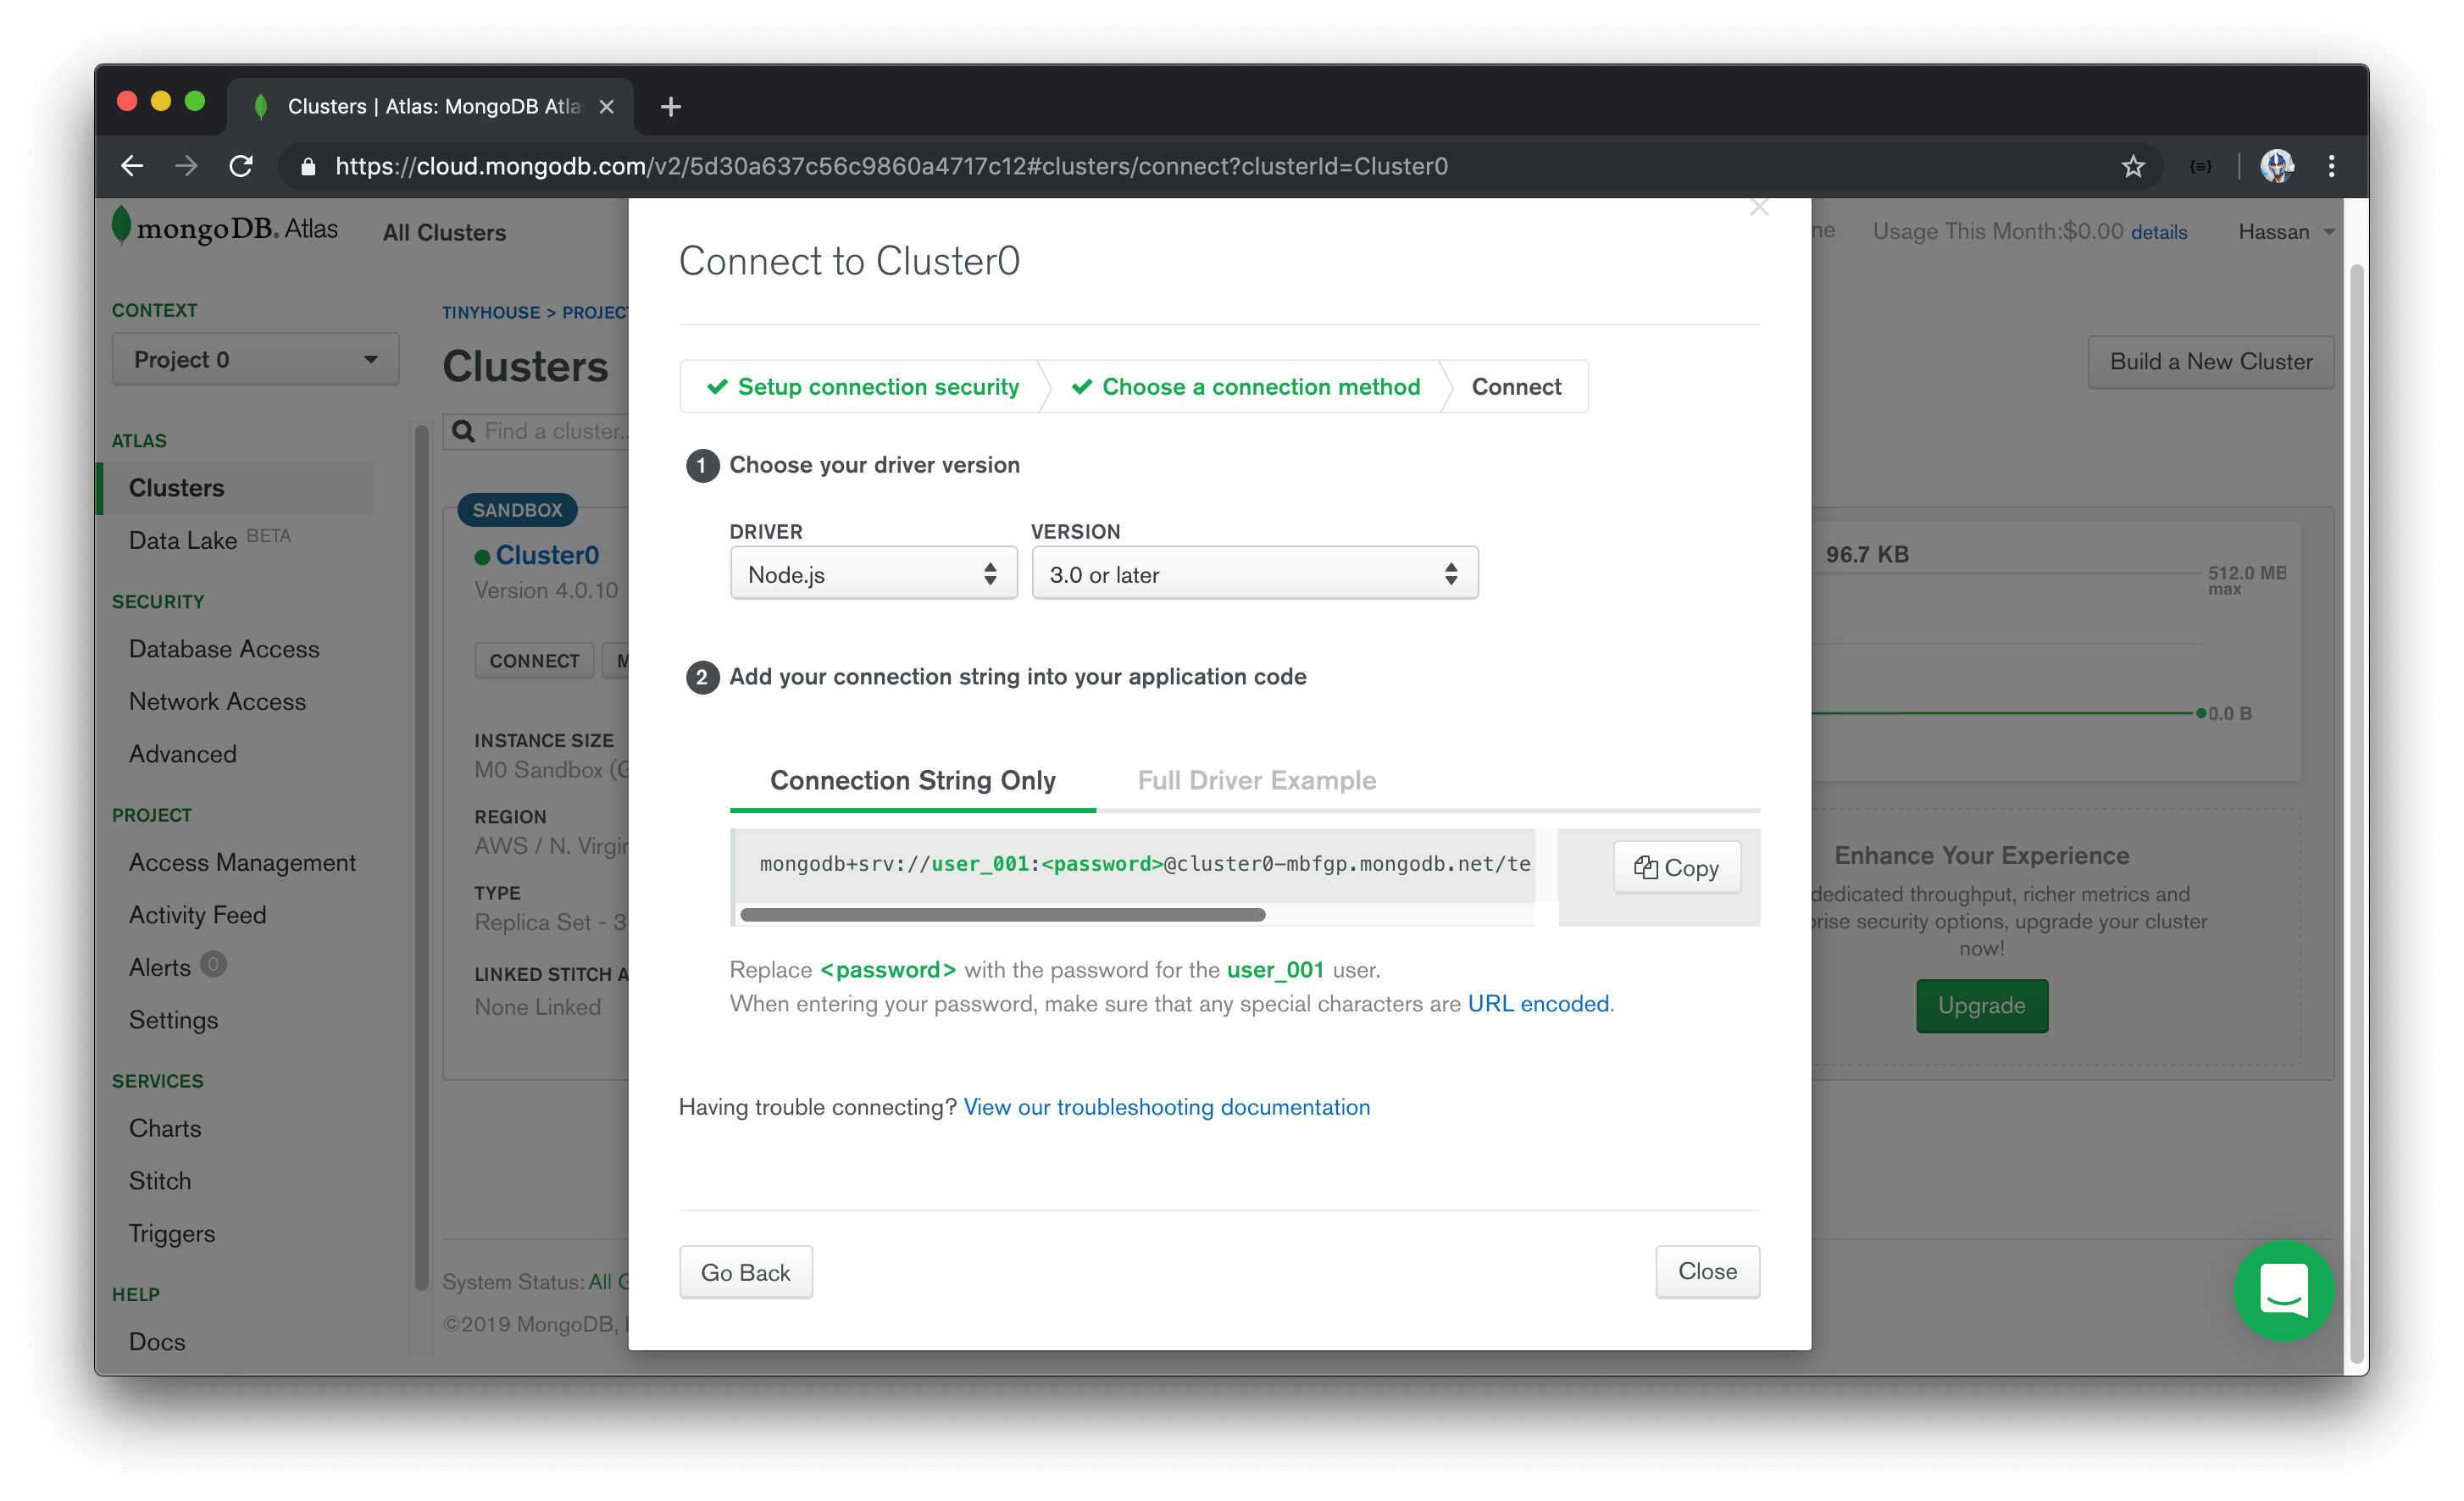
We’ll copy the connection url string provided to us and assign it to a const variable called url in our src/database/index.ts file.
import { MongoClient } from "mongodb";

const url = `mongodb+srv://user_001:<password>@cluster0-mbfgp.mongodb.net`;

export const connectDatabase = () => {};
The connection url string contains details about the database user, the user’s password (though not provided since the password is a protected credential), and the cluster we’re making the connection to.
We’ll extrapolate the user, password, and cluster portions of the string to their own respective const variables.
import { MongoClient } from "mongodb";

const user = "user_001";
const userPassword = "";
const cluster = "cluster0-mbfgp";

const url = `mongodb+srv://${user}:${userPassword}@${cluster}.mongodb.net`;

export const connectDatabase = () => {};
We can get the password of the MongoDB user in the SECURITY section of MongoDB Atlas. We’ll navigate to Database Access under the SECURITY tab, find the particular user we want. We’ll auto-generate a new password, copy the password value, and assign it to the userPassword constant variable we’ve set up.
import { MongoClient } from "mongodb";

const user = "user_001";
const userPassword = "XXXXXX"; // user password
const cluster = "cluster0-mbfgp";

const url = `mongodb+srv://${user}:${userPassword}@${cluster}.mongodb.net`;

export const connectDatabase = () => {};
It’s especially important to never commit or expose database configuration variables. In this case, we’re simply pasting the values here to verify our connection works in this lesson before we decide to extrapolate it. Database configuration variables should never be committed directly to source code!
MONGOCLIENT
With the connection URL available to us, let’s use the MongoClient constructor to connect to our Mongo cluster.
In our connectDatabase() function, we’ll run the connect() function from the MongoClient instance and pass in the connection url. This will return a new Mongo Client instance with which we’ll assign to a const variable called client .
import { MongoClient } from "mongodb";

const user = "user_001";
const userPassword = "XXXXXX";
const cluster = "cluster0-mbfgp";

const url = `mongodb+srv://${user}:${userPassword}@${cluster}.mongodb.net`;

export const connectDatabase = () => {
  const client = MongoClient.connect(url);
};
The connect() function is asynchronous. We want to assign the result of the asynchronous function to the client variable, so we’ll use the await syntax here to achieve this. Since the await keyword can only be used within an async function, we’ll declare that our connectDatabase() function is asynchronous.
import { MongoClient } from "mongodb";

const user = "user_001";
const userPassword = "XXXXXX";
const cluster = "cluster0-mbfgp";

const url = `mongodb+srv://${user}:${userPassword}@${cluster}.mongodb.net`;

export const connectDatabase = async () => {
  const client = await MongoClient.connect(url);
};
Documentation from the node MongoDB driver often shows passing a { useNewUrlParser: true } option to a MongoClient.connect() function. This is to ensure compatibility with parsing of the connection url between the current version of our Node MongoDB driver and the version of MongoDB being used in Atlas. We’ll follow along and specify the useNewUrlParser option.
import { MongoClient } from "mongodb";

const user = "user_001";
const userPassword = "XXXXXX";
const cluster = "cluster0-mbfgp";

const url = `mongodb+srv://${user}:${userPassword}@${cluster}.mongodb.net`;

export const connectDatabase = async () => {
  const client = await MongoClient.connect(url, {
    useNewUrlParser: true
  });
};
As of recently, when we start our server with the above connection, a deprecation warning is shown in our terminal logs encouraging us to use a new Server Discover and Monitoring engine . To do so, we can pass a { useUnifiedTopology: true } option to the MongoClient.connect() function constructor.
import { MongoClient } from "mongodb";

const user = "user_001";
const userPassword = "XXXXXX";
const cluster = "cluster0-mbfgp";

const url = `mongodb+srv://${user}:${userPassword}@${cluster}.mongodb.net`;

export const connectDatabase = async () => {
  const client = await MongoClient.connect(url, {
    useNewUrlParser: true,
    useUnifiedTopology: true
  });
};
In upcoming screencast videos, you may see the
MongoClient.connect()constructor function without theuseUnifiedTopologyoption defined. Be sure to define theuseUnifiedTopologyoption if you’re interested in avoiding the MongoClient connection deprecation warning.
From the newly created client , we can access the databases within our cluster with the client.db() method. Let’s retrieve the database we’ve created named main from our cluster and assign the result to a db constant variable:
import { MongoClient } from "mongodb";

const user = "user_001";
const userPassword = "XXXXXX";
const cluster = "cluster0-mbfgp";

const url = `mongodb+srv://${user}:${userPassword}@${cluster}.mongodb.net`;

export const connectDatabase = async () => {
  const client = await MongoClient.connect(url, {
    useNewUrlParser: true,
    useUnifiedTopology: true
  });
  const db = client.db("main");
};
Though we could return this db value directly from our function, we will aim to return a map of the collections from the database. We’ll return an object that contains a reference to the collections we have in our database. Since we only have a test_listings collection in our database, we’ll return an object with a listings key that references the test_listings collection in our database. We can access the collections from the db object with the db.collection() function.
Our src/database/index.ts file will now look like the following.
import { MongoClient } from "mongodb";

const user = "user_001";
const userPassword = "XXXXXX";
const cluster = "cluster0-mbfgp";

const url = `mongodb+srv://${user}:${userPassword}@${cluster}.mongodb.net`;

export const connectDatabase = async () => {
  const client = await MongoClient.connect(url, {
    useNewUrlParser: true,
    useUnifiedTopology: true
  });
  const db = client.db("main");

  return {
    listings: db.collection("test_listings")
  };
};
SRC/INDEX.TS
With our database connection function established, let’s look to have our Express Server execute the database connection when our app is being instantiated.
To be able to run the connectDatabase() function the minute our server starts, we’ll slightly configure how our src/index.ts file is shaped. To make things a little more apparent, we’ll create a mount() function that accepts the Express app instance. We’ll dictate that this mount() function will be the parent function to run to essentially start our Node Express server.
The mount() function will accept the Express app instance and do what we’ve done before by instantiating the Apollo Server, applying the necessary middleware, and having our app listen on the appropriate port. The “type” of the Express app instance will be the Application interface that we’ll import from the express declaration file. This will have our src/index.ts file look like the following:
import express, { Application } from "express";
import { ApolloServer } from "apollo-server-express";
import { typeDefs, resolvers } from "./graphql";

const port = 9000;

const mount = (app: Application) => {
  const server = new ApolloServer({ typeDefs, resolvers });

  server.applyMiddleware({ app, path: "/api" });
  app.listen(port);

  console.log(`[app]: http://localhost:${port}`);
};

mount(express());
We’ll now import the connectDatabase() function from the src/database/ folder. At the beginning of our mount() function, we’ll run the connectDatabase() function and assign the result to a const variable that we’ll call db . We’ll want the result of the asynchronous connectDatabase() function to be assigned to the db variable so we’ll use the async/await syntax for our mount() function as well.
import express, { Application } from "express";
import { ApolloServer } from "apollo-server-express";
import { connectDatabase } from "./database";
import { typeDefs, resolvers } from "./graphql";

const port = 9000;

const mount = async (app: Application) => {
  const db = await connectDatabase();

  // ...
};

mount(express());
We’re interested in having all our resolver functions in our GraphQL API be able to interact with the db object. This is because any reading or updates we intend to make, we’ll want to make it towards the test_listings collection in the database in our MongoDB cluster.
This is where we can take advantage of the ctx (i.e. context) argument within our resolver functions. The context argument is an object that is shared by all resolvers in a GraphQL API. The context argument is useful in passing information that all or many resolvers may need such as database connections.
In our Apollo Server constructor, we’ll introduce a third option labeled context . The Apollo Server constructor gets called with every request so we’re able to set the context based off request details if we’re interested but in our case, we’ll simply just pass in the db object.
import express, { Application } from "express";
import { ApolloServer } from "apollo-server-express";
import { connectDatabase } from "./database";
import { typeDefs, resolvers } from "./graphql";

const port = 9000;

const mount = async (app: Application) => {
  const db = await connectDatabase();
  const server = new ApolloServer({
    typeDefs,
    resolvers,
    context: () => ({ db })
  });

  // ...
};

mount(express());
All our resolvers should now have access to the connected database as part of context .
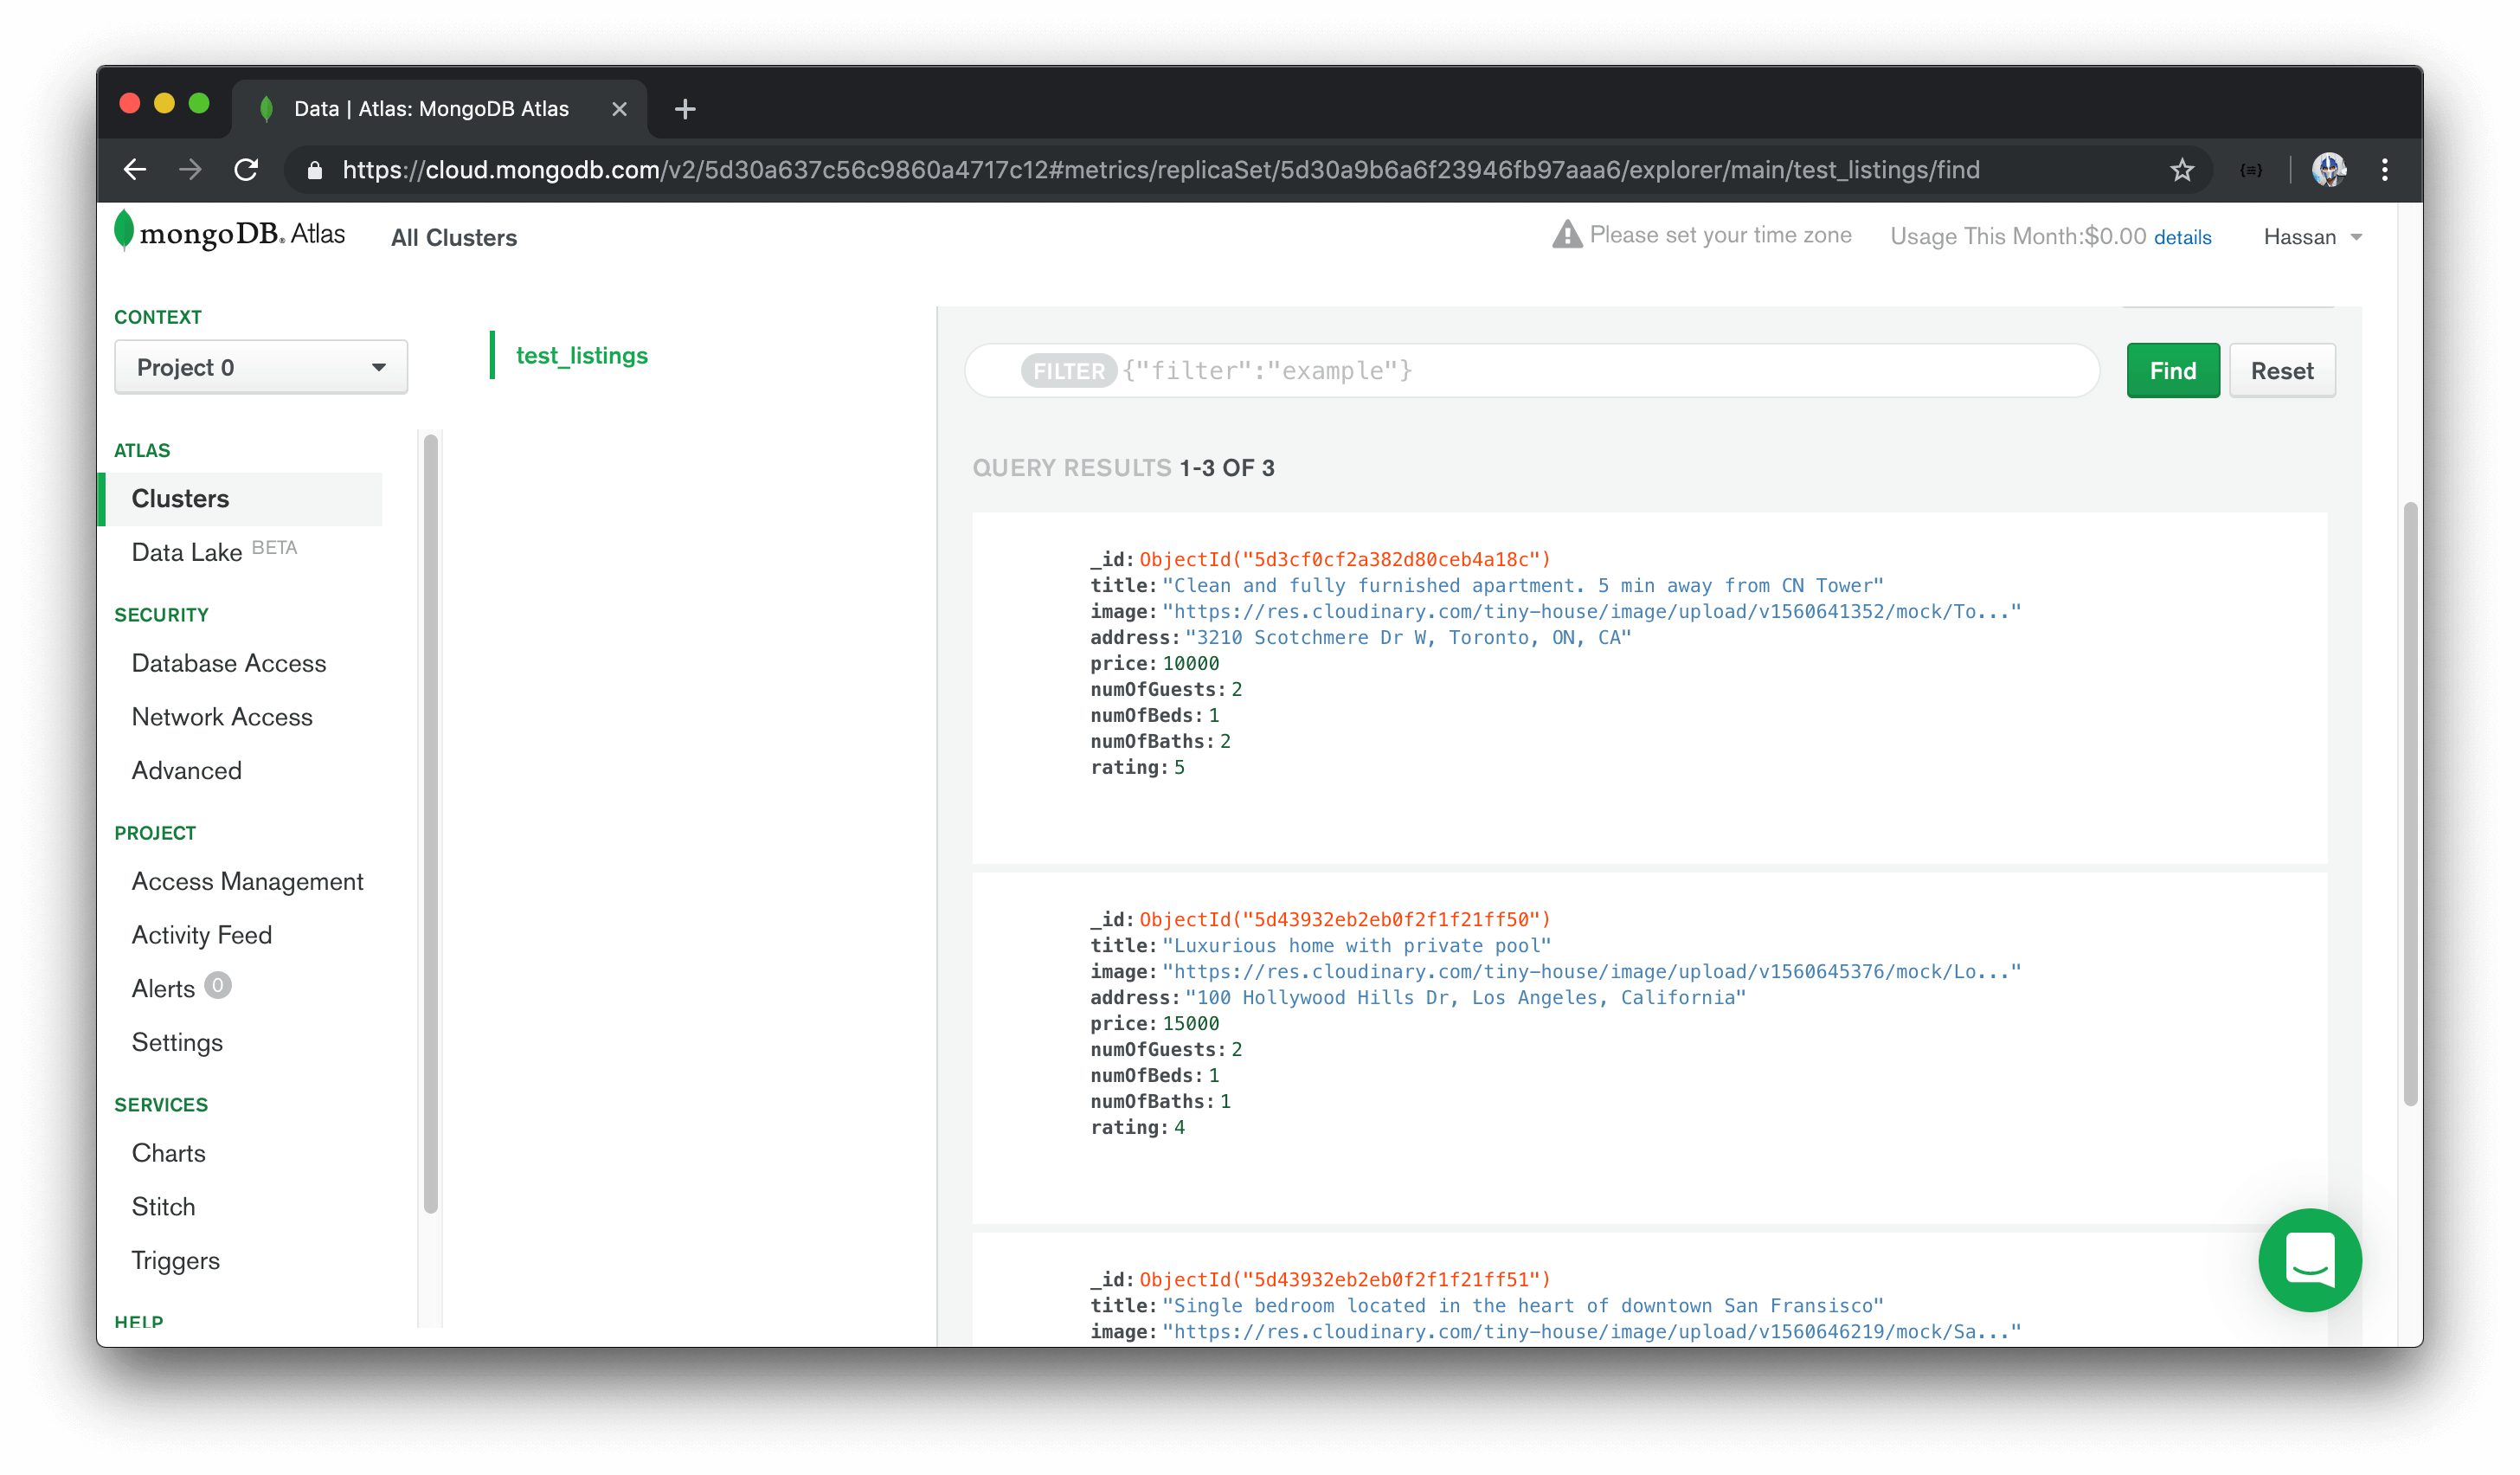
Before we begin to change our existing query and mutation to interact with our MongoDB collection, we’ll do a quick check to see if we’re able to connect to the MongoDB cluster. We’ll look to query the sample listing document we’ve set up in the listings ( test_listings ) collection in our database.
We’ll make our first query at the end of our mount() function in the src/index.ts file. We’ll look to find all the listing documents in our listings ( test_listings ) collection and assign the result to a const variable called listings . To achieve this, we’ll use the MongoDB find() method.
The find() method is used to find all documents that match a query parameter. In our case, we’ll specify an empty query parameter to have all documents in our listings collection ( test_listings ) be returned. To ensure an array of documents is to be returned, we’ll use the MongoDB toArray() function at the end of the query find() statement.
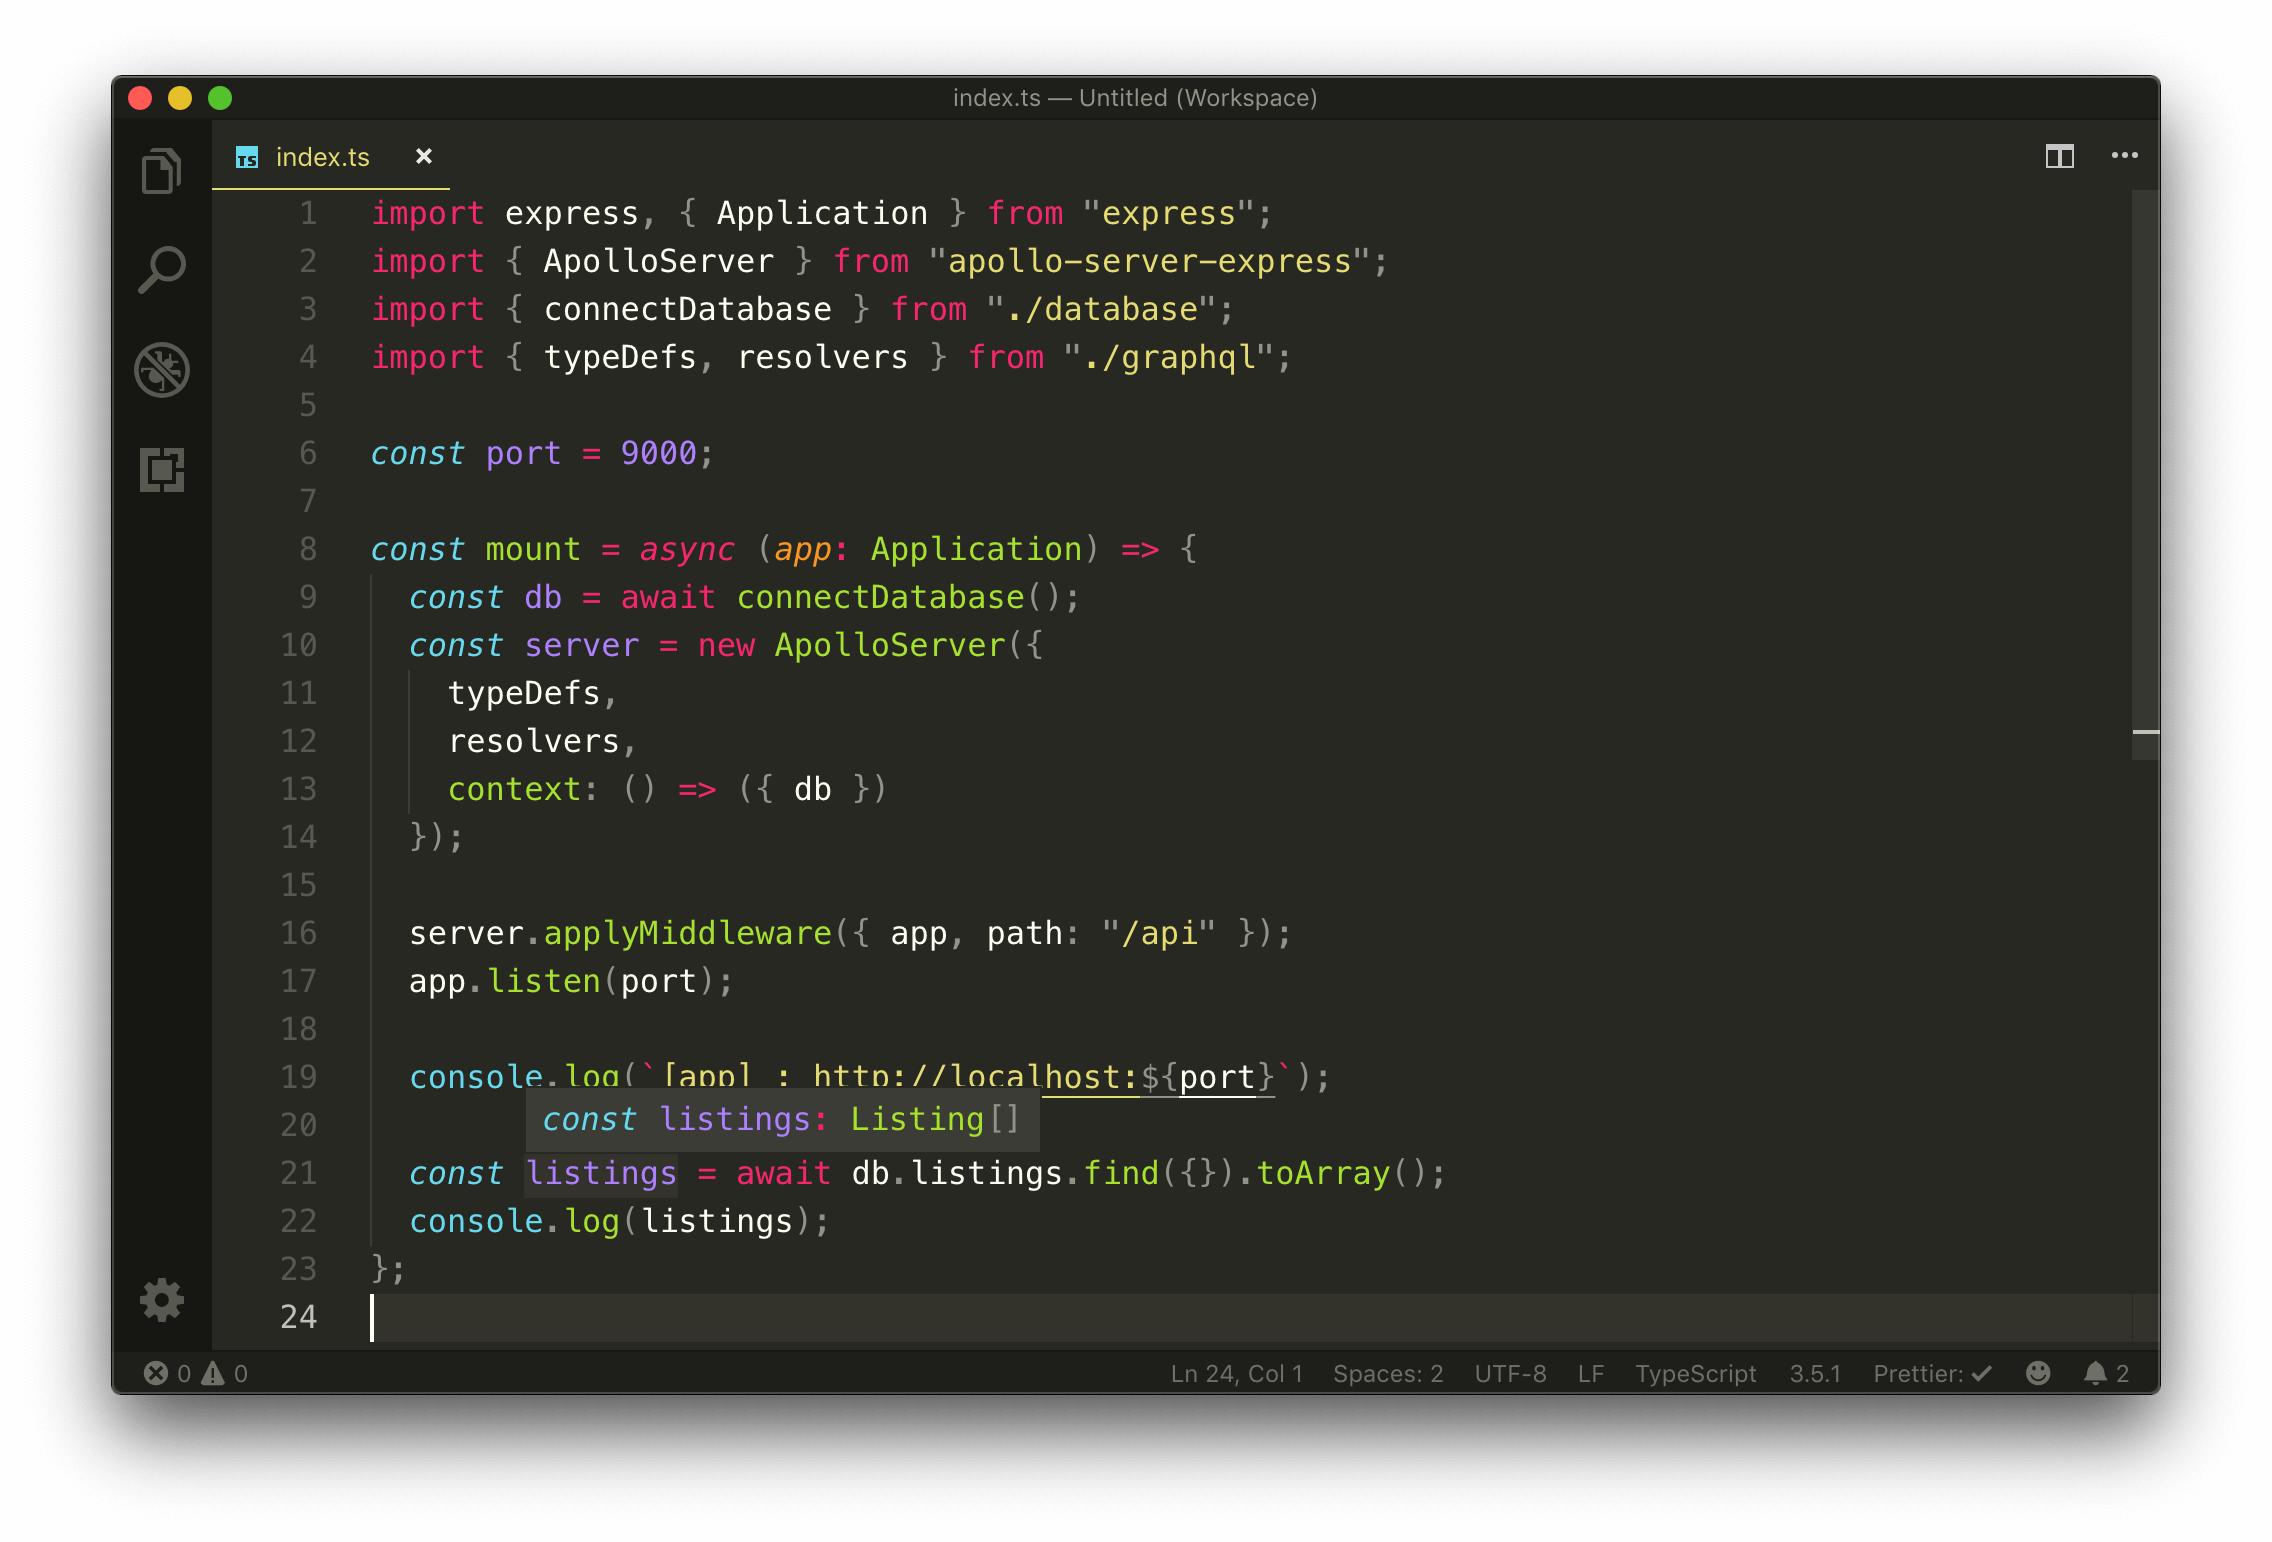
We’ll then place a console.log() to survey the value of the listings const variable.
import express, { Application } from "express";
import { ApolloServer } from "apollo-server-express";
import { connectDatabase } from "./database";
import { typeDefs, resolvers } from "./graphql";

const port = 9000;

const mount = async (app: Application) => {
  const db = await connectDatabase();

  // ...

  const listings = await db.listings.find({}).toArray();
  console.log(listings);
};

mount(express());
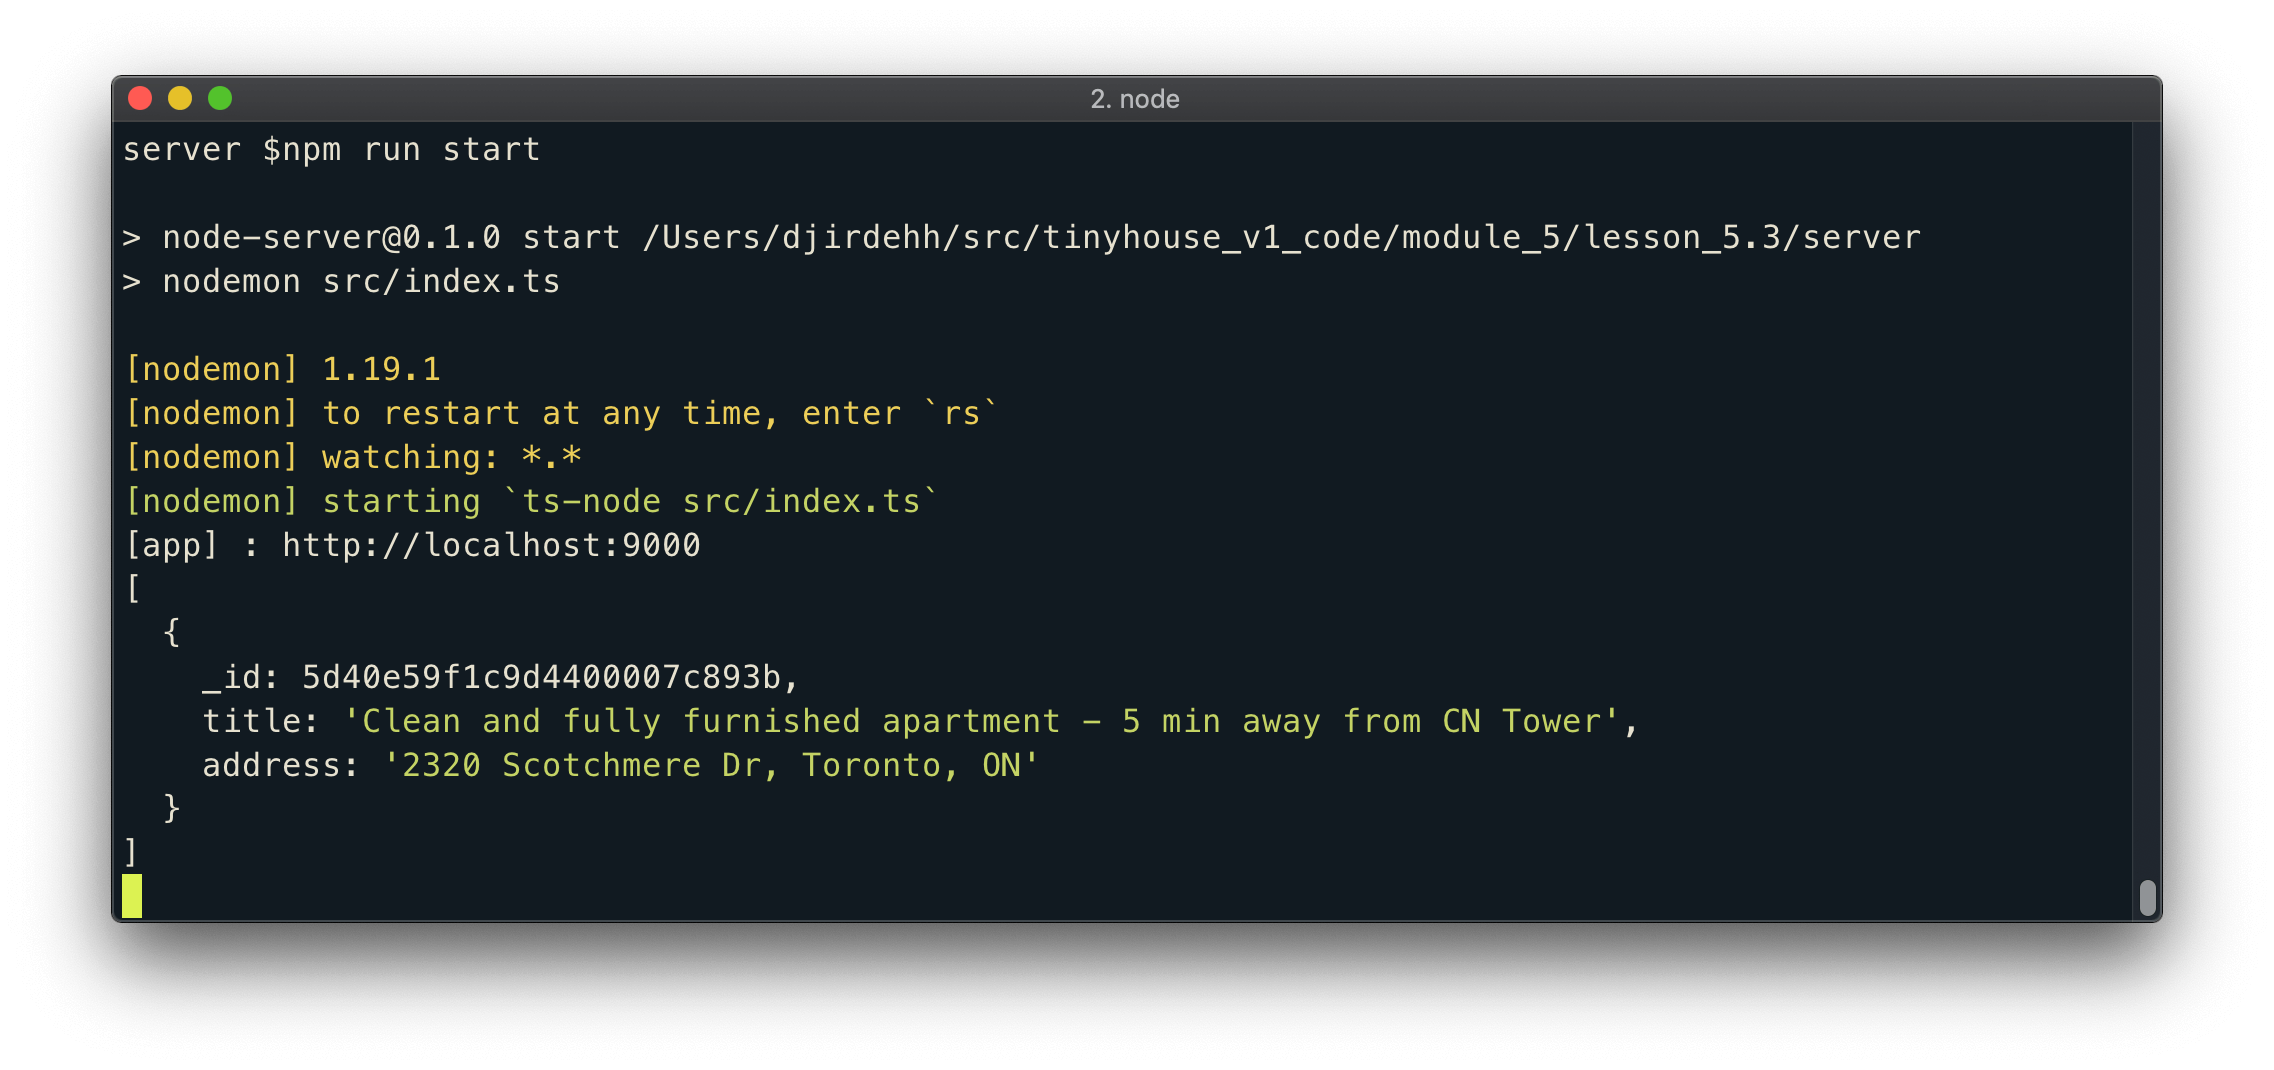
When we start our server, we’ll be presented with a log message in our terminal that shows the sample listing document we’ve added to the Atlas test_listings collection! This shows that we’ve successfully connected our server to MongoDB.
In the next lesson, we’ll provide type definitions for the collection objects available to us on the server.
TYPESCRIPT GENERICS AND ADDING TYPES TO OUR COLLECTIONS
Let’s bring the benefit of TypeScript to our MongoDB functionalities in our server code. What we’ll essentially need to do is create type definitions for the database collections we want to access in our server. We’ll create these type definitions in a new file called types.ts under a src/lib/ folder. This is where we’ll keep any type definitions that are to be used in our code in multiple different areas.
server/
  src/
    database/
    graphql/
    lib/
      types.ts
    index.ts
    listings.ts
  // ...
At this moment, our database only contains a single collection ( test_listings ) geared towards storing documents of listing data. In the src/lib/types.ts file, we’ll create an interface that resembles the shape of a document in our listings collection. This will look very similar to what we had before when we created an interface for our mock listings array.
export interface Listing {
  id: string;
  title: string;
  image: string;
  address: string;
  price: number;
  numOfGuests: number;
  numOfBeds: number;
  numOfBaths: number;
  rating: number;
}
In a MongoDB document, the main identifier field, by default, is a little unique. First, it’s prefixed with an underscore so it’s actually _id . In addition, it usually has a unique data type - ObjectId .
The ObjectId data type is a unique 12-byte identifier which by default is generated by MongoDB as the primary key for a document in a collection. ObjectId plays a role in how documents can be searched, filtered, and sorted in a collection. Since our listing documents in our collection is to have the _id field, we’ll declare this field in our Listing interface and give it a type value of ObjectID which is provided to us from the type definitions of the Node MongoDB driver.
import { ObjectId } from "mongodb";

export interface Listing {
  _id: ObjectId;
  title: string;
  image: string;
  address: string;
  price: number;
  numOfGuests: number;
  numOfBeds: number;
  numOfBaths: number;
  rating: number;
}
We’ll now create an interface that will help shape the object being returned from our connectDatabase() function in the src/database/index.ts file. We’ll establish this as a new interface called Database .
import { ObjectId } from "mongodb";

interface Listing {
  // ...
}

interface Database {}
Since our database object returned from the connectDatabase() contains a single listing collection, we can specify that in our Database interface and provide it a type value of Collection . The Collection interface will also be imported from the mongodb library.
import { Collection, ObjectId } from "mongodb";

interface Listing {
  // ...
}

interface Database {
  listings: Collection;
}
At this moment, we haven’t done anything of significance since our app already infers that the listings collection property from our connectDatabase() function is of type Collection . The Collection interface, however, is a generic and accepts a type variable (i.e. parameter). We can add the Listing interface we’ve created as the type parameter of the Collection interface we’ve assigned as the type of the listings field.
Our src/lib/types.ts will now look like the following:
server/src/lib/types.ts
import { Collection, ObjectId } from 'mongodb';

export interface Listing {
  _id: ObjectId;
  title: string;
  image: string;
  address: string;
  price: number;
  numOfGuests: number;
  numOfBeds: number;
  numOfBaths: number;
  rating: number;
}

export interface Database {
  listings: Collection<Listing>;
}
We’ll now take a bit of a tangent to better explain what we’ve just done with the use of the Collection generic.
TYPESCRIPT GENERICS
IDENTITY<T>()
TypeScript generics is one piece of TypeScript that often confuses newcomers since it makes TypeScript code appear a lot more complicated than it actually is.
First and foremost, generics is a tool/programming method that exists in languages like C# and Java and is geared to help create reusable components that can work with a variety of different types. Generics make this possible by allowing the abstraction of types used in functions or variables. TypeScript adopts this pattern by allowing us to create code that can work with different types.
We’ll go through a simple example extrapolated from the TypeScript documentation to illustrate the basics of generics. Assume we had a function called identity() that received an argument and returned said argument. Since it’s expected to return what it receives, we can specify the type of the argument and the value returned by the function to be the same (e.g. number ).
const identity = (arg: number): number => {
  return arg;
};

identity(5); // arg type and return type = number
identity("5"); // ERROR
If we tried to change the return type of the function, TypeScript will display a warning and rightly so since it infers the type of the parameter being returned from the function.
What if we wanted the identity() function to be reusable for different types? One thing we could try to do is specify Union Types where the argument type and returned type could be one of many types. For example, we could say the function argument can accept a number or a string and return either a number or a string .
const identity = (arg: number | string): number | string => {
  return arg;
};

identity(5); // arg type and return type = number
identity("5"); // arg type and return type = string
Though this would work in certain cases, the example above won’t be reusable especially if we don’t know the type of the argument we’ll pass in.
Another approach we could take that would work for all types is to use the any type.
const identity = (arg: any): any => {
  return arg;
};

identity(5); // arg type and return type = number
identity("5"); // arg type and return type = string
Using any would work but it isn’t ideal since we won’t be able to constrain what arguments the function accepts or infer what the function is to return.
Here is where generics and the capability of passing a type variable comes in. Just like how we’ve said identity() can accept an argument, we can also say that identity() is to accept a type variable , or in other words a type parameter or type argument. In TypeScript, we can pass type variables with the angle brackets syntax - <> . Here’s an example of having the identity() function accept a type variable denoted with the letter T .
const identity = <T>(arg: any): any => {
  return arg;
};
Just like how the value argument is available in the function, the type argument is available in the function as well. We could say that whatever type variable is passed will be the type of the argument and the return type of the function.
const identity = <T>(arg: T): T => {
  return arg;
};

identity<number>(5); // arg type and return type = number
identity<string>("5"); // arg type and return type = string
identity<any>({ fresh: "kicks" }); // arg type and return type = any
In the example above, TypeScript will be smart enough to recognize the value of the type variable
T, without always specifying a type value (e.g.<any>). This only works in simple cases. In more complicated cases, we’ll need to ensure type variables are being passed in.
GENERIC INTERFACES
Generics can be used extensively and aren’t only specific to functions. Assume we wanted to have our identity() function create an object that has a field property with the value of arg .
const identity = <T>(arg: T): T => {
  const obj = {
    field: arg
  };
  return arg;
};
Assume we wanted to type constrain the obj created to a particular Interface type. TypeScript type aliases and interfaces also accept type variables , so we could have an IdentityObj interface created above the function that sets the type of a field property to a type variable being passed in.
interface IdentityObj<T> {
  field: T;
}

const identity = <T>(arg: T): T => {
  const obj = {
    field: arg
  };
  return arg;
};
In the identity() function, we can define the type of obj as the IdentityObj interface and pass the type variable along. We can also have the function then return the field property from obj to conform to the expected return type of the identity() function.
interface IdentityObj<T> {
  field: T;
}

const identity = <T>(arg: T): T => {
  const obj: IdentityObj<T> = {
    field: arg
  };
  return obj.field;
};
DEFAULT GENERIC VALUES
TypeScript allows for the capability to have default generic type values (i.e. generic parameter defaults). Here’s an example of having our identity() function and IdentityObj interface assign a default type value of any to the type variable that can be passed in.
interface IdentityObj<T = any> {
  field: T;
}

const identity = <T = any>(arg: T): T => {
  const obj: IdentityObj<T> = {
    field: arg
  };
  return obj.field;
};
Now if a type variable isn’t defined when using the identity() function and the compiler isn’t able to infer what the type variable might be, it’ll simply be set to any .
By convention, the letter T is often used to infer a type variable and is most likely due to the fact it stands for Type. We could very well use any letter we want - U V , etc. In certain cases, some prefer to extrapolate the type variable name especially if one might pass in multiple type variables. Here’s an example of the identity() function being able to accept two type variables - TData and TVariables .
interface IdentityObj<T = any> {
  field: T;
}

const identity = <TData = any, TVariables = any>(arg: TData): TData => {
  const obj: IdentityObj<TData> = {
    field: arg
  };
  return obj.field;
};
Notice how much more complicated the above code appears to be? It’s not that difficult if one recognizes what’s happening and can trace things step by step.
We’ll stop here for now. We’ll remove this example identity() function and look back at the use of the Collection interface for the listings collection in our connectDatabase() function.
COLLECTION
In the src/lib/types.ts file, why is the passing of the Listing interface as a type variable helpful in the context of using the Collection interface for the listings property?
import { Collection, ObjectId } from "mongodb";

interface Listing {
  // ...
}

interface Database {
  listings: Collection<Listing>;
}
If we take a look at the Collection interface in our mongodb type definitions file, we can see that it takes a type variable labeled TSchema that has a default type value of Default .
// https://github.com/DefinitelyTyped/DefinitelyTyped/blob/master/types/mongodb/index.d.ts

export interface Collection<TSchema = Default> {
  // ...
}
When we take a look at the Default type in the type declaration file, we’ll recognize that it’s equal to the type of any .
// https://github.com/DefinitelyTyped/DefinitelyTyped/blob/master/types/mongodb/index.d.ts

type Default = any;
When we do a quick search of TSchema ,we can see some functions that utilize it in such a way that the return statement of the function takes advantage of the type variable being passed in.
When we pass in the Listing interface to Collection , this will help ensure that many MongoDB methods ( find() , findOne() , etc.) on a collection will utilize the Listing type from the returned result. We’ll see an example of this when we use the Database interface type we’ve just created.
In the src/database/index.ts file, let’s import the Database interface from the newly created types file and look to specify the type of the returned statement from the connectDatabase() function. Our connectDatabase() function is asynchronous so we can’t simply specify the return type of the value we expect, we have to say it’s going to be a Promise of the expected return. TypeScript natively provides a Promise interface which accepts a type variable with which will be the type of the resolved promise value.
We’ll declare the return type of the connectDatabase() function to be of Promise<Database> .
// ...
import { Database } from "../lib/types";

// ...

export const connectDatabase = async (): Promise<Database> => {
  // ....
};
We’ve stated that our connectDatabase() function when resolved will be an object that resembles the shape of the Database interface type. Our listings field in the object being returned will now be inferred to be a Collection of Listing .
Instead of defining an explicit return type of
connectDatabase(), we could have very well passed in theListinginterface as a type variable to thedb.collection()method.
db.collection<Listing>('test_listings).This will achieve the same result.
We’ll head to the src/index.ts file and survey the value of listings from our MongoDB find() function we’ve set up in the last lesson to verify our MongoDB connection. We can see that the listings variable is now appropriately type defined as an array of items where each item is of the Listing interface type!
Since we haven’t made any functional changes in this lesson, when we start the server - our server should work as expected and console.log the sample listings data in our collection. We’ll no longer need to verify our database connection works so we’ll remove the query we’ve made to retrieve all listing documents from our collection as well the console.log() method in our mount() function.
SETTING UP ENV VARIABLES
In the last lesson, we hard-coded MongoDB environment configuration values directly into our code. We created a user variable, a userPassword variable, and a cluster variable in our src/database/index.ts file. We obtained the values of these variables directly from our MongoDB Atlas dashboard.
Having these database configuration values in our code is a bad idea for a couple of reasons.
- Database environment variables should be confidential so we should be wary of having our values publicly available especially if we start to consider pushing our source code to an online repository.
- As the name suggests, environment variables are for setting up our app’s runtime environment . They don’t have anything to do with our app’s logic. What if we wanted to change our MongoDB’s user password when our application has already been built? We would want to update the environment variable without having to go back into the source code and changing it. This will help limit the need to modify and redeploy an app due to changes in configuration data when an app is already deployed.
PROCESS AND DOTENV
In Node, process is a global object with information about the currently running process. process.env is an object within process that contains information representative of the state of the Node environment. During runtime, the reference to an environment variable within process.env is replaced with the actual value of the variable.
Environment variables defined within process can be specified both in a development setting as well as in a production setting. The dotenv library is a popular package that helps load variables from a .env file for Node.js projects, which is helpful during development.
We’ll head to the terminal and install the dotenv library as a development dependency. We’ll also install the type declaration file of dotenv as a development dependency.
server $: npm install -D dotenv @types/dotenv
We’re installing
dotenvlibrary as adevDependencysince when we deploy our app, our cloud management solution - Heroku will automatically save environment variables defined in the dashboard intoprocess.env. As a result, we won’t need thedotenvlibrary in our production code. However, if you choose to use another method to deploy your app that may require a.envfile, you might need to installdotenvas a regular dependency!
With dotenv installed, we’ll create a .env file in the root of our project directory.
server/
  // ...
  .env
In this .env file, we can specify the different values that we’d want to be passed in as environment variables. Convention often finds us defining these variables with capital letters.
We’ll define three environment configuration variables, DB_USER , DB_USER_PASSWORD , and DB_CLUSTER . We’ll retrieve the values of the DB configuration variables from our MongoDB Atlas dashboard.
DB_USER=user_001
DB_USER_PASSWORD=XXXXX
DB_CLUSTER=cluster0-mbfgp
In certain environments (Heroku for example), we can specify the port in which the app is to run as an environment variable. With that in mind, we’ll also specify a PORT environment variable as well which would be the port our app is to run on.
PORT=9000
DB_USER=user001
DB_USER_PASSWORD=XXXXX
DB_CLUSTER=cluster-kli81
SRC/INDEX.TS
Next, we’ll modify our code to use the values from our .env file. First, we’ll require and configure dotenv as early as possible in our application in the src/index.ts file. To do so and before any imports, we’ll use the require syntax to introduce the library and run the config() function. This helps us avoid any ESLint warnings of running code before the import of other files and by doing so as early as possible, this also helps prevent compilation issues where other imported files don’t pick up environment variables.
require("dotenv").config();

import express, { Application } from "express";
import { ApolloServer } from "apollo-server-express";
import { connectDatabase } from "./database";
import { typeDefs, resolvers } from "./graphql";

const mount = async (app: Application) => {
  // ...
};

mount(express());
process.env will now have the keys and values defined from our .env file during development. In the src/index.ts file, we can use the process.env.PORT value to reference the port defined in our environment variables in the app.listen() function and the console.log() method.
require("dotenv").config();

import express, { Application } from "express";
import { ApolloServer } from "apollo-server-express";
import { connectDatabase } from "./database";
import { typeDefs, resolvers } from "./graphql";

const mount = async (app: Application) => {
  // ...

  app.listen(process.env.PORT);

  console.log(`[app] : http://localhost:${process.env.PORT}`);
};

mount(express());
SRC/DATABASE/INDEX.TS
In the src/database/index.ts file, we’ll reference the values necessary for our MongoDB connection from process.env . We’ll also remove the hard-coded variables we’ve specified before.
import { MongoClient } from "mongodb";
import { Database } from "../lib/types";

const url = `mongodb+srv://${process.env.DB_USER}:${process.env.DB_USER_PASSWORD}@${process.env.DB_CLUSTER}.mongodb.net`;

export const connectDatabase = async (): Promise<Database> => {
  // ...
};
.GITIGNORE
Like we’ve mentioned before, environment variables should never be committed to source code. An easy way to prevent git from committing the entire .env file is by introducing a .gitignore file that references the files we don’t want to be committed (e.g. .env ).
We’ll create a .gitignore file at the root of our project. In addition to not ever committing .env files there’s a few other files and folders that usually shouldn’t be committed such as the node_modules folder, the build/ folder from our TypeScript compilation process, and any npm or yarn debug logs. Here we’ll paste a series of files and folders we think shouldn’t be committed but you are more than welcome to customize it as you see fit.
# dependencies
node_modules/

# production
build/

# misc
.DS_Store

# environment variables
.env

npm-debug.log*
yarn-debug.log*
yarn-error.log*
If we start the server and attempt to connect to the database as we’ve done before, everything should continue to work as expected.
In the code samples provided with Part I of this course, we won’t be committing a .env file of configuration variables . You will need to ensure a
.envfile is created in the root of the project directory and declare thePORT,DB_USER,DB_USER_PASSWORD, andDB_CLUSTERenvironment variables. The database configuration variables should be retrieved from your MongoDB Atlas dashboard.
SEEDING MOCK DATA TO THE DATABASE
Now that we’ve successfully connected our app to our MongoDB instance, we’ll want to change the query and mutation we have in our app to interact with data in our database. Before we do that, we’ll begin by first seeding our database with the same mock data we’ve used in the previous lessons.
We aim to have a script that will make it easy for us to populate the database with some mock data for development. This will help us avoid navigating to the MongoDB Atlas dashboard to introduce mock data whenever needed.
We’ll create this script in a seed.ts file in a new temp/ folder in our root project directory.
server/
  temp/
    seed.ts
  // ...
TypeScript may warn us that we’re introducing a TypeScript file outside of the rootDir/ , which are the files we want TypeScript code to be compiled (i.e. the files in the src/ folder). The reason we’re placing the seed.ts file outside of our src/ folder (which is where our app is being instantiated and run) is because the seed() function we’ll create is to only be used for development . The seed() function is to help populate mock data in our database so we can test the rest of our app. When we get to deploying our app, we won’t need this seed file and parent temporary folder.
Since the code in the seed file isn’t needed for our app, we don’t need TypeScript to compile it to valid JavaScript. In the tsconfig.json file, we can specify files and folders we don’t want to be included in the TypeScript compilation process with the exclude option. We’ll specify that the temp folder should be excluded from our TypeScript compilation.
server/tsconfig.json
{
  "compilerOptions": {
    "target": "es6",
    "module": "commonjs",
    "rootDir": "./src",
    "outDir": "./build",
    "esModuleInterop": true,
    "strict": true
  },
  "exclude": ["temp"]
}
SEED.TS
In the temp/seed.ts file, we’ll first require the dotenv library and configure it since our soon to be created seed() function is going to use the connectDatabase() function in our app. The database credentials used in the connectDatabase() function are referenced from environment variables so we’ll need dotenv configured.
server/temp/seed.ts
require("dotenv").config();
Next, we’ll create a simple asynchronous seed() function that has a try and catch block. The try statement will simply log a message to the console noting that the seed function is being run and in the catch statement we’ll throw an Error .
At the bottom of the file, we’ll also run the seed() function.
require("dotenv").config();

const seed = async () => {
  try {
    console.log(`[seed] : running...`);
  } catch (error) {
    throw new Error("failed to seed database");
  }
};

seed();
Notice how we’re using JavaScript’s try … catch statement here? Usually, when a code encounters an error it just crashes and outputs the error to a console if one is available. But with the try … catch pattern, we have a chance to catch that error and choose how to handle it. We might want to just console.log the error, log the error in our database for reference, or in our seed() function - we’ll simply throw another error and stop the program execution.
The try … catch pattern works in the following steps:
- The code in
try {...}is executed. - If there are no errors, then the
catch (error) {...}is ignored. - If an error does occur, the
tryexecution is stopped and the control flows to the beginning ofcatch (error). Theerrorargument ofcatchcontains details about the error that has occurred.
In our seed() function, we’ll now connect to our MongoDB Atlas database just like we’ve done in the src/index.ts file. We’ll import the connectDatabase() function, run the function and assign the result to a db constant.
require("dotenv").config();

import { connectDatabase } from "../src/database";

const seed = async () => {
  try {
    console.log(`[seed] : running...`);

    const db = await connectDatabase();
  } catch (error) {
    throw new Error("failed to seed database");
  }
};

seed();
We’ll then copy the mock listings data from our src/listings.ts file and paste it directly after our database connection.
require("dotenv").config();

import { connectDatabase } from "../src/database";

const seed = async () => {
  try {
    console.log(`[seed] : running...`);

    const db = await connectDatabase();
    export const listings = [
      {
        id: "001",
        title:
          "Clean and fully furnished apartment. 5 min away from CN Tower",
        image:
          "https://res.cloudinary.com/tiny-house/image/upload/v1560641352/mock/Toronto/toronto-listing-1_exv0tf.jpg",
        address: "3210 Scotchmere Dr W, Toronto, ON, CA",
        price: 10000,
        numOfGuests: 2,
        numOfBeds: 1,
        numOfBaths: 2,
        rating: 5
      }
      // ...
    ];
  } catch (error) {
    throw new Error("failed to seed database");
  }
};

seed();
In our seed() function, we want the entire mock listings array to be inserted into our test_listings collection in our Mongo database. We’ve specified the type of a listing that resembles the shape of a listing collection document in the src/lib/types folder. To make sure we’re inserting listings that resemble the shape that we expect, we’ll import the Listing interface type and define the type of the mock listings array as Listing[] .
require("dotenv").config();

import { connectDatabase } from "../src/database";
import { Listing } from "../src/lib/types";

const seed = async () => {
  try {
    console.log(`[seed] : running...`);

    const db = await connectDatabase();
    export const listings: Listing[] = [
      {
        id: "001",
        title:
          "Clean and fully furnished apartment. 5 min away from CN Tower",
        image:
          "https://res.cloudinary.com/tiny-house/image/upload/v1560641352/mock/Toronto/toronto-listing-1_exv0tf.jpg",
        address: "3210 Scotchmere Dr W, Toronto, ON, CA",
        price: 10000,
        numOfGuests: 2,
        numOfBeds: 1,
        numOfBaths: 2,
        rating: 5
      }
      // ...
    ];
  } catch (error) {
    throw new Error("failed to seed database");
  }
};

seed();
TypeScript will display an error since the Listing interface expects an _id field of type ObjectId while in our mock listings array we’ve provided id fields of type string . To generate a new ObjectId value for each of the different listing objects, we can import the ObjectId class from the Node MongoDB driver and create a new ObjectId instance with new ObjectId() .
We’ll specify _id (instead of id ) fields for each listing object in our mock data array and provide new ObjectId values.
require("dotenv").config();

import { ObjectId } from "mongodb";
import { connectDatabase } from "../src/database";
import { Listing } from "../src/lib/types";

const seed = async () => {
  try {
    console.log(`[seed] : running...`);

    const db = await connectDatabase();
    export const listings: Listing[] = [
      {
        _id: new ObjectId(),
        title:
          "Clean and fully furnished apartment. 5 min away from CN Tower",
        image:
          "https://res.cloudinary.com/tiny-house/image/upload/v1560641352/mock/Toronto/toronto-listing-1_exv0tf.jpg",
        address: "3210 Scotchmere Dr W, Toronto, ON, CA",
        price: 10000,
        numOfGuests: 2,
        numOfBeds: 1,
        numOfBaths: 2,
        rating: 5
      }
      // ...
    ];
  } catch (error) {
    throw new Error("failed to seed database");
  }
};

seed();
With our mock listings data array available to us, we can simply loop through the array and insert each listing into the database collection with Mongo’s insertOne() function.
We’ll place a console.log at the end of the try statement to notify us when the seed process is made complete.
require("dotenv").config();

import { ObjectId } from "mongodb";
import { connectDatabase } from "../src/database";
import { Listing } from "../src/lib/types";

const seed = async () => {
  try {
    console.log(`[seed] : running...`);

    const db = await connectDatabase();
    export const listings: Listing[] = [
      {
        _id: new ObjectId(),
        title:
          "Clean and fully furnished apartment. 5 min away from CN Tower",
        image:
          "https://res.cloudinary.com/tiny-house/image/upload/v1560641352/mock/Toronto/toronto-listing-1_exv0tf.jpg",
        address: "3210 Scotchmere Dr W, Toronto, ON, CA",
        price: 10000,
        numOfGuests: 2,
        numOfBeds: 1,
        numOfBaths: 2,
        rating: 5
      }
      // ...
    ];

    for (const listing of listings) {
      await db.listings.insertOne(listing);
    }

    console.log(`[seed] : success`);
  } catch (error) {
    throw new Error("failed to seed database");
  }
};

seed();
With our seed() function prepared, we can now introduce an application script that will run the seed() function. We’ll label this script as the seed script and use ts-node instead of nodemon to run the seed file (this is because we only want to run the seed script once at a time, we don’t need to watch for changes in our code and re-run the seed script).
server/package.json
  "scripts": {
    "start": "nodemon src/index.ts",
    "seed": "ts-node temp/seed.ts",
    "build": "tsc -p ./"
  }
Let’s run the seed script in our terminal to verify our seeding functionality works as expected.
server $: npm run seed
We’ll notice the two console.log statements in our terminal notifying us that our seed() function is running before being made complete.

And we’ll notice the newly inserted listings in the collections tab of our cluster in MongoDB Atlas!
If the
listingdocument that we’ve introduced a few lessons back (i.e. thelistingdocument with just the_id,title, andaddressfields) still exists in the collection in MongoDB Atlas, we’ll remove it from our collection.
PROCESSING DATA FROM MONGODB
In this lesson, we’ll modify our GraphQL resolvers to now manipulate and use information from our database. We’ll start by modifying the listings query field which currently returns the mock listings array we’ve set up in our code when queried.
QUERY LISTINGS
We’ll head to the src/graphql/resolvers.ts file to update the GraphQL API resolver functions. In our resolvers, we’re going to need to access the db object created in our src/index.ts file. In our Apollo Server instantiation, we’ve placed the db object in our context so we should be able to access the db object from all our GraphQL resolvers.
Context is the third positional parameter of a resolver function. The listings field resolver doesn’t use the first root object parameter or expect any arguments to be passed as part of the second parameter. As a result, we’ll define the first two function parameters to then access the ctx parameter. Since the root obj parameter doesn’t have any value, we’ll state its type to be undefined . The arguments parameter of a resolver function is always an object and since no arguments are expected to be passed for the listings field, we’ll define the type of the arguments option as an empty object literal - {} .
import { IResolvers } from "apollo-server-express";
import { listings } from "../listings";

export const resolvers: IResolvers = {
  Query: {
    listings: (_root: undefined, _args: {}) => {
      return listings;
    }
  },
  Mutation: {
    // ...
  }
};
We’ll destruct the db property from the third context parameter. The type of the db object is the Database interface we’ve set up in the src/lib/types.ts file. We’ll import the Database interface and assign the type of the db object to the Database interface type.
import { IResolvers } from "apollo-server-express";
import { Database } from "../lib/types";
import { listings } from "../listings";

export const resolvers: IResolvers = {
  Query: {
    listings: (_root: undefined, _args: {}, { db }: { db: Database }) => {
      return listings;
    }
  },
  Mutation: {
    // ...
  }
};
The listings resolver function will use Mongo’s find() method to return all the documents in our listings collection. The find() method allows us to find documents based on a query but we won’t provide a query argument since we want the method to return every collection document. We’ll also use Mongo’s toArray() method to ensure an array of data is to be returned.
We’ll use the async/await syntax to ensure the result of our asynchronous method is returned.
import { IResolvers } from "apollo-server-express";
import { Database } from "../lib/types";
import { listings } from "../listings";

export const resolvers: IResolvers = {
  Query: {
    listings: async (_root: undefined, _args: {}, { db }: { db: Database }) => {
      return await db.listings.find({}).toArray();
    }
  },
  Mutation: {
    // ...
  }
};
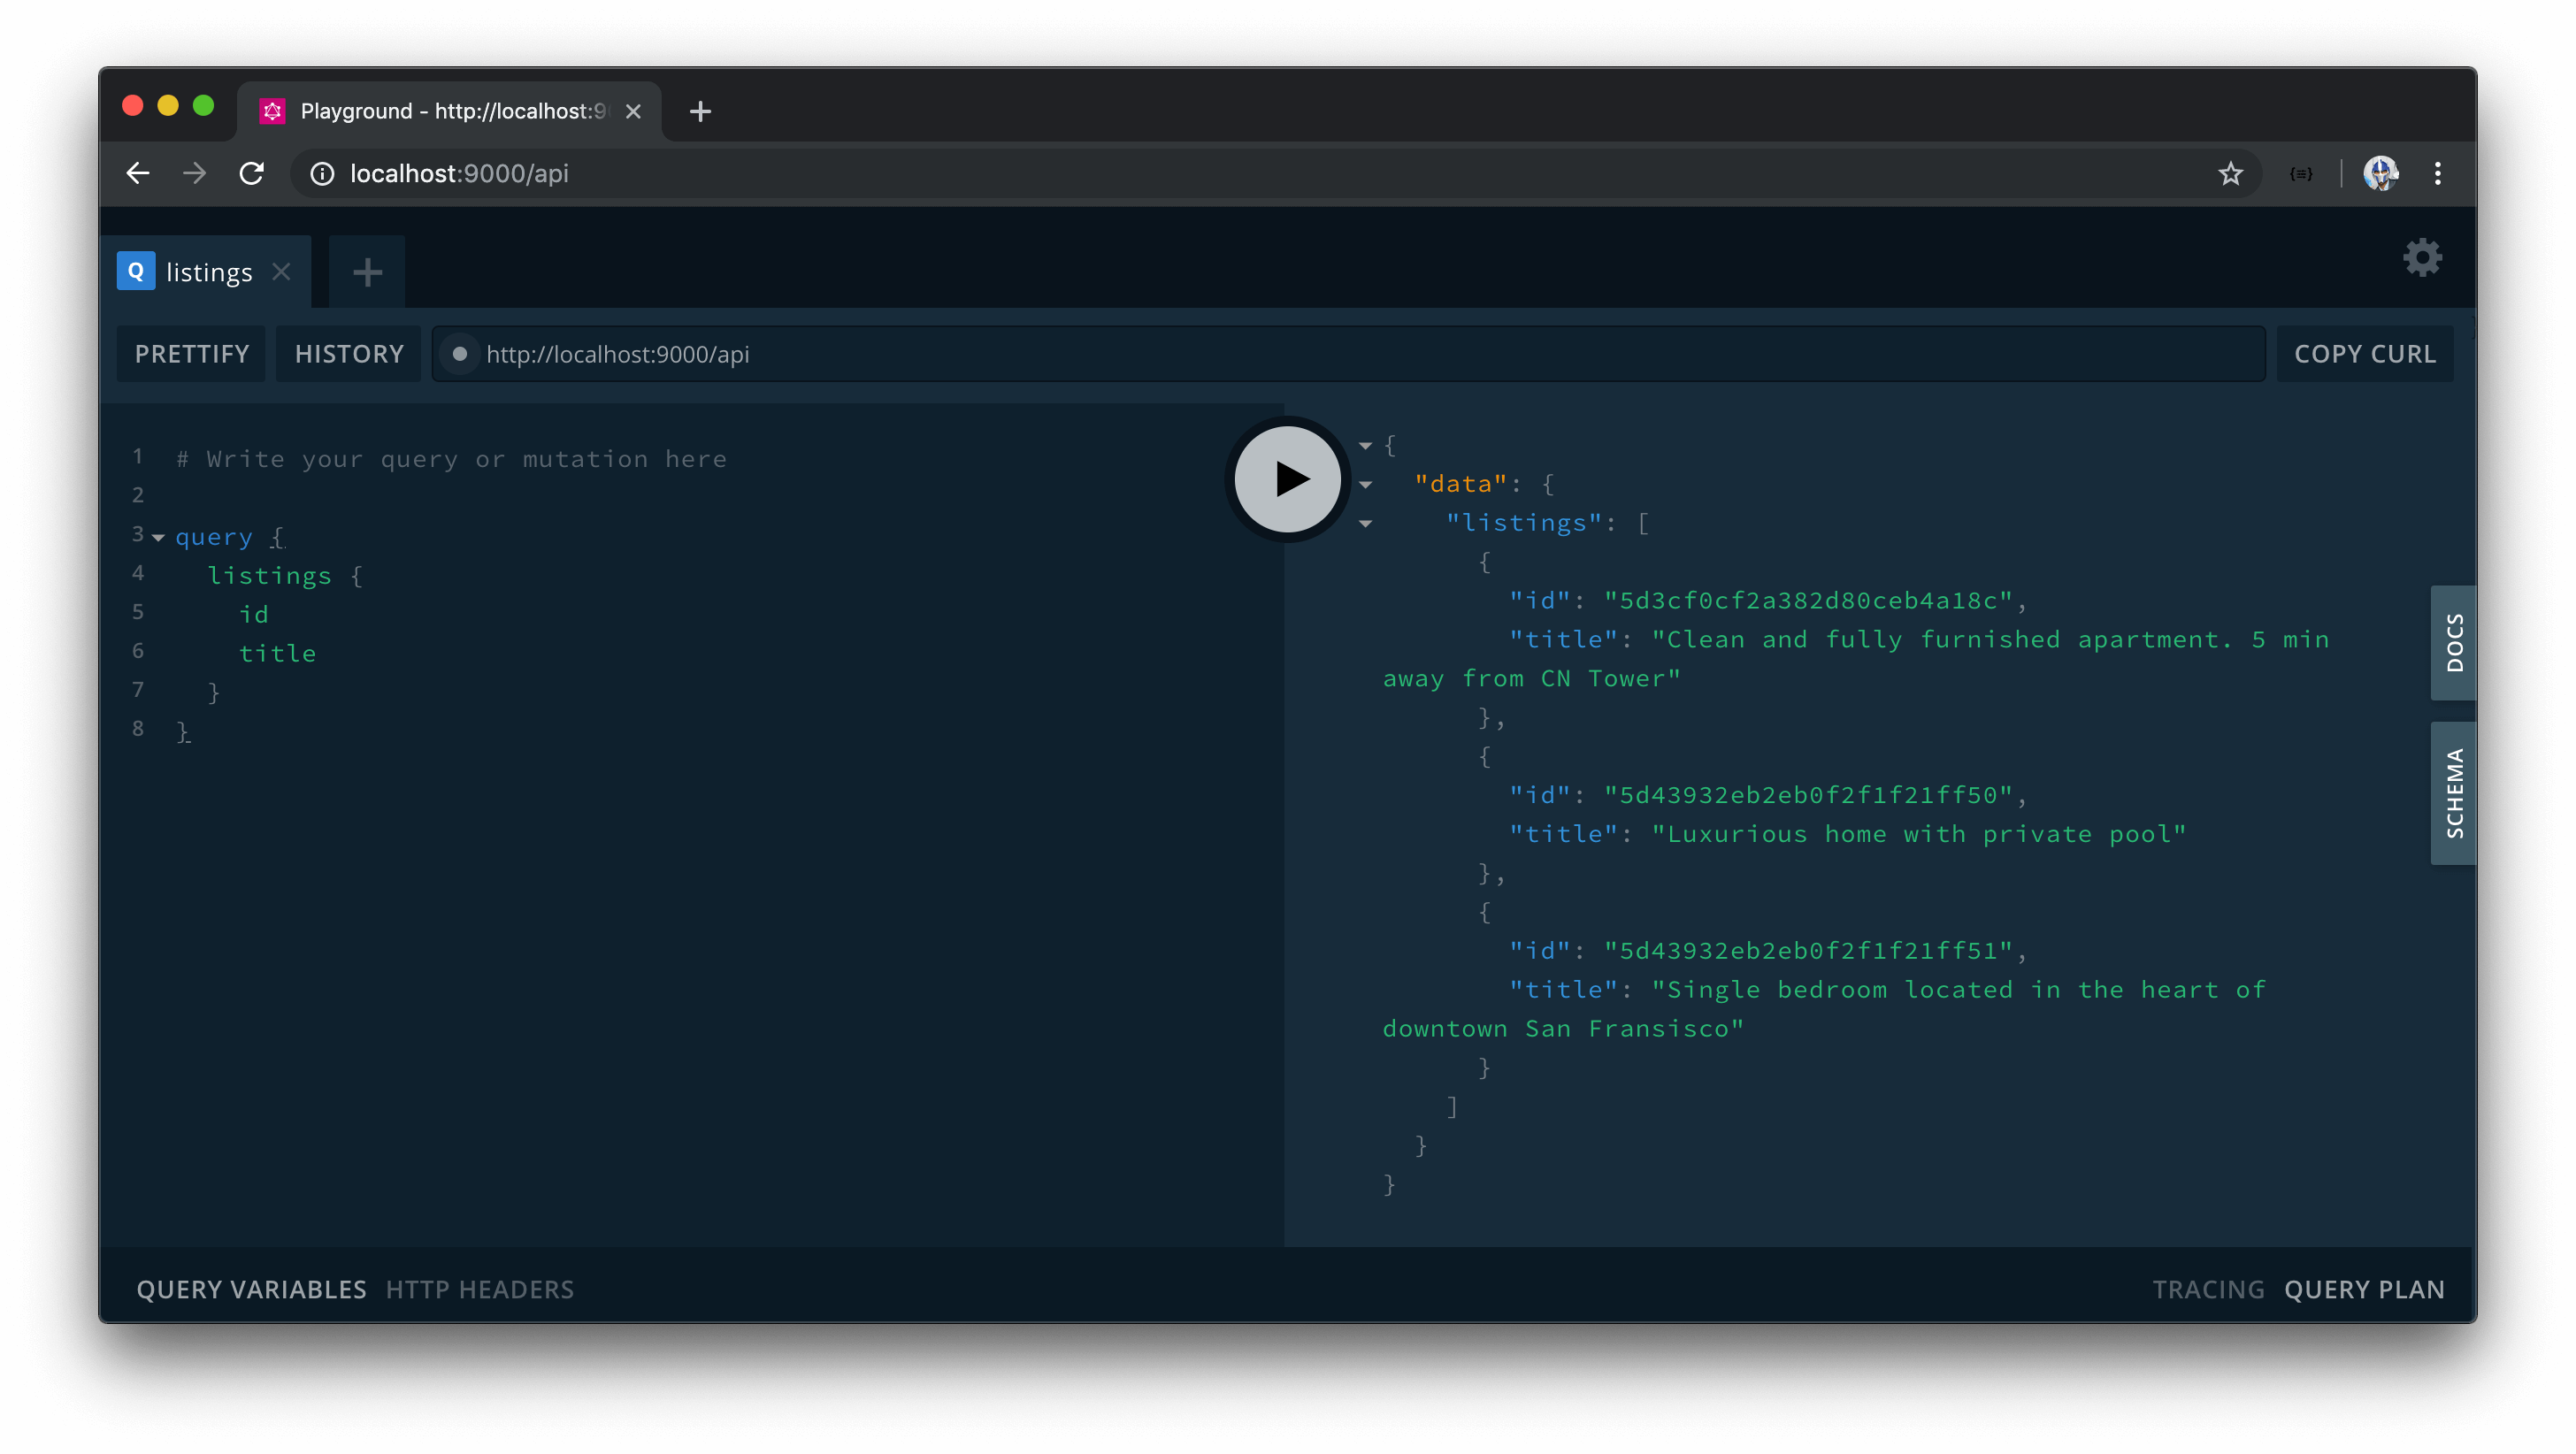
Our listings query will now return the listings data from our MongoDB collection.
DELETELISTING
We’ll modify the deleteListing mutation to delete a listing from our database. In our deleteListing resolver function, we’ll access the db object from the context as we’ve done in our query. We’ll also remove the delete functionality we had in our deleteListing resolver that removed a listing object from the mock data array in the src/listings.ts file.
import { IResolvers } from "apollo-server-express";
import { Database } from "../lib/types";
import { listings } from "../listings";

export const resolvers: IResolvers = {
  Query: {
    // ...
  },
  Mutation: {
    deleteListing: (
      _root: undefined,
      { id }: { id: string },
      { db }: { db: Database }
    ) => {}
  }
};
In our deleteListing resolver function, we’ll use MongoDB’s findOneAndDelete() method to allow us to delete a single document based on filter criteria.
The id of the listing that is to be deleted is passed in as an argument parameter of the deleteListing mutation. We can apply a filter in our findOneAndDelete() function to delete the listing in which its ID matches that of the id parameter passed in. If we recall, the unique identifying field in a listing document is the _id field which is of type ObjectId .
Just like how the ObjectId class from the Node MongoDB driver allows us to create a new ObjectId , it also accepts a string value to convert it to the valid hexadecimal format. We’ll run the findOneAndDelete() function and apply a filter where we look for the listing in which it’s _id field is equal to the ObjectId format of the passed in id argument. The findOneAndDelete() function returns an object so we’ll assign the returned object to a deleteRes constant variable. We’ll use the async/await syntax to ensure the returned result from the findOneAndDelete() is assigned to the deleteRes constant variable.
import { ObjectId } from "mongodb";
import { IResolvers } from "apollo-server-express";
import { Database } from "../lib/types";
import { listings } from "../listings";

export const resolvers: IResolvers = {
  Query: {
    // ...
  },
  Mutation: {
    deleteListing: async (
      _root: undefined,
      { id }: { id: string },
      { db }: { db: Database }
    ) => {
      const deleteRes = await db.listings.findOneAndDelete({
        _id: new ObjectId(id)
      });
    }
  }
};
The value property of the returned object from the findOneAndDelete() method contains the value of the deleted item, when successful. We’ll use an if statement to verify the value property exists. If it does exist, we’ll simply have our deleteListing function return the value property (which is to be the deleted listing itself). If the value property doesn’t exist, we’ll throw an error that says "failed to delete listing" .
import { ObjectId } from "mongodb";
import { IResolvers } from "apollo-server-express";
import { Database } from "../lib/types";
import { listings } from "../listings";

export const resolvers: IResolvers = {
  Query: {
    // ...
  },
  Mutation: {
    deleteListing: async (
      _root: undefined,
      { id }: { id: string },
      { db }: { db: Database }
    ) => {
      const deleteRes = await db.listings.findOneAndDelete({
        _id: new ObjectId(id)
      });

      if (!deleteRes.value) {
        throw new Error("failed to delete listing");
      }

      return deleteRes.value;
    }
  }
};
With our resolvers updated to now interact with the database, we no longer need the mock listings array so we’ll remove the import of the mock array in the src/graphql/resolvers.ts file and remove the src/listings.ts file as well.
LISTING
At this moment, if we started our server and tried to run either the listings query or the deleteListing mutation, they would actually both fail. This is primarily due to how our Listing object type is set up in our GraphQL schema and how our listing document is being returned from the database.
There’s one important point to discuss that we might have not addressed yet. We’ve mentioned that every field in a GraphQL schema needs to have a resolver function responsible in resolving that field. We have resolver functions for both the Query and Mutation root object types but what about the Listing object type. How are those particular fields being resolved?
To follow the appropriate standard, in our src/graphql/resolvers.ts file, we should be setting up a resolvers map for the Listing object type. Let’s go ahead and create the new Listing object field in our resolvers map to better illustrate this.
import { ObjectId } from "mongodb";
import { IResolvers } from "apollo-server-express";
import { Database } from "../lib/types";

export const resolvers: IResolvers = {
  Query: {
    // ...
  },
  Mutation: {
    // ...
  },
  Listing: {}
};
Assume we wanted to resolve the title field in our Listing object type.
import { ObjectId } from "mongodb";
import { IResolvers } from "apollo-server-express";
import { Database } from "../lib/types";

export const resolvers: IResolvers = {
  Query: {
    // ...
  },
  Mutation: {
    // ...
  },
  Listing: {
    title: () => {}
  }
};
In the root level listings and deleteListing resolvers, the first positional obj argument for each of these fields was undefined . In the fields within the Listing object type, the first positional obj argument will be defined as whatever the root level fields return .
When we take a look at our schema (in the src/graphql/typeDefs.ts file), we know the return type of the listings field and deleteListing mutation would be the Listing object type in some variation or another ( listings returns an array of Listing while deleteListing return a single Listing ).
import { gql } from "apollo-server-express";

export const typeDefs = gql`
  type Listing {
    // ...
  }

  type Query {
    listings: [Listing!]!
  }

  type Mutation {
    deleteListing(id: ID!): Listing!
  }
`;
When we take a look at the resolver functions of the listings and deleteListing fields, we see that we have the functions return values. Where do these returned values go? These values become the object argument for the children fields.
In the Listing object type, the first positional object argument is going to be the listing obj returned from the parent fields. This listing object is essentially the shape of the listing document in our database collection. We have a type labeled Listing in our src/lib/types file that is to resemble the shape of a listing collection document. We’ll import the Listing interface type in our resolvers file and assign it as the type of the obj argument of the title resolver. Since we know this object is a listing we’ll name this object parameter accordingly.
import { ObjectId } from "mongodb";
import { IResolvers } from "apollo-server-express";
import { Database, Listing } from "../lib/types";

export const resolvers: IResolvers = {
  Query: {
    // ...
  },
  Mutation: {
    // ...
  },
  Listing: {
    title: (listing: Listing) => {}
  }
};
In the title resolver of Listing , we can specify how we want the title to be resolved. Since the listing obj has a title of type string , we can have the resolver function return listing.title directly.
import { ObjectId } from "mongodb";
import { IResolvers } from "apollo-server-express";
import { Database, Listing } from "../lib/types";

export const resolvers: IResolvers = {
  Query: {
    // ...
  },
  Mutation: {
    // ...
  },
  Listing: {
    title: (listing: Listing) => listing.title
  }
};
For the majority of fields in our Listing object type, we’ll do the same and return the value directly from the listing object.
import { ObjectId } from "mongodb";
import { IResolvers } from "apollo-server-express";
import { Database, Listing } from "../lib/types";

export const resolvers: IResolvers = {
  Query: {
    // ...
  },
  Mutation: {
    // ...
  },
  Listing: {
    title: (listing: Listing) => listing.title,
    image: (listing: Listing) => listing.image
    // ...
  }
};
In GraphQL, the title and image resolvers we’ve defined above are known as trivial resolvers . Trivial resolvers are resolvers that simply return a value from the object using the same key specified in the Object type (e.g. title -> listing.title ). Many GraphQL libraries (Apollo Server included) allow us to omit these simple resolvers since if a resolver isn’t specified it would simply read for the property of the object of the same name by default!
Even if we don’t specify trivial resolvers, these fields are being resolved but are taken care of by the GraphQL server library!
As a result, we don’t have to define resolver functions for all our Listing fields expect for the id field. A listing document in our collection contains an _id field while our API specifies an id field in our schema. Since the listing obj being passed from the root fields doesn’t contain an id field without an underscore, we’ll need to define a resolver for id .
import { ObjectId } from "mongodb";
import { IResolvers } from "apollo-server-express";
import { Database, Listing } from "../lib/types";

export const resolvers: IResolvers = {
  Query: {
    // ...
  },
  Mutation: {
    // ...
  },
  Listing: {
    id: (listing: Listing) => {}
  }
};
We could say the id field will be equal to the _id field from the listing object. However, the listing _id field isn’t a string but an ObjectId . To ensure compatibility, we’ll apply the JavaScript toString method to convert the ObjectId to a string.
import { ObjectId } from "mongodb";
import { IResolvers } from "apollo-server-express";
import { Database, Listing } from "../lib/types";

export const resolvers: IResolvers = {
  Query: {
    // ...
  },
  Mutation: {
    // ...
  },
  Listing: {
    id: (listing: Listing) => listing._id.toString()
  }
};
Our listings and deleteListing GraphQL fields should now work as expected. There’s one last thing we’ll do before we verify everything works.
EXPLICIT RESOLVER FUNCTION TYPES
We’ve customized our ESLint rules to not enforce the requirement of having to define explicit function return types since we’re okay with TypeScript inferring the function return types whenever it can. However, in our resolver functions, it would be helpful to specify the return type to ensure we return the correct type of values for each function .
- The
listingsquery resolver should return an array of listings. Since thelistingsresolver is a promise, we can state its return type asPromise<Listing[]>. - The
deleteListingmutation resolver should return a single listing (i.e. the deleted listing). Since thedeleteListingresolver is also a promise, we can state its return type asPromise<Listing>. - The
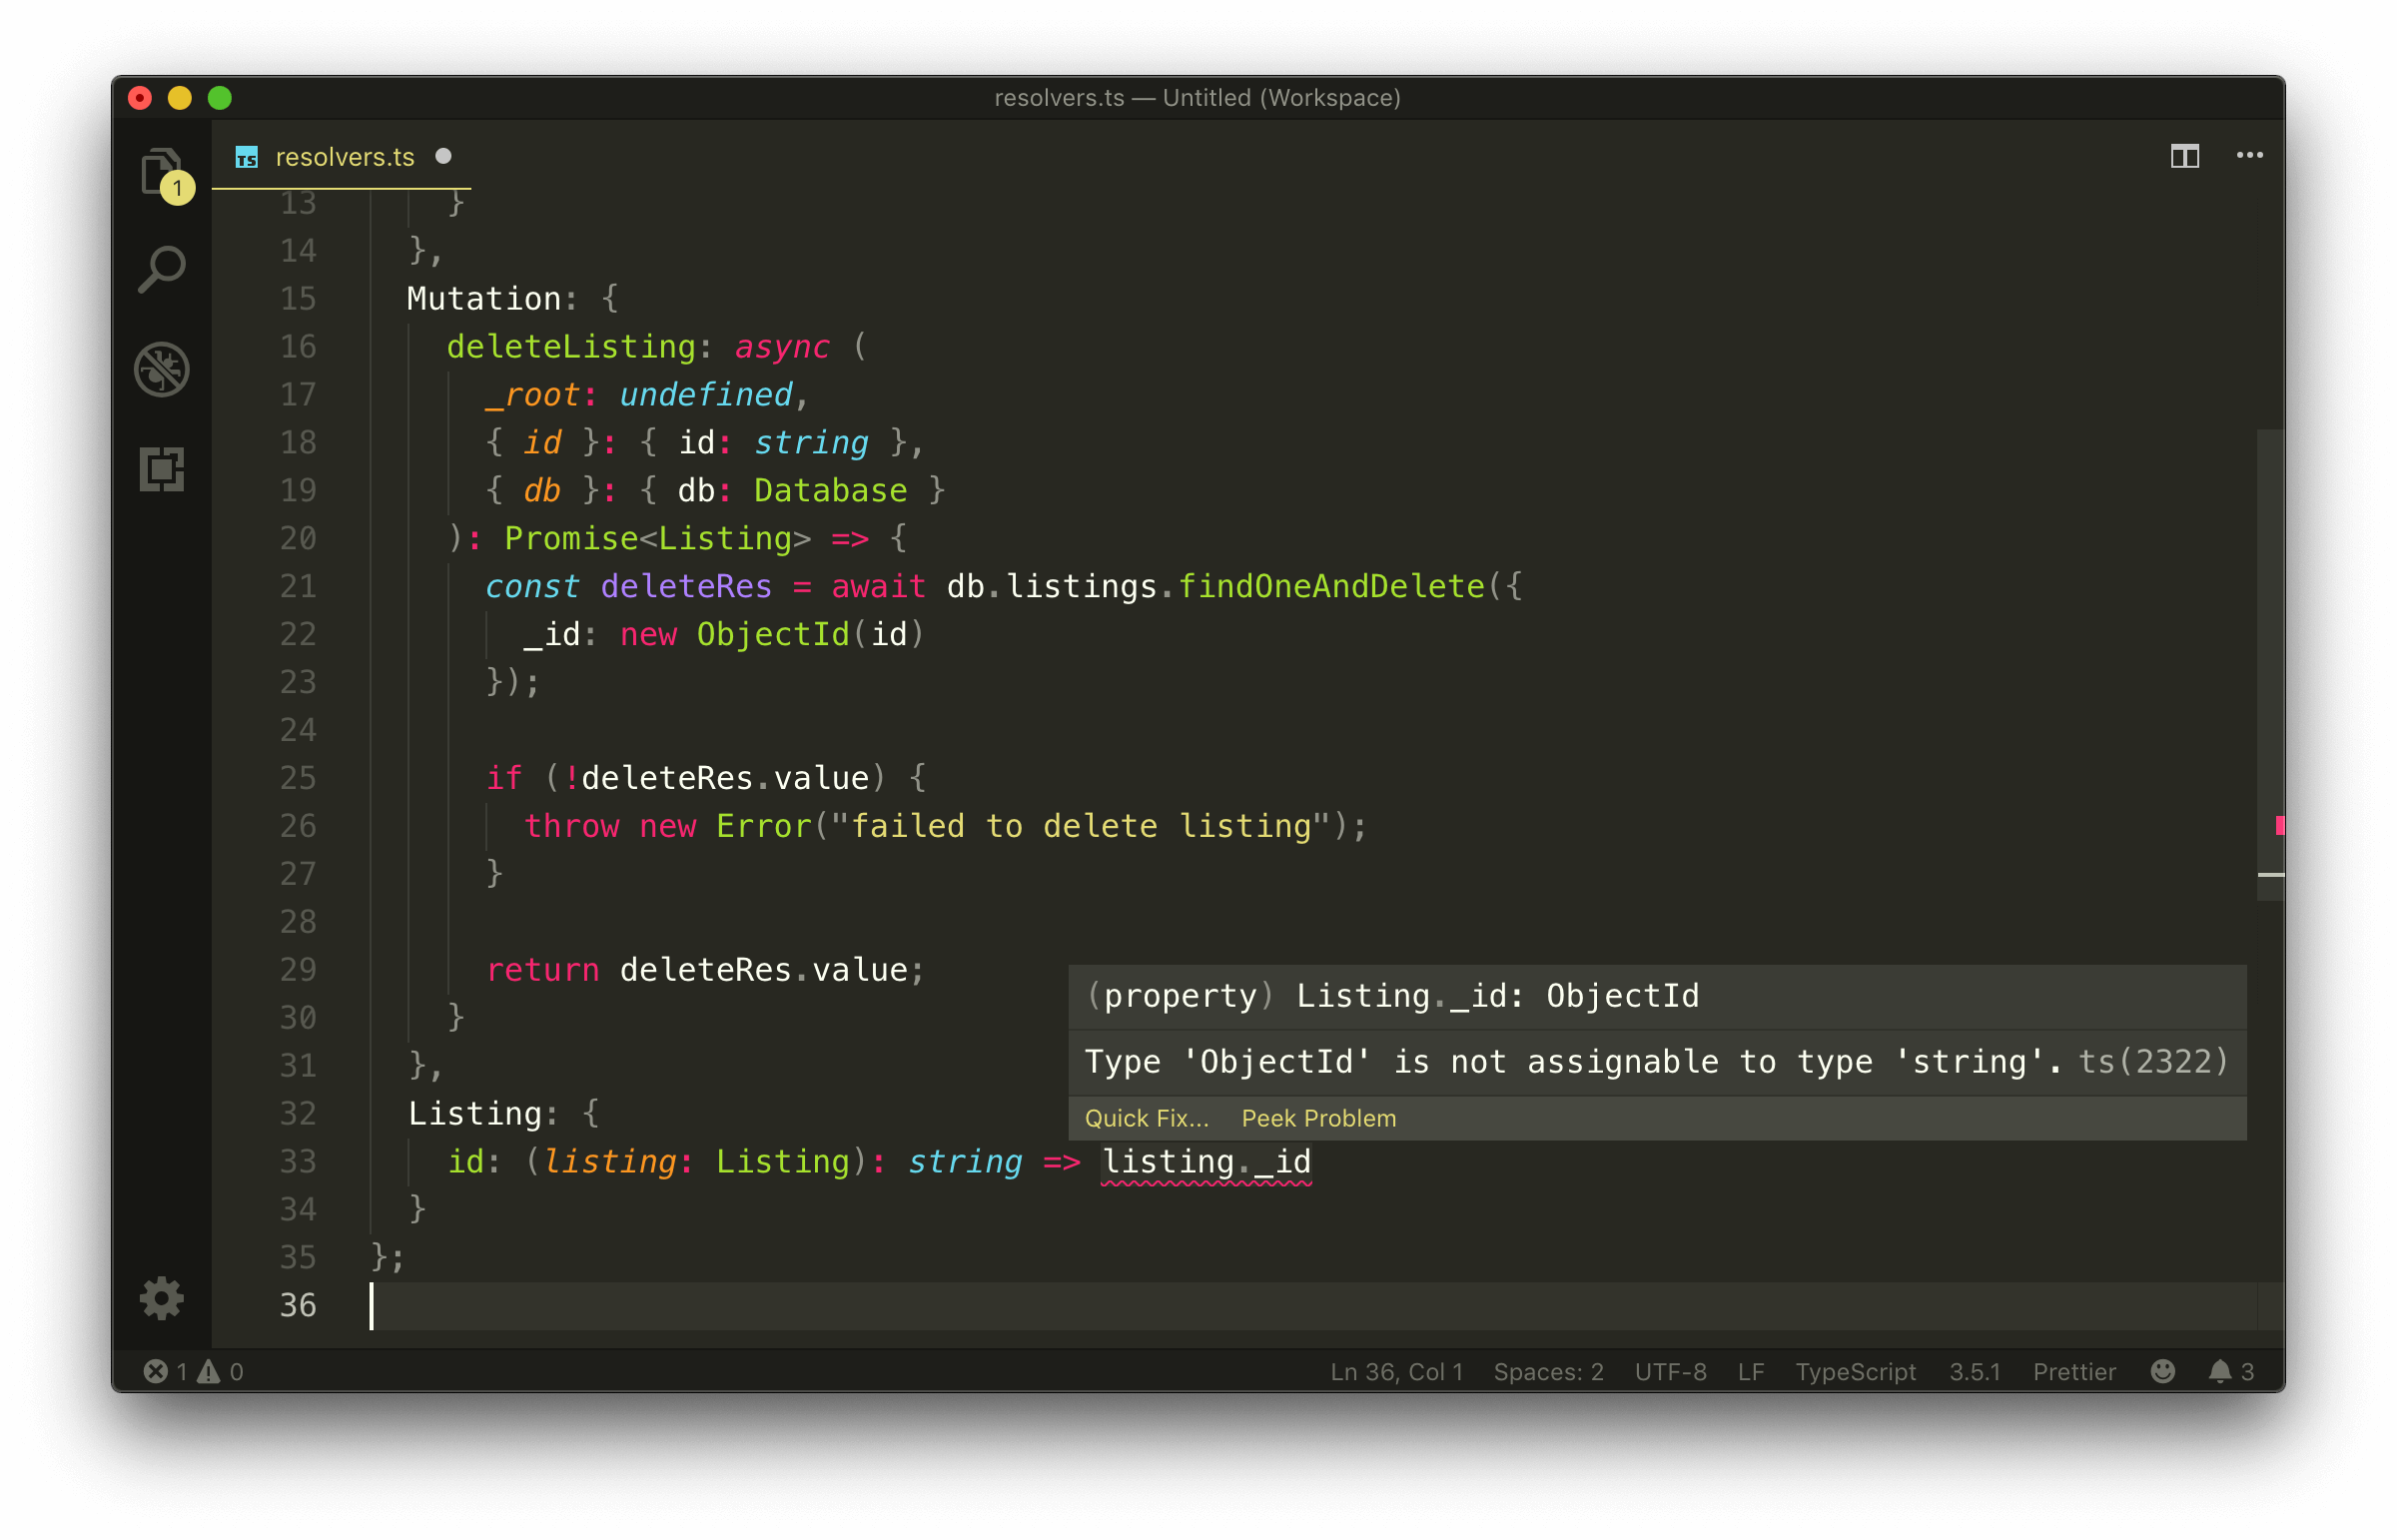
idfield in theListingobject type isGraphQLIDwhich is to be handled as a string when resolved. As a result, we’ll state that the expected return type of theidresolver inListingis astring.
Now, if we attempted to return a value from the resolver function that doesn’t match the expected return type - TypeScript will display a warning.
With all the changes made, our src/graphql/resolvers.ts file will now look like the following:
server/src/graphql/resolvers.ts
import { ObjectId } from "mongodb";
import { IResolvers } from "apollo-server-express";
import { Database, Listing } from "../lib/types";

export const resolvers: IResolvers = {
  Query: {
    listings: async (
      _root: undefined,
      _args: {},
      { db }: { db: Database }
    ): Promise<Listing[]> => {
      return await db.listings.find({}).toArray();
    }
  },
  Mutation: {
    deleteListing: async (
      _root: undefined,
      { id }: { id: string },
      { db }: { db: Database }
    ): Promise<Listing> => {
      const deleteRes = await db.listings.findOneAndDelete({
        _id: new ObjectId(id)
      });

      if (!deleteRes.value) {
        throw new Error("failed to delete listing");
      }

      return deleteRes.value;
    }
  },
  Listing: {
    id: (listing: Listing): string => listing._id.toString()
  }
};
We’ll start our server and verify that our listings query works as expected.
If we were to copy an id from one of the listing objects returned from our query and use it as the argument value for the deleteListing mutation, we’ll observe that our deleteListing mutation also deletes a listing successfully.
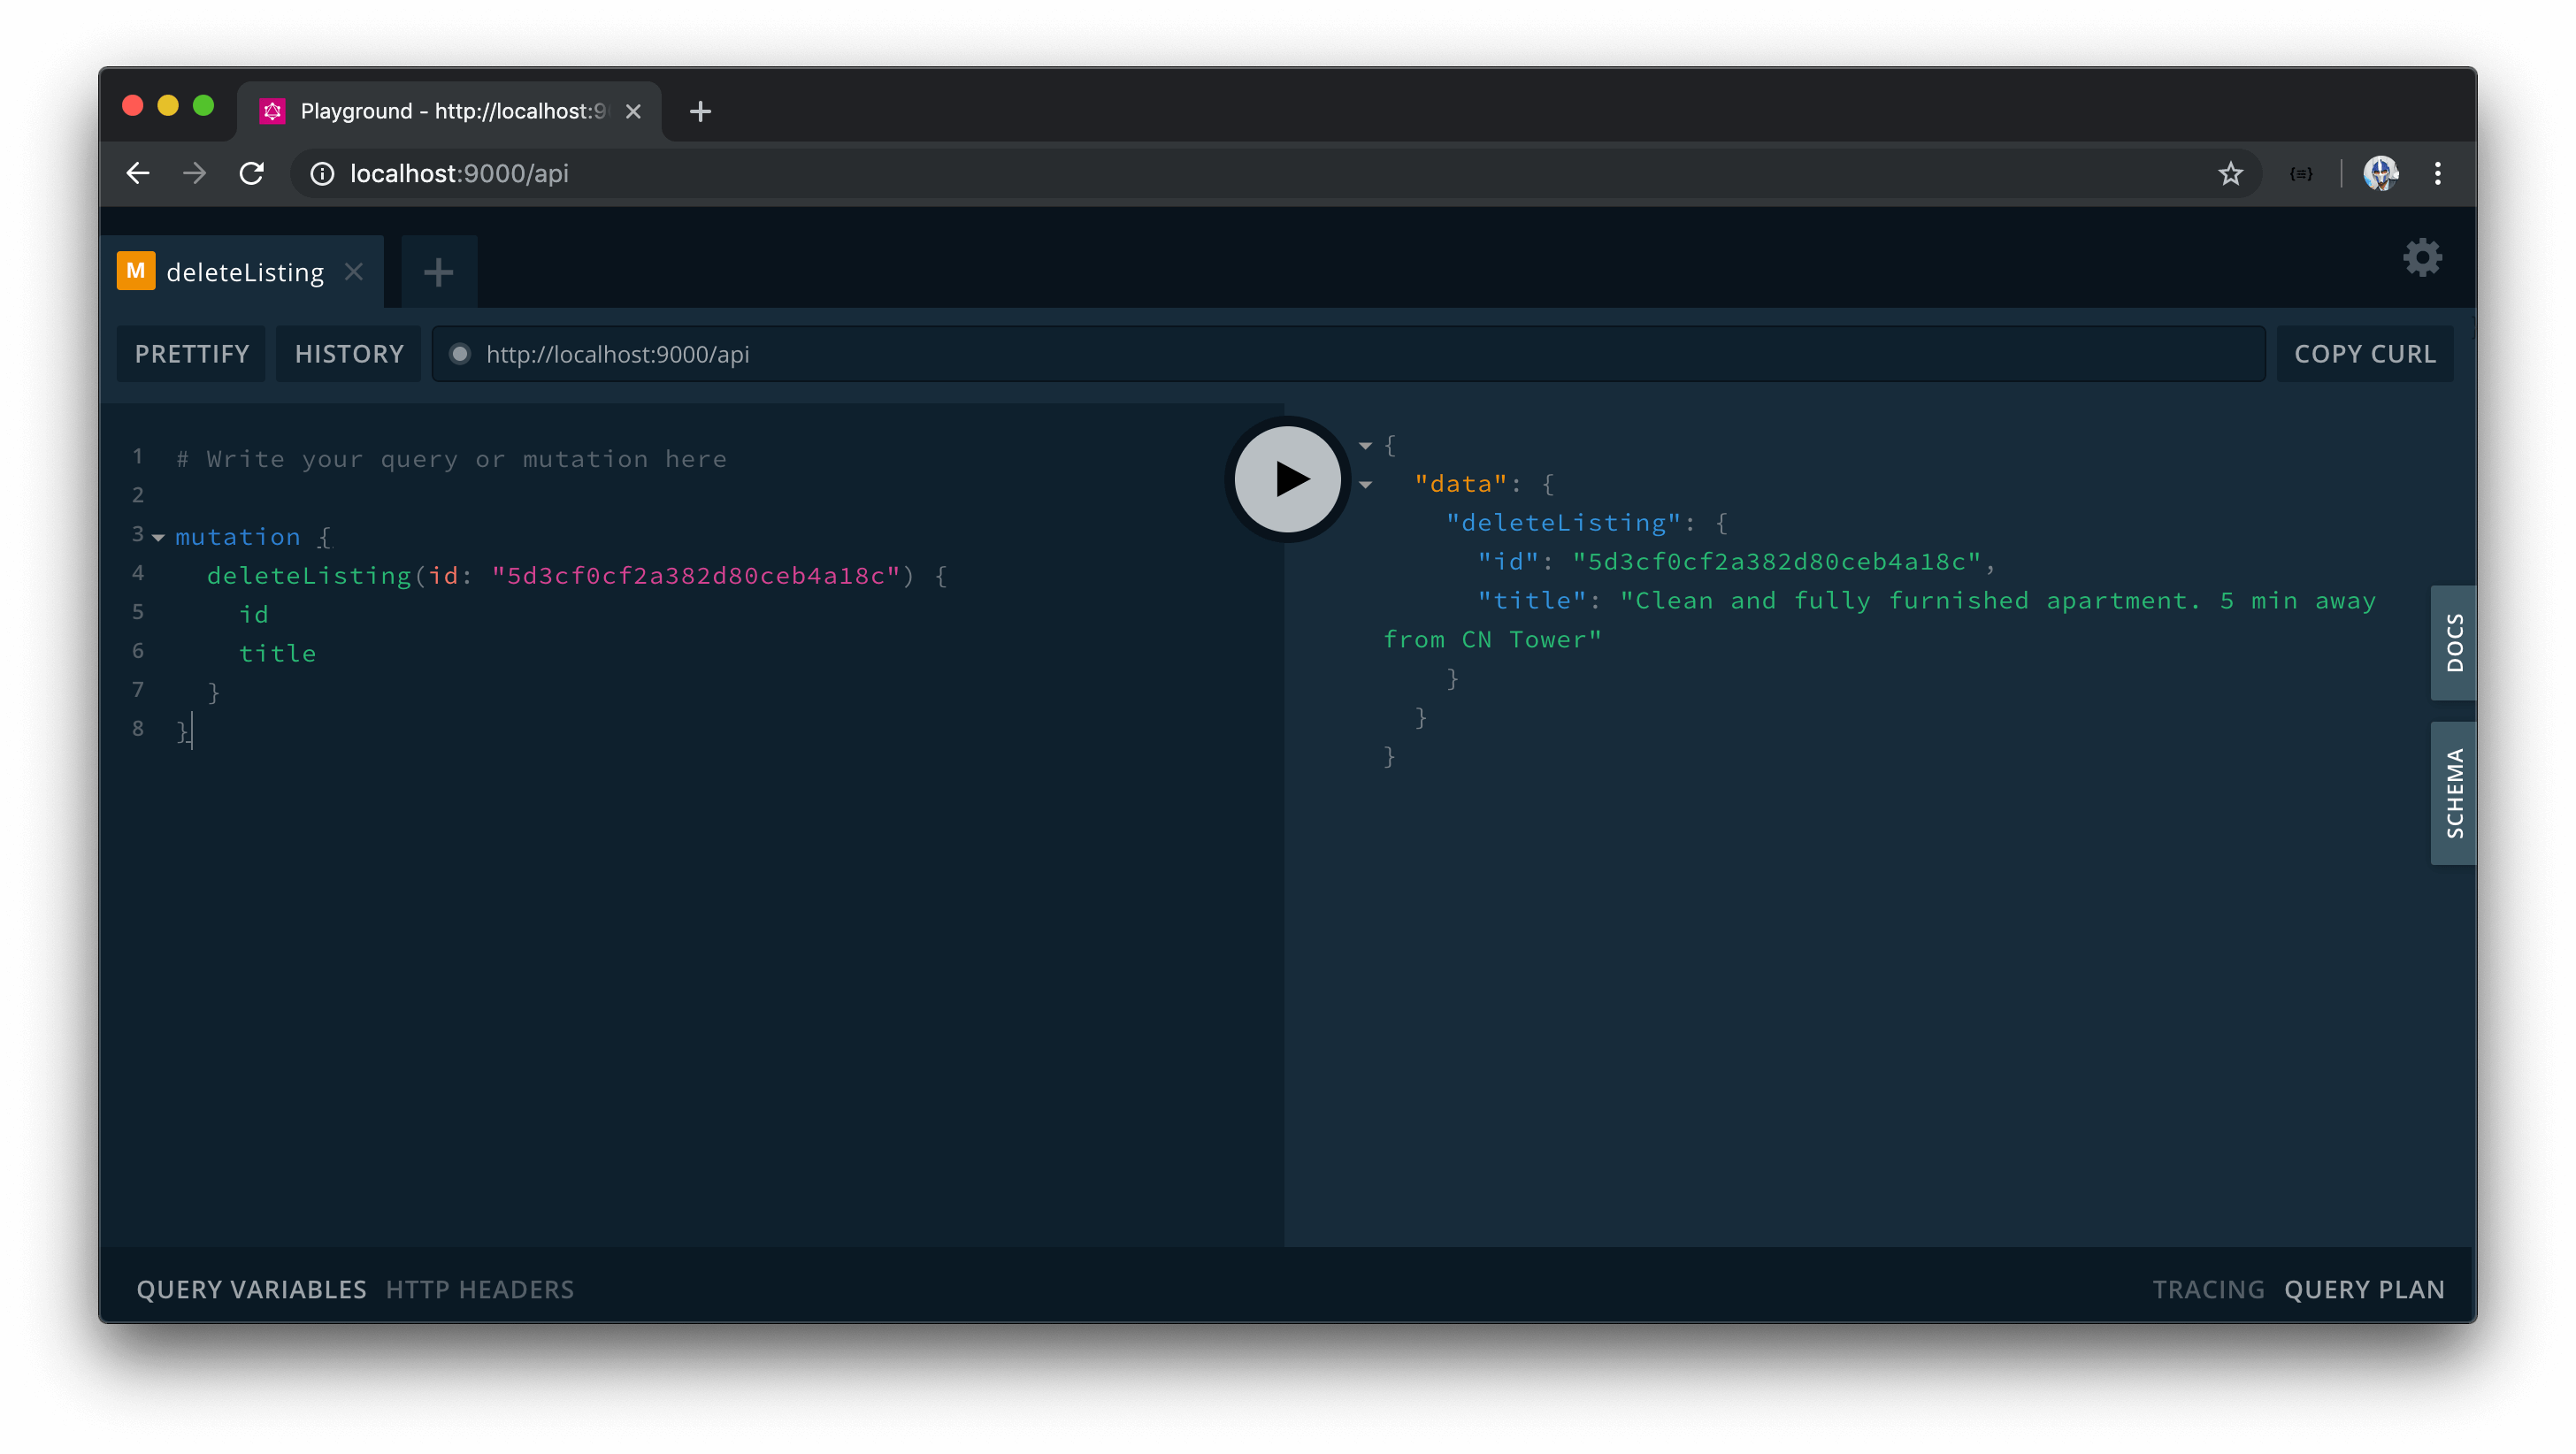
This asserts that we now have our GraphQL API interact and manipulate persisted data in a database.
At any moment in time, you should be able to run the
seedscript to introduce more listings to the database collection.
MODULARIZING RESOLVERS
If our app was to continue to grow, our resolvers.ts file will continue to get bigger to accommodate all the different resolvers within the different object types in our API. Though there’s nothing inherently wrong with this, we can look to separate our resolvers into different resolvers maps (i.e. modules) in such a way that each resolvers map will pertain a particular domain (or module).
For example, assume we had a resolvers map just for resolvers that pertain to the listings domain (i.e. the listingResolvers ). The listings resolvers map will encompass all the resolvers that pertain to the listing domain or module such as the listings query, the deleteListing mutation, the id resolver field for the Listing object, etc.
export const listingResolvers: IResolvers = {
  Query: {
    listings: () => {
      // ...
    }
  },
  Mutation: {
    deleteListing: () => {
      // ...
    }
  },
  Listing: {
    id: () => {
      // ...
    }
  }
};
We could have another resolvers map that deals with a different domain or module. For example, we can have a userResolvers map that contained all the resolvers that pertain to retrieving or changing user data in our database.
export const userResolvers: IResolvers = {
  Query: {
    users: () => {
      // ...
    }
  },
  Mutation: {
    deleteUser: () => {
      // ...
    }
  },
  User: {
    id: () => {
      // ...
    }
  }
};
This level of modularization will make no change to the actual functionality of our app but aim to have our resolvers be more concise and easier to read.
Let’s set up the resolvers of our API to follow this level of modularization. The first thing we’ll do is create a new folder called resolvers in our src/graphql/ folder. The src/graphql/resolvers/ folder is where we’ll place each of our different resolvers objects.
server/
  src/
    graphql/
      resolvers/
      // ...
    // ...
In the src/graphql/resolvers/ folder, we’ll create a sub-folder for each module we’d want to have a resolvers object. At this moment in time, we only have the capability to modify and read data about listings (i.e. we only have a listings collection), so we’ll create a Listing/ sub-folder that contains an index.ts file where we’ll create and export a listingResolvers map.
server/
  src/
    graphql/
      resolvers/
        Listing/
      // ...
    // ...
We’ll move everything from our src/graphql/resolvers.ts file to the index.ts file in src/graphql/resolvers/Listing/ and rename the exported resolvers object to listingResolvers .
server/src/graphql/resolvers/Listing/index.ts
import { ObjectId } from "mongodb";
import { IResolvers } from "apollo-server-express";
import { Database, Listing } from "../../../lib/types";

export const listingResolvers: IResolvers = {
  Query: {
    listings: async (
      _root: undefined,
      _args: {},
      { db }: { db: Database }
    ): Promise<Listing[]> => {
      return await db.listings.find({}).toArray();
    }
  },
  Mutation: {
    deleteListing: async (
      _root: undefined,
      { id }: { id: string },
      { db }: { db: Database }
    ): Promise<Listing> => {
      const deleteRes = await db.listings.findOneAndDelete({
        _id: new ObjectId(id)
      });

      if (!deleteRes.value) {
        throw new Error("failed to delete listing");
      }

      return deleteRes.value;
    }
  },
  Listing: {
    id: (listing: Listing): string => listing._id.toString()
  }
};
We’ll also remove the previously existing src/graphql/resolvers.ts file.
LODASH.MERGE
Since we only have a single resolvers map ( listingResolvers ), we could reference the listingResolvers map directly in our Apollo server instantiation. Instead, we’ll look to prepare our app such that it is ready to accept and merge multiple different resolvers maps.
For us to pass multiple resolver objects into the ApolloServer constructor, we must find a way to merge them into a single object. Luckily, there is an npm package perfect for this and it comes from lodash.
Lodash is an incredibly useful utility library that provides a significant number of functions to help do a variety of different things needed to manipulate objects and arrays. We’re most interested in the lodash merge method which helps recursively merge enumerable properties of source objects into a destination object.
We won’t need the entire lodash library since we’re only interested in the lodash merge method. As a result, we’ll install the lodash.merge package which is a single npm package that provides the merge function alone.
In our terminal, we’ll install the lodash.merge package as an application dependency.
server $: npm install lodash.merge
We’ll also install the @types/lodash.merge package as a development dependency.
server $: npm install -D @types/lodash.merge
We’ll create an index.ts file in our src/graphql/resolvers/ folder and import the merge function from lodash.merge . We’ll also import the listingResolvers map from the src/graphql/resolvers/Listing folder.
server/src/graphql/resolvers/index.ts
import merge from "lodash.merge";
import { listingResolvers } from "./Listing";
We can then export a const variable labeled resolvers that uses the merge function and places the listingResolvers map within.
server/src/graphql/resolvers/index.ts
import merge from "lodash.merge";
import { listingResolvers } from "./Listing";

export const resolvers = merge(listingResolvers);
If we were to now create different resolvers maps in our src/graphql/resolvers folder, we can import them in the src/graphql/resolvers/index.ts file and place them in the merge function to have them merged into a single destination object.
// example of having multiple resolvers objects
import merge from "lodash.merge";
import { bookingResolvers } from "./Booking";
import { listingResolvers } from "./Listing";
import { userResolvers } from "./User";

export const resolvers = merge(bookingResolvers, listingResolvers, userResolvers);
Our app is already prepared to consume the resolvers object. This is because the src/index.ts file imports the resolvers object from the src/graphql/ folder.
// ...
import { typeDefs, resolvers } from "./graphql";

const mount = async () => {
  // ...
};

// ...
And the src/graphql/ folder exports the resolvers object from a resolvers file path in the src/graphql/ folder.
src/graphql/index.ts
export * from "./resolvers";
export * from "./typeDefs";
When we now run our app, everything should work as expected. Our listings query should retrieve all the listing documents in our listings collection.
And our deleteListing mutation will appropriately remove a listing document from our collection.
TYPEDEFS
Just like how a resolvers object can be broken down and modularized into smaller objects, the typeDefs string for our GraphQL schema could also be broken down to smaller sub-strings as well. This can be achieved with the use of the extend keyword, which allows for the creation of a schema by extending a base schema. This can help avoid a large list of root Query and Mutation fields.
Here’s an example of a typeDefs schema from the Apollo Server documentation that shows the creation of two strings where the second type definitions string use the extend keyword to extend the root Query object type and introduce a foos field.
const typeDefs = [`
  schema {
    query: Query
  }

  type Query {
    bars: [Bar]!
  }

  type Bar {
    id
  }
  `, `
  type Foo {
    id: String!
  }

  extend type Query {
    foos: [Foo]!
  }
`]
Though we’re able to break our typeDefs schema to smaller pieces and subsequently into separate files, we personally prefer to have the entire typeDefs schema be kept in a single string within a single file. One reason we prefer to have all type definitions within a single string is that its hard for the typeDefs string to become large enough that it becomes to difficult to manage.
MODULE 4 SUMMARY
In this module, we’ve established a connection between our Node server and the Mongo database with which we’ve created and set up in a database as a service known as MongoDB Atlas. Our database credentials are declared in a .env file to decouple environment-specific configuration and application code as well as to avoid committing our database configuration as part of our source code.
In the temp/seed.ts file, we’ve created a seed script that will help populate our database with three mock listings whenever the application seed script is run.
server/temp/seed.ts
require("dotenv").config();

import { ObjectId } from "mongodb";
import { connectDatabase } from "../src/database";
import { Listing } from "../src/lib/types";

const seed = async () => {
  try {
    console.log("[seed] : running...");

    const db = await connectDatabase();
    const listings: Listing[] = [
      {
        _id: new ObjectId(),
        title: "Clean and fully furnished apartment. 5 min away from CN Tower",
        image:
          "https://res.cloudinary.com/tiny-house/image/upload/v1560641352/mock/Toronto/toronto-listing-1_exv0tf.jpg",
        address: "3210 Scotchmere Dr W, Toronto, ON, CA",
        price: 10000,
        numOfGuests: 2,
        numOfBeds: 1,
        numOfBaths: 2,
        rating: 5
      },
      {
        _id: new ObjectId(),
        title: "Luxurious home with private pool",
        image:
          "https://res.cloudinary.com/tiny-house/image/upload/v1560645376/mock/Los%20Angeles/los-angeles-listing-1_aikhx7.jpg",
        address: "100 Hollywood Hills Dr, Los Angeles, California",
        price: 15000,
        numOfGuests: 2,
        numOfBeds: 1,
        numOfBaths: 1,
        rating: 4
      },
      {
        _id: new ObjectId(),
        title: "Single bedroom located in the heart of downtown San Fransisco",
        image:
          "https://res.cloudinary.com/tiny-house/image/upload/v1560646219/mock/San%20Fransisco/san-fransisco-listing-1_qzntl4.jpg",
        address: "200 Sunnyside Rd, San Fransisco, California",
        price: 25000,
        numOfGuests: 3,
        numOfBeds: 2,
        numOfBaths: 2,
        rating: 3
      }
    ];

    for (const listing of listings) {
      await db.listings.insertOne(listing);
    }

    console.log("[seed] : success");
  } catch {
    throw new Error("failed to seed database");
  }
};

seed();
In the src/database/index.ts file, we’ve created a connectDatabase() function that makes the connection between our Node server and the Mongo cluster in MongoDB Atlas. We’ve used the official Node Mongo Driver to make our connection. Our connectDatabase() function returns an object of the collections we want our Node server to interact. As of this moment, we only have the single listings collection with which we’ve named as test_listings in our cluster.
server/src/database/index.ts
import { MongoClient } from "mongodb";
import { Database } from "../lib/types";

const url = `mongodb+srv://${process.env.DB_USER}:${
  process.env.DB_USER_PASSWORD
}@${process.env.DB_CLUSTER}.mongodb.net`;

export const connectDatabase = async (): Promise<Database> => {
  const client = await MongoClient.connect(url, {
    useNewUrlParser: true,
    useUnifiedTopology: true
  });
  const db = client.db("main");

  return {
    listings: db.collection("test_listings")
  };
};
We’ve introduced TypeScript generics and with the capability of abstracting type information with the type definitions of the Node Mongo Driver, we’ve been able to define the type of data that can be returned from the listings collection.
server/src/lib/types.ts
import { Collection, ObjectId } from 'mongodb';

export interface Listing {
  _id: ObjectId;
  title: string;
  image: string;
  address: string;
  price: number;
  numOfGuests: number;
  numOfBeds: number;
  numOfBaths: number;
  rating: number;
}

export interface Database {
  listings: Collection<Listing>;
}
Our listings and deleteListing GraphQL resolvers interact with the MongoDB Database to either retrieve the list of listings in the listings collection OR delete a listing completely from the listings collection.
server/src/graphql/resolvers/Listing/index.ts
import { ObjectId } from "mongodb";
import { IResolvers } from "apollo-server-express";
import { Database, Listing } from "../../../lib/types";

export const listingResolvers: IResolvers = {
  Query: {
    listings: async (
      _root: undefined,
      _args: {},
      { db }: { db: Database }
    ): Promise<Listing[]> => {
      return await db.listings.find({}).toArray();
    }
  },
  Mutation: {
    deleteListing: async (
      _root: undefined,
      { id }: { id: string },
      { db }: { db: Database }
    ): Promise<Listing> => {
      const deleteRes = await db.listings.findOneAndDelete({
        _id: new ObjectId(id)
      });

      if (!deleteRes.value) {
        throw new Error("failed to delete listing");
      }

      return deleteRes.value;
    }
  },
  Listing: {
    id: (listing: Listing): string => listing._id.toString()
  }
};
We’ve modularized our resolvers with the help of the lodash.merge method which helps us break our resolvers map function to specific modules.
MOVING FORWARD
We’ve spent our entire time building the GraphQL API from a Node server. Moving forward, we’ll be focusing on the client portion of our app by introducing React, creating a React TypeScript project with the create-react-app command line, and building a simple UI that will allow a user to query the listings from our API and delete a listing of their choice.
MODULE 5 INTRODUCTION
From modules 1 - 4, we’ve been focusing on the server portion of our application. We created a server using Node and Express and we set up a GraphQL API with the help of Apollo. We also verified our GraphQL APIs functionality using the GraphQL Playground.
In this module, we’ll now switch over to the client portion of Part I of the course. In this module, we’re going to:
- Introduce React as the main tool we’ll use to build our client application.
- Walkthrough
create-react-appto help scaffold a new Webpack bundled React application.
REACT
Though this course assumes some experience with the use of React, we’re going to cover some of the core concepts of React in this lesson to bring everyone up to speed.
TRADITIONAL JAVASCRIPT
In traditional HTML and JavaScript applications, JavaScript is used to directly manipulate the DOM (i.e. the Document Object Model). To make changes in our UI, we’d have to make references to the DOM and imperatively declare the changes we’d want.
For example, assume we had a simple <h2> element that said Hello World! and a button with an onclick listener that calls a changeGreeting() method when triggered.
<html>
  <body>
    <div id="app">
      <h2>Hello World!</h2>
      <button onclick="changeGreeting()">
        Change Greeting
      </button>
    </div>
    <script src="./main.js"></script>
  </body>
</html>
Let’s say we’re interested in toggling the text content of the <h2> element when the button is clicked. To do so in native JavaScript, we have to get the reference to the DOM node in question and only then will we be able to change the text content of the DOM node.
Here’s an example of toggling between the Hello World! and What is up! text when the Change Greeting button element is clicked.
let greetingTag = document.getElementsByTagName("h2")[0];

changeGreeting = () => {
  if (greetingTag.textContent === "Hello World!") {
    greetingTag.textContent = "What is up!";
  } else {
    greetingTag.textContent = "Hello World!";
  }
};
This works fine but the problem a lot of engineers noticed with large-scale applications is things get difficult to track very quickly . Certain libraries came to the scene to help structure things better with the Model-View-Controller pattern or even the Model-View-Presenter pattern. React came into the scene with a pretty unique way of solving this.
REACT
React changed the paradigm of how we make changes to our UI with the help of something known as the virtual DOM . The virtual DOM is a cool term for essentially just JavaScript objects that represent the structure of the DOM.
When we make changes in React, we don’t make changes directly to the actual DOM - we make changes to the virtual DOM. Why? Because it’s a lot less expensive too. React then has the responsibility to compare the difference between the changes to the virtual DOM and the actual DOM, then patch the changes made to the actual DOM.
This has introduced a different way of building UI with React.
JSX
React gives us the ability to use JSX, a non-standard syntax which helps us create markup in JavaScript.
Here’s an example of using the ReactDOM.render() function to render an element on a particular DOM node.
ReactDOM.render(<h2>Hello World!</h2>, document.getElementById("app"));
ReactDOM.render() is often the starting point of React Applications. The <h2>Hello World!</h2> element passed in the first argument of the ReactDOM.render() is JSX - XML-like syntax in JavaScript .
REUSABLE COMPONENTS
Components are the building blocks of React applications and are essentially functions or classes that return a React element. Reusability and maintainability are some of the significant benefits of having well-structured components in a large application.
Here’s a HelloWorld function component that simply renders a header element of Hello World! .
import React from "react";

const HelloWorld = () => {
  return <h2>Hello World!</h2>;
};
DATA-DRIVEN APPLICATIONS
The heart of every React component is its state . State is an object that determines how the component behaves. When we make changes in React, we never make changes to the DOM directly but make changes to state . React is responsible in rendering and re-rendering components based on changes made to state.
Here’s a similar implementation to what we had before with the native JavaScript example of having a click listener be used to update the text content of a <h2> element.
import React, { useState } from "react";

const HelloWorld = () => {
  const [message, setMessage] = useState("Hello World!");

  changeMessage = () => {
    let newMessage = message === "Hello World!" ? "What is up!" : "Hello World!";
    setMessage(newMessage);
  };

  return (
    <div>
      <h2>{message}</h2>
      <button onClick={changeMessage}>Change Greeting</button>
    </div>
  );
};
In this case, we’re using React and the capability of state to update our UI. We use the useState Hook to return a message state property and setMessage() function. The message property is returned as part of the component template, and the setMessage() function is used to update the message state button whenever the component changeMessage() function is invoked.
Notice the data-driven mindset of how we change UI in React? In React, we update data (i.e. state ) and React takes responsibility in determining the changes to be made in the UI based on the change to state.
We’ll be taking a deep dive into what React Hooks are and how the
useStateHook behaves in Module 7.
PROPS AND UNIDIRECTIONAL DATA FLOW
To pass data from one component to another, React gives us the capability to use something known as props to achieve this.
Props can only flow in a single direction, from parent components down to child components (and further down). When a change in state is made in a parent, React will cause the components that depend on these values to re-render.
Here’s an example of having a parent pass a message prop with a string value of Hello World! to a child component.
Parent
ReactDOM.render(<HelloWorld message="Hello World!" />, document.getElementById("app"));
Child
import React, { useState } from "react";

const HelloWorld = ({ message }) => {
  return <h2>{message}</h2>;
};
CLASS AND FUNCTION COMPONENTS
React gives us the capability to create components one of two ways, with classes or functions . In either case, a react element is expected to be returned.
Here’s a class component that has a message state property and returns it as part of the returned component element. A componentDidMount lifecycle method is used to log something to the console whenever the component first mounts.
import React, { Component } from "react";

class HelloWorld extends Component {
  constructor(props) {
    super(props);
    state = {
      message: "Hello World!"
    };
  }

  componentDidMount() {
    console.log("Component has mounted!");
  }

  render() {
    return <h2>{message}</h2>;
  }
}
Here’s the functional component alternative where in this case, we can use the useState Hook to create our state value. We can use the useEffect Hook to have an effect that logs a message to the console when the component first mounts.
import React, { useState, useEffect } from "react";

const HelloWorld = () => {
  const [message] = useState("Hello World!");

  useEffect(() => {
    console.log("Component has mounted!");
  }, []);

  return <h2>{message}</h2>;
};
Traditionally, class components had to be used to declare state as well as any lifecycle effects a component can have. This is why a container/presentational structure often arose where container class components will contain the state and lifecycle of a component and simply pass the data down as props to simple “dummy” presentational components.
Well, as of recently the container/presentational pattern isn’t required any longer thanks to a major feature React introduced known as React Hooks! We’ll be taking a deep dive into Hooks in a few modules from now!
This lesson isn’t intended to be a thorough introduction to React but instead aims to serve as a refresher for some of the main core concepts such as JSX, props , state , etc. We’ll be familiarizing ourselves with these concepts some more once we start to use them in the components we begin to build.
CREATE REACT APP
Our focus thus far has been building a GraphQL API from the server-side of our app. We’re now going to switch our focus to the client-side of our app. The core piece of our client application is going to be React.
For simple React applications, we’re able to create a React app by introducing a few script tags in an HTML file. There are a few limitations to this approach which make it difficult to write complex applications. We’re unable to use JavaScript modules and being able to compile TypeScript and ESNext code becomes difficult or practically impossible to maintain as an application becomes larger.
WEBPACK
The Webpack JavaScript bundler can help us here.

Webpack is a third-party tool that helps bundle JavaScript code. A JavaScript bundler bundles all the JavaScript code used in an application, which includes the code we write and the code of any external libraries, and bundles them into a single bundle. This bundle could be a single file or a series of a few files.
Why is bundling important? First off, bundling improves performance in production. It’s a lot quicker for a browser to download a few large bundled files as opposed to downloading a very large number of small files.
Webpack also works with other dependencies to compile and bundle development code to production code. For example, Webpack combined with babel-loader helps compile ES6 (or newer) JavaScript code to an older format that almost all browsers can recognize. Another important example is Webpack can work with typescript-loader to help compile our TypeScript code to normal JavaScript when bundled.
Webpack is a powerful tool. Since a large number of modern-day JavaScript applications use Webpack, a huge thanks goes to the people working on it. With that said, Webpack does come at a cost - it’s often recognized to be a little advanced and not very easy to understand to help setup. This is where something like create-react-app comes in.
CREATE-REACT-APP
The React team and community have given us create-react-app (repo link), a tool to help scaffold and create a Webpack bundled React application rapidly . We’ll use create-react-app to create a new React project.
Though we’re able to globally install the create-react-app utility, we can use the npx runner to run create-react-app without having to install it.
npx is an npm package runner that was introduced with npm version 5.2. Among doing a few different things, it allows for the execution of Node packages which haven’t been previously installed.
In our case, we’ll execute the
create-react-apppackage to create a new React app without having to install thecreate-react-apppackage.
In the tinyhouse_v1 folder, we’ll create a new React application under a directory labeled client/ , with create-react-app . create-react-app allows us to create a React application with TypeScript by adding the --typescript flag.
tinyhouse_v1 $: npx create-react-app client --typescript
When the create-react-app command is complete, a client/ directory will be created in the tinyhouse_v1/ folder adjacent to the server/ project we’ve been working with.
tinyhouse_v1/
  client/
  server/
If we follow the instructions logged to us from the terminal once the directory has been created, we’ll navigate to the client/ folder and run our React application with npm run start .
client $: npm run start
We’ll have our React app running on http://localhost:3000 !