MODULE 7 INTRODUCTION
In the last module, we made our client have the ability to make requests to our API. However, we haven’t been able to display any information in our UI just yet. In this module, we’re going to use React Hooks to display data in our UI as well as handle our GraphQL API requests.
React Hooks are functions that allow components to hook into React specific features. In this module, we’ll:
- Introduce and explain what React Hooks are.
- Use React’s
useStateHook to keep track of component state. - Use React’s
useEffectHook to help make our GraphQL query when our component first mounts. - Create our own custom
useQueryHook that consolidates the functionality to make a query when a component mounts. - Extrapolate a
refetch()property from ouruseQueryHook to help our components re-trigger a query after the component has already been mounted. - Retrieve the
loadinganderrorstatus of our query made with theuseQueryHook. - Create a
useMutationhook that provides a request function to conduct mutations. - Finally, use React’s
useReducerHook to recognize a different way to handle state and state changes in our custom Hooks.
REACT HOOKS
In our React Introduction lesson, we mentioned how components in React can be created with either a class or a function. Traditionally, React required us to create components with classes to:
- Use
statewithin a component. - Be able to use other certain React features (e.g lifecycle methods).
As a result, class components were often used as “container” components since these components were stateful and responsible in defining and providing data to other components. Function components didn’t keep their own state and were more used as “presentational” components to determine the presentation of UI.
From this, a popular pattern emerged for having components be divided into two categories - “container” and “presentational”. There were variations to this approach but as of late, Dan Abramov (React core team member) does not suggest splitting components with the container and presentational pattern anymore. This is in large part due to the presence of a new React feature - React Hooks.
When it comes to sharing stateful logic between any components, other more advanced patterns emerged such as:
- Higher Order Components - Functions that take a component and return a new component with additional data or functionality
- Render Props - Props whose value is a function where the component calls the prop function to return the React element instead of implementing its own logic.
Higher-order components and render props are advanced patterns that simply emerged within the React community to handle component logic re-use. Though both these patterns help abstract shared logic, they tend to make components difficult to understand.
Dan Abramov summarized the above issues as symptoms of a certain particular problem. Roughly quoted, this is because React didn’t provide a simpler/smaller primitive to adding state or lifecycle than a class component. Class components are difficult to split up unless more complicated patterns are used which then can lead to something often labeled as “wrapper hell” where component declarations are wrapped over one another multiple levels deep.
MOTIVATION BEHIND REACT HOOKS
This is where Hooks come in. Hooks aims to solve the difficulties of logic reuse by enabling us to write functional components that have access to features like state , context , lifecycle methods, ref , etc. without having to write a Class component .
In this lesson, we’ll go through one example of a React Hook - the useState Hook.
In traditional class-based React components with the stable JavaScript syntax, creating a class component that keeps track of state will look something like the following:
import React, { Component } from 'react';

class Counter extends Component {
  constructor(props) {
  super(props);
    state = {
      count: 0
    }
  }

  increment() {
    setState({
      count: this.state.count + 1
    })
  }

  decrement() {
    setState({
      count: this.state.count - 1
    })
  }

  return (
  <div>
    <p>{this.state.count}</p>
    <button onClick={increment}>Increment</button>
    <button onClick={decrement}>Decrement</button>
  </div>
  );
};
We have a count state property created and we have component methods that call the component setState function to update the count property. This component renders two buttons where each button when clicked either increments or decrements the count state property being rendered in the UI.
The equivalent of this with the useState Hook in a function component will look something like the following.
import React, { useState } from "react";

const Counter = () => {
  const [count, setCount] = useState(0);

  const increment = () => {
    setCount(count + 1);
  };

  const decrement = () => {
    setCount(count - 1);
  };

  return (
    <div>
      <p>{count}</p>
      <button onClick={increment}>Increment</button>
      <button onClick={decrement}>Decrement</button>
    </div>
  );
};
We declare the useState Hook at the top of the function component. We declare the initial value of the state property as 0 and we destruct a count property and setCount function. count is rendered as part of the component template and the component functions use the setCount function property to update the count state value.
Notice how much more legible the useState Hook is when it comes to creating and updating a component state value? This is compounded even further when we introduce other Hooks for other specific features we’d want in a component.
CUSTOM HOOKS
Hooks essentially allow us to split a component into smaller functions that can easily be reused between components. The ability to create custom Hooks makes sharing logic between components incredibly intuitive.
Assume we wanted another component to implement a very similar counter to what was done in the Counter component example we had earlier. We could replicate the important bits of code (the initialization of the state property and the functions to increment or decrement state value) or create a custom Hook that consolidates the logic responsible for the counter.
Here’s an example of creating a custom useCounter Hook to consolidate the logic around incrementing/decrementing a state value.
import React, { useState } from "react";

const useCounter = ({ initialState }) => {
  const [count, setCount] = useState(initialState);
  const increment = () => setCount(count + 1);
  const decrement = () => setCount(count - 1);
  return [count, { increment, decrement }];
};
We have a custom useCounter Hook that accepts an initialState value and uses it in a useState Hook. The useCounter Hook then sets up increment and decrement functions responsible in updating the state count property created. The useCounter Hook simply returns the information a component may need such as the count state property and the increment / decrement functions.
All a component needs to do is declare the useCounter Hook at the very beginning, pass in the initial value of the count property and destruct and use the properties given to it by the useCounter Hook.
import React, { useState } from "react";

const useCounter = ({ initialState }) => {
  const [count, setCount] = useState(initialState);
  const increment = () => setCount(count + 1);
  const decrement = () => setCount(count - 1);
  return [count, { increment, decrement }];
};

const Counter = () => {
  const [myCount, { increment, decrement }] = useCounter({
    initialState: 0
  });

  return (
    <div>
      <p>{myCount}</p>
      <button onClick={increment}>Increment</button>
      <button onClick={decrement}>Decrement</button>
    </div>
  );
};
The properties destructured from the useCounter Hook are part of the Counter component. The useCounter Hook simply abstracts the logic away so the Counter or any other component doesn’t explicitly have to define the same stateful logic pattern.
That was easy! Though useCounter is a simple example, it does show how effective Hooks are when it comes to reusing logic between components.
HOOKS - GOOD TO KNOWS
We’ll be taking a better deep dive as we introduce Hooks in the next coming lessons but here are a few notes to know about when using Hooks.
- Custom Hooks are functions that call other Hooks. As a best practice, custom Hooks should always be denoted with the term
usebefore the Hook name. (e.g.useCounter). - We should only call Hooks at the top level of components.
- We should only call Hooks from React functions (not native JavaScript functions).
- There are no breaking changes with the emergence of Hooks. Hooks are entirely opt-in and the React team has no plans of removing the class-based syntax. We’re simply encouraged by the React team to start to introduce Hooks in new components that we intend to create.
In the next lesson, we’ll take a deeper dive into the useState Hook and see how we can use it in our application to keep track of component state.
THE USESTATE HOOK
The useState Hook is a special Hook that allows us to add React state to functional components. We’re going to use the useState Hook to keep track of the listings data from our query as part of the <Listings> component state.
USESTATE
In our Listings.tsx component file, we’ll import the useState Hook from the React library.
client/src/sections/Listings/Listings.tsx
import React, { useState } from "react";
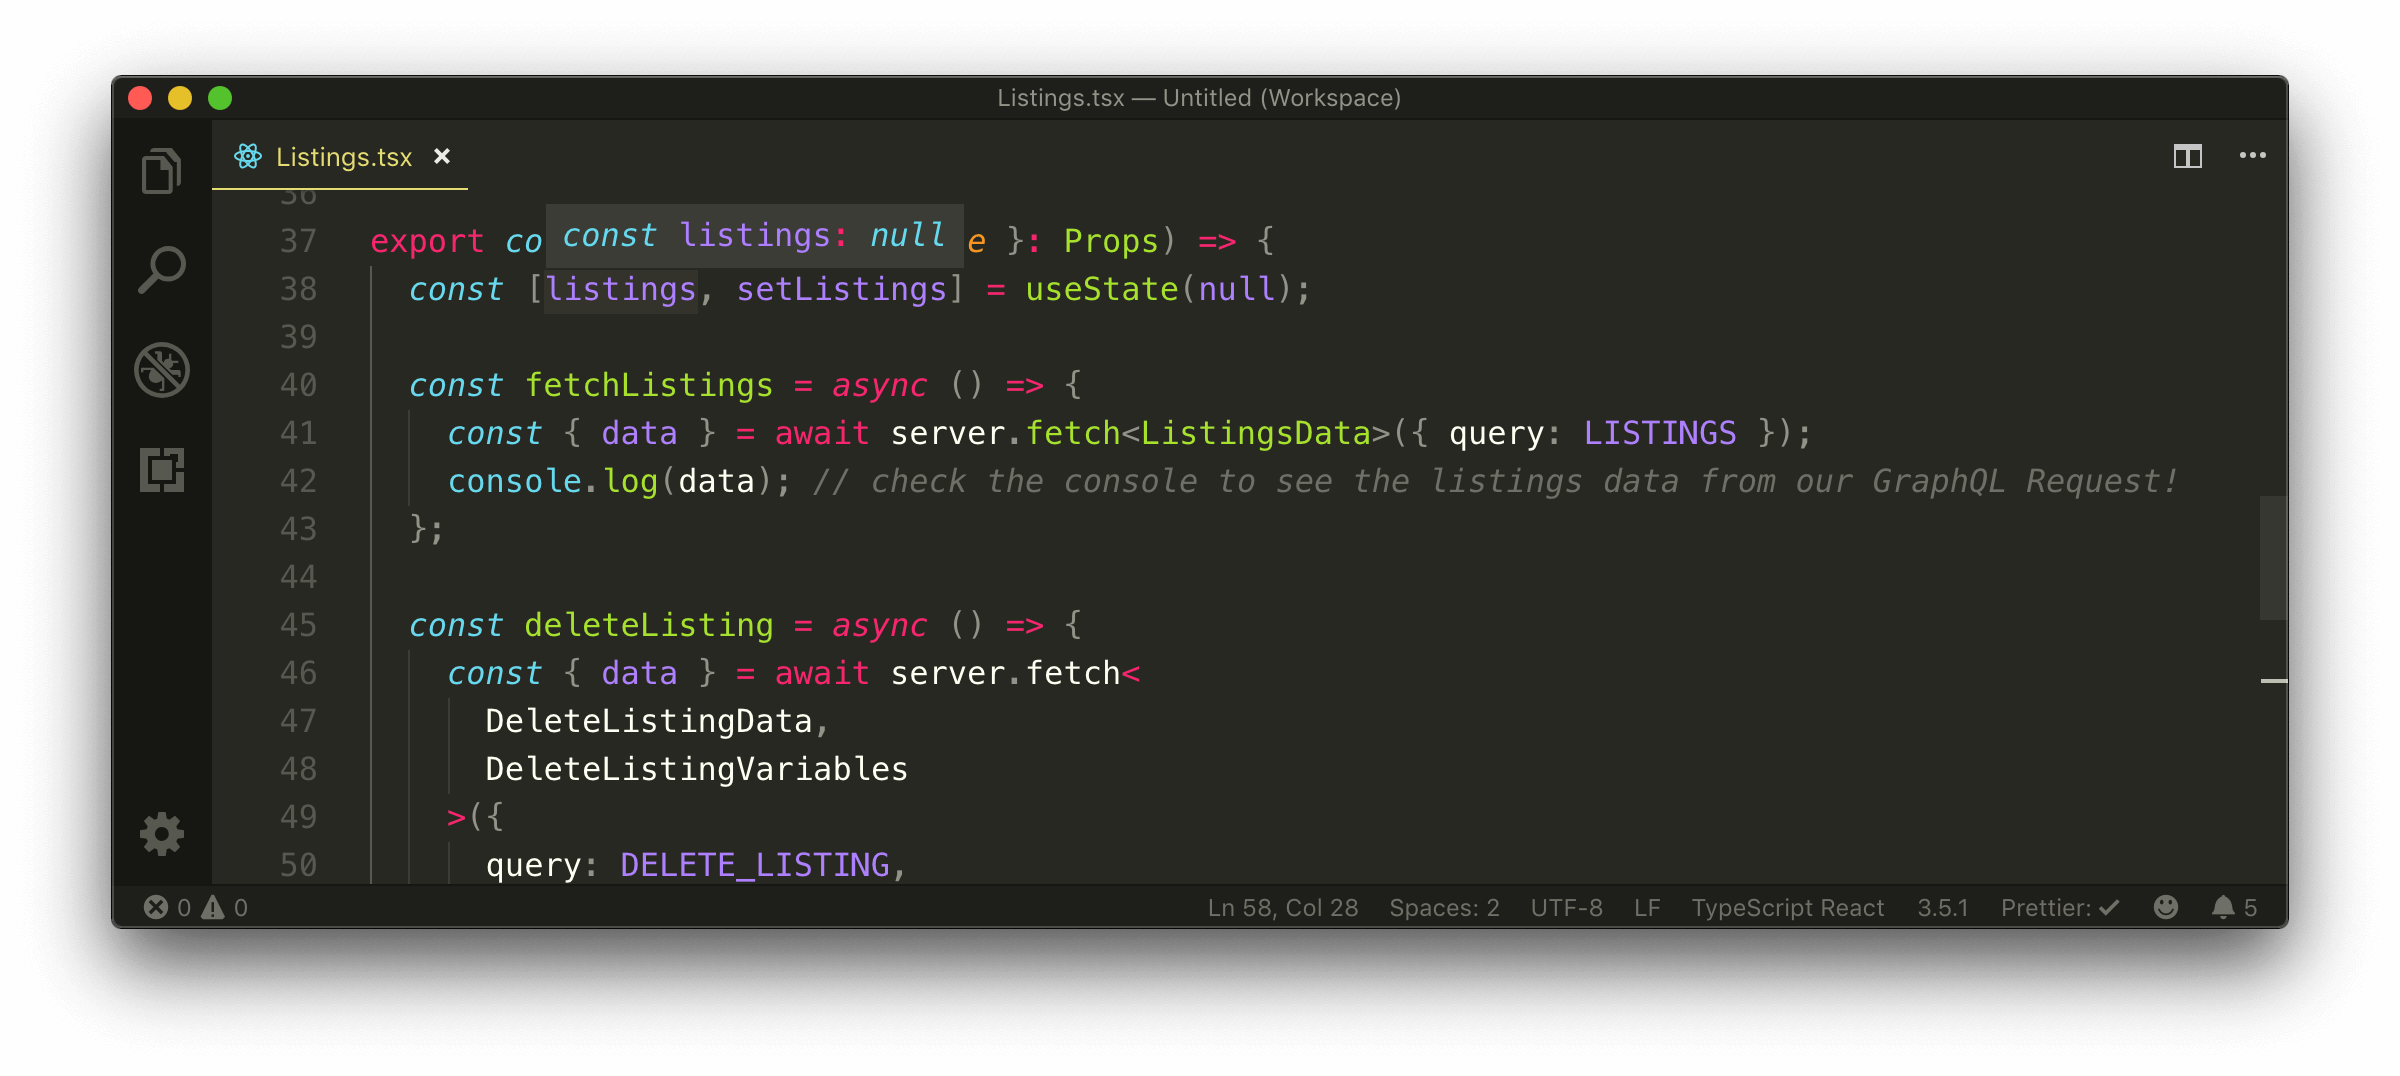
We’ll specify the useState Hook at the top of the Listings component and specify two values it will return - listings and setListings . Since we don’t have an idea of what the initial data of our state object is going to be, we’ll initialize it with null .
export const Listings = ({ title }: Props) => {
  const [listings, setListings] = useState(null);

  // ...
};
The useState Hook allows us to destructure two values.
- The first value is the state value we want to create. In our case, we’ve called the state value we’ve created
listings. - The second value is a function used to update the state value. In our case, we’ve called the function to update
listings-setListings().
The only argument that the useState Hook accepts is the initial value of the state value being created. We’ve initialized the listings value with null .
We’re destructuring the array useState gives us into two values - listings and setListings . The useState Hook is just a function that returns an array of two values. What we’ve written is equivalent to doing:
export const Listings = ({ title }: Props) => {
  const listingsAndSetListings = useState(null);
  const listings = listingsAndSetListings[0];
  const setListings = listingsAndSetListings[1];

  // ...
};
Instead of writing the above in three lines, we’re able to group the use of useState into a single line with array de-structuring, a feature introduced in ES6.
USESTATE AND THE LISTING TYPE
The useState Hook often does a good job in inferring the type of state data depending on the initial value provided. If we take a look at the listings state value at this moment in time, we can see that the TypeScript compiler recognizes the type of listings as null .
There’s an issue here. When we initialize our state values, we often initialize them with null or empty values. If we intend on using the listings value later in our component when it’s finally populated, TypeScript will emit a warning if we attempt to access a property from it or map through it because TypeScript recognizes the type of the listings value as null .
This is why the useState Hook accepts a type argument that allows us to specify the type of the value being created. In this case, we would want to specify the type of the listings state value is the array of the Listing type we’ve created in the Listings/types.ts file.
We’ll first export the Listing interface from the Listings/types.ts file.
client/src/sections/Listings/types.ts
export interface Listing {
  id: string;
  title: string;
  image: string;
  address: string;
  price: number;
  numOfGuests: number;
  numOfBeds: number;
  numOfBaths: number;
  rating: number;
}
And import the Listing interface type in the Listings.tsx component file.
client/src/sections/Listings/Listings.tsx
import {
  DeleteListingData,
  DeleteListingVariables,
  Listing,
  ListingsData
} from "./types";
We’ll then use the Listing interface type to state that the listings state value is to have a type of Listing[] . Since we’re initializing the listings state value with null , we’ll state the type of the listings state value as a union type of Listing[] | null . This will mean that the listings state value can either be of the Listing[] type or the null type.
export const Listings = ({ title }: Props) => {
  const [listings, setListings] = useState<Listing[] | null>(null);

  // ...
};
QUERY LISTINGS
We want to update the listings state value the moment our listings query is complete. In our component fetchListings() function, we’ll remove the console.log() and use the setListings() function from our Hook to update listings .
export const Listings = ({ title }: Props) => {
  const [listings, setListings] = useState<Listing[] | null>(null);

  const fetchListings = async () => {
    const { data } = await server.fetch<ListingsData>({
      query: LISTINGS
    });
    setListings(data.listings);
  };

  // ...
};
With our component state being updated when the query is complete, we can now attempt to display the listings data when available in our UI. Since the listings state value is to be an array of objects, we’ll use the JavaScript .map() function to render a simple list item for every data object in listings when available. We’ll assign this list to a const variable called listingsList .
export const Listings = ({ title }: Props) => {
  const [listings, setListings] = useState<Listing[] | null>(null);

  const fetchListings = async () => {
    const { data } = await server.fetch<ListingsData>({
      query: LISTINGS
    });
    setListings(data.listings);
  };

  // ...

  const listingsList = (
    <ul>
      {listings.map(listing => {
        return <li key={listing.id}>{listing.title}</li>;
      })}
    </ul>
  );
};
A
keyis specified to each rendered list item (with a value oflisting.id) to help React identify each item and keep track if one is to change, be removed, or added. You can find more details about Lists and Keys in the React documentation.
Right away, our editor will display an error saying listings might be null and it is when the component gets rendered for the first time. As a result, we should only map through the values when listings is available. When listings is null , we’ll set the listingsList const variable to null . We’ll use a ternary statement to achieve this.
export const Listings = ({ title }: Props) => {
  const [listings, setListings] = useState<Listing[] | null>(null);

  const fetchListings = async () => {
    const { data } = await server.fetch<ListingsData>({
      query: LISTINGS
    });
    setListings(data.listings);
  };

  // ...

  const listingsList = listings ? (
    <ul>
      {listings.map(listing => {
        return <li key={listing.id}>{listing.title}</li>;
      })}
    </ul>
  ) : null;

  // ...
};
We’ll now place the listingsList constant element right below the <h2>{title}</h2> element in the <Listings> component return statement.
export const Listings = ({ title }: Props) => {
  const [listings, setListings] = useState<Listing[] | null>(null);

  const fetchListings = async () => {
    const { data } = await server.fetch<ListingsData>({
      query: LISTINGS
    });
    setListings(data.listings);
  };

  // ...

  const listingsList = listings ? (
    <ul>
      {listings.map(listing => {
        return <li key={listing.id}>{listing.title}</li>;
      })}
    </ul>
  ) : null;

  return (
    <div>
      <h2>{title}</h2>
      {listingsList}
      <button onClick={fetchListings}>Query Listings!</button>
      <button onClick={deleteListing}>Delete a listing!</button>
    </div>
  );
};
Let’s try and see what we’ve done so far. We’ll make sure both the server and client apps are running.
server $: npm run start
client $: npm run start
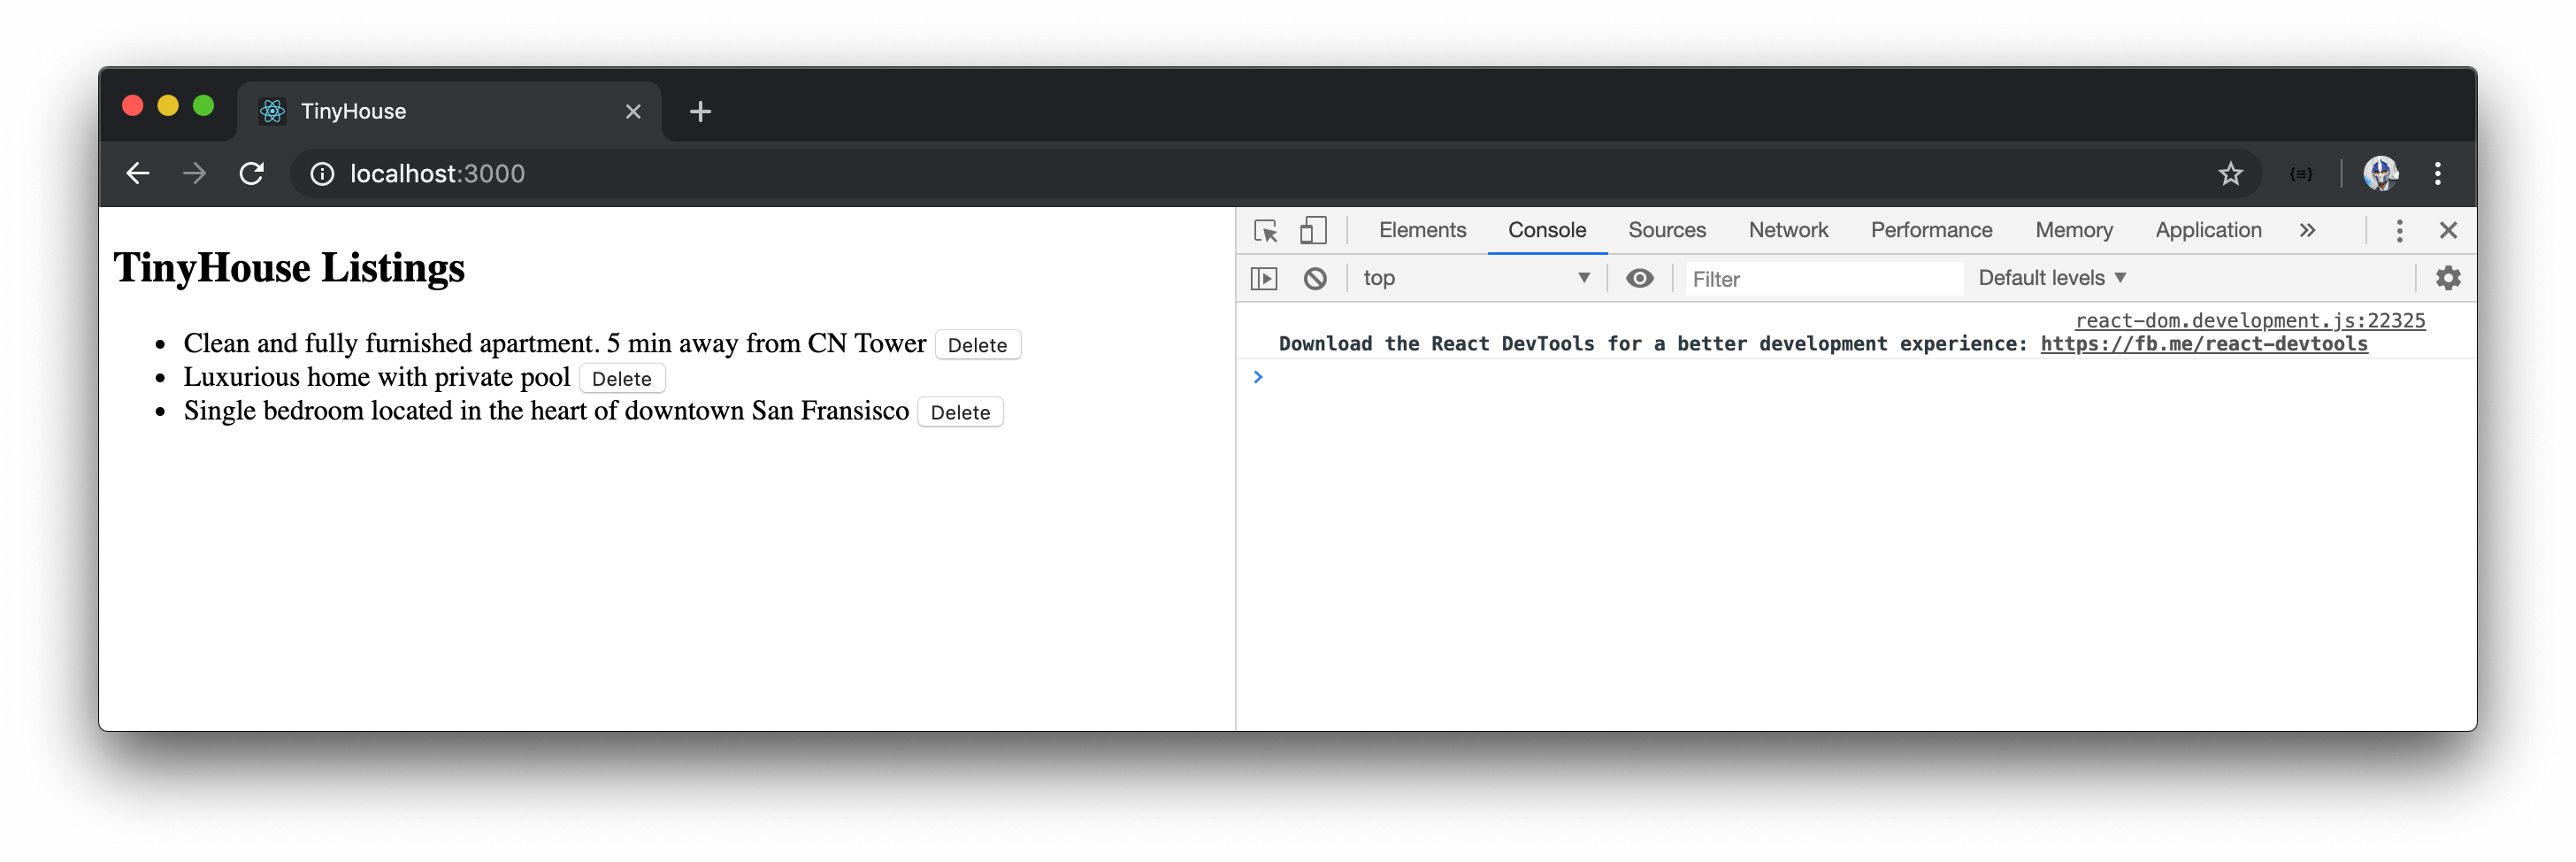
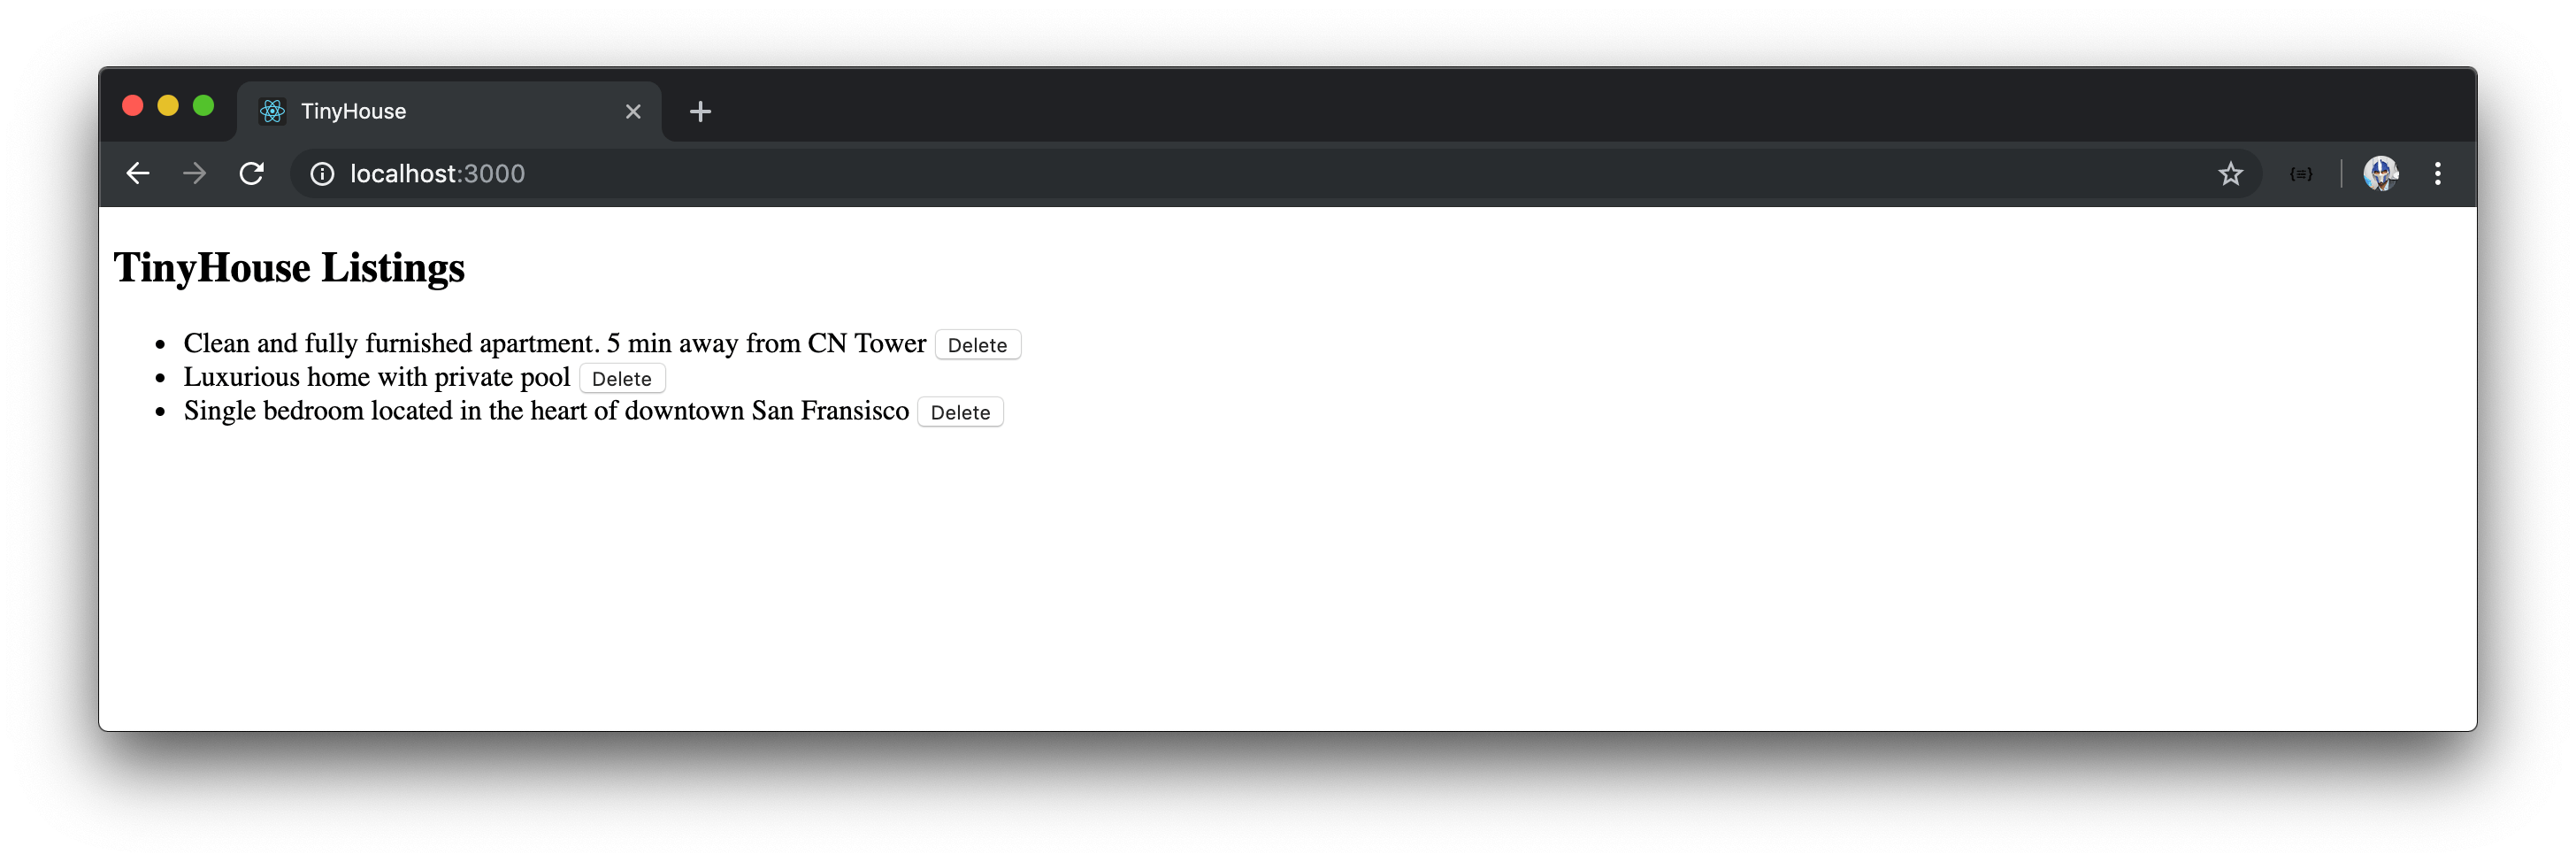
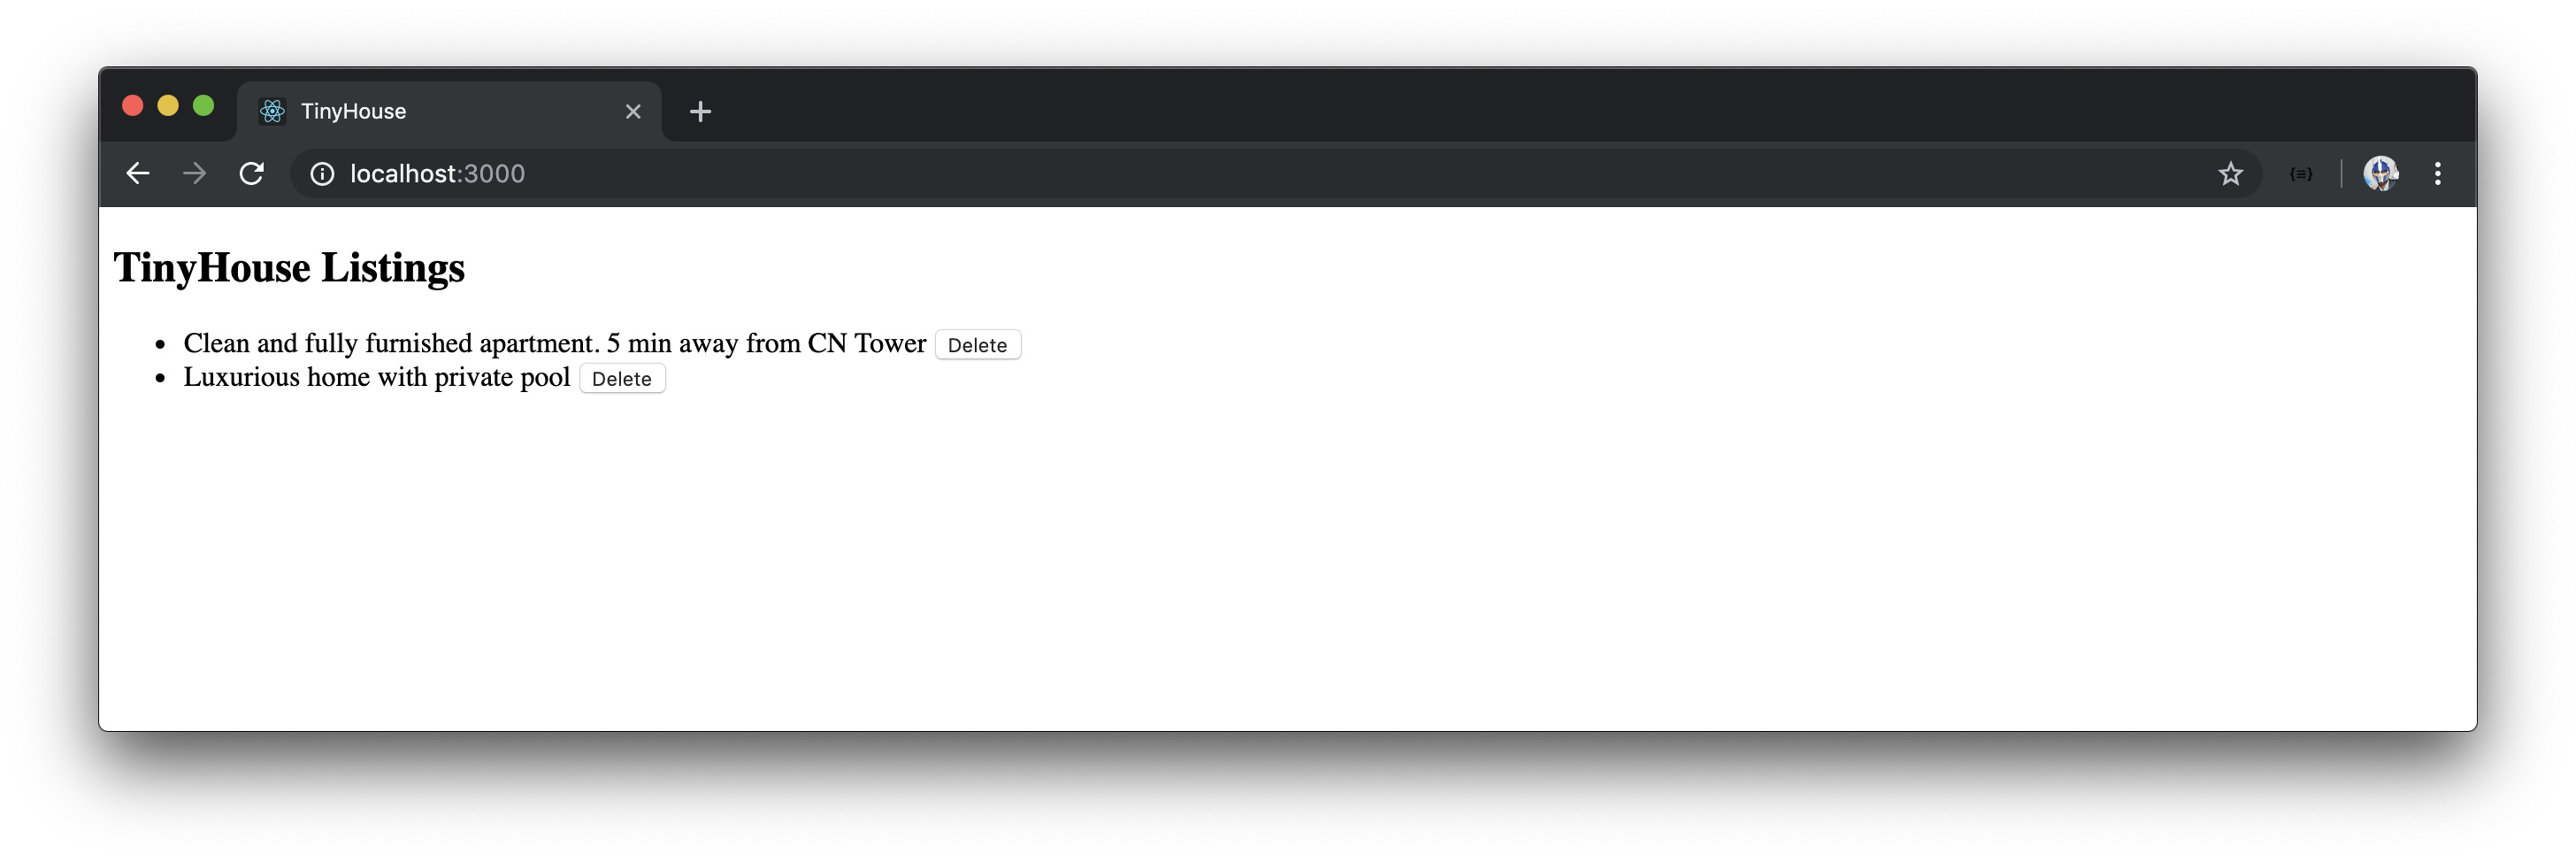
We’ll then launch our React app and click the button available to us to query listings. When the query is complete, we’re presented with a list of listing titles in our UI!

DELETE A LISTING
Since we’re able to display a list of listings in our UI, we can now try to attach the deleteListing() component function to every rendered list item node and allow the user to select which listing they’d want to delete.
We’ll first declare that the component deleteListing() function should accept an id argument, of type string , and pass it as the id variable for our server.fetch() function. We’ll also remove the console.log() message at the end of our deleteListing() function. Since we don’t need data here, we’ll also remove the de-structuring portion as where we destruct the data from our mutation result. deleteListing() will be responsible in simply calling the server.fetch() function to delete a listing.
export const Listings = ({ title }: Props) => {
  const [listings, setListings] = useState<Listing[] | null>(null);

  // ...

  const deleteListing = async (id: string) => {
    await server.fetch<DeleteListingData, DeleteListingVariables>({
      query: DELETE_LISTING,
      variables: {
        id
      }
    });
  };

  // ...
};
For every rendered list item, we’ll introduce a button that has a click event listener that’ll trigger the deleteListing() function and pass in the id of the list item node. We’ll also remove the additional button that was geared to deleting a listing with a hard-coded id in our component return statement.
export const Listings = ({ title }: Props) => {
  const [listings, setListings] = useState<Listing[] | null>(null);

  // ...

  const deleteListing = async (id: string) => {
    await server.fetch<DeleteListingData, DeleteListingVariables>({
      query: DELETE_LISTING,
      variables: {
        id
      }
    });
  };

  const listingsList = listings ? (
    <ul>
      {listings.map(listing => {
        return (
          <li key={listing.id}>
            {listing.title}{" "}
            <button onClick={() => deleteListing(listing.id)}>Delete</button>
          </li>
        );
      })}
    </ul>
  ) : null;

  return (
    <div>
      <h2>{title}</h2>
      {listingsList}
      <button onClick={fetchListings}>Query Listings!</button>
    </div>
  );
};
When we now delete a listing, our mutation should be successful and we’d expect our UI to update and show the change. But that doesn’t happen. We’re only able to see the updated UI when we query the listings again by refreshing the page. This makes sense since when the mutation is complete, our listings state value remains unchanged and keeps its original state object.
We could directly manipulate the listings state value after the deleteListing mutation is complete. A potentially simpler approach is to refetch the listings query after a listing has been deleted and have our listings state object be updated for the new listings data. We can do this by simply calling the fetchListings() function right at the end of the component deleteListing() function.
Our Listings.tsx file in its complete state will look like the following:
client/src/sections/Listings/Listings.tsx
import React, { useState } from "react";
import { server } from "../../lib/api";
import {
  DeleteListingData,
  DeleteListingVariables,
  Listing,
  ListingsData
} from "./types";

const LISTINGS = `
  query Listings {
    listings {
      id
      title
      image
      address
      price
      numOfGuests
      numOfBeds
      numOfBaths
      rating
    }
  }
`;

const DELETE_LISTING = `
  mutation DeleteListing($id: ID!) {
    deleteListing(id: $id) {
      id
    }
  }
`;

interface Props {
  title: string;
}

export const Listings = ({ title }: Props) => {
  const [listings, setListings] = useState<Listing[] | null>(null);

  const fetchListings = async () => {
    const { data } = await server.fetch<ListingsData>({ query: LISTINGS });
    setListings(data.listings);
  };

  const deleteListing = async (id: string) => {
    await server.fetch<DeleteListingData, DeleteListingVariables>({
      query: DELETE_LISTING,
      variables: {
        id
      }
    });
    fetchListings();
  };

  const listingsList = listings ? (
    <ul>
      {listings.map(listing => {
        return (
          <li key={listing.id}>
            {listing.title}{" "}
            <button onClick={() => deleteListing(listing.id)}>Delete</button>
          </li>
        );
      })}
    </ul>
  ) : null;

  return (
    <div>
      <h2>{title}</h2>
      {listingsList}
      <button onClick={fetchListings}>Query Listings!</button>
    </div>
  );
};
With the list of listing titles available to us, we’ll be able to delete the listing we want by clicking the 'Delete' button to the right of a certain listing title.
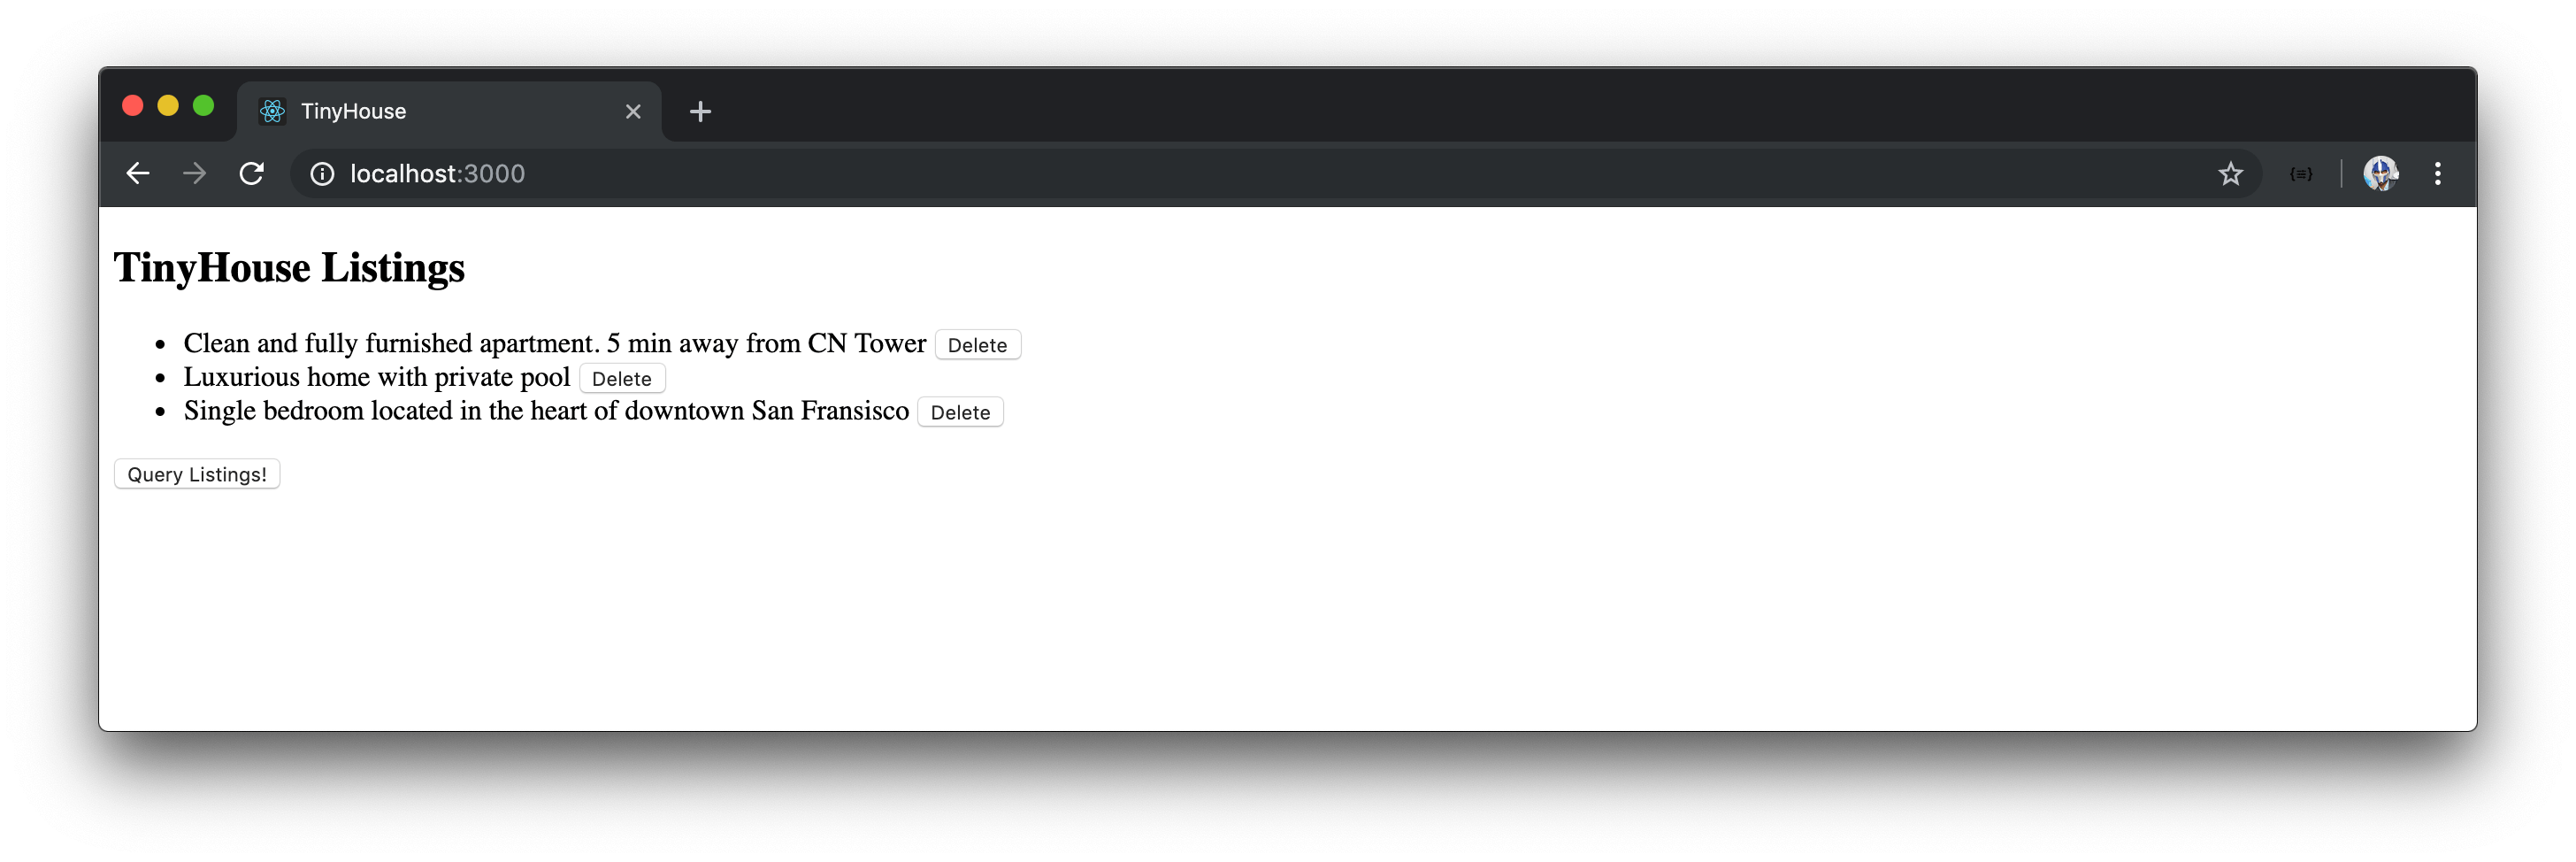
When we delete a listing in our list - the listings query is refetched, the listings state value is updated, and our UI is re-rendered to show the new state of the app.
THE USEEFFECT HOOK
In the last lesson, we observed how the useState Hook helped keep track of the listings data fetched from our query as component state. As a result, we were able to present the listings state data in the UI. We also managed to have the listings query be refetched at any time the user deletes a listing.
To be able to query all the listings from the API, we attached a click listener that called our server.fetch() function to make the request. In a lot of applications we use day-to-day, queries and the display of data is often made at the moment a page is being rendered. In the context of our <Listings> component, we’ll want our initial query to be made when the <Listings> component is being rendered for the first time . To help us achieve this, we’ll use another very commonly used React Hook - the useEffect Hook.
USEEFFECT
The useEffect Hook allows us to perform side effects in our function components. Side effects are essentially anything where we want an “imperative” action to happen. API calls, updating the DOM, subscribing to event listeners - these are all side effects that we might like a component to undergo at different times.
The useEffect Hook is sometimes a little harder to grasp than the useState Hook so we’ll spend some time explaining it in a little more detail.
We’ll import the useEffect Hook from react in the Listings.tsx component file:
client/src/sections/Listings/Listings.tsx
import React, { useState, useEffect } from "react";
Just like how we’ve set up the useState Hook at the top level of the <Listings> component, we’ll do the same for the useEffect Hook as well. We’ll declare the useEffect right after our useState Hook.
export const Listings = ({ title }: Props) => {
  const [listings, setListings] = useState(null);

  useEffect();

  // ...
};
CALLBACK FUNCTION
The useEffect Hook doesn’t return any values but instead takes two arguments. The first being required and the second optional. The first argument is the effect callback function we want the Hook to run (i.e. the effect itself). To get us started, let’s place a console.log() message within the effect callback.
export const Listings = ({ title }: Props) => {
  const [listings, setListings] = useState(null);

  useEffect(() => {
    console.log("Effect has run!");
  });

  // ...
};
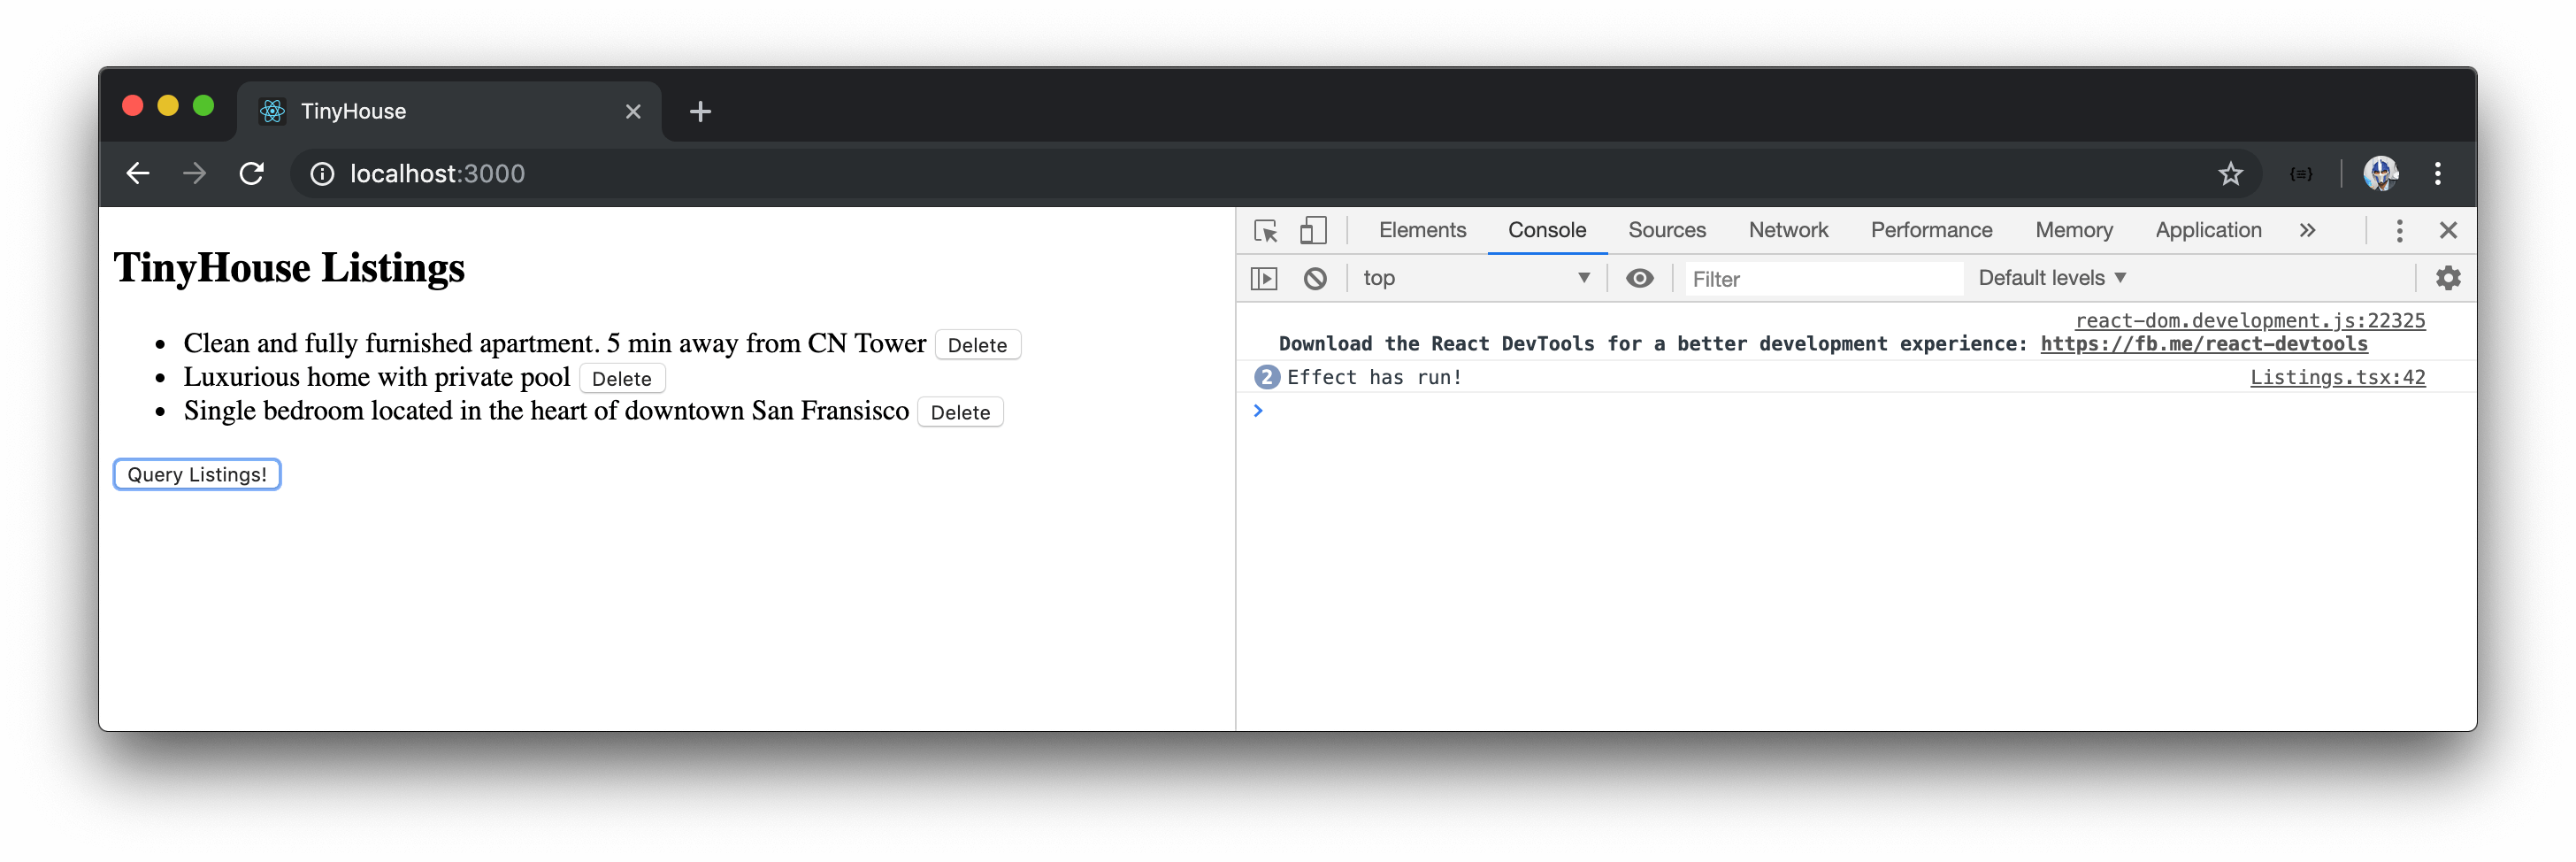
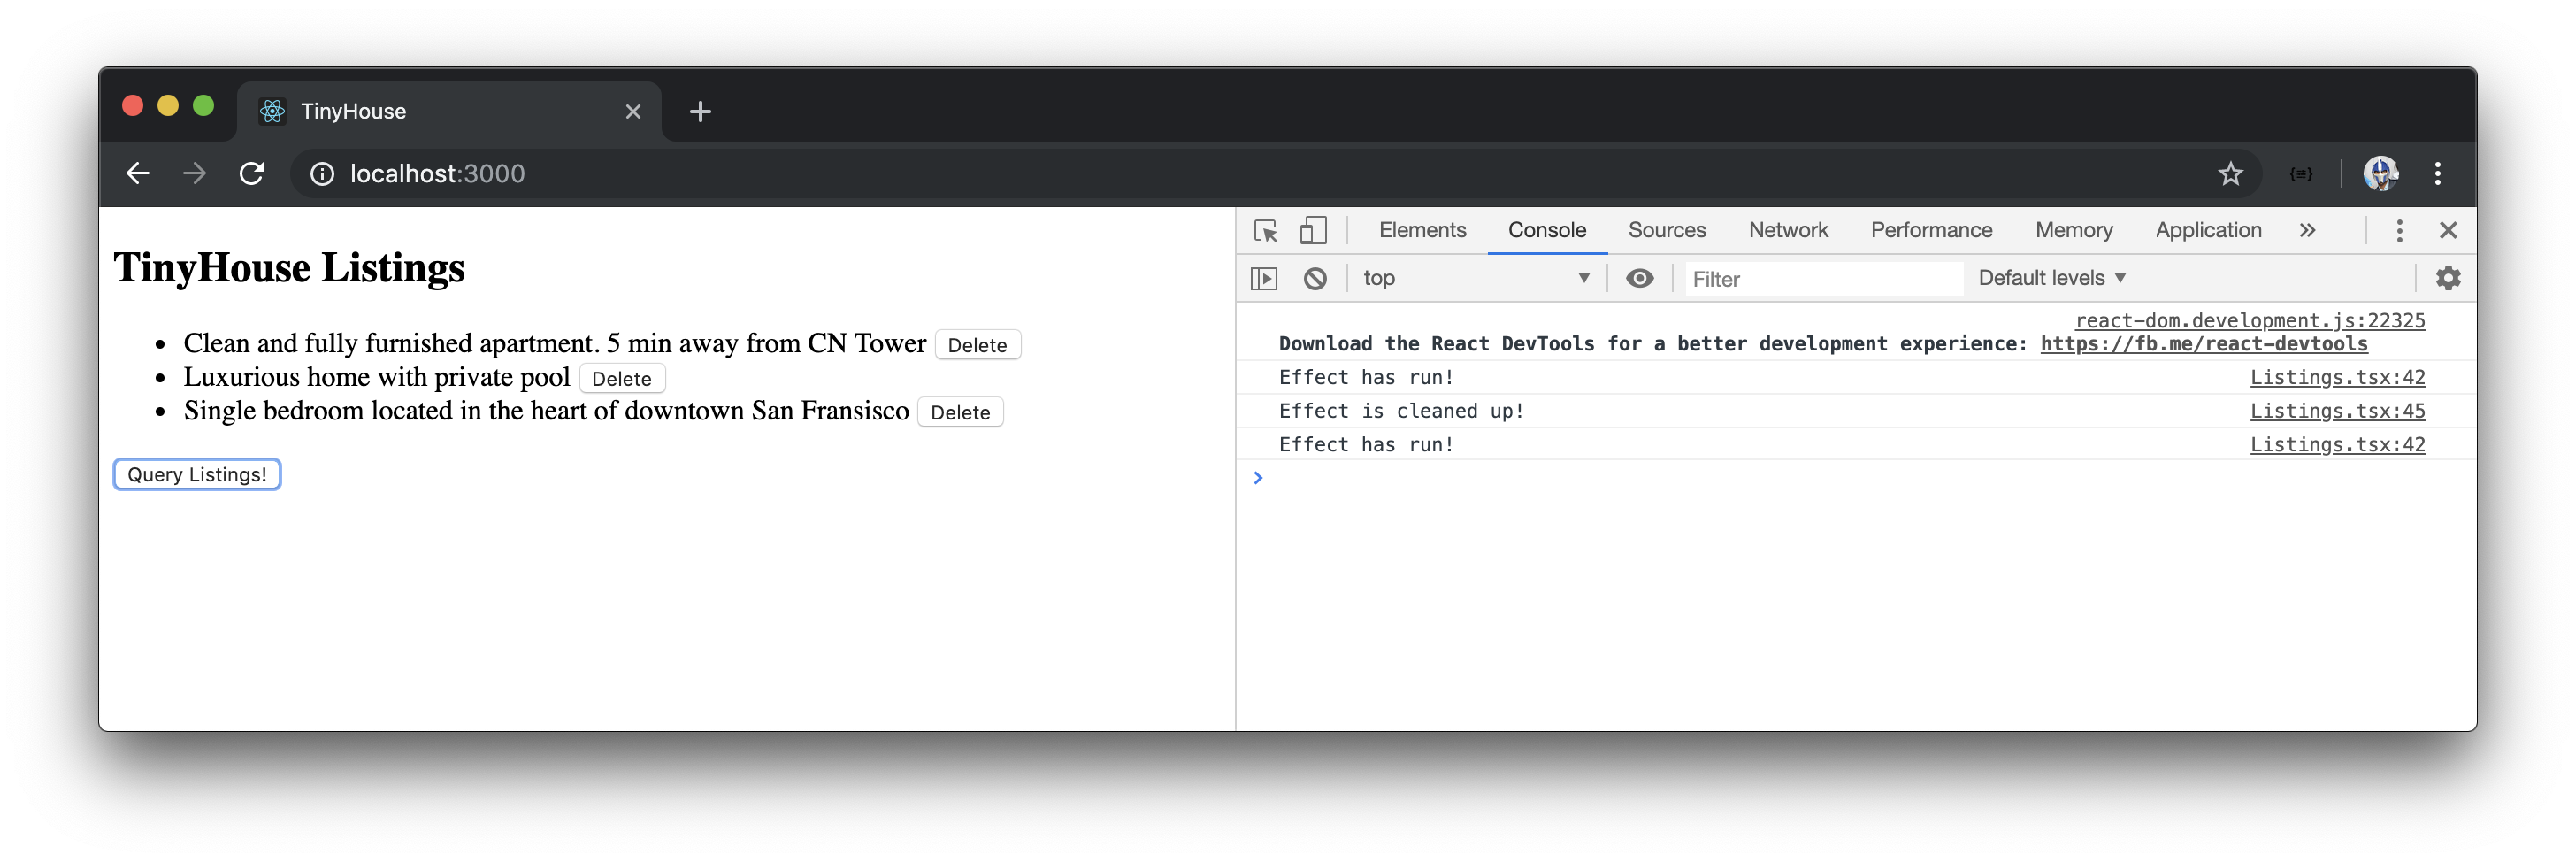
By default, the effect stated in a useEffect Hook runs when the component first renders and after every update . If we run our application right now, we’ll notice the console.log() message is generated as our component is rendered. To determine when the component updates, we can hit the 'Query Listings' button and notice the console message be generated practically every time the component is being updated.
DEPENDENCY LIST
The second argument of the useEffect Hook is optional and is a dependency list which allows us to tell React to skip applying the effect only until in certain conditions. In other words, the second argument of the useEffect Hook allows us to limit when the effect is to be run . If we simply place a blank empty array as the second argument, this is how we tell React to only run the effect on initial render.
export const Listings = ({ title }: Props) => {
  const [listings, setListings] = useState(null);

  useEffect(() => {
    console.log("Effect has run!");
  }, []);

  // ...
};
If we launched our app, we’ll notice the console message only be generated when the component first mounts.

Instead of having our effect run once in the beginning and on every update, we can attempt to restrict the effect to run only in the beginning and when the component updates in a specific fashion. The component simply updating is a broad term - the component can update due when a certain state value changes, when its parent gets rerendered causing children components to re-render as well, etc. With the useEffect Hooks dependency list, we can fine-tune to which values the Hook should depend on to run the effect.
In our case, let’s say we want to fire off a console message when the component update depends on the listings state value getting updated. We’ll specify the listings value as a dependency in our useEffect Hook.
export const Listings = ({ title }: Props) => {
  const [listings, setListings] = useState(null);

  useEffect(() => {
    console.log("Effect has run!");
  }, [listings]);

  // ...
};
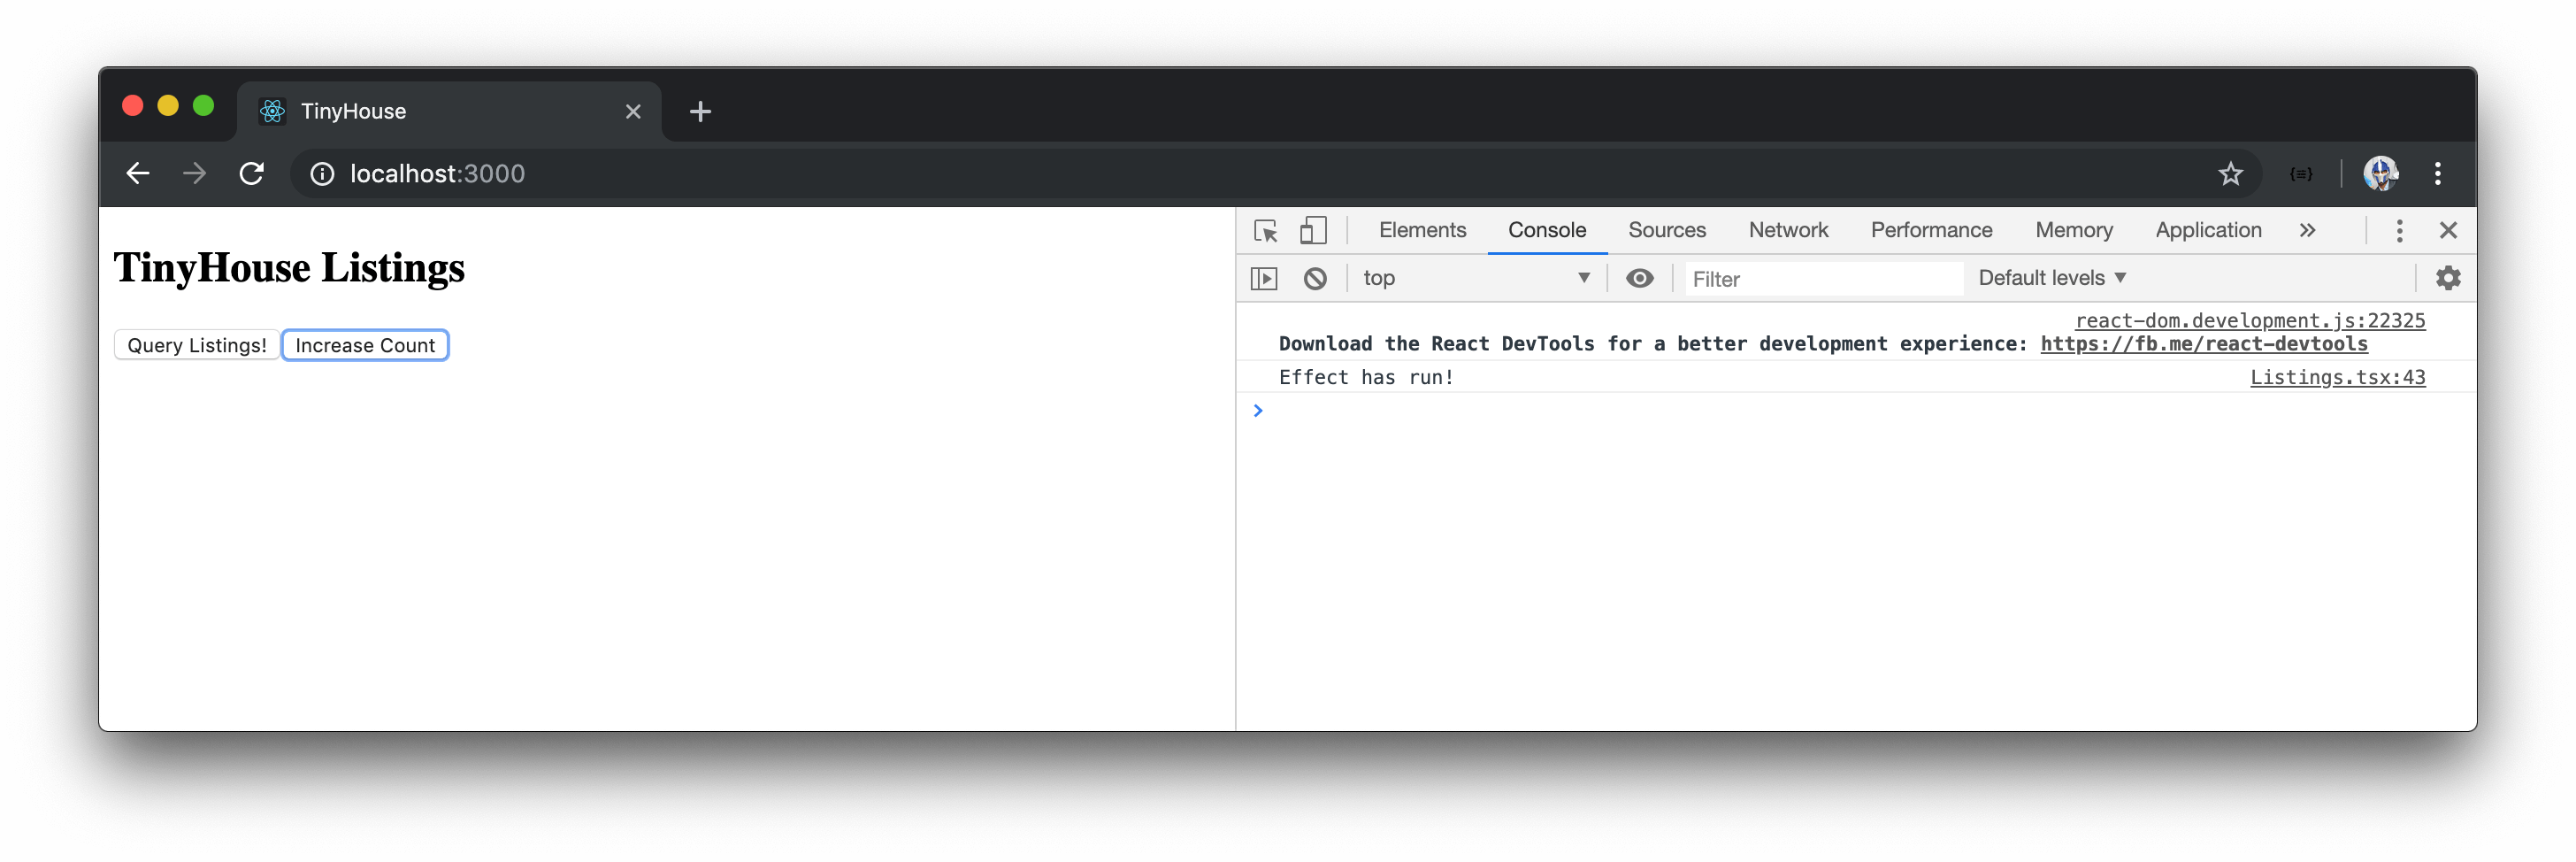
Assume we were to create a new state number property called count , initialize it with 0 , and create a click event handler that increments the state count property.
export const Listings = ({ title }: Props) => {
  const [listings, setListings] = useState(null);
  const [count, setCount] = useState(0);

  useEffect(() => {
    console.log("Effect has run!");
  }, [listings]);

  // ...

  return (
    <div>
      <h2>{title}</h2>
      {listingsList}
      <button onClick={fetchListings}>Query Listings!</button>
      <button onClick={() => setCount(count + 1)}>Increase Count</button>
    </div>
  );
};
We’ll notice our effect callback doesn’t run when the count state property changes. It runs on update only when the listings value changes.
If we want the effect to run on both change in listings and count , we can add the count state value to the dependencies list as well.
export const Listings = ({ title }: Props) => {
  const [listings, setListings] = useState(null);
  const [count, setCount] = useState(0);

  useEffect(() => {
    console.log("Effect has run!");
  }, [listings, count]);

  // ...
};
We’ll remove the initialization and use of the count state value.
EFFECT CLEANUP
The effect callback gets run every time on initial render and when we’ve specified when an effect should run. The useEffect Hook also provides the ability to run a cleanup after the effect. This can be done by specifying a return function at the end of our effect.
export const Listings = ({ title }: Props) => {
  const [listings, setListings] = useState(null);

  useEffect(() => {
    console.log("Effect has run!");

    return () => {
      console.log("Effect is cleaned up!");
    };
  }, [listings]);

  // ...
};
If we head to the UI, we can observe when this cleanup is run. Essentially, we can see that the cleanup function is run before running the intended effect the next time. In addition, if our component ever un-mounts - the cleanup function will run as well.
A good example of when we might need a cleanup is when we set up a subscription in our effect but want to remove the subscription whenever the next subscription call is to be made, to avoid memory leaks.
USEEFFECT TO FETCH LISTINGS
We’ve gathered enough information on the useEffect Hook to perform what we intend to achieve. We’re interested in fetching the listings from our GraphQL API the moment our component is rendered. We know that we can have an effect only run if we specify an empty array in the dependencies list. In our <Listings> component, we’ll set up a useEffect Hook with an empty dependency list and call the fetchListings() function right within our effect callback. The fetchListings() function will be responsible for making our query and updating the listings state of our component.
Since we’ll be able to render our list on mount, we’ll remove the onClick handler we had before that allowed us to make our query upon the click of a button.
Our Listings.tsx component will now look like the following:
client/src/sections/Listings/Listings.tsx
import React, { useState, useEffect } from "react";
import { server } from "../../lib/api";
import {
  DeleteListingData,
  DeleteListingVariables,
  Listing,
  ListingsData
} from "./types";

const LISTINGS = `
  query Listings {
    listings {
      id
      title
      image
      address
      price
      numOfGuests
      numOfBeds
      numOfBaths
      rating
    }
  }
`;

const DELETE_LISTING = `
  mutation DeleteListing($id: ID!) {
    deleteListing(id: $id) {
      id
    }
  }
`;

interface Props {
  title: string;
}

export const Listings = ({ title }: Props) => {
  const [listings, setListings] = useState<Listing[] | null>(null);

  useEffect(() => {
    fetchListings();
  }, []);

  const fetchListings = async () => {
    const { data } = await server.fetch<ListingsData>({ query: LISTINGS });
    setListings(data.listings);
  };

  const deleteListing = async (id: string) => {
    await server.fetch<DeleteListingData, DeleteListingVariables>({
      query: DELETE_LISTING,
      variables: {
        id
      }
    });
    fetchListings();
  };

  const listingsList = listings ? (
    <ul>
      {listings.map(listing => {
        return (
          <li key={listing.id}>
            {listing.title}{" "}
            <button onClick={() => deleteListing(listing.id)}>Delete</button>
          </li>
        );
      })}
    </ul>
  ) : null;

  return (
    <div>
      <h2>{title}</h2>
      {listingsList}
    </div>
  );
};
Our listings list is now shown the moment our component is rendered!
As a best practice, it’s recommended to have functions that are used within the
useEffectHook to be declared inside of the effect itself. This is most important when the function used in the effect depends on component props or state (with which thefetchListings()function doesn’t).We’ll discuss this point further at the end of this lesson and in the next few lessons. For now, we’ll keep the instantiation of the
fetchListings()function outside of the effect since we also use it in the componentdeleteListing()function.
USEEFFECT AND MISSING DEPENDENCIES
There’s one important point we’ll make before we close this lesson. If an effect depends on a component value that’s prone to change (for example props or state ) and that value is not defined in the effect’s dependencies list - this can be a source of bugs.
For example, assume we wanted to run an effect and display a console message when the listings state value gets populated or updated.
export const Listings = ({ title }: Props) => {
  const [listings, setListings] = useState(null);

  useEffect(() => {
    fetchListings();

    if (listings && listings.length) {
      console.log("Listings Exist!");
    }
  }, []);

  // ...
};
In the above case, our VSCode editor will warn us by telling us to either include the missing dependency ( listings ) or remove the dependency array completely.
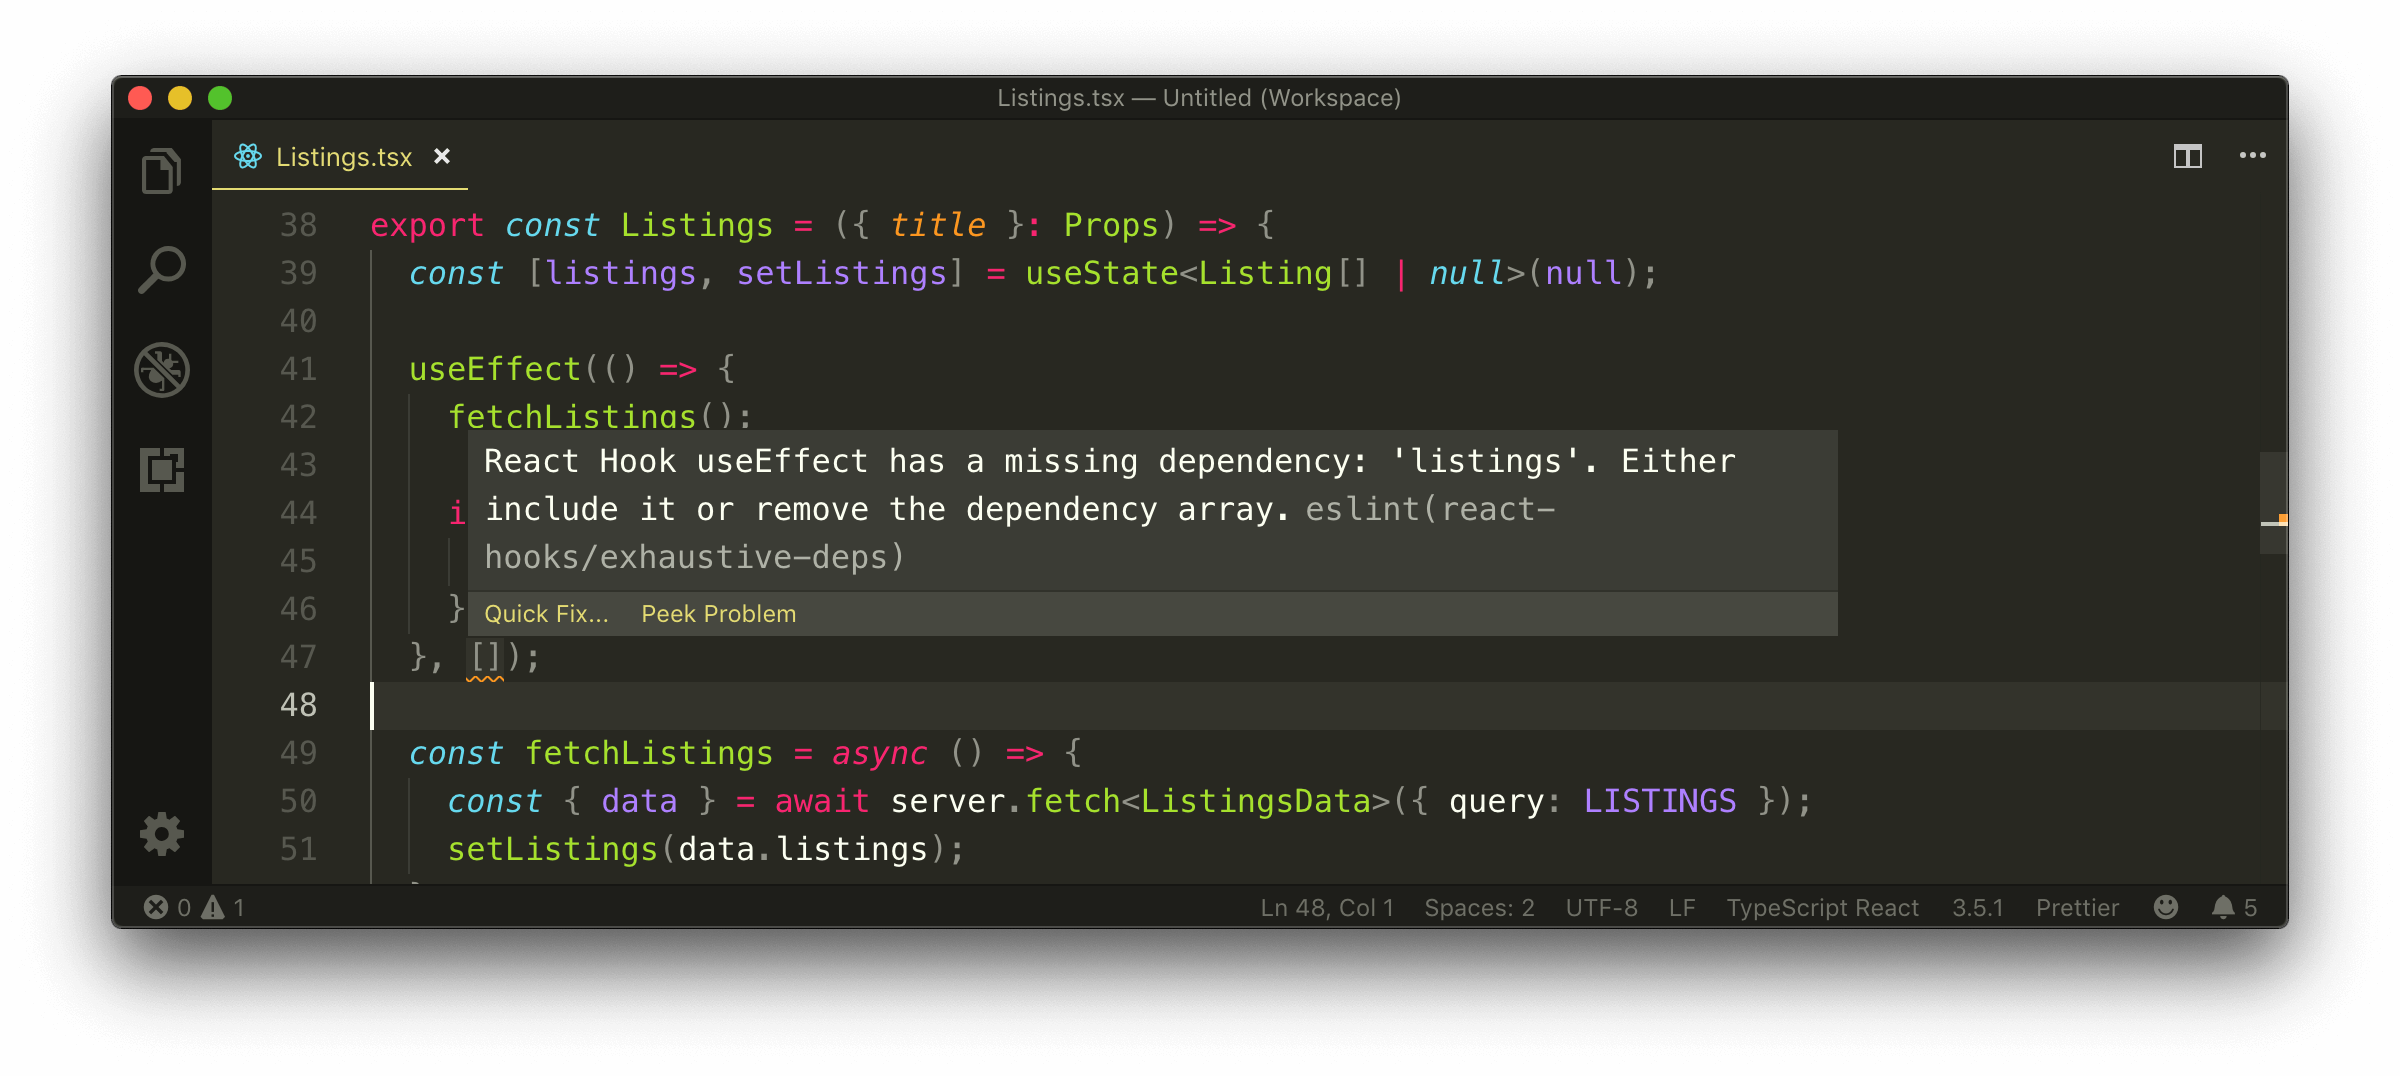
The lint warning check comes from the
react-hooks/exhaustive-depsESLint rule that is introduced with everycreate-react-appgenerated application.
Why is using a dependency not declared in the dependencies list of the useEffect an issue? Because by not specifying a dependency that’s being used in the effect, we risk our effect function potentially depending on stale values from previous renders. It’s hard to pinpoint when something like this can happen but if it does, it could lead to some difficult to change bugs. This is also a reason why React recommends the moving of all functions that are used in the Hook within the Hook itself, to help better survey the dependencies that function may depend on.
Each render cycle of a React component has its own version of
propsandstate. Effects always observe thepropsandstatefrom the render they were defined in. By declaring all the dependencies that are to be used in an effect within the dependencies list, we ensure that an effect is re-run when a change in dependency is made and the effect can reference the new updated dependency value.Dan Abramov (of the React core team) has a fantastic blog post labeled A Complete Guide to useEffect where he discusses this topic in detail.
CUSTOM USEQUERY HOOK
React’s useEffect Hook helped us achieve the desired result of displaying listings information the moment our <Listings> component mounts.
The pattern of creating a state property, using the useEffect Hook, and running the server.fetch() function to make our query on mount will be replicated for every component that might want to fetch data the moment the component mounts. We can create a custom Hook that will help consolidate this pattern for all components.
Custom Hooks in React allows us to share logic between components and with best practice should have the use keyword in its name. Custom Hooks can also call other Hooks as well!
Gameplan
Let’s walk through how we’ll want our custom Hook to behave. We’ll label this Hook the useQuery Hook and we’ll look to declare it at the top level of a component like so:
export const Listings = ({ title }: Props) => {
  useQuery();
};
Since the query of our application doesn’t have any variables, our useQuery Hook will accept a single argument here - the GraphQL query that we’d want to make.
export const Listings = ({ title }: Props) => {
  useQuery(LISTINGS);
};
The Hook will return an object, where we’ll be able to destruct the data from and use in our component:
export const Listings = ({ title }: Props) => {
  const { data } = useQuery(LISTINGS);
};
Just like we’ve done already, we’ll make our Hook accept a type variable to help type define the data being returned:
export const Listings = ({ title }: Props) => {
  const { data } = useQuery<ListingsData>(LISTINGS);
};
That would be all a component will need to do. The Hook will take care of tracking a state property, how the server.fetch() function is called and when it should be called (i.e when the component mounts).
USEQUERY HOOK
Now with an idea of what we intend to do, we’ll create this Hook in a file named useQuery.ts that is to be kept in the existing src/lib/api/ folder.
src/
  lib/
    api/
      index.ts
      server.ts
      useQuery.ts
  // ...
In the useQuery.ts file, we’ll export a function constant called useQuery that accepts a type variable labeled TData which we’ll give a default value of any . The function itself will accept a query parameter argument of type string .
export const useQuery = <TData = any>(query: string) => {};
useState
We’ve used the useState Hook before to maintain the query data kept in the component for it to be presented in the UI. We’ll use the useState Hook similarly to keep track of the data to be returned from the query for us to then return at the end of our Hook.
We’ll also use the useEffect Hook to help run the effect of making the API call when a component is rendered.
Let’s import the useState and useEffect Hooks from React.
import { useState, useEffect } from "react";

export const useQuery = <TData = any>(query: string) => {};
At the beginning of our custom Hook, we’ll look to use the useState Hook to create a state object that will contain the data from our API call. Before we initialize this state property, we’ll describe the shape that it expects to have in an interface called State .
import { useState, useEffect } from "react";

interface State {}

export const useQuery = <TData = any>(query: string) => {};
The State interface will contain the data object that will be returned from our API call. The shape of data will be from a type variable the interface will accept and be passed from the useQuery Hook function. We’ll label the type variable the State interface is to accept as TData as well.
import { useState, useEffect } from "react";

interface State<TData> {
  data: TData;
}

export const useQuery = <TData = any>(query: string) => {};
The shape of data will only be what the TData type variable is after our API call has been made complete. Therefore we’ll state that data is a union type such that data can also be null (which will be the time before the API call has been made).
import { useState, useEffect } from "react";

interface State<TData> {
  data: TData | null;
}

export const useQuery = <TData = any>(query: string) => {};
With the shape of state in mind, let’s use the useState Hook and initialize this state object. We’ll label the state property state and the function setter as setState . We’ll pass in the State interface as the expected type variable of the useState Hook, and we’ll initialize our state data object as null .
import { useState, useEffect } from "react";

interface State<TData> {
  data: TData | null;
}

export const useQuery = <TData = any>(query: string) => {
  const [state, setState] = useState<State<TData>>({
    data: null
  });
};
useEffect
To make our API call, we’ll use the server.fetch() function we’ve already created. As a result, we’ll import the server object in our useQuery.ts file from the src/lib/api/server.ts file.
import { useState, useEffect } from "react";
import { server } from "./server";

interface State<TData> {
  data: TData | null;
}

export const useQuery = <TData = any>(query: string) => {
  const [state, setState] = useState<State<TData>>({
    data: null
  });
};
We’ll now construct the server.fetch() function and specify we’d want it to run in a useEffect Hook. We’ll follow the recommended pattern of having functions used in an effect declared within the effect callback.
We’ll set up the useEffect Hook, and define an asynchronous function within the effect callback that we’ll label fetchApi() .
import { useState, useEffect } from "react";
import { server } from "./server";

interface State<TData> {
  data: TData | null;
}

export const useQuery = <TData = any>(query: string) => {
  const [state, setState] = useState<State<TData>>({
    data: null
  });

  useEffect(() => {
    const fetchApi = async () => {};
  });
};
The fetchApi() function will be responsible for making the API request by running the server.fetch() function. As we run server.fetch() , we’ll pass in the query payload it expects and a type variable of the data that is to be returned. We’ll retrieve the data from the request and update the state property created in our Hook.
import { useState, useEffect } from "react";
import { server } from "./server";

interface State<TData> {
  data: TData | null;
}

export const useQuery = <TData = any>(query: string) => {
  const [state, setState] = useState<State<TData>>({
    data: null
  });

  useEffect(() => {
    const fetchApi = async () => {
      const { data } = await server.fetch<TData>({ query });
      setState({ data });
    };
  });
};
When we update state, we’re updating an object that contains the
dataobject.
With the fetchApi() function declared, we want to run this function only when a component first mounts. We’ll achieve this by running the function in the effect callback and specifying an empty array in the effect’s dependencies list.
import { useState, useEffect } from "react";
import { server } from "./server";

interface State<TData> {
  data: TData | null;
}

export const useQuery = <TData = any>(query: string) => {
  const [state, setState] = useState<State<TData>>({
    data: null
  });

  useEffect(() => {
    const fetchApi = async () => {
      const { data } = await server.fetch<TData>({ query });
      setState({ data });
    };

    fetchApi();
  }, []);
};
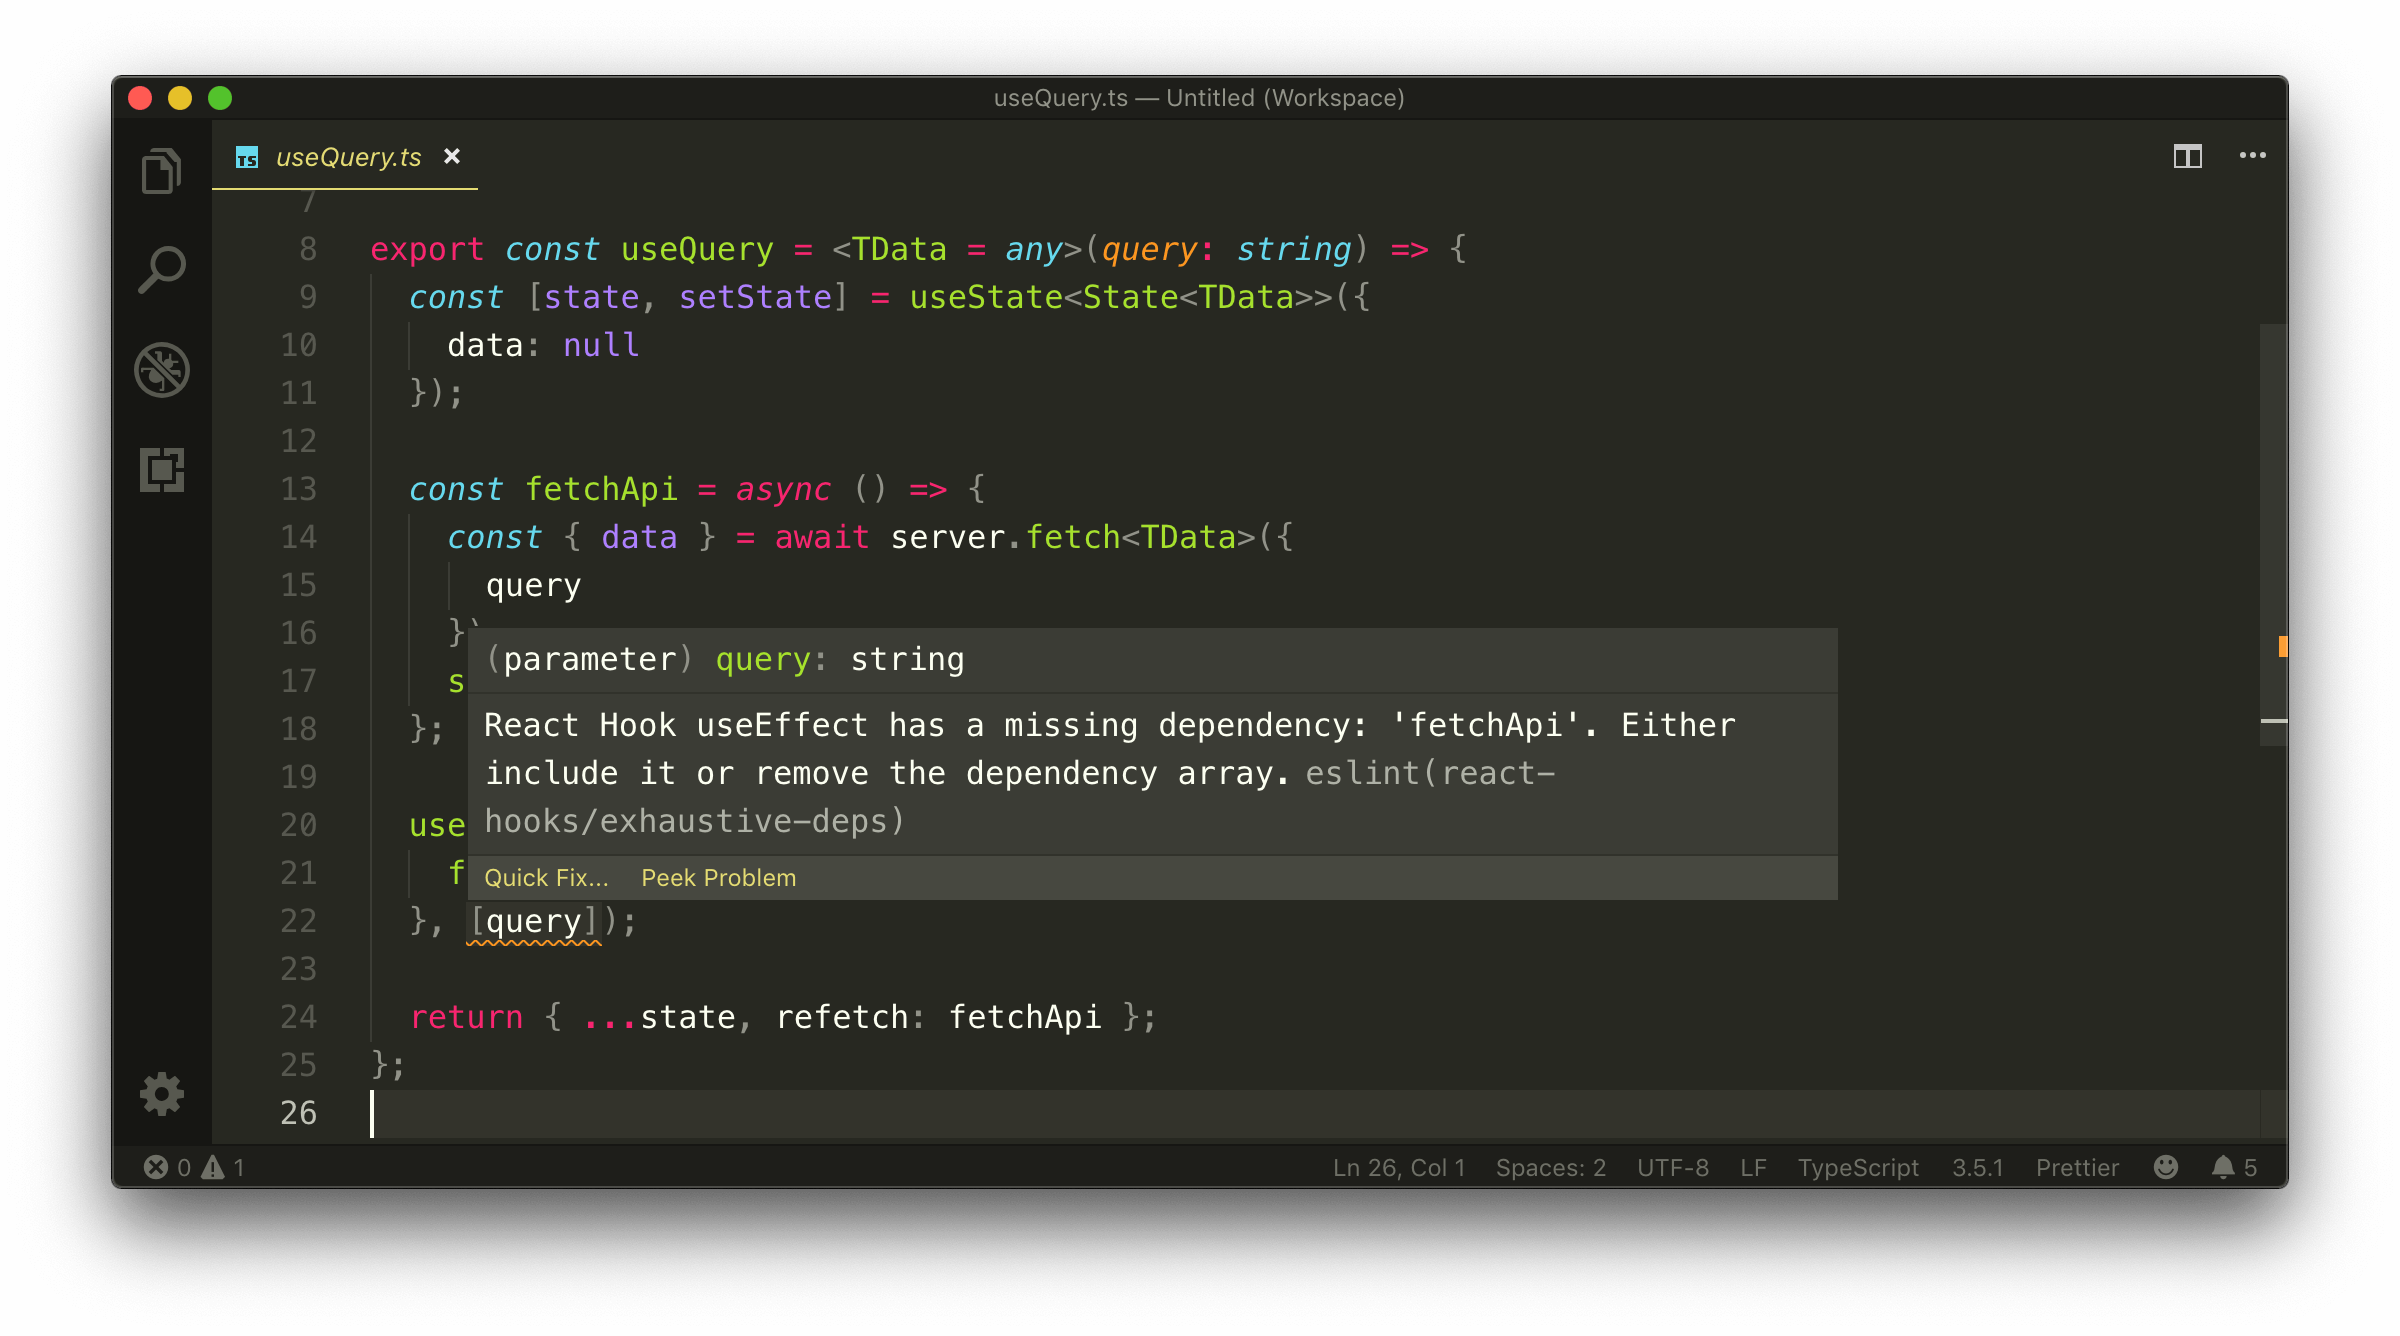
We’ll notice an ESLint warning be shown in the dependencies list of our useEffect Hook.
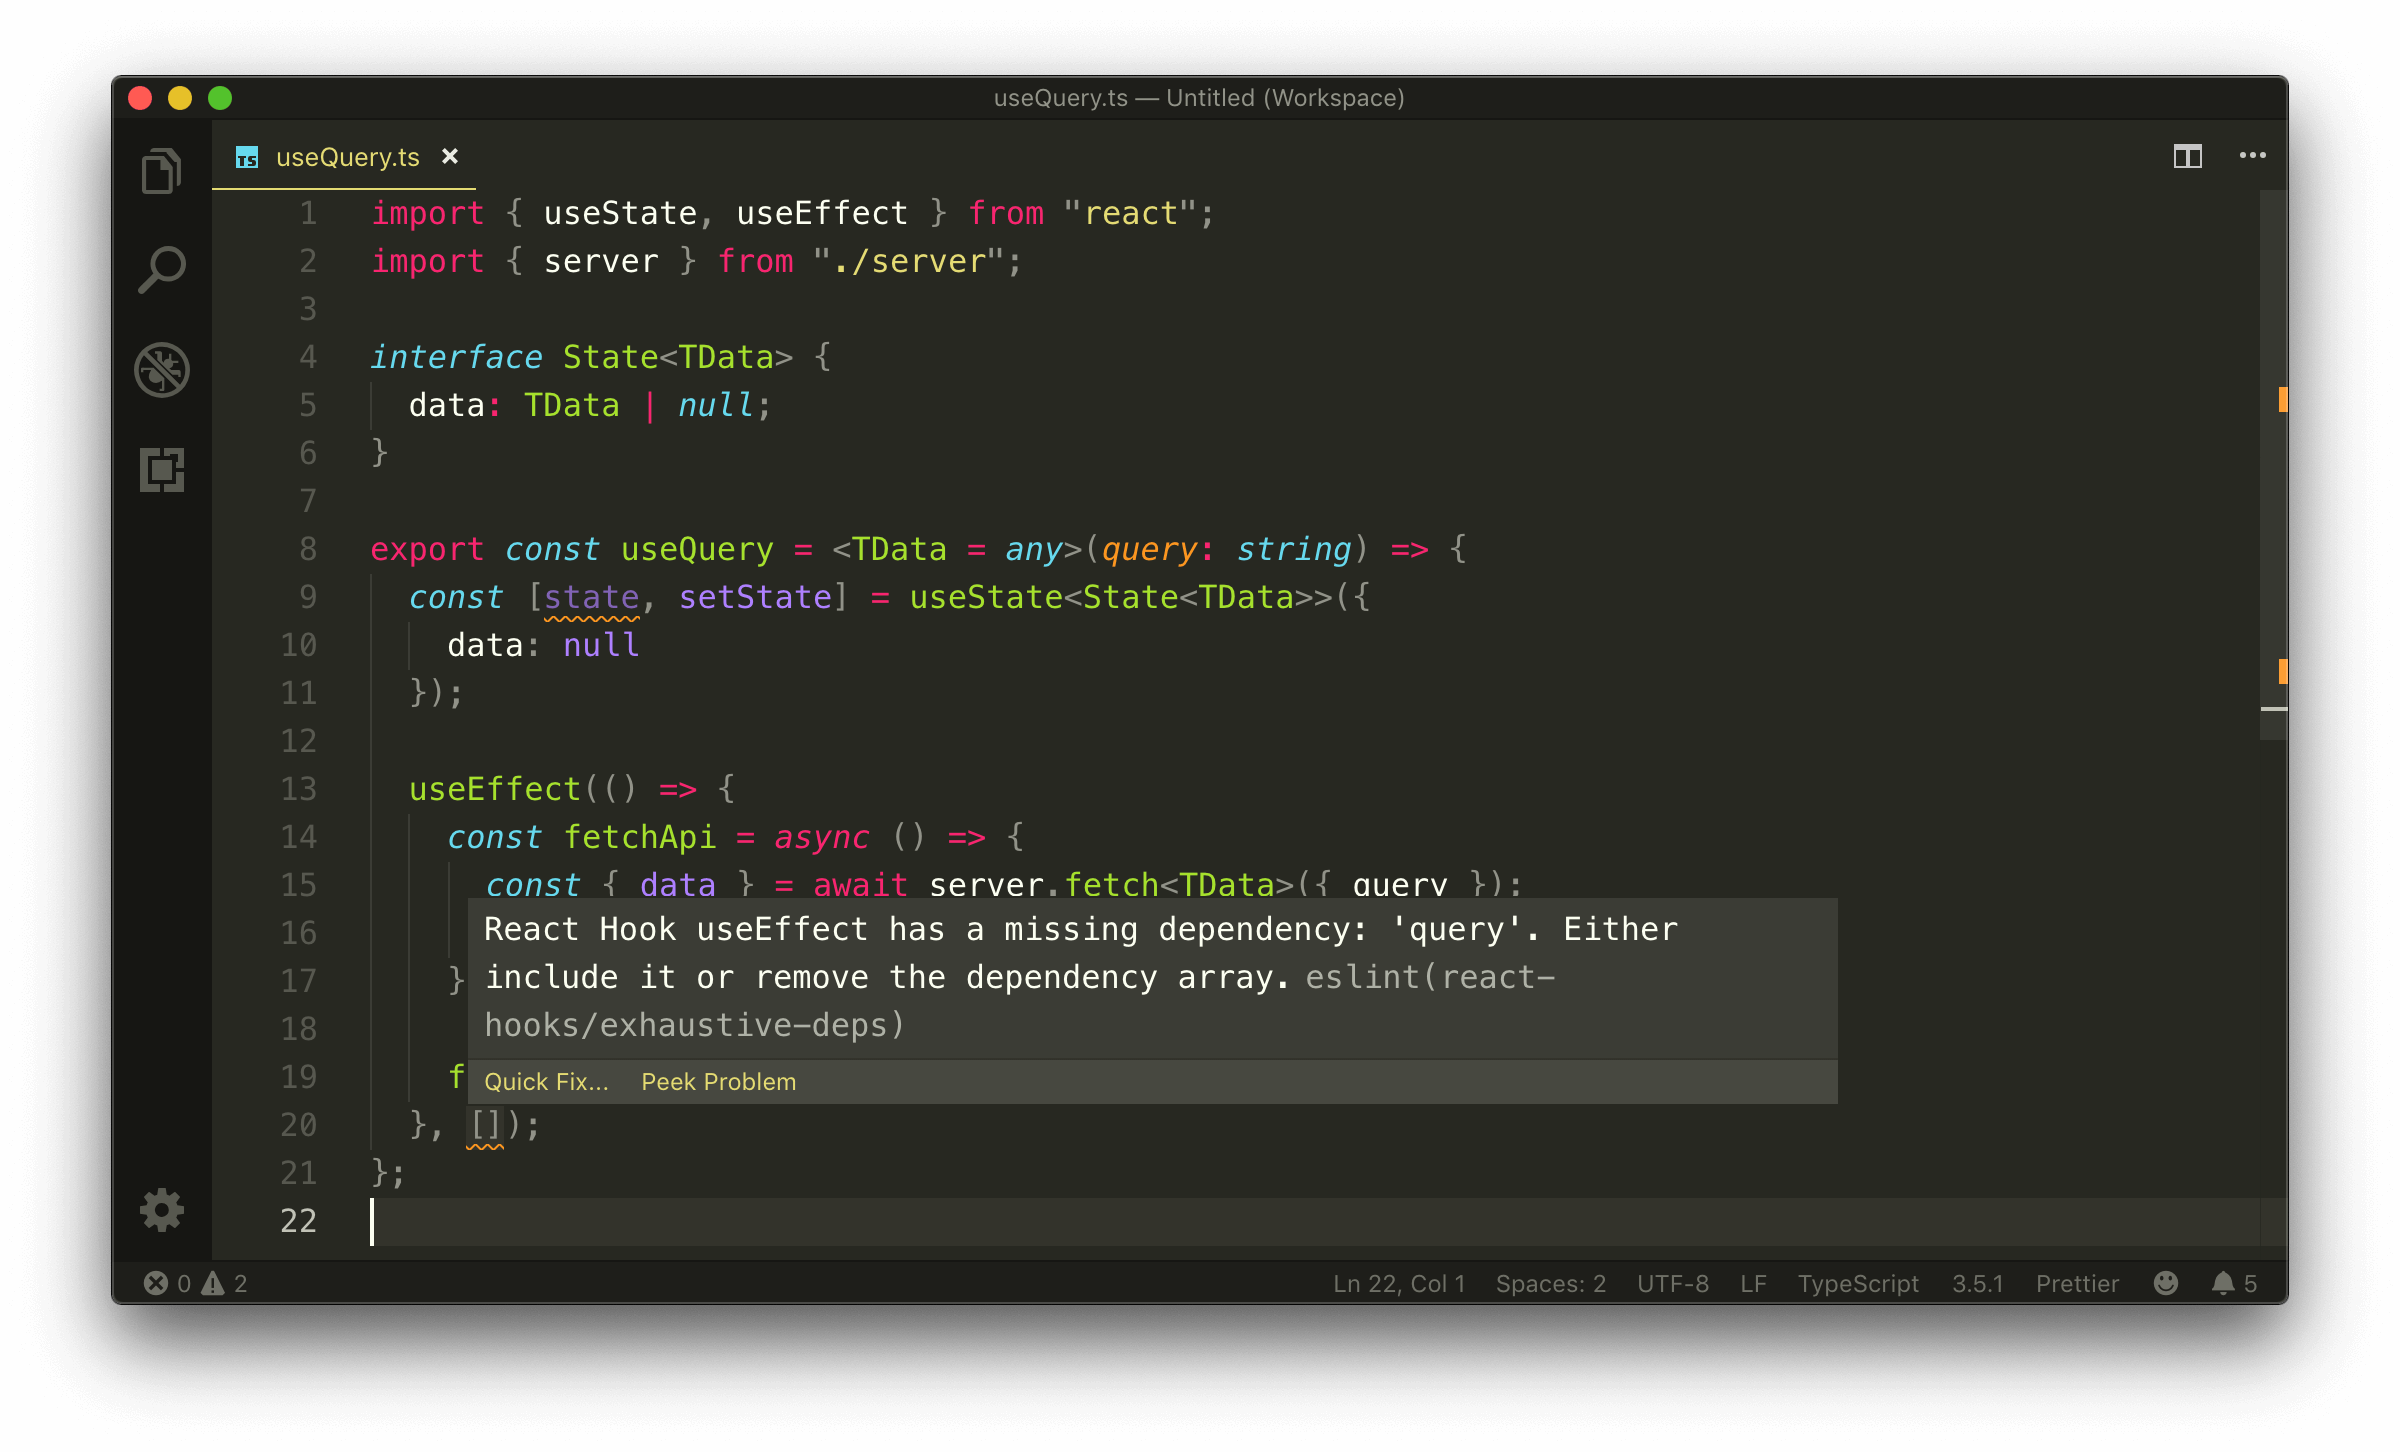
The react-Hooks/exhaustive-deps rule asks us to pass in the query value to the dependencies list or remove the dependencies list entirely. This is because query is being passed from elsewhere, and as a result, the useEffect Hook wants to make sure that we don’t reference a stale value if our effect was to run again.
In this instance, we’ll include the query dependency.
import { useState, useEffect } from "react";
import { server } from "./server";

interface State<TData> {
  data: TData | null;
}

export const useQuery = <TData = any>(query: string) => {
  const [state, setState] = useState<State<TData>>({
    data: null
  });

  useEffect(() => {
    const fetchApi = async () => {
      const { data } = await server.fetch<TData>({ query });
      setState({ data });
    };

    fetchApi();
  }, [query]);
};
This is because we don’t expect our useEffect Hook to run after initial mount since we don’t picture the query constant to ever change . If we take a look at the Listings.tsx component, we’ll be able to see the LISTINGS query document that we’ll pass to our Hook be declared outside of the <Listings> component.
// ...

const LISTINGS = `
  query Listings {
    listings {
      id
      title
      image
      address
      price
      numOfGuests
      numOfBeds
      numOfBaths
      rating
    }
  }
`;

// ...

export const Listings = ({ title }: Props) => {
  const { data } = useQuery<ListingsData>(LISTINGS);
};
The useQuery Hook isn’t smart enough to recognize that the query parameter value is to be a constant value declared outside of the component. Even if the <Listings> component gets re-rendered on change, we’ll still be referencing the same LISTINGS constant value. As a recommended approach mentioned by Dan Abramov - if a dependency (function or non-function value) is truly constant, there’s no harm in placing it as part of the dependencies list of an effect.
At the end of the useQuery Hook, we’ll now simply return the state object. Our useQuery Hook in its complete state will look like the following:
client/src/lib/api/useQuery.ts
import { useState, useEffect } from "react";
import { server } from "./server";

interface State<TData> {
  data: TData | null;
}

export const useQuery = <TData = any>(query: string) => {
  const [state, setState] = useState<State<TData>>({
    data: null
  });

  useEffect(() => {
    const fetchApi = async () => {
      const { data } = await server.fetch<TData>({ query });
      setState({ data });
    };

    fetchApi();
  }, [query]);

  return state;
};
We’ll re-export the useQuery Hook from the src/lib/api/index.ts file.
client/src/lib/api/index.ts
export * from "./server";
export * from "./useQuery";
Our <Listings> component can now import and use the useQuery Hook. In the Listings.tsx component file, we’ll import the useQuery Hook and remove the listings state declaration, the useEffect Hook, and the fetchListings function from the component.
The <Listings> component deleteListing() function depends on calling fetchListings() again, so we’ll remove that line from the function for now and come back to how we attempt to make refetch happen in the next lesson.
Finally, we’ll declare the useQuery Hook at the top of our <Listings> component and pass in the LISTINGS query we want to make. We’ll specify the type of the data we want and we’ll use a ternary statement to retrieve the listings data that we’re looking for, from what the useQuery Hook returns.
With all the changes made, the Listings.tsx component file will look as follows:
client/src/sections/Listings/Listings.tsx
import React from "react";
import { server, useQuery } from "../../lib/api";
import {
  DeleteListingData,
  DeleteListingVariables,
  ListingsData
} from "./types";

const LISTINGS = `
  query Listings {
    listings {
      id
      title
      image
      address
      price
      numOfGuests
      numOfBeds
      numOfBaths
      rating
    }
  }
`;

const DELETE_LISTING = `
  mutation DeleteListing($id: ID!) {
    deleteListing(id: $id) {
      id
    }
  }
`;

interface Props {
  title: string;
}

export const Listings = ({ title }: Props) => {
  const { data } = useQuery<ListingsData>(LISTINGS);

  const deleteListing = async (id: string) => {
    await server.fetch<DeleteListingData, DeleteListingVariables>({
      query: DELETE_LISTING,
      variables: {
        id
      }
    });
  };

  const listings = data ? data.listings : null;

  const listingsList = listings ? (
    <ul>
      {listings.map(listing => {
        return (
          <li key={listing.id}>
            {listing.title}{" "}
            <button onClick={() => deleteListing(listing.id)}>Delete</button>
          </li>
        );
      })}
    </ul>
  ) : null;

  return (
    <div>
      <h2>{title}</h2>
      {listingsList}
    </div>
  );
};
We’ll now verify that our query works as intended. We’ll start both the Node server and React client applications.
server $: npm run start
client $: npm run start
When we load our React app, we can see that our useQuery Hook does as intended. It makes the request and updates the component state the moment our component is mounted! Great!
The useQuery Hook is a great example of how components can share logic between one another which makes components more concise and easier to read. The <Listings> component is pretty much unaware of what the useQuery Hook does. All the <Listings> component needs to do is use the Hook at the beginning of the component and get the data it needs. If any other component needs to make a query upon initial mount, it can follow the same approach done in <Listings> .
With that said, there are some limitations to what we’ve set up. We’ve removed the capability to refetch our query when a change has been made which requires us to refresh the page to get an updated UI, when a listing has been deleted. In the next lesson, we’ll see how we can introduce the refetch capability as part of the useQuery Hook.
CUSTOM USEQUERY AND REFETCH
Our custom useQuery Hook made our <Listings> component simpler and provided the opportunity to have the shared piece of functionality of querying and updating state with other components as well.
In this lesson, we’ll address how we’d like a query refetch be made when the deleteListing mutation is fired. We’ll have our useQuery Hook prepared to allow for a component to trigger a refetch.
GAMEPLAN
There might be a few ways we can think about solving this but a simple way we’d like to go with is we can perhaps destruct the fetchApi() function from our useQuery Hook and have it labeled as refetch() . If we ever intend to refetch the query stated in the Hook, we can simply run this function directly in our component.
export const Listings = ({ title }: Props) => {
  const { data, refetch } = useQuery<ListingsData>(LISTINGS);

  const deleteListing = async (id: string) => {
    // ...
    refetch();
  };

  // ...
};
REFETCH()
The fetchApi() function in our useQuery Hook is the function we’ll want to run again if we needed to refetch query information and update state. In the useQuery.ts file, we’ll restructure how our Hook is set up to have the fetchApi() function be returned from the Hook. To do so, we’ll need to declare the fetchApi() function outside of the effect callback.
import { useState, useEffect } from "react";
import { server } from "./server";

interface State<TData> {
  data: TData | null;
}

export const useQuery = <TData = any>(query: string) => {
  const [state, setState] = useState<State<TData>>({
    data: null
  });

  const fetchApi = async () => {
    const { data } = await server.fetch<TData>({
      query
    });
    setState({ data });
  };

  useEffect(() => {
    fetchApi();
  }, [query]);

  return { ...state, refetch: fetchApi };
};
In the return statement of our useQuery Hook, we return an object that contains all the properties within state by using the JavaScript spread syntax to expand the properties of state in the new object. We’ve also introduced a new property called refetch that has the value of the fetchApi() function.
ESLint will display a warning in the useEffect dependencies list stating that the useEffect Hook is missing the dependency - fetchApi .
If we attempt to place fetchApi has a dependency to the useEffect Hook, we’ll get another ESLint warning telling us the fetchApi dependency will make the dependencies of useEffect run on every render which is not what we want.
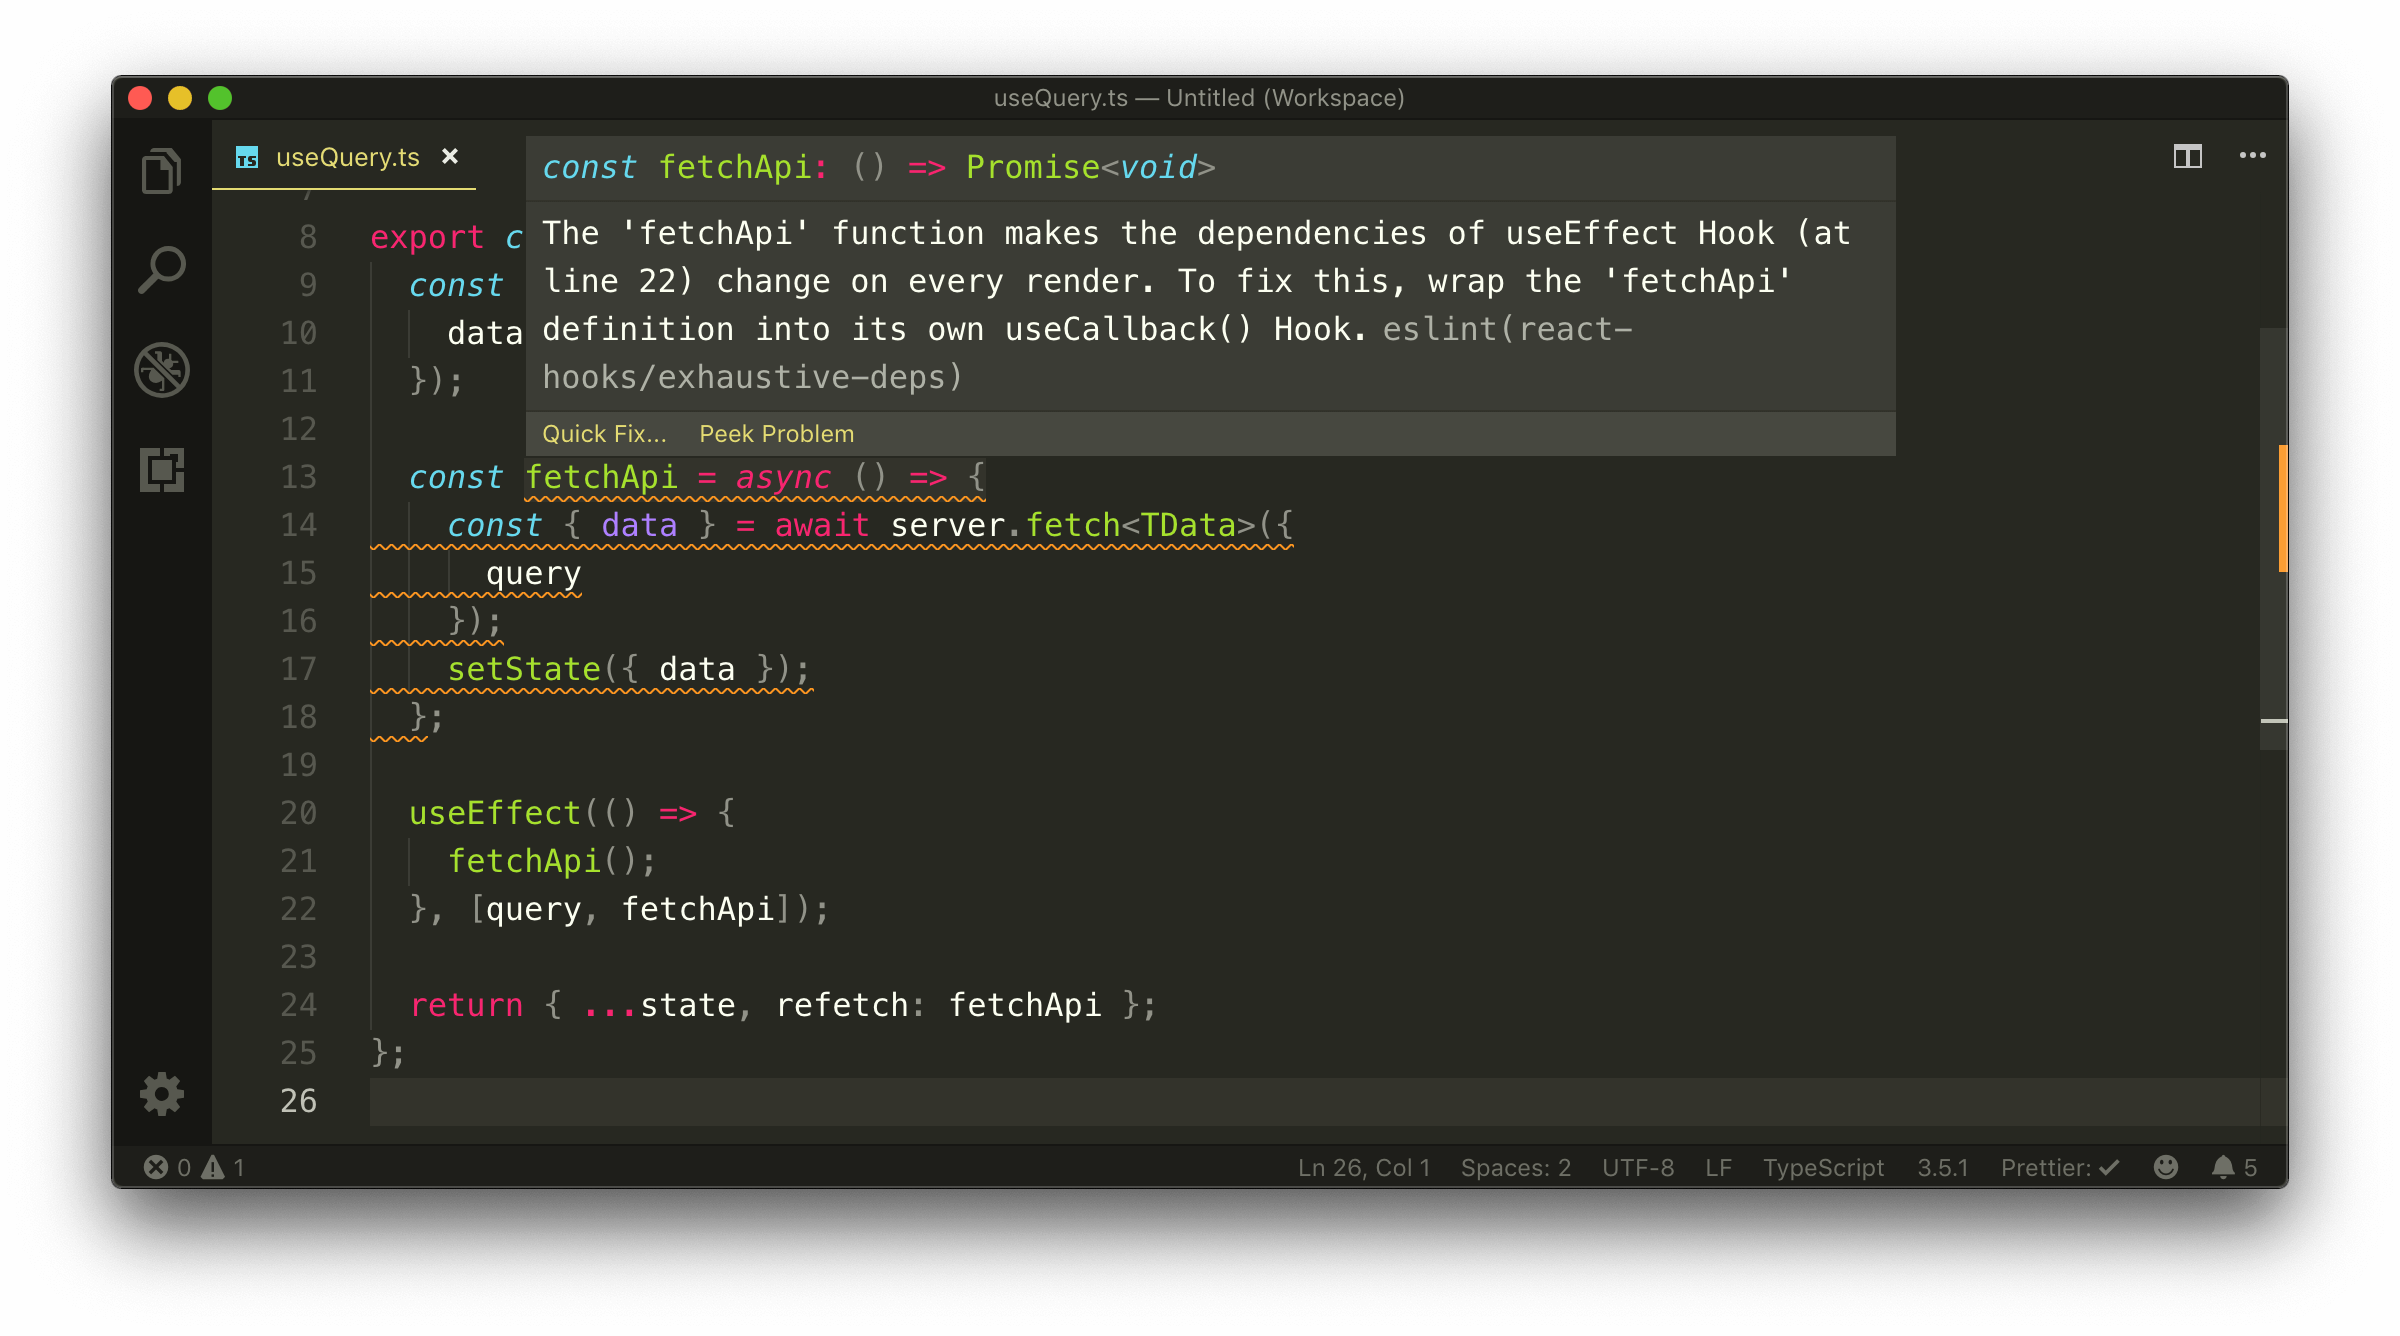
This is where we can follow the suggestion given to us from the react-hooks/exhaustive-deps ESLint rule to wrap the fetchApi() function within a useCallback Hook.
useCallback()
We’ll import the useCallback Hook in our useQuery.ts file.
client/src/lib/api/useQuery.ts
import { useState, useEffect, useCallback } from "react";
The useCallback Hook appears similar to the useEffect Hook and receives a callback function as the first argument and a dependency list in the second argument.
import { useState, useEffect } from "react";
import { server } from "./server";

interface State<TData> {
  data: TData | null;
}

export const useQuery = <TData = any>(query: string) => {
  const [state, setState] = useState<State<TData>>({
    data: null
  });

  useCallback(() => {}, []);

  // ...
};
The useCallback Hook returns a memoized version of the callback being passed in. Memoization is a technique geared towards improving performance by storing the results of function calls and returning the cached result when the same inquiry for the function is made again.
In the instance of having the useCallback Hook within our useQuery Hook, we can ensure that the callback function won’t run unless the dependencies specified in the useCallback Hook is changed.
In the useCallback Hook, we’ll declare the fetchApi() function within and run the function just like we’ve done in the useEffect Hook. We’ll also specify query as a dependency of useCallback .
import { useState, useEffect } from "react";
import { server } from "./server";

interface State<TData> {
  data: TData | null;
}

export const useQuery = <TData = any>(query: string) => {
  const [state, setState] = useState<State<TData>>({
    data: null
  });

  useCallback(() => {
    const fetchApi = async () => {
      const { data } = await server.fetch<TData>({
        query
      });
      setState({ data });
    };

    fetchApi();
  }, [query]);

  // ...
};
We can assign the memoized callback returned from useCallback to a const variable we can simply call fetch .
import { useState, useEffect } from "react";
import { server } from "./server";

interface State<TData> {
  data: TData | null;
}

export const useQuery = <TData = any>(query: string) => {
  const [state, setState] = useState<State<TData>>({
    data: null
  });

  const fetch = useCallback(() => {
    const fetchApi = async () => {
      const { data } = await server.fetch<TData>({
        query
      });
      setState({ data });
    };

    fetchApi();
  }, [query]);

  // ...
};
We can finally run the memoized fetch() function in the useEffect Hook. We’ll also specify the fetch() function as a dependency to the useEffect Hook.
In our useQuery return statement, we’ll return an object that contains the properties of state . In the returned object, we’ll return a refetch property that has the value of the fetch() function.
This will have our useQuery Hook look like the following:
client/src/lib/api/useQuery.ts
import { useState, useEffect, useCallback } from "react";
import { server } from "./server";

interface State<TData> {
  data: TData | null;
}

export const useQuery = <TData = any>(query: string) => {
  const [state, setState] = useState<State<TData>>({
    data: null
  });

  const fetch = useCallback(() => {
    const fetchApi = async () => {
      const { data } = await server.fetch<TData>({
        query
      });
      setState({ data });
    };

    fetchApi();
  }, [query]);

  useEffect(() => {
    fetch();
  }, [fetch]);

  return { ...state, refetch: fetch };
};
USEEFFECT AND USECALLBACK
What we’ve introduced might appear a little confusing so we’ll summarize what we’ve just done.
We’ve used the useEffect Hook to attempt to run our server.fetch() function when a component mounts for the first time.
export const useQuery = <TData = any>(query: string) => {
  // ...

  useEffect(() => {
    const fetchApi = async () => {
      const { data } = await server.fetch<TData>({ query });
      setState({ data });
    };

    fetchApi();
  }, []);

  // ...
};
Our useEffect Hook depends on the query parameter with which it expects us to define in the dependencies list to avoid any potential issues. Since query is to be a static constant referenced outside of the component, we can specify it in the dependencies list of the useEffect Hook with no issues.
export const useQuery = <TData = any>(query: string) => {
  // ...

  useEffect(() => {
    const fetchApi = async () => {
      const { data } = await server.fetch<TData>({ query });
      setState({ data });
    };

    fetchApi();
  }, [query]);

  // ...
};
We, however, wanted to have the fetchApi() function extractable from the Hook itself, and as a result needed to declare fetchApi() outside of the useEffect Hook.
export const useQuery = <TData = any>(query: string) => {
  // ...

  const fetchApi = async () => {
    const { data } = await server.fetch<TData>({ query });
    setState({ data });
  };

  useEffect(() => {
    fetchApi();
  }, [query]); // ESLint warning - fetchApi is a missing dependency

  // ...
};
The useEffect Hook wants to ensure we’re not doing something incorrectly and asks if we can specify the fetchApi() function as a dependency or wrap it within a useCallback Hook. We’re not sure how the fetchApi() function will behave as the component gets updated and we only want fetchApi() to run on initial mount, so we instead use the useCallback Hook to memoise our callback function to never change unless the query parameter changes, which is unlikely to.
export const useQuery = <TData = any>(query: string) => {
  // ...

  const fetch = useCallback(() => {
    const fetchApi = async () => {
      const { data } = await server.fetch<TData>({
        query
      });
      setState({ data });
    };

    fetchApi();
  }, [query]);

  useEffect(() => {
    fetch();
  }, [fetch]);

  // ...
};
With what we’ve just done, we’ve been able to return a refetch property from our useQuery Hook that will allow components to refetch a query.
LISTINGS AND REFETCH()
In the <Listings> component, we’ll destruct the refetch() function from our Hook, and run it after our deleteListing mutation is complete.
Our <Listings> component will look like the following:
client/src/sections/Listings/Listings.tsx
export const Listings = ({ title }: Props) => {
  const { data, refetch } = useQuery<ListingsData>(LISTINGS);

  const deleteListing = async (id: string) => {
    await server.fetch<DeleteListingData, DeleteListingVariables>({
      query: DELETE_LISTING,
      variables: {
        id
      }
    });

    refetch();
  };

  const listings = data ? data.listings : null;

  const listingsList = listings ? (
    <ul>
      {listings.map(listing => {
        return (
          <li key={listing.id}>
            {listing.title}{" "}
            <button onClick={() => deleteListing(listing.id)}>Delete</button>
          </li>
        );
      })}
We’ll start our Node server and React client apps.
server $: npm run start
client $: npm run start
And when we now delete a listing, our listings query is refetched and our UI is updated!
Amazing! Our useQuery Hook behaves as we want it to! The only other things we’ll like to consider for our useQuery Hook is the ability to handle loading and errors, which is something that we haven’t thought about yet but is pretty important!
Our
listingsGraphQL query doesn’t depend on variables but we can very well have passed in variables to our Hook to consume if needed. However, we’ll have to be careful here since if our component ever re-renders, a new variables object will be passed into our Hook if variables are defined in the component (unlike the query document). If we were to do this, we may need to take additional steps to perhaps memoize the variables being passed as well. This is where auseRefHook may need to be used.