MODULE 10 INTRODUCTION
Stripe is a third-party payment processor that helps applications and businesses accept payments online in a safe/secure manner. In TinyHouse, we’re going to use Stripe to help handle payments between tenants and hosts.
In this module, we’ll
- Discuss Stripe and the Stripe Connect product for marketplaces
- Discuss how we’ll facilitate Sign-in with Stripe, with OAuth 2.0, so users that are to receive payments can sign-in with their Stripe accounts.
- Establish the GraphQL Fields for Stripe authentication.
- Interact with the Stripe API and build the accompanying resolver functions.
- Update the user profile section of a logged-in user in the User page, to allow a user to connect and disconnect with Stripe from our application.
STRIPE & STRIPE CONNECT
Information about Stripe as an organization can be found - here.
It’s finally time we talk about payments! The business model of the TinyHouse platform is an online marketplace where users can host and book listings. When a booking is made, the user that is making the booking (i.e. the tenant) needs to pay the owner of the listing (i.e. the host) a sum of money. TinyHouse (i.e. we) will take a percentage of that transaction as revenue (a.k.a. a platform fee).

Building and integrating a payment infrastructure on top of an app is extremely complex. Do we want our users to be able to pay by debit card? Well, we’ll pretty much need to work with every single bank in the country that our platform will be operating in. Do we want our users to be able to pay by credit card? Again, we’ll need to work with tools provided to us from credit card companies that we would want to support (VISA, Mastercard, AMEX, etc.). Do we want to accept international payments? Going international is another avenue of difficulty.
If we were to go through the approach of building our own custom payment infrastructure, we’ll need to work with all these different parties. This will be extremely time-consuming and probably more complex than the actual app we’re building. Not to mention, depending on where our app operates, there are strict laws and regulations on services that deal with the transfer of money.
This is where a third-party payment processor comes in . Companies like Stripe and PayPal specializes in payments. In this course, we’ll be using Stripe to facilitate payments for our TinyHouse application.
STRIPE
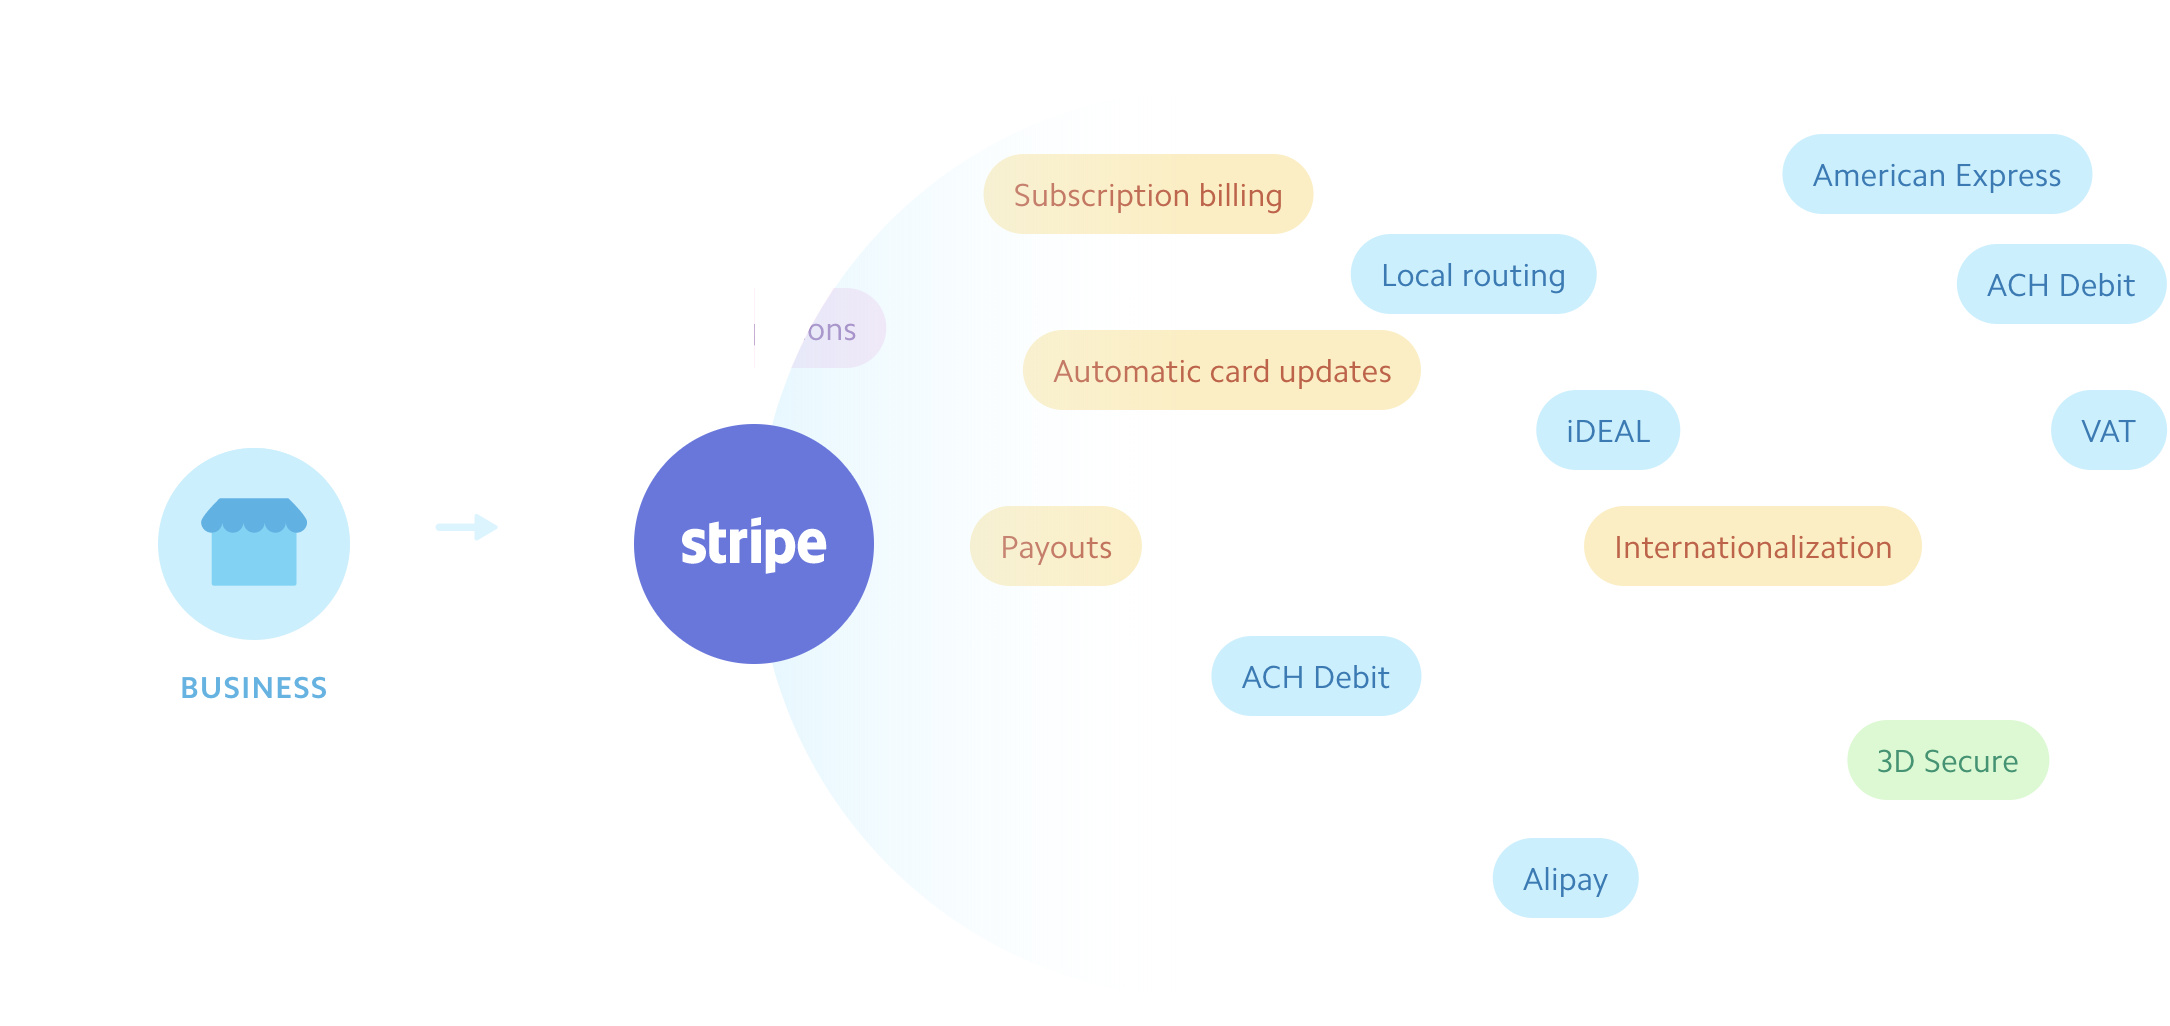
Stripe is a technology company that helps builds infrastructure where online businesses, like TinyHouse, can accept payments online. Stripe removes the complexity of dealing with finances and payments by working with various financial institutions, regulators, payment networks, and banks so businesses like ourselves don’t have to.
A remarkable number of companies use and utilize Stripe - millions in fact and over 120 countries. This consists of small businesses as well as million to billion dollar organizations like Amazon, Google, Shopify, Microsoft, etc.

Note: For more details on Stripe as a company, be sure to check out the about section of Stripe’s documentation - https://stripe.com/about.
What does it take to use Stripe within an application? There’s the simple to understand pricing plan from Stripe which provides an integrated plan that charges 2.9% (plus 30 cents extra) for every successful charge with a card. There’s also the customized plan where organizations and businesses can design a custom package by contacting the sales team with Stripe.

Keep in mind that depending on what tool you use from Stripe, there can be smaller additional charges that can be applied (e.g. international payments, using tools like Alipay or WeChat, etc.). However, for the most part, the basic payment plan follows a simple process of essentially charging a small percentage (like 2.9%) and a few additional cents for every successful payment.
Note: For more details on Stripe pricing, be sure to check out the pricing section of Stripe’s documentation - https://stripe.com/pricing.
STRIPE CONNECT
Stripe provides many different tools such as their Payments platform, their Billing utility, Analytics, etc. We’re interested in leveraging one in particular called Stripe Connect.
Stripe Connect is the solution intended for marketplaces and platforms since it allows applications to accept money and payout to third parties . Stripe Connect supports many different business models such as on-demand businesses, e‑commerce, crowdfunding, etc.
Stripe Connect provides many different customizations for how we want payments to be routed within an application. We’ll go through some great diagrams and examples obtained from the Stripe Connect documentation.
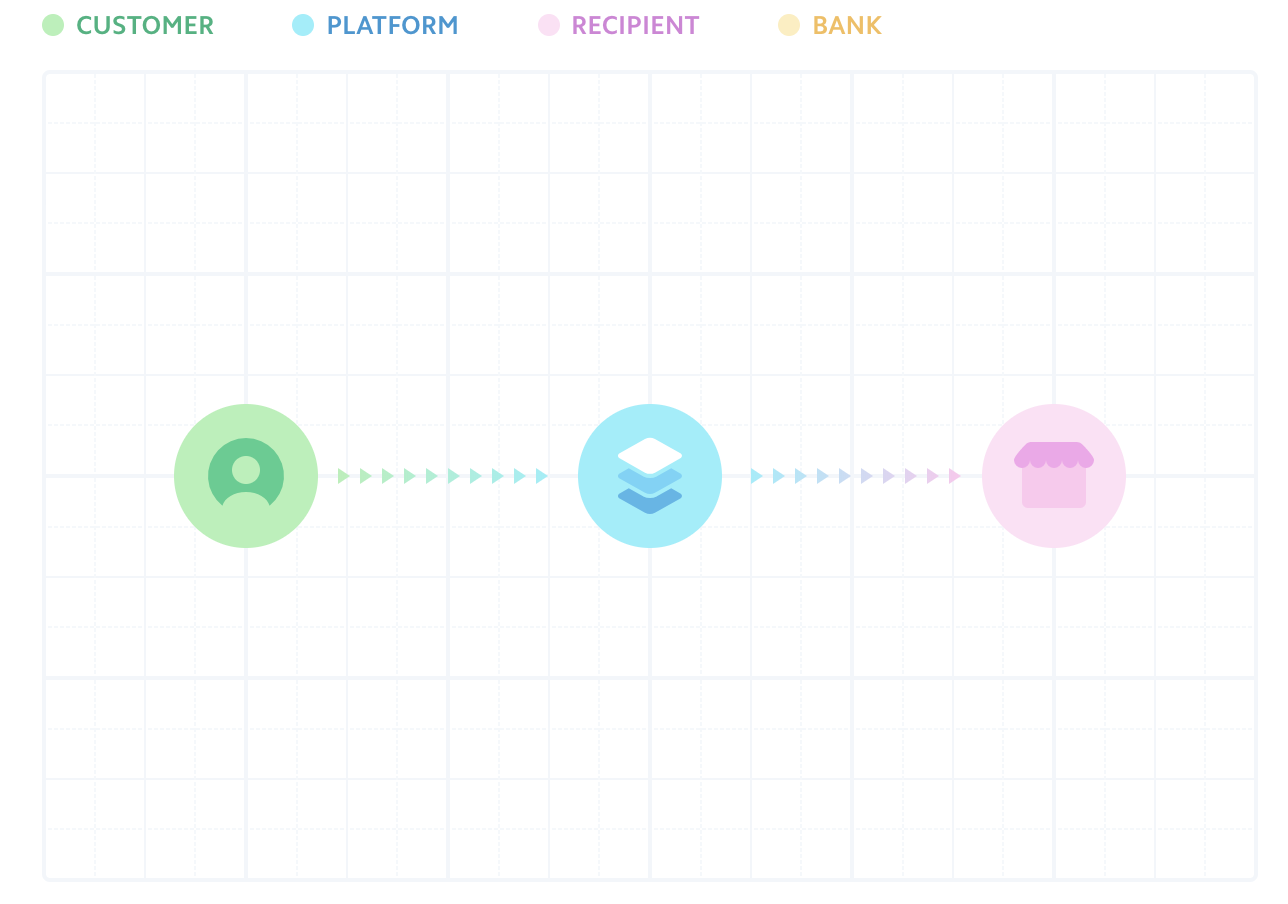
One-to-one
There’s the one-to-one model where one customer is charged and one recipient is paid out with a one-to-one relationship between charge and transfer. A valid use case for this is a ride-sharing service.
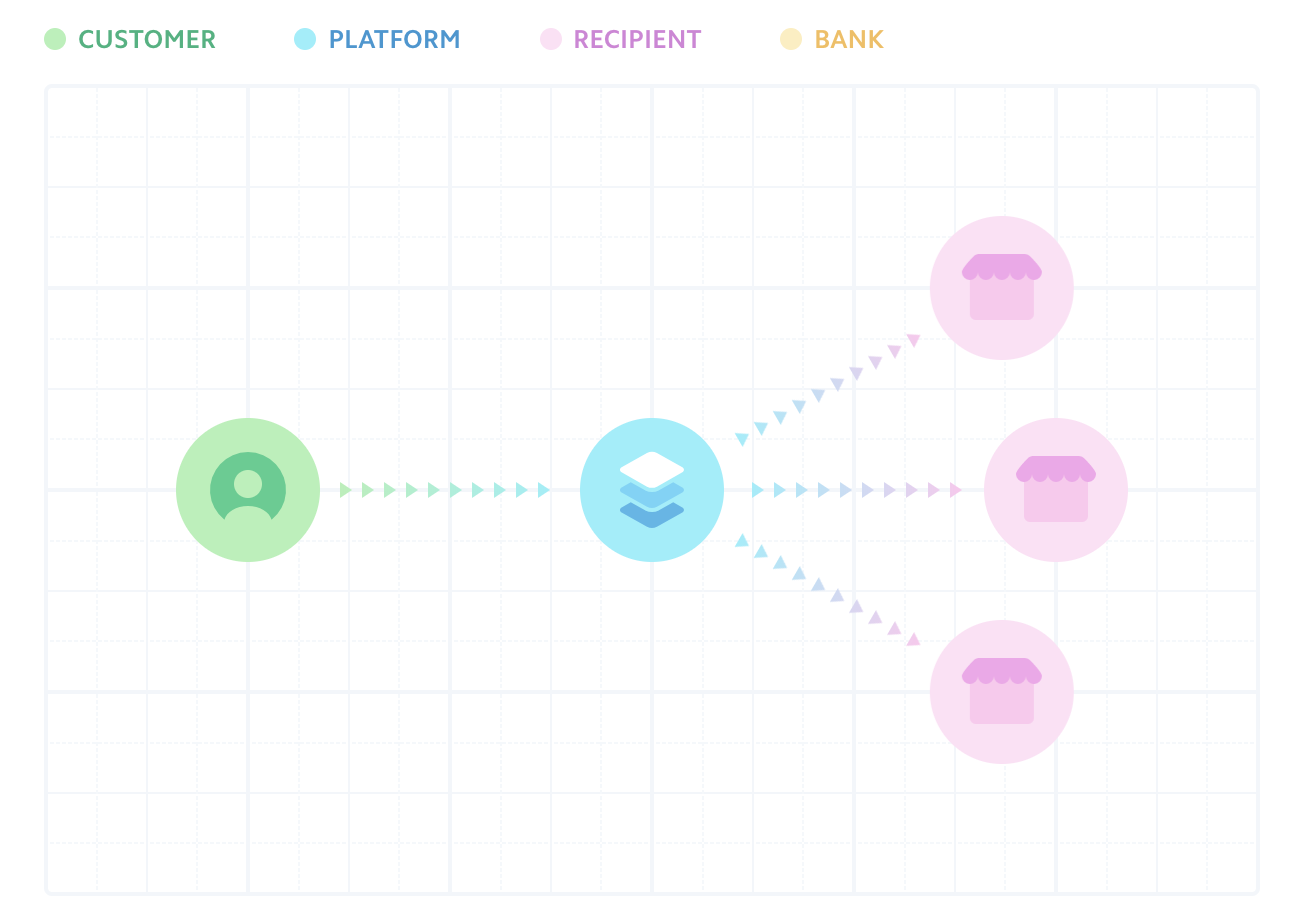
One-to-many
There’s the one-to-many model where one customer is charged and the funds are split between multiple recipients. A valid use case for this would be a retail marketplace where a consumer can purchase from multiple online stores within a single application.
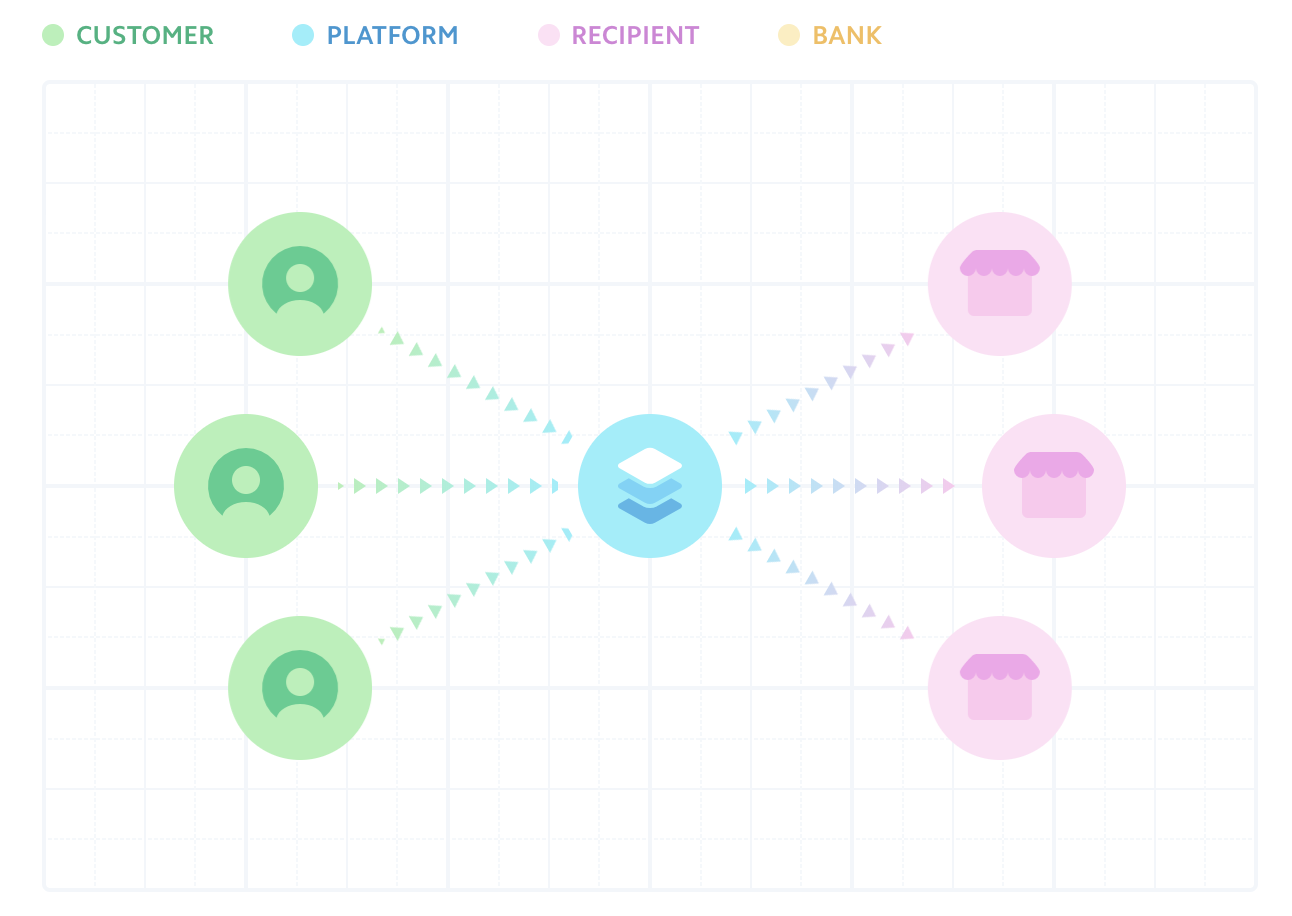
Many-to-many
There’s the many-to-many model where multiple customers are charged and the funds are split out across multiple recipients. A valid use case for this could be a SaaS (Software As A Service) platform that charges customers a monthly fee for access to fitness classes at different studios.
There are also other more complicated scenarios that Stripe Connect allows for such as the capability for the platform to hold funds before paying out to recipients, the capability to simply charge recipients a fee on a semi-frequent basis, etc.
The use case for our application is going to be one of the more simple scenarios and will be the one-to-one relationship model . We’ll have a single customer (that is to say a tenant) that pays out to a single recipient (that is to say the host of the listing). TinyHouse (i.e. we) will leverage Stripe Connect to have the host pay us a small percentage to use our application and receive payments from tenants.
Stripe Connect - Account Types
There exists three different account types within the Stripe Connect utility - Standard , Express , and Custom . Many different factors go into choosing the best type of platform account to use. The following table, from Stripe documentation, lists many of these factors.

For us, integration effort and the user experience is particularly important. If one doesn’t want to spend a lot of time building actual onboarding flows for payments/checkout/etc., the Standard or Express account types might be easier to implement. If one needs more control over the connected user’s experience the Express or Custom account types might fit one’s needs.
Note: The Custom account type of Stripe Connect is API only while Standard and Express provide integration through OAuth.
The Express account itself can only be created for individuals and businesses based in the United States and Canada. The Custom account type requires us to take care of and build the infrastructure to collect user information, create a user dashboard, handle support, and so on. It’s even noted that it’s ideal for users that can dedicate significant engineering resources.
We’ll be using the Standard account type for Stripe Connect . It’s by far the easiest to integrate and the user is responsible for disputing liability, not the platform.
In the next coming lessons, we’re going to create our Stripe Connect account, retrieve the necessary credentials that we might need, and build out the capability to have users in our application connect with Stripe and be part of our Stripe Connect platform.
STRIPE CONNECT OAUTH
.envfile in our server project, after this lesson is complete, can be found - here.
.envfile in our client project, after this lesson is complete, can be found - here.
When a user in our application plans to host a listing, we’ll need to ensure they’ve connected to their own Stripe account through our Stripe platform account . This is to leverage Stripe Connect’s capability to pay the users who have listings in our app when a booking is made. Stripe enables this connection with OAuth 2.0.
Any application that uses OAuth to access Stripe’s APIs must have credentials that identify that particular application to Stripe’s server. With that said, in this lesson we’ll set up the credentials we’ll need from Stripe and save them as environment variables for both our server and client projects.
STRIPE ACCOUNT
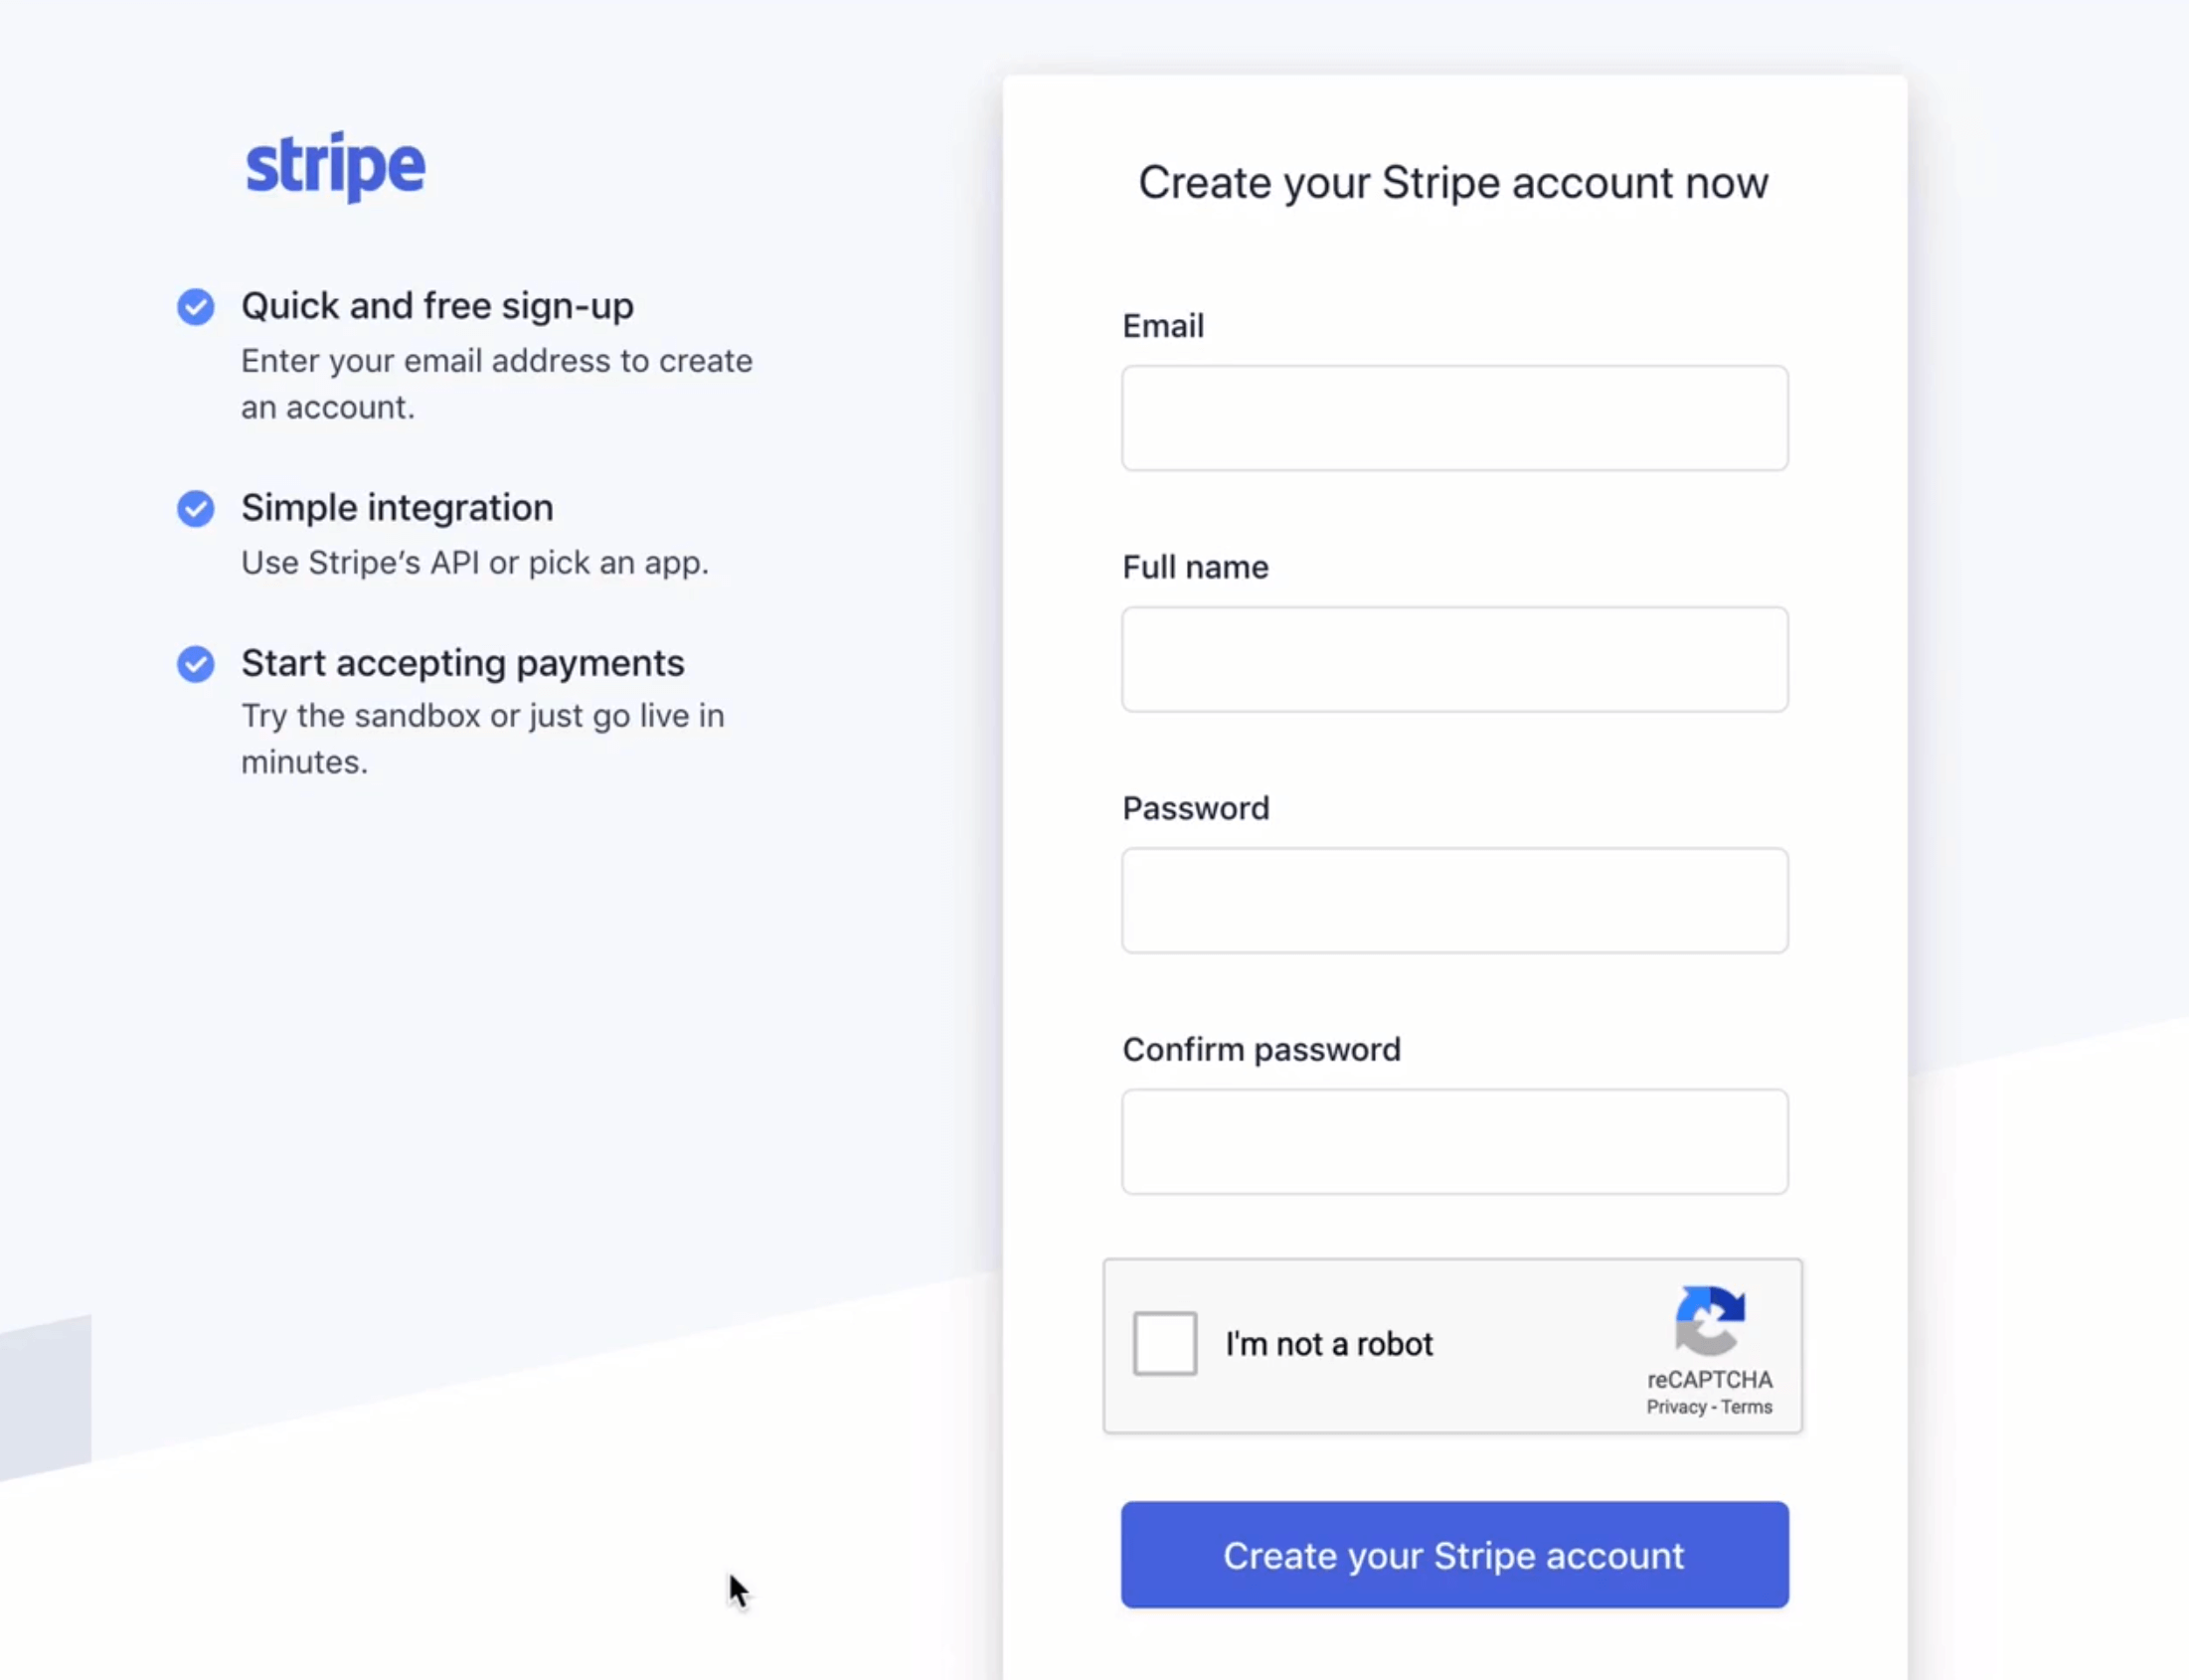
Before you can proceed, the first thing you’ll need to do is have an account with Stripe. This account is to represent the Stripe account of the TinyHouse application. You’ll be able to create an account at https://dashboard.stripe.com/register, fill out the required information, and click Create your Stripe Account . If you get prompted to fill out more information about your organization or business after you’ve signed up, feel free to click the SKIP FOR NOW option that will be available to you.
After your sign-up is successful, you’ll most likely get an email confirmation sent out to you. To confirm and complete your account creation, do find the email from Stripe and click the confirmation link.
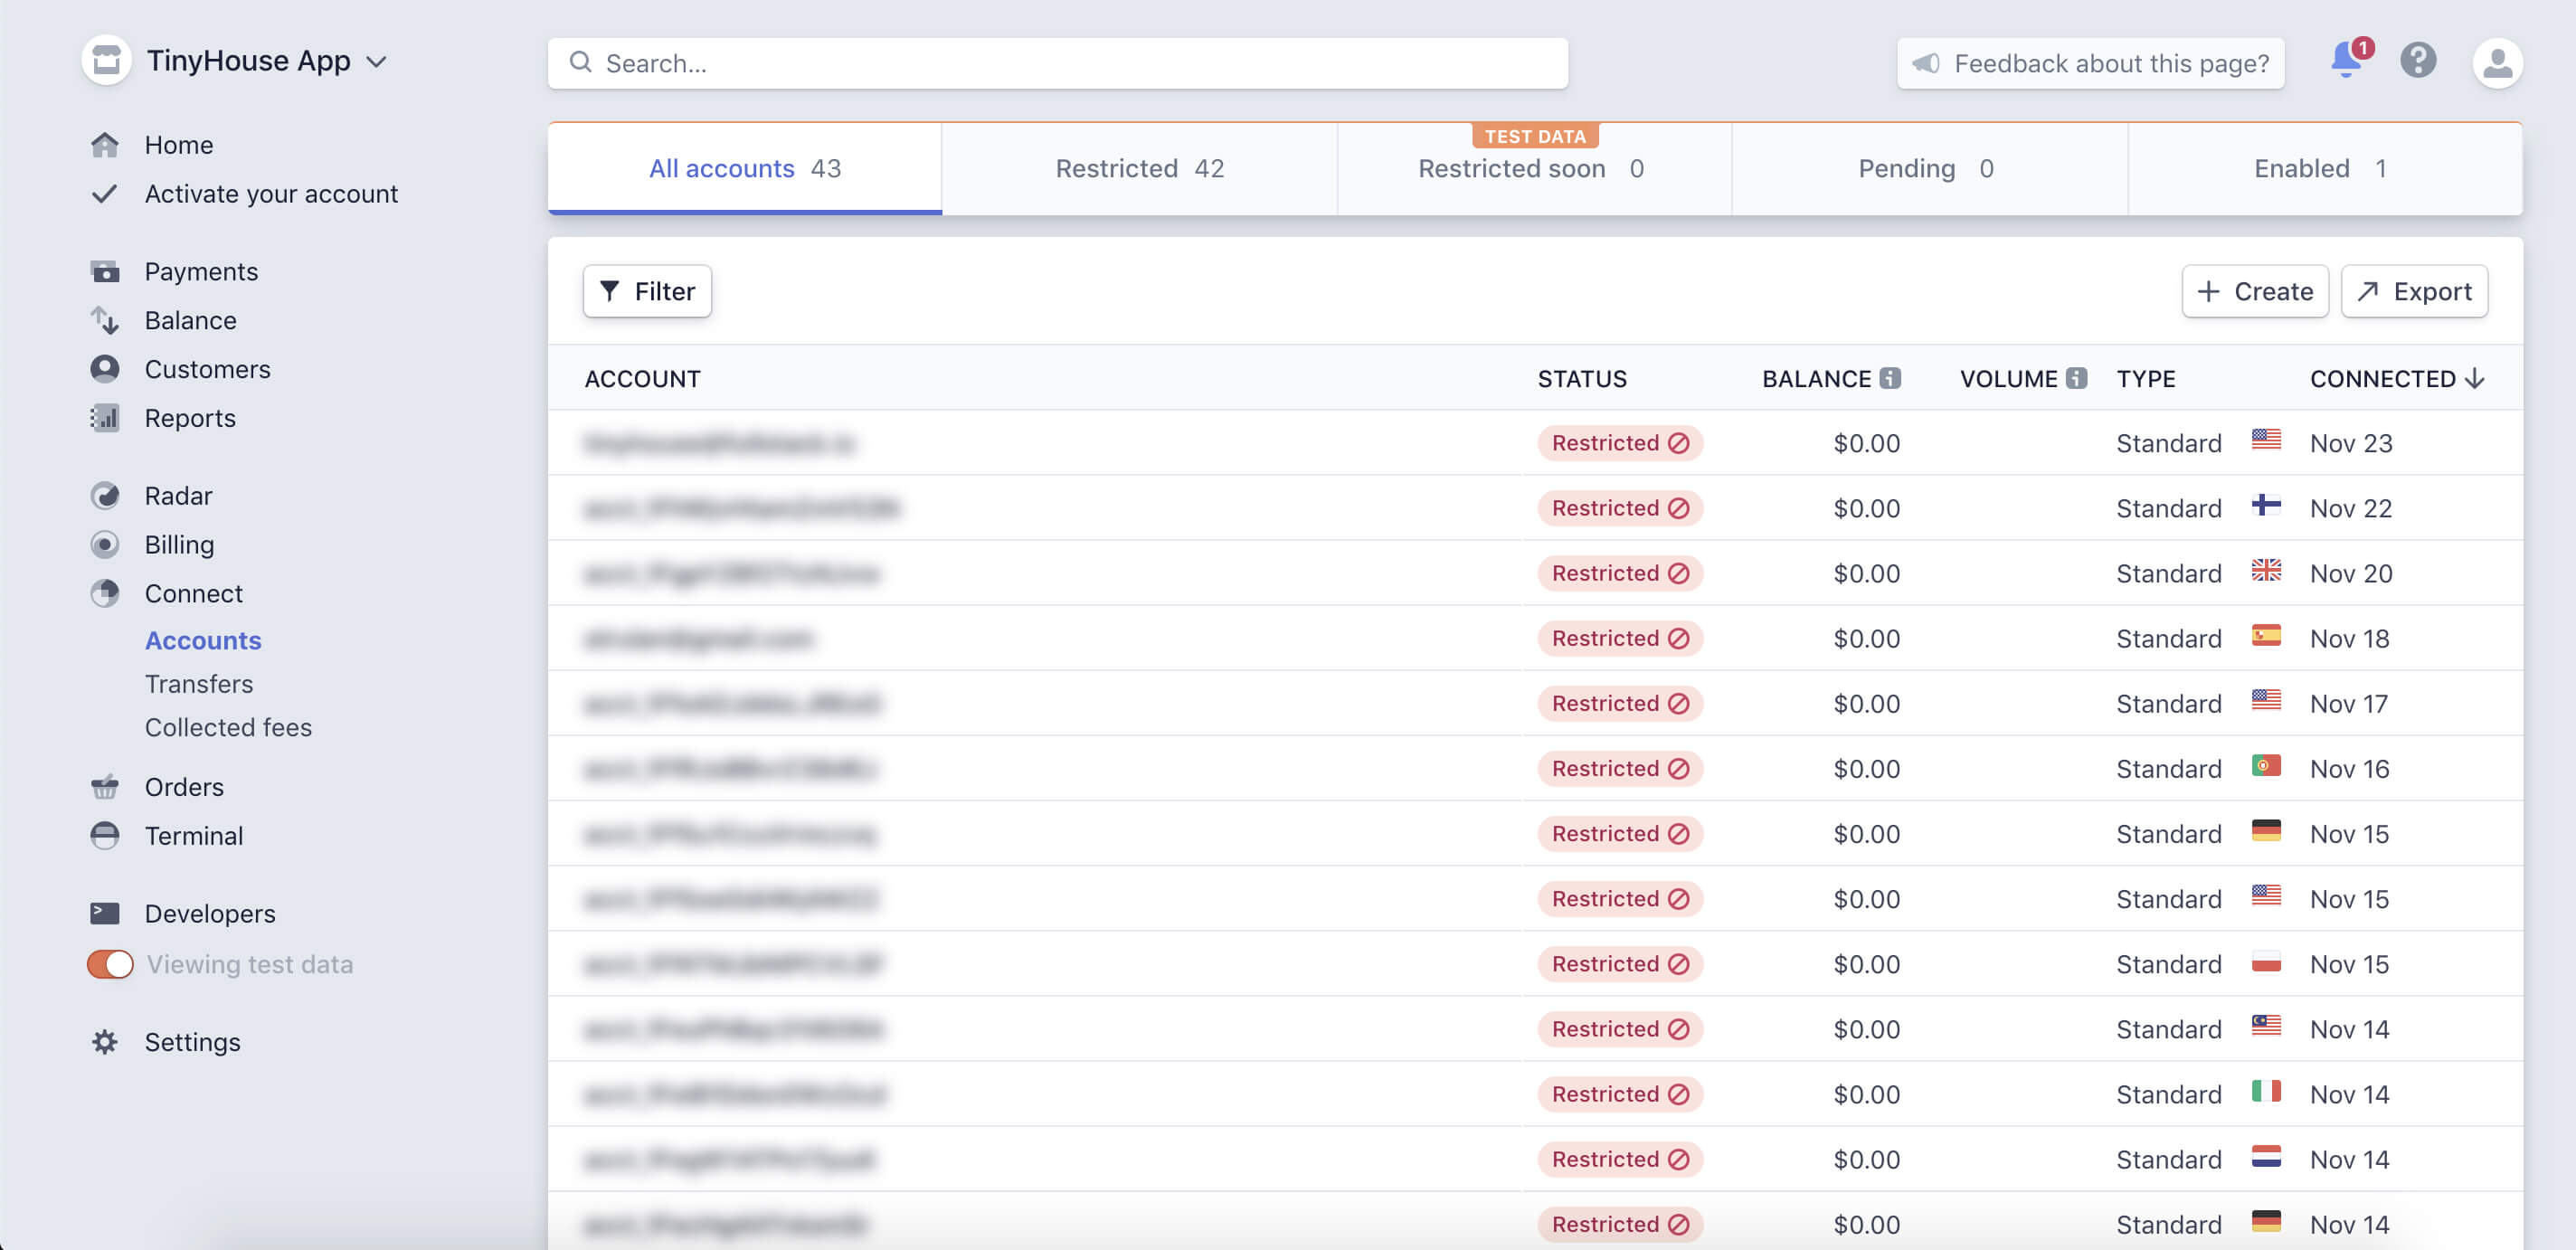
When we’ve logged-in successfully to our new account, we’ll land in the dashboard of our Stripe account. In the top left corner, we’ll see our Account Name be shown to us. If a name doesn’t exist yet, we may see "Unnamed account" as the existing name with a prompt stating that we can add a name. Feel free to add a name that you see fit for your Stripe account. We’ve named our Stripe account "TinyHouse App" .
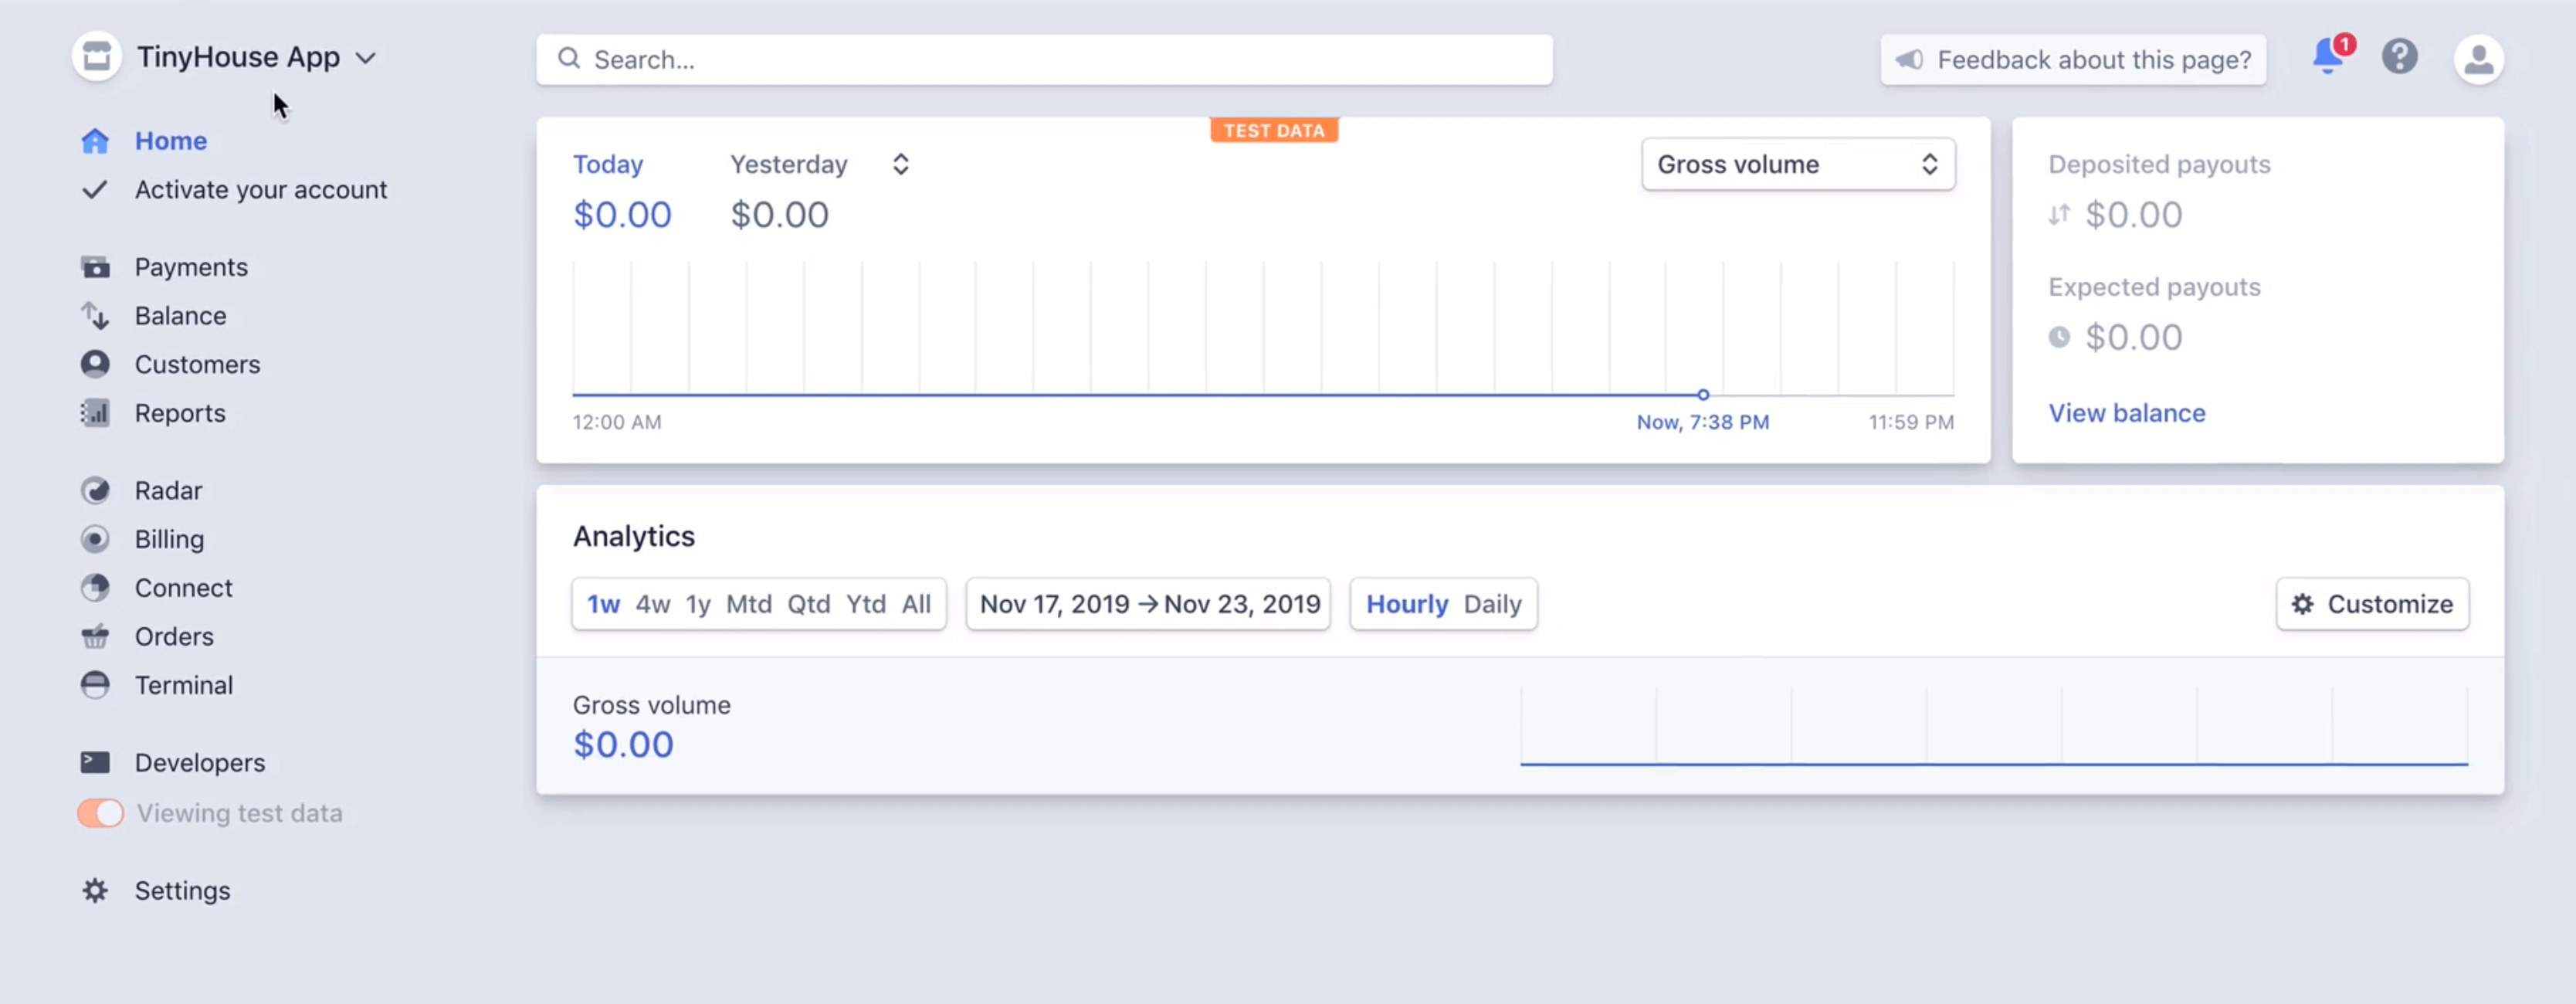
VIEWING TEST DATA
In the bottom left corner, we’ll notice a tab labeled Viewing test data that may be turned on automatically. By having this turned on, Stripe will provide all the payment information and analytics of your account within a test environment . If you attempt to toggle it to off (i.e. not view test data), we may be prompted to activate our account to access live data.
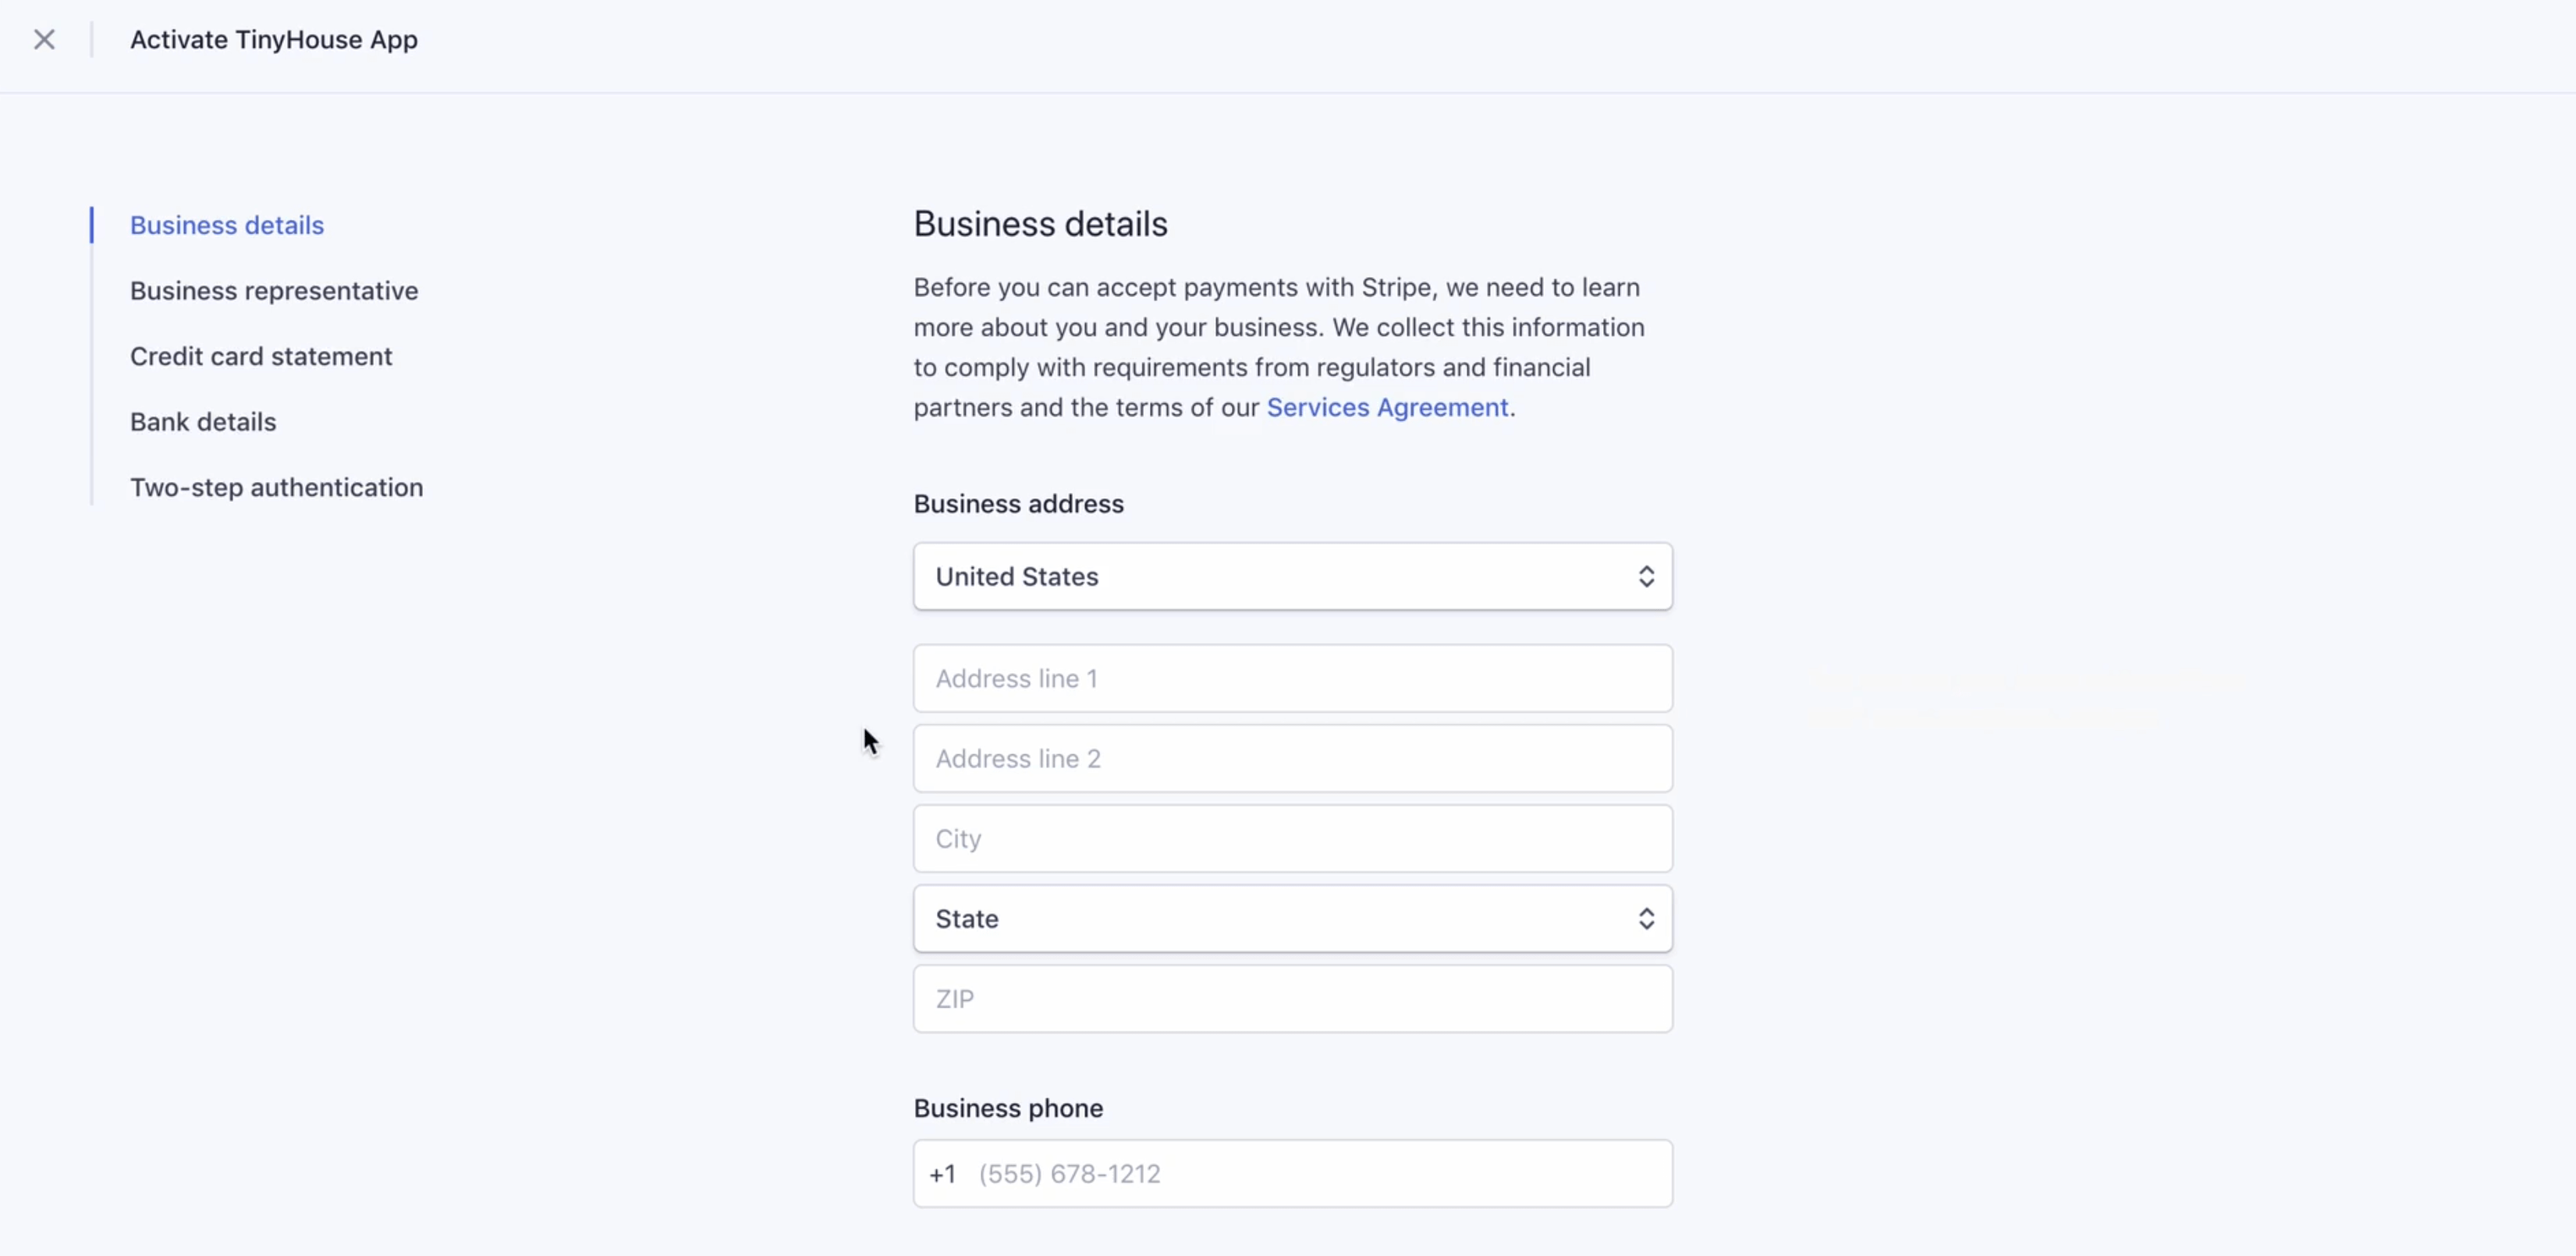
Stripe requires us to activate our account by filling out all necessary business information. If we are to create an application/platform that accepts any money, it must be an established business. Stripe needs to know any information about our business it deems important as well as details of an actual business bank account to accept money from our Stripe dashboard.
The good news is we don’t actually have to have an established business yet, or a business bank account, or fill out any of this information if we are to stay within the test environment of our Stripe account. This is true for testing with Stripe Connect as well! However, before you go live with Stripe and accept real money, you would have to activate your account and provide the necessary information.
STRIPE CONNECT
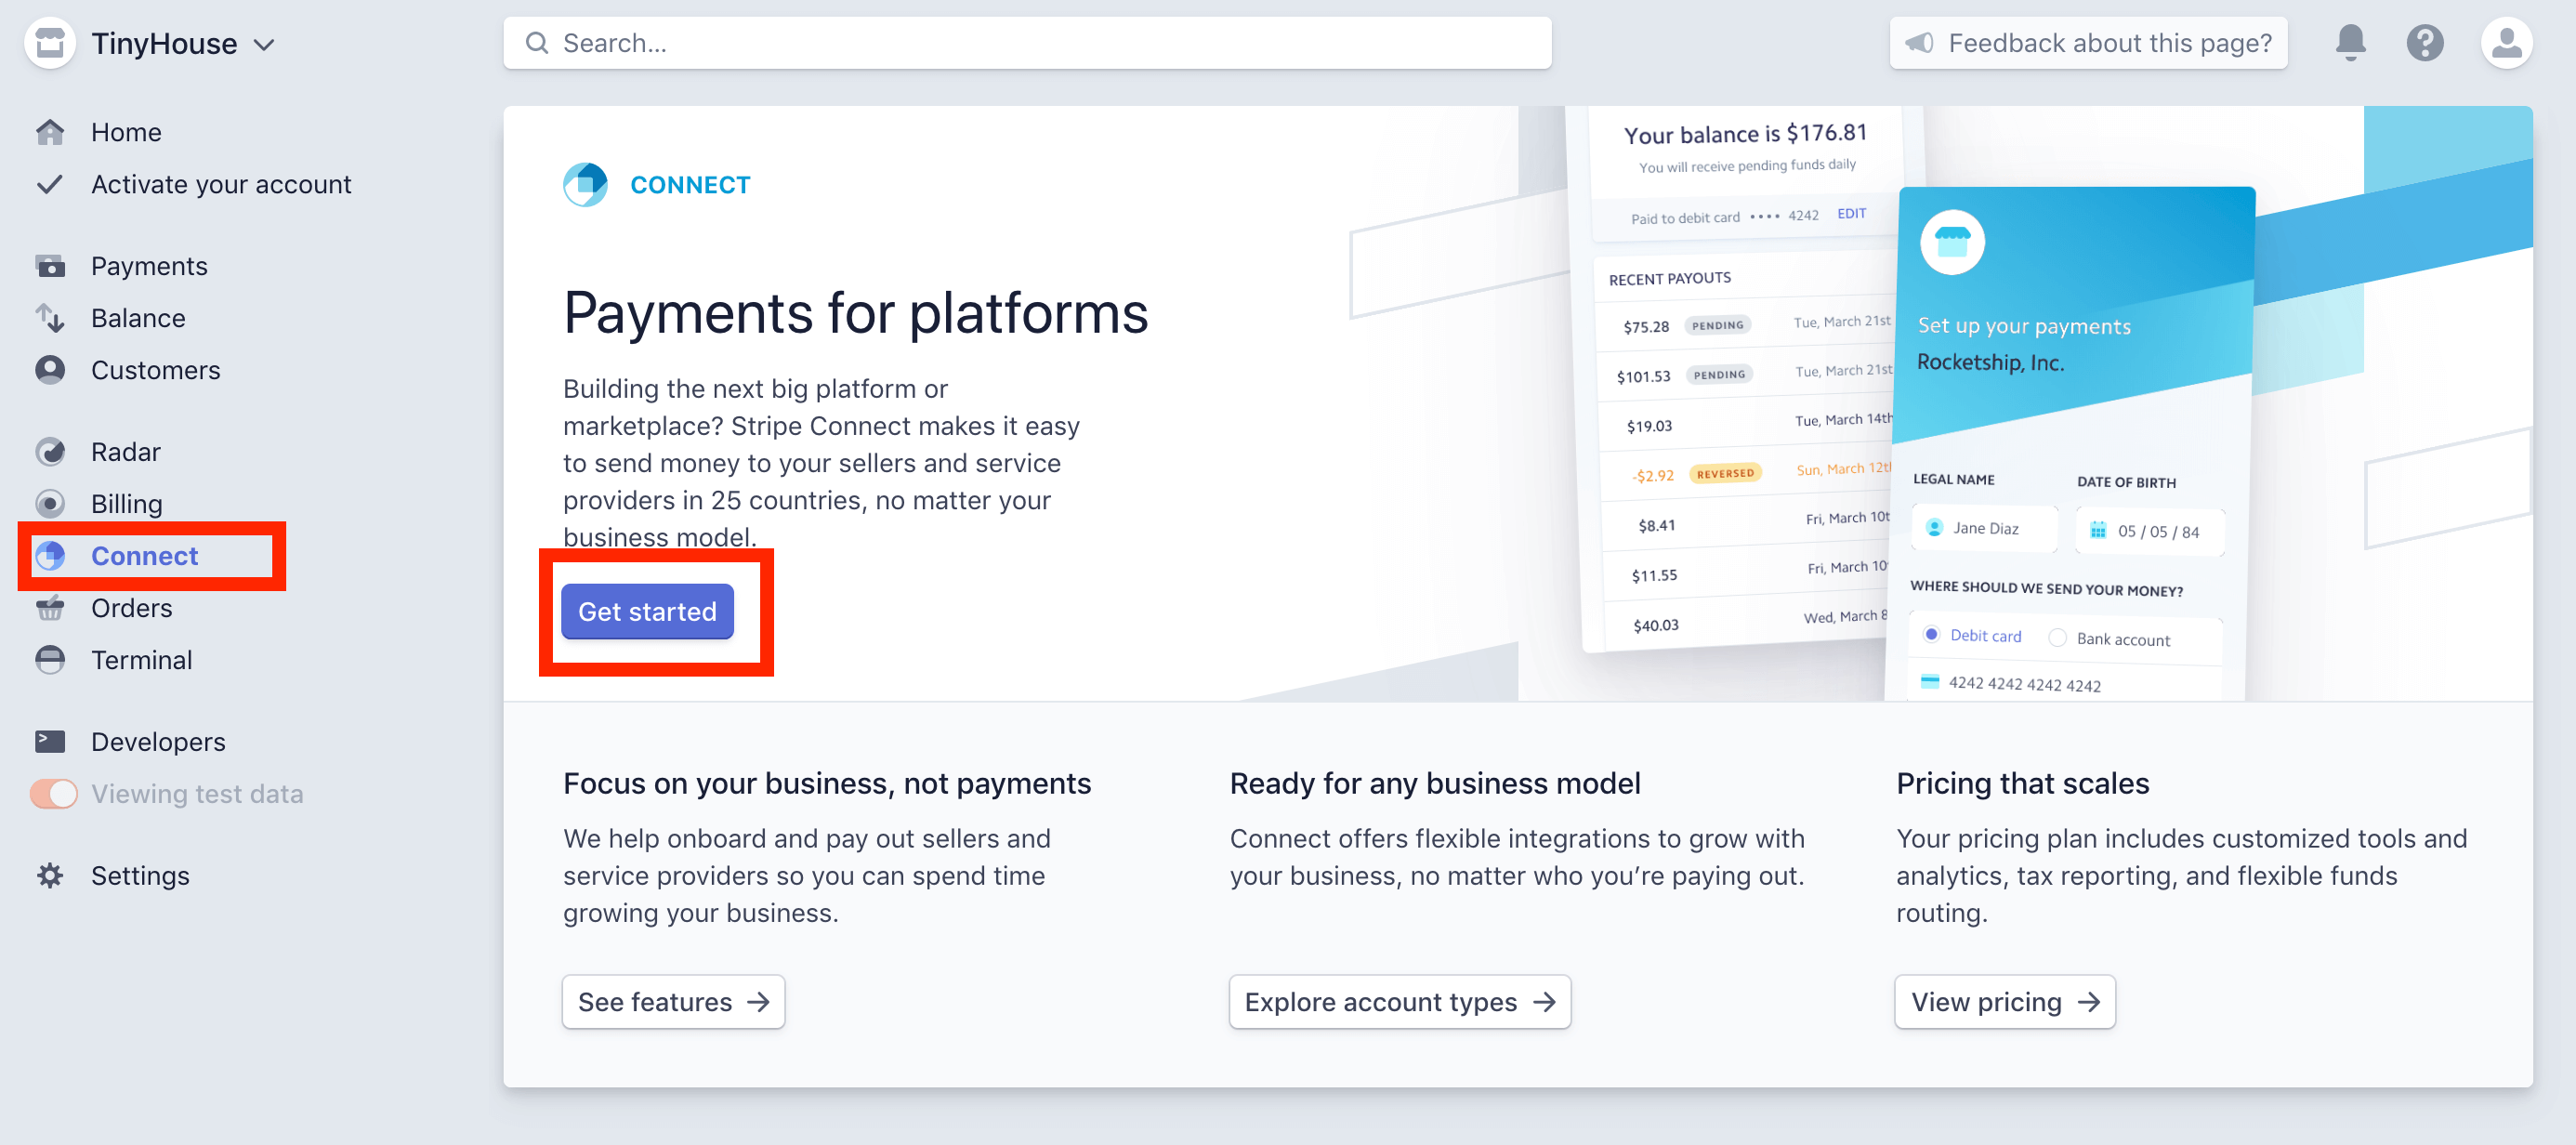
On the left-hand panel of our dashboard, there exist tabs that allow us to use the different Stripe utility tools - like Radar, Connect, Billing, etc.
We’re interested in Stripe Connect , so we’ll click Connect and follow up by clicking the Get Started button available to us.
It gives us two options with how we’d like to build with Connect. Either, we’re interested in:
- Using Stripe Connect for a Marketplace or Platform like Lyft, Squarespace, or Kickstarter.
- Or, we can use Stripe Connect within the context of an extension.
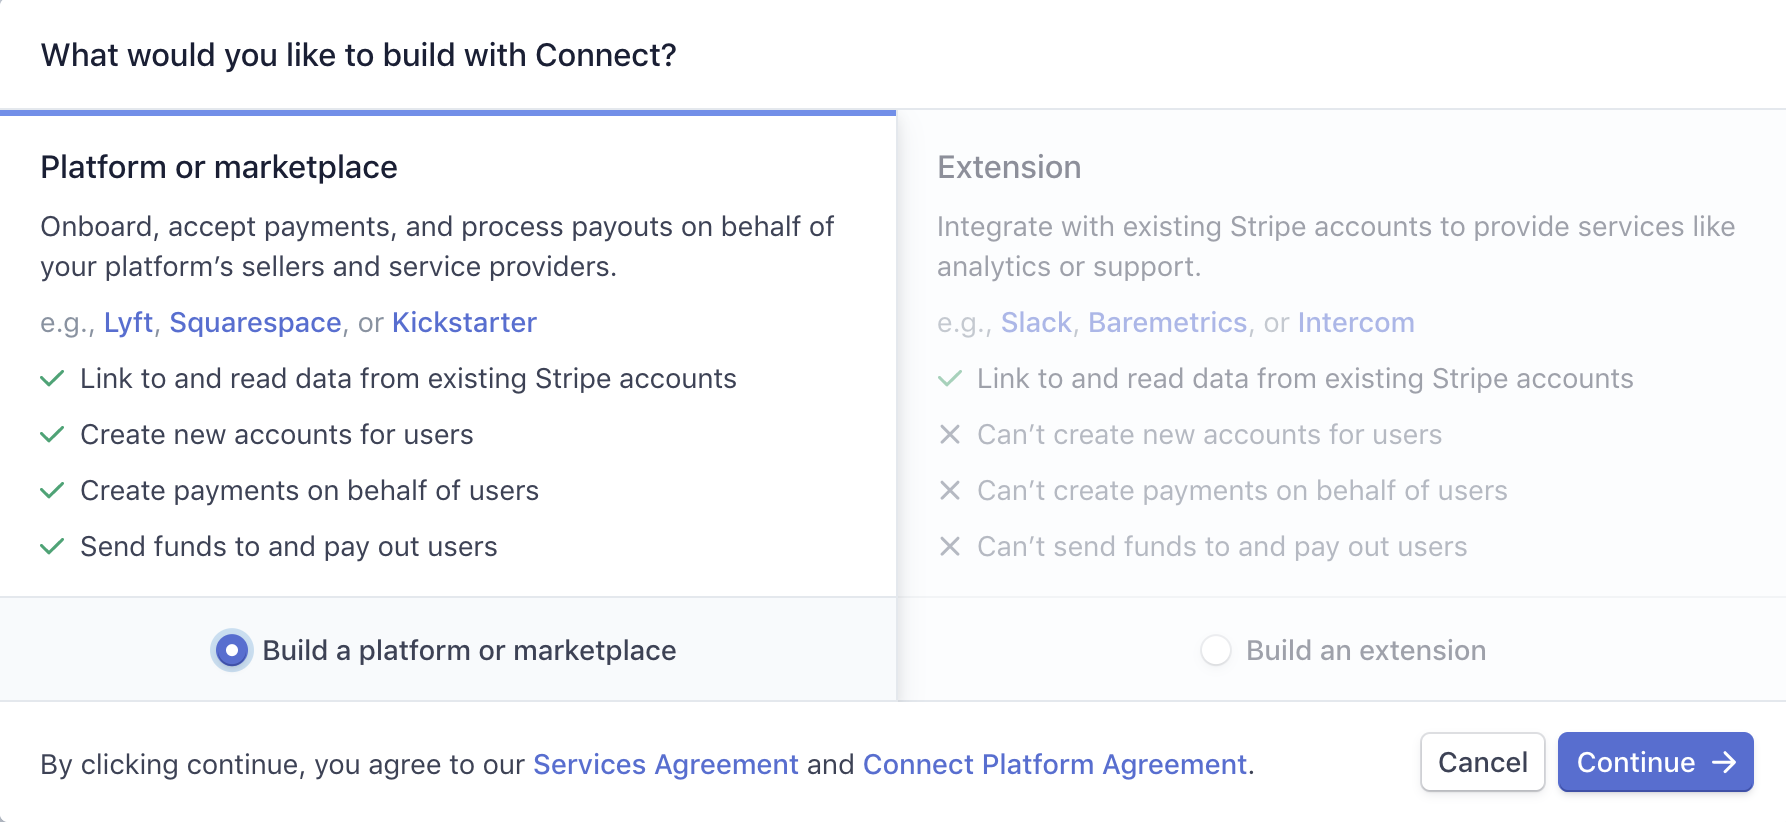
We’re interested in having our users in our platform connect with new Stripe accounts, create payments on behalf of users, and send funds to and payout users. As a result, we’re interested in the Platform/Marketplace option so we’ll pick that and proceed.
With Stripe Connect enabled, it gives us prompts on how we can learn more about Connect, activate our Connect tool, complete our platform profile, and create our first live connected account.
Publishable & Secret keys
First, we’ll head to the Developers section in the left-hand panel and select API Keys to collect the necessary API Keys for our server and client projects.
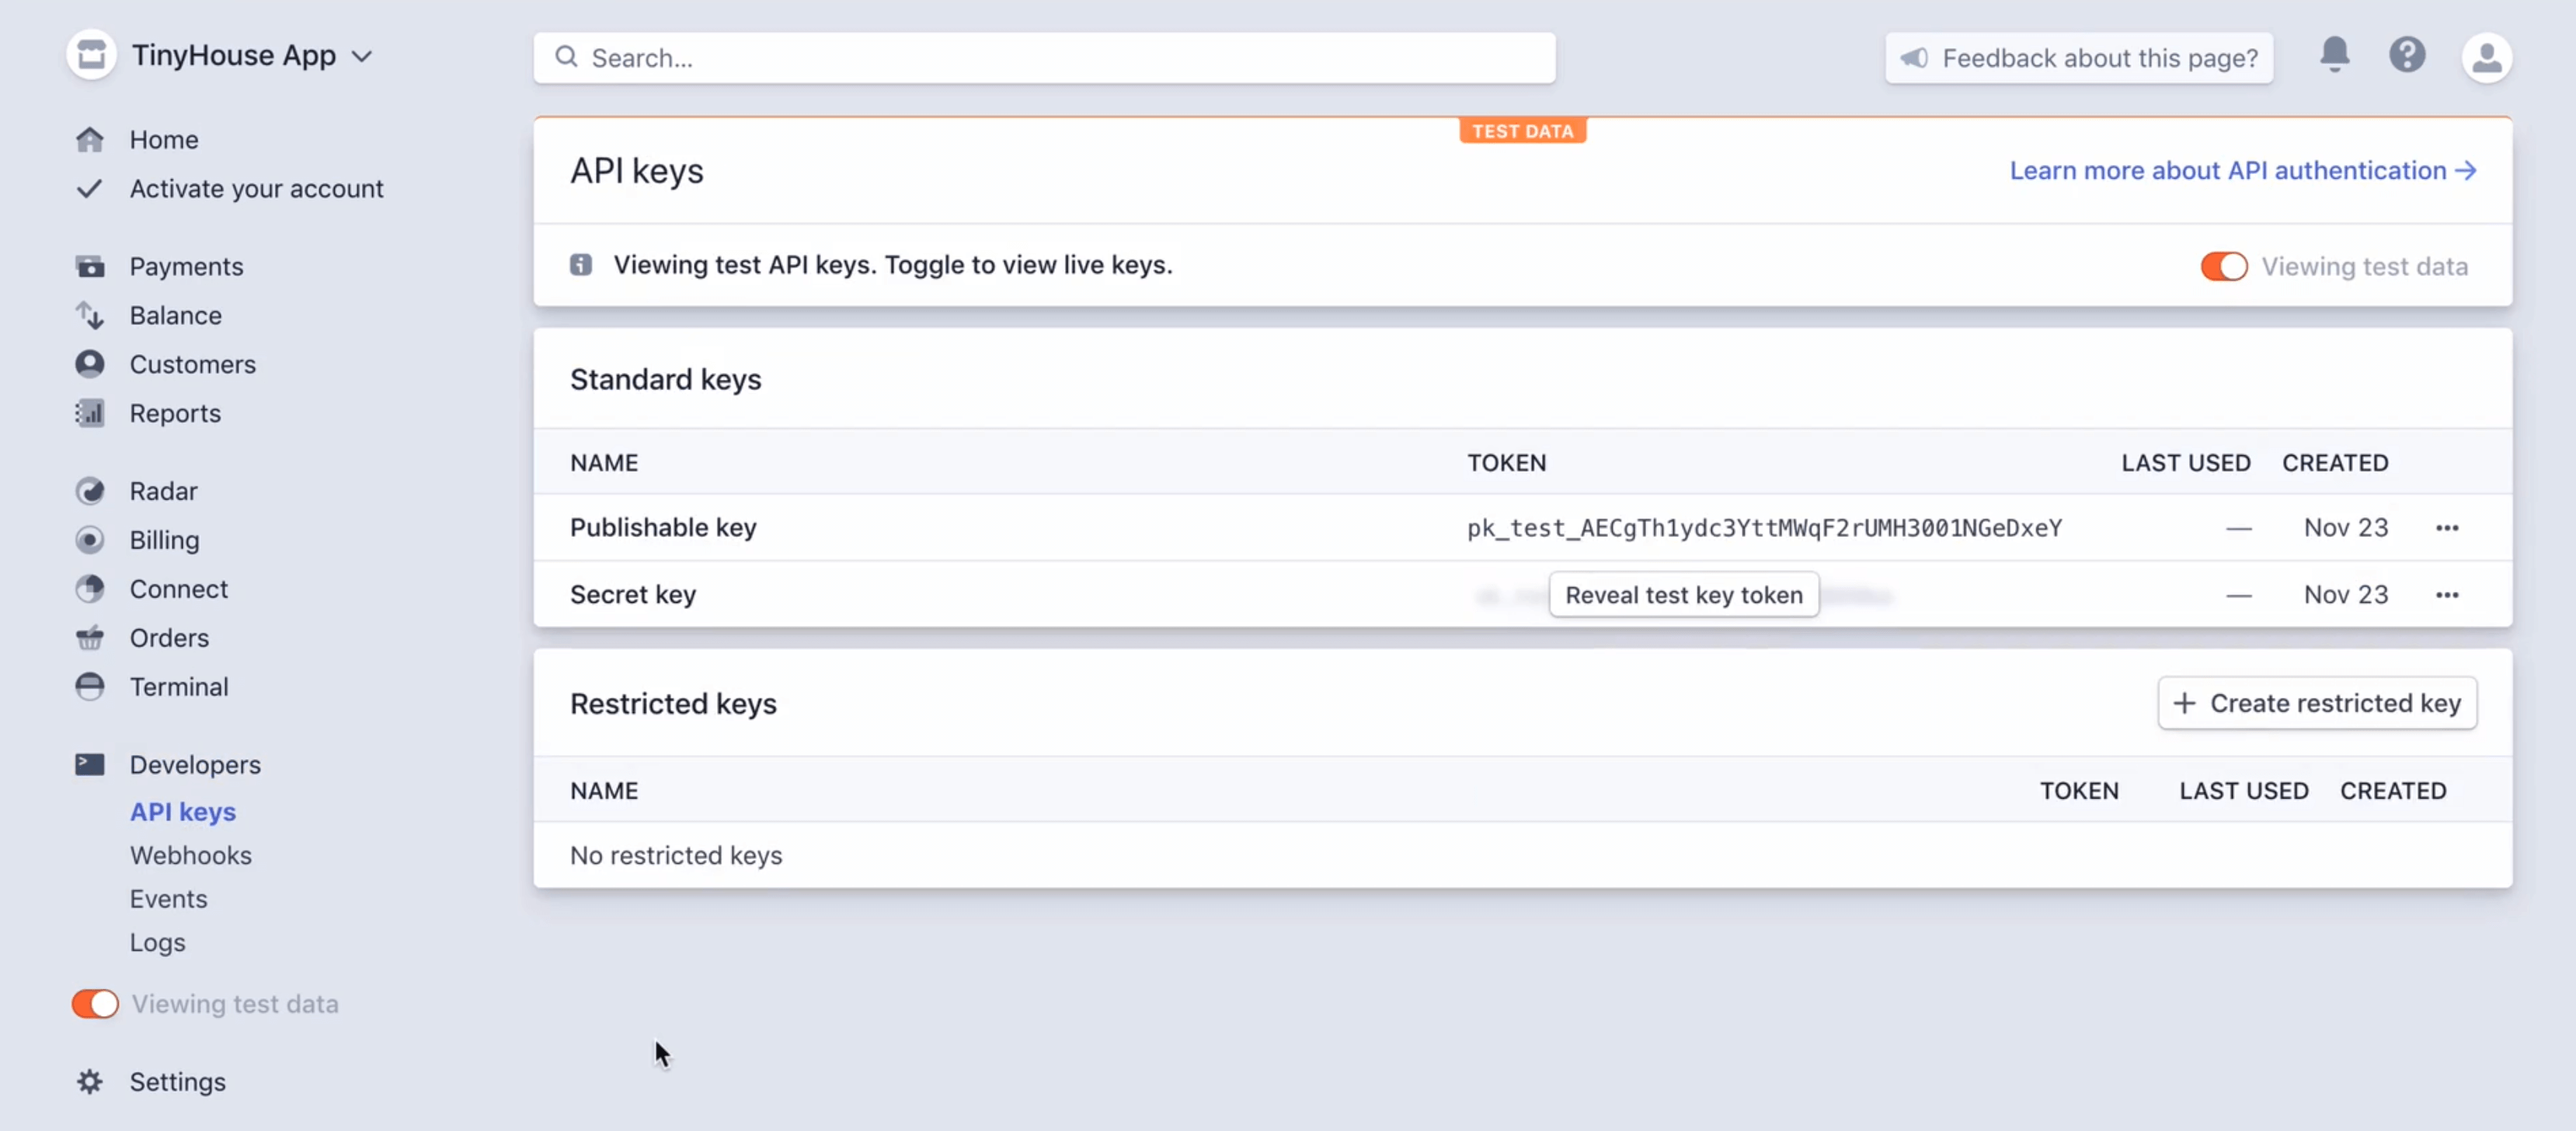
The keys shown in the image above refer to the API keys for our test environment since we have test data enabled. We’re presented with two keys - the Publishable key and Secret key .
- The Publishable key is meant to identify our application account with Stripe and isn’t intended to be secret. The Publishable key has the power to create tokens for credit card payments and will be used in our client React project .
- The Secret key can perform API requests to our Stripe account without restriction and therefore should be secret and kept within our server project .
First and foremost, we’ll copy the stripe Publishable key, head over to our React client project and create a .env file in the root directory of our React project (i.e. client/.env ). We’ll then create an environment variable called REACT_APP_S_PUBLISHABLE_KEY and provide the value we’ve copied over.
REACT_APP_S_PUBLISHABLE_KEY=pk_test_************************
Next, we’ll copy over our account’s Secret key, head over to our server project, and create an environment variable called S_SECRET_KEY and provide the value we’ve copied over.
S_SECRET_KEY=sk_test_************************
Note : The environment variables we’ve created here refer to our test environment (hence the "
_test_" keyword in each string value. These test credentials are for development purposes to test with fake payment information. Live credentials will be used only when real payments are ready to be made in our app.
Stripe Connect Client ID & Redirect URL
We’ll now need to set up a redirect URL for our Stripe Connect account. Our Stripe OAuth redirect URL is the URL our users will be redirected to after they’ve connected through our Stripe Connect account.
To be able to specify this, we can head over to the settings page, and from there, head over to Connect Settings .
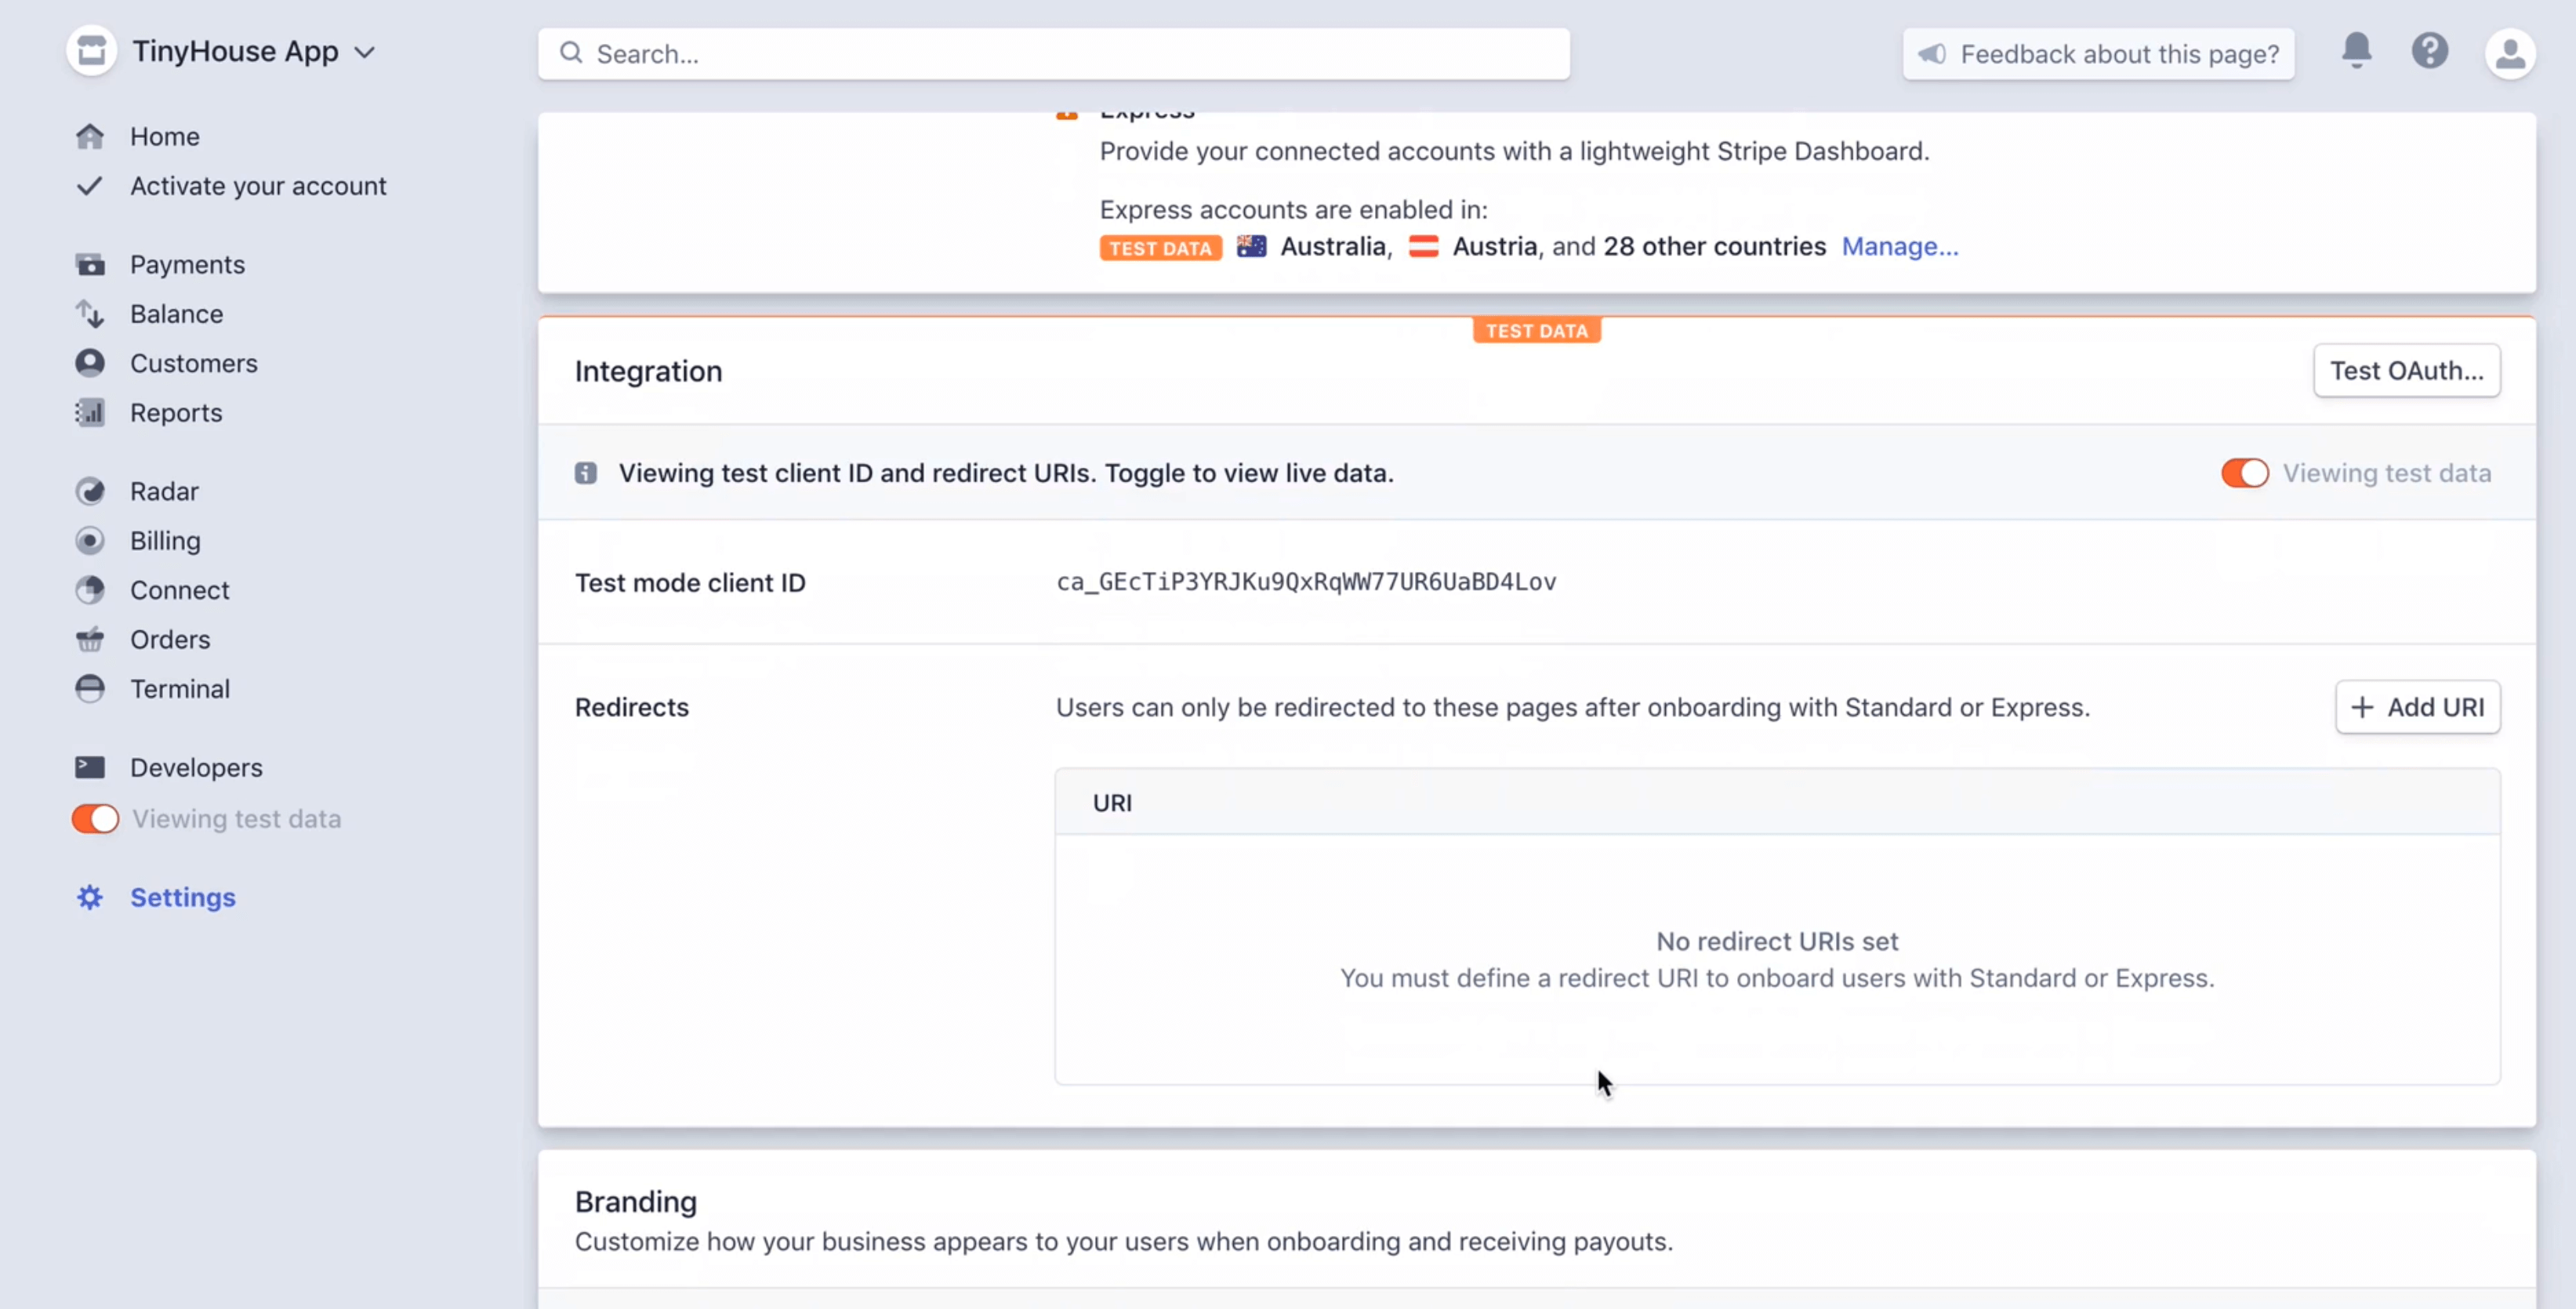
This is where we can see our Stripe Connect client ID and where we can set our redirect URL. The client ID will be used to construct the URL target where the user can navigate to and then be prompted to log in with their stripe information. It isn’t necessarily a secret but we’ll need this in our React client project, so we’ll copy it over, head over to the .env file in our React project, and create a new environment variable labeled REACT_APP_S_CLIENT_ID with the value we’ve just copied.
REACT_APP_S_CLIENT_ID=ca_******************
When a user successfully logs-in with their Stripe account, we’ll want to redirect them somewhere where Stripe will return a code in the URL that we’ll capture and use to authenticate the fact that the user has logged in with Stripe. Just like how we have a /login route in our app for when a user logs in with Google OAuth, we’ll have a /stripe route in our app dedicated to receiving the code returned from Stripe OAuth.
For our local development environment, we’ll specify the redirect URL as http://localhost:3000/stripe .
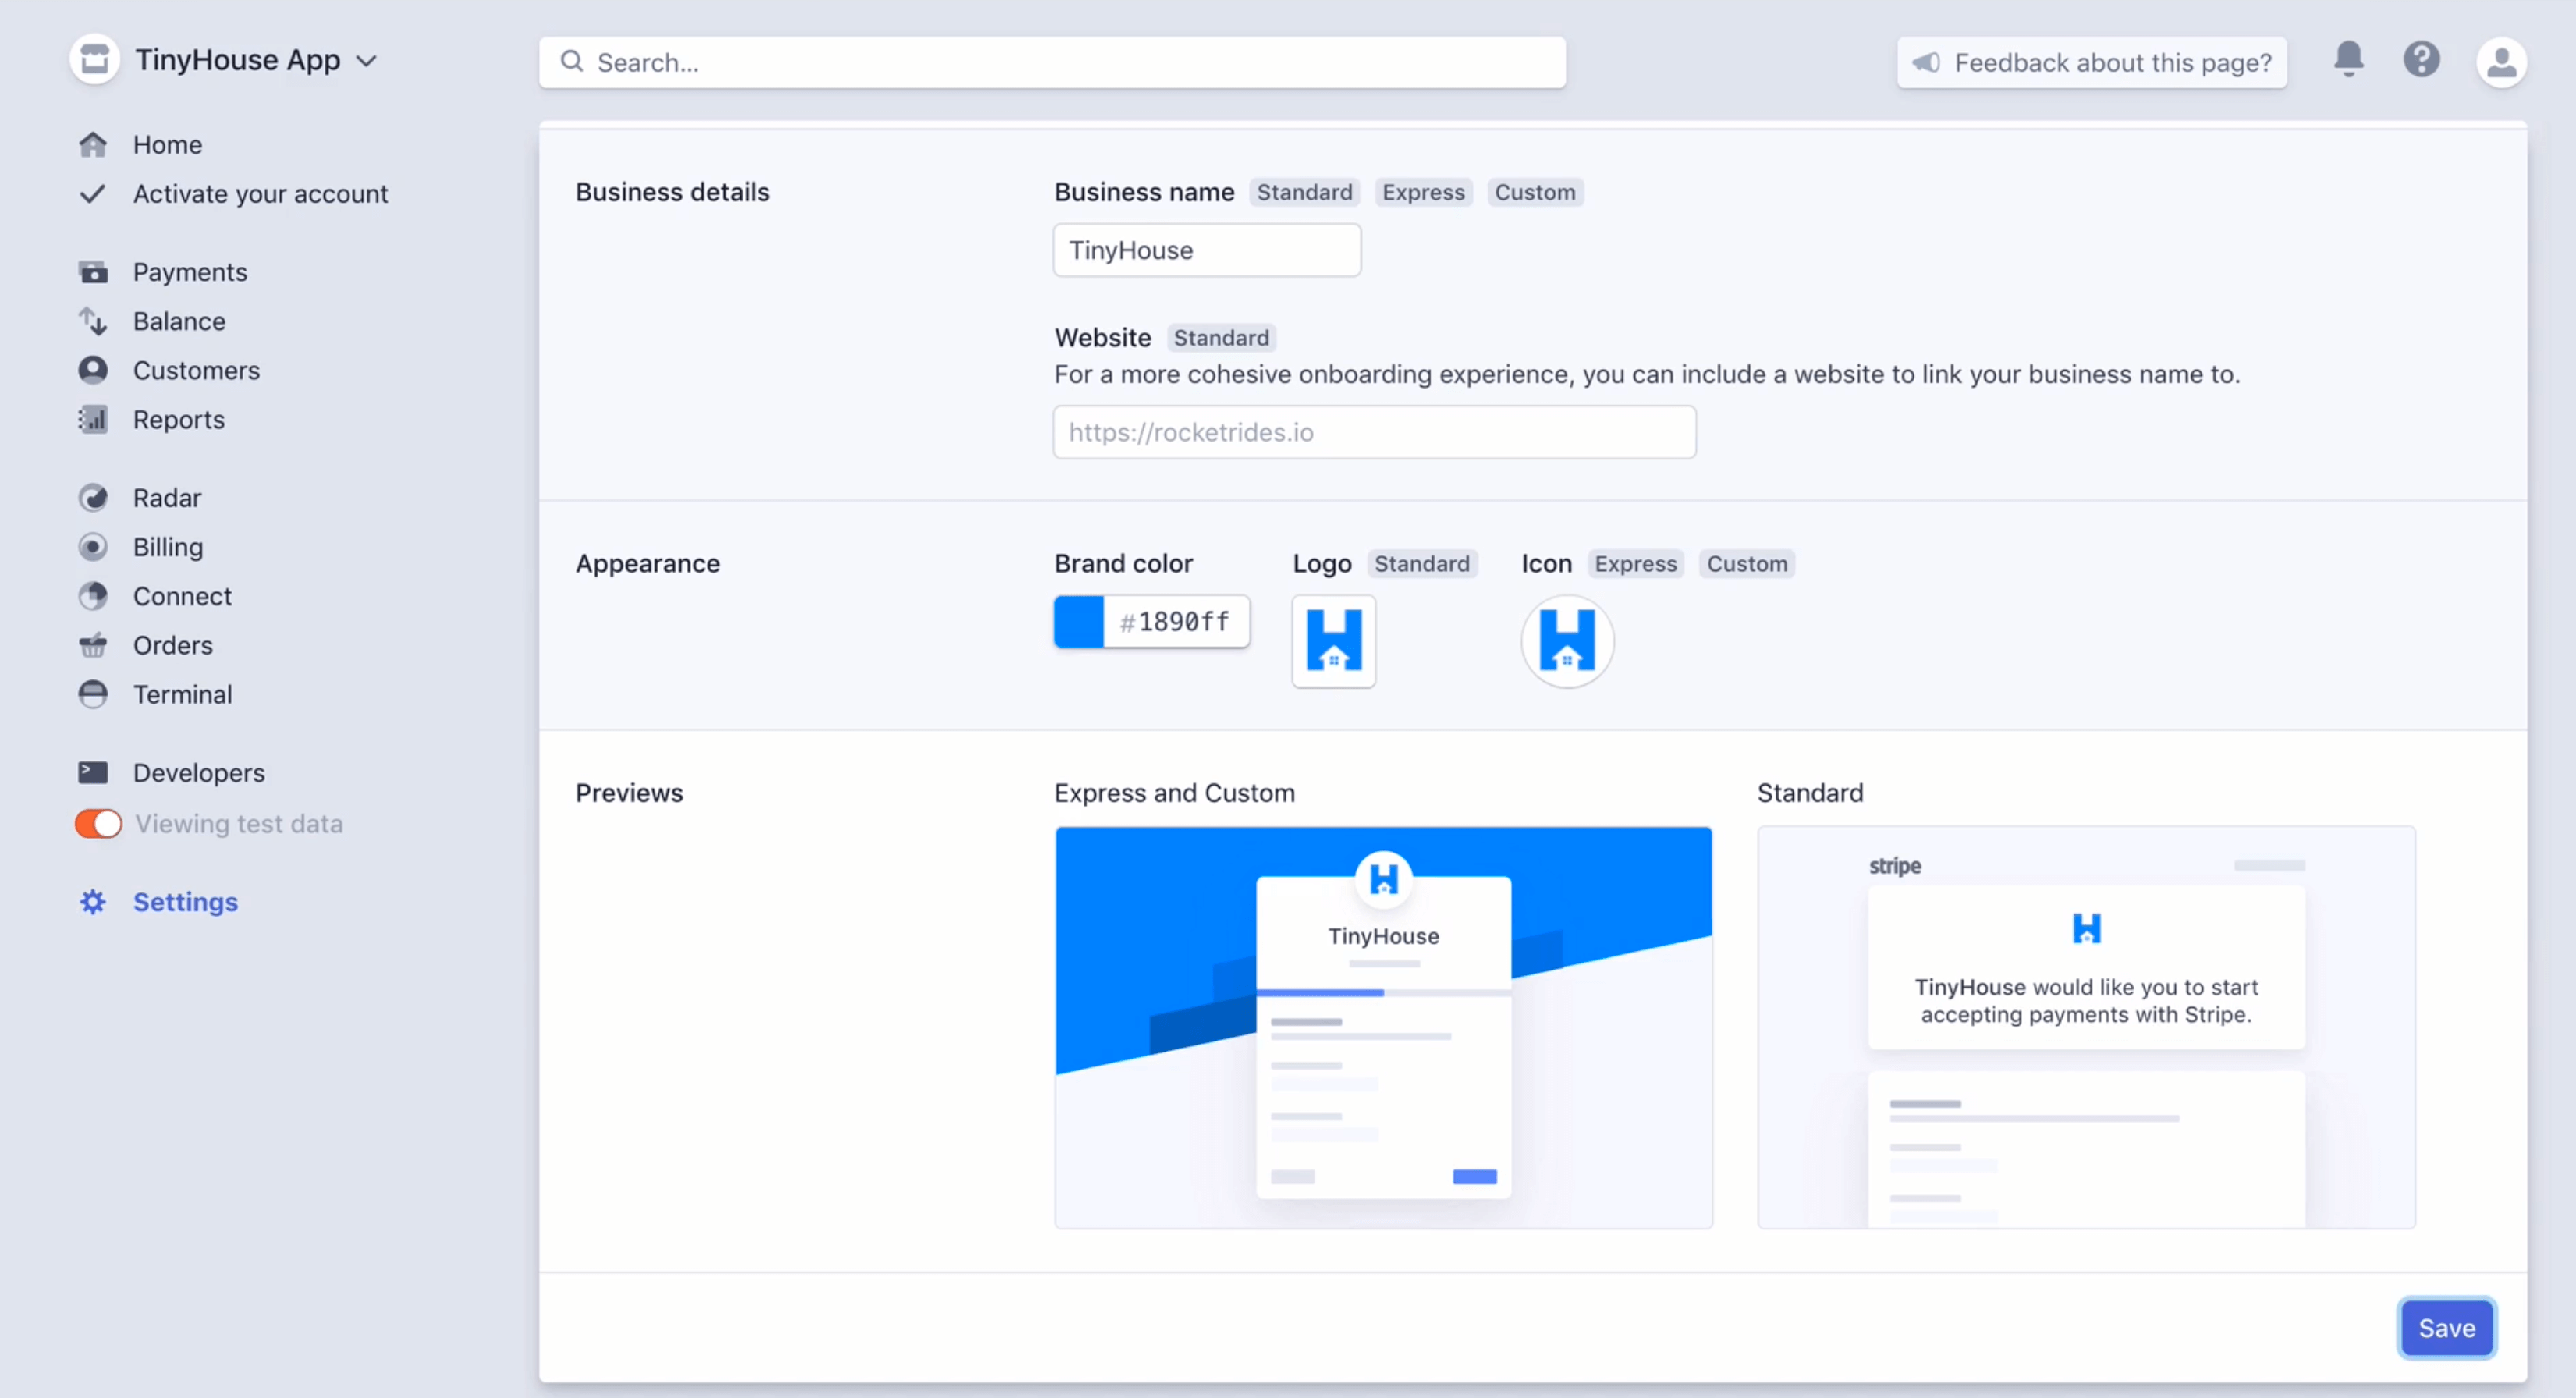
Stripe Connect Branding
Though this isn’t very important, we can provide branding information for how our business will appear to users when they’re onboarding or receiving payouts.
We’ll specify a Business Name of TinyHouse , a brand color that matches the brand of our app ( #1890ff ), and a logo and appropriate icon. Find details of the branding we’ve used here.
With the relevant Stripe credentials prepared and stored as environment variables in our app, we’ll begin building the GraphQL fields we’ll need in our API in the next lesson.
STRIPE CONNECT GRAPHQL FIELDS
Let’s brainstorm the GraphQL fields we’ll need to integrate Stripe Connect into our app. As we’ve mentioned in the previous lesson, Stripe uses the industry-standard OAuth 2.0 protocol for authorization. At this point, we’re not looking to see how payments can be made from tenants to hosts when a booking is made but instead provide the capability for users to connect through our Stripe Platform and be a connected account on our platform. Why do we want this? By having users connected on to our Stripe Platform account - when a payment is made to them - we can be the middleman and ensure the payment is routed to their Stripe account while we take our platform fee.
GAMEPLAN
Here’s an overview of what it would look like when users have connected to our Stripe Connect account, TinyHouse App .
At this stage, these users would have a standard Stripe account, be able to log in to their own dashboard and be able to process charges of their own. In short, we want to have users who’ve logged in to our TinyHouse application be able to connect to their Stripe account and be a connected account on our Stripe Connect platform .
The authentication flow for having a user connect to their Stripe account is going to be very similar to the OAuth 2.0 implementation for when a user logs in with their Google Account.
On the client application, we’ll have a call to action for the user who’s already signed in to our application to connect their Stripe account.
When the user clicks the action to connect, they’ll be redirected to Stripe’s login page to log in with their Stripe account. This page notifies the user about the Stripe Connect account they’re connecting with and this is determined by the Client ID value that is part of the URL. At this moment, for a real live application, the user will need to sign in with their already existing Stripe account or create and activate a new account in the form presented to them. If our Stripe connected account is in test mode, Stripe will give users the capability to skip this account form which will be useful for us during testing.
Once the user is successfully logged in, they’ll be redirected to the redirect URL we’ve specified for our connected account client. We’ve said in the previous lesson, we’ll want users to be redirected to the /stripe route of our app. In development, we’ve set the route as localhost:3000/stripe but in production, we’ll reference our production app’s domain name (e.g. tinyhouse.app/stripe ). Either way, Stripe returns an authorization code as a query parameter in the URL.
When redirected, our client app receives the authorization code and sends it to our server. Our server uses this authorization code to make another request with Stripe to receive the connected user’s account Stripe information. Many different fields are to be returned but we’ll be interested in keeping and storing the user’s connected stripe_user_id value. This stripe_user_id value will be used later on to act on behalf of the user . If someone books this connected user’s listing, we’ll create a stripe charge and then say we would want the account with this user’s id to be paid out. On our database, we’re going to store this stripe_user_id as the walletId field of a user document.

In this module, we’re not going to concern ourselves with how the actual payments or charges are going to be made. We’ll spend our focus on having users in our app connect through Stripe with our connected TinyHouse account, from where we can receive the user’s Stripe user ID.
CONNECTSTRIPE , DISCONNECTSTRIPE
In this lesson, we’re going to create two new GraphQL mutations to help with authenticating users with Stripe OAuth - connectStripe and disconnectStripe .
The connectStripe mutation will take a code input that is to be provided by Stripe and make another request to Stripe using the code to get the user’s “wallet” information. The disconnectStripe mutation will allow a user the ability to disconnect their Stripe “wallet” from our platform (or in other words, to remove their Stripe credentials kept in the database).
Note: With Stripe, we’ll be able to create the URL on the client to take the user to the consent form to log in so we won’t need to have a query or mutation for this.
connectStripe and disconnectStripe are the two GraphQL root-level mutations we’ll need to handle Stripe OAuth. Let’s prepare our GraphQL API type definitions and resolvers with these new fields. We’ll first head over to the src/graphql/typeDefs.ts file in our server project. Similar to how our logIn and logOut mutations when resolved return a Viewer object, we’ll look to have the connectStripe and disconnectStripe mutations return a Viewer object when resolved successfully as well.
export const typeDefs = gql`
  # ...
  # ...

  type Mutation {
    logIn(input: LogInInput): Viewer!
    logOut: Viewer!
    connectStripe: Viewer!
    disconnectStripe: Viewer!
  }
`;
Note: If we recall,
viewerrefers to the object of the user viewing our application.
Similar to how our logIn mutation expects an input object argument object that is to contain a code field of type string, we’ll have our connectStripe mutation also expect to have an input be passed in which is to contain a code of type string.
server/src/graphql/typeDefs.ts
  type Mutation {
    logIn(input: LogInInput): Viewer!
    logOut: Viewer!
    connectStripe(input: ConnectStripeInput!): Viewer!
    disconnectStripe: Viewer!
  }
We’ll call the input object type for the connectStripe mutation - ConnectStripeInput .
server/src/graphql/typeDefs.ts
  input ConnectStripeInput {
    code: String!
  }
When we built the logIn mutation, we mentioned that the log-in capability can happen in one of two ways - one where the client app provides a code and the other where the client provides a viewer cookie instead. This is why the input argument is an optional argument for the logIn mutation. However, for our connectStripe mutation, we expect the capability to connect with Stripe to only happen with the presence of a valid authorization code which is why input for the connectStripe mutation is a required argument.
Next, we’ll set up the boilerplate of our resolver functions for the fields we’ve just created in our schema. Since the capability to connect and disconnect with Stripe falls in the context of a viewer viewing our app, we’re to have these resolver functions be created as part of the viewerResolvers map in the src/graphql/resolvers/Viewer/index.ts file.
For now, we’ll have both the connectStripe and disconnectStripe mutations return { didRequest: true } under the root level Mutation object.
// ...

// ...

export const viewerResolver: IResolvers = {
  Query: {
    // ...
  },
  Mutation: {
    // ...
    connectStripe: (): Viewer => {
      return { didRequest: true };
    },
    disconnectStripe: (): Viewer => {
      return { didRequest: true };
    }
  },
  Viewer: {
    // ...
  }
};
If we recall, the didRequest field is part of the Viewer object that is used to indicate that the viewer has been requested. This was useful within the context of logging in or logging out since we would want to notify the client the viewer object was requested from the server to the client. We’ll want to do something similar with our connectStripe and disconnectStripe mutations since we’ll look to manipulate and modify the viewer (i.e. the logged in user) in the database. Whether the connectStripe or disconnectStripe mutations are successful or not, we’ll want the client notified that a request was made.
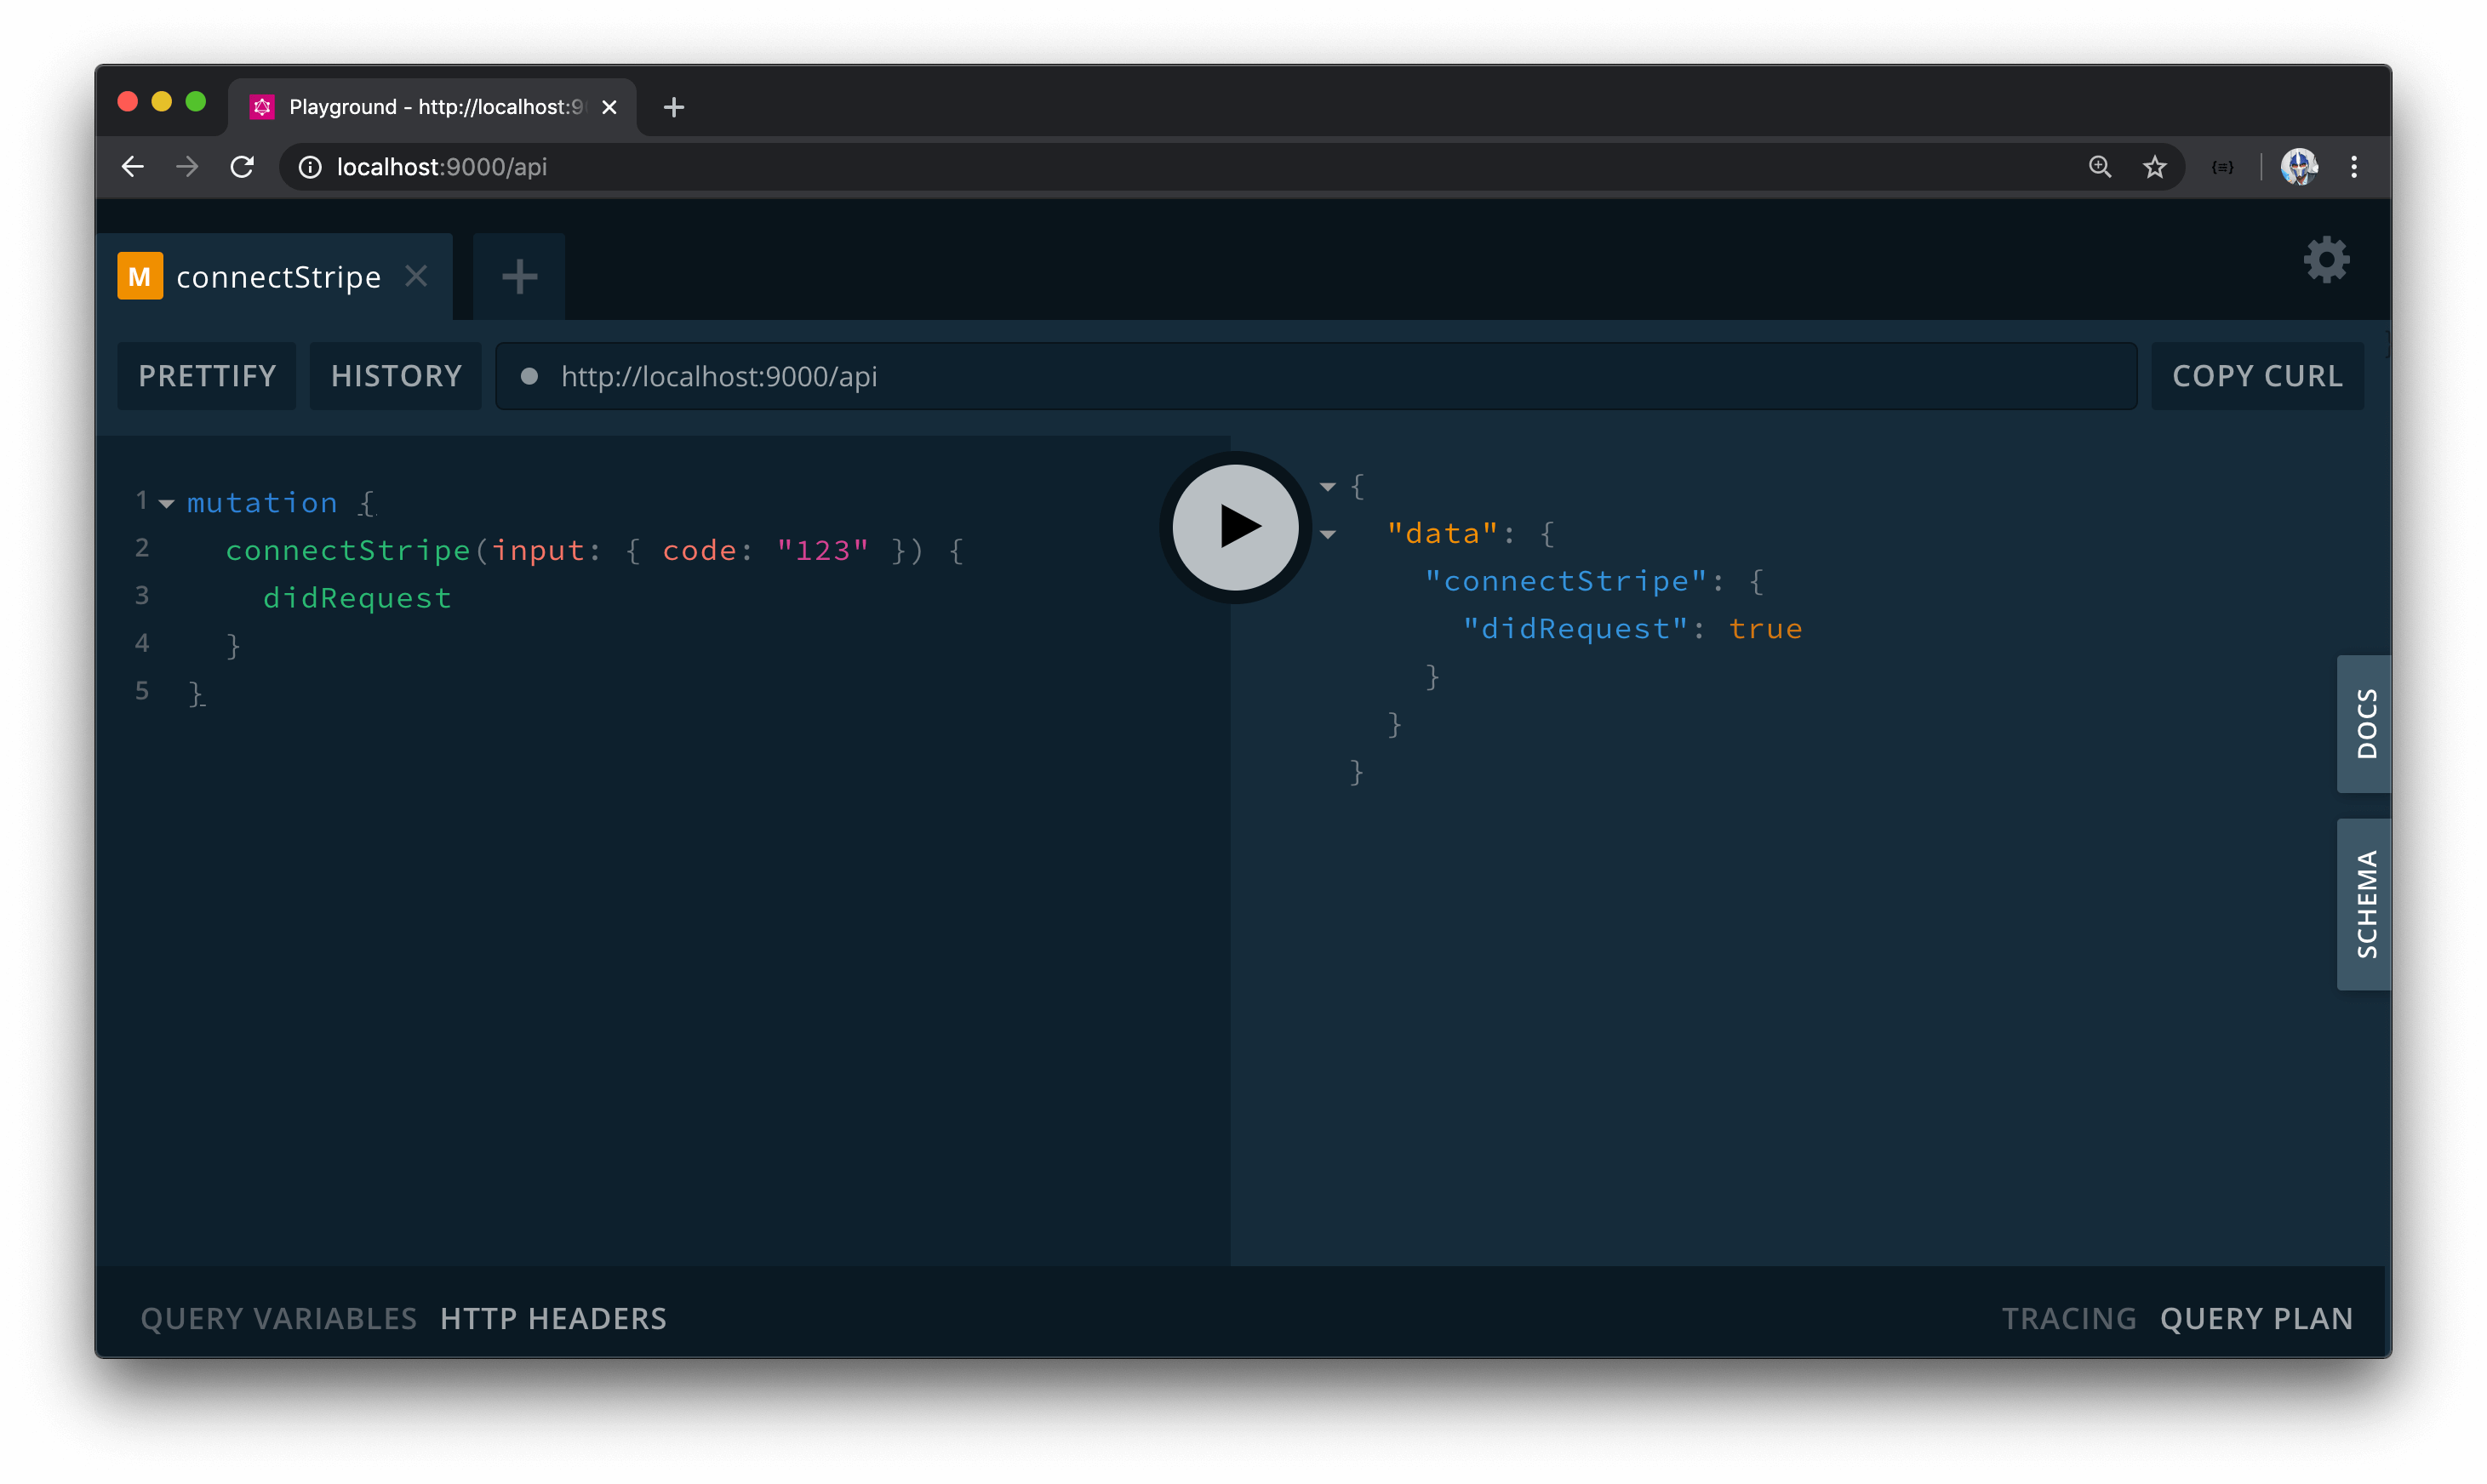
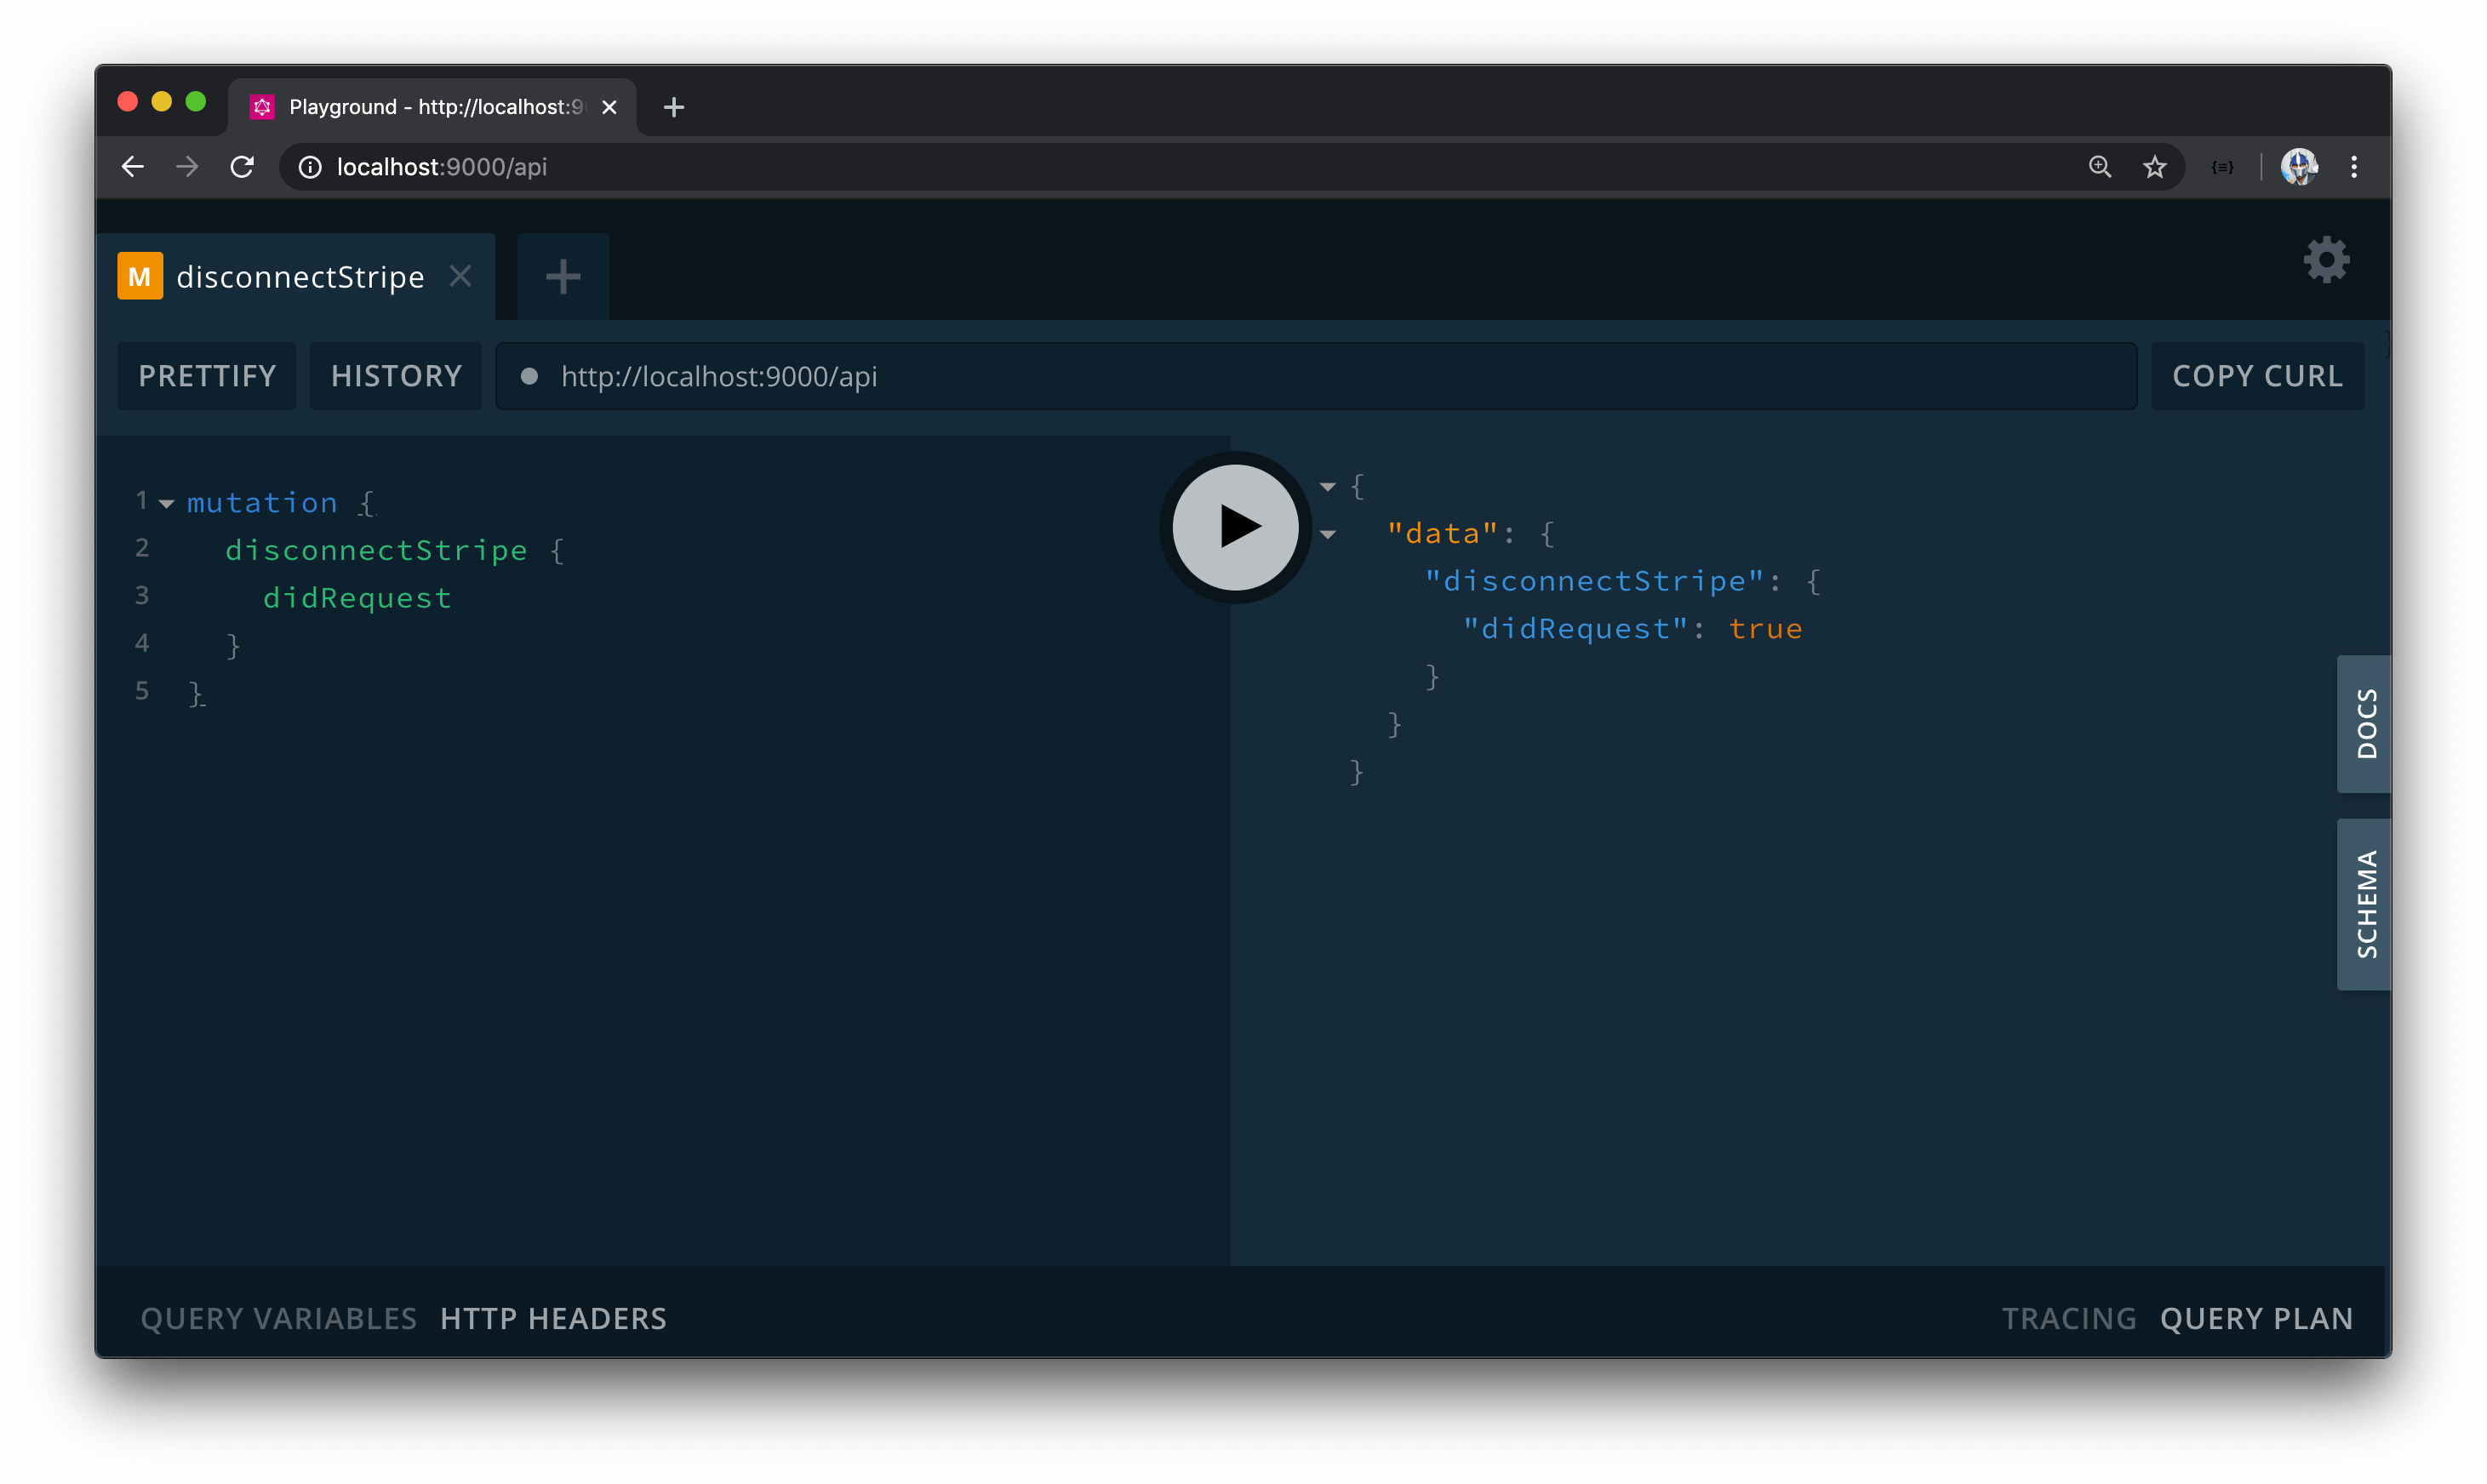
With our server running, if we head over to GraphQL playground at http://localhost:9000/api, we can see that each of our new mutation fields can be queried.
In the next lesson, we’ll update the resolver functions for the newly created mutations to execute the functionality we would want.
BUILDING THE STRIPE CONNECT RESOLVERS
🙋🏽 We’re performing Step 4: Fetch the user’s credentials from Stripe from the steps highlighted in the OAuth connection flow section of using Stripe Connect with Standard accounts. This can be seen - here.
The Stripe API library for Node.js applications now has first class TypeScript support. Find details on some minor changes that can be made - here.
In this lesson, we’ll establish the resolver functions for the connectStripe and disconnectStripe mutations. We’ll be installing a new dependency in our server application and the accompanying type definitions. We’re going to install the official Stripe API library for Node.js applications. The stripe Node.js library will allow us to make requests to Stripe from our Node server.
With that said, we’ll head to the terminal and install the stripe library.
npm i stripe
We’ll then install the community prepared typings.
npm i -D @types/stripe
INTERACTING WITH STRIPE API
Just like how we have a Google.ts file kept within our src/lib/api/ folder responsible in setting up the functions necessary to interact with Google APIs, we’ll create a Stripe.ts file in the src/lib/api/ folder to consolidate all the functionalities we are to have to interact with the Stripe API.
server/
  src/
    // ...
    lib/
      api/
        // ...
        Stripe.ts
      // ...
  // ...
In the src/lib/api/index.ts file, we’ll re-export the Stripe object we’ll soon create.
server/src/lib/api/index.ts
export * from "./Stripe";
In the newly created Stripe.ts file, we’ll import the stripe constructor from the installed stripe library. We’ll create a constant function called client that will be the result of the stripe() constructor function.
import stripe from "stripe";

const client = new stripe();
The stripe() constructor expects us to pass in the API Secret key of our platform Stripe account. We have this secret key kept as an environment variable in our server project so we’ll reference it and pass it into the stripe() function with process.env.S_SECRET_KEY .
import stripe from "stripe";

const client = new stripe(`${process.env.S_SECRET_KEY}`);
We’ll construct an object called Stripe that at this moment will only have a connect() function property that is to accept a code parameter of type string . This code will be the authorization code received from the client and used to make an authorization request to Stripe’s server.
import stripe from "stripe";

const client = new stripe(`${process.env.S_SECRET_KEY}`);

export const Stripe = {
  connect: async (code: string) => {}
};
In our connect() function, we’ll use the oauth.token() function available to us within our constructed Stripe client. This oauth.token() function takes an options object and returns the connected user’s information. We’ll need to specify the code that is to be passed into this function to successfully connect the user to our Stripe Connect platform and retrieve the users connected stripe_user_id . In addition, the documentation tells us to specify a grant_type option with a value of "authorization" with which we’ll do as well.
Our TypeScript ESLint set-up will warn us and tell us that the options properties in the function should be in camelCase format. We agree but we can’t change the format of the grant_type property it so we’ll simply disable the @typescript-eslint/camelcase rule around our options.
server/src/lib/api/Stripe.ts
import stripe from "stripe";

const client = new stripe(`${process.env.S_SECRET_KEY}`);

export const Stripe = {
  connect: async (code: string) => {
    const response = await client.oauth.token({
      /* eslint-disable @typescript-eslint/camelcase */
      grant_type: "authorization_code",
      code
      /* eslint-enable @typescript-eslint/camelcase */
    });

    return response;
  }
};
The response object returned from the client.oauth.token() function is to contain a series of different fields such as the stripe_user_id , the access_token , scope , livemode , token_type , etc. With OAuth 2.0 implementations, we might usually look to track the access_token of a user so we can make requests on behalf of the person’s account. However, in this case, all we’ll need to collect for our use case is the stripe_user_id . The stripe_user_id is a reference to the connected account, so when a payment is made, we’ll simply payout to the user with this particular ID.
If you need to do more things within your Stripe platform such as recurring payments or acting on behalf of a user to interact with other APIs, you may need to collect more information for the connected account (such as the access_token ). However in our case, we’ll only grab the stripe_user_id from the response in our connectStripe() mutation resolver function since that is what we’ll only need.
CONNECTSTRIPE()
With that said, we’ll now modify our connectStripe() and disconnectStripe() mutation resolvers we have in the viewerResolvers map and we’ll begin with the connectStripe() mutation.
In the types.ts file within the src/graphql/resolvers/Viewer/ folder, we’ll first create an interface to represent the shape of data for the arguments that can be passed into our connectStripe mutation. We’ll create and export this interface called ConnectStripeArgs which is to have an input with a code property of type string .
server/src/graphql/resolvers/Viewer/types.ts
export interface ConnectStripeArgs {
  input: { code: string };
}
In our viewerResolvers map in the adjacent index.ts file, we’ll import the ConnectStripeArgs interface. In our connectStripe() mutation resolver, we’ll retrieve the input argument and the db and req objects from the context available in our resolvers. We’ll state that our connectStripe() mutation function will be asynchronous and will return a Promise that when resolved will be the Viewer object.
// ...

// ...

export const viewerResolver: IResolvers = {
  Query: {
    // ...
  },
  Mutation: {
    // ...
    connectStripe: async (
      _root: undefined,
      { input }: ConnectStripeArgs,
      { db, req }: { db: Database; req: Request }
    ): Promise<Viewer> => {
      // ...
    }
    // ...
  },
  Viewer: {
    // ...
  }
};
In the connectStripe function, we’ll set up a try...catch block and at the beginning of our try statement, we’ll destruct the code value from the input argument. We’ll then look to identify the viewer that is making the request. We’ll only want a viewer that is logged in our application to connect with Stripe.
We already have an authorize() function we’ve set up to determine the identity of a viewer so we’ll run the authorize() function and pass in the db and req objects it expects. If the viewer can’t be found or recognized, we’ll throw an error along the lines of "viewer cannot be found" .
// ...

// ...

export const viewerResolver: IResolvers = {
  Query: {
    // ...
  },
  Mutation: {
    // ...
    connectStripe: async (
      _root: undefined,
      { input }: ConnectStripeArgs,
      { db, req }: { db: Database; req: Request }
    ): Promise<Viewer> => {
      try {
        const { code } = input;

        let viewer = await authorize(db, req);
        if (!viewer) {
          throw new Error("viewer cannot be found");
        }
      } catch {}
    }
    // ...
  },
  Viewer: {
    // ...
  }
};
We’ll need to import this authorize() function from the src/lib/utils/ folder.
server/src/graphql/resolvers/Viewer/index.ts
import { authorize } from "../../../lib/utils";
We’ll also import the Stripe object from the src/lib/api/ folder since we’re about to use it to run the connect() function we’ve just set up.
server/src/graphql/resolvers/Viewer/index.ts
import { Google, Stripe } from "../../../lib/api";
When this viewer object is available in our connectStripe() function, we’ll know that this request is coming from a viewer successfully logged in so we’ll then run the connect() function from our Stripe object and pass in the code that is to be passed from the client. We’ll call the object that is returned from Stripe’s servers - wallet . We’ll check to see if this wallet exists and if not, we’ll throw an error.
// ...

// ...

export const viewerResolver: IResolvers = {
  Query: {
    // ...
  },
  Mutation: {
    // ...
    connectStripe: async (
      _root: undefined,
      { input }: ConnectStripeArgs,
      { db, req }: { db: Database; req: Request }
    ): Promise<Viewer> => {
      try {
        const { code } = input;

        let viewer = await authorize(db, req);
        if (!viewer) {
          throw new Error("viewer cannot be found");
        }

        const wallet = await Stripe.connect(code);
        if (!wallet) {
          throw new Error("stripe grant error");
        }
      } catch {}
    }
    // ...
  },
  Viewer: {
    // ...
  }
};
With the wallet information available, we’ll then look to update the user document for the viewer in the "users" collection in our database and specify the wallet stripe_user_id we’ve just obtained. We’ll use Mongo’s findOneAndUpdate() function to achieve this. We’ll find the document where the _id field value is equal to the _id value of the viewer . We’ll use the set option property to update the walletId field of this document with the stripe_user_id value from the wallet . We’ll specify the returnOriginal property to be false so this function value will be the updated value, not the original.
// ...

// ...

export const viewerResolver: IResolvers = {
  Query: {
    // ...
  },
  Mutation: {
    // ...
    connectStripe: async (
      _root: undefined,
      { input }: ConnectStripeArgs,
      { db, req }: { db: Database; req: Request }
    ): Promise<Viewer> => {
      try {
        const { code } = input;

        let viewer = await authorize(db, req);
        if (!viewer) {
          throw new Error("viewer cannot be found");
        }

        const wallet = await Stripe.connect(code);
        if (!wallet) {
          throw new Error("stripe grant error");
        }

        const updateRes = await db.users.findOneAndUpdate(
          { _id: viewer._id },
          { $set: { walletId: wallet.stripe_user_id } },
          { returnOriginal: false }
        );
      } catch {}
    }
    // ...
  },
  Viewer: {
    // ...
  }
};
If the value property of the update result doesn’t exist, it means we haven’t been able to update the necessary document so we’ll throw an error and say "viewer could not be updated" . If the value property of the update result exists, we’ll update the viewer variable we have in this function with this new viewer object that is to now have the walletId property populated.
// ...

// ...

export const viewerResolver: IResolvers = {
  Query: {
    // ...
  },
  Mutation: {
    // ...
    connectStripe: async (
      _root: undefined,
      { input }: ConnectStripeArgs,
      { db, req }: { db: Database; req: Request }
    ): Promise<Viewer> => {
      try {
        const { code } = input;

        let viewer = await authorize(db, req);
        if (!viewer) {
          throw new Error("viewer cannot be found");
        }

        const wallet = await Stripe.connect(code);
        if (!wallet) {
          throw new Error("stripe grant error");
        }

        const updateRes = await db.users.findOneAndUpdate(
          { _id: viewer._id },
          { $set: { walletId: wallet.stripe_user_id } },
          { returnOriginal: false }
        );

        if (!updateRes.value) {
          throw new Error("viewer could not be updated");
        }

        viewer = updateRes.value;
      } catch {}
    }
    // ...
  },
  Viewer: {
    // ...
  }
};
We can have the mutation return whatever the client may need to access. We’ll return the viewer _id , token , avatar , and walletId fields. We’ll also specify the didRequest property of the viewer as true to convey that the request was made.
In our function’s catch statement, we’ll catch whatever error might have occurred and place it with an error statement that says "Failed to connect with Stripe" .
server/src/graphql/resolvers/Viewer/index.ts
    connectStripe: async (
      _root: undefined,
      { input }: ConnectStripeArgs,
      { db, req }: { db: Database; req: Request }
    ): Promise<Viewer> => {
      try {
        const { code } = input;

        let viewer = await authorize(db, req);
        if (!viewer) {
          throw new Error("viewer cannot be found");
        }

        const wallet = await Stripe.connect(code);
        if (!wallet) {
          throw new Error("stripe grant error");
        }

        const updateRes = await db.users.findOneAndUpdate(
          { _id: viewer._id },
          { $set: { walletId: wallet.stripe_user_id } },
          { returnOriginal: false }
        );

        if (!updateRes.value) {
          throw new Error("viewer could not be updated");
        }

        viewer = updateRes.value;

        return {
          _id: viewer._id,
          token: viewer.token,
          avatar: viewer.avatar,
          walletId: viewer.walletId,
          didRequest: true
        };
      } catch (error) {
        throw new Error(`Failed to connect with Stripe: ${error}`);
      }
    },
DISCONNECTSTRIPE()
Our disconnectStripe() mutation function will appear similar but instead of updating a user document with a walletId field, it will instead remove the value of the walletId field for the user document. This is how we’ll have a user disconnect from Stripe in our app.
In the disconnectStripe() resolver function, we’ll:
- Look to access the
dbandreqobjects available as context. - Identify and authorize the viewer making the request and if the viewer can’t be found, throw an error.
- If the
vieweris available, we’ll update the user document of the viewer by setting thewalletIdfield of the document asnull. - If the
valueproperty of the update result doesn’t exist, we’ll throw an error and say"viewer could not be updated". - If the
valueproperty of the update result does exist, it means we’ve made the update successfully and we’ll simply return theviewerobject similar to what we’ve returned in theconnectStripe()mutation. We’ll return theid,token,avatar, andwalletIdfields which should all benulland thedidRequestproperty astrue. - If an error is to occur anywhere in the implementation, we’ll capture it and keep it within another error message that says
"Failed to disconnect with Stripe".
server/src/graphql/resolvers/Viewer/index.ts
    disconnectStripe: async (
      _root: undefined,
      _args: {},
      { db, req }: { db: Database; req: Request }
    ): Promise<Viewer> => {
      try {
        let viewer = await authorize(db, req);
        if (!viewer) {
          throw new Error("viewer cannot be found");
        }

        const updateRes = await db.users.findOneAndUpdate(
          { _id: viewer._id },
          { $set: { walletId: null } },
          { returnOriginal: false }
        );

        if (!updateRes.value) {
          throw new Error("viewer could not be updated");
        }

        viewer = updateRes.value;

        return {
          _id: viewer._id,
          token: viewer.token,
          avatar: viewer.avatar,
          walletId: viewer.walletId,
          didRequest: true
        };
      } catch (error) {
        throw new Error(`Failed to disconnect with Stripe: ${error}`);
      }
    }
That should be it! Our connectStripe() mutation function is capable of connecting a user with their Stripe account into our Stripe connected platform. We’re primarily capturing the stripe_user_id value of the connected account and storing it in our database.
CONNECTING WITH STRIPE ON THE CLIENT
🙋🏽 We’re performing Step 1: Create the OAuth link , Step 2: User creates or connects their account , and Step 3: User is redirected back to your site from the steps highlighted in the OAuth connection flow section of using Stripe Connect with Standard accounts.
With the relevant mutations now available in our server to allow the user to connect with Stripe, we’ll prepare the client-side functionality to give the user the capability to connect with Stripe through the UI.
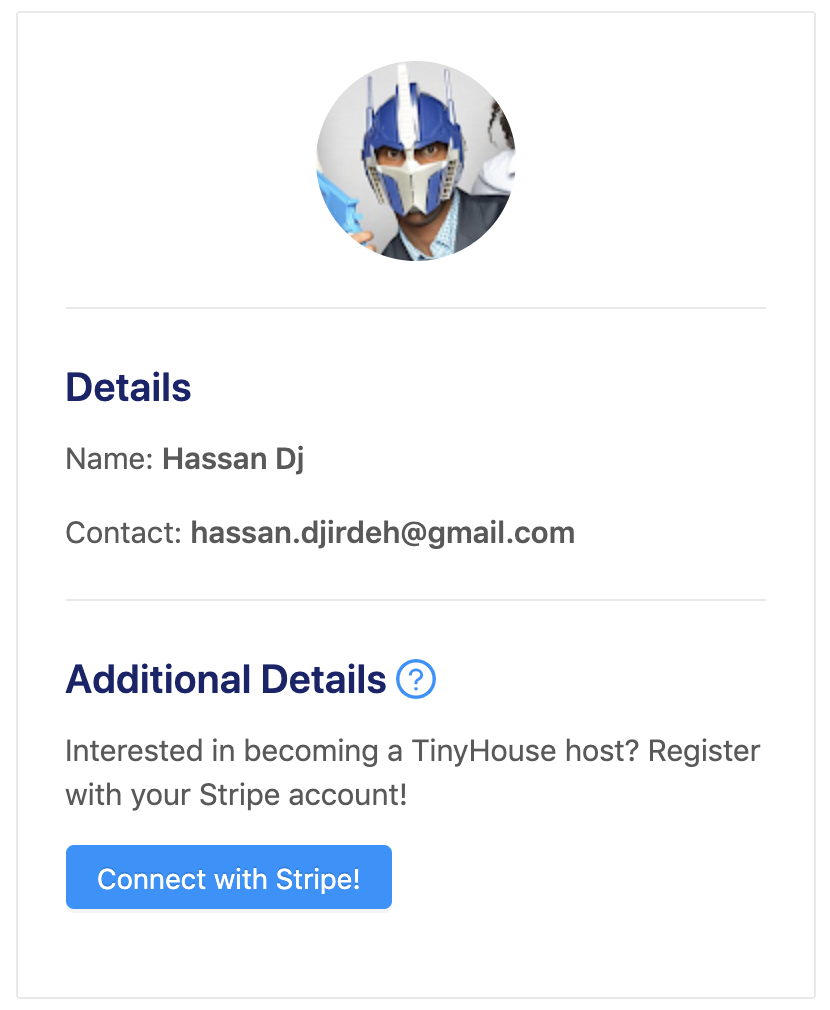
Our objective would be to surface a "Connect with Stripe" button in the user profile of a logged-in user.
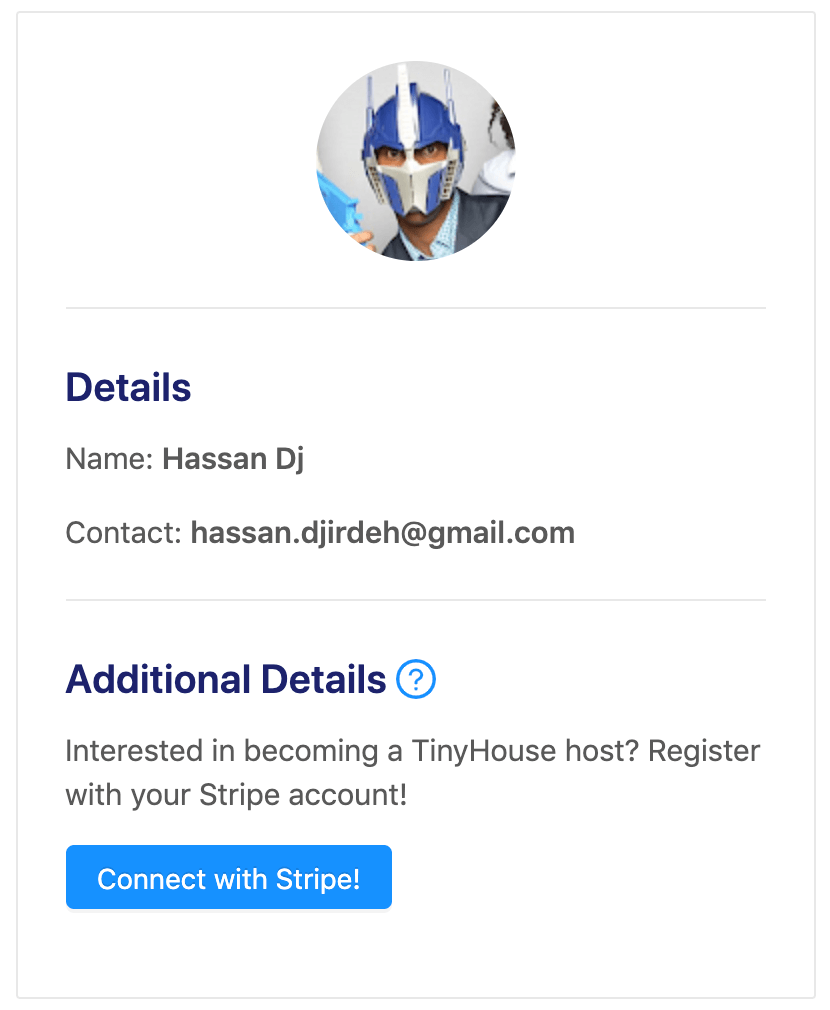
When the user clicks the connect button, they’re taken to the Stripe login page to be able to log-in as a connected account on our TinyHouse Stripe account platform.
When the user is to log-in, they’ll be redirected to the /stripe route of our app where we’ll have a component that will receive the code query parameter from the URL, run the connectStripe mutation, and pass the code value as part of the input argument of the mutation.

When the connectStripe mutation on the server resolves successfully, it means we would have been able to store the stripe_user_id for the viewer who’s connected with Stripe which would mean we’ve successfully connected the user to our Stripe platform. We’ll then redirect the user to their /user/:id page. When a user is successfully connected with Stripe, instead of seeing the "Connect with Stripe" button in their user profile, they’ll see the income they’ve made within the app.
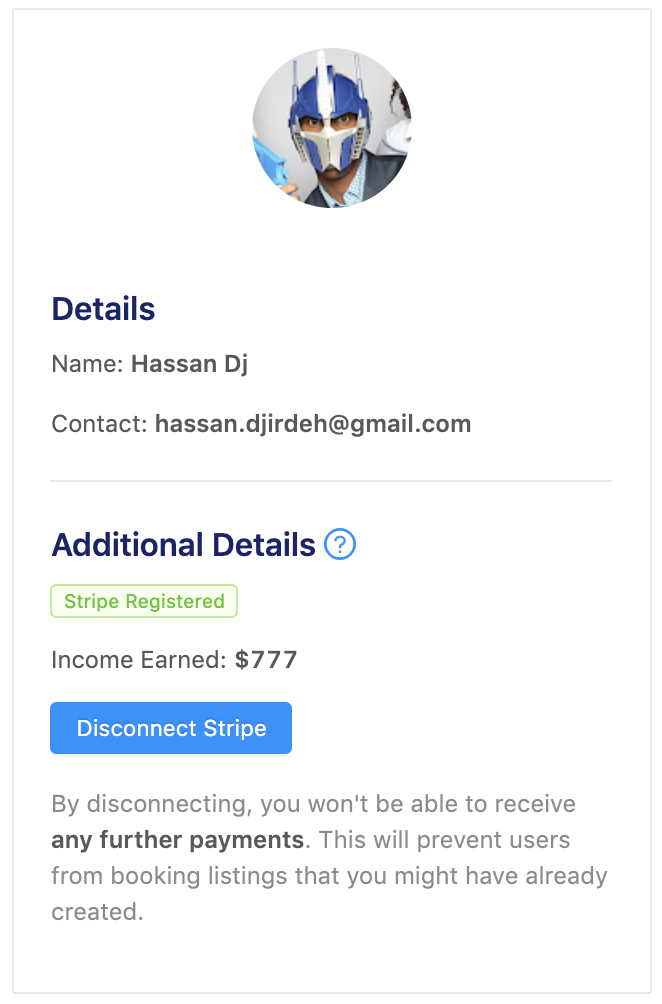
income is a value of the user data object that will be updated when others make bookings and create payments to the host’s listings. At this point, there will be a "Disconnect Stripe" button that when clicked will disconnect the viewer from Stripe by removing the user’s stripe_user_id value in the database.
CONNECTSTRIPE
We’ll take this step by step. In this lesson, we’ll focus on creating and conducting the connectStripe mutation. The first thing we’ll do is create the GraphQL document for the connectStripe mutation in our client project.
We’ll head to our src/lib/graphql/mutations/ folder and create a ConnectStripe/ folder with an index.ts file.
client/
  src/
    lib/
      graphql/
        mutations/
          // ...
          ConnectStripe/
            index.ts
          // ...
        // ...
    // ...
In the src/lib/graphql/mutations/index.ts file, we’ll reexport the soon to be created CONNECT_STRIPE mutation documents
client/src/lib/graphql/mutations/index.ts
export * from "./ConnectStripe";
In the src/lib/graphql/mutations/ConnectStripe/index.ts file, we’ll import the gql tag from apollo-boost , export a constant labeled CONNECT_STRIPE , specify the ConnectStripe mutation and declare that it expects an input argument of GraphQL type ConnectStripeInput . We’ll also declare the mutation field and pass the input argument along.
import { gql } from "apollo-boost";

export const CONNECT_STRIPE = gql`
  mutation ConnectStripe($input: ConnectStripeInput!) {
    connectStripe(input: $input) {

    }
  }
`;
On the server, we’ve stated that the connectStripe mutation is to return all details about the viewer such as the viewer’s id , avatar , etc. At this moment, we’re only going to be needing the hasWallet field that is to be returned. The hasWallet field of the viewer object is a boolean value that detects the presence of the value for the walletId field of the viewer.
client/src/lib/graphql/mutations/ConnectStripe/index.ts
import { gql } from "apollo-boost";

export const CONNECT_STRIPE = gql`
  mutation ConnectStripe($input: ConnectStripeInput!) {
    connectStripe(input: $input) {
      hasWallet
    }
  }
`;
With our connectStripe GraphQL mutation document prepared, we’ll autogenerate the corresponding TypeScript definitions. We’ll head over to the terminal and in our client project first run npm run codegen:schema to regenerate a schema.json file:
npm run codegen:schema
We’ll then run npm run codegen:generate to regenerate the TypeScript definitions for our new mutation:
npm run codegen:generate
<USERPROFILE /> - OAUTH LOGIN
In the <UserProfile /> component, we’ve already prepared the UI in the user profile section to consist of the "Connect with Stripe" button that will allow a logged-in user to connect with Stripe. When the user clicks the connect button, we’ll want them to be taken to Stripe’s OAuth Login page for our TinyHouse Connect account. In the Stripe documentation, they note that the OAuth link a user can be directed to can be created with https://connect.stripe.com/oauth/authorize and appending a few necessary query parameters:
-
response_typewith a value ofcode. -
client_idwith a value of the connected account’s client ID with which we’ve stored as an environment variable in our React application. -
scopewith a value ofread_write.
With that said, in our <UserProfile /> component file and outside of our component function, we’ll construct a constant called stripeAuthUrl that will be the OAuth URL we want to create. For the client_id query parameter, we’ll specify the value of the client environment variable we have in our React project called REACT_APP_S_CLIENT_ID .
const stripeAuthUrl = `
  https://connect.stripe.com/oauth/authorize?
    response_type=code
    &client_id=${process.env.REACT_APP_S_CLIENT_ID}
    &scope=read_write
`;
When the user clicks the connect button in their user profile section, we’ll want to direct the user to the OAuth url we’ve established. To achieve this, in our "Connect with Stripe" <Button /> element we can have an onClick handler that will call a method labeled redirectToStripe() .
redirectToStripe() will be a component method that will use the window object and set the location target to the value of the stripeAuthUrl constant.
// ...

export const UserProfile = ({ user, viewerIsUser }: Props) => {

  const redirectToStripe = () => {
    window.location.href = stripeAuthUrl;
  };

  const additionalDetailsSection = viewerIsUser ? (
    <Fragment>
      <Divider />
      <div className="user-profile__details">
        {/* ... */}
        <Button
          type="primary"
          className="user-profile__details-cta"
          onClick={redirectToStripe}
        >
          Connect with Stripe
        </Button>
        {/* ... */}
      </div>
    </Fragment>
  ) : null;

  return (
    // ...
  );
}
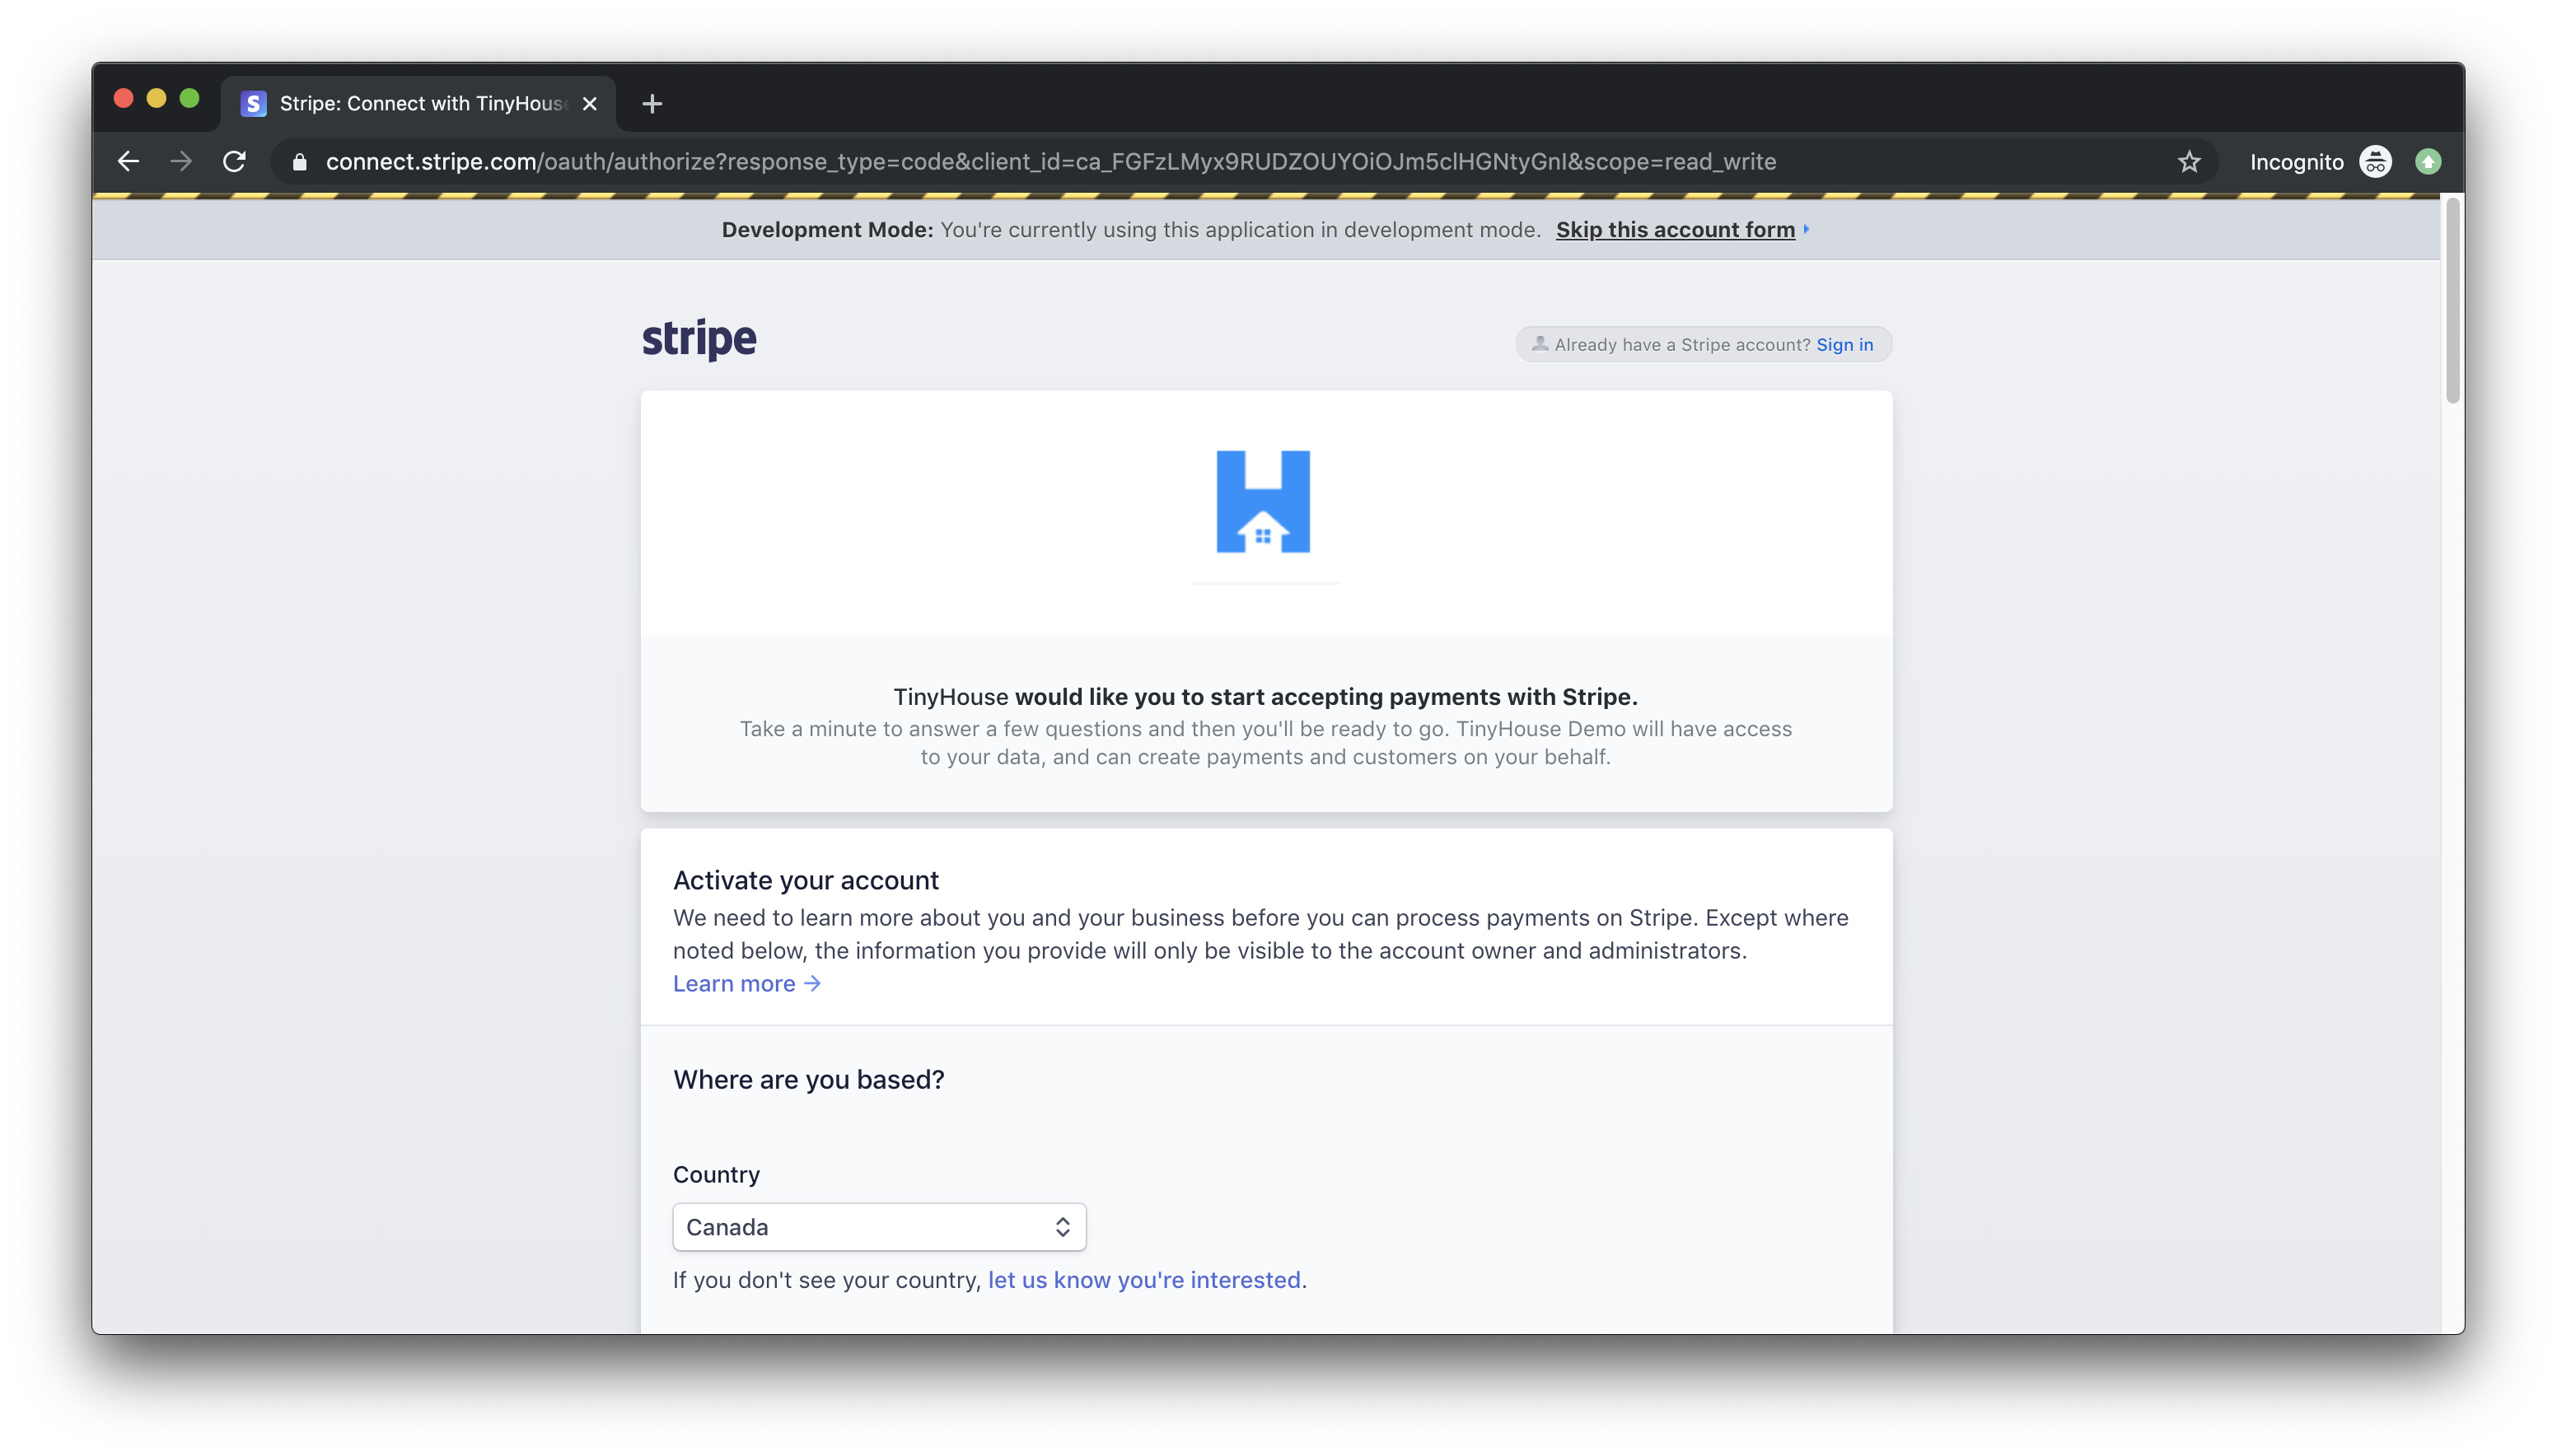
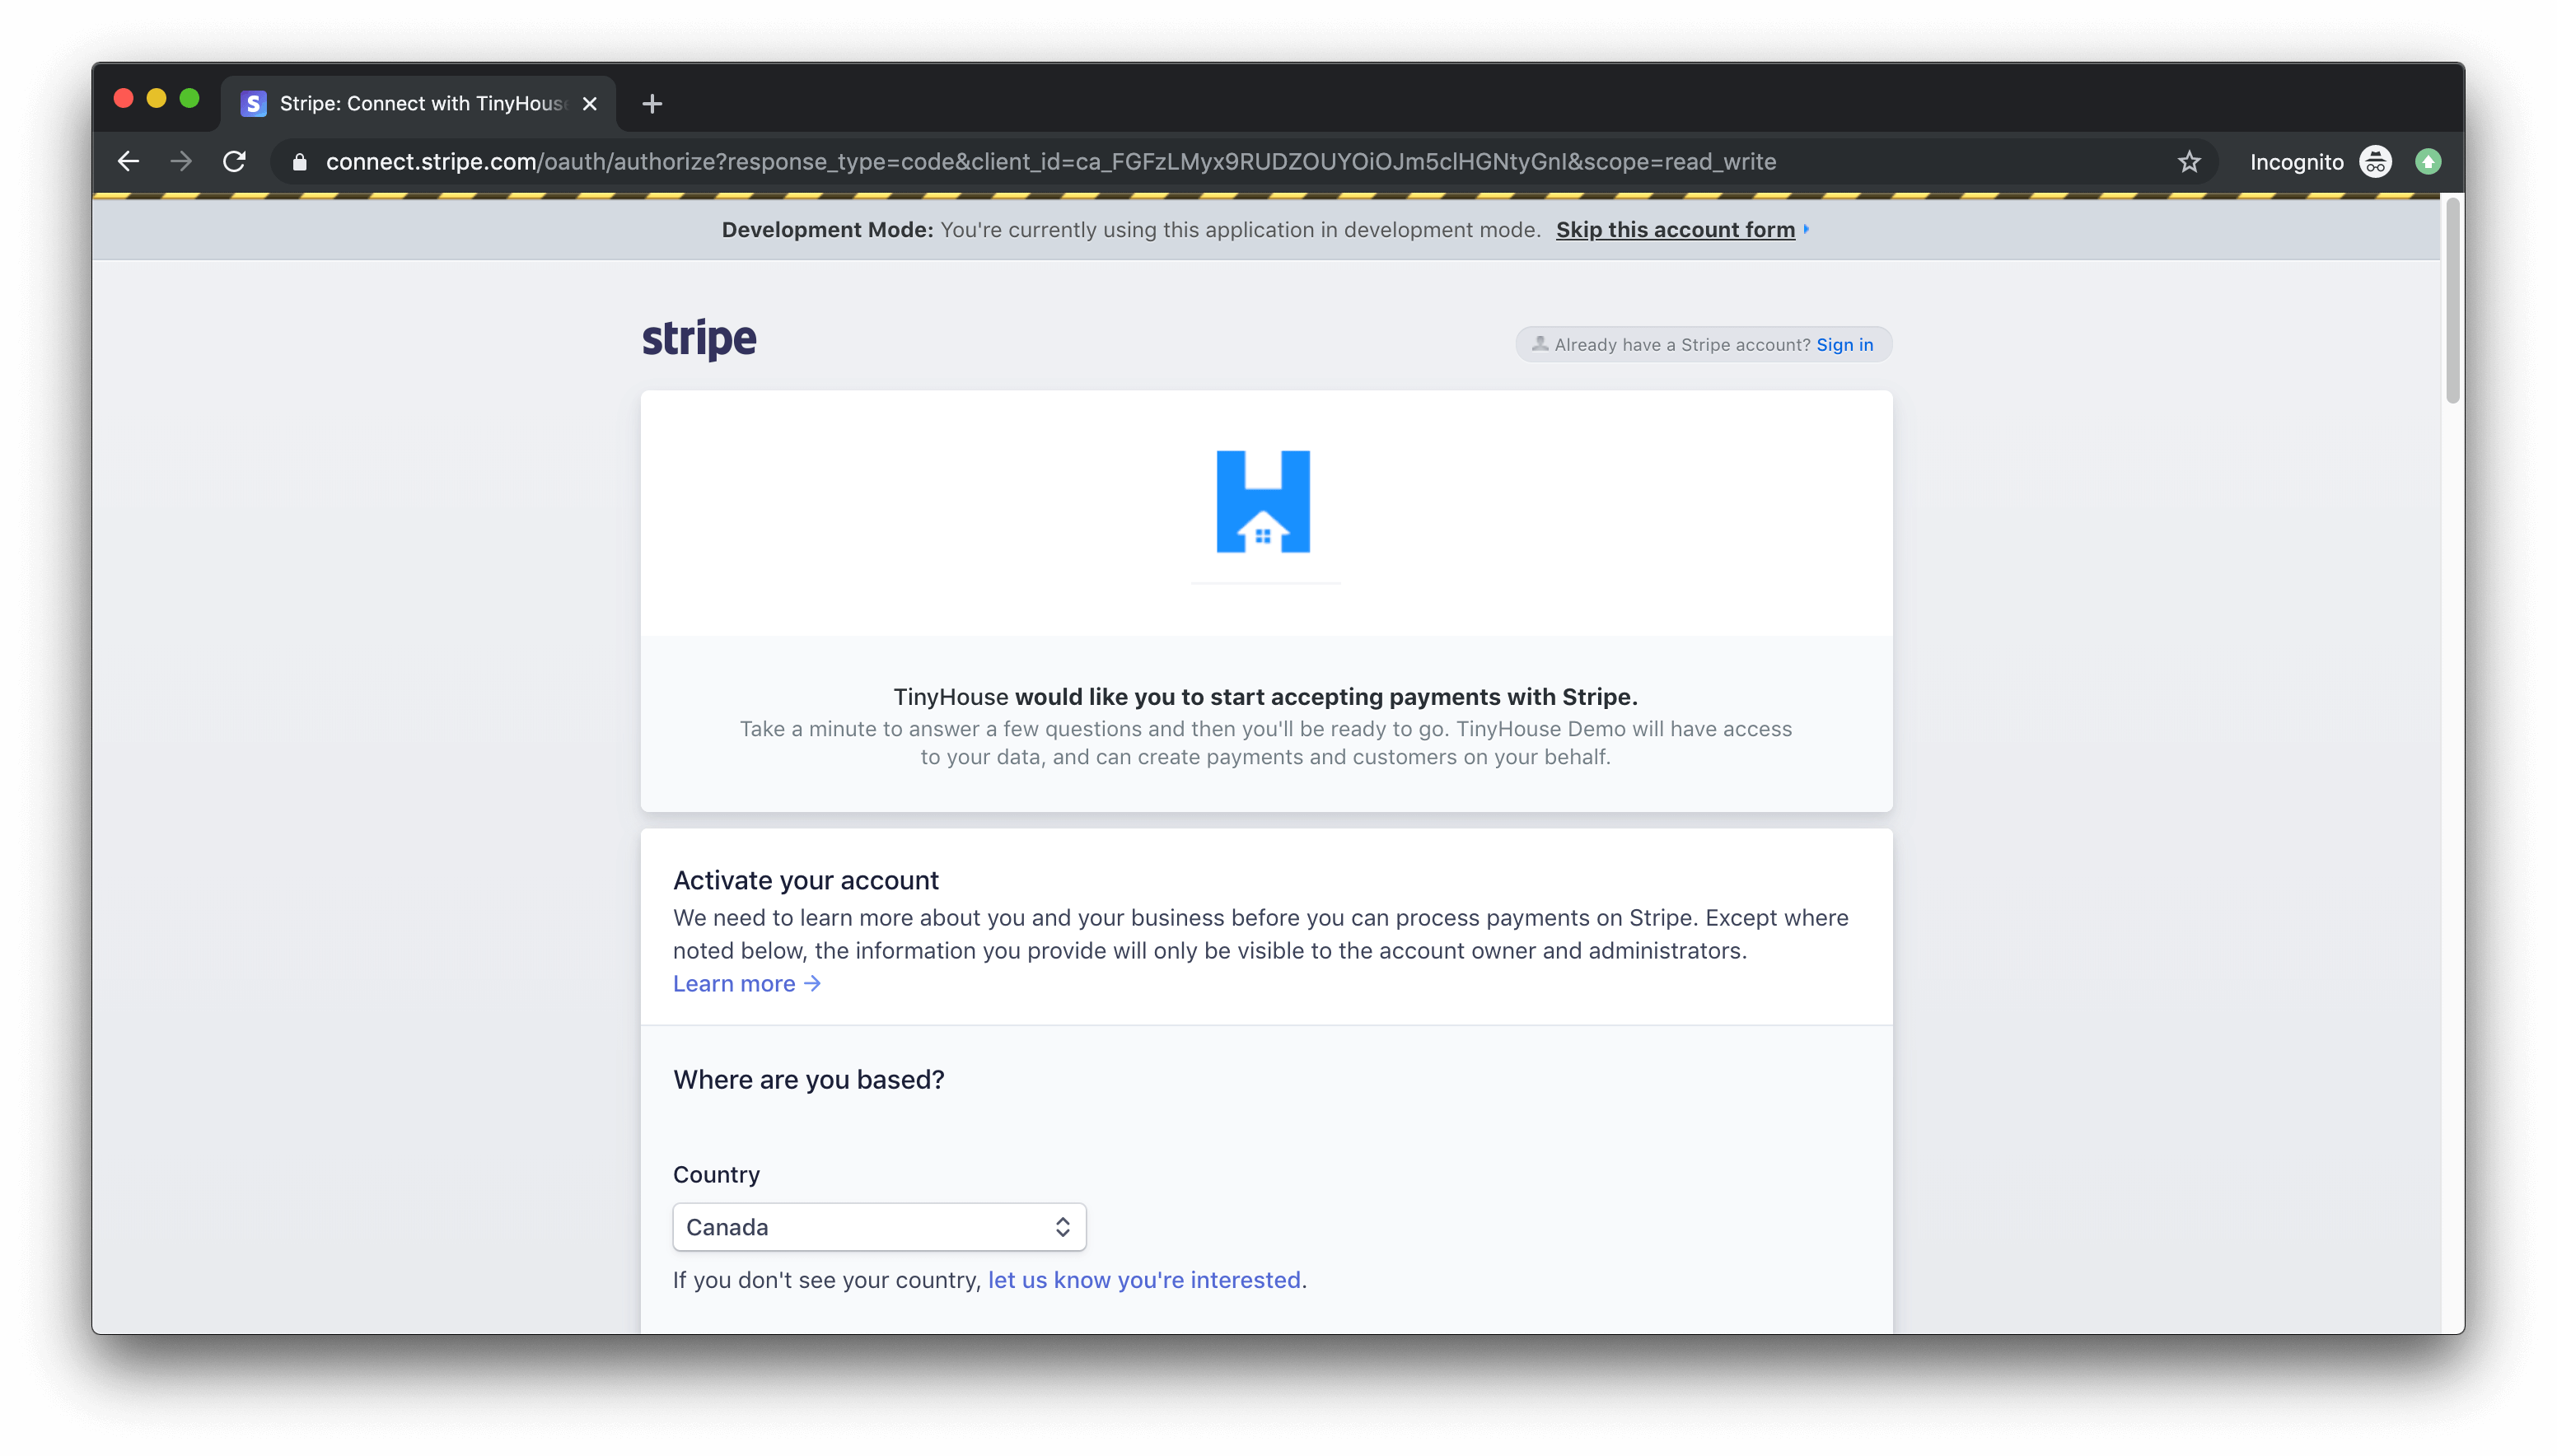
With our server and client projects running, if we were to click the "Connect with Stripe" button in the user profile section, we’ll be redirected to the OAuth Login page of our Stripe Connect Platform! We should see the logo and the TinyHouse name we’ve set up as a business for our connect account page.
For real live payments, the user attempting to be a connected user in our platform needs to activate their account and provide information about themselves and their tenant business (or log-in with an account that has this information prepared) to be able to process payments with Stripe. Since we’re building this in development and we’re using test credentials, we can click the "Skip this account form" action available at the top to help skip this form and pretend that we’ve activated our account.
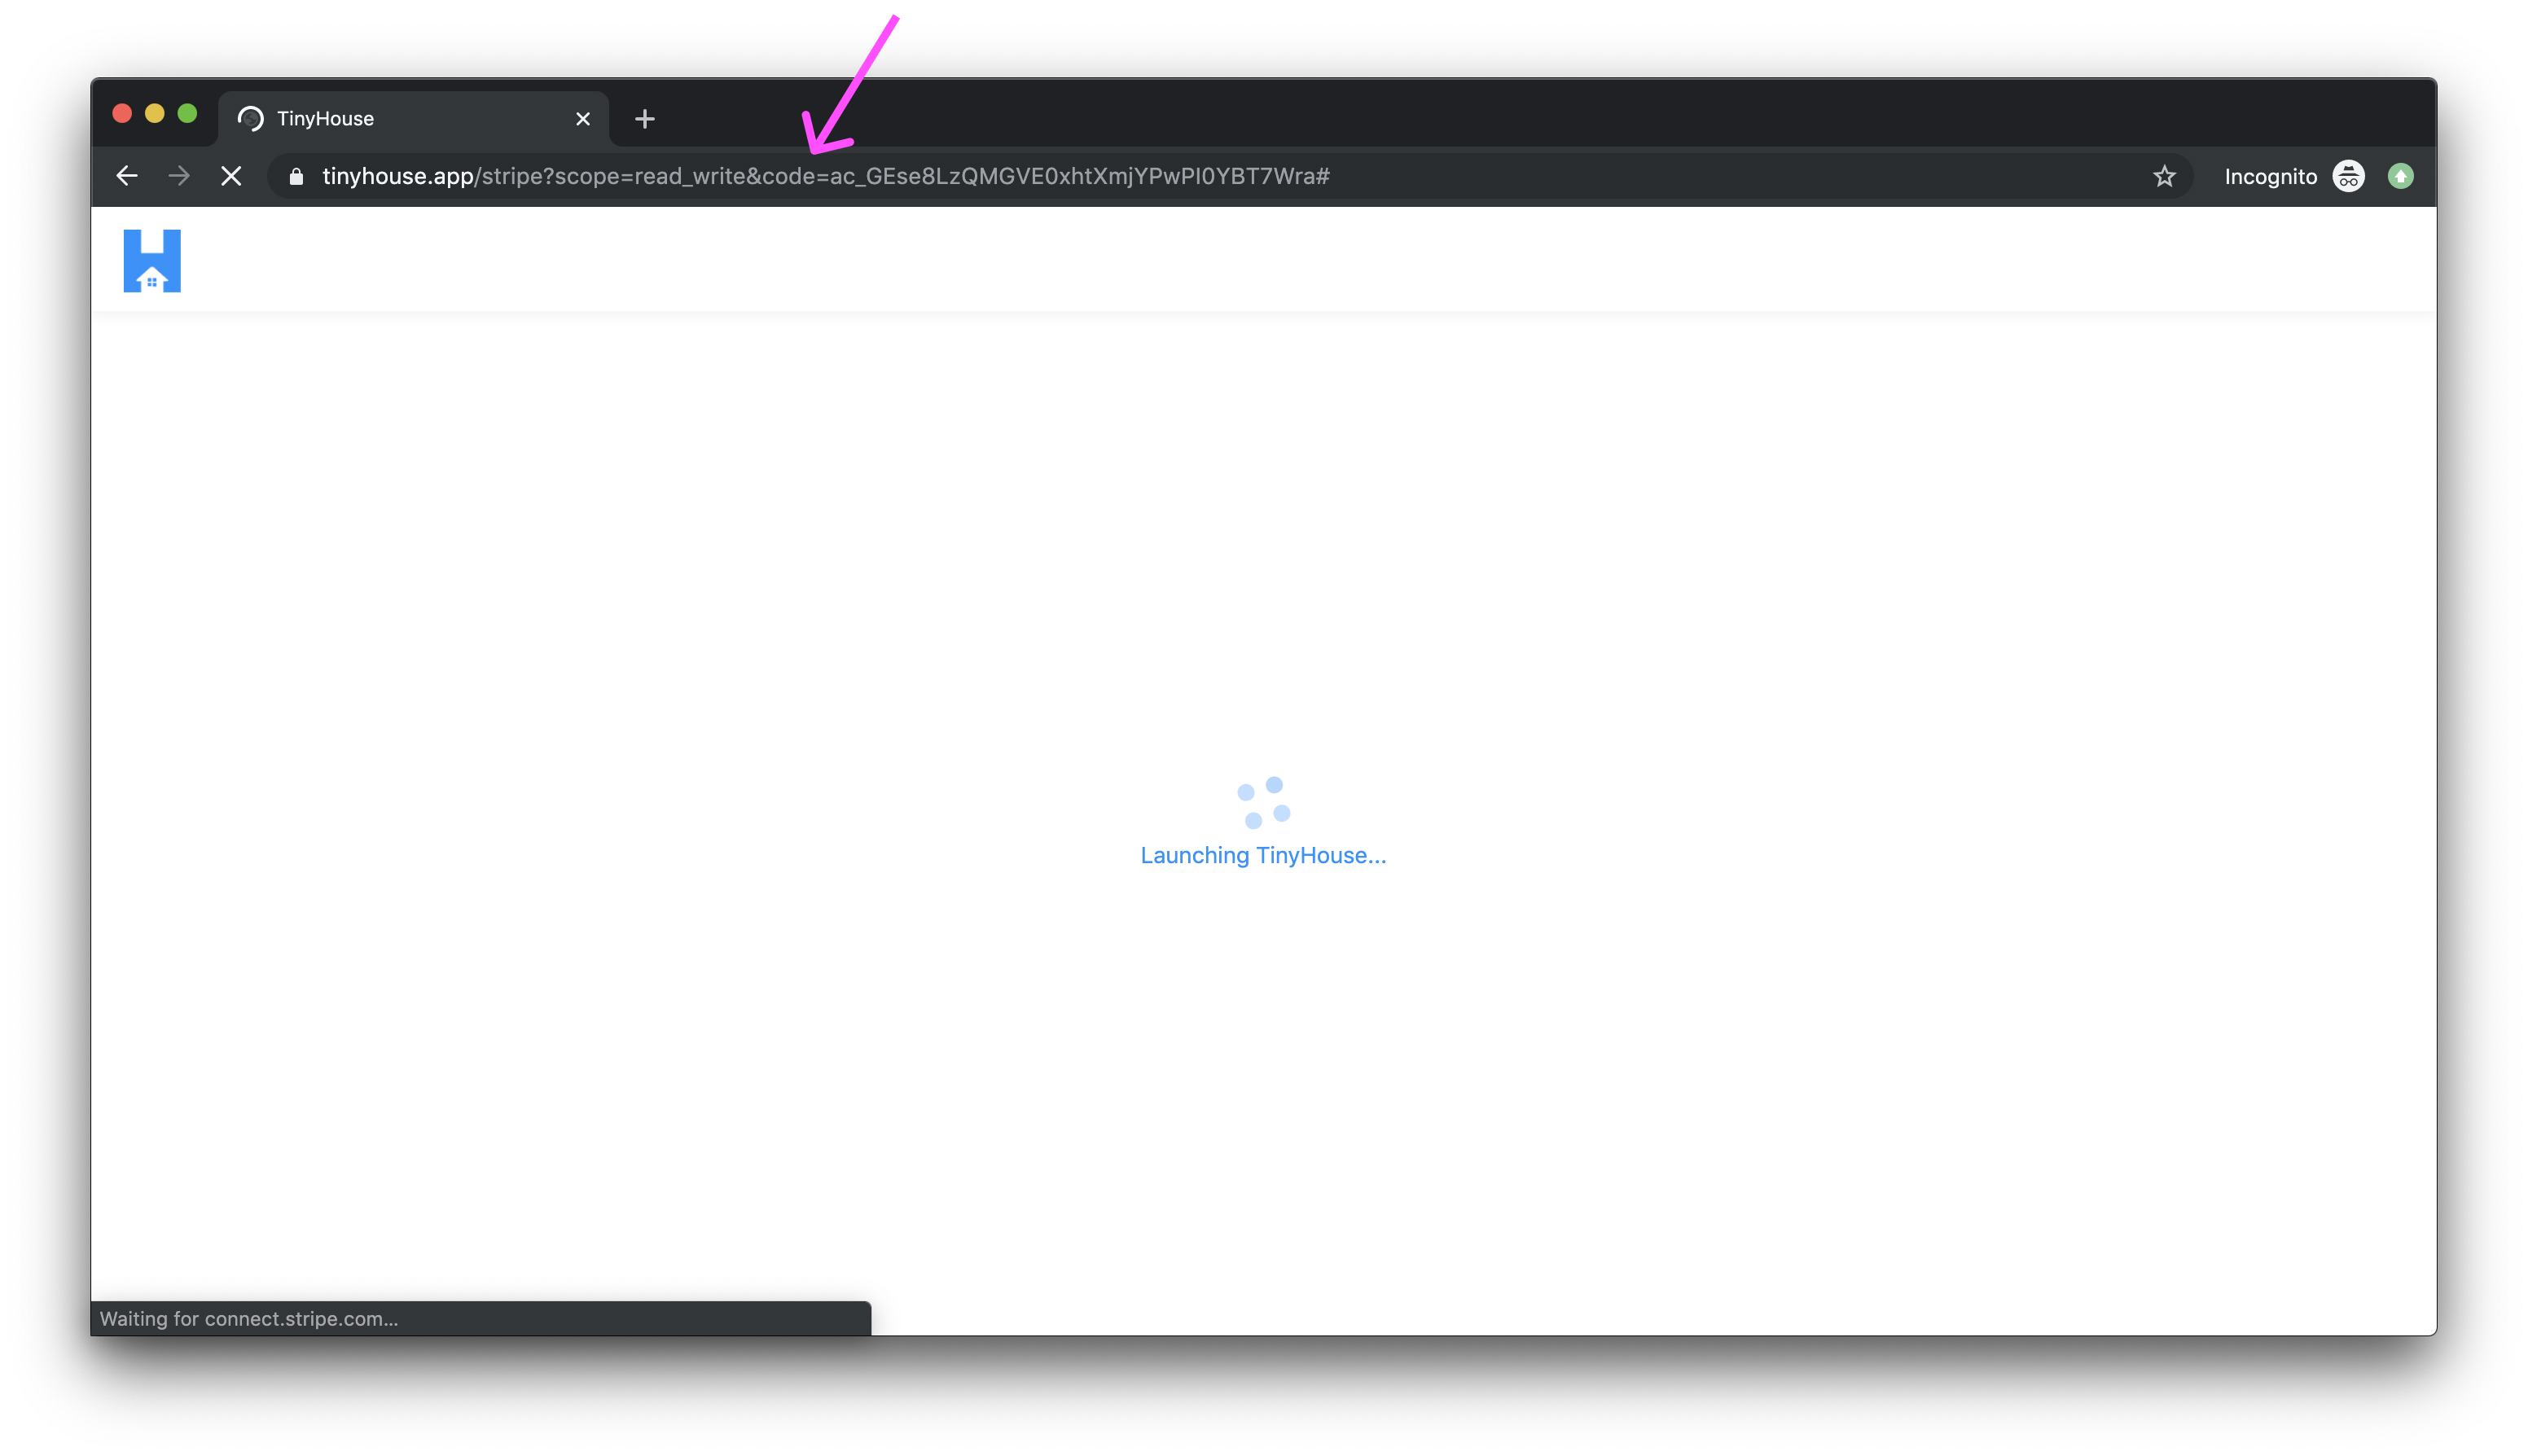
When we proceed past the OAuth login page, we’ll notice that Stripe returns us to the redirect URL that we’ve set up, /stripe and has the authorization code returned to us as part of the URL query parameter.
This is where we need to have functionality that will receive this code and trigger the connectStripe mutation and pass this code argument along.
We created a <Login /> component that allowed the user to begin the log-in process however it was also responsible in being the component that received the redirect URL from Google OAuth and consuming the authorization code returned from Google’s servers. We’ll create a <Stripe /> component that will play a similar role and receive the authorization code from Stripe’s servers, call the connectStripe mutation, and when successful take to the user to their user page.
<STRIPE />
We’ll first create a Stripe/ folder that is to have an index.tsx file within the src/sections/ directory.
client/
  src/
    // ...
    sections/
      // ...
      Stripe/
        index.tsx
      // ...
  // ...
In the src/sections/index.ts file, we’ll re-export the soon to be created <Stripe /> component.
client/src/sections/index.ts
export * from "./Stripe";
In the <Stripe /> component file, we’ll import the majority of things we’ll need for this component. We’ll import:
- The
Reactlibrary. - The
useEffectHook since we’ll want to trigger theconnectStripemutation upon the components first render. - The
useMutationHook from React Apollo. - The
<Layout />and<Spin />components from Ant Design that we’ll use to help display a loading/spinning indicator when the mutation is in flight. - The
ConnectStripemutation document and it’s autogenerated typescript definitions.
We’ll also destruct the <Content /> component from <Layout /> and we’ll export the Stripe function component.
import React, { useEffect } from "react";
import { useMutation } from "@apollo/react-hooks";
import { Layout, Spin } from "antd";
import { CONNECT_STRIPE } from "../../lib/graphql/mutations";
import {
  ConnectStripe as ConnectStripeData,
  ConnectStripeVariables
} from "../../lib/graphql/mutations/ConnectStripe/__generated__/ConnectStripe";

const { Content } = Layout;

export const Stripe = () => {};
Since we’re going to need to run the connectStripe mutation - we’ll declare the useMutation Hook at the top of the component function, pass in the autogenerated types for the connectStripe mutation, pass in the mutation document, and return the mutation function and the data , loading , and error statuses of the mutation result.
// ...

export const Stripe = () => {
  const [connectStripe, { data, loading, error }] = useMutation<
    ConnectStripeData,
    ConnectStripeVariables
  >(CONNECT_STRIPE);
};
We’ll want to run the connectStripe() mutation function when the <Stripe /> component is to first render. With that said, we’ll use the useEffect Hook to declare an effect and specify an empty dependencies list since we don’t picture running the effect more than once.
// ...

export const Stripe = () => {
  const [connectStripe, { data, loading, error }] = useMutation<
    ConnectStripeData,
    ConnectStripeVariables
  >(CONNECT_STRIPE);

  useEffect(() => {}, []);
};
We’ll want to run the connectStripe mutation in the effect callback and we’ll want to pass in the code retrieved from the query parameter. To access the code query parameter, we’ll use the URL constructor and retrieve the value of the param labeled code .
// ...

export const Stripe = () => {
  const [connectStripe, { data, loading, error }] = useMutation<
    ConnectStripeData,
    ConnectStripeVariables
  >(CONNECT_STRIPE);

  useEffect(() => {
    const code = new URL(window.location.href).searchParams.get("code");
  }, []);
};
With the value of the code query parameter available, we’ll state that if the value of code exists, we’ll run the connectStripe() mutation function and provide the input object variable that is to contain the code property.
// ...

export const Stripe = () => {
  const [connectStripe, { data, loading, error }] = useMutation<
    ConnectStripeData,
    ConnectStripeVariables
  >(CONNECT_STRIPE);

  useEffect(() => {
    const code = new URL(window.location.href).searchParams.get("code");

    if (code) {
      connectStripe({
        variables: {
          input: { code }
        }
      });
    }
  }, []);
};
The useEffect Hook will warn us that we should place the connectStripe() mutation function as a dependency to the effect since there’s a risk for it to change in value. The connectStripe() mutation function is being instantiated/created within the <Stripe /> component. If the <Stripe /> component goes through another render, we’ll get a new copy of this connectStripe() function and if we placed it as a dependency; we’ll have the effect run again. We wouldn’t want this since we want the connectStripe() mutation function run only once. To help us achieve this, we’ll import the useRef Hook from React.
client/src/sections/Stripe/index.tsx
import React, { useEffect, useRef } from "react";
Right after we desctruct the connectStripe() function from the useMutation Hook, we’ll create a reference object for the connectStripe() function so as to have a reference value of the function that won’t change in value through the life of the component (unless we specify a change). In our effect callback, we’ll then run the mutation function from the current property of the newly created reference.
// ...

export const Stripe = () => {
  const [connectStripe, { data, loading, error }] = useMutation<
    ConnectStripeData,
    ConnectStripeVariables
  >(CONNECT_STRIPE);
  const connectStripeRef = useRef(connectStripe);

  useEffect(() => {
    const code = new URL(window.location.href).searchParams.get("code");

    if (code) {
      connectStripeRef.current({
        variables: {
          input: { code }
        }
      });
    }
  }, []);
};
Before we handle how the <Stripe /> component should behave when the mutation is successful, we’ll look to handle the loading and error states of the mutation result.
connectStripe() loading
When the connectStripe mutation is loading , we’ll want to show a loading indicator. In our <Stripe /> component, we’ll check for the loading status of the mutation result and when true , we’ll display the <Content /> component that is to contain the <Spin /> component that says “Connecting Your Stripe account…”.
// ...

export const Stripe = () => {
  const [connectStripe, { data, loading, error }] = useMutation<
    ConnectStripeData,
    ConnectStripeVariables
  >(CONNECT_STRIPE);
  const connectStripeRef = useRef(connectStripe);

  useEffect(() => {
    const code = new URL(window.location.href).searchParams.get("code");

    if (code) {
      connectStripeRef.current({
        variables: {
          input: { code }
        }
      });
    }
  }, []);

  if (loading) {
    return (
      <Content className="stripe">
        <Spin size="large" tip="Connecting your Stripe account..." />
      </Content>
    );
  }
};
connectStripe() error
If our mutation was to error out, we won’t want the user to remain in the /stripe route but instead will want to take the viewer to their own /user/:id page. When the user is directed to the /user/:id page after the mutation error, we’ll look to display an error banner on the user page to notify the user that something went wrong and they couldn’t connect with Stripe. We’ll first need the capability to redirect the user away from the /stripe page. We’ll look to employ the <Redirect /> component from React Router to help us achieve this so we’ll import the <Redirect /> component from react-router-dom .
// ...
import { Redirect } from "react-router-dom";
// ...
In our component function, we’ll say if the mutation error result was ever true , we’ll redirect the viewer to the /user page.
// ...

export const Stripe = () => {
  const [connectStripe, { data, loading, error }] = useMutation<
    ConnectStripeData,
    ConnectStripeVariables
  >(CONNECT_STRIPE);
  const connectStripeRef = useRef(connectStripe);

  useEffect(() => {
    const code = new URL(window.location.href).searchParams.get("code");

    if (code) {
      connectStripeRef.current({
        variables: {
          input: { code }
        }
      });
    }
  }, []);

  if (loading) {
    return (
      <Content className="stripe">
        <Spin size="large" tip="Connecting your Stripe account..." />
      </Content>
    );
  }

  if (error) {
    return <Redirect to={`/user/`} />;
  }
};
If we recall, the /user/:id route expects a value for the id of the specific user. In the redirect of the mutation error, we want to go to the user page of the viewer viewing the app so we’ll need the id of this viewer. When we are to have this <Stripe /> component rendered in the parent <App /> component, we’ll pass the viewer state object in the parent <App /> component down to the <Stripe /> component as props. With that said, we can state that the <Stripe/> component is to expect a viewer prop and we’ll describe the shape of this viewer prop as the Viewer interface we have in the src/lib/types.ts file.
We’ll access the viewer prop from the props passed into the component function and in the <Redirect /> component, we’ll state that the id URL parameter of the /user/:id route is the id of the viewer .
// ...
import { Viewer } from "../../lib/types";

interface Props {
  viewer: Viewer;
}

// ...

export const Stripe = ({ viewer }: Props) => {
  const [connectStripe, { data, loading, error }] = useMutation<
    ConnectStripeData,
    ConnectStripeVariables
  >(CONNECT_STRIPE);
  const connectStripeRef = useRef(connectStripe);

  useEffect(() => {
    const code = new URL(window.location.href).searchParams.get("code");

    if (code) {
      connectStripeRef.current({
        variables: {
          input: { code }
        }
      });
    }
  }, []);

  if (loading) {
    return (
      <Content className="stripe">
        <Spin size="large" tip="Connecting your Stripe account..." />
      </Content>
    );
  }

  if (error) {
    return <Redirect to={`/user/${viewer.id}`} />;
  }
};
Though this would work, we don’t just want to take the viewer to their user page. We also want to tell them something might have gone wrong. A simple way we can achieve is first appending a query string or query parameter to this redirected route. We can add a stripe_error=true query parameter.
// ...
import { Viewer } from "../../lib/types";

interface Props {
  viewer: Viewer;
}

// ...

export const Stripe = ({ viewer }: Props) => {
  const [connectStripe, { data, loading, error }] = useMutation<
    ConnectStripeData,
    ConnectStripeVariables
  >(CONNECT_STRIPE);
  const connectStripeRef = useRef(connectStripe);

  useEffect(() => {
    const code = new URL(window.location.href).searchParams.get("code");

    if (code) {
      connectStripeRef.current({
        variables: {
          input: { code }
        }
      });
    }
  }, []);

  if (loading) {
    return (
      <Content className="stripe">
        <Spin size="large" tip="Connecting your Stripe account..." />
      </Content>
    );
  }

  if (error) {
    return <Redirect to={`/user/${viewer.id}?stripe_error=true`} />;
  }
};
In the section <User /> component (i.e. the component rendered in the /user/:id route), we can attempt to handle what will occur when the stripe_error query parameter ever exists. Somewhere in the <User /> component function, we can attempt to access the value of the stripe_error query parameter with the help of the URL constructor.
// ...

export const User = ({ viewer, match }: Props & RouteComponentProps<MatchParams>) => {

  // ...

  // ...

  const stripeError = new URL(window.location.href).searchParams.get("stripe_error");

  return (
    // ...
  )
};
React Router doesn’t support a way to access query strings within URL routes which is why we’re going with the approach of using the
URLconstructor to obtain the of thestripe_errorquery string.
In the <User /> component, we can now check and see if this stripeError constant has a value and if it does, we can create a stripeErrorBanner constant element that will be the <ErrorBanner /> we have imported and is to contain a description that says "We had an issue connecting with Stripe. Please try again soon" . In the return statement of the <User /> component, we’ll place the stripeErrorBanner constant element near the top.
// ...

export const User = ({ viewer, match }: Props & RouteComponentProps<MatchParams>) => {
  // ...

  // ...

  const stripeError = new URL(window.location.href).searchParams.get("stripe_error");
  const stripeErrorBanner = stripeError ? (
    <ErrorBanner description="We had an issue connecting with Stripe. Please try again soon." />
  ) : null;

  return (
    <Content className="user">
      {stripeErrorBanner}
      <Row gutter={12} type="flex" justify="space-between">
        <Col xs={24}>{userProfileElement}</Col>
        <Col xs={24}>
          {userListingsElement}
          {userBookingsElement}
        </Col>
      </Row>
    </Content>
  );
};
We’ll now go back to our <Stripe /> component.
connectStripe success
When data from our mutation result exists and the connectStripe object from data is present, we’ll also want to redirect the viewer to the user page. In the <Stripe /> component function, we’ll place an if condition to say if data and the connectStripe object within data is present, take the viewer to their user page but without the stripe_error query parameter.
If data from the mutation result isn’t present, loading isn’t true , and no error exists from the mutation we’ll have our component just return null since this will be unlikely to occur.
// ...

export const Stripe = ({ viewer }: Props) => {
  const [connectStripe, { data, loading, error }] = useMutation<
    ConnectStripeData,
    ConnectStripeVariables
  >(CONNECT_STRIPE);
  const connectStripeRef = useRef(connectStripe);

  useEffect(() => {
    const code = new URL(window.location.href).searchParams.get("code");

    if (code) {
      connectStripeRef.current({
        variables: {
          input: { code }
        }
      });
    }
  }, []);

  if (data && data.connectStripe) {
    return <Redirect to={`/user/${viewer.id}`} />;
  }

  if (loading) {
    return (
      <Content className="stripe">
        <Spin size="large" tip="Connecting your Stripe account..." />
      </Content>
    );
  }

  if (error) {
    return <Redirect to={`/user/${viewer.id}?stripe_error=true`} />;
  }

  return null;
};
This is primarily how we’ll want the <Stripe /> component to behave except there are a few more other things we’ll look to handle.
When the mutation is successful, we’ll look to update the viewer state object available in the parent <App /> component to update the viewer object in the client to recognize the hasWallet field is true . This would be important to do since when we later want to restrict the user from certain actions only until the user has connected with Stripe, we’ll need to ensure the viewer state object is up to date within our client.
Since we would want to run some functionality when the mutation is successful, we can try and do this within the onCompleted() callback function from the useMutation Hook. The parameter will be the data object returned from the mutation.
If we want to update the viewer object in our parent <App /> component, we’ll use the setViewer() function available in the parent that will be passed down as props. We’ll state that the <Stripe /> component expects a prop called setViewer which is a function that expects a viewer object and returns void .
In the onCompleted() callback of our mutation, we’ll use the setViewer() function to update the hasWallet field of the viewer state object in the parent <App /> component. Additionally, we’ll like to provide the user with a success message that they’ve connected successfully. We’ll import the displaySuccessNotification() function from the src/lib/utils/ folder and run it in the onCompleted() callback with a title and description that tells the user they’ve connected successfully.
// ...
import { displaySuccessNotification } from "../../lib/utils";
// ...

interface Props {
  viewer: Viewer;
  setViewer: (viewer: Viewer) => void;
}

export const Stripe = ({ viewer, setViewer }: Props) => {
  const [connectStripe, { data, loading, error }] = useMutation<
    ConnectStripeData,
    ConnectStripeVariables
  >(CONNECT_STRIPE, {
    onCompleted: data => {
      if (data && data.connectStripe) {
        setViewer({ ...viewer, hasWallet: data.connectStripe.hasWallet });
        displaySuccessNotification(
          "You've successfully connected your Stripe Account!",
          "You can now begin to create listings in the Host page."
        );
      }
    }
  });
  const connectStripeRef = useRef(connectStripe);

  useEffect(() => {
    const code = new URL(window.location.href).searchParams.get("code");

    if (code) {
      connectStripeRef.current({
        variables: {
          input: { code }
        }
      });
    }
  }, []);

  if (data && data.connectStripe) {
    return <Redirect to={`/user/${viewer.id}`} />;
  }

  if (loading) {
    return (
      <Content className="stripe">
        <Spin size="large" tip="Connecting your Stripe account..." />
      </Content>
    );
  }

  if (error) {
    return <Redirect to={`/user/${viewer.id}?stripe_error=true`} />;
  }

  return null;
};
NAVIGATING TO /STRIPE WITHOUT A CODE
The one last thing we’ll handle in the <Stripe /> component is if the user tries to access the /stripe route in the app without the code query parameter. This can happen if the user tries to hit the /stripe route directly in the URL bar. If this was to occur, nothing will happen and the user will probably just see a blank page. However, we’ll look to avoid this from happening since the <Stripe /> component should only hold the responsibility to receive the authorization code from Stripe and run the connectStripe mutation.
We’ll handle this by stating that if the user accesses the /stripe route and there’s no code in the query parameters, we’ll redirect them to the /login page directly. We’re using the /login page as the redirect since if a viewer is not logged in, we won’t be able to take them to their own user page.
We’ll want to handle this in the effect callback within the useEffect Hook. We shouldn’t (and probably can’t) use the <Redirect /> component from React Router in the useEffect Hook since the useEffect Hook is used to run side effects, not to render JSX.
Since the <Stripe /> component is to be rendered as a route level component, we’ll have access to React Router’s history object as a prop. We’ll attempt to access the history object from the props passed in the component and we’ll use the RouteComponentProps interface from react-router-dom to describe its shape.
client/src/sections/Stripe/index.tsx
import { Redirect, RouteComponentProps } from "react-router-dom";
In the prepared effect callback, we’ll check to see if a value for the code query parameter doesn’t exist. If it doesn’t exist, we’ll use the replace() function from the history object to replace the route pathname with /login . We’ll also add the history object as a dependency to the effect. With this change and all the changes made to the <Stripe /> component, the src/sections/Stripe/index.tsx file will appear as the following:
client/src/sections/Stripe/index.tsx
import React, { useEffect, useRef } from "react";
import { Redirect, RouteComponentProps } from "react-router-dom";
import { useMutation } from "@apollo/react-hooks";
import { Layout, Spin } from "antd";
import { CONNECT_STRIPE } from "../../lib/graphql/mutations";
import {
  ConnectStripe as ConnectStripeData,
  ConnectStripeVariables
} from "../../lib/graphql/mutations/ConnectStripe/__generated__/ConnectStripe";
import { displaySuccessNotification } from "../../lib/utils";
import { Viewer } from "../../lib/types";

interface Props {
  viewer: Viewer;
  setViewer: (viewer: Viewer) => void;
}

const { Content } = Layout;

export const Stripe = ({ viewer, setViewer, history }: Props & RouteComponentProps) => {
  const [connectStripe, { data, loading, error }] = useMutation<
    ConnectStripeData,
    ConnectStripeVariables
  >(CONNECT_STRIPE, {
    onCompleted: data => {
      if (data && data.connectStripe) {
        setViewer({ ...viewer, hasWallet: data.connectStripe.hasWallet });
        displaySuccessNotification(
          "You've successfully connected your Stripe Account!",
          "You can now begin to create listings in the Host page."
        );
      }
    }
  });
  const connectStripeRef = useRef(connectStripe);

  useEffect(() => {
    const code = new URL(window.location.href).searchParams.get("code");

    if (code) {
      connectStripeRef.current({
        variables: {
          input: { code }
        }
      });
    } else {
      history.replace("/login");
    }
  }, [history]);

  if (data && data.connectStripe) {
    return <Redirect to={`/user/${viewer.id}`} />;
  }

  if (loading) {
    return (
      <Content className="stripe">
        <Spin size="large" tip="Connecting your Stripe account..." />
      </Content>
    );
  }

  if (error) {
    return <Redirect to={`/user/${viewer.id}?stripe_error=true`} />;
  }

  return null;
};
In the parent <App /> component, we’ll import the <Stripe /> component from the adjacent sections/ folder.
client/src/index.tsx
import {
  AppHeader,
  Home,
  Host,
  Listing,
  Listings,
  Login,
  NotFound,
  Stripe,
  User
} from "./sections";
In the return statement of our <App /> component, we’ll look to have the <Stripe /> component be returned for the /stripe route. We’ll use the render props pattern to render the <Stripe /> component and pass the viewer and setViewer props it is to expect.
client/src/index.tsx
          <Route
            exact
            path="/stripe"
            render={props => <Stripe {...props} viewer={viewer} setViewer={setViewer} />}
          />
That should be it! Let’s see how our functionality now works.
By clicking the "Connect with Stripe button" in the user profile section, we’ll be taken to the OAuth login page where we’re supposed to activate (or log-in) with a Stripe account.
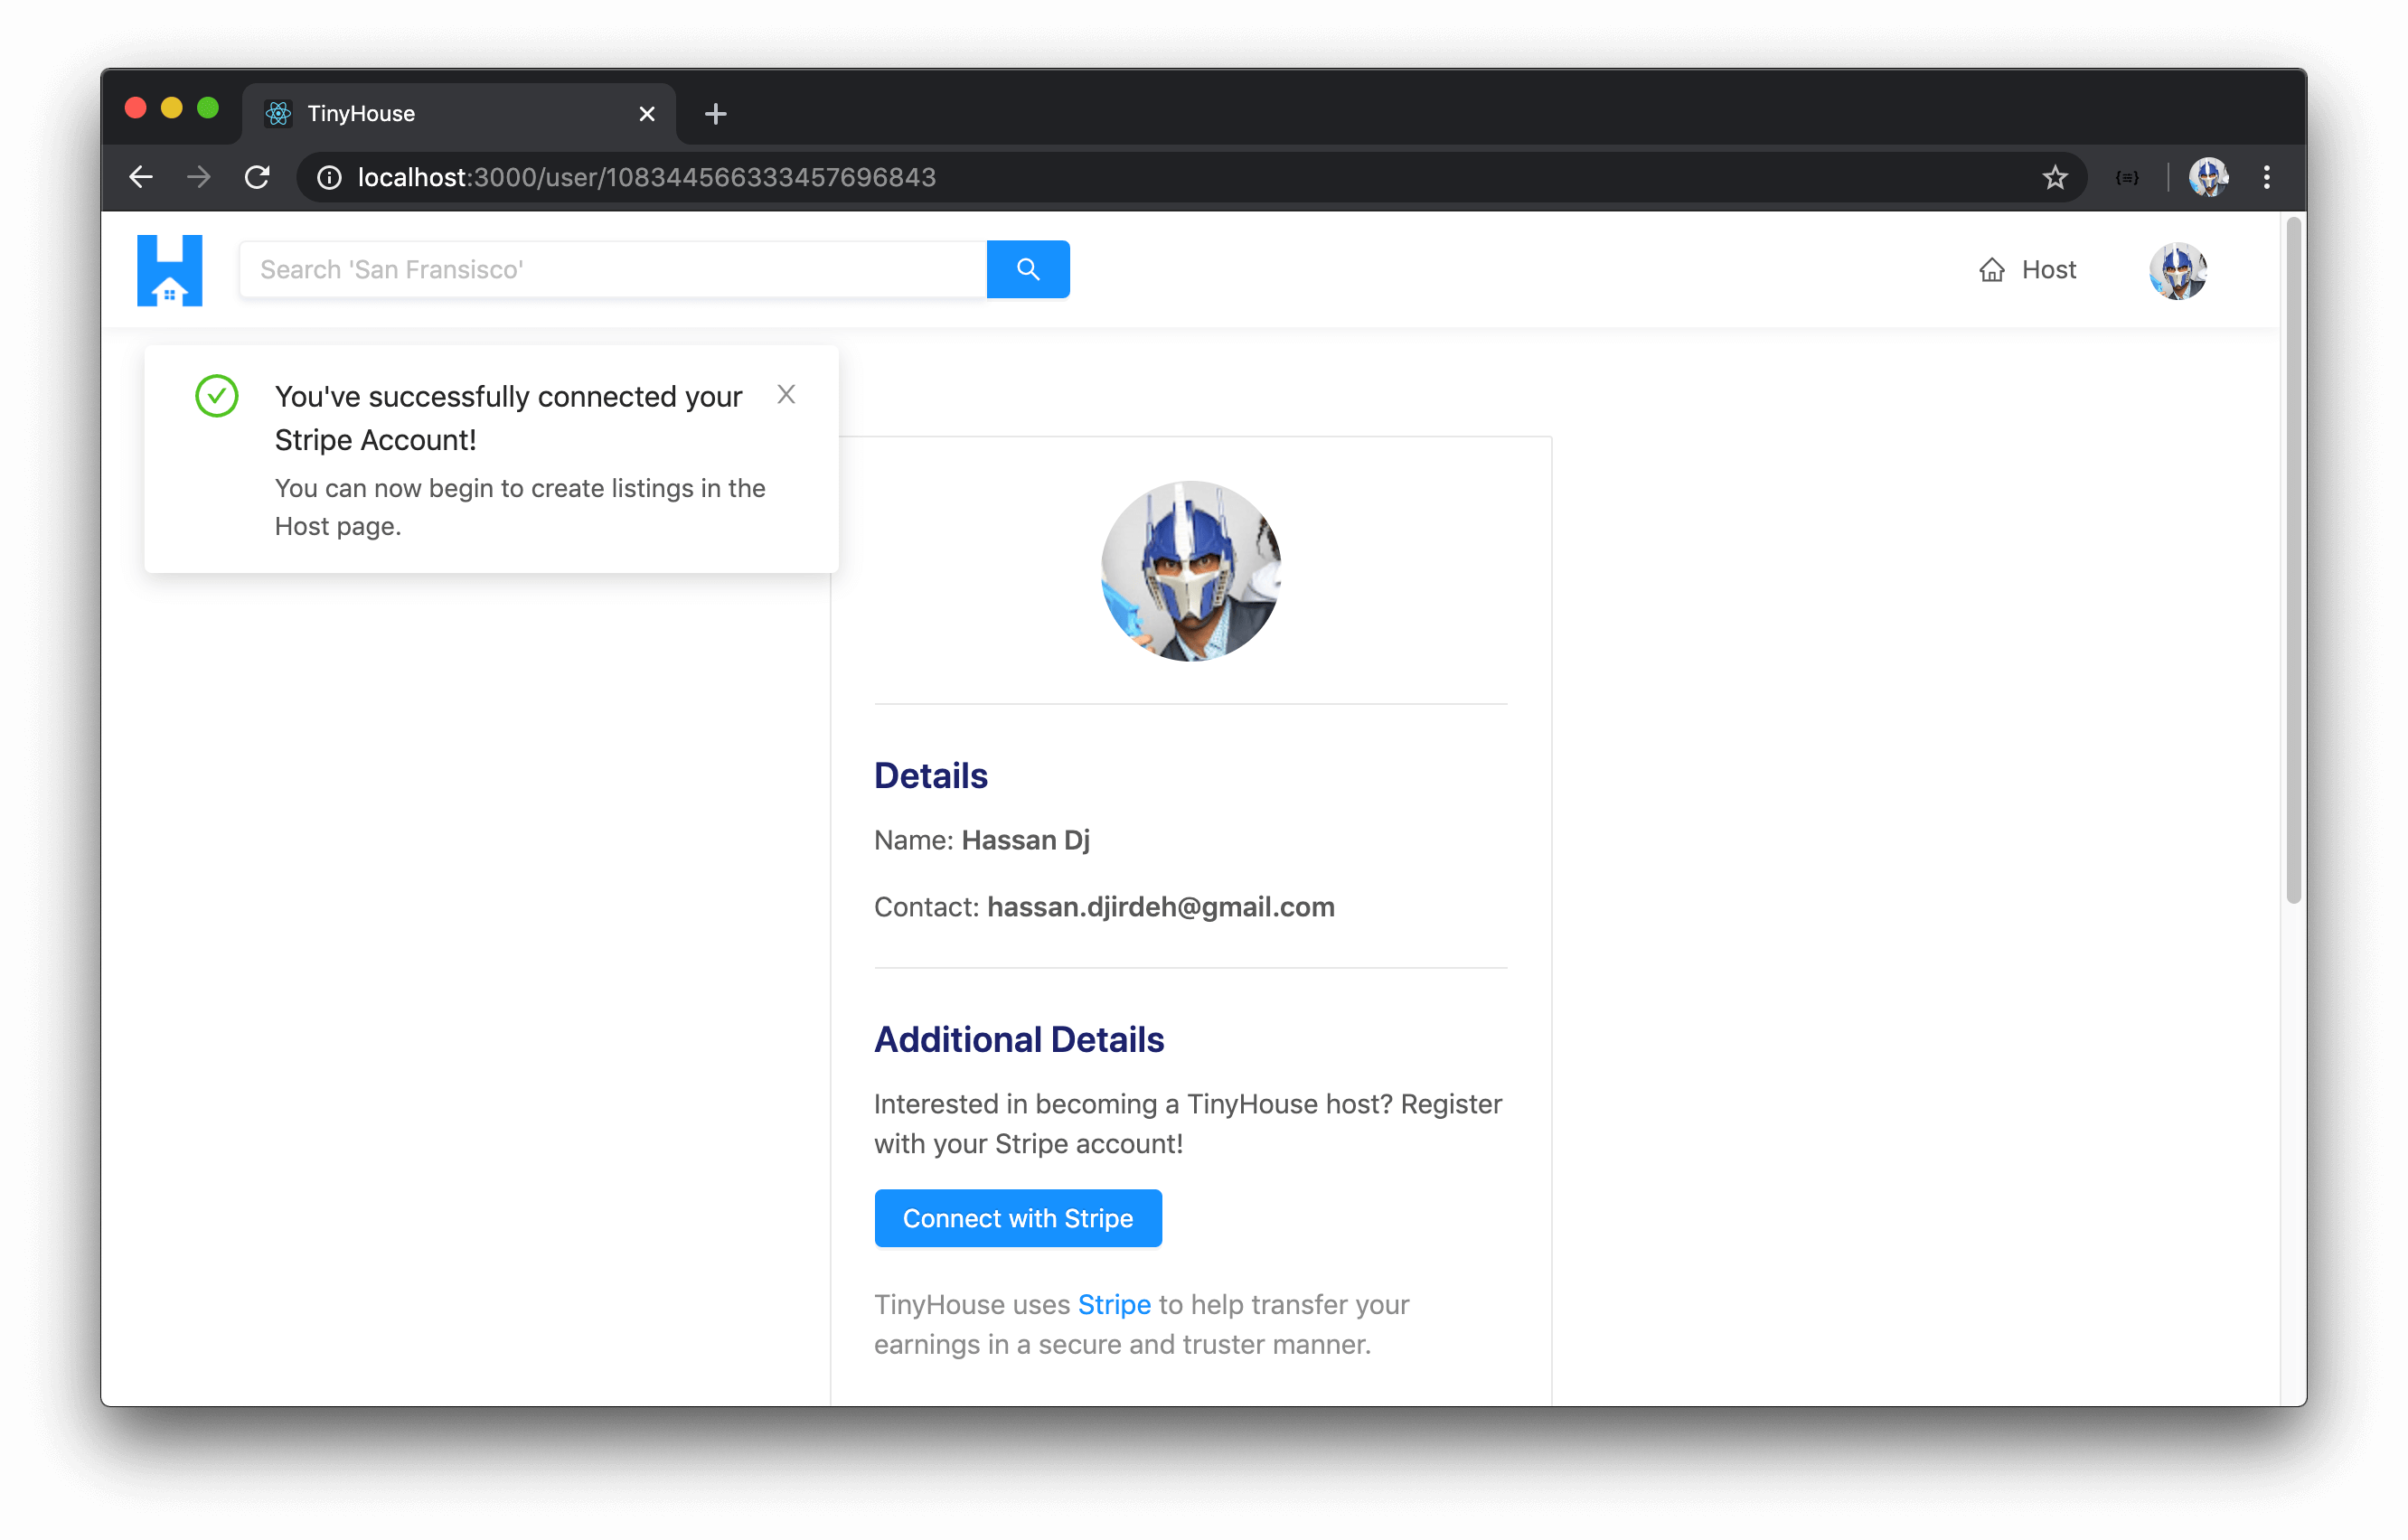
When we proceed past the OAuth login page (in development we can skip it), we’re taken to the /stripe route of our app. When the connectStripe mutation is successful, we’ll be taken to our user/:id page where we get the notification that we’ve connected successfully!
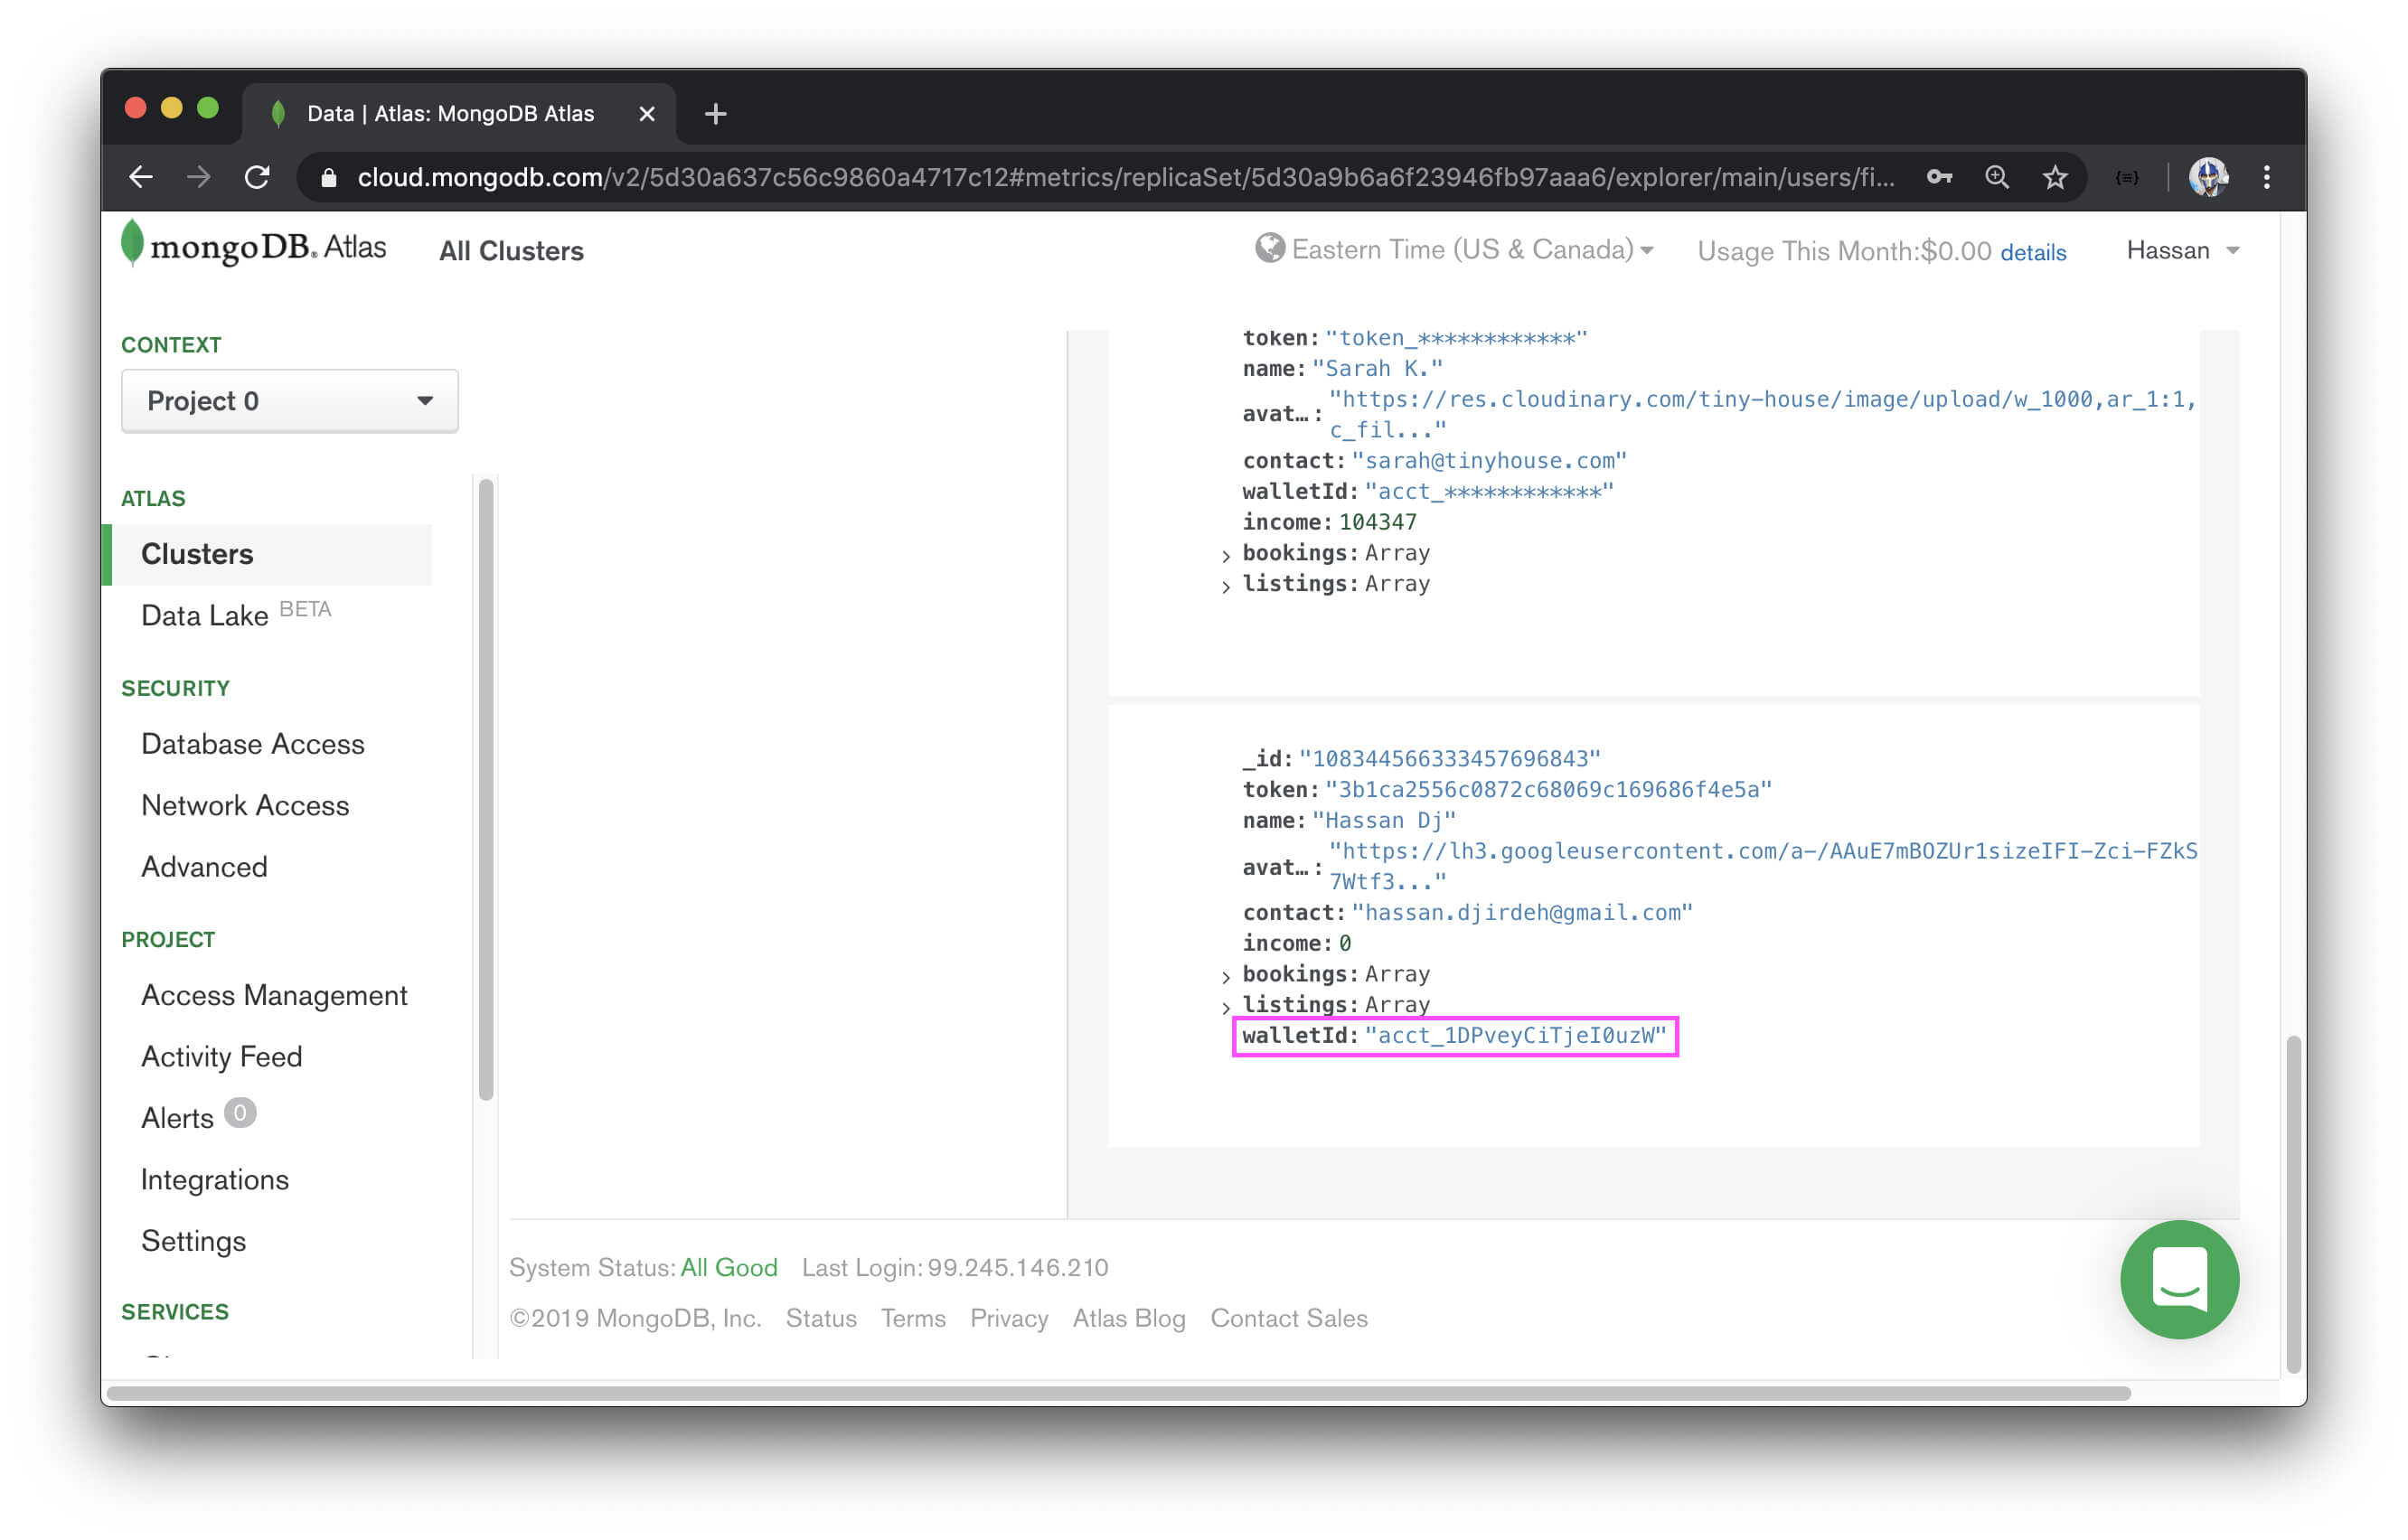
If we were to take look at the walletId value for the user document in our database for the profile we’ve just connected with Stripe with, we’ll see the walletId value populated with the stripe_user_id value returned from Stripe’s servers.
If we were to visit the Stripe dashboard for the TinyHouse App Stripe Connect account, we’ll see one connected account in our connect platform!

Amazing work! In the next coming lesson, we’ll update the UI for our <UserProfile /> component to show a user’s income when they’ve connected with Stripe and we’ll also prepare the functionality to have the user be able to disconnect from Stripe.