DISCONNECTING FROM STRIPE ON THE CLIENT
We’ve managed to create the functionality to have a logged-in user in our app connect with Stripe. In this lesson, we’ll look to visually indicate that the user is in the connected state and have an action responsible for allowing the user to disconnect from Stripe.
USER CONNECTED WITH STRIPE
At this moment, when we query for a user object in the /user/:id page, we’re already querying for the hasWallet field within the User graphQL object. The hasWallet field indicates the presence of a value in the walletId of the user in our database. If the hasWallet field is truthy, it means we have the stripe_user_id of the user.
If we take a look at the <UserProfile /> component we’ve prepared, we’ve specified that the additional details section is only shown when a user is logged in. However, the information that encompasses the button to connect with the Stripe should only be shown when the user hasn’t yet connected with Stripe.
We’ll take the markup that encompasses the button and description to allow a user to connect with Stripe and place it within a constant element we’ll call additionalDetails . We’ll say if the hasWallet field in the user object available as props is not true, the additionalDetails constant will contain the "Connect with Stripe" related markup we’ve seen before.
We’ll also place the additionalDetails constant element within the additionalDetailsSection constant element.
// ...

export const UserProfile = ({ user, viewerIsUser }: Props) => {
  const additionalDetails = user.hasWallet ? (
    <Fragment></Fragment>
  ) : (
    <Fragment>
      <Paragraph>
        Interested in becoming a TinyHouse host? Register with your Stripe account!
      </Paragraph>
      <Button
        type="primary"
        className="user-profile__details-cta"
        onClick={redirectToStripe}
      >
        Connect with Stripe
      </Button>
      <Paragraph type="secondary">
        TinyHouse uses{" "}
        <a
          href="https://stripe.com/en-US/connect"
          target="_blank"
          rel="noopener noreferrer"
        >
          Stripe
        </a>{" "}
        to help transfer your earnings in a secure and truster manner.
      </Paragraph>
    </Fragment>
  );

  const additionalDetailsSection = viewerIsUser ? (
    <Fragment>
      <Divider />
      <div className="user-profile__details">
        <Title level={4}>Additional Details</Title>
        {additionalDetails}
      </div>
    </Fragment>
  ) : null;

  // ...
};
We’ll now look to prepare the markup in the additionalDetails constant for when the user is connected with Stripe (i.e. user.hasWallet is true ). We’ll first import one other component from Ant Design that we’ll use - the <Tag /> component.
client/src/sections/User/components/UserProfile/index.tsx
import { Avatar, Button, Card, Divider, Tag, Typography } from "antd";
We’ll also import the utility function formatListingPrice() that is used to format price number values in our client app. We’ll import the formatListingPrice() function from the src/lib/utils/ folder.
import { formatListingPrice } from "../../../../lib/utils";
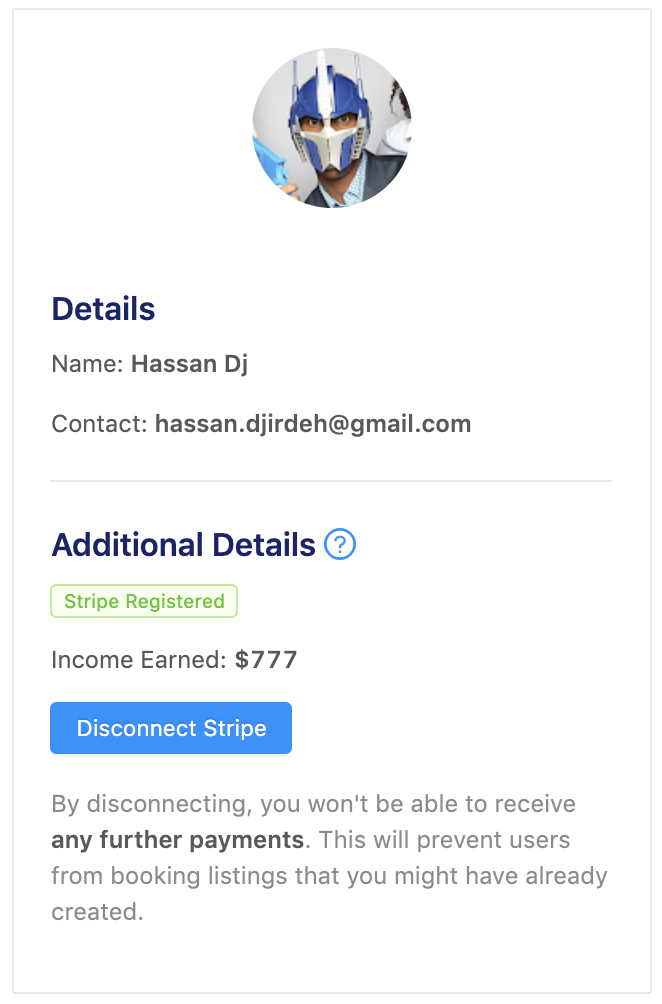
In the additionalDetails constant element within the <UserProfile /> component, when the user hasWallet field is true , the markup we’ll prepare will have:
- A green
<Tag />that says"Stripe Registered". - A
<Paragraph />to display the income of the user with which we’ll be able to access from theuser.incomefield. If theincomevalue withinuserexists, we’ll use theformatListingPrice()function to format the income. Otherwise we’ll simply show$0. - A
<Button />to allow the user to disconnect from Stripe. - A secondary
<Paragraph />that will tell the user that if they were to disconnect from Stripe, this will prevent other users from booking listings that they might have already created.
// ...

export const UserProfile = ({ user, viewerIsUser }: Props) => {
  const additionalDetails = user.hasWallet ? (
    <Fragment>
      <Paragraph>
        <Tag color="green">Stripe Registered</Tag>
      </Paragraph>
      <Paragraph>
        Income Earned:{" "}
        <Text strong>{user.income ? formatListingPrice(user.income) : `$0`}</Text>
      </Paragraph>
      <Button type="primary" className="user-profile__details-cta">
        Disconnect Stripe
      </Button>
      <Paragraph type="secondary">
        By disconnecting, you won't be able to receive{" "}
        <Text strong>any further payments</Text>. This will prevent users from booking
        listings that you might have already created.
      </Paragraph>
    </Fragment>
  ) : (
    <Fragment>
      <Paragraph>
        Interested in becoming a TinyHouse host? Register with your Stripe account!
      </Paragraph>
      <Button
        type="primary"
        className="user-profile__details-cta"
        onClick={redirectToStripe}
      >
        Connect with Stripe
      </Button>
      <Paragraph type="secondary">
        TinyHouse uses{" "}
        <a
          href="https://stripe.com/en-US/connect"
          target="_blank"
          rel="noopener noreferrer"
        >
          Stripe
        </a>{" "}
        to help transfer your earnings in a secure and truster manner.
      </Paragraph>
    </Fragment>
  );

  const additionalDetailsSection = viewerIsUser ? (
    <Fragment>
      <Divider />
      <div className="user-profile__details">
        <Title level={4}>Additional Details</Title>
        {additionalDetails}
      </div>
    </Fragment>
  ) : null;

  // ...
};
If we take a look at our user page now and if we’re connected with Stripe, we’ll see the new section be shown in the user profile section.
DISCONNECTSTRIPE
We’ll now focus on providing the capability for a user to disconnect from Stripe when connected. We have the disconnectStripe mutation set up on the server so we’ll first create the mutation document in our client.
We’ll head to our src/lib/graphql/mutations/ folder and create a DisconnectStripe/ folder that is to have an index.ts file.
client/
  src/
    lib/
      graphql/
        mutations/
          // ...
          DisconnectStripe/
            index.ts
          // ...
        // ...
    // ...
The disconnectStripe mutation takes no arguments and we’ll want the hasWallet field from the viewer object to be returned.
import { gql } from "apollo-boost";

export const DISCONNECT_STRIPE = gql`
  mutation DisconnectStripe {
    disconnectStripe {
      hasWallet
    }
  }
`;
In the src/lib/graphql/mutations/index.ts file, we’ll re-export the DISCONNECT_STRIPE mutation document.
client/src/lib/graphql/mutations/index.ts
export * from "./DisconnectStripe";
We’ll run the codegen:generate command to autogenerate the TypeScript definitions.
npm run codegen:generate
We’ll have the disconnectStripe mutation be used in the <UserProfile /> component. In the <UserProfile/> component file, we’ll import the useMutation Hook, the DISCONNECT_STRIPE mutation document, and the relevant TypeScript definitions for the disconnectStripe mutation. There are no variables for this mutation so we’ll only import the data interface.
import { useMutation } from "@apollo/react-hooks";
// ...
import { DISCONNECT_STRIPE } from "../../../../lib/graphql/mutations/";
import { DisconnectStripe as DisconnectStripeData } from
"../../../../lib/graphql/mutations/DisconnectStripe/__generated__/DisconnectStripe";
import { User as UserData } from "../../../../lib/graphql/queries/User/__generated__/User";
// ...
At the beginning of our <UserProfile /> component function, we’ll use the useMutation Hook, pass along the appropriate type definitions, and destruct the disconnectStripe mutation function. The only result field we’ll use will be the loading state of our mutation.
// ...

export const UserProfile = ({ user, viewerIsUser }: Props) => {
  const [disconnectStripe, { loading }] = useMutation<DisconnectStripeData>(
    DISCONNECT_STRIPE
  );

  // ...
};
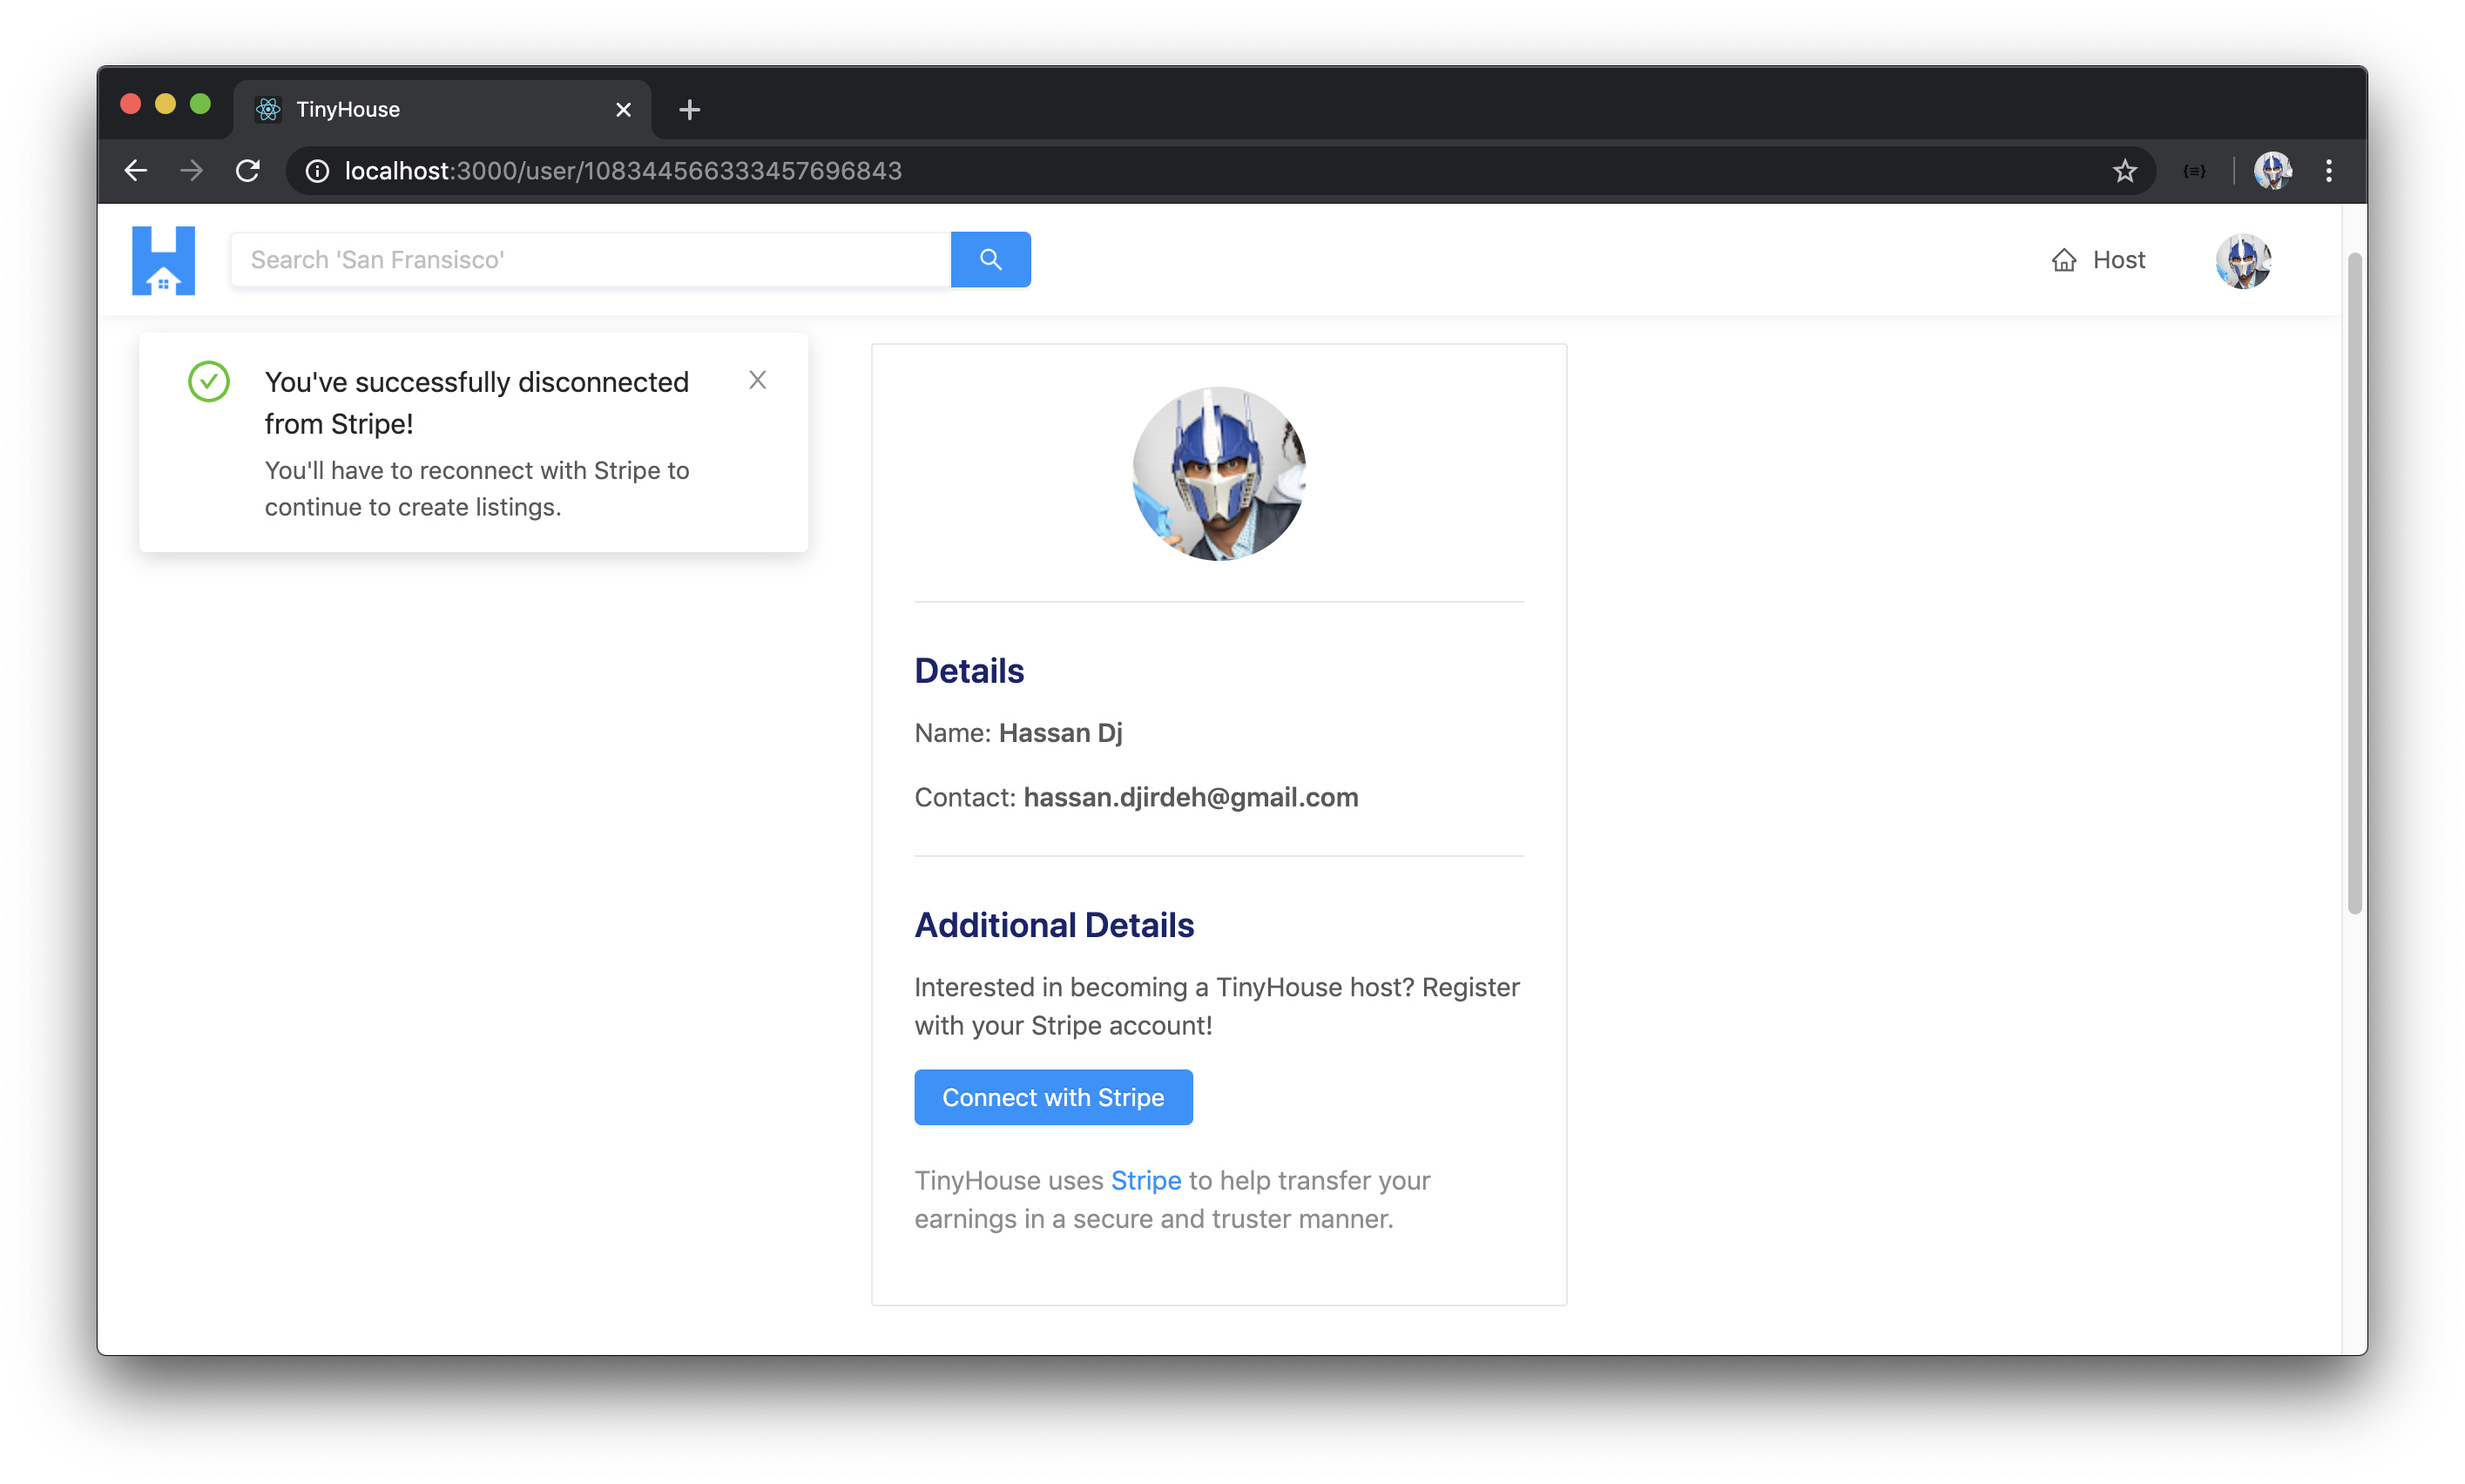
To handle the success and error states of the mutation, we’ll look to either display a success notification or an error message. Since we’re not going to render anything for these conditions, we’ll simply handle these conditions with the onCompleted() and onError() callback functions as part of the mutation results.
We’ll import the displaySuccessNotification and the displayErrorMessage functions from the src/lib/utils folder.
client/src/sections/User/components/UserProfile/index.tsx
import {
  formatListingPrice,
  displaySuccessNotification,
  displayErrorMessage
} from "../../../../lib/utils";
In the onCompleted() callback function of our disconnectStripe mutation, we’ll check for the data object and if the disconnectStripe object within data exists. If data and data.disconnectStripe is present, we’ll simply run the displaySuccessNotification() function with a message that says "You've successfully disconnected from Stripe!" and a description that says "You'll have to reconnect with Stripe to continue to create listings" .
// ...

export const UserProfile = ({ user, viewerIsUser }: Props) => {
  const [disconnectStripe, { loading }] = useMutation<DisconnectStripeData>(
    DISCONNECT_STRIPE,
    {
      onCompleted: data => {
        if (data && data.disconnectStripe) {
          displaySuccessNotification(
            "You've successfully disconnected from Stripe!",
            "You'll have to reconnect with Stripe to continue to create listings."
          );
        }
      }
    }
  );

  // ...
};
In the onError() callback of the mutation, we’ll use the displayErrorMessage() utility function to display an error message that says "Sorry! We weren't able to disconnect you from Stripe. Please try again later!" .
// ...

export const UserProfile = ({ user, viewerIsUser }: Props) => {
  const [disconnectStripe, { loading }] = useMutation<DisconnectStripeData>(
    DISCONNECT_STRIPE,
    {
      onCompleted: data => {
        if (data && data.disconnectStripe) {
          displaySuccessNotification(
            "You've successfully disconnected from Stripe!",
            "You'll have to reconnect with Stripe to continue to create listings."
          );
        }
      },
      onError: () => {
        displayErrorMessage(
          "Sorry! We weren't able to disconnect you from Stripe. Please try again later!"
        );
      }
    }
  );

  // ...
};
When the disconnectStripe mutation is successful, we’ll want to ensure the viewer state object available in our client is updated. With that said, we’ll state that the <UserProfile /> component is to expect the viewer object and setViewer() function as props. The type of the viewer prop object will be the Viewer interface we’ll import from the src/lib/types.ts file.
import { Viewer } from "../../../../lib/types";

interface Props {
  user: UserData["user"];
  viewer: Viewer;
  viewerIsUser: boolean;
  setViewer: (viewer: Viewer) => void;
}
In our mutation onCompleted callback, we’ll use the setViewer() function and the viewer object to update the hasWallet property of the viewer object in our client.
// ...

export const UserProfile = ({ user, viewer, viewerIsUser, setViewer }: Props) => {
  const [disconnectStripe, { loading }] = useMutation<DisconnectStripeData>(
    DISCONNECT_STRIPE,
    {
      onCompleted: data => {
        if (data && data.disconnectStripe) {
          setViewer({ ...viewer, hasWallet: data.disconnectStripe.hasWallet });
          displaySuccessNotification(
            "You've successfully disconnected from Stripe!",
            "You'll have to reconnect with Stripe to continue to create listings."
          );
        }
      },
      onError: () => {
        displayErrorMessage(
          "Sorry! We weren't able to disconnect you from Stripe. Please try again later!"
        );
      }
    }
  );

  // ...
};
Let’s make sure the viewer and setViewer props are to be passed down to this <UserProfile /> component. In the uppermost parent <App /> component, we’ll pass down viewer and setViewer as props to the <User /> component.
client/src/index.tsx
          <Route
            exact
            path="/user/:id"
            render={props => <User {...props} viewer={viewer} setViewer={setViewer} />}
          />
In the <User /> component page, we’ll declare the setViewer prop and we’ll pass the viewer and setViewer props further down to the <UserProfile/> component.
interface Props {
  viewer: Viewer;
  setViewer: (viewer: Viewer) => void;
}

export const User = ({
  viewer,
  setViewer,
  match
}: Props & RouteComponentProps<MatchParams>) => {
  // ...

  const userProfileElement = user ? (
    <UserProfile
      user={user}
      viewer={viewer}
      viewerIsUser={viewerIsUser}
      setViewer={setViewer}
    />
  ) : null;

  // ...
};
In the <UserProfile /> component, we’ll look to use the disconnectStripe() mutation function and the loading state from our mutation result. We’ll place the loading status of the mutation as the value of the loading prop in our "Disconnect Stripe" button. The onClick handler of the "Disconnect Stripe" button will trigger a callback that calls the disconnectStripe() mutation function.
// ...

export const UserProfile = ({ user, viewerIsUser }: Props) => {
  const additionalDetails = user.hasWallet ? (
    <Fragment>
      {/* ... */}
      <Button
        type="primary"
        className="user-profile__details-cta"
        loading={loading}
        onClick={() => disconnectStripe()}
      >
        Disconnect Stripe
      </Button>
      {/* ... */}
    </Fragment>
  ) : (
    <Fragment>{/* ... */}</Fragment>
  );

  // ...
};
REFETCH USER DATA AFTER DISCONNECTING FROM STRIPE
There’s one last thing we’ll look to handle. When the disconnectStripe mutation is successful, we’ll want the UI of the user profile section to update and show the markup that’s associated with a user that’s not connected with Stripe any longer. Since the markup in the user profile section is dependant on the hasWallet field of the user object - we’ll need to refetch the user query in the parent <User /> component to ensure the information in the user profile section is up to date.
In the parent <User /> component, we’ll destruct the refetch property from the useQuery Hook.
client/src/sections/User/index.tsx
  const { data, loading, error, refetch } = useQuery<UserData, UserVariables>(USER, {
    variables: {
      id: match.params.id,
      bookingsPage,
      listingsPage,
      limit: PAGE_LIMIT
    }
  });
We’ll then set-up an async function in the <User /> component called handleUserRefetch() that will simply trigger the refetch function.
client/src/sections/User/index.tsx
  const handleUserRefetch = async () => {
    await refetch();
  };
We’ll then ensure the handleUserRefetch() function is passed down as a prop to the <UserProfile /> component.
client/src/sections/User/index.tsx
  const userProfileElement = user ? (
    <UserProfile
      user={user}
      viewer={viewer}
      viewerIsUser={viewerIsUser}
      setViewer={setViewer}
      handleUserRefetch={handleUserRefetch}
    />
  ) : null;
In our <UserProfile /> component, we’ll state that the handleUserRefetch function is expected as a prop and in the onCompleted callback of the disconnectStripe mutation, we’ll trigger the handleUserRefetch() function. With this change and all the changes we’ve made to the <UserProfile /> component, the src/sections/User/UserProfile/index.tsx file will look like the following:
client/src/sections/User/components/UserProfile/index.tsx
import React, { Fragment } from "react";
import { useMutation } from "@apollo/react-hooks";
import { Avatar, Button, Card, Divider, Tag, Typography } from "antd";
import {
  formatListingPrice,
  displaySuccessNotification,
  displayErrorMessage
} from "../../../../lib/utils";
import { DISCONNECT_STRIPE } from "../../../../lib/graphql/mutations";
import { DisconnectStripe as DisconnectStripeData } from
"../../../../lib/graphql/mutations/DisconnectStripe/__generated__/DisconnectStripe";
import { User as UserData } from "../../../../lib/graphql/queries/User/__generated__/User";
import { Viewer } from "../../../../lib/types";

interface Props {
  user: UserData["user"];
  viewer: Viewer;
  viewerIsUser: boolean;
  setViewer: (viewer: Viewer) => void;
  handleUserRefetch: () => void;
}

const stripeAuthUrl = `
  https://connect.stripe.com/oauth/authorize?
    response_type=code
    &client_id=${process.env.REACT_APP_S_CLIENT_ID}
    &scope=read_write
`;
const { Paragraph, Text, Title } = Typography;

export const UserProfile = ({
  user,
  viewer,
  viewerIsUser,
  setViewer,
  handleUserRefetch
}: Props) => {
  const [disconnectStripe, { loading }] = useMutation<DisconnectStripeData>(
    DISCONNECT_STRIPE,
    {
      onCompleted: data => {
        if (data && data.disconnectStripe) {
          setViewer({ ...viewer, hasWallet: data.disconnectStripe.hasWallet });
          displaySuccessNotification(
            "You've successfully disconnected from Stripe!",
            "You'll have to reconnect with Stripe to continue to create listings."
          );
          handleUserRefetch();
        }
      },
      onError: () => {
        displayErrorMessage(
          "Sorry! We weren't able to disconnect you from Stripe. Please try again later!"
        );
      }
    }
  );

  const redirectToStripe = () => {
    window.location.href = stripeAuthUrl;
  };

  const additionalDetails = user.hasWallet ? (
    <Fragment>
      <Paragraph>
        <Tag color="green">Stripe Registered</Tag>
      </Paragraph>
      <Paragraph>
        Income Earned:{" "}
        <Text strong>{user.income ? formatListingPrice(user.income) : `$0`}</Text>
      </Paragraph>
      <Button
        type="primary"
        className="user-profile__details-cta"
        loading={loading}
        onClick={() => disconnectStripe()}
      >
        Disconnect Stripe
      </Button>
      <Paragraph type="secondary">
        By disconnecting, you won't be able to receive{" "}
        <Text strong>any further payments</Text>. This will prevent users from booking
        listings that you might have already created.
      </Paragraph>
    </Fragment>
  ) : (
    <Fragment>
      <Paragraph>
        Interested in becoming a TinyHouse host? Register with your Stripe account!
      </Paragraph>
      <Button
        type="primary"
        className="user-profile__details-cta"
        onClick={redirectToStripe}
      >
        Connect with Stripe
      </Button>
      <Paragraph type="secondary">
        TinyHouse uses{" "}
        <a
          href="https://stripe.com/en-US/connect"
          target="_blank"
          rel="noopener noreferrer"
        >
          Stripe
        </a>{" "}
        to help transfer your earnings in a secure and truster manner.
      </Paragraph>
    </Fragment>
  );

  const additionalDetailsSection = viewerIsUser ? (
    <Fragment>
      <Divider />
      <div className="user-profile__details">
        <Title level={4}>Additional Details</Title>
        {additionalDetails}
      </div>
    </Fragment>
  ) : null;

  return (
    <div className="user-profile">
      <Card className="user-profile__card">
        <div className="user-profile__avatar">
          <Avatar size={100} src={user.avatar} />
        </div>
        <Divider />
        <div className="user-profile__details">
          <Title level={4}>Details</Title>
          <Paragraph>
            Name: <Text strong>{user.name}</Text>
          </Paragraph>
          <Paragraph>
            Contact: <Text strong>{user.contact}</Text>
          </Paragraph>
        </div>
        {additionalDetailsSection}
      </Card>
    </div>
  );
};
Let’s now see how the disconnectStripe mutation works. When connected with Stripe for our user account, we’ll click the "Disconnect Stripe" button available in the user profile section of our /user/:id page. When successfully disconnected from Stripe, we’ll see the success notification message and the user query in the <User /> component is refetched to get the most up to date information showing the correct user profile information!
Great! For a user that’s logged in to our application, they now can connect and disconnect from Stripe.
MODULE 10 SUMMARY
In this module, we’ve set-up a Stripe Connect account for our TinyHouse application and we’ve provided the capability for users in our application to connect with their Stripe account and be a connected Stripe account in our platform.
SERVER PROJECT
SRC/GRAPHQL/TYPEDEFS.TS
In our GraphQL API type definitions, we’ve established two new root-level mutation fields - connectStripe and disconnectStripe .
- The
connectStripemutation is to be executed, from the client, when the user proceeds through the Stripe OAuth page to connect their Stripe account and is redirected back to our app. - The
disconnectStripemutation is to be executed when a user decides to disconnect from Stripe from our TinyHouse application.
server/src/graphql/typeDefs.ts
  type Mutation {
    logIn(input: LogInInput): Viewer!
    logOut: Viewer!
    connectStripe(input: ConnectStripeInput!): Viewer!
    disconnectStripe: Viewer!
  }
SRC/GRAPHQL/RESOLVERS/VIEWER/INDEX.TS
We’ve constructed the resolver functions for the connectStripe and disconnectStripe mutations in the viewerResolvers map within the src/graphql/resolvers/Viewer/index.ts file.
In the connectStripe() resolver function, we obtain the value of the authorization code returned from Stripe’s servers and passed into our mutation as part of the input. We then verify that a valid viewer is making the request and then look to obtain the stripe_user_id of the viewer by interacting with Stripe’s API. When the stripe_user_id is available, we update the user document of the viewer by adding the stripe_user_id as the value to the walletId field of the document.
server/src/graphql/resolvers/Viewer/index.ts
export const viewerResolvers: IResolvers = {    connectStripe: async (
      _root: undefined,
      { input }: ConnectStripeArgs,
      { db, req }: { db: Database; req: Request }
    ): Promise<Viewer> => {
      try {
        const { code } = input;

        let viewer = await authorize(db, req);
        if (!viewer) {
          throw new Error("viewer cannot be found");
        }

        const wallet = await Stripe.connect(code);
        if (!wallet) {
          throw new Error("stripe grant error");
        }

        const updateRes = await db.users.findOneAndUpdate(
          { _id: viewer._id },
          { $set: { walletId: wallet.stripe_user_id } },
          { returnOriginal: false }
        );

        if (!updateRes.value) {
          throw new Error("viewer could not be updated");
        }

        viewer = updateRes.value;

        return {
          _id: viewer._id,
          token: viewer.token,
          avatar: viewer.avatar,
          walletId: viewer.walletId,
          didRequest: true
        };
      } catch (error) {
        throw new Error(`Failed to connect with Stripe: ${error}`);
      }
    },};
The disconnectStripe() resolver function primarily involves removing the value of the walletId field of the viewer making the request.
server/src/graphql/resolvers/Viewer/index.ts
export const viewerResolvers: IResolvers = {    disconnectStripe: async (
      _root: undefined,
      _args: {},
      { db, req }: { db: Database; req: Request }
    ): Promise<Viewer> => {
      try {
        let viewer = await authorize(db, req);
        if (!viewer) {
          throw new Error("viewer cannot be found");
        }

        const updateRes = await db.users.findOneAndUpdate(
          { _id: viewer._id },
          { $set: { walletId: null } },
          { returnOriginal: false }
        );

        if (!updateRes.value) {
          throw new Error("viewer could not be updated");
        }

        viewer = updateRes.value;

        return {
          _id: viewer._id,
          token: viewer.token,
          avatar: viewer.avatar,
          walletId: viewer.walletId,
          didRequest: true
        };
      } catch (error) {
        throw new Error(`Failed to disconnect with Stripe: ${error}`);
      }
    }};
SRC/LIB/API/STRIPE.TS
In the src/lib/api/Stripe.ts file, we created a Stripe object instance that consolidates the functionality to interact with Stripe’s servers. In the src/lib/api/Stripe.ts file, we constructed an OAuth client and in the exported Stripe object, there exists a connect() function property that uses the Stripe client to fetch the user’s credentials from Stripe.
server/src/lib/api/Stripe.ts
import stripe from "stripe";

const client = new stripe(`${process.env.S_SECRET_KEY}`);

export const Stripe = {
  connect: async (code: string) => {
    const response = await client.oauth.token({
      /* eslint-disable @typescript-eslint/camelcase */
      grant_type: "authorization_code",
      code
      /* eslint-enable @typescript-eslint/camelcase */
    });

    return response;
  }
};
CLIENT PROJECT
SRC/LIB/GRAPHQL/
We created the GraphQL documents for the new root-level mutation fields - connectStripe and disconnectStripe . For both of these mutations, we simply return the value of the hasWallet field in the returned viewer object.
client/src/lib/graphql/mutations/ConnectStripe/index.ts
import { gql } from "apollo-boost";

export const CONNECT_STRIPE = gql`
  mutation ConnectStripe($input: ConnectStripeInput!) {
    connectStripe(input: $input) {
      hasWallet
    }
  }
`;
client/src/lib/graphql/mutations/DisconnectStripe/index.ts
import { gql } from "apollo-boost";

export const DISCONNECT_STRIPE = gql`
  mutation DisconnectStripe {
    disconnectStripe {
      hasWallet
    }
  }
`;
SRC/SECTIONS/USER/COMPONENTS/USERPROFILE/INDEX.TSX
In the <UserProfile /> component that is rendered as part of the <User /> component, we provide the functionality to allow the user to:
- Be redirected to Stripe’s OAuth page when connecting with Stripe.
- Trigger the
disconnectStripemutation when already connected with Stripe and interested in disconnecting.
client/src/sections/User/components/UserProfile/index.tsx
const stripeAuthUrl = `
  https://connect.stripe.com/oauth/authorize?
    response_type=code
    &client_id=${process.env.REACT_APP_S_CLIENT_ID}
    &scope=read_write
`;
client/src/sections/User/components/UserProfile/index.tsx
export const UserProfile = ({
  user,
  viewer,
  viewerIsUser,
  setViewer,
  handleUserRefetch
}: Props) => {
  const [disconnectStripe, { loading }] = useMutation<DisconnectStripeData>(
    DISCONNECT_STRIPE,
    {
      onCompleted: data => {
        if (data && data.disconnectStripe) {
          setViewer({ ...viewer, hasWallet: data.disconnectStripe.hasWallet });
          displaySuccessNotification(
            "You've successfully disconnected from Stripe!",
            "You'll have to reconnect with Stripe to continue to create listings."
          );
          handleUserRefetch();
        }
      },
      onError: () => {
        displayErrorMessage(
          "Sorry! We weren't able to disconnect you from Stripe. Please try again later!"
        );
      }
    }
  );

  const redirectToStripe = () => {
    window.location.href = stripeAuthUrl;
  };

  const additionalDetails = user.hasWallet ? (
    <Fragment>
      <Paragraph>
        <Tag color="green">Stripe Registered</Tag>
      </Paragraph>
      <Paragraph>
        Income Earned:{" "}
        <Text strong>{user.income ? formatListingPrice(user.income) : `$0`}</Text>
      </Paragraph>
      <Button
        type="primary"
        className="user-profile__details-cta"
        loading={loading}
        onClick={() => disconnectStripe()}
      >
        Disconnect Stripe
      </Button>
      <Paragraph type="secondary">
        By disconnecting, you won't be able to receive{" "}
        <Text strong>any further payments</Text>. This will prevent users from booking
        listings that you might have already created.
      </Paragraph>
    </Fragment>
  ) : (
    <Fragment>
      <Paragraph>
        Interested in becoming a TinyHouse host? Register with your Stripe account!
      </Paragraph>
      <Button
        type="primary"
        className="user-profile__details-cta"
        onClick={redirectToStripe}
      >
        Connect with Stripe
      </Button>
      <Paragraph type="secondary">
        TinyHouse uses{" "}
        <a
          href="https://stripe.com/en-US/connect"
          target="_blank"
          rel="noopener noreferrer"
        >
          Stripe
        </a>{" "}
        to help transfer your earnings in a secure and truster manner.
      </Paragraph>
    </Fragment>
  );

  const additionalDetailsSection = viewerIsUser ? (
    <Fragment>
      <Divider />
      <div className="user-profile__details">
        <Title level={4}>Additional Details</Title>
        {additionalDetails}
      </div>
    </Fragment>
  ) : null;

  return (
    <div className="user-profile">
      <Card className="user-profile__card">
        <div className="user-profile__avatar">
          <Avatar size={100} src={user.avatar} />
        </div>
        <Divider />
        <div className="user-profile__details">
          <Title level={4}>Details</Title>
          <Paragraph>
            Name: <Text strong>{user.name}</Text>
          </Paragraph>
          <Paragraph>
            Contact: <Text strong>{user.contact}</Text>
          </Paragraph>
        </div>
        {additionalDetailsSection}
      </Card>
    </div>
  );
};
SRC/SECTIONS/STRIPE/INDEX.TSX
We’ve constructed a <Stripe /> component that is to be rendered when a user is redirected to the /stripe route of our app after connecting their Stripe account. When the user is redirected to /stripe , a value for the authorization code is available in the URL as a query parameter. An effect is run in the <Stripe /> component to retrieve the value of the code parameter and execute the connectStripe mutation. When the connectStripe mutation is successful, the user is redirected to their /user/:id page.
client/src/sections/Stripe/index.tsx
export const Stripe = ({ viewer, setViewer, history }: Props & RouteComponentProps) => {
  const [connectStripe, { data, loading, error }] = useMutation<
    ConnectStripeData,
    ConnectStripeVariables
  >(CONNECT_STRIPE, {
    onCompleted: data => {
      if (data && data.connectStripe) {
        setViewer({ ...viewer, hasWallet: data.connectStripe.hasWallet });
        displaySuccessNotification(
          "You've successfully connected your Stripe Account!",
          "You can now begin to create listings in the Host page."
        );
      }
    }
  });
  const connectStripeRef = useRef(connectStripe);

  useEffect(() => {
    const code = new URL(window.location.href).searchParams.get("code");

    if (code) {
      connectStripeRef.current({
        variables: {
          input: { code }
        }
      });
    } else {
      history.replace("/login");
    }
  }, [history]);

  if (data && data.connectStripe) {
    return <Redirect to={`/user/${viewer.id}`} />;
  }

  if (loading) {
    return (
      <Content className="stripe">
        <Spin size="large" tip="Connecting your Stripe account..." />
      </Content>
    );
  }

  if (error) {
    return <Redirect to={`/user/${viewer.id}?stripe_error=true`} />;
  }

  return null;
};
MOVING FORWARD
In the next module, we move towards creating the capability for a user to host a listing in our application.
MODULE 11 INTRODUCTION
In this module, we’ll focus on allowing users to host their own listings on the TinyHouse platform.
Users will able to submit and create a new listing in the form presented in the /host route of our app which in the complete state will look similar to the following:
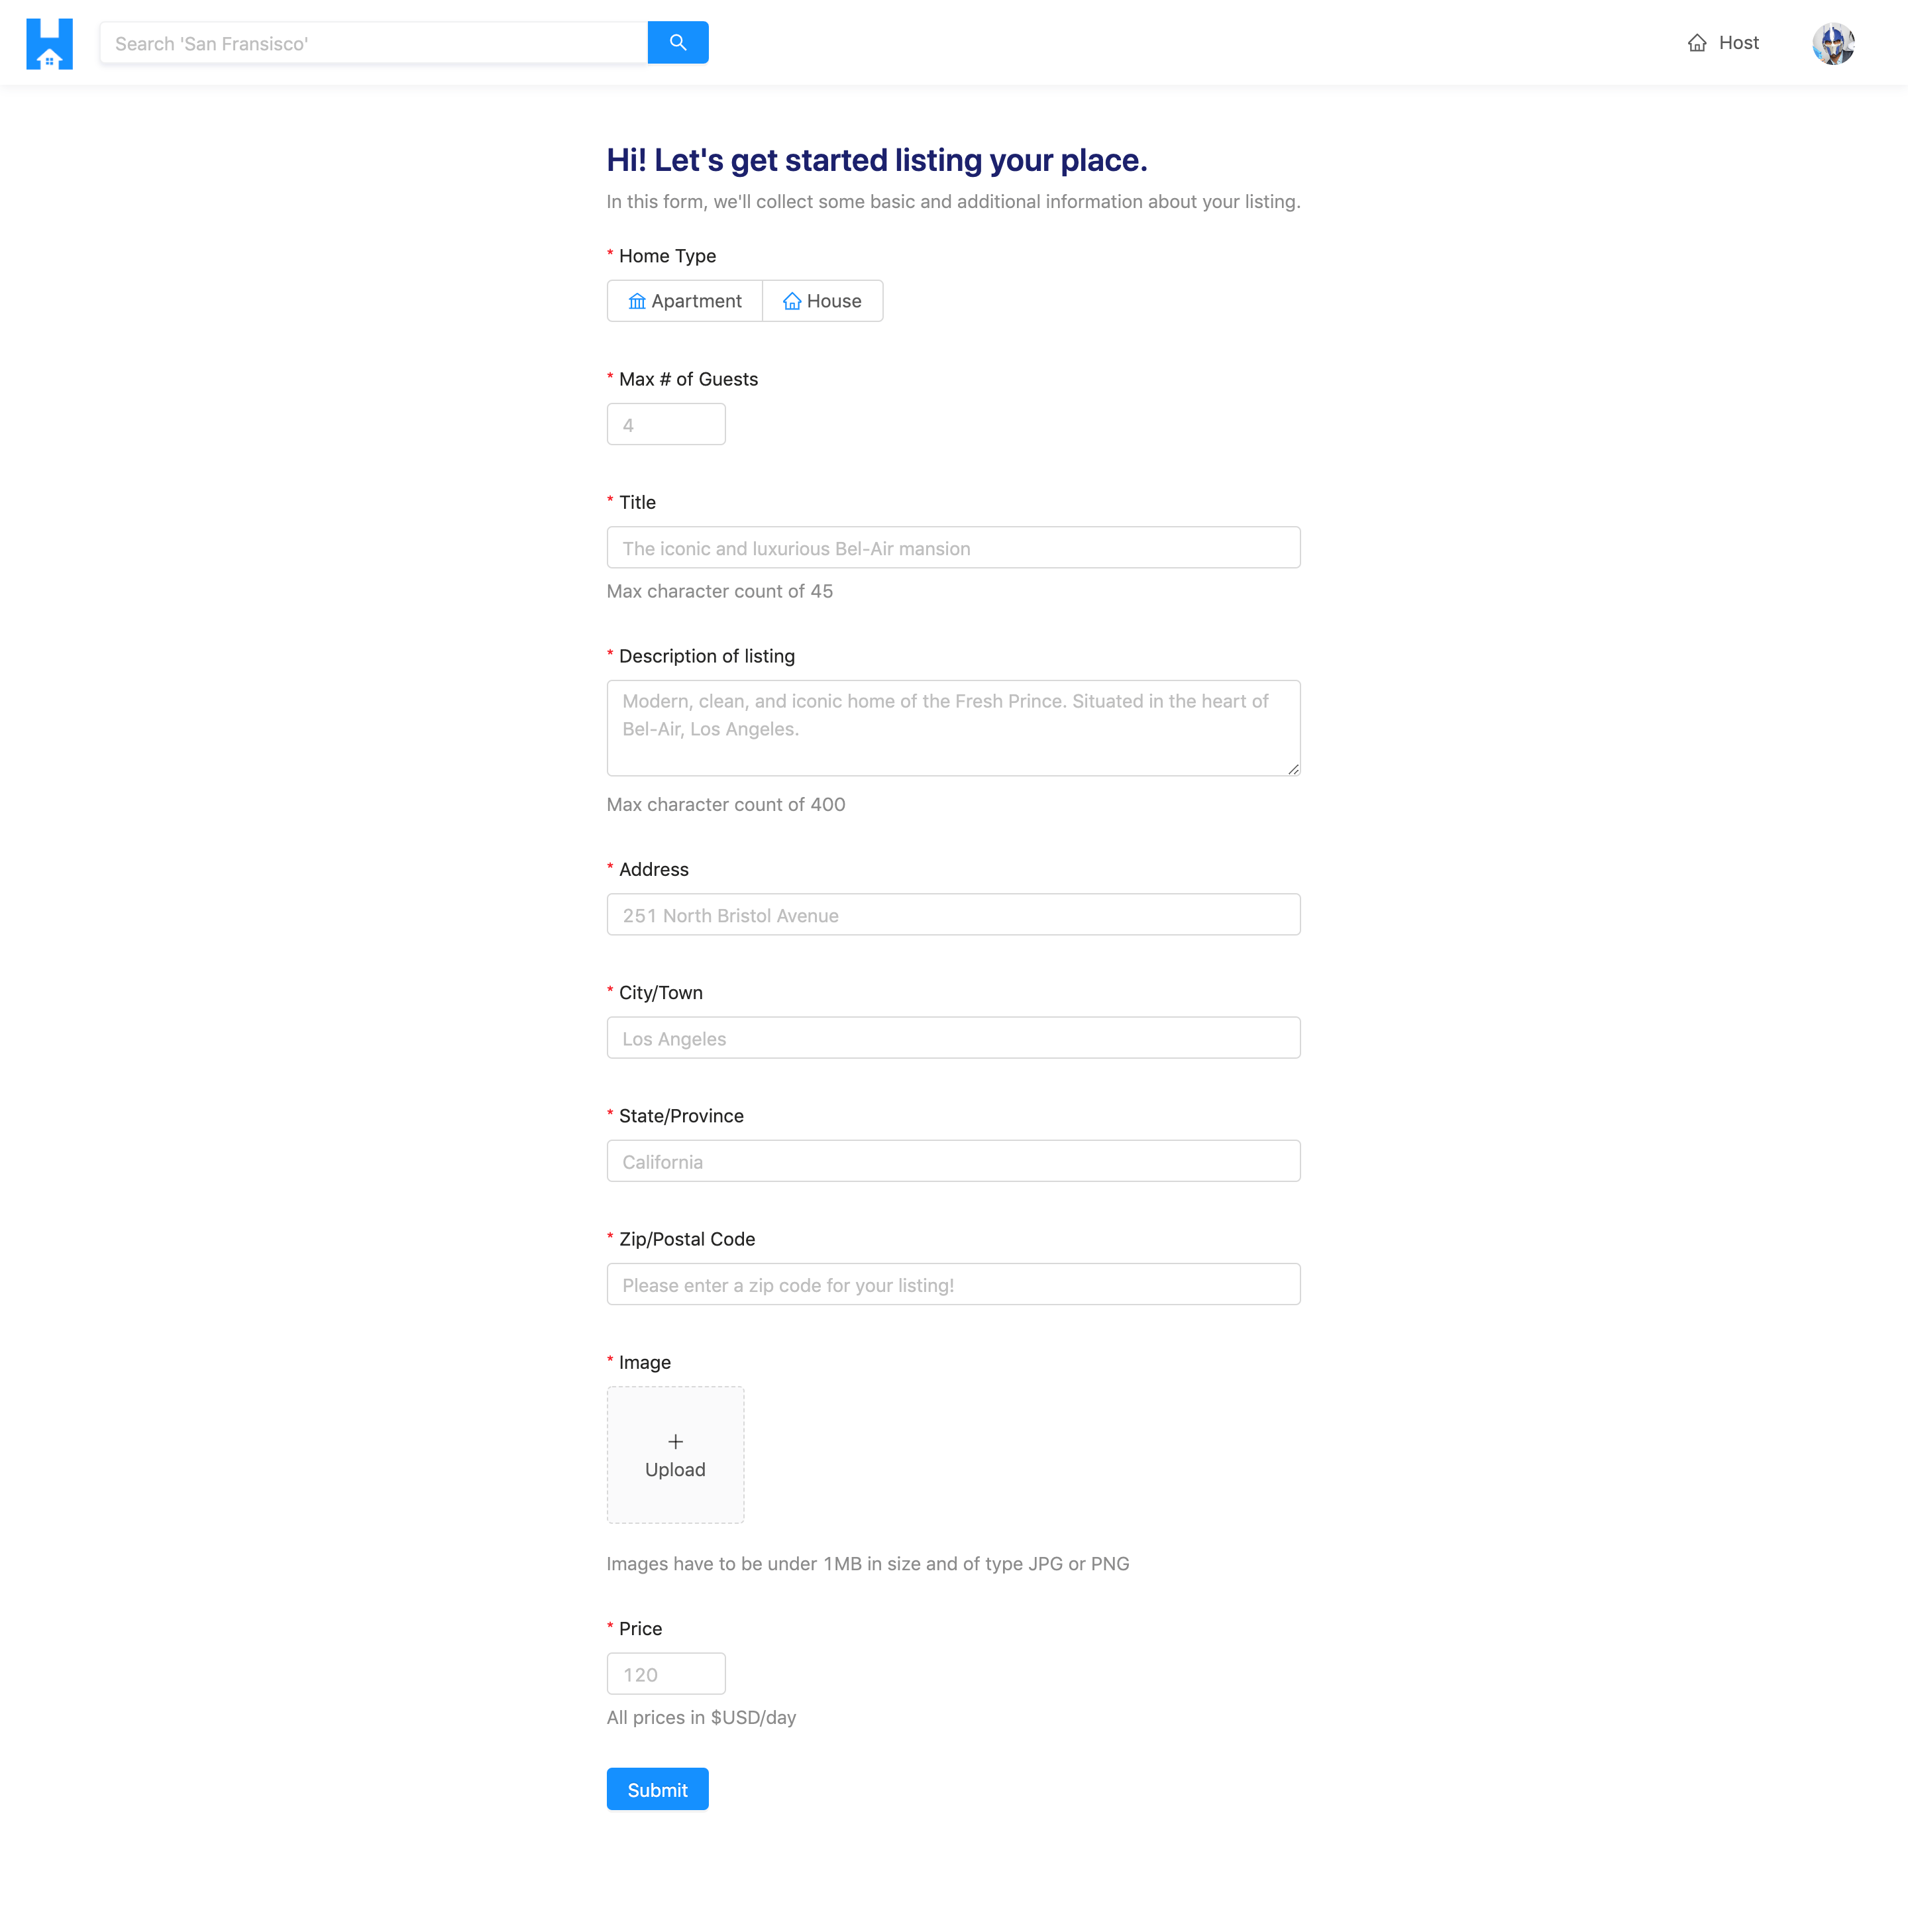
In this module, we’ll:
- Introduce the
hostListingGraphQL mutation. - Build the
hostListing()resolver function that is to receive the appropriate input and subsequently update certain collections in our database. - On the client, build the form in the
/hostpage and trigger thehostListingmutation when the host form is completed and submitted.
HOSTLISTING GRAPHQL FIELDS
For users in our application to add listings (i.e. host listings) in the TinyHouse application, we’ll need to create the functionality where users can upload and insert new listing data into our database. We’ll only allow for this functionality for users who have:
- Logged into our application.
- And have connected with Stripe.
We’ll need users who intend to host listings connected with Stripe since we’ll use the user’s stripe_user_id value for them to receive payments on our connected Stripe platform. We’ll discuss more about this in the next coming modules but for now we’ll talk about the GraphQL fields we’ll need to have for users to create listings.
All we’ll need to have users be able to create listings is one new root level mutation we’ll call hostListing . This hostListing mutation will receive an input that contains various different information about a new listing such as the listing address, title, image, etc. When the hostListing mutation is successful, a new listing document will be added to the "listings" collection in our database.
The hostListing mutation sounds like it will be fairly straightforward to implement. The more complicated things we’ll look to consider with this mutation is:
- How we intend to receive address information for the new listing location and use Google’s Geocoding API to geocode the address information.
- How we would want to handle image uploads from the client onto the server.
We’ll take this step by step. For this lesson, we’ll establish a GraphQL field in our GraphQL type definitions file and an accompanying resolver function before we begin to build the implementation. In the src/graphql/typeDefs.ts file, we’ll introduce a new mutation labeled hostListing that at this moment will just return a string.
server/src/graphql/typeDefs.ts
  type Mutation {
    logIn(input: LogInInput): Viewer!
    logOut: Viewer!
    connectStripe(input: ConnectStripeInput!): Viewer!
    disconnectStripe: Viewer!
    hostListing: String!
  }
We already have a listingResolvers map dedicated to containing the resolver functions that pertain to the domain of a listing. We’ll introduce a Mutation object in this listingResolvers map, within the src/graphql/resolvers/Listing/index.ts file, that is to contain a hostListing() mutation resolver. We’ll have this hostListing() resolver function return a string that says Mutation.hostListing .
server/src/graphql/resolvers/Listing/index.ts
export const listingResolvers: IResolvers = {  Mutation: {
    hostListing: () => {
      return "Mutation.hostListing";
    }
  },};
With our server running, when we head to GraphQL Playground and attempt to run the hostListing mutation, we’ll get the string message we’ve just set up.

In the next lesson, we’ll look to implement the functionality the hostListing() resolver should have.
BUILDING THE HOSTLISTING RESOLVER
GAMEPLAN
In this lesson, we’ll look to have the hostListing() resolver receive an input with new listing information and add a new listing document to the "listings" collection in our database.
It’s probably important to first discuss what kind of information is going to be provided from the client to the server to create a listing. When we build the form where the user can create a new listing, the form will collect the following information:
- The listing type (i.e. apartment or house).
- The maximum number of guests.
- The title of the listing.
- The description of the listing.
- The address, city (or town), state (or province), and zip (or postal code) of the listing.
- The image of the listing.
- The price of the listing per day.
There are other fields in our listing documents in the database that govern the context of what a listing is to have in our app such as the number of bookings in a listing, the id of the host of the listing, etc. For most of these other fields, we won’t need the client to provide this information since we’ll govern the values in the server when the listing is being created. For example, when a new listing is being made, the bookings of that listing will be empty and the host id will be the id of the viewer making the request to create the listing.
The fields we’re going to capture from the client are for the most part going to be mapped one to one. For example, whatever the user says the title of the listing is going to be, we’ll simply make it the title of the listing document. This is the same for capturing the description, image, type, price, and the maximum number of guests for a listing.
Things will be a little different for the address information we’re going to capture. We’re not simply going to take the address information provided from the client and place those values directly in our database. This is for a few reasons:
- Our database isn’t going to accept information such as the postal code of a listing. The only location information we have for a listing document is
address,country,admin, andcity. - We’ll want the
country,admin, andcityinformation within every listing document to be the geocoded information that Google’s Geocoding API gives us . We won’t want to store the city or country information the user types directly in the form into our database for a multitude of reasons. One being the fact that users might provide information differently, they may misspell something, etc. If we had different variations of the same representation of a location, this would affect how listings can be searched for in the/listings/:location?page !
In our server, the Google Geocoder functionality we’ve set-up requires a single input and outputs valid geographic information for the input regardless of how terse or verbose the input is. It can be just the address of a location or it can be a more formatted address that contains the specific address with the postal code, city, and country.
From the client, we’ll have the user provide information for the address, city, state, and postal code of the new listing.
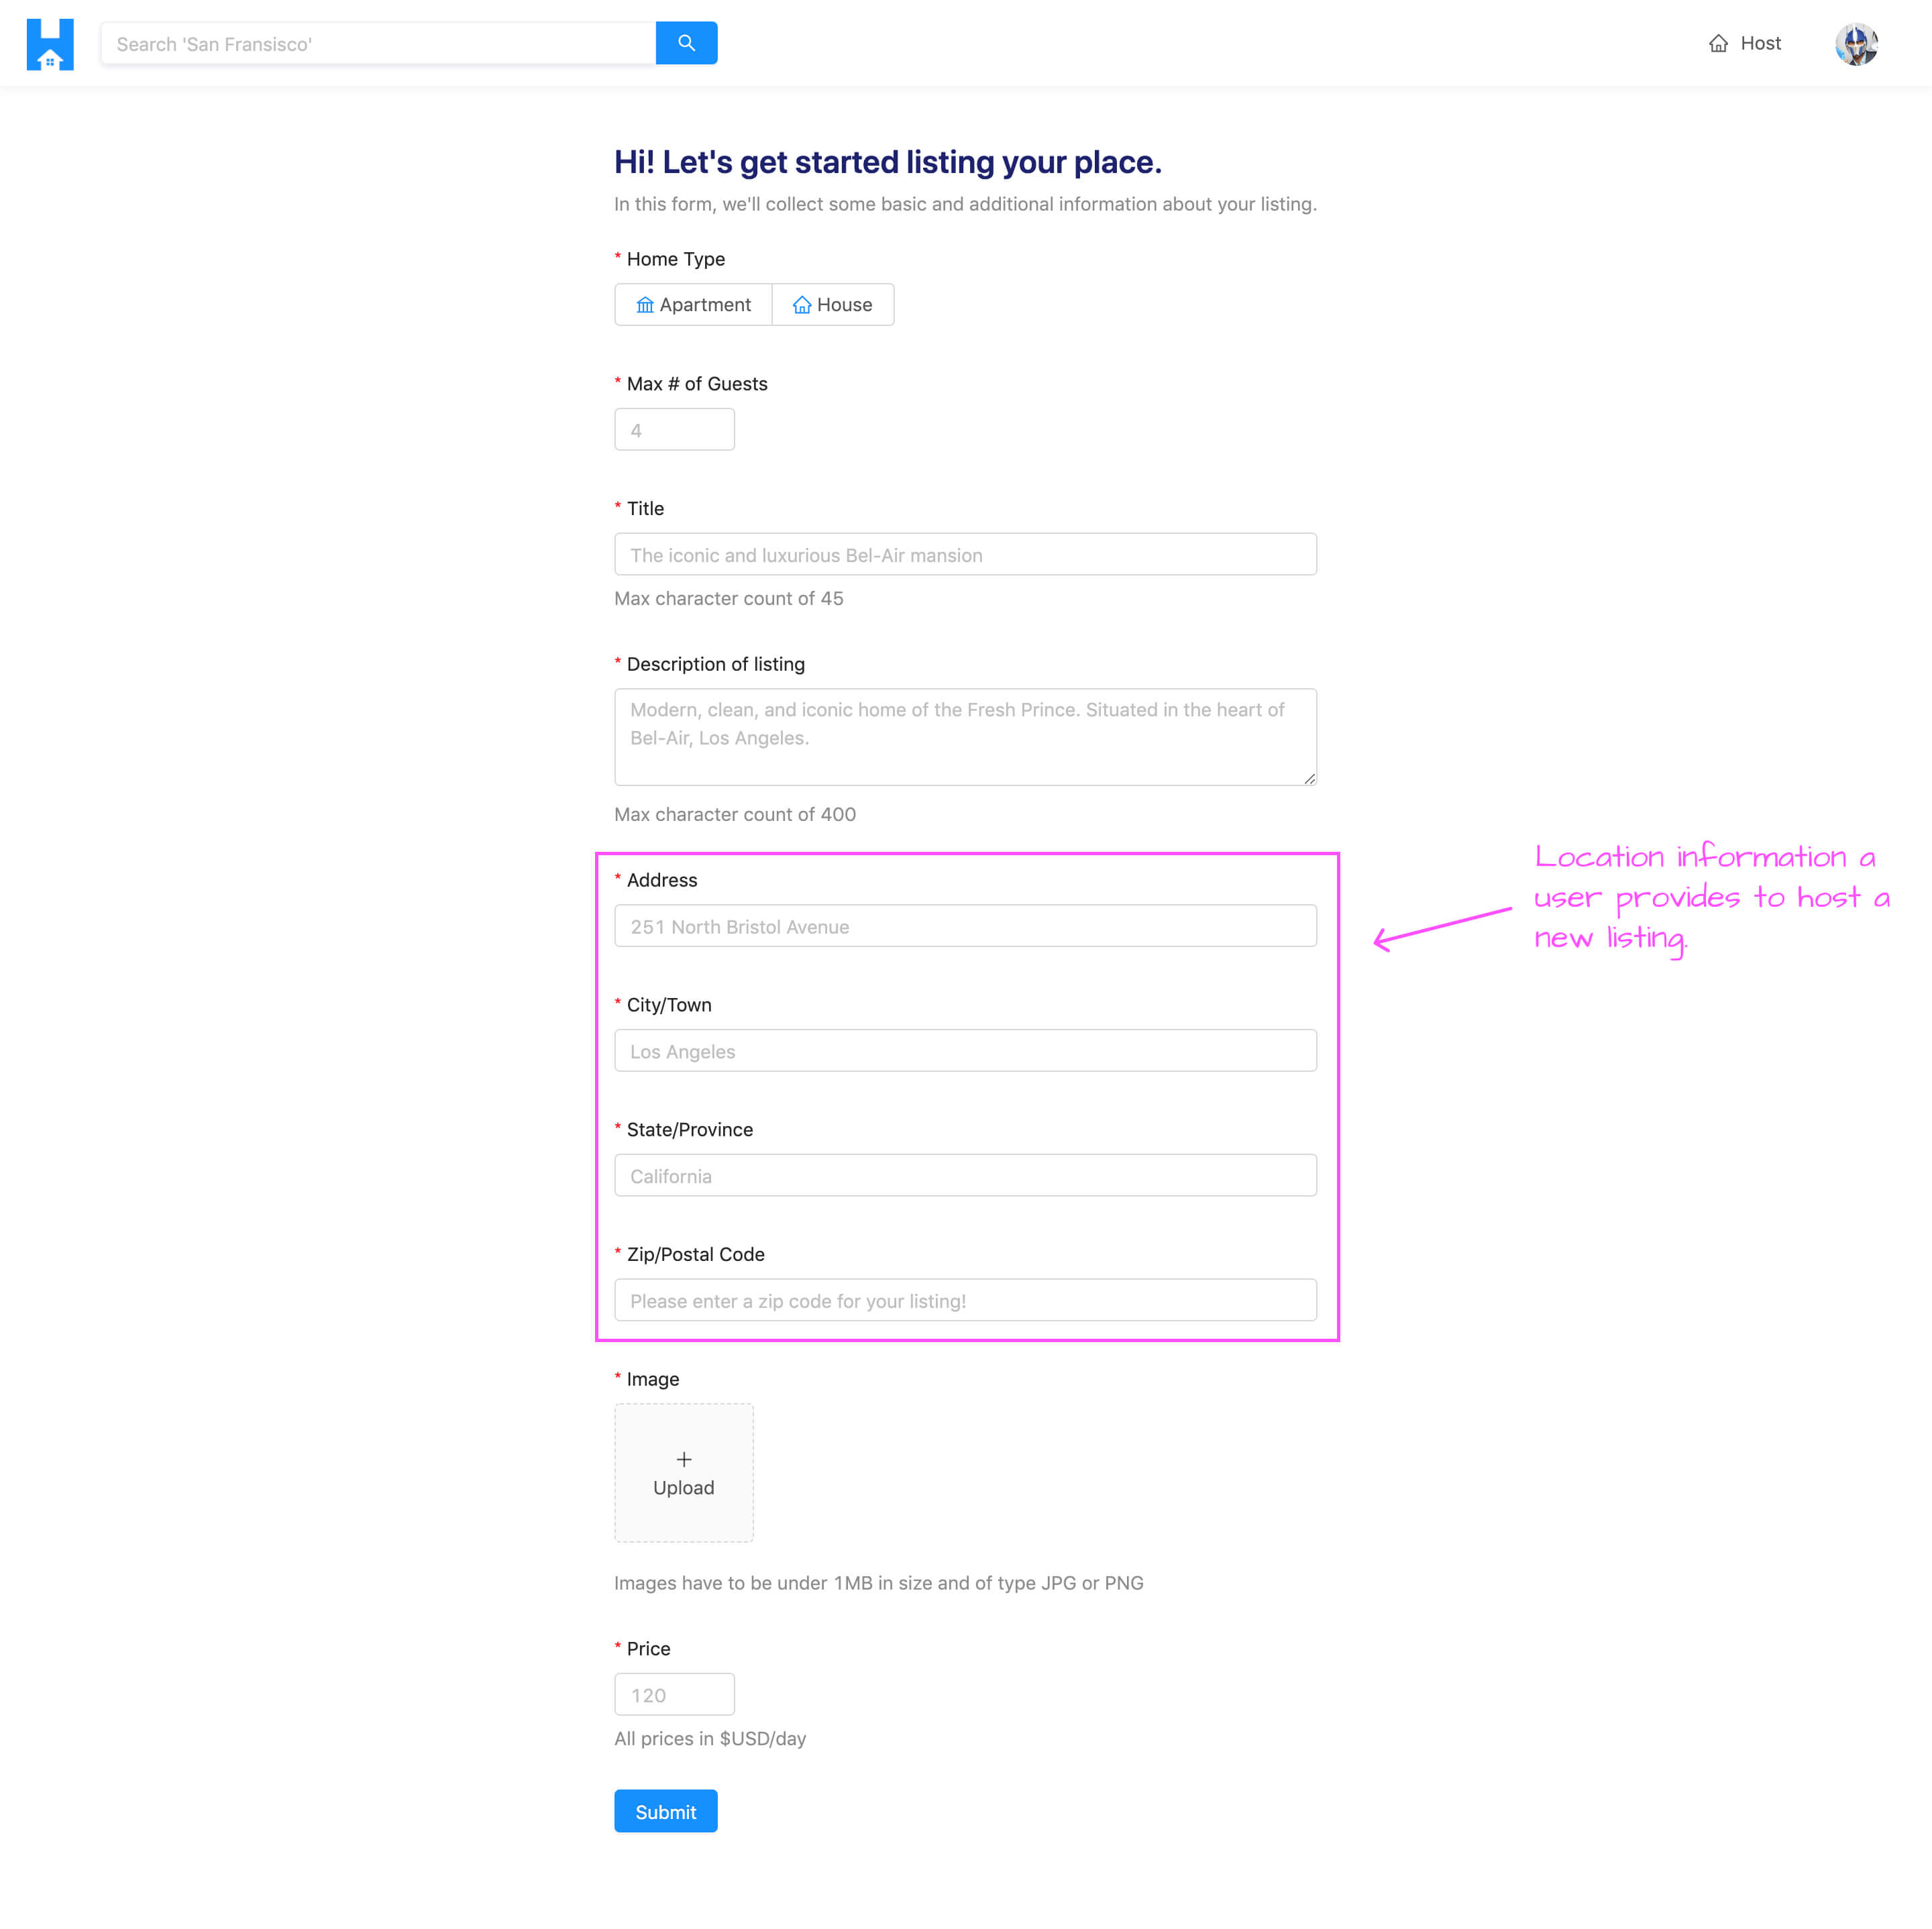
When the mutation to create the listing (i.e. hostListing ) is made, we’ll concatenate all this information to a single address within the input of the mutation. For example, assume a user was to state in the client form, the address of a new listing is "251 North Bristol Avenue" , the city is "Los Angeles" , the state is "California" , and the zip code is "90210" . In the client, we’ll parse this information and simply pass a concatenated address that has all this information into the server (i.e. "251 North Bristol Avenue, Los Angeles, California, 90210" ).
The hostListing mutation will accept the concatenated address in the input argument, run it through Google’s Geocoding API, and retrieve the country , admin , and city information of the address and provide that in our new listing document.
With our gameplan sort of established, let’s begin to build out our hostListing mutation.
HOSTLISTING
In our GraphQL API type definitions file ( src/graphql/typeDefs.ts ), we’ll state that our hostListing mutation is to receive an input of object type HostListingInput and when the mutation resolves successfully, we’ll want it to return the newly created listing document to the client so it’ll return a Listing object type.
server/src/graphql/typeDefs.ts
  type Mutation {
    logIn(input: LogInInput): Viewer!
    logOut: Viewer!
    connectStripe(input: ConnectStripeInput!): Viewer!
    disconnectStripe: Viewer!
    hostListing(input: HostListingInput!): Listing!
  }
We’ll describe the shape of the HostListingInput object type and we’ll note the fields we’ve mentioned the client will pass on to the server. This input will contain:
-
titleof typeString. -
descriptionof typeString. -
imageof typeString. We’ll discuss how we’re going to handle image uploads shortly but it will be received as a string. -
typewith which will be of theListingTypeEnum. -
addressof typeString. -
pricewhich is to be anInt. -
numOfGuestswhich is to be anIntas well.
server/src/graphql/typeDefs.ts
  input HostListingInput {
    title: String!
    description: String!
    image: String!
    type: ListingType!
    address: String!
    price: Int!
    numOfGuests: Int!
  }
We’ll then create the TypeScript interface type for this HostListingInput argument in the types file kept within the listing resolvers folder ( src/graphql/resolvers/Listing/types.ts ). We’ll export an interface called HostListingArgs which is to have an input of type HostListingInput . The shape of the HostListingInput interface will be as we described in our GraphQL API type definitions. We’ll import the ListingType interface from the src/lib/types.ts file which we’ll use to describe the shape of the type field within HostListingInput .
server/src/graphql/resolvers/Listing/types.ts
export interface HostListingInput {
  title: string;
  description: string;
  image: string;
  type: ListingType;
  address: string;
  price: number;
  numOfGuests: number;
}

export interface HostListingArgs {
  input: HostListingInput;
}
In the listingResolvers map (within src/graphql/resolvers/Listing/index.ts ), we’ll import the HostListingArgs interface from the adjacent types file and we’ll declare our hostListing() resolver will receive an input argument. We’ll also look to destruct the database and request objects available as context and when the mutation function is resolved successfully, it will return Promise<Listing> .
import {
  // ...,
  HostListingArgs
} from "./types";

export const listingResolvers: IResolvers = {
  Query: {
    // ...
  },
  Mutation: {
    hostListing: async (
      _root: undefined,
      { input }: HostListingArgs,
      { db, req }: { db: Database; req: Request }
    ): Promise<Listing> => {
      // ...
    }
  },
  Listing: {
    // ...
  }
};
There are a few things we’ll want to do in the hostListing() resolver function. The first thing we’ll want to do is verify that the input provided by the user is valid. A valid input is one where we want to verify that the title and description fields don’t exceed a certain number of characters, the type selected is an apartment or a house and the price isn’t less than 0. We’re going to provide some of these restrictions on the client-side as well but we’ll add these server-side validations as an extra precaution.
We’ll have these validations handled in a separate function that we’ll call verifyHostListingInput() and will receive the input argument. We’ll construct the verifyHostListingInput() function above the listingResolvers map object that is to receive an input argument. We’ll import the HostListingInput interface from the adjacent types file to describe the shape of the input.
import {
  // ...,
  HostListingInput
  // ...
} from "./types";

const verifyHostListingInput = (input: HostListingInput) => {};

export const listingResolvers: IResolvers = {
  Query: {
    // ...
  },
  Mutation: {
    hostListing: async (
      _root: undefined,
      { input }: HostListingArgs,
      { db, req }: { db: Database; req: Request }
    ): Promise<Listing> => {
      verifyHostListingInput(input);
    }
  },
  Listing: {
    // ...
  }
};
From the input argument of the verifyHostListingInput() function, we’ll destruct the fields that we’ll want to validate - title , description , type , and price .
const verifyHostListingInput = ({
  title,
  description,
  type,
  price
}: HostListingInput) => {};
We’ll provide the following validation checks in the verifyHostListingInput() function:
- If the length of the
titleis greater than 100 characters, we’ll throw an error that says"listing title must be under 100 characters". - If the length of the
descriptionis greater than 5000 characters, we’ll throw an error that says"listing description must be under 5000 characters". - If the type of
listingis neither anapartmentorhouse, we’ll throw an error that says"listing type must either an apartment or house". We’ll import theListingTypeTypeScript Enum from thesrc/lib/types.tsfor it to be used here. - If the
priceof the listing is less than 0, we’ll throw an error that says"price must be greater than 0"
server/src/graphql/resolvers/Listing/index.ts
import { Database, Listing, ListingType, User } from "../../../lib/types";
server/src/graphql/resolvers/Listing/index.ts
const verifyHostListingInput = ({
  title,
  description,
  type,
  price
}: HostListingInput) => {
  if (title.length > 100) {
    throw new Error("listing title must be under 100 characters");
  }
  if (description.length > 5000) {
    throw new Error("listing description must be under 5000 characters");
  }
  if (type !== ListingType.Apartment && type !== ListingType.House) {
    throw new Error("listing type must be either an apartment or house");
  }
  if (price < 0) {
    throw new Error("price must be greater than 0");
  }
};
In our hostListing() resolver function, if the input is valid, we’ll look to validate that a viewer who’s logged in to our application is making the listing since we only want listings to be created for users who’ve already logged in to the application. We have an authorize() function in the src/lib/utils/ folder that’s already imported and can be used here. We’ll use the authorize() function, pass in the db and req objects, and attempt to retrieve a user based on the CSRF token available in the request. If the viewer doesn’t exist, we’ll throw an error saying "viewer could not be found" .
export const listingResolvers: IResolvers = {
  Query: {
    // ...
  },
  Mutation: {
    hostListing: async (
      _root: undefined,
      { input }: HostListingArgs,
      { db, req }: { db: Database; req: Request }
    ): Promise<Listing> => {
      verifyHostListingInput(input);

      let viewer = await authorize(db, req);
      if (!viewer) {
        throw new Error("viewer cannot be found");
      }
    }
  },
  Listing: {
    // ...
  }
};
If the viewer object exists, we can now look to get the country , admin , and city information from our geocoder based on the address in the input object. We’ll run the geocode() function from the Google object imported in this file, pass the input.address field, and destruct the country , admin , and city information. If any of these location fields can’t be found from the geocoder, we’ll throw an error that says “invalid address input”.
export const listingResolvers: IResolvers = {
  Query: {
    // ...
  },
  Mutation: {
    hostListing: async (
      _root: undefined,
      { input }: HostListingArgs,
      { db, req }: { db: Database; req: Request }
    ): Promise<Listing> => {
      verifyHostListingInput(input);

      let viewer = await authorize(db, req);
      if (!viewer) {
        throw new Error("viewer cannot be found");
      }

      const { country, admin, city } = await Google.geocode(input.address);
      if (!country || !admin || !city) {
        throw new Error("invalid address input");
      }
    }
  },
  Listing: {
    // ...
  }
};
At this moment, if there are no errors, we can prepare to insert a new listing document to the "listings" collection in our database. We’ll use the insertOne() method of the Node Mongo Driver to insert a new document to the "listings" collection.
The _id field of the new document we’ll insert will be a new ObjectId we’ll create with the help of the ObjectId constructor from MongoDB. We’ll then use the spread operator to add the fields from the input object directly into the new document.
We’ll specify some other fields in the new document as well. For example:
- The
bookingsfield will be an empty array. -
bookingsIndexwill be an empty object - We’ll pass the
country,admin, andcityfields from our geocoder. - The
hostfield will have a value of theidof the viewer creating the listing.
export const listingResolvers: IResolvers = {
  Query: {
    // ...
  },
  Mutation: {
    hostListing: async (
      _root: undefined,
      { input }: HostListingArgs,
      { db, req }: { db: Database; req: Request }
    ): Promise<Listing> => {
      verifyHostListingInput(input);

      let viewer = await authorize(db, req);
      if (!viewer) {
        throw new Error("viewer cannot be found");
      }

      const { country, admin, city } = await Google.geocode(input.address);
      if (!country || !admin || !city) {
        throw new Error("invalid address input");
      }

      const insertResult = await db.listings.insertOne({
        _id: new ObjectId(),
        ...input,
        bookings: [],
        bookingsIndex: {},
        country,
        admin,
        city,
        host: viewer._id
      });
    }
  },
  Listing: {
    // ...
  }
};
There’s one other thing we’re going to do in the hostListing() resolver function. Every user document in the "users" collection is to have a listings field that contains an array of listing ids to represent the listings that the user has . We’ll look to update the user document of the viewer making the request to state that the id of this new listing will be part of the listings array of that user document.
We’ll first look to access the newly inserted listing document. There are a few ways one can perhaps do this but we can achieve this by accessing the first item in the .ops array in the insert result. We’ll assign the insert result to a new constant called insertedListing and we’ll be sure to describe its shape as the Listing interface. We’ll then run the updateOne() method from the Node MongoDB driver to help update a document in the "users" collection. We’ll find the document where the _id field is that of the viewer_id and we’ll simply push the _id of the insertedListing to the listings field in this document.
Finally, we’ll have the hostListing() resolver function return the newly inserted listing document.
server/src/graphql/resolvers/Listing/index.ts
export const listingResolvers: IResolvers = {  Mutation: {
    hostListing: async (
      _root: undefined,
      { input }: HostListingArgs,
      { db, req }: { db: Database; req: Request }
    ): Promise<Listing> => {
      verifyHostListingInput(input);

      let viewer = await authorize(db, req);
      if (!viewer) {
        throw new Error("viewer cannot be found");
      }

      const { country, admin, city } = await Google.geocode(input.address);
      if (!country || !admin || !city) {
        throw new Error("invalid address input");
      }

      const insertResult = await db.listings.insertOne({
        _id: new ObjectId(),
        ...input,
        bookings: [],
        bookingsIndex: {},
        country,
        admin,
        city,
        host: viewer._id
      });

      const insertedListing: Listing = insertResult.ops[0];

      await db.users.updateOne(
        { _id: viewer._id },
        { $push: { listings: insertedListing._id } }
      );

      return insertedListing;
    }
  },};
Our hostListing mutation can now receive an input object that contains information about a new listing. In the hostListing() resolver, we verify if input is valid and we verify the viewer making the request. We then try to resolve the country , admin , and city information from the address that was provided. If all this is successful, we insert a new document into the "listings" collection and we update the user document of the viewer making the request.
In the next lesson, we’ll begin to build the client functionality to have the form available in the /host page which would receive information for the user creating a new listing and trigger the hostListing mutation.