CLOUDINARY & IMAGE STORAGE
A sample of the
.envfile in our server project, after this lesson is complete, can be found - here.
Let’s go to the /user/:id route of of our own profile page in our application and examine the listing we’ve recently created in the last module. If we survey the data returned from our Query.user GraphQL field in our network inspector, we can see that the listing we just created has the base64 encoded version of the image file as the image data.

If we were to survey the "listings" collection in MongoDB Atlas and find the same recently created listing, we can see the same base64 encoded string in the image field.
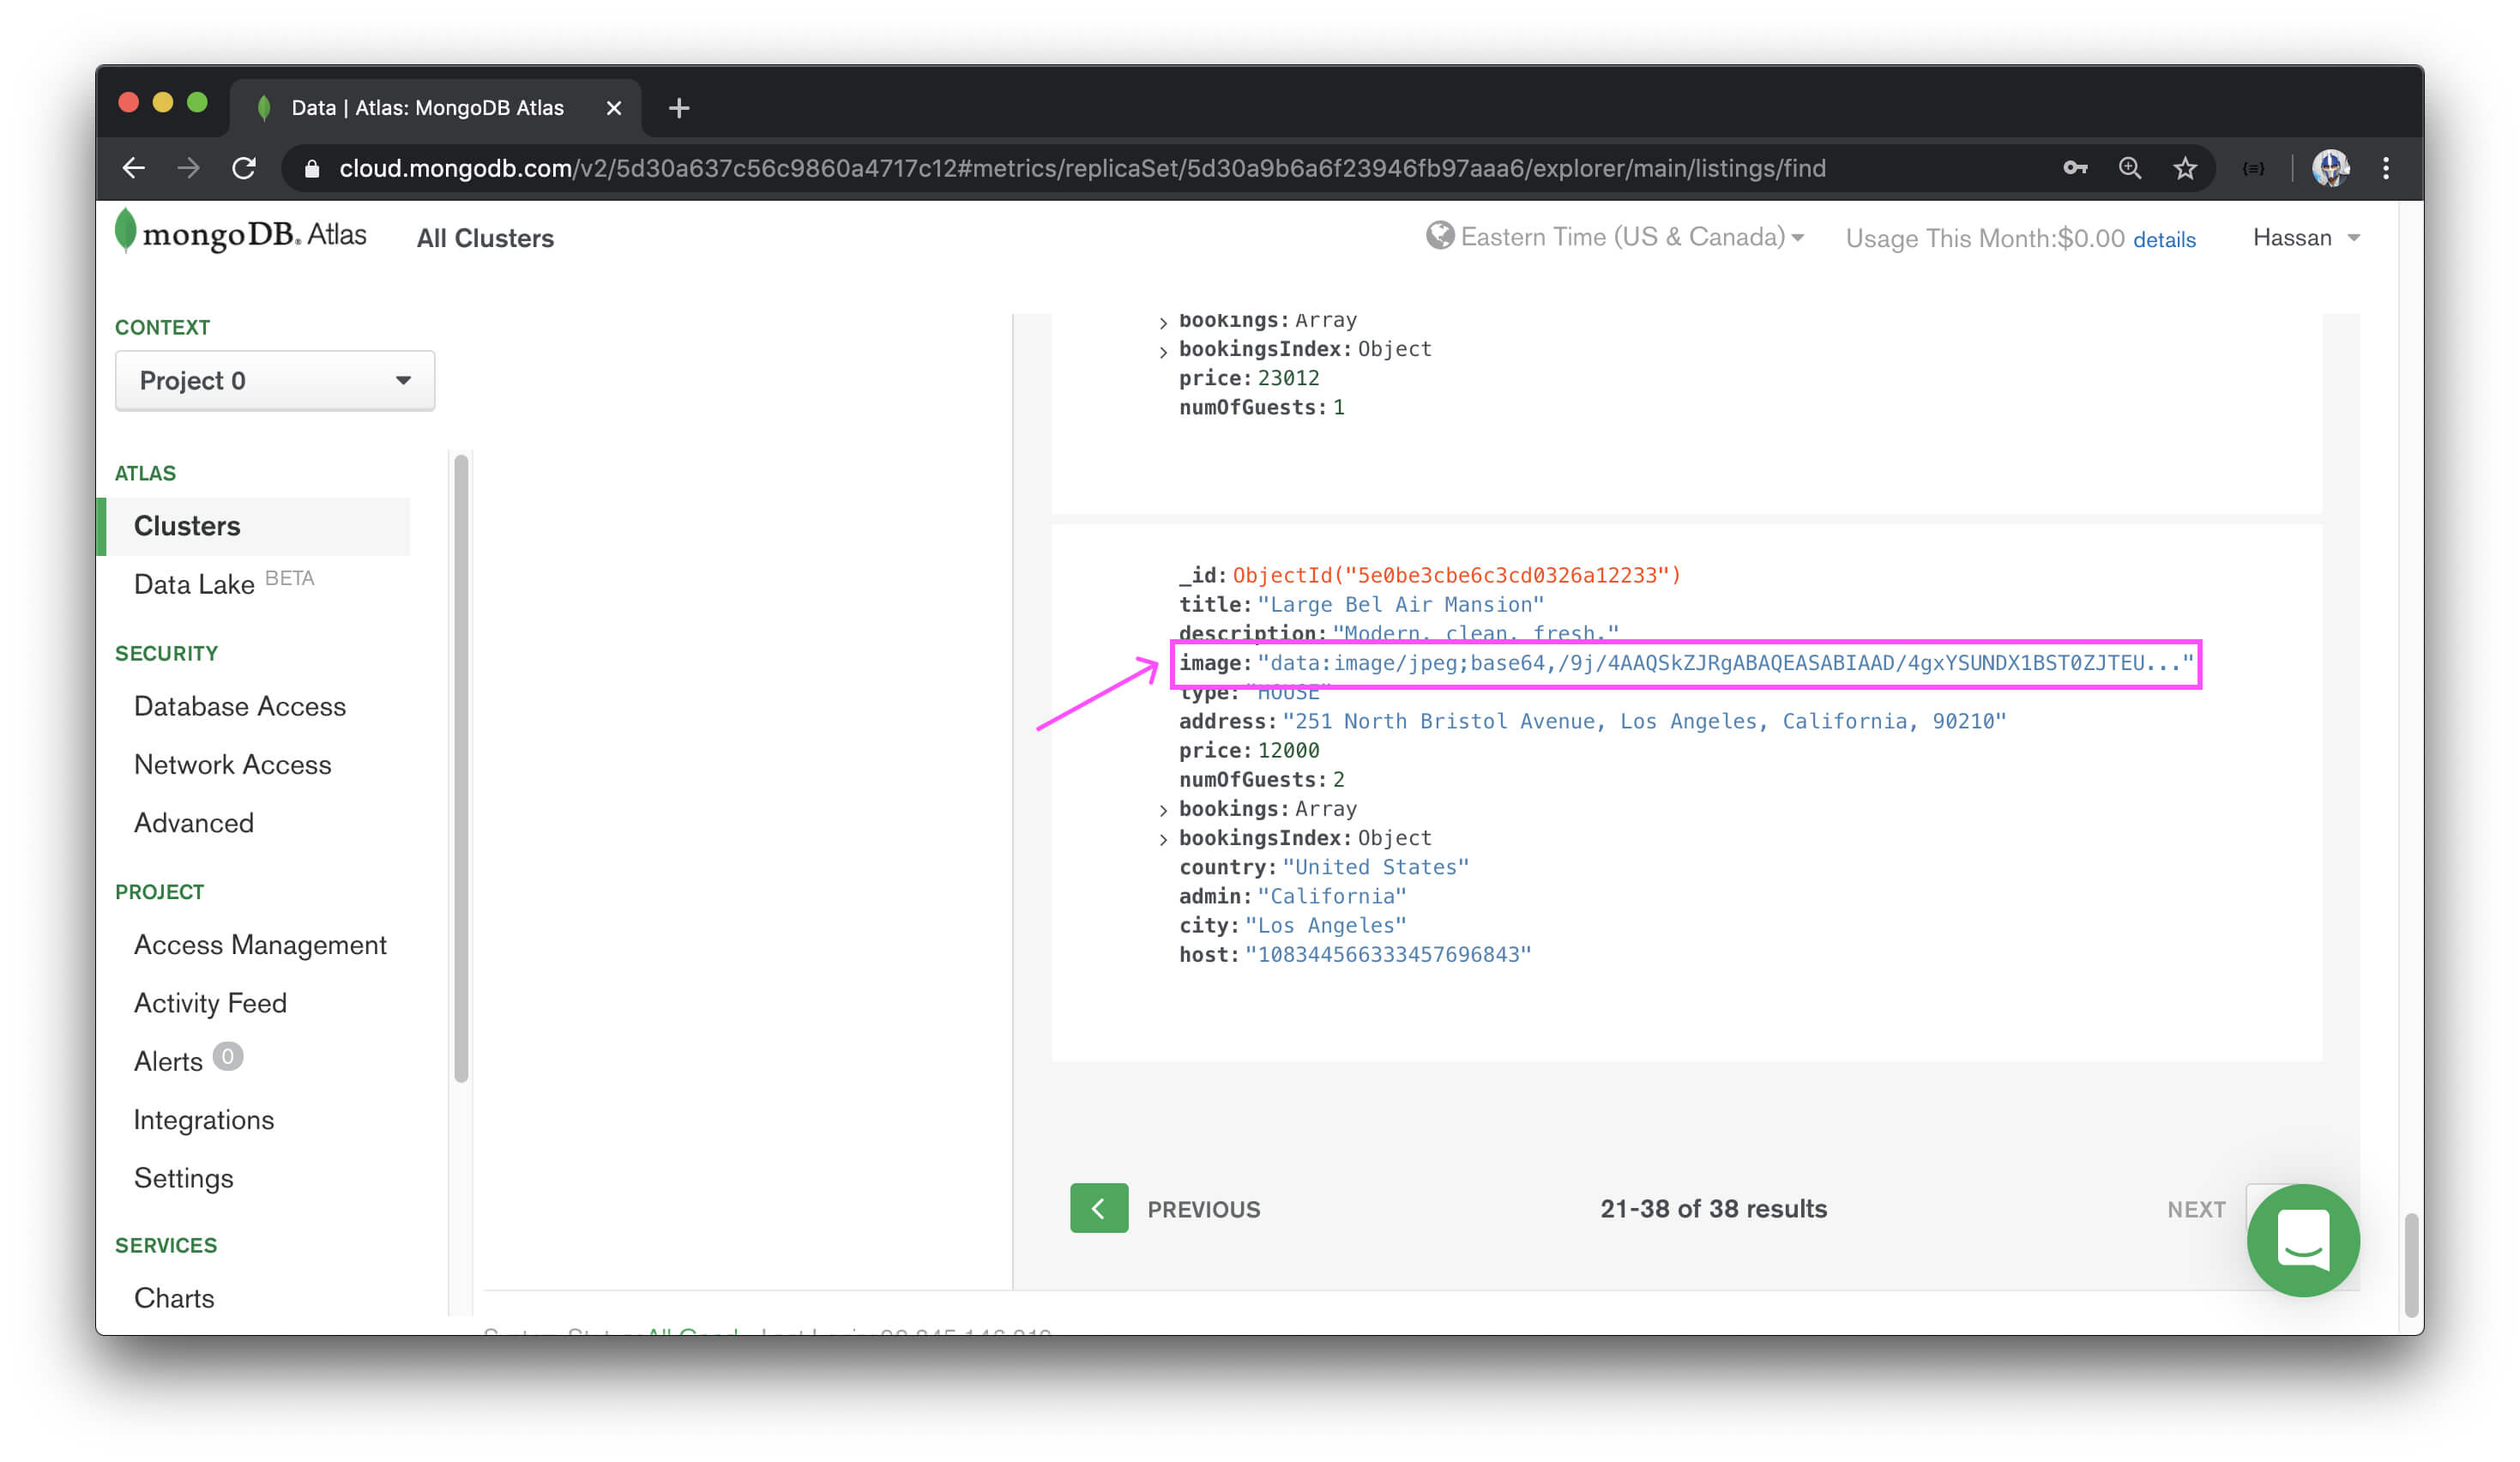
This shouldn’t be surprising because that is what we told our server to do. We encoded an image file in the client and sent the encoded image as a string to our server to be stored in our database. Thus, when we request listing data, the listing.image field will return the base64 encoded string directly from our database.
Although there is nothing wrong with this method of storing images, it isn’t ideal . There are two inherent flaws with this:
- Images can take a lot of storage space in our database. Image files by nature are large. In addition, by base64 encoding the binary image files into a string, it actually increases the size of the source image by about 33%. The
imagefield takes up more space than the rest of the fields of a single listing document combined. - If all our listings had base64 images, transmitting and querying all that image data in our GraphQL queries will slow down our response time which can make our app feel laggy and un-optimized.
This is where a cloud-based image and video management service comes in! These services store our images for us on the cloud and all we need to do is save the URL link of the image in our database instead of the image itself. If our app was to even have videos, these services can help store videos as well.
All major applications we use day-to-day use a cloud-based image and video management service . For example, let’s check out Airbnb. We can visit one of a certain listing and look for the image in the document inspector.

We’ll see that this particular image is hosted by the following URL.

Cloud-based image management services solve the previous two problems we talked about above:
- We won’t need to store the images directly into our database anymore since we’ll just be storing the URL link to it. This makes our database smaller which increases the speed of certain database operations, such as copying, reading, backups, etc! Not to mention, this can save money since database memory costs money.
- It makes our app much more responsive because we’re not transmitting or querying all that image data from our GraphQL queries. Our GraphQL queries will only query for the URLs for the image fields of listings and when we pass the URLs to the HTML
<img />tags in our client, they will load the individual images in parallel.
Another significant advantage that we won’t necessarily use but is incredibly helpful is that these cloud-based image services often allow the capability to manipulate and enhance images with a URL-based API. With popular cloud-based solutions, practically any kind of image manipulation that we can think can be done such as changing the pixel size, adding filters, rotating, rounding corners, and much more.
If we take a closer look at the URL we found for that listing in Airbnb, we’ll see a query parameter that says aki_policy=large . We can probably gather that this image has been given a large size based on this particular parameter. If we were to change the value of the aki_policy parameter to medium , we’ll get a slightly smaller image. small gives us an even smaller image, and so on. This is incredibly helpful for a multitude of reasons. As an example, we can obtain certain image sizes we’re looking for directly from the URL which can help avoid the need to manipulate image sizes with CSS.
CLOUDINARY
Though many different cloud solutions exist, one of the more popular cloud-based image and video management services is Cloudinary. Cloudinary has a free plan allowing us to store around 25 GB of managed images for free which is perfect for trying it out in development.
If you don’t have a Cloudinary account, the first thing you’ll need to do head over to the Cloudinary site - cloudinary.com and click on the SIGN UP FOR FREE button. Here’s where you’ll fill in your information and sign up.

Once signed up, Cloudinary should send you a verification email for the email for your account.
Within the signup form, you should have the opportunity to provide the name of your choice for your account where you can store your images and videos. We encourage you to pick a name that you prefer. You’ll also have the opportunity to change your cloud name in the account settings section of your dashboard.
When you’ve verified with your Cloudinary account and have signed in with it, you’ll land within the Dashboard of your account (this is the /console route). Here we’ll see some stats about our Cloudinary account but what is of interest to us is the account details section at the top.
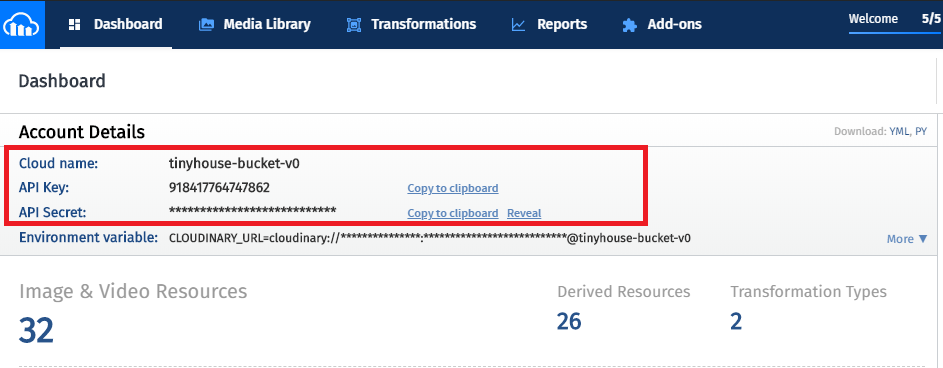
To use Cloudinary’s API in our server application and make changes to a certain Cloudinary account, we’ll need to have all three of these account credentials here - Cloud Name , API Key , and API Secret . Since this is environment-specific information, let’s store this information in the .env file of our server project.
We’ll copy over the cloud name first and store its value as an environment variable called CLOUDINARY_NAME.
CLOUDINARY_NAME=tinyhouse-bucket-v0
We’ll copy the API Key value and store it as an environment variable we’ll call CLOUDINARY_KEY .
CLOUDINARY_KEY=******************
Finally, we’ll copy over the API Secret value and store it as an environment variable we’ll call CLOUDINARY_SECRET .
CLOUDINARY_SECRET=*********************
In the next lesson, we’ll pick up from here and begin modifying our server code to utilize Cloudinary to host listing images for our web app.
- Lesson
- Discussion
-
 Ask a question
IMAGE UPLOADS WITH CLOUDINARY
🙋🏽 To upload an image asset to the cloud with the Cloudinary API, we’ll follow the approach highlighted in the Upload method section of the Cloudinary documentation which can be seen - here.
To use the Cloudinary API in our Node server application, we’ll need to first install the relevant cloudinary package. We’ll head to our terminal and in our server project, install the npm cloudinary library as a dependency.
npm i cloudinary
The community has recently prepared a declaration file directly in the npm cloudinary package so we won’t have to install additional typings.
CLOUDINARY
Just like how we’ve set up dedicated files for Stripe and Google to prepare functions to interact with their APIs, we’ll create a Cloudinary.ts file in our src/lib/api/ folder responsible in having the function needed to interact with the Cloudinary API.
server/
  src/
    // ...
    lib/
      api/
        Cloudinary.ts
        // ...
  // ...
In the src/lib/api/index.ts file, we’ll re-export the soon to be created Cloudinary object.
export * from "./Cloudinary";
In the src/lib/api/Cloudinary.ts file, we’ll import the cloudinary module and export an object we’ll create called Cloudinary . The exported object will have an asynchronous function labeled upload() that will expect an image argument of type string.
import cloudinary from "cloudinary";

export const Cloudinary = {
  upload: async (image: string) => {
    // ...
  }
};
In our hostListing() resolver function, we’ll call the upload() function available in our constructed Cloudinary object and pass the listing base64 encoded image as an argument to the function. The upload() function will then use the Cloudinary API to upload the image as an asset to our Cloudinary account storage. When successfully uploaded, we’ll want the upload() function to return the uploaded image URL.
We can make an upload happen with an upload() function available in the cloudinary module. It’s a little verbose but it’ll appear something like this - cloudinary.v2.uploader.upload() . This would be an asynchronous function where we’ll be interested in the response that is to be returned.
import cloudinary from "cloudinary";

export const Cloudinary = {
  upload: async (image: string) => {
    const res = await cloudinary.v2.uploader.upload();
  }
};
The cloudinary.v2.uploader.upload() function takes two arguments:
- The file that is going to be uploaded which will be the
imagewe’re going to pass in. - An options object.
In the options object, we can specify options for how we want the upload to happen. For example, we can specify the folder we’ll like to upload this image on in our Cloudinary storage. This isn’t a requirement but it helps organize our Cloudinary cloud server. You can upload an image to any folder you may be interested in but we’ll upload it to a folder labeled "TH_Assets" .
import cloudinary from "cloudinary";

export const Cloudinary = {
  upload: async (image: string) => {
    const res = await cloudinary.v2.uploader.upload(image, {
      folder: "TH_Assets/"
    });
  }
};
To upload to our Cloudinary storage, we’ll need to specify the credentials of our account within the options object. We saved the Cloudinary environment credentials of our account in our server .env file in the last lesson so we’ll specify and label them here as follows.
-
api_keywill have theCLOUDINARY_KEYenvironment variable as the value. -
api_secretwill have theCLOUDINARY_SECRETenvironment variable as the value. -
cloud_namewill have theCLOUDINARY_NAMEenvironment variable as the value.
import cloudinary from "cloudinary";

export const Cloudinary = {
  upload: async (image: string) => {
    const res = await cloudinary.v2.uploader.upload(image, {
      api_key: process.env.CLOUDINARY_KEY,
      api_secret: process.env.CLOUDINARY_SECRET,
      cloud_name: process.env.CLOUDINARY_NAME,
      folder: "TH_Assets/"
    });
  }
};
This should pretty much do the upload the way we want it to.
The only other thing we’ll want to do in this function is return the URL of the uploaded image. In the Cloudinary documentation, the sample response from the upload contains a large number of different fields. We’re interested in retrieving the URL of the upload. There is to exist a url and secure_url fields in the sample response. We’ll go with attempting to access and return the secure_url field.
Lastly, we’ll disable the @typescript-eslint/camelcase rule around the properties defined in our options object.
server/src/lib/api/Cloudinary.ts
import cloudinary from "cloudinary";

export const Cloudinary = {
  upload: async (image: string) => {
    /* eslint-disable @typescript-eslint/camelcase */
    const res = await cloudinary.v2.uploader.upload(image, {
      api_key: process.env.CLOUDINARY_KEY,
      api_secret: process.env.CLOUDINARY_SECRET,
      cloud_name: process.env.CLOUDINARY_NAME,
      folder: "TH_Assets/"
    });

    return res.secure_url;
    /* eslint-enable @typescript-eslint/camelcase */
  }
};
HOSTLISTING()
We’ll now look to update the hostListing mutation. In the listingResolvers map within src/graphql/resolvers/Listing/index.ts , we’ll import the Cloudinary object from the src/lib/api/ folder.
server/src/graphql/resolvers/Listing/index.ts
import { Cloudinary, Google } from "../../../lib/api";
In our hostListing() mutation resolver function, right before we insert a new document to the listings collection, we’ll call the upload() function within our Cloudinary instance and pass the base64 encoded image along. We’ll obtain the result of this function as a constant labelled imageUrl and specify that as the value of the image field in the listing document we’ll add to the database. Our hostListing() mutation in its entirety will look as follows:
server/src/graphql/resolvers/Listing/index.ts
export const listingResolvers: IResolvers = {  Mutation: {
    hostListing: async (
      _root: undefined,
      { input }: HostListingArgs,
      { db, req }: { db: Database; req: Request }
    ): Promise<Listing> => {
      verifyHostListingInput(input);

      let viewer = await authorize(db, req);
      if (!viewer) {
        throw new Error("viewer cannot be found");
      }

      const { country, admin, city } = await Google.geocode(input.address);
      if (!country || !admin || !city) {
        throw new Error("invalid address input");
      }

      const imageUrl = await Cloudinary.upload(input.image);

      const insertResult = await db.listings.insertOne({
        _id: new ObjectId(),
        ...input,
        image: imageUrl,
        bookings: [],
        bookingsIndex: {},
        country,
        admin,
        city,
        host: viewer._id
      });

      const insertedListing: Listing = insertResult.ops[0];

      await db.users.updateOne(
        { _id: viewer._id },
        { $push: { listings: insertedListing._id } }
      );

      return insertedListing;
    }
  },};
That’s it! If we were to now create a new listing in our client application, the image of the created listing should reference the image URL in our Cloudinary account. If we head to the dashboard of our Cloudinary account and navigate to the media library section, there will be a new folder called TH_Assets (if it didn’t exist before). By launching this particular folder, we’ll see the image upload that Cloudinary has made.
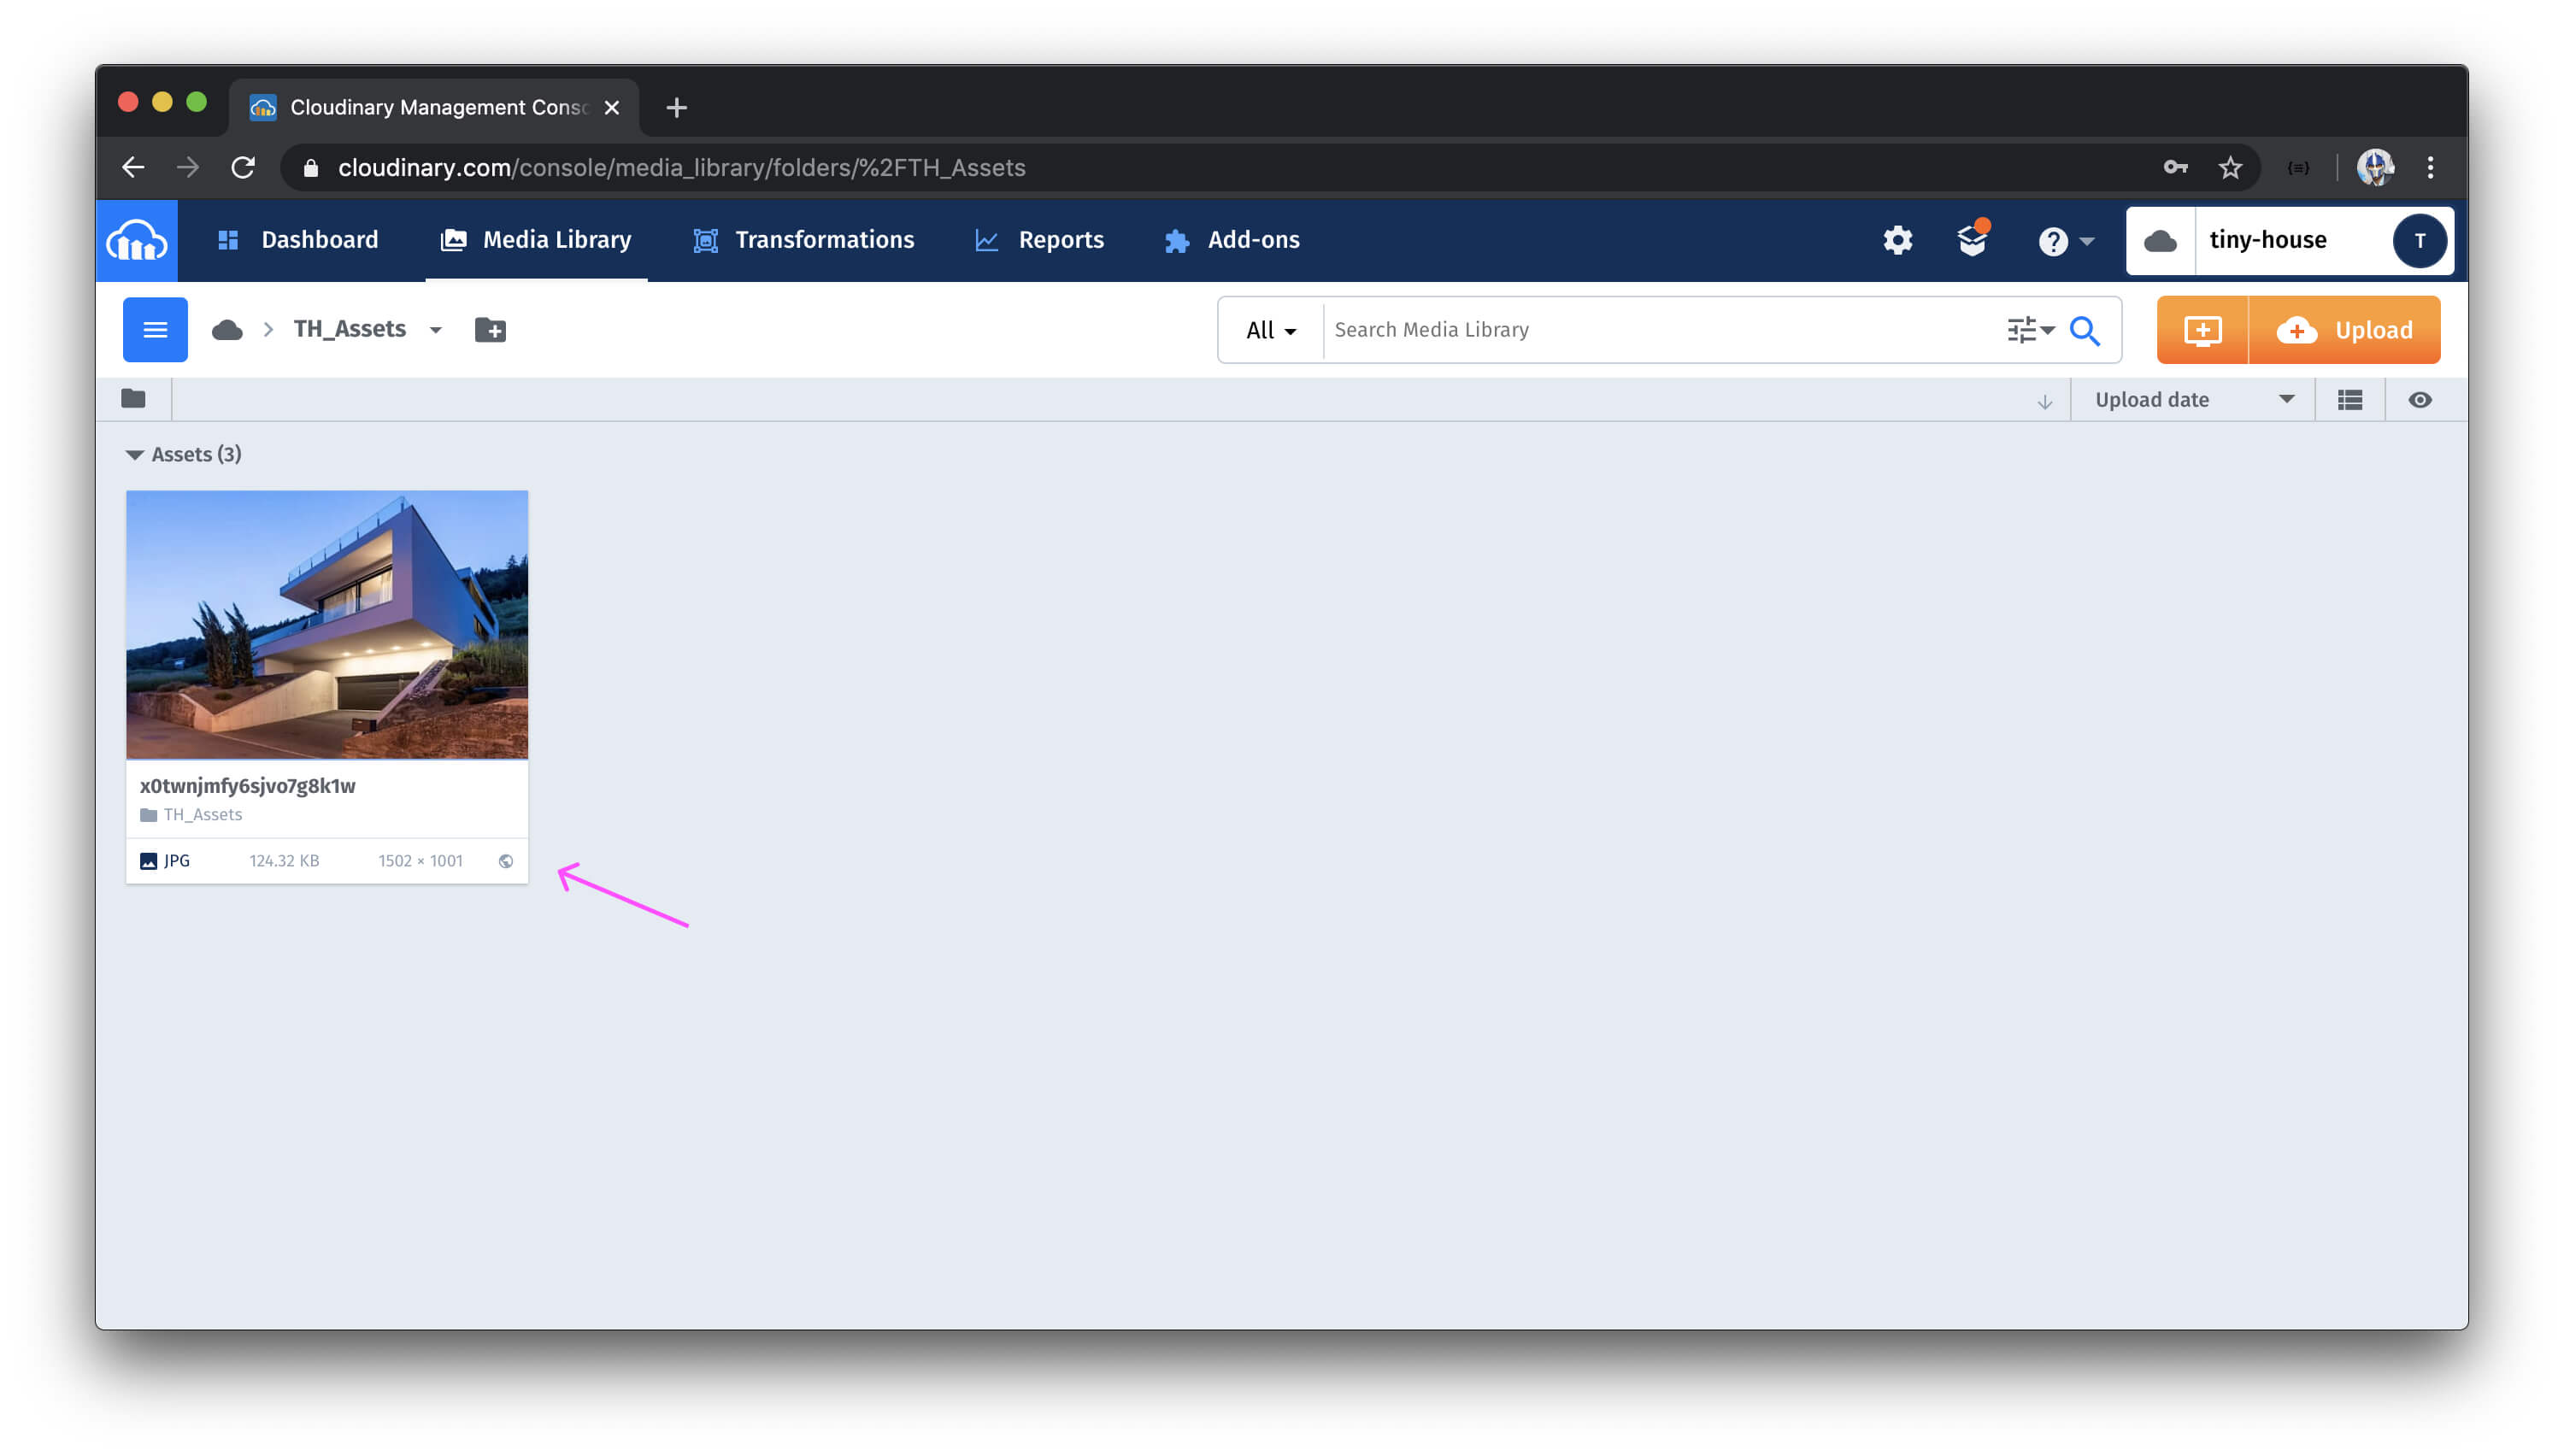
Cloudinary offers a variety of different things we can do with images we’ve uploaded. We can customize them, edit them, enlarge them, shrink them, etc. For our use case, our purpose has been completed. We just want to host all our listing images outside of our database and in cloud-based storage where we can retrieve and use the image URLs in our application.
MODULE 13 INTRODUCTION
In this module, we’ll focus on the last big feature of our application and that is allowing users to book listings from other users.
In this module, we’ll
- Create and build the
createBookingGraphQL mutation. - Address that when a booking is created, how the
bookingsIndexof a listing is to be updated. - See how we can disable dates that have already been booked in the date picker elements of the Listing page.
- Show how we can surface a confirmation modal that summarizes the amount to be paid when a user is ready to book a listing.
- See how we can use components from the React Stripe Elements library to capture debit or credit card information.
- Finally, when the
createBookingmutation is triggered - verify the payment is made and all the expected updates in our application are made accordingly.
CREATEBOOKING GRAPHQL FIELDS
For users to book a listing in our app, we’ll need functionality to handle this as well as the capability to process transactions between the tenant and host. When a booking is made to a listing, the tenant (i.e. person making the booking) will pay the host (i.e. person who owns the listing) a set price . We, TinyHouse, will take a small percentage of the payment as a platform fee. Let’s brainstorm what GraphQL fields we’ll need to accomplish this.
All we’ll need for this is a single root level mutation we’ll call createBooking . On the client, when the tenant picks the dates of when the booking should be made, provides their payment information, and finally confirms their booking - the createBooking mutation will be fired which facilitates that the booking has been made. Fairly straightforward, however, we’ll need to handle a few things within this mutation such as recognizing the dates in which the tenant has picked for their booking and facilitating a Stripe charge from the tenant to the host.
We’ll handle this step by step. In this lesson, we’ll set up the GraphQL mutation field before we finalize the implementation in the next coming lessons. In our GraphQL type definitions within the src/graphql/typeDefs.ts file of our server project, we’ll create a new field in the root Mutation object called createBooking and for now, we’ll have it return a String when resolved successfully.
server/src/graphql/typeDefs.ts
  type Mutation {
    logIn(input: LogInInput): Viewer!
    logOut: Viewer!
    connectStripe(input: ConnectStripeInput!): Viewer!
    disconnectStripe: Viewer!
    hostListing(input: HostListingInput!): Listing!
    createBooking: String!
  }
createBooking is the last mutation and root-level GraphQL field we’ll create for our app! Since this mutation falls within the domain of bookings, we’ll head over to the bookingResolvers map and look to create the resolver for this mutation field. In the src/graphql/resolvers/Booking/index.ts file, we’ll first create a Mutation object and within, we’ll create the resolver function called createBooking() that at this moment resolves to "Mutation.createBooking" .
server/src/graphql/resolvers/Booking/index.ts
export const bookingResolvers: IResolvers = {  Mutation: {
    createBooking: () => {
      return "Mutation.createBooking";
    }
  },};
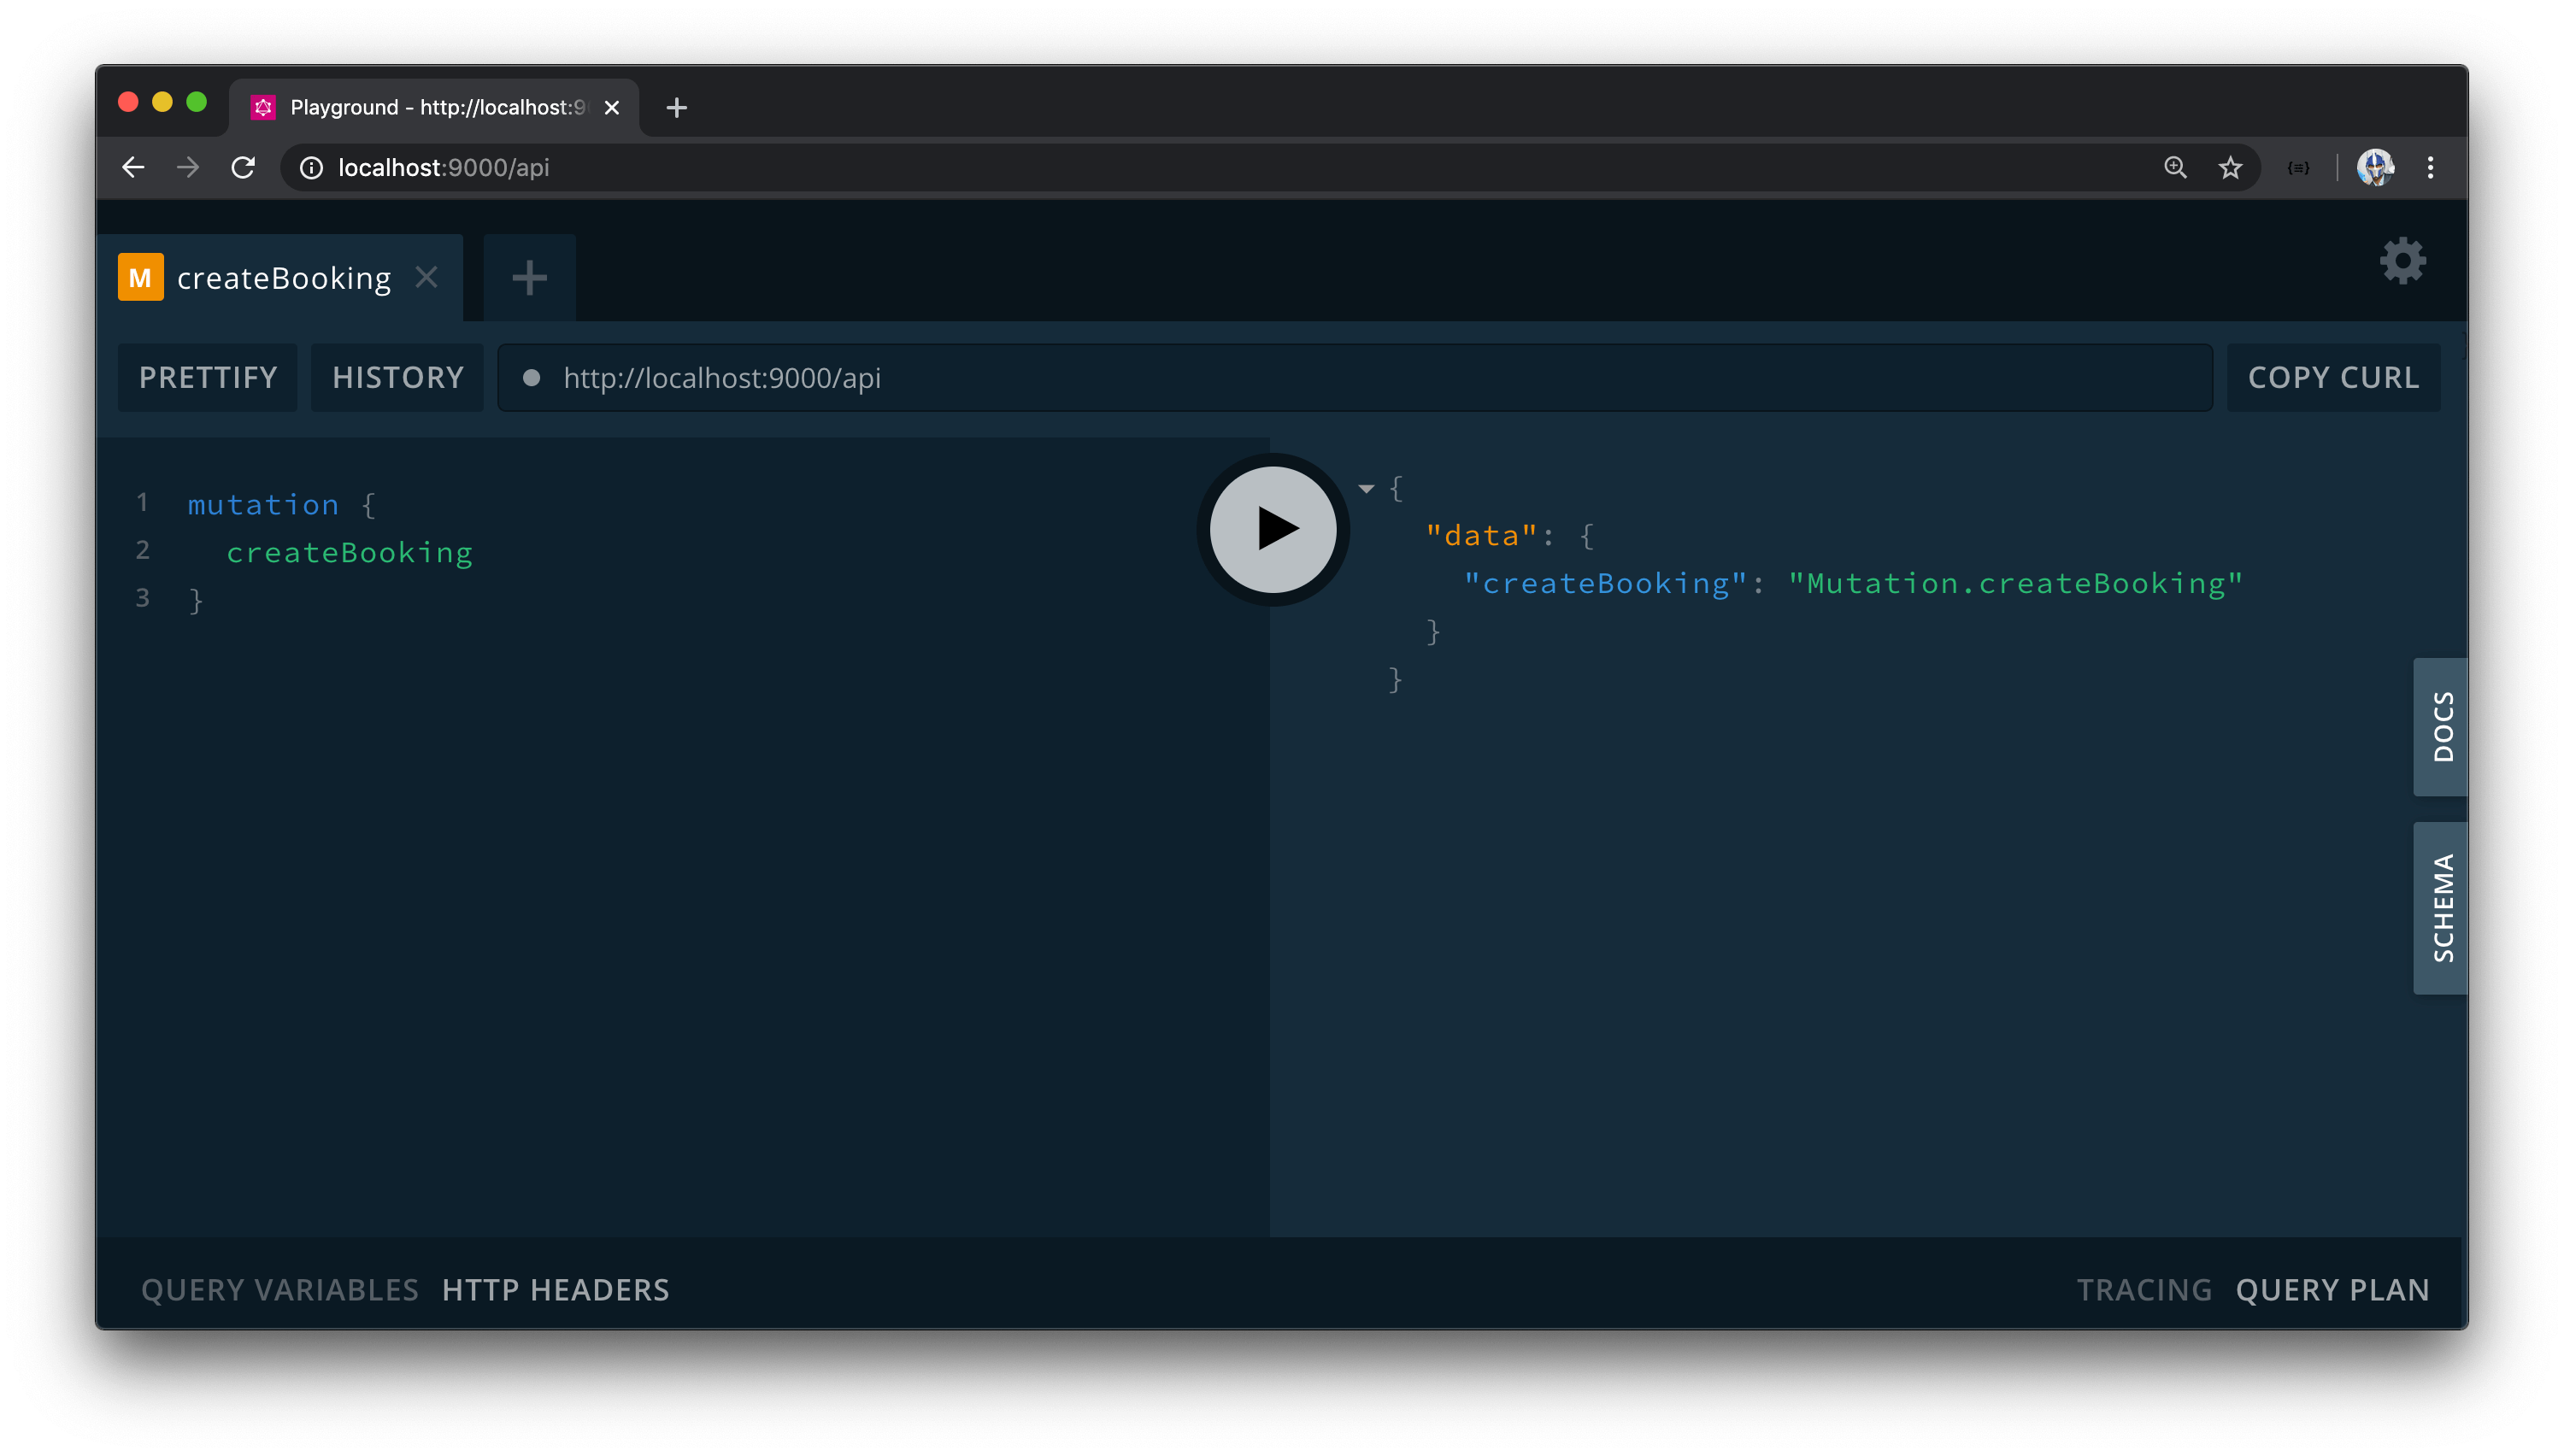
When we head to the GraphQL Playground of our server project and attempt to run the createBooking mutation, we’ll see the expected return of "Mutation.createBooking" .
In the next coming lessons, we’ll see how we can use the Stripe API to create a Stripe charge which will play a role in the createBooking() mutation resolver.
BUILDING THE CREATEBOOKING RESOLVER
Before we begin to implement the createBooking() mutation resolver, we’ll first create the utility function that will facilitate a Stripe charge. We’ll need to have this capability to allow the person who’s making the booking (i.e. the tenant) to pay the owner of the listing (i.e. the host) a set fee before we can say the booking is finalized.
We already have a Stripe instance established in the src/lib/api/Stripe.ts file where we’ve instantiated a Stripe client and a connect() function where a user can connect their Stripe account with our Stripe TinyHouse Connect Platform. We’ll create another asynchronous function within this Stripe instance labeled charge() .
export const Stripe = {
  connect: async (code: string) => {
    // ...
  },
  charge: async () => {}
};
The term “charge” constitutes having a user make a payment. In more formal terms, a charge constitutes a demand for money that is owed. Though many different types of charges can be created, we’ll create a simple direct charge which is recommended for Standard Accounts which are the account types that are connected within our Stripe Connect platform. In this context, the connected account (not our TinyHouse platform account) will be the ones responsible for Stripe fees, refunds, and chargebacks.
From taking a look at the Node.js Charges API example in the Stripe documentation on creating direct charges, we can create a direct charge with the create() function available from the charges object within a stripe client.
// Node.js example of creating direct charge from Stripe documentation
// https://stripe.com/docs/connect/direct-charges
const stripe = require("stripe")("sk_test_#######");

stripe.charges
  .create(
    {
      amount: 1000,
      currency: "cad",
      source: "tok_visa"
    },
    {
      stripe_account: "{{CONNECTED_STRIPE_ACCOUNT_ID}}"
    }
  )
  .then(function(charge) {
    // asynchronously called
  });
The first argument in the create() function is a data object that is to contain information about the Stripe charge. There are many different fields we can specify here with some being required.
- The first required value is the
amountwhich is the amount the connected user is going to be receiving from the charge, or in other words, the amount that we’re going to charge the person making the payment. - The second option value we’ll provide is the
currencywhich is another required data option. This is to be a three-letter ISO code to represent the currency. For our application, we’ll charge everyone with"USD". Note that the amount being charged refers to the smallest unit of the currency so, with US dollars, the amount specified in the charge will be in cents . - The third option value we’ll provide is the
sourcewhich is an optional data option but useful since it represents the source being charged (e.g. ID of a Credit Card, Debit Card, Bank information, etc). In our case, the value for thissourcewill be passed in from the client. - The last option value we’ll provide though optional will be important for us. This is the
application_fee_amountwhich is a fee in cents that is to be applied as a charge and collected as the Stripe account owner. Which is us!
Note : To see more option arguments that can be specified and passed in for a direct charge, be sure to check out the Create a charge section of the API documentation - here.
How would we go about determining which Stripe connected account is going to receive the payment? That will be the value we introduce in the second header options object for the field of stripe_account of the charge() function. This is where we’ll provide the stripe_user_id we’ve collected when the user connected with their Stripe account and we’ve stored as the walletId field of a user document.
This is how we’ll have the person making the payment pay the owner of the listing. The person who’s making the payment (i.e. the tenant) doesn’t need to have a Stripe account . They just need to provide their payment information. In our application, that will be their credit card or debit card details. Once the charge is made, Stripe will charge their payment information and direct the payment to the connected account who owns the listing. We (the middleman) are to receive a small fee for using the platform that will be charged to the connected account.
CHARGE()
Let’s now visit the Stripe instance we have in our application and attempt to create the charge functionality.
The charge() function, within the Stripe instance, will accept a few arguments from the createBooking() mutation resolver. It will accept an amount of type number , a source of type string which will come from our React client, and a stripeAccount of type string which is to be the value of the walletId field for a user document.
export const Stripe = {
  connect: async (code: string) => {
    // ...
  },
  charge: async (amount: number, source: string, stripeAccount: string) => {};
};
In the charge() function, we’ll call the create() function within the Charges class of our Stripe client. For the data object, we’ll pass the amount along. For the currency , we’ll state "usd" since we want to charge everyone in US dollars. We’ll also pass the source along as well.
export const Stripe = {
  connect: async (code: string) => {
    // ...
  },
  charge: async (amount: number, source: string, stripeAccount: string) => {
    const res = await client.charges.create({
      amount,
      currency: "usd",
      source
    });
  }
};
The application_fee_amount is the amount we want to charge the connected user to pay us, TinyHouse, for using the app. We can say anything here but we intend on charging 5% of whatever payment the host is to obtain. Though not very necessary, we’ll say it’ll be approximately 5% and we’ll use the Math.round() function to round the amount to the nearest integer.
export const Stripe = {
  connect: async (code: string) => {
    // ...
  },
  charge: async (amount: number, source: string, stripeAccount: string) => {
    const res = await client.charges.create({
      amount,
      currency: "usd",
      source,
      application_fee_amount: Math.round(amount * 0.05)
    });
  }
};
In the options object to be passed in the second argument of the create() function, we’ll specify the stripe_account and pass the StripeAccount value that will be passed in to this function as an argument.
export const Stripe = {
  connect: async (code: string) => {
    // ...
  },
  charge: async (amount: number, source: string, stripeAccount: string) => {
    const res = await client.charges.create(
      {
        amount,
        currency: "usd",
        source,
        application_fee_amount: Math.round(amount * 0.05)
      },
      {
        stripe_account: stripeAccount
      }
    );
  }
};
From the response, we’ll be able to look at the status field. The status of the payment will have one of three values - "succeeded" , "pending" , or "failed" . Since we are to await for the completion of this asynchronous charge function, the status at this point should either be succeeded or failed . We’ll simply do a check and say if the status of the charge response is not "succeeded" , we’ll throw an error that says "failed to create charge with Stripe" . We’ll also disable the @typescript-eslint/camelcase rule around our Stripe client charge() function.
server/src/lib/api/Stripe.ts
export const Stripe = {  charge: async (amount: number, source: string, stripeAccount: string) => {
    /* eslint-disable @typescript-eslint/camelcase */
    const res = await client.charges.create(
      {
        amount,
        currency: "usd",
        source,
        application_fee_amount: Math.round(amount * 0.05)
      },
      {
        stripe_account: stripeAccount
      }
    );
    /* eslint-enable @typescript-eslint/camelcase */

    if (res.status !== "succeeded") {
      throw new Error("failed to create charge with Stripe");
    }
  }};
CREATEBOOKING
With our Stripe charge capability established, let’s begin to work on the createBooking mutation. We’ll first need to update the GraphQL type definitions for our createBooking mutation.
Just like our other mutations, we’ll have the createBooking mutation expect an input of an object where its type will be labeled as CreateBookingInput . When the createBooking mutation is to resolve successfully, though we may not necessarily need this resolved information in the client, we’ll follow the pattern we have and have the mutation return the primary entity that’s been mutated or created which in this case is a Booking object itself.
server/src/graphql/typeDefs.ts
  type Mutation {
    logIn(input: LogInInput): Viewer!
    logOut: Viewer!
    connectStripe(input: ConnectStripeInput!): Viewer!
    disconnectStripe: Viewer!
    hostListing(input: HostListingInput!): Listing!
    createBooking(input: CreateBookingInput!): Booking!
  }
We’ll create the CreateBookingInput object type. There are four required fields we’ll want the client to pass in the input when the createBooking mutation is triggered.
- We’ll want to have the
idof the listing that is being booked which will be of type GraphQLID. - We’ll want a
sourcewhich is what the Stripe React component in our client will pass for us to describe the payment source being charged (e.g. the ID of a credit or debit card). - We’ll also want the
checkInandcheckOutdates of the booking. When dates get passed from our client to our server, we simply are to have them passed in as strings.
server/src/graphql/typeDefs.ts
  input CreateBookingInput {
    id: ID!
    source: String!
    checkIn: String!
    checkOut: String!
  }
Notice that we’re not passing in the amount that’s going to be charged to the user? The reason being is we determine the amount we’ll charge from the checkIn and checkOut date values. By recognizing which listing is being booked (from the id passed in), we’ll gather details of that listing such as the price per day. To get the total amount, we’ll simply multiply the number of days the user is booking with that price. We’ll see this shortly when we build out the createBooking() resolver function.
CREATEBOOKING()
We’ll now create the TypeScript interface type for the input argument of the createBooking mutation. We have a bookingResolvers map we’ve set up before in the src/graphql/resolvers/Booking/index.ts file. We’ll create a types.ts file adjacent to this index.ts file that is to contain the TypeScript types that pertain to the bookingResolvers map.
server/
  src/
    // ...
    graphql/
      resolvers/
        Bookings/
          // ...
          types.ts
        // ...
      // ...
    // ...
  // ...
In the newly created types.ts file, we’ll export an interface called CreateBookingArgs that will have an input field of type CreateBookingInput . We’ll create the CreateBookingInput interface that is to have the id , source , checkIn and checkOut fields, all of type string . Remember that the id field in our GraphQL API is of type GraphQLID but it gets serialized as a string in our TypeScript code.
server/src/graphql/resolvers/Booking/types.ts
export interface CreateBookingInput {
  id: string;
  source: string;
  checkIn: string;
  checkOut: string;
}

export interface CreateBookingArgs {
  input: CreateBookingInput;
}
In our bookingResolvers map file, we’ll import the CreateBookingArgs interface from the adjacent types.ts file.
// ...
import { CreateBookingArgs } from "./types";
In our createBooking() resolver function, we’ll specify the input argument that is expected to be passed in. We’ll also state that when the createBooking() function is resolved, it should return a promise of the Booking object type. In the createBooking() function, we’ll also need access to the db and req objects from context so we’ll destruct them as well. We’ll import the Request interface from the express library to describe the shape of the req object. In the function, we’ll set up a try...catch statement and in the try statement will destruct all the fields from the input object - id , source , checkIn , and checkOut .
// ...
import { Request } from "express";
// ...
createBooking: async (
  _root: undefined,
  { input }: CreateBookingArgs,
  { db, req }: { db: Database; req: Request }
): Promise<Booking> => {
  try {
    const { id, source, checkIn, checkOut } = input;
  } catch {}
};
authorize()
The first thing we’ll want to do in the createBooking() function is verify that a logged-in user (i.e viewer) is making the request. We have an authorize() function established for this which checks to see if a user can be found based on the request details. We’ll import this authorize() function from the src/lib/utils/ folder. In the createBooking() function, we’ll run the authorize() function and pass the db and req objects along. If the viewer from the authorize() function can’t be found, we’ll throw an error that says "viewer cannot be found" .
import { authorize } from "../../../lib/utils";
createBooking: async (
  _root: undefined,
  { input }: CreateBookingArgs,
  { db, req }: { db: Database; req: Request }
): Promise<Booking> => {
  try {
    const { id, source, checkIn, checkOut } = input;

    let viewer = await authorize(db, req);
    if (!viewer) {
      throw new Error("viewer cannot be found");
    }
  } catch {}
};
Find listing document
To find the appropriate listing document that is being booked, we’ll use MongoDB’s findOne() method to find the listing document where the _id field value is the same as that from the id field from the input argument. We’ll wrap the id from the input with the Node Mongo Driver ObjectId class to have it in the format of a MongoDB document ObjectID.
We’ll then check to see if the listing document that is being found exists. If not, we’ll throw an error that says "listing can't be found" .
import { ObjectId } from "mongodb";
createBooking: async (
  _root: undefined,
  { input }: CreateBookingArgs,
  { db, req }: { db: Database; req: Request }
): Promise<Booking> => {
  try {
    const { id, source, checkIn, checkOut } = input;

    let viewer = await authorize(db, req);
    if (!viewer) {
      throw new Error("viewer cannot be found");
    }

    const listing = await db.listings.findOne({
      _id: new ObjectId(id)
    });
    if (!listing) {
      throw new Error("listing can't be found");
    }
  } catch {}
};
Check if viewer is host
We’ll now place a check to see if listing.host is the same as viewer.id . In other words, is the viewer booking a listing of their own? If this is true, we’ll throw an error that says "viewer can't book own listing" .
createBooking: async (
  _root: undefined,
  { input }: CreateBookingArgs,
  { db, req }: { db: Database; req: Request }
): Promise<Booking> => {
  try {
    const { id, source, checkIn, checkOut } = input;

    let viewer = await authorize(db, req);
    if (!viewer) {
      throw new Error("viewer cannot be found");
    }

    const listing = await db.listings.findOne({
      _id: new ObjectId(id)
    });
    if (!listing) {
      throw new Error("listing can't be found");
    }

    if (listing.host === viewer._id) {
      throw new Error("viewer can't book own listing");
    }
  } catch {}
};
Check if check-out date is before check-in
We’ll then look to see the dates the user has booked and see if we can determine if the viewer has somehow booked a checkIn date that is after checkOut . To help make this simple date comparison, we won’t need to install and use a robust date library (like moment.js). Instead, we’ll use the Date constructor function available in JavaScript to simply convert the checkIn and checkOut string values to their date representation.
We’ll then say if checkOutDate is before (i.e. less than) the checkInDate , we’ll throw an error that says "check out date can't be before check in date" .
createBooking: async (
  _root: undefined,
  { input }: CreateBookingArgs,
  { db, req }: { db: Database; req: Request }
): Promise<Booking> => {
  try {
    const { id, source, checkIn, checkOut } = input;

    let viewer = await authorize(db, req);
    if (!viewer) {
      throw new Error("viewer cannot be found");
    }

    const listing = await db.listings.findOne({
      _id: new ObjectId(id)
    });
    if (!listing) {
      throw new Error("listing can't be found");
    }

    if (listing.host === viewer._id) {
      throw new Error("viewer can't book own listing");
    }

    const checkInDate = new Date(checkIn);
    const checkOutDate = new Date(checkOut);

    if (checkOutDate < checkInDate) {
      throw new Error("check out date can't be before check in date");
    }
  } catch {}
};
Update bookingsIndex
At this point in the function, we’ll attempt to try to update the bookingsIndex object of the listing document with the new dates that the viewer has picked. This will take a bit of work to do so we’ll consolidate this functionality to a function we’ll call resolveBookingsIndex() which will receive the bookingsIndex of the listing document, the checkIn date, and the checkOut date.
createBooking: async (
  _root: undefined,
  { input }: CreateBookingArgs,
  { db, req }: { db: Database; req: Request }
): Promise<Booking> => {
  try {
    const { id, source, checkIn, checkOut } = input;

    let viewer = await authorize(db, req);
    if (!viewer) {
      throw new Error("viewer cannot be found");
    }

    const listing = await db.listings.findOne({
      _id: new ObjectId(id)
    });
    if (!listing) {
      throw new Error("listing can't be found");
    }

    if (listing.host === viewer._id) {
      throw new Error("viewer can't book own listing");
    }

    const checkInDate = new Date(checkIn);
    const checkOutDate = new Date(checkOut);

    if (checkOutDate < checkInDate) {
      throw new Error("check out date can't be before check in date");
    }

    const bookingsIndex = resolveBookingsIndex(listing.bookingsIndex, checkIn, checkOut);
  } catch {}
};
We’ll create the resolveBookingsIndex() function in a second. For now, let’s look to populate the rest of the createBooking() mutation function.
Get total price of booking
With the new bookingsIndex to be prepared at this point, we’ll look to gather the total price of what the tenant will pay. To determine the total price, we’ll simply want to multiply the price of a listing document (which refers to the price per day) with the number of days the booking is made.
We don’t have a library like moment.js to help us here and though we could install it, we’ll avoid doing so since we don’t have a lot of work that deal with dates on the server. We’ll do our own somewhat rough implementation that should work for the vast majority of use cases.
We know that the total price will be equal to the listing price multiplied by the difference between the check-out and check-in dates. To determine the difference, we’ll use the getTime() function on a date object which gives us a time of milliseconds since the Unix Epoch. We can subtract the millisecond time of checkOut by checkIn which will give us the difference in milliseconds. With this difference available to us, we can divide the difference with the number of milliseconds in a day which is 86400000 . This will give us the difference in days, however, we always want to count the checkIn date as part of the total price so we’ll add the total number of days by 1 .
createBooking: async (
  _root: undefined,
  { input }: CreateBookingArgs,
  { db, req }: { db: Database; req: Request }
): Promise<Booking> => {
  try {
    const { id, source, checkIn, checkOut } = input;

    let viewer = await authorize(db, req);
    if (!viewer) {
      throw new Error("viewer cannot be found");
    }

    const listing = await db.listings.findOne({
      _id: new ObjectId(id)
    });
    if (!listing) {
      throw new Error("listing can't be found");
    }

    if (listing.host === viewer._id) {
      throw new Error("viewer can't book own listing");
    }

    const checkInDate = new Date(checkIn);
    const checkOutDate = new Date(checkOut);

    if (checkOutDate < checkInDate) {
      throw new Error("check out date can't be before check in date");
    }

    const bookingsIndex = resolveBookingsIndex(listing.bookingsIndex, checkIn, checkOut);

    const totalPrice =
      listing.price * ((checkOutDate.getTime() - checkInDate.getTime()) / 86400000 + 1);
  } catch {}
};
Check if host is connected with Stripe
For the next couple of things we intend to do, we’ll need access to the user document of the host (i.e. the person who owns the listing). We can use MongoDB’s findOne() method on the "users" collection to find the document where the id is equal to the host field in our listing document.
We can then check for two things. If this host object doesn’t exist, we’ll throw an error. Additionally, we’ll want this host connected with Stripe since that’s the only way we’ll be able to pay them out. When connected with Stripe, the host’s walletId field should have a value. If neither the host nor the host.walletId values can’t be found, we’ll throw an error that says "the host either can't be found or is not connected with Stripe" .
createBooking: async (
  _root: undefined,
  { input }: CreateBookingArgs,
  { db, req }: { db: Database; req: Request }
): Promise<Booking> => {
  try {
    const { id, source, checkIn, checkOut } = input;

    let viewer = await authorize(db, req);
    if (!viewer) {
      throw new Error("viewer cannot be found");
    }

    const listing = await db.listings.findOne({
      _id: new ObjectId(id)
    });
    if (!listing) {
      throw new Error("listing can't be found");
    }

    if (listing.host === viewer._id) {
      throw new Error("viewer can't book own listing");
    }

    const checkInDate = new Date(checkIn);
    const checkOutDate = new Date(checkOut);

    if (checkOutDate < checkInDate) {
      throw new Error("check out date can't be before check in date");
    }

    const bookingsIndex = resolveBookingsIndex(listing.bookingsIndex, checkIn, checkOut);

    const totalPrice =
      listing.price * ((checkOutDate.getTime() - checkInDate.getTime()) / 86400000 + 1);

    const host = await db.users.findOne({
      _id: listing.host
    });

    if (!host || !host.walletId) {
      throw new Error("the host either can't be found or is not connected with Stripe");
    }
  } catch {}
};
Create Stripe Charge
If all this information is available to us, we can then create the Stripe charge. We’ll import the Stripe instance object we’ve created in our src/lib/api folder.
import { Stripe } from "../../../lib/api";
We’ll run the charge() function within our Stripe instance and pass in the payloads that function is to expect which is the totalPrice we want to charge, the source which will come from the client, and the stripe_user_id of the person that is to be paid out which is the walletId value of the host.
createBooking: async (
  _root: undefined,
  { input }: CreateBookingArgs,
  { db, req }: { db: Database; req: Request }
): Promise<Booking> => {
  try {
    const { id, source, checkIn, checkOut } = input;

    let viewer = await authorize(db, req);
    if (!viewer) {
      throw new Error("viewer cannot be found");
    }

    const listing = await db.listings.findOne({
      _id: new ObjectId(id)
    });
    if (!listing) {
      throw new Error("listing can't be found");
    }

    if (listing.host === viewer._id) {
      throw new Error("viewer can't book own listing");
    }

    const checkInDate = new Date(checkIn);
    const checkOutDate = new Date(checkOut);

    if (checkOutDate < checkInDate) {
      throw new Error("check out date can't be before check in date");
    }

    const bookingsIndex = resolveBookingsIndex(listing.bookingsIndex, checkIn, checkOut);

    const totalPrice =
      listing.price * ((checkOutDate.getTime() - checkInDate.getTime()) / 86400000 + 1);

    const host = await db.users.findOne({
      _id: listing.host
    });

    if (!host || !host.walletId) {
      throw new Error("the host either can't be found or is not connected with Stripe");
    }

    await Stripe.charge(totalPrice, source, host.walletId);
  } catch {}
};
Update bookings collection
At this moment, the charge would have been made successfully. We’ll then simply need to update the documents in the different collections in our database.
In our database, we have a "bookings" collection to keep track of all the bookings made in our app. We’ll use the insertOne() function from MongoDB to insert a new document to the "bookings" collection with the following field and field values:
- A new ObjectId for the
_idfield. - A
listingfield to reference the listing that’s being booked. - A
tenantfield to reference the person who’s making the booking. - The
checkInandcheckOutdates of the booking in normal string format.
We’ll also need access to the newly inserted booking document with which we can access from the first item of the .ops property within the insert result.
createBooking: async (
  _root: undefined,
  { input }: CreateBookingArgs,
  { db, req }: { db: Database; req: Request }
): Promise<Booking> => {
  try {
    const { id, source, checkIn, checkOut } = input;

    let viewer = await authorize(db, req);
    if (!viewer) {
      throw new Error("viewer cannot be found");
    }

    const listing = await db.listings.findOne({
      _id: new ObjectId(id)
    });
    if (!listing) {
      throw new Error("listing can't be found");
    }

    if (listing.host === viewer._id) {
      throw new Error("viewer can't book own listing");
    }

    const checkInDate = new Date(checkIn);
    const checkOutDate = new Date(checkOut);

    if (checkOutDate < checkInDate) {
      throw new Error("check out date can't be before check in date");
    }

    const bookingsIndex = resolveBookingsIndex(listing.bookingsIndex, checkIn, checkOut);

    const totalPrice =
      listing.price * ((checkOutDate.getTime() - checkInDate.getTime()) / 86400000 + 1);

    const host = await db.users.findOne({
      _id: listing.host
    });

    if (!host || !host.walletId) {
      throw new Error("the host either can't be found or is not connected with Stripe");
    }

    await Stripe.charge(totalPrice, source, host.walletId);

    const insertRes = await db.bookings.insertOne({
      _id: new ObjectId(),
      listing: listing._id,
      tenant: viewer._id,
      checkIn,
      checkOut
    });

    const insertedBooking: Booking = insertRes.ops[0];
  } catch {}
};
Update user document of host
Next, we’ll look to update the user document of the host and increment the income field by the total price earned by the host. We’ll use the updateOne() function from MongoDB to update the user document with the _id field equal to the host._id field. We’ll then use the $inc operator to increment the income field by whatever the totalPrice is.
createBooking: async (
  _root: undefined,
  { input }: CreateBookingArgs,
  { db, req }: { db: Database; req: Request }
): Promise<Booking> => {
  try {
    const { id, source, checkIn, checkOut } = input;

    let viewer = await authorize(db, req);
    if (!viewer) {
      throw new Error("viewer cannot be found");
    }

    const listing = await db.listings.findOne({
      _id: new ObjectId(id)
    });
    if (!listing) {
      throw new Error("listing can't be found");
    }

    if (listing.host === viewer._id) {
      throw new Error("viewer can't book own listing");
    }

    const checkInDate = new Date(checkIn);
    const checkOutDate = new Date(checkOut);

    if (checkOutDate < checkInDate) {
      throw new Error("check out date can't be before check in date");
    }

    const bookingsIndex = resolveBookingsIndex(listing.bookingsIndex, checkIn, checkOut);

    const totalPrice =
      listing.price * ((checkOutDate.getTime() - checkInDate.getTime()) / 86400000 + 1);

    const host = await db.users.findOne({
      _id: listing.host
    });

    if (!host || !host.walletId) {
      throw new Error("the host either can't be found or is not connected with Stripe");
    }

    await Stripe.charge(totalPrice, source, host.walletId);

    const insertRes = await db.bookings.insertOne({
      _id: new ObjectId(),
      listing: listing._id,
      tenant: viewer._id,
      checkIn,
      checkOut
    });

    const insertedBooking: Booking = insertRes.ops[0];

    await db.users.updateOne({ _id: host._id }, { $inc: { income: totalPrice } });
  } catch {}
};
Update user document of viewer
Next, we’ll update the user document of the viewer to specify a new booking is to exist in the bookings field of this user. We’ll use the updateOne() method again and find the user document where the _id field of the user is the viewer._id . We’ll simply use the $push operator to push a new entry to the bookings field and we’ll push the newly inserted booking _id .
createBooking: async (
  _root: undefined,
  { input }: CreateBookingArgs,
  { db, req }: { db: Database; req: Request }
): Promise<Booking> => {
  try {
    const { id, source, checkIn, checkOut } = input;

    let viewer = await authorize(db, req);
    if (!viewer) {
      throw new Error("viewer cannot be found");
    }

    const listing = await db.listings.findOne({
      _id: new ObjectId(id)
    });
    if (!listing) {
      throw new Error("listing can't be found");
    }

    if (listing.host === viewer._id) {
      throw new Error("viewer can't book own listing");
    }

    const checkInDate = new Date(checkIn);
    const checkOutDate = new Date(checkOut);

    if (checkOutDate < checkInDate) {
      throw new Error("check out date can't be before check in date");
    }

    const bookingsIndex = resolveBookingsIndex(listing.bookingsIndex, checkIn, checkOut);

    const totalPrice =
      listing.price * ((checkOutDate.getTime() - checkInDate.getTime()) / 86400000 + 1);

    const host = await db.users.findOne({
      _id: listing.host
    });

    if (!host || !host.walletId) {
      throw new Error("the host either can't be found or is not connected with Stripe");
    }

    await Stripe.charge(totalPrice, source, host.walletId);

    const insertRes = await db.bookings.insertOne({
      _id: new ObjectId(),
      listing: listing._id,
      tenant: viewer._id,
      checkIn,
      checkOut
    });

    const insertedBooking: Booking = insertRes.ops[0];

    await db.users.updateOne({ _id: host._id }, { $inc: { income: totalPrice } });

    await db.users.updateOne(
      { _id: viewer._id },
      { $push: { bookings: insertedBooking._id } }
    );
  } catch {}
};
Update listing document being booked
Finally, we’re going to update the listing document that’s being booked. We’ll use the updateOne() method again and find the listing document where the _id field is that of the listing we’ve found from the id passed in as the argument.
We’ll update two things in the listing document. We’ll need to update the bookingsIndex of this document with the new bookingsIndex from the resolveBookingsIndex() we’ll create soon. We’ll use the $set operator to update the entire value with the new value we’ve prepared.
Similar to the update we’ve made right above, we’ll also want to update the bookings array in the listing document to have the id of the newly created booking. We’ll use the $push operator just like the above and push the id of the inserted booking to the new booking.
createBooking: async (
  _root: undefined,
  { input }: CreateBookingArgs,
  { db, req }: { db: Database; req: Request }
): Promise<Booking> => {
  try {
    const { id, source, checkIn, checkOut } = input;

    let viewer = await authorize(db, req);
    if (!viewer) {
      throw new Error("viewer cannot be found");
    }

    const listing = await db.listings.findOne({
      _id: new ObjectId(id)
    });
    if (!listing) {
      throw new Error("listing can't be found");
    }

    if (listing.host === viewer._id) {
      throw new Error("viewer can't book own listing");
    }

    const checkInDate = new Date(checkIn);
    const checkOutDate = new Date(checkOut);

    if (checkOutDate < checkInDate) {
      throw new Error("check out date can't be before check in date");
    }

    const bookingsIndex = resolveBookingsIndex(listing.bookingsIndex, checkIn, checkOut);

    const totalPrice =
      listing.price * ((checkOutDate.getTime() - checkInDate.getTime()) / 86400000 + 1);

    const host = await db.users.findOne({
      _id: listing.host
    });

    if (!host || !host.walletId) {
      throw new Error("the host either can't be found or is not connected with Stripe");
    }

    await Stripe.charge(totalPrice, source, host.walletId);

    const insertRes = await db.bookings.insertOne({
      _id: new ObjectId(),
      listing: listing._id,
      tenant: viewer._id,
      checkIn,
      checkOut
    });

    const insertedBooking: Booking = insertRes.ops[0];

    await db.users.updateOne({ _id: host._id }, { $inc: { income: totalPrice } });

    await db.users.updateOne(
      { _id: viewer._id },
      { $push: { bookings: insertedBooking._id } }
    );

    await db.listings.updateOne(
      { _id: listing._id },
      {
        $set: { bookingsIndex },
        $push: { bookings: insertedBooking._id }
      }
    );
  } catch {}
};
These are all the changes we’ll want to be done in the createBooking() mutation resolver function. However, we’re still not done yet since we’ll need to build out the functionality for the resolveBookingsIndex() function that will create a new bookingsIndex from the check-in and check-out dates of a booking. We’ll look to handle this in the next lesson.
We’ll have the createBooking() mutation function return the insertedBooking document at the end of the function and in our function’s catch statement, we’ll catch whatever error might have been thrown and compile it within a new error statement that says "Failed to create a booking" .
server/src/graphql/resolvers/Booking/index.ts
export const bookingResolvers: IResolvers = {  Mutation: {
    createBooking: async (
      _root: undefined,
      { input }: CreateBookingArgs,
      { db, req }: { db: Database; req: Request }
    ): Promise<Booking> => {
      try {
        const { id, source, checkIn, checkOut } = input;

        let viewer = await authorize(db, req);
        if (!viewer) {
          throw new Error("viewer cannot be found");
        }

        const listing = await db.listings.findOne({
          _id: new ObjectId(id)
        });
        if (!listing) {
          throw new Error("listing can't be found");
        }

        if (listing.host === viewer._id) {
          throw new Error("viewer can't book own listing");
        }

        const checkInDate = new Date(checkIn);
        const checkOutDate = new Date(checkOut);

        if (checkOutDate < checkInDate) {
          throw new Error("check out date can't be before check in date");
        }

        // to be continued in the next lesson
        //
        // const bookingsIndex = resolveBookingsIndex(
        //   listing.bookingsIndex,
        //   checkIn,
        //   checkOut
        // );

        const totalPrice =
          listing.price *
          ((checkOutDate.getTime() - checkInDate.getTime()) / 86400000 + 1);

        const host = await db.users.findOne({
          _id: listing.host
        });

        if (!host || !host.walletId) {
          throw new Error(
            "the host either can't be found or is not connected with Stripe"
          );
        }

        await Stripe.charge(totalPrice, source, host.walletId);

        const insertRes = await db.bookings.insertOne({
          _id: new ObjectId(),
          listing: listing._id,
          tenant: viewer._id,
          checkIn,
          checkOut
        });

        const insertedBooking: Booking = insertRes.ops[0];

        await db.users.updateOne(
          {
            _id: host._id
          },
          {
            $inc: { income: totalPrice }
          }
        );

        await db.users.updateOne(
          {
            _id: viewer._id
          },
          {
            $push: { bookings: insertedBooking._id }
          }
        );

        await db.listings.updateOne(
          {
            _id: listing._id
          },
          {
            // $set: { bookingsIndex }, // to be handled in the next lesson
            $push: { bookings: insertedBooking._id }
          }
        );

        return insertedBooking;
      } catch (error) {
        throw new Error(`Failed to create a booking: ${error}`);
      }
    }
  },};
RESOLVING THE BOOKINGSINDEX OF A LISTING
bookingsIndexobject that we’ll address in this lesson can be found - here.
In the last lesson, we got almost everything within the createBooking() mutation resolver function complete except for preparing the resolveBookingsIndex() utility function. The resolveBookingsIndex() function is to help produce a new bookingsIndex object for a listing. We’ll have the resolveBookingsIndex() function created in the same file as to where we have the bookingResolvers map. Above and outside of our resolvers map, we’ll construct the function and the parameters it is to accept. It’ll accept a bookingsIndex object and it’ll accept checkInDate and checkOutDate parameters of type string .
export const resolveBookingsIndex = (
  bookingsIndex,
  checkInDate: string,
  checkOutDate: string
) => {};
We’ll need a type to specify the shape of the bookingsIndex parameter. If we recall, the bookingsIndex object will be our way for how we hope to handle dates and the booking of dates in our application and will look something like this:
// 2019-01-01   year: 2019 | month: 01 | day: 01
// 2019-01-02   year: 2019 | month: 01 | day: 02
// 2019-05-31   year: 2019 | month: 05 | day: 31
// 2019-06-01   year: 2019 | month: 06 | day: 01
// 2019-07-20   year: 2019 | month: 07 | day: 20

const bookingsIndex = {
  "2019": {
    "00": {
      "01": true,
      "02": true
    },
    "04": {
      "31": true
    },
    "05": {
      "01": true
    },
    "06": {
      "20": true
    }
  }
};

// NOTE: the JavaScript function for getting the month returns 0 for Jan ... and 11 for Dec
bookingsIndex is an object that contains a set of nested objects that contain key-value pairs.
- In the root level, the index will be the year the booking is made.
- The child objects of the root will reference the month the booking is made.
- Further down, the child objects will reference the day a booking is made with which at this moment, a
trueboolean value indicates the days that have already been booked.
Note: The JavaScript function for getting the month according to universal time, getUTCMonth(), starts at 0 to represent January which is why in the
bookingsIndexexample above, 0 references the month of January.
From the bookingsIndex example noted above, let’s highlight two different cases of a new booking that is about to be made.
Case 1: If a user wants to book from 2019-Jan-01 to 2019-Jan-03 for a listing that has the bookingsIndex example shown above, the booking should fail because the check-in and check-out dates overlap dates that have already been booked. The bookingsIndex will remain as follows:
const bookingsIndex = {
  "2019": {
    "00": {
      "01": true,
      "02": true
    },
    "04": {
      "31": true
    },
    "05": {
      "01": true
    },
    "06": {
      "20": true
    }
  }
};
Case 2 : If a user wants to book from 2019-Dec-01 to 2019-Dec-03 for a listing that has the bookingsIndex example shown above, the booking should be successful because the check-in and check-out dates don’t overlap with already booked dates . The new bookingsIndex will be as follows:
const bookingsIndex = {
  "2019": {
    "00": {
      "01": true,
      "02": true
    },
    "04": {
      "31": true
    },
    "05": {
      "01": true
    },
    "06": {
      "20": true
    },
    "11": {
      "01": true,
      "02": true,
      "03": true
    }
  }
};
We want the resolveBookingsIndex() function to handle the above two cases. Let’s first define the shape of the bookingsIndex field argument for the function. If we take a look at our src/lib/types.ts file, we’ll see we’ve prepared interfaces for the BookingsIndexYear and BookingsIndexMonth objects. The BookingsIndex object itself will essentially be the parent of the key-value pairs where the values will be the BookingsIndexYear objects so we’ll create and export a BookingsIndex interface to represent this:
server/src/lib/types.ts
export interface BookingsIndex {
  [key: string]: BookingsIndexYear;
}
We’ll also make sure the bookingsIndex field of the TypeScript interface to describe the shape of a listing document is to have the type of BookingsIndex .
server/src/lib/types.ts
export interface Listing {
  _id: ObjectId;
  title: string;
  description: string;
  image: string;
  host: string;
  type: ListingType;
  address: string;
  country: string;
  admin: string;
  city: string;
  bookings: ObjectId[];
  bookingsIndex: BookingsIndex;
  price: number;
  numOfGuests: number;
  authorized?: boolean;
}
In the src/graphql/resolvers/Booking/index.ts file, we’ll import the BookingsIndex interface from the src/lib/types.ts file and state the type of the bookingsIndex argument for the resolveBookingsIndex() function to be the BookingsIndex interface. Since we expect this function to also return a valid index of the shape, we’ll state the function’s return type as BookingsIndex as well.
// ...
import { Database, Listing, Booking, BookingsIndex } from "../../../lib/types";
// ...

export const resolveBookingsIndex = (
  bookingsIndex: BookingsIndex,
  checkInDate: string,
  checkOutDate: string
): BookingsIndex => {};
At the beginning of the resolveBookingsIndex() function, we’ll specify a dateCursor which will be set to the date object of the checkInDate string. We’ll also specify a checkOut date object which will be the date object of the checkOutDate string. We’ll then declare a new constant variable called newBookingsIndex and initialize it with the bookingsIndex object that was passed in as an argument. We’ll want the resolveBookingsIndex() function to update this newBookingsIndex variable and return it in the end.
export const resolveBookingsIndex = (
  bookingsIndex: BookingsIndex,
  checkInDate: string,
  checkOutDate: string
): BookingsIndex => {
  let dateCursor = new Date(checkInDate);
  let checkOut = new Date(checkOutDate);
  const newBookingsIndex: BookingsIndex = { ...bookingsIndex };

  // update newBookingsIndex here

  return newBookingsIndex;
};
Since we’ll want to ensure that we can update the newBookingsIndex object for all the number of days being booked, we’ll want to run a statement through an iteration of sorts and this is where a while loop can be helpful. The while loop is a control flow statement that’ll allow the code we write to be executed over and over given a valid Boolean condition. The condition we’ll provide will involve the dateCursor being less than or equal to checkOut (i.e. is the dateCursor date before the checkOut date).
It’s important to control the moment in which we want to break out of this loop. In the while statement, we’ll increment the dateCursor value by one day at a time and we’re going to do this by adding the number of milliseconds in a day ( 86400000 ).
export const resolveBookingsIndex = (
  bookingsIndex: BookingsIndex,
  checkInDate: string,
  checkOutDate: string
): BookingsIndex => {
  let dateCursor = new Date(checkInDate);
  let checkOut = new Date(checkOutDate);
  const newBookingsIndex: BookingsIndex = { ...bookingsIndex };

  while (dateCursor <= checkOut) {
    // update newBookingsIndex here

    dateCursor = new Date(dateCursor.getTime() + 86400000);
  }

  return newBookingsIndex;
};
This would allow us to iterate and update the newBookingsIndex object day by day while the dateCursor is still less than or equal to checkOut . The moment the dateCursor value exceeds the checkOut date, we’ll break out of the loop.
We’ll now begin to update the newBookingsIndex object for days that are valid. The newBookingsIndex constant we’ve set-up is an object (i.e. hash). When it comes to updating or reading objects and hashes, it can be done practically instantly. All we need to do is simply provide the key that we’re looking for to find the point in the object we want to update.
The newBookingsIndex object is broken down into three steps. We need to sort of compile information for the dateCursor for each of these steps. In other words, we need to compile what the year is, what the month is, and what the day is for a certain point in the index. We can achieve this with the following three JavaScript date functions.
export const resolveBookingsIndex = (
  bookingsIndex: BookingsIndex,
  checkInDate: string,
  checkOutDate: string
): BookingsIndex => {
  let dateCursor = new Date(checkInDate);
  let checkOut = new Date(checkOutDate);
  const newBookingsIndex: BookingsIndex = { ...bookingsIndex };

  while (dateCursor <= checkOut) {
    const y = dateCursor.getUTCFullYear(); // year
    const m = dateCursor.getUTCMonth(); // month
    const d = dateCursor.getUTCDate(); // day

    dateCursor = new Date(dateCursor.getTime() + 86400000);
  }

  return newBookingsIndex;
};
Note: As we’ve stated before,
getUTCMonth()returns 0 for Jan … and 11 for Dec!
With the date values available for the existing dateCursor , we can access and manipulate the newBookingsIndex object. For example, in the beginning, we can check to see if newBookingsIndex has a value for the year of the dateCursor . If it doesn’t, let’s construct an object. We will repeat this for the month value and check to see if newBookingsIndex has a value for the month of the dateCursor . If not, we’ll create another object.
const resolveBookingsIndex = (
  bookingsIndex: BookingsIndex,
  checkInDate: string,
  checkOutDate: string
): BookingsIndex => {
  let dateCursor = new Date(checkInDate);
  let checkOut = new Date(checkOutDate);
  const newBookingsIndex: BookingsIndex = { ...bookingsIndex };

  while (dateCursor <= checkOut) {
    const y = dateCursor.getUTCFullYear();
    const m = dateCursor.getUTCMonth();
    const d = dateCursor.getUTCDate();

    if (!newBookingsIndex[y]) {
      newBookingsIndex[y] = {};
    }

    if (!newBookingsIndex[y][m]) {
      newBookingsIndex[y][m] = {};
    }

    dateCursor = new Date(dateCursor.getTime() + 86400000);
  }

  return newBookingsIndex;
};
Finally, we’ll then check if the newBookingsIndex object has value for the day of the dateCursor . If not, we’ll simply add the value of true to the key of newBookingsIndex[y][m][d] which states that this day has been booked . However, this is where we’ll also have an else statement if the day value already exists which would mean its already been booked. If the value already exists, we’ll throw an error and say "selected dates can't overlap dates that have already been booked" .
server/src/graphql/resolvers/Booking/index.ts
const resolveBookingsIndex = (
  bookingsIndex: BookingsIndex,
  checkInDate: string,
  checkOutDate: string
): BookingsIndex => {
  let dateCursor = new Date(checkInDate);
  let checkOut = new Date(checkOutDate);
  const newBookingsIndex: BookingsIndex = { ...bookingsIndex };

  while (dateCursor <= checkOut) {
    const y = dateCursor.getUTCFullYear();
    const m = dateCursor.getUTCMonth();
    const d = dateCursor.getUTCDate();

    if (!newBookingsIndex[y]) {
      newBookingsIndex[y] = {};
    }

    if (!newBookingsIndex[y][m]) {
      newBookingsIndex[y][m] = {};
    }

    if (!newBookingsIndex[y][m][d]) {
      newBookingsIndex[y][m][d] = true;
    } else {
      throw new Error("selected dates can't overlap dates that have already been booked");
    }

    dateCursor = new Date(dateCursor.getTime() + 86400000);
  }

  return newBookingsIndex;
};
This is a pretty simple solution and it does what we need to do for our use case. There’s a lot of questions and discussions that can come from this such as performance. Is what we’ve done a somewhat performant solution? From what we’ve gathered, it’s pretty good. The reason being is that when the size of the input (i.e. the difference between the number of days between checkIn and checkOut ) increases, the time dependency of our solution will only increase linearly based on the input.
However, there are bigger discussions that could come from the fact that what if a user picks a check-in date in 2019 and a check-out date far in the future (e.g. 2025). The way we have our loop, we’re going to increment from the check-in date all the way through to the check-out date. If there are no bookings made in between, we’re just going to keep going which can take some time. A simple solution to avoid this would be limiting the length of time the user can check-in and check-out (e.g a user can only book listings for a maximum of one month). Another solution would involve limiting the furthest time in the future that a user can either check-in or check-out (e.g listings can only be booked within a year from check-in).
TENANT()
The last thing we’ll do is to add a tenant() resolver function inside of our bookingResolvers map. In this tenant() resolver function, we’ll look to access the booking data object that will be passed from the parent resolver functions. There’ll be no arguments we expect here and we’ll look to access the db object available in context. We’ll use MongoDB’s findOne() method to find the user document where the _id value matches booking.tenant which is the id of the user who is making the booking.
With this change and all the changes we’ve made, the src/graphql/resolvers/Booking/index.ts file will appear as follows:
server/src/graphql/resolvers/Booking/index.ts
import { IResolvers } from "apollo-server-express";
import { Request } from "express";
import { ObjectId } from "mongodb";
import { Stripe } from "../../../lib/api";
import { Database, Listing, Booking, BookingsIndex } from "../../../lib/types";
import { authorize } from "../../../lib/utils";
import { CreateBookingArgs } from "./types";

const resolveBookingsIndex = (
  bookingsIndex: BookingsIndex,
  checkInDate: string,
  checkOutDate: string
): BookingsIndex => {
  let dateCursor = new Date(checkInDate);
  let checkOut = new Date(checkOutDate);
  const newBookingsIndex: BookingsIndex = { ...bookingsIndex };

  while (dateCursor <= checkOut) {
    const y = dateCursor.getUTCFullYear();
    const m = dateCursor.getUTCMonth();
    const d = dateCursor.getUTCDate();

    if (!newBookingsIndex[y]) {
      newBookingsIndex[y] = {};
    }

    if (!newBookingsIndex[y][m]) {
      newBookingsIndex[y][m] = {};
    }

    if (!newBookingsIndex[y][m][d]) {
      newBookingsIndex[y][m][d] = true;
    } else {
      throw new Error("selected dates can't overlap dates that have already been booked");
    }

    dateCursor = new Date(dateCursor.getTime() + 86400000);
  }

  return newBookingsIndex;
};

export const bookingResolvers: IResolvers = {
  Mutation: {
    createBooking: async (
      _root: undefined,
      { input }: CreateBookingArgs,
      { db, req }: { db: Database; req: Request }
    ): Promise<Booking> => {
      try {
        const { id, source, checkIn, checkOut } = input;

        let viewer = await authorize(db, req);
        if (!viewer) {
          throw new Error("viewer cannot be found");
        }

        const listing = await db.listings.findOne({
          _id: new ObjectId(id)
        });
        if (!listing) {
          throw new Error("listing can't be found");
        }

        if (listing.host === viewer._id) {
          throw new Error("viewer can't book own listing");
        }

        const checkInDate = new Date(checkIn);
        const checkOutDate = new Date(checkOut);

        if (checkOutDate < checkInDate) {
          throw new Error("check out date can't be before check in date");
        }

        const bookingsIndex = resolveBookingsIndex(
          listing.bookingsIndex,
          checkIn,
          checkOut
        );

        const totalPrice =
          listing.price *
          ((checkOutDate.getTime() - checkInDate.getTime()) / 86400000 + 1);

        const host = await db.users.findOne({
          _id: listing.host
        });

        if (!host || !host.walletId) {
          throw new Error(
            "the host either can't be found or is not connected with Stripe"
          );
        }

        await Stripe.charge(totalPrice, source, host.walletId);

        const insertRes = await db.bookings.insertOne({
          _id: new ObjectId(),
          listing: listing._id,
          tenant: viewer._id,
          checkIn,
          checkOut
        });

        const insertedBooking: Booking = insertRes.ops[0];

        await db.users.updateOne(
          {
            _id: host._id
          },
          {
            $inc: { income: totalPrice }
          }
        );

        await db.users.updateOne(
          {
            _id: viewer._id
          },
          {
            $push: { bookings: insertedBooking._id }
          }
        );

        await db.listings.updateOne(
          {
            _id: listing._id
          },
          {
            $set: { bookingsIndex },
            $push: { bookings: insertedBooking._id }
          }
        );

        return insertedBooking;
      } catch (error) {
        throw new Error(`Failed to create a booking: ${error}`);
      }
    }
  },
  Booking: {
    id: (booking: Booking): string => {
      return booking._id.toString();
    },
    listing: (
      booking: Booking,
      _args: {},
      { db }: { db: Database }
    ): Promise<Listing | null> => {
      return db.listings.findOne({ _id: booking.listing });
    },
    tenant: (booking: Booking, _args: {}, { db }: { db: Database }) => {
      return db.users.findOne({ _id: booking.tenant });
    }
  }
};
That’s pretty much it! In the next coming lessons, we’ll begin to work on the client-side to facilitate the booking of a listing. Great job so far!