DISABLING BOOKED DATES ON THE CLIENT
GAMEPLAN
We built the /listing/:id page a few modules before which is the page that surfaces and displays information about a certain listing. In the <Listing /> component rendered in the /listing/:id page, we retrieve the value of the dynamic id parameter available in the URL which we use as an argument for the listing query that allows us to retrieve information about a certain listing.
We also set up the component called <ListingCreateBooking /> , rendered as a child of <Listing /> , as the surface area where we allow a user to select the dates to check-in and check-out of a listing. We haven’t built functionality further than that.
There are a few things we want to achieve here. When the user selects the check-in and check-out dates for a booking and clicks the "Request to book!" button, we’ll want to surface a modal. This modal will be the confirmation modal where the user can confirm their booking and the dates they want to be booked. A summary of the total price it will cost them for the booking is to be displayed as well as an element where the user can provide their credit or debit card information to book their listing.

The element where the user will be able to provide their card information will be a component that we’ll get and use from Stripe itself. There are a few reasons why this is helpful:
- The card payment component we’ll use will ensure that the user is to provide valid credit or debit card information . If invalid information is presented, the component would have client-side UI to reflect what is incorrect. This won’t be handled by us through custom means since it’ll be taken care of by the component we’ll use from Stripe.
- More importantly, when someone is to provide their payment information - it is sensitive information . By using elements provided to us from Stripe, we can create the capability for users to provide their information without us having to worry about handling sensitive card data on the client.
When the listing is confirmed to be booked through the "Book" action in the modal, this is where we’ll fire the createBooking mutation and pass in the variables the createBooking mutation expects. The createBooking mutation expects an input that contains the id of the listing being booked, the source of the payment (which we’ll get from the Stripe element), and the checkIn and checkOut dates being booked.
This are some of the main remaining things we want to handle. Additionally, there are a few other things we’ll need to look into as well. In our server, we’ve provided some capability when a user shouldn’t be able to book a listing. We’ll also want to provide some client-side validations as well to prevent the user from even launching the booking modal if they shouldn’t be booking the listing in the first place. For example, we can disable the check-in and check-out datepickers and the "Request to Book" button when:
- A user is not signed in to our application.
- A user attempts to book a listing of their own.
- A user attempts to book a listing where the host of the listing has disconnected from Stripe . In this context, we’ll be unable to facilitate the payment to the host so we shouldn’t allow someone to make a booking.
When bookings have been made to a listing, the listing bookingsIndex object will be updated to reflect which bookings have been made for it. We’ll need to update the check-in and check-out datepicker inputs to prevent users from booking dates that have already been booked!
PREVENT USER FROM BOOKING A LISTING
Since there are a couple of things for us to do, we’ll take it step by step. We’ll first look to handle the client-side checks for disabling the check-in/check-out datepickers and the `“Request to book!” button when the user should not be able to book a listing.
In the <ListingCreateBooking /> component in the src/sections/Listing/components/ListingCreateBooking/index.tsx file, we’ll create a constant element called buttonMessage that we’ll provide a value for "You won't be charged yet" . This will be the message we want to show under the "Request to book!" button when a user can book a listing but is how we’ll convey that this won’t confirm the booking yet. We’ll place the buttonMessage element within a <Text /> component that has the "secondary" type and a mark prop.
const { Paragraph, Text, Title } = Typography;

// ...
// ...

let buttonMessage = "You won't be charged yet";

export const ListingCreateBooking = ({
  price,
  checkInDate,
  checkOutDate,
  setCheckInDate,
  setCheckOutDate
}: Props) => {
  return (
    <div className="listing-booking">
      <Card className="listing-booking__card">
        <div>{/* ... */}</div>
        <Divider />
        <Button
          disabled={buttonDisabled}
          size="large"
          type="primary"
          className="listing-booking__card-cta"
        >
          Request to book!
        </Button>
        <Text type="secondary" mark>
          {buttonMessage}
        </Text>
      </Card>
    </div>
  );
};
Prevent booking when user is not logged in
We’ll look to prevent a user from booking a listing if they aren’t logged in . For this, we’ll need access to the viewer object we have in our client app that keeps context of the status of the viewer (i.e. the user viewing the app). The parent <Listing /> component doesn’t have the viewer object available so we’ll need to pass it two levels down from the root parent <App /> component.
In the parent <App /> component, we’ll employ the render props pattern to render the <Listing /> component for its route and we’ll pass an additional viewer prop down.
client/src/index.tsx
          <Route
            exact
            path="/listing/:id"
            render={props => <Listing {...props} viewer={viewer} />}
          />
In the <Listing /> component file, we’ll declare that it is to expect the viewer prop object.
client/src/sections/Listing/index.tsx
import { Viewer } from "../../lib/types";
client/src/sections/Listing/index.tsx
interface Props {
  viewer: Viewer;
}
We’ll declare the viewer prop as a value of the props argument and we’ll pass it further down to the child <ListingCreateBooking /> component.
export const Listing = ({ viewer, match }: Props & RouteComponentProps<MatchParams>) => {
  // ...

  const listingCreateBookingElement = listing ? (
    <ListingCreateBooking
      viewer={viewer}
      price={listing.price}
      checkInDate={checkInDate}
      checkOutDate={checkOutDate}
      setCheckInDate={setCheckInDate}
      setCheckOutDate={setCheckOutDate}
    />
  ) : null;

  return (
    // ...
  )
};
In the <ListingCreateBooking /> component, we’ll specify it is to also accept a viewer prop object.
// ...
import { Viewer } from "../../../../lib/types";

interface Props {
  viewer: Viewer;
  // ...
}

export const ListingCreateBooking = (
  viewer
  // ...
) => {
  // ...
};
With the viewer object available in the <ListingCreateBooking /> component, we can check to see if the viewer is available by simply seeing if the id property of the viewer object is available. We’ll set up a checkInInputDisabled constant in the component that will be true when viewer.id doesn’t exist.
We can then say if the checkInInputDisabled value is ever true , so would be the checkOutInputDisabled value (i.e. if the user can’t select a date for check-in, they shouldn’t be able to select a date for check-out). If the checkOutInputDisabled property is ever true, the "Request to book!" button will be disabled as well. Finally, we’ll say if the viewer.id value doesn’t exist, the buttonMessage property will be updated to say - "You have to be signed in to book a listing!" .
We’ll then add the checkInInputDisabled property as the value for the disabled prop for the check-in <DatePicker /> input component.
export const ListingCreateBooking = (/* ... */) => {
  // ...

  const checkInInputDisabled = !viewer.id;
  const checkOutInputDisabled = checkInInputDisabled || !checkInDate;
  const buttonDisabled = checkOutInputDisabled || !checkInDate || !checkOutDate;

  let buttonMessage = "You won't be charged yet";
  if (!viewer.id) {
    buttonMessage = "You have to be signed in to book a listing!";
  }

  return (
    <div className="listing-booking">
      <Card className="listing-booking__card">
        <div>
          <Paragraph>{/* ... */}</Paragraph>
          <Divider />
          <div className="listing-booking__card-date-picker">
            <Paragraph strong>Check In</Paragraph>
            <DatePicker
              value={checkInDate ? checkInDate : undefined}
              format={"YYYY/MM/DD"}
              showToday={false}
              disabled={checkInInputDisabled}
              disabledDate={disabledDate}
              onChange={dateValue => setCheckInDate(dateValue)}
              onOpenChange={() => setCheckOutDate(null)}
            />
          </div>
          <div className="listing-booking__card-date-picker">{/* ... */}</div>
        </div>
        <Divider />
        {/* ... */}
      </Card>
    </div>
  );
};
If we were to now take a look at the /listing/:id page of a listing when not logged in, we’ll notice the check-in datepicker input is disabled since viewer.id doesn’t exist. The check-out datepicker input and the "Request to book!" button are also disabled. The text below the confirmation button will say "You have to be signed in to book a listing!" .

Prevent booking when viewer attempts to book own listing
The next thing we’ll check for is that the viewer isn’t attempting to book their own listing . From the GraphQL query we make for the listing information, the host field is to have the user information of the user who owns the listing. To verify a viewer isn’t booking a listing of their own, we can check viewer.id isn’t equal to the host.id .
In the parent <Listing /> component, we’ll pass a prop labeled host that reflects the listing host.
export const Listing = ({ viewer, match }: Props & RouteComponentProps<MatchParams>) => {
  // ...

  const listingCreateBookingElement = listing ? (
    <ListingCreateBooking
      viewer={viewer}
      host={listing.host}
      price={listing.price}
      checkInDate={checkInDate}
      checkOutDate={checkOutDate}
      setCheckInDate={setCheckInDate}
      setCheckOutDate={setCheckOutDate}
    />
  ) : null;

  return (
    // ...
  )
};
In the <ListingCreateBooking /> component, we’ll state that it is to accept a prop labeled host . We’ll describe the shape of the host prop by importing the shape of the Listing data interface from the autogenerated types for the listing query and declare a lookup type to access the type of the host field within this listing data interface.
import { Listing as ListingData } from "../../../../lib/graphql/queries/Listing/__generated__/Listing";

interface Props {
  viewer: Viewer;
  host: ListingData["listing"]["host"];
  // ...
}

export const ListingCreateBooking = ({
  viewer,
  host,
  price,
  checkInDate,
  checkOutDate,
  setCheckInDate,
  setCheckOutDate
}: Props) => {
  // ...
};
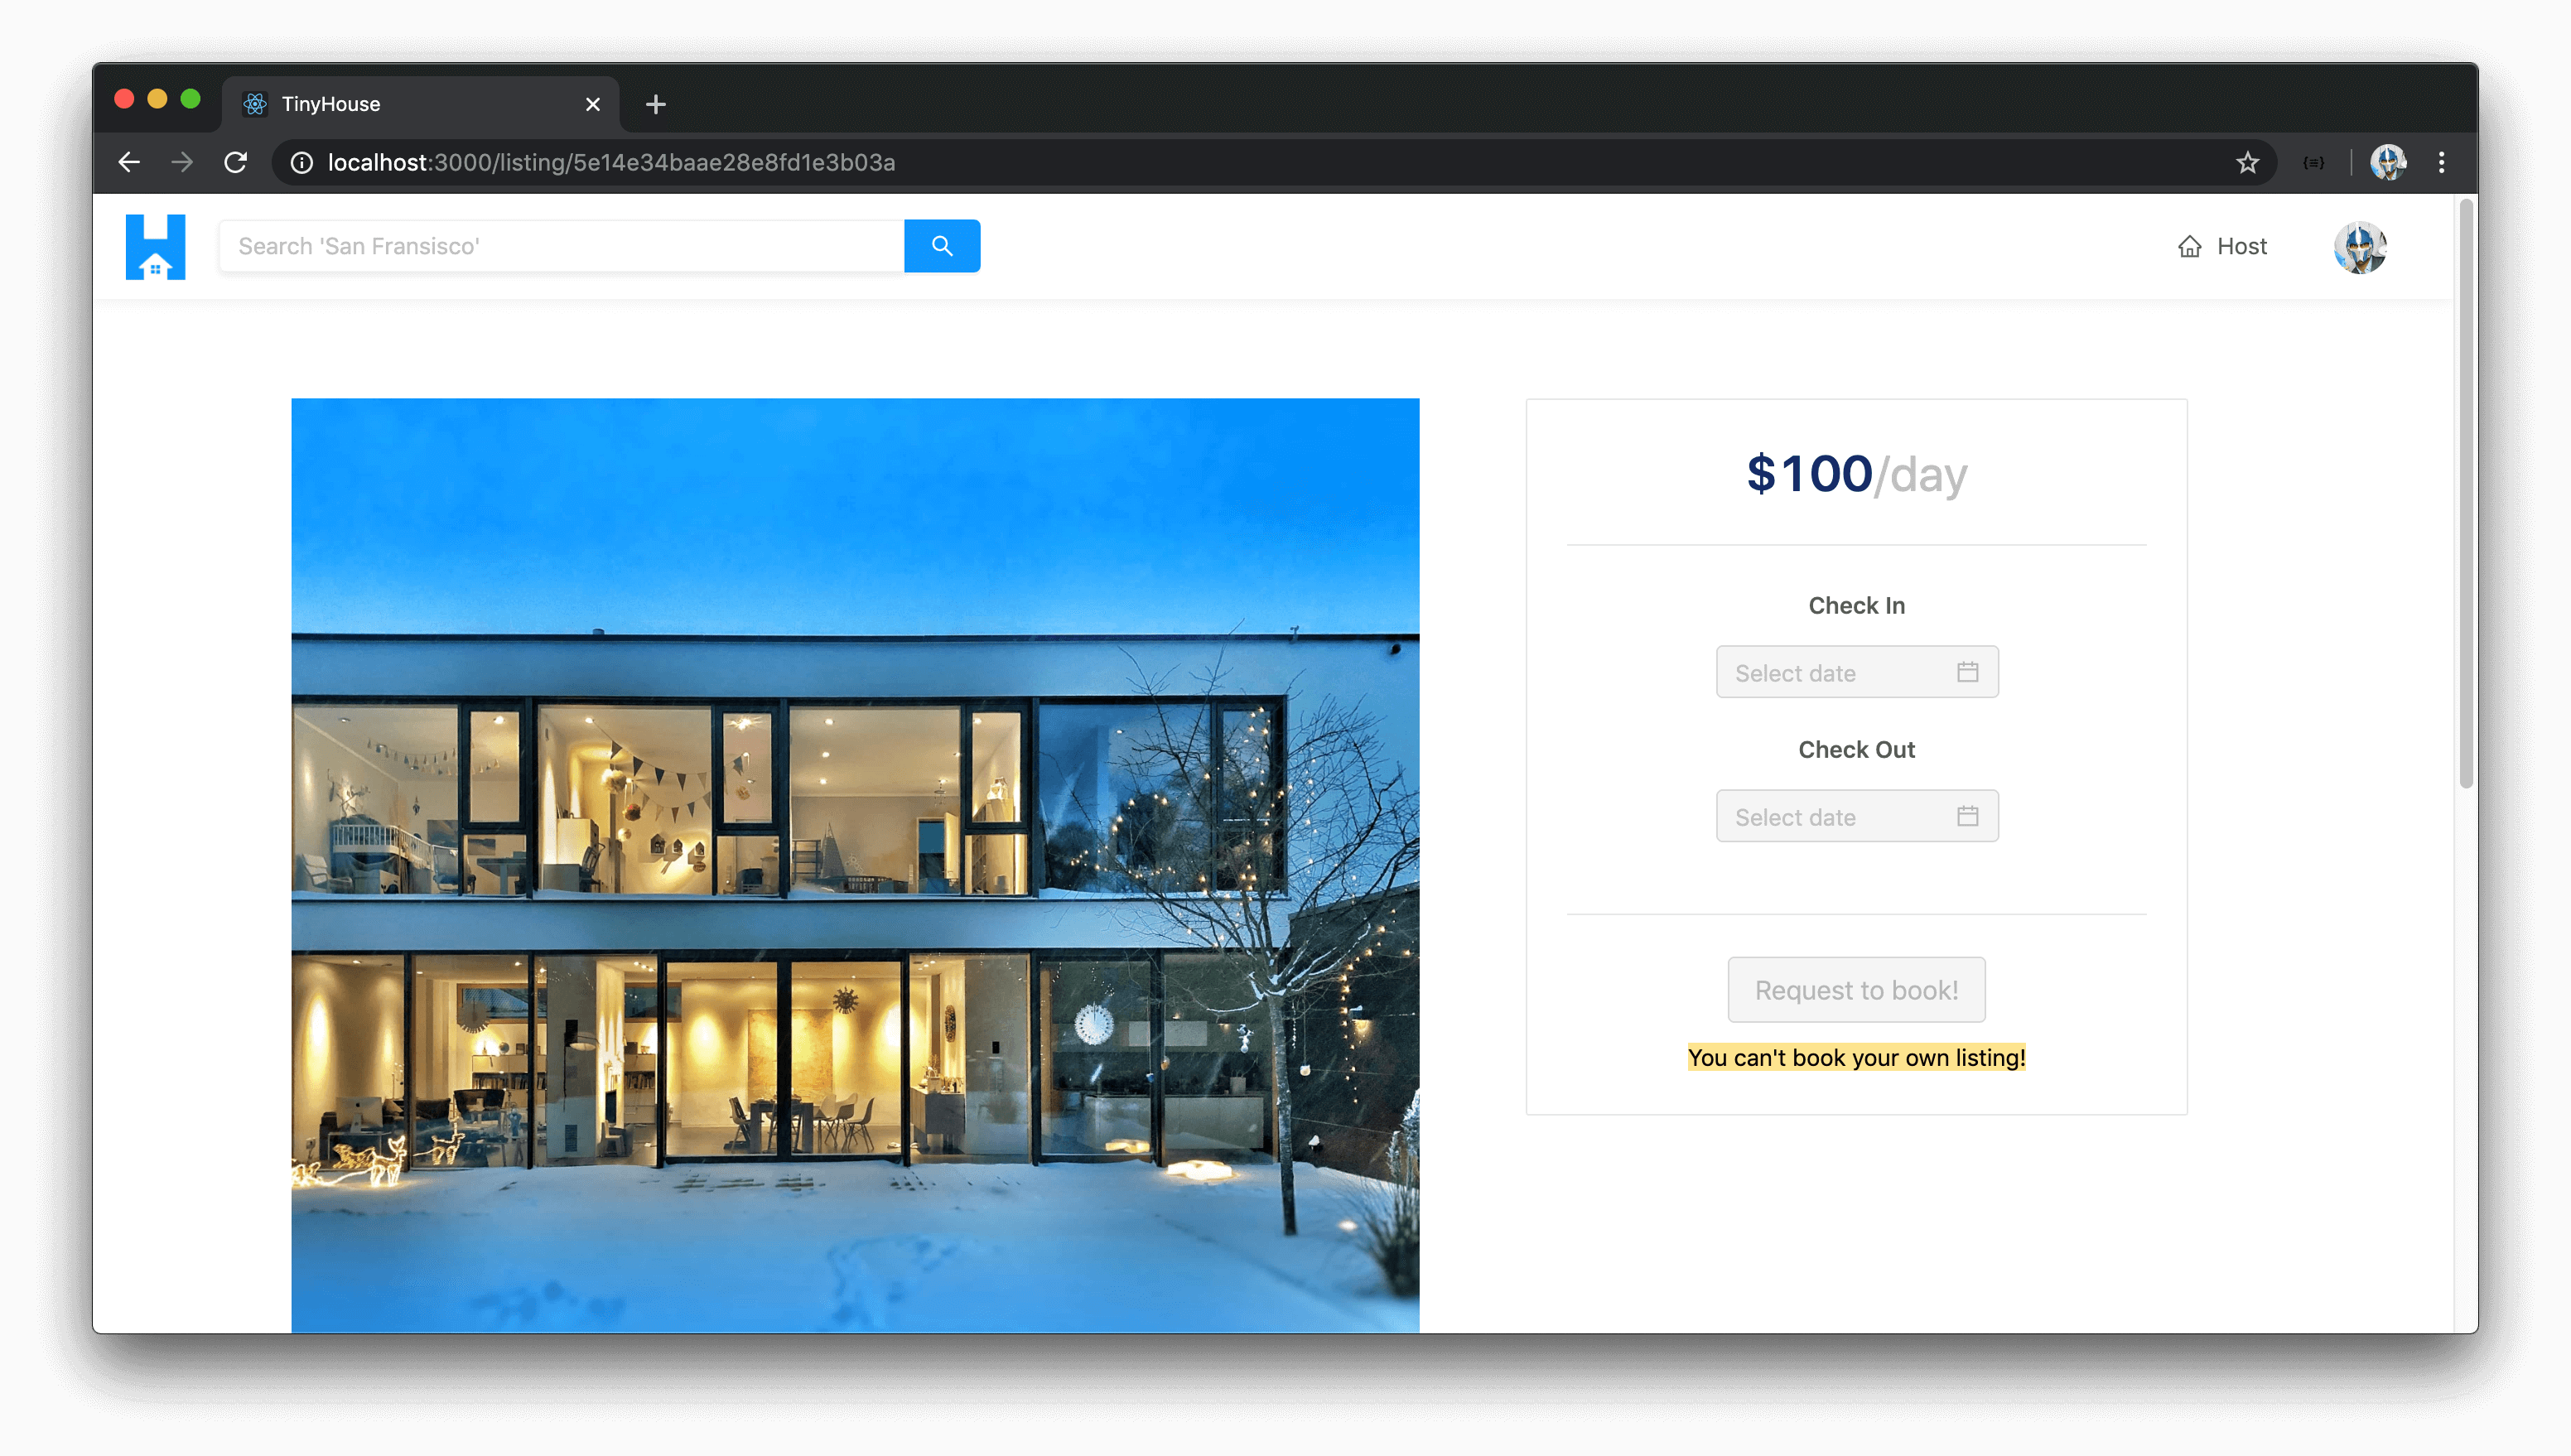
In the <ListingCreateBooking /> component, we’ll create a constant called viewerIsHost that holds true when the viewer.id matches the host.id . We’ll say the checkInInputDisabled property is true when viewerIsHost is ever true . We’ll update the buttonMessage property, in this case, to say "You can't book your own listing!" .
export const ListingCreateBooking = (/* ... */) => {
  // ...

  const viewerIsHost = viewer.id === host.id;
  const checkInInputDisabled = !viewer.id || viewerIsHost;
  const checkOutInputDisabled = checkInInputDisabled || !checkInDate;
  const buttonDisabled = checkOutInputDisabled || !checkInDate || !checkOutDate;

  let buttonMessage = "You won't be charged yet";
  if (!viewer.id) {
    buttonMessage = "You have to be signed in to book a listing!";
  } else if (viewerIsHost) {
    buttonMessage = "You can't book your own listing!";
  }

  return (
    // ...
  );
};
If we were to launch the listing page of one of our recently create listings, we’ll see that we’re unable to check-in or check-out to make a booking and we’re presented with the message - "You can't book your own listing!" .
Prevent booking when host has disconnected from Stripe
The last thing we’ll consider here is when a viewer attempts to book a listing where the host has disconnected from Stripe . This will be fairly simple to check for and we can use the hasWallet field within the host object. In the database, a user document has the walletId field that is populated when a user has connected with Stripe. In our GraphQL API, we’ve mentioned the client wouldn’t necessarily need to know the actual walletId value so we instead return a boolean called hasWallet .
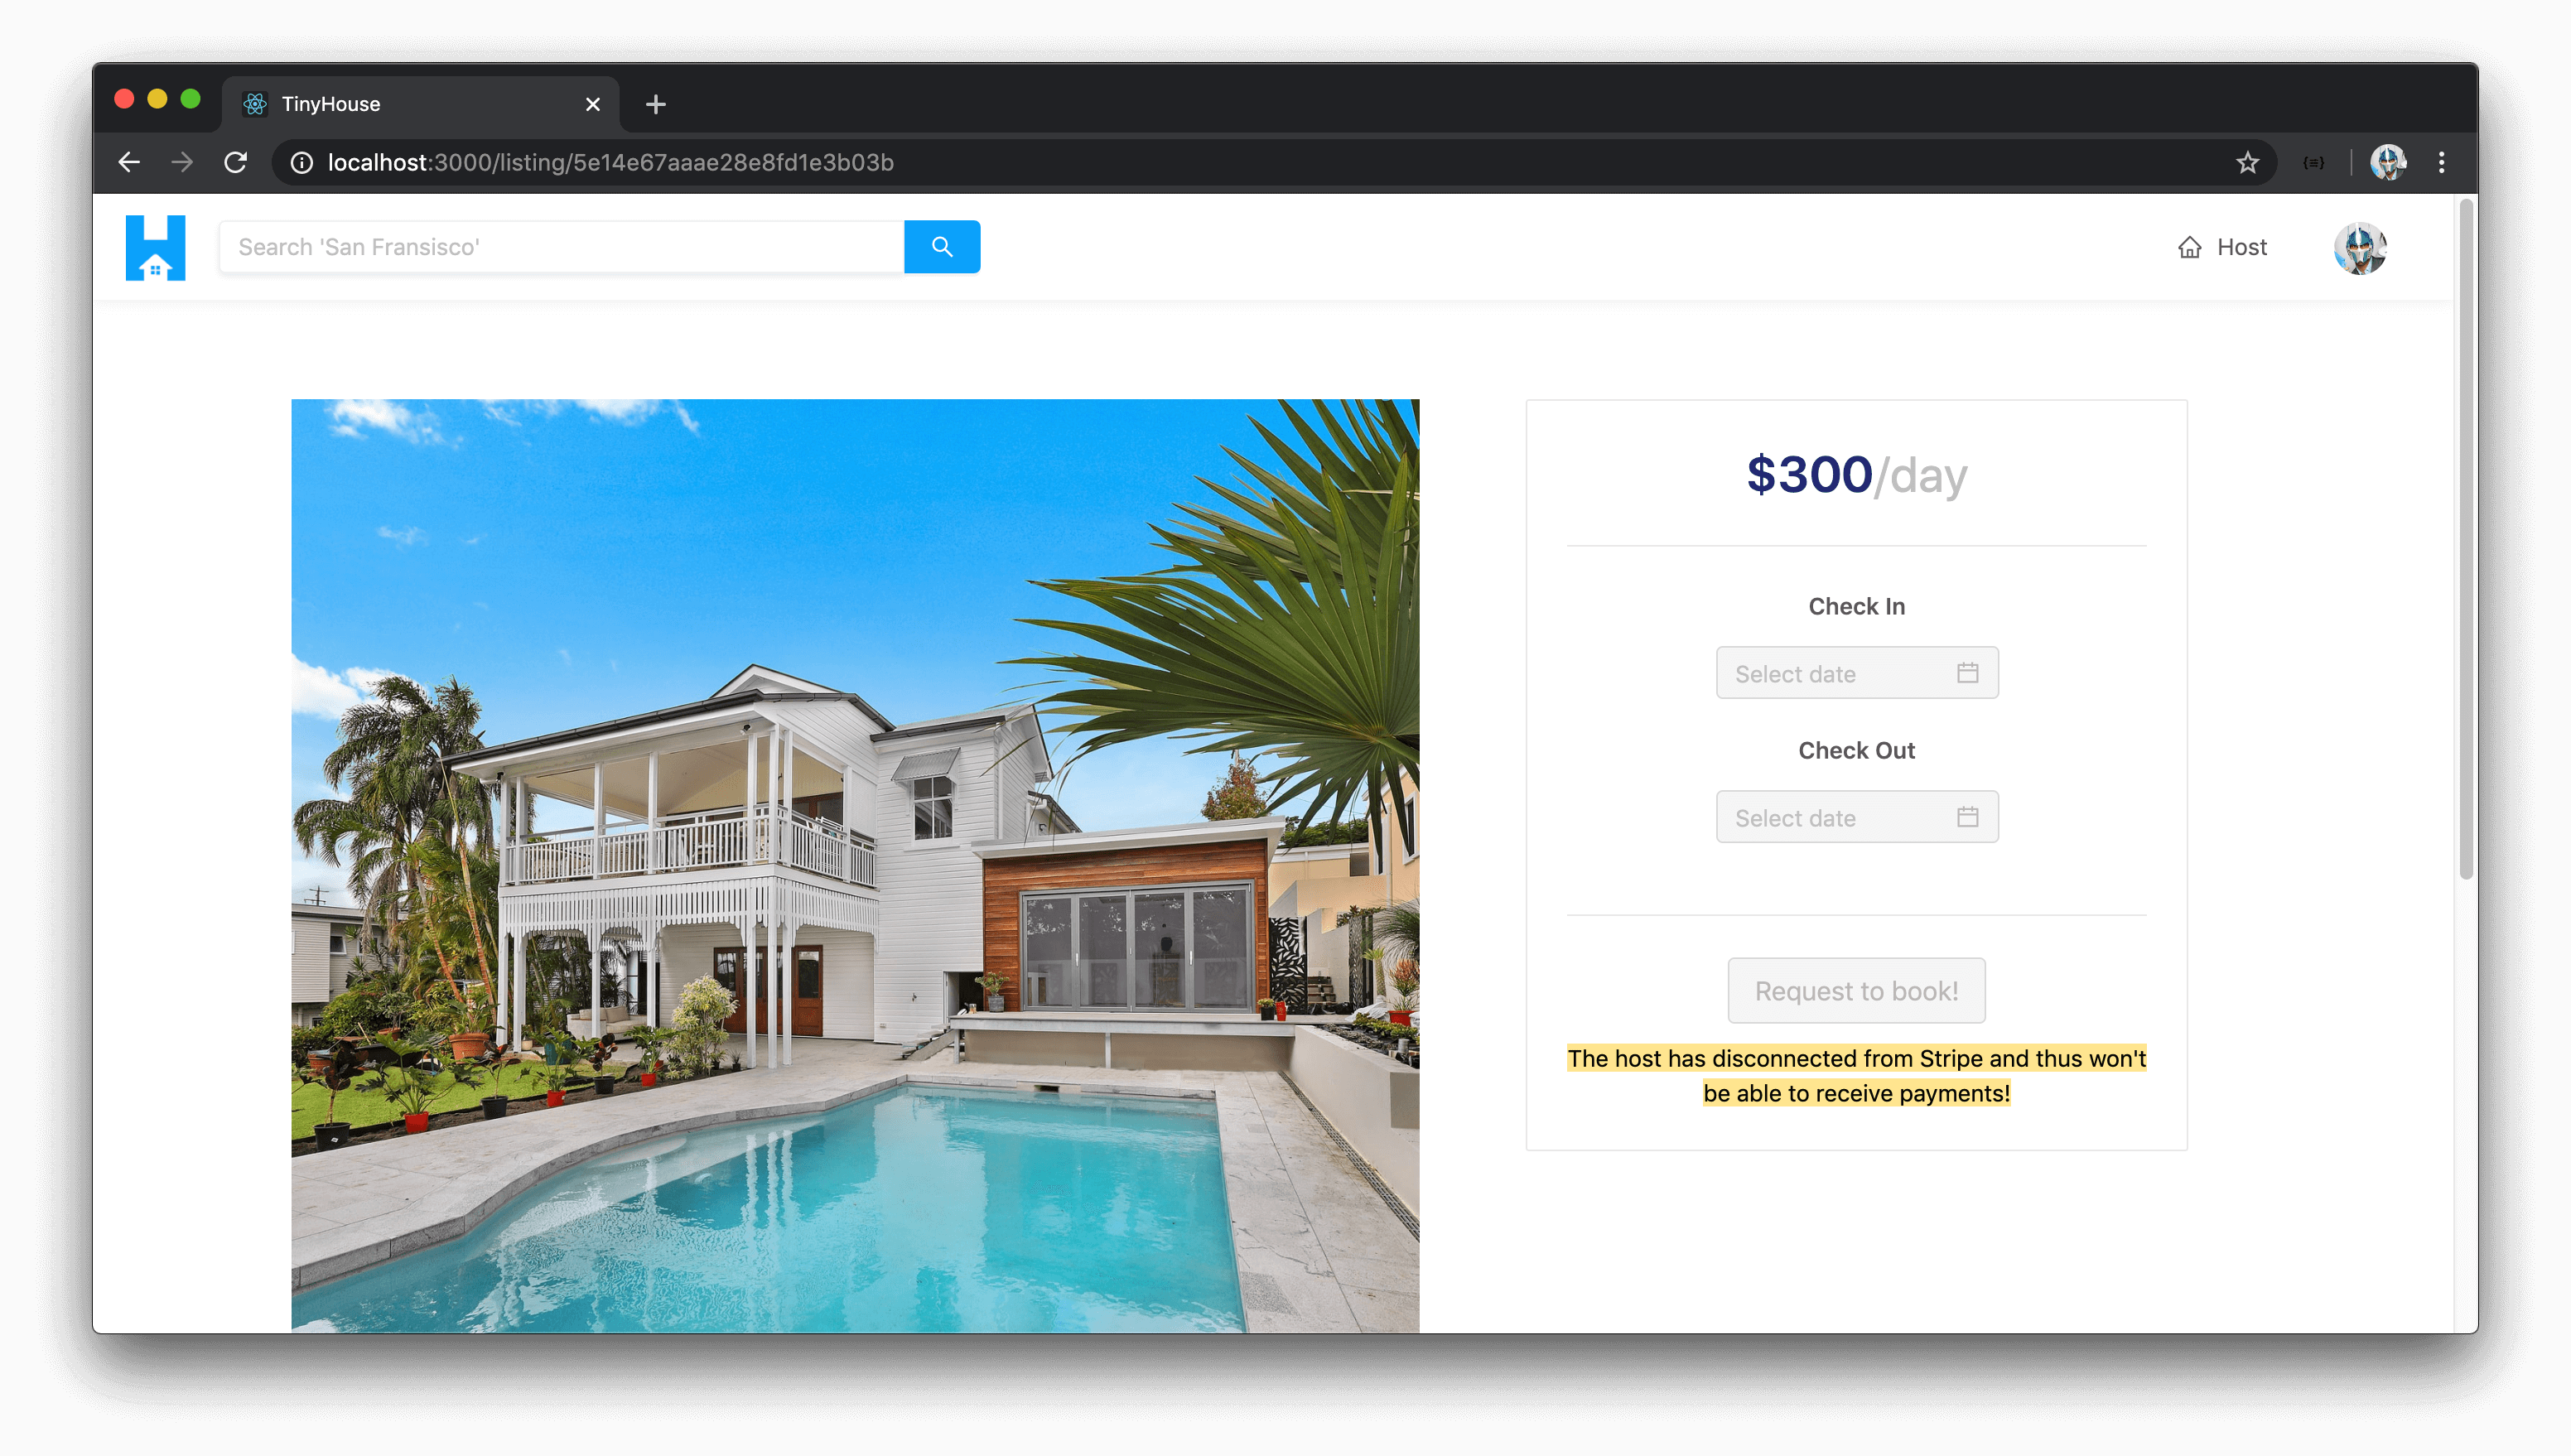
We’ll have the checkInInputDisabled constant also be true if the hasWallet field within the host object doesn’t exist. In this condition, we’ll place a message that says "The host has disconnected from Stripe and thus won't be able to receive payments." .
export const ListingCreateBooking = (/* ... */) => {
  // ...

  const viewerIsHost = viewer.id === host.id;
  const checkInInputDisabled = !viewer.id || viewerIsHost || !host.hasWallet;
  const checkOutInputDisabled = checkInInputDisabled || !checkInDate;
  const buttonDisabled = checkOutInputDisabled || !checkInDate || !checkOutDate;

  let buttonMessage = "You won't be charged yet";
  if (!viewer.id) {
    buttonMessage = "You have to be signed in to book a listing!";
  } else if (viewerIsHost) {
    buttonMessage = "You can't book your own listing!";
  } else if (!host.hasWallet) {
    buttonMessage =
      "The host has disconnected from Stripe and thus won't be able to receive payments.";
  }

  return (
    // ...
  );
};
To test this out, we can create a listing with an account that is logged-in and connected with Stripe. We’ll then have the account disconnect from Stripe and log-in with another user account that will attempt to book the listing created by the former account. In this condition, we’ll notice that the datepicker inputs are disabled and we’re presented with the message that says "The host has disconnected from Stripe" .
DISABLE DATES THAT HAVE BEEN BOOKED
The last thing we’ll handle in this lesson is to make sure the dates that have already been booked for the listing is disabled in the datepicker elements . The bookingsIndex object is available in the listing data object available in the parent that is to contain information about the dates that have been booking in a listing. In the <Listing /> component, we’ll pass a prop called bookingsIndex with the value being the listing.bookingsIndex object.
export const Listing = ({ viewer, match }: Props & RouteComponentProps<MatchParams>) => {
  // ...

  const listingCreateBookingElement = listing ? (
    <ListingCreateBooking
      viewer={viewer}
      host={listing.host}
      price={listing.price}
      bookingsIndex={listing.bookingsIndex}
      checkInDate={checkInDate}
      checkOutDate={checkOutDate}
      setCheckInDate={setCheckInDate}
      setCheckOutDate={setCheckOutDate}
    />
  ) : null;

  return (
    // ...
  )
};
In the <ListingCreateBooking /> component, we’ll want to declare that the component is to accept the bookingsIndex prop. We’ll specify the type of the prop for the type of the bookingsIndex field within the listing object from our GraphQL data.
interface Props {
  viewer: Viewer;
  host: ListingData["listing"]["host"];
  price: number;
  bookingsIndex: ListingData["listing"]["bookingsIndex"];
  // ...
}
export const ListingCreateBooking = ({
  viewer,
  host,
  price,
  bookingsIndex,
  checkInDate,
  checkOutDate,
  setCheckInDate,
  setCheckOutDate
}: Props) => {
  // ...
};
The bookingsIndex field is sent as a string from the server to the client. At the beginning of the <ListingCreateBooking /> component, we’ll specify a new constant called bookingsIndexJSON that is an object representation of the string. We can achieve this with the help of the JSON.parse() function available in JavaScript.
export const ListingCreateBooking = (/* ...*/) => {
  const bookingsIndexJSON = JSON.parse(bookingsIndex);

  // ...
};
The JSON.parse() function doesn’t tell us what the type of the returned property is going to be. To ensure we’re taking advantage of TypeScript, let’s look to define a type for the bookingsIndexJSON constant. We’ll do this in a types.ts file adjacent to the index.tsx file where the <ListingCreateBooking /> component is being built.
client/
  src/
    // ...
    sections/
      Listing/
        components/
          // ...
          ListingCreateBooking/
            // ...
            types.ts
          // ...
      // ...
    // ...
  // ...
In the src/sections/Listing/components/ListingCreateBooking/types.ts file, we’ll export and create an interface called BookingsIndex that essentially resembles the shape of the bookingsIndexJSON object within a listing. It will be very similar to what we had on the server. It’ll be a key-value pair that has two nested objects. The first one will be the BookingsIndexYear interface that is to have another nested key-value pair for BookingsIndexMonth . The BookingsIndexMonth interface will be a key-value pair with the values being boolean .
client/src/sections/Listing/components/ListingCreateBooking/types.ts
interface BookingsIndexMonth {
  [key: string]: boolean;
}

interface BookingsIndexYear {
  [key: string]: BookingsIndexMonth;
}

export interface BookingsIndex {
  [key: string]: BookingsIndexYear;
}
In the adjacent index file, we’ll import the BookingsIndex interface.
client/src/sections/Listing/components/ListingCreateBooking/index.tsx
import { BookingsIndex } from "./types";
And assign BookingsIndex as the type of the bookingsIndexJSON constant.
client/src/sections/Listing/components/ListingCreateBooking/index.tsx
const bookingsIndexJSON: BookingsIndex = JSON.parse(bookingsIndex);
The disabledDate() function, in the <ListingCreateBooking /> component we created before, is a function to dictate which dates should be disabled in both our check-in and check-out date pickers.
When the iterated date value in the disabledDate() function exists and in the return statement, we can say the function will return true (i.e. date will be disabled) when the date is before end of today or when a date is booked . We’ll determine that the date is booked by passing the iterated date object to another function we’ll shortly create called dateIsBooked() .
client/src/sections/Listing/components/ListingCreateBooking/index.tsx
  const disabledDate = (currentDate?: Moment) => {
    if (currentDate) {
      const dateIsBeforeEndOfDay = currentDate.isBefore(moment().endOf("day"));

      return dateIsBeforeEndOfDay || dateIsBooked(currentDate);
    } else {
      return false;
    }
  };
The dateIsBooked() function would accept the currentDate property which should be of type Moment and will check that the year, month, and day value of this currentDate property within bookingsIndexJSON isn’t truthy.
client/src/sections/Listing/components/ListingCreateBooking/index.tsx
  const dateIsBooked = (currentDate: Moment) => {
    const year = moment(currentDate).year();
    const month = moment(currentDate).month();
    const day = moment(currentDate).date();

    if (bookingsIndexJSON[year] && bookingsIndexJSON[year][month]) {
      return Boolean(bookingsIndexJSON[year][month][day]);
    } else {
      return false;
    }
  };
We’re not done yet! Right now, a user can still pick overlapping bookings by picking a check-in date before a previous booking and then picking a check-out date after the previous booking. Therefore, we will need some functionality to loop through each date the user is trying to book and ensure none of them have been booked in between.
We have a method already called verifyAndSetCheckOutDate() that we use to provide an additional check to verify the user is selecting a valid check-out date. In this function, we’ll look to add an additional check to prevent overlapping bookings. Similar to what we did on the server, we’ll use a dateCursor which will start at the beginning (i.e. checkInDate ) and we’ll simply loop through the dates between check-in and check-out and try to see if any of these dates have already been booked. If any dates between check-in and check-out are booked, we’ll fire an error message notifying the user and return early.
const verifyAndSetCheckOutDate = (selectedCheckOutDate: Moment | null) => {
  if (checkInDate && selectedCheckOutDate) {
    if (moment(selectedCheckOutDate).isBefore(checkInDate, "days")) {
      return displayErrorMessage(
        `You can't book date of check out to be prior to check in!`
      );
    }

    let dateCursor = checkInDate;

    while (moment(dateCursor).isBefore(selectedCheckOutDate, "days")) {
      dateCursor = moment(dateCursor).add(1, "days");

      const year = moment(dateCursor).year();
      const month = moment(dateCursor).month();
      const day = moment(dateCursor).date();

      if (
        bookingsIndexJSON[year] &&
        bookingsIndexJSON[year][month] &&
        bookingsIndexJSON[year][month][day]
      ) {
        return displayErrorMessage(
          "You can't book a period of time that overlaps existing bookings. Please try again!"
        );
      }
    }
  }

  setCheckOutDate(selectedCheckOutDate);
};
At this moment, if bookings were made for a listing - they’ll appear as disabled date elements in each of the datepickers. If we attempt to pick a check-in and check-out date that overlapped dates that have already been booked, we’ll be prevented from doing so. We’ll confirm this when we build out the functionality to have bookings be made in our app.
With all the changes made in the <ListingCreateBooking /> component, the src/sections/Listing/components/ListingCreateBooking/index.tsx file will appear as the following:
client/src/sections/Listing/components/ListingCreateBooking/index.tsx
import React from "react";
import { Button, Card, DatePicker, Divider, Typography } from "antd";
import moment, { Moment } from "moment";
import { Listing as ListingData } from "../../../../lib/graphql/queries/Listing/__generated__/Listing";
import { displayErrorMessage, formatListingPrice } from "../../../../lib/utils";
import { Viewer } from "../../../../lib/types";
import { BookingsIndex } from "./types";

const { Paragraph, Text, Title } = Typography;

interface Props {
  viewer: Viewer;
  host: ListingData["listing"]["host"];
  price: number;
  bookingsIndex: ListingData["listing"]["bookingsIndex"];
  checkInDate: Moment | null;
  checkOutDate: Moment | null;
  setCheckInDate: (checkInDate: Moment | null) => void;
  setCheckOutDate: (checkOutDate: Moment | null) => void;
}

export const ListingCreateBooking = ({
  viewer,
  host,
  price,
  bookingsIndex,
  checkInDate,
  checkOutDate,
  setCheckInDate,
  setCheckOutDate
}: Props) => {
  const bookingsIndexJSON: BookingsIndex = JSON.parse(bookingsIndex);

  const dateIsBooked = (currentDate: Moment) => {
    const year = moment(currentDate).year();
    const month = moment(currentDate).month();
    const day = moment(currentDate).date();

    if (bookingsIndexJSON[year] && bookingsIndexJSON[year][month]) {
      return Boolean(bookingsIndexJSON[year][month][day]);
    } else {
      return false;
    }
  };

  const disabledDate = (currentDate?: Moment) => {
    if (currentDate) {
      const dateIsBeforeEndOfDay = currentDate.isBefore(moment().endOf("day"));

      return dateIsBeforeEndOfDay || dateIsBooked(currentDate);
    } else {
      return false;
    }
  };

  const verifyAndSetCheckOutDate = (selectedCheckOutDate: Moment | null) => {
    if (checkInDate && selectedCheckOutDate) {
      if (moment(selectedCheckOutDate).isBefore(checkInDate, "days")) {
        return displayErrorMessage(
          `You can't book date of check out to be prior to check in!`
        );
      }

      let dateCursor = checkInDate;

      while (moment(dateCursor).isBefore(selectedCheckOutDate, "days")) {
        dateCursor = moment(dateCursor).add(1, "days");

        const year = moment(dateCursor).year();
        const month = moment(dateCursor).month();
        const day = moment(dateCursor).date();

        if (
          bookingsIndexJSON[year] &&
          bookingsIndexJSON[year][month] &&
          bookingsIndexJSON[year][month][day]
        ) {
          return displayErrorMessage(
            "You can't book a period of time that overlaps existing bookings. Please try again!"
          );
        }
      }
    }

    setCheckOutDate(selectedCheckOutDate);
  };

  const viewerIsHost = viewer.id === host.id;
  const checkInInputDisabled = !viewer.id || viewerIsHost || !host.hasWallet;
  const checkOutInputDisabled = checkInInputDisabled || !checkInDate;
  const buttonDisabled = checkOutInputDisabled || !checkInDate || !checkOutDate;

  let buttonMessage = "You won't be charged yet";
  if (!viewer.id) {
    buttonMessage = "You have to be signed in to book a listing!";
  } else if (viewerIsHost) {
    buttonMessage = "You can't book your own listing!";
  } else if (!host.hasWallet) {
    buttonMessage =
      "The host has disconnected from Stripe and thus won't be able to receive payments!";
  }

  return (
    <div className="listing-booking">
      <Card className="listing-booking__card">
        <div>
          <Paragraph>
            <Title level={2} className="listing-booking__card-title">
              {formatListingPrice(price)}
              <span>/day</span>
            </Title>
          </Paragraph>
          <Divider />
          <div className="listing-booking__card-date-picker">
            <Paragraph strong>Check In</Paragraph>
            <DatePicker
              value={checkInDate ? checkInDate : undefined}
              format={"YYYY/MM/DD"}
              showToday={false}
              disabled={checkInInputDisabled}
              disabledDate={disabledDate}
              onChange={dateValue => setCheckInDate(dateValue)}
              onOpenChange={() => setCheckOutDate(null)}
            />
          </div>
          <div className="listing-booking__card-date-picker">
            <Paragraph strong>Check Out</Paragraph>
            <DatePicker
              value={checkOutDate ? checkOutDate : undefined}
              format={"YYYY/MM/DD"}
              showToday={false}
              disabled={checkOutInputDisabled}
              disabledDate={disabledDate}
              onChange={dateValue => verifyAndSetCheckOutDate(dateValue)}
            />
          </div>
        </div>
        <Divider />
        <Button
          disabled={buttonDisabled}
          size="large"
          type="primary"
          className="listing-booking__card-cta"
        >
          Request to book!
        </Button>
        <Text type="secondary" mark>
          {buttonMessage}
        </Text>
      </Card>
    </div>
  );
};
In the next few lessons, we’ll create the confirmation modal and we’ll conduct the createBooking mutation when the user provides valid payment information. Great job so far!
CREATING THE BOOKING CONFIRMATION MODAL
Diagram from Stripe documentation on the Flow of funds with fees when a direct charge is made in a Stripe Connect setting can be found - here.
In this lesson, let’s look to prepare the modal that gets displayed to the user when the "Request to book" button has been selected in the booking section within the /listing/:id page. Modal dialogs are helpful since they often allow us to create a new floating layer over a certain page to get user feedback or display information without having the need to interrupt a user’s workflow. We’ll be using the Ant Design <Modal /> component to help facilitate this for us.
We’ll create the confirmation modal within a component of its own that we’ll call <ListingCreateBookingModal /> . We’ll prepare this component folder within the components/ folder in the src/sections/Listing/ directory.
client/
  src/
    // ...
    sections/
      Listing/
        components/
          // ...
          ListingCreateBookingModal/
            index.tsx
          // ...
        // ...
      // ...
  // ...
In the src/sections/Listing/components/index.tsx file, we’ll look to re-export the soon to be created modal component.
client/src/sections/Listing/components/index.ts
export * from "./ListingCreateBookingModal";
In the <ListingCreateBookingModal /> index file, we’ll import the React library and the <Modal /> component from Ant Design. We’ll export a component function we’ll call <ListingCreateBookingModal /> .
import React from "react";
import { Modal } from "antd";

export const ListingCreateBookingModal = () => {
  return (
    // ...
  )
}
In the component return statement, we’ll look to display Ant Design’s <Modal /> component. There are a few props we’ll pass in to help prepare it the way we want it to.
There exists a visible prop that receives a boolean value to help determine when the modal should be shown or not. When the visible prop has a value of true , the modal will show and with a value of false , the modal won’t show. It’ll be helpful to have this property value kept as part of component state. We’ll have it as part of component state in the <Listing /> component that will be a parent of this modal component.
With that said, let’s assume a prop will be passed into the <ListingCreateBookingModal /> component called modalVisible which is to be a boolean and will be the value of the visible prop.
The few other props we’ll look to pass in will help have our Modal be centered - with the centered prop . We won’t want to display a footer in the modal so we’ll pass a value of null for the footer prop. The value of the onCancel prop is a callback that will trigger a function that we can use to close the modal. Let’s assume we’ll also have a function that will be passed in from the parent called setModalVisible() that will be used to update the modalVisible state property. The setModalVisible() function prop will receive a boolean and will return void . The onCancel prop will trigger and call the setModalVisible() function and pass in a value of false .
import React from "react";
import { Modal } from "antd";

interface Props {
  modalVisible: boolean;
  setModalVisible: (modalVisible: boolean) => void;
}

export const ListingCreateBookingModal = ({ modalVisible, setModalVisible }: Props) => {
  return (
    <Modal
      visible={modalVisible}
      centered
      footer={null}
      onCancel={() => setModalVisible(false)}
    ></Modal>
  );
};
Let’s look to have this component be rendered in the <Listing /> component. In the <Listing /> component, we’ll import the <ListingCreateBookingModal /> component. We’ll also create a new state property with a setter function that will help determine when this modal component will be shown. We’ll label this state property as modalVisible and initialize it with false . We’ll also destruct a function that can be used to update this state property labeled setModalVisible() .
Lastly, we’ll look to create a constant to represent the modal component and have it rendered in the <Listing /> component template. It shouldn’t matter where we render the modal since it’ll be automatically placed in the center, but we’ll have it outside of the <Row /> section.
import {
  ListingBookings,
  ListingCreateBooking,
  ListingCreateBookingModal,
  ListingDetails
} from "./components";

// ...

export const Listing = ({ viewer, match }: Props & RouteComponentProps<MatchParams>) => {
  // ...
  const [modalVisible, setModalVisible] = useState(false);

  // ...

  const listingCreateBookingModalElement = (
    <ListingCreateBookingModal
      modalVisible={modalVisible}
      setModalVisible={setModalVisible}
    />
  );

  // ...

  return (
    <Content className="listings">
      <Row gutter={24} type="flex" justify="space-between">
        <Col xs={24} lg={14}>
          {listingDetailsElement}
          {listingBookingsElement}
        </Col>
        <Col xs={24} lg={10}>
          {listingCreateBookingElement}
        </Col>
      </Row>
      {listingCreateBookingModalElement}
    </Content>
  );
};
To have this modal be shown, we’ll need the modalVisible state property in the <Listing /> component be true . We want the "Request to Book" button action in the <ListingCreateBooking/> component to facilitate the launching of the modal. As a result, we’ll pass the setModalVisible() setter function in the <Listing /> component down to the <ListingCreateBooking /> component.
export const Listing = ({ viewer, match }: Props & RouteComponentProps<MatchParams>) => {
  // ...
  const [modalVisible, setModalVisible] = useState(false);

  // ...

  const listingCreateBookingElement = listing ? (
    <ListingCreateBooking
      viewer={viewer}
      host={listing.host}
      price={listing.price}
      bookingsIndex={listing.bookingsIndex}
      checkInDate={checkInDate}
      checkOutDate={checkOutDate}
      setCheckInDate={setCheckInDate}
      setCheckOutDate={setCheckOutDate}
      setModalVisible={setModalVisible}
    />
  ) : null;

  // ...
  return (
    // ...
  );
};
In the <ListingCreateBooking /> component, we’ll specify the setModalVisible prop that is to be passed down. In the "Request to Book" button, we’ll add the onClick prop which will trigger a callback and call the setModalVisible() function and pass a value of true .
interface Props {
  // ...
  setModalVisible: (modalVisible: boolean) => void;
}

export const ListingCreateBooking = ({
  // ...
  setModalVisible
}: Props) => {
  // ...
  return (
    <div className="listing-booking">
      <Card className="listing-booking__card">
        <div>{/* ... */}</div>
        <Divider />
        <Button
          disabled={buttonDisabled}
          size="large"
          type="primary"
          className="listing-booking__card-cta"
          onClick={() => setModalVisible(true)}
        >
          Request to book!
        </Button>
        <Text type="secondary" mark>
          {buttonMessage}
        </Text>
      </Card>
    </div>
  );
};
Let’s see how this would currently behave. We’ll head to the /listing/:id page of a listing that we aim to book. We’ll pick some date values in the check-in and check-out datepicker input to have our button be enabled. When we click the "Request to book" button, the modal is shown!
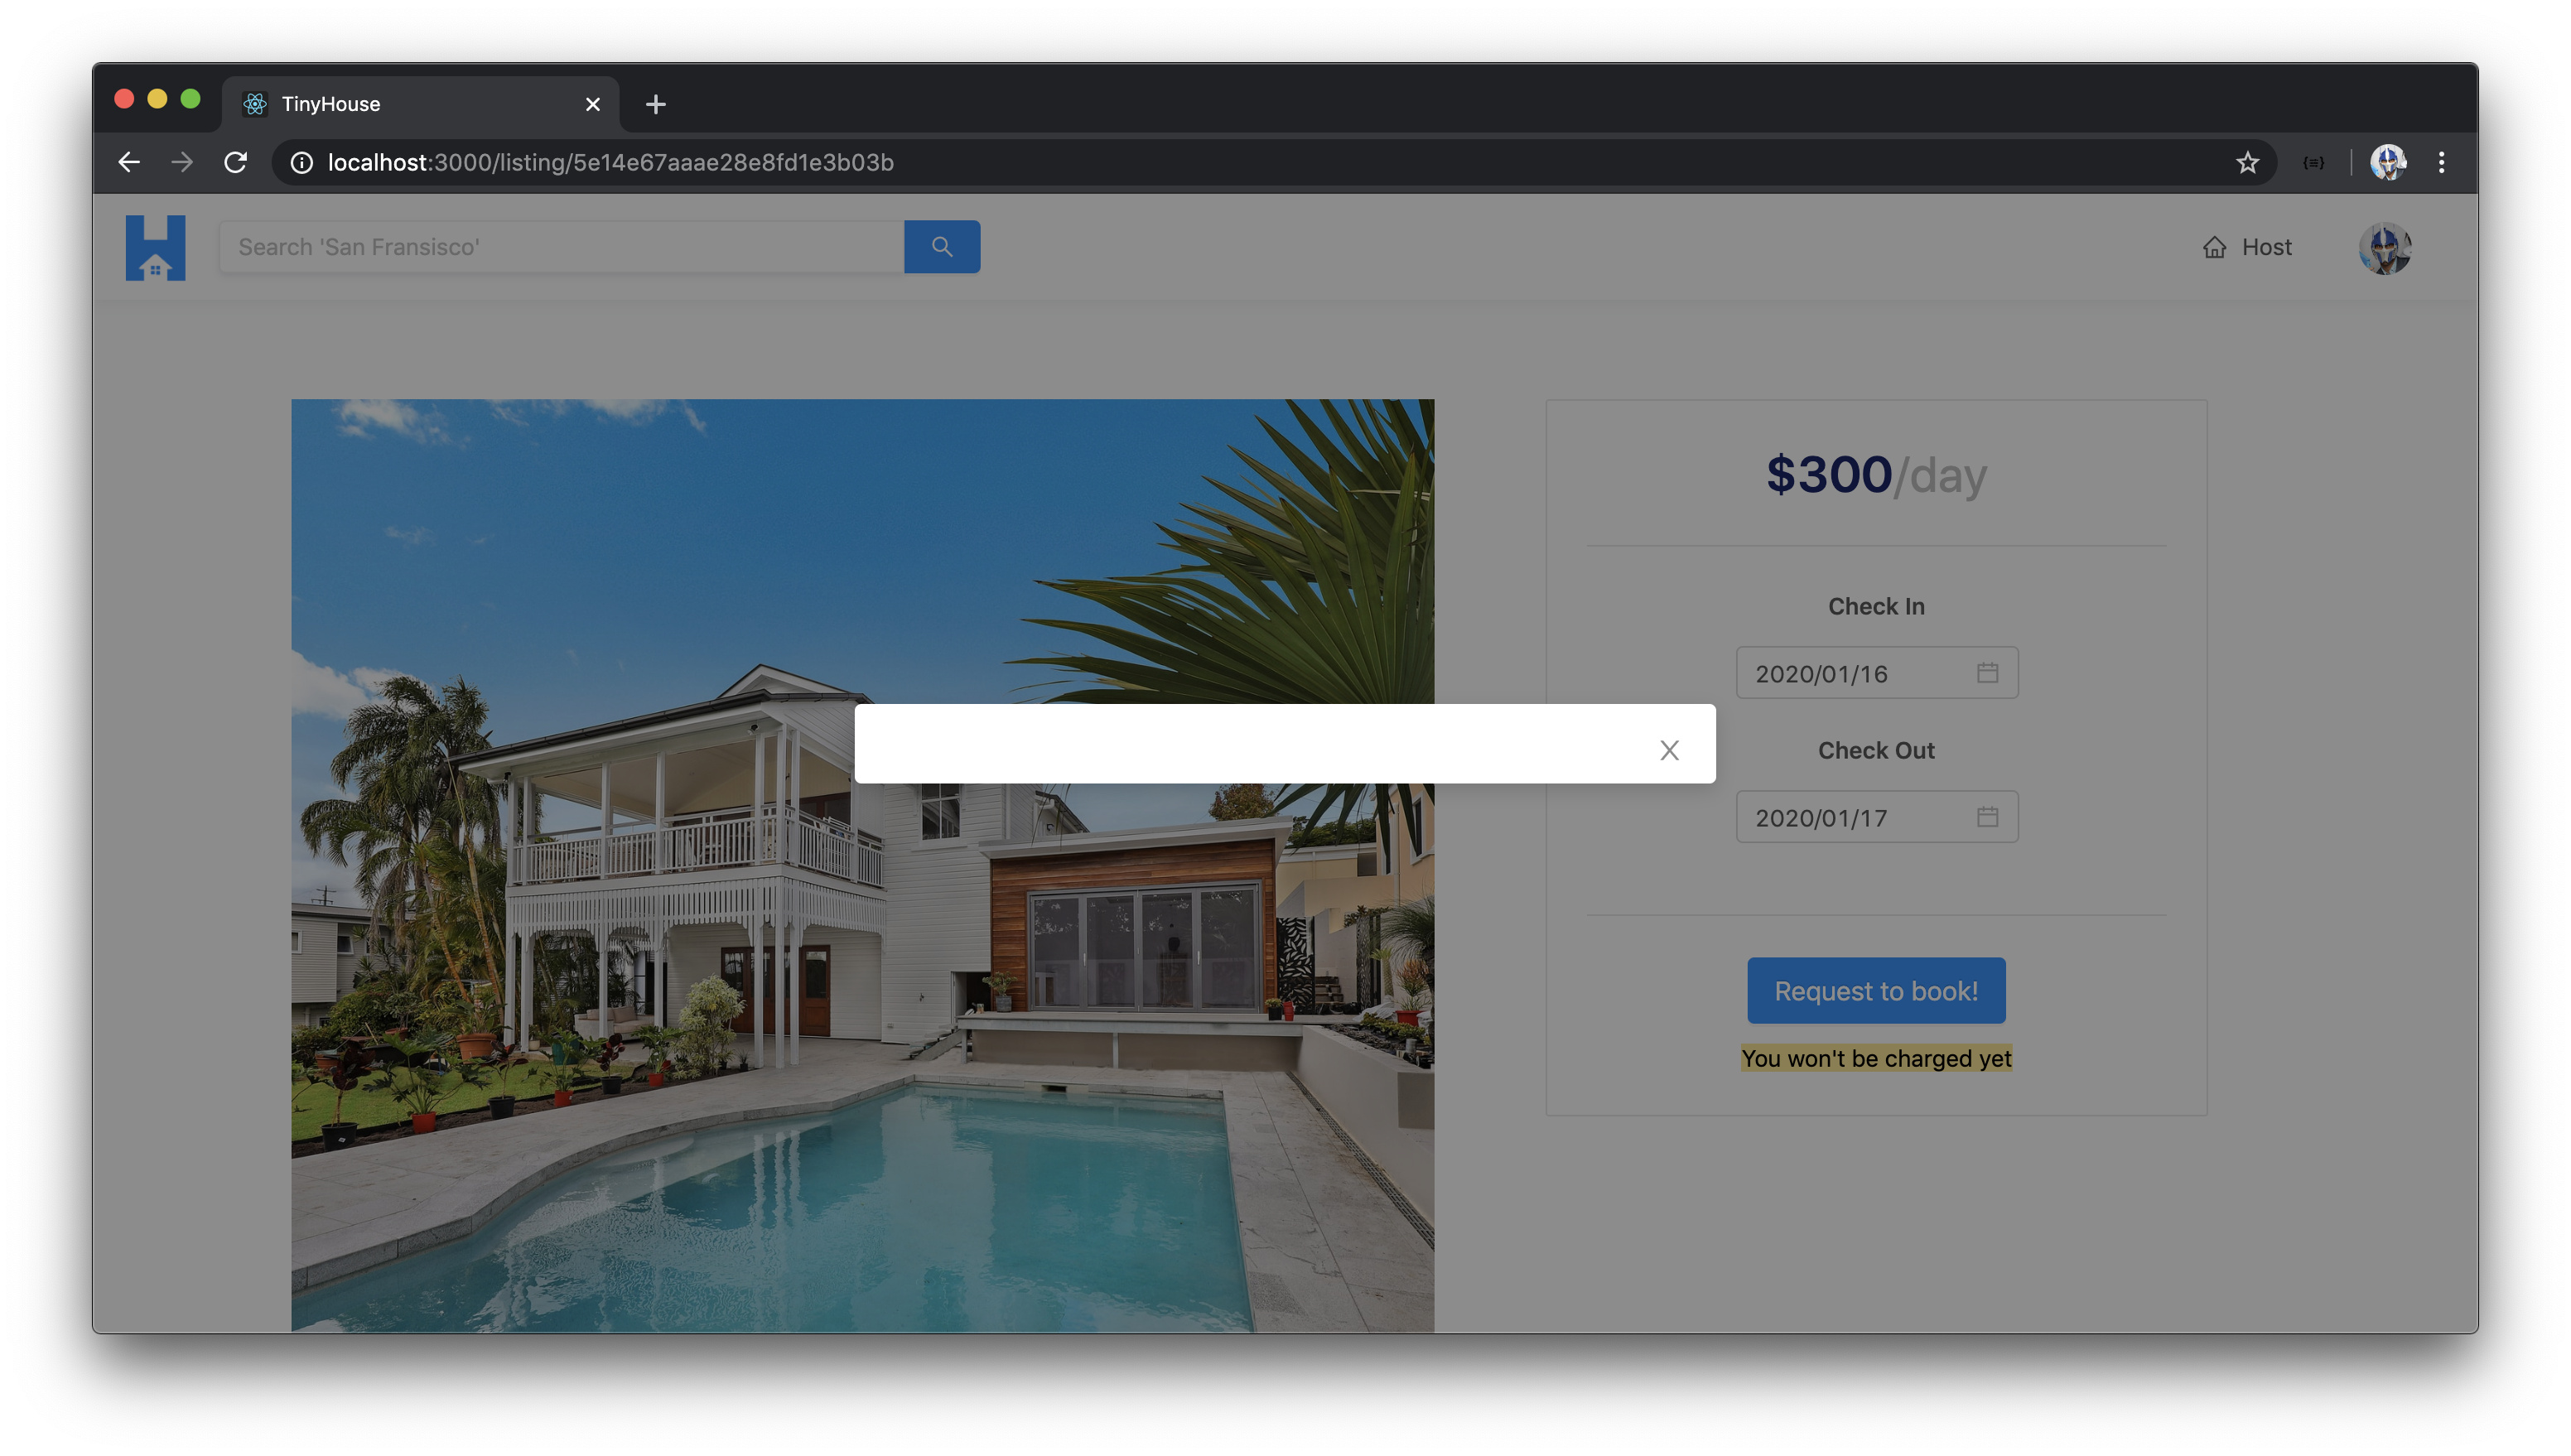
The close icon in the modal will trigger the onCancel prop callback with which we revert the modalVisible state value to false and have the modal be closed.
With the modal now being able to be shown to us, let’s look to populate it with the content we’ll expect to show. In the <ListingCreateBookingModal/> component file, there are a few components from Ant Design we’ll need to use - <Button /> , <Divider /> , <Icon /> , and <Typography /> . We’ll import these components and we’ll destruct the <Paragraph /> , <Text /> , and <Title /> components from <Typography /> .
There are a few props we’ll expect this component will receive that will help show some useful information in the modal element. These props will be the price of the listing per day which is to be a number value and the checkIn and checkOut dates selected by the user. The checkIn and checkOut props will be Moment date objects so we’ll import the appropriate interface from the moment library to define their shape.
import React from "react";
import { Button, Divider, Icon, Modal, Typography } from "antd";
import { Moment } from "moment";

interface Props {
  price: number;
  modalVisible: boolean;
  checkInDate: Moment;
  checkOutDate: Moment;
  setModalVisible: (modalVisible: boolean) => void;
}

const { Paragraph, Text, Title } = Typography;

const ListingCreateBookingModal = ({
  price,
  modalVisible,
  checkInDate,
  checkOutDate,
  setModalVisible
}: Props) => {
  // ...
};
There is a small amount of data preparation we’ll make. Between the check-in and check-out dates, we’ll be interested in getting the number of days that have been booked. With the moment library, this is fairly straightforward to do and we can use the diff() function to get the difference between two moment dates and we’ll say we’ll want it in "days" . This will give us the difference between the two days. If we recall, we’ve mentioned we’re interested in always counting the day being checked-in as an additional day, so we’ll add 1 to this.
// ...

const ListingCreateBookingModal = ({
  price,
  modalVisible,
  checkInDate,
  checkOutDate,
  setModalVisible
}: Props) => {
  const daysBooked = checkOutDate.diff(checkInDate, "days") + 1;

  return (
    // ...
  )
};
The price value to be available as a prop is to be the price of the listing per day. To determine the total price the user will pay, we’ll multiply the price per day with the number of days being booked.
// ...

const ListingCreateBookingModal = ({
  price,
  modalVisible,
  checkInDate,
  checkOutDate,
  setModalVisible
}: Props) => {
  const daysBooked = checkOutDate.diff(checkInDate, "days") + 1;
  const listingPrice = price * daysBooked;

  return (
    // ...
  )
};
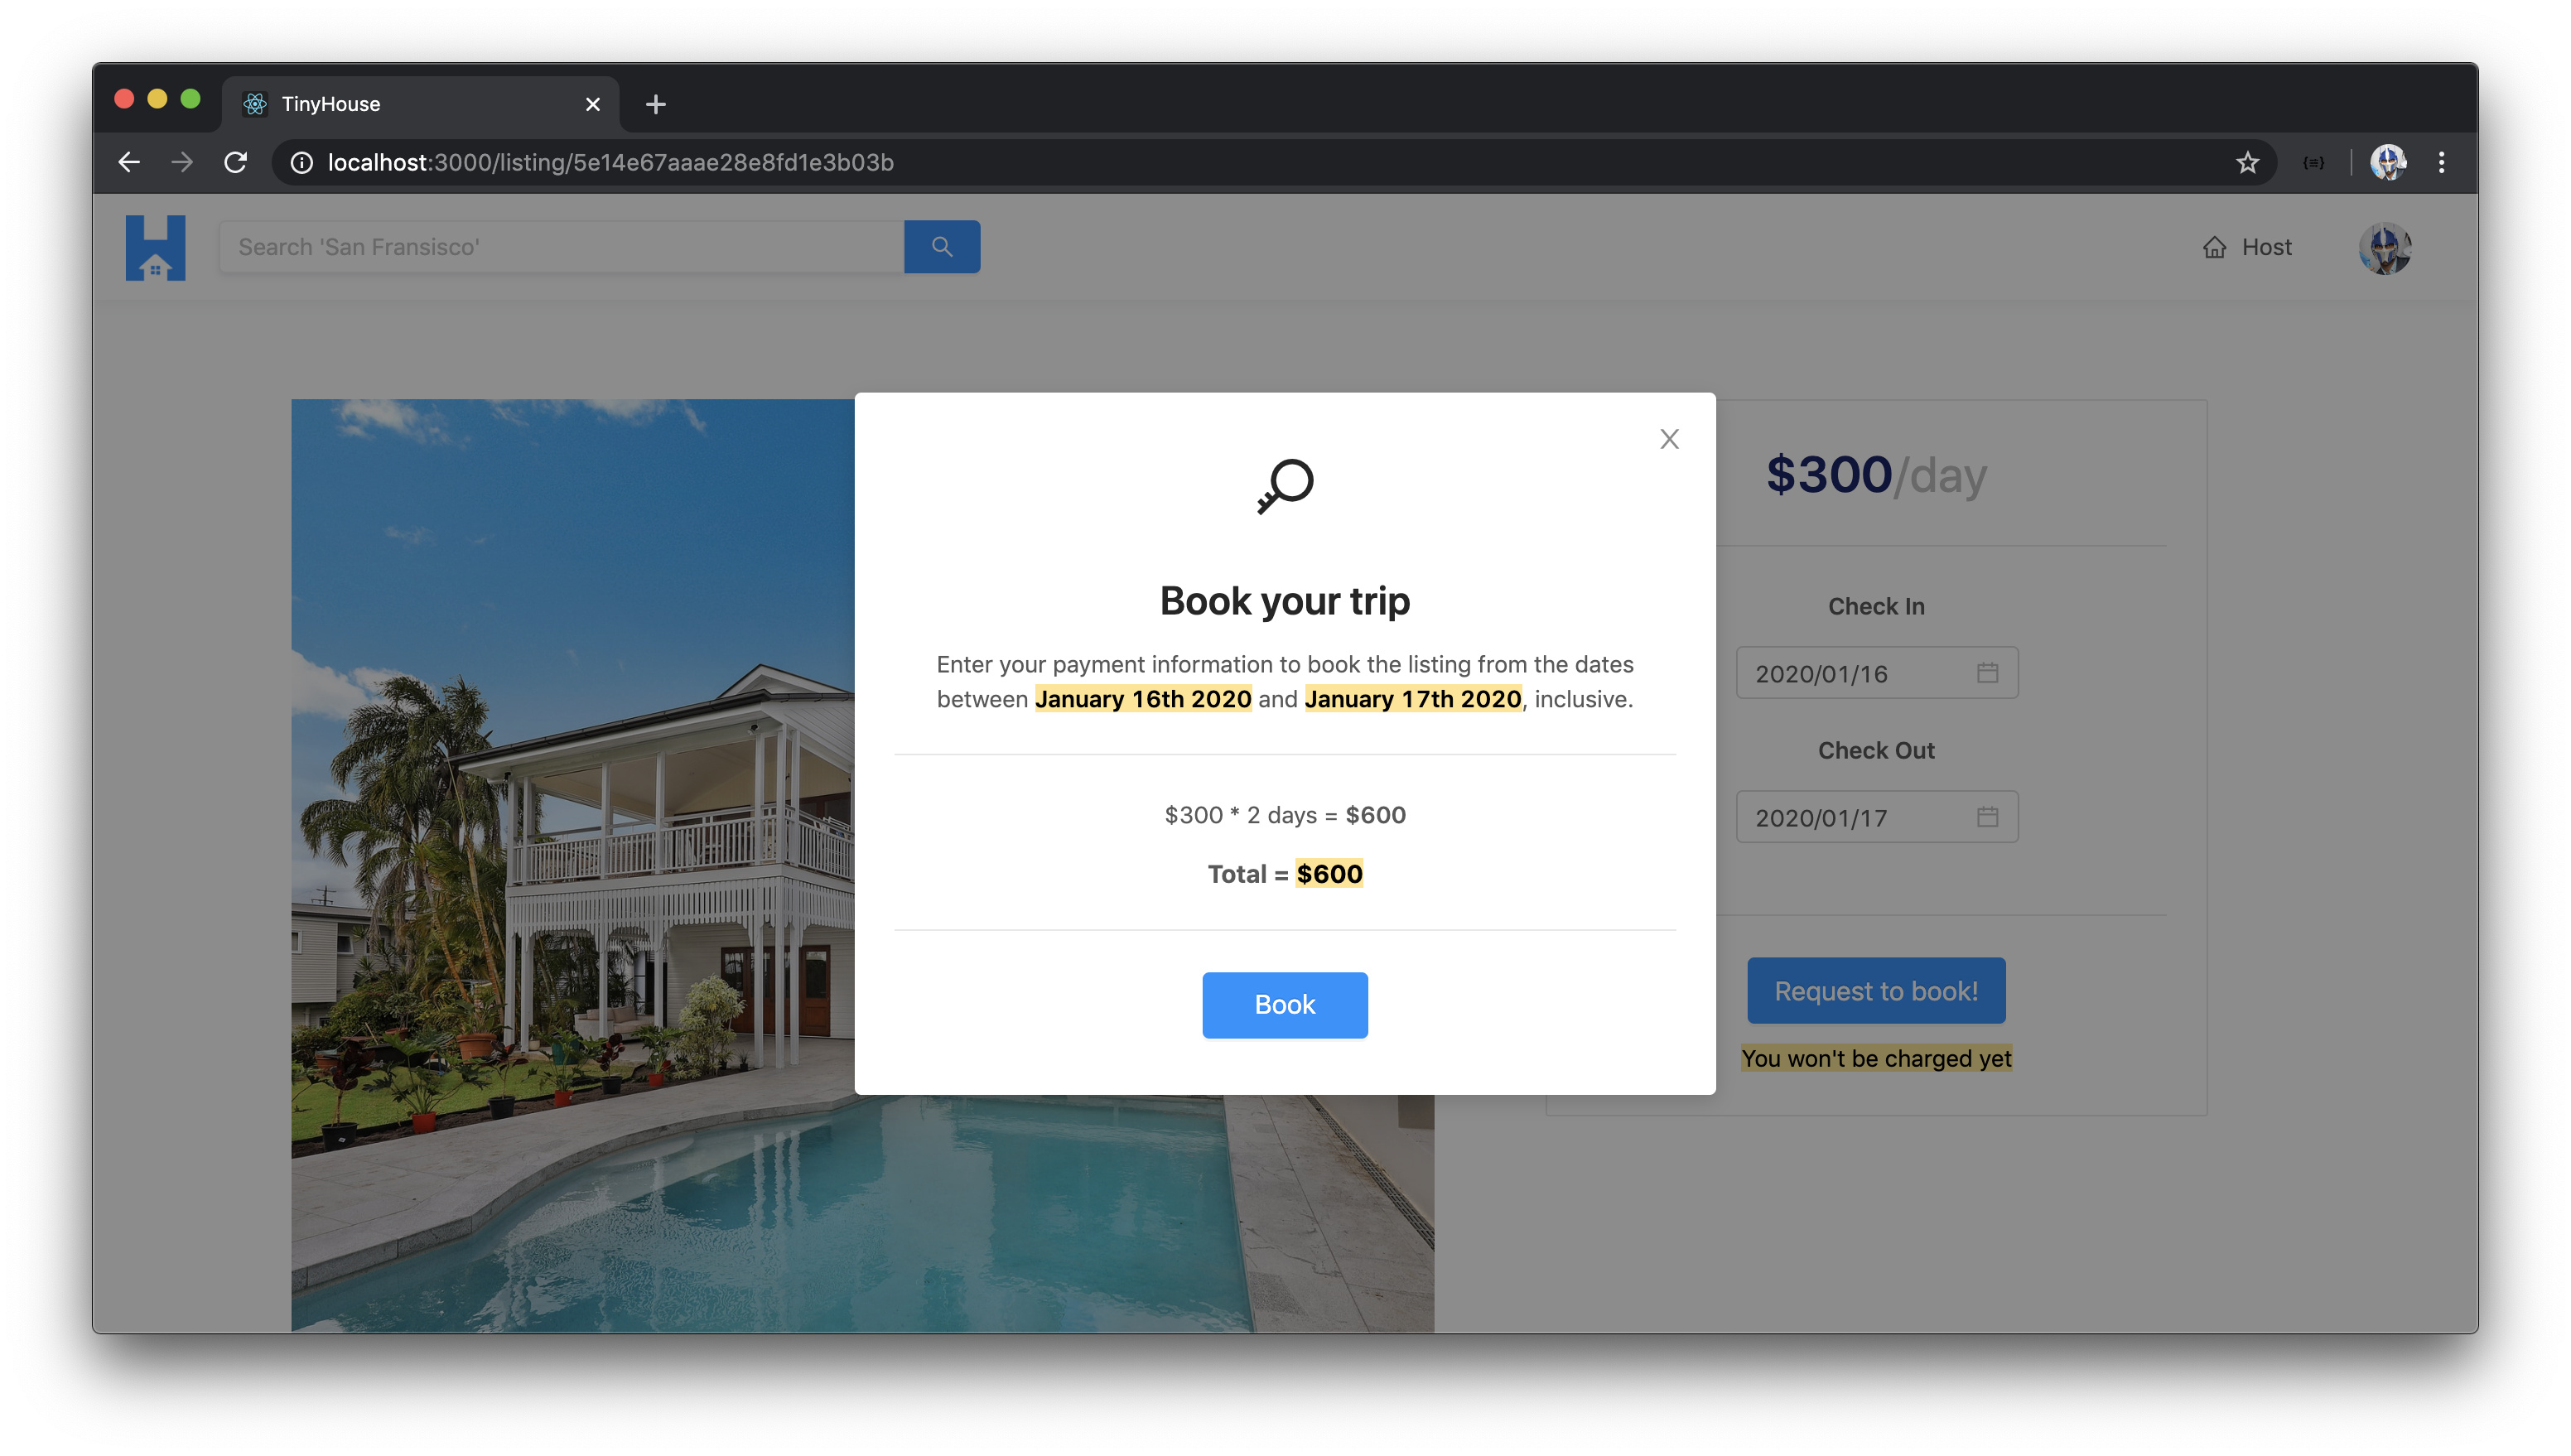
We’ll now prepare the template of the <ListingCreateBookingModal /> component. We’ll display a <Title /> that will show just an icon of a key. We’ll have this followed with another <Title /> that says "Book your trip" . We’ll have a <Paragraph /> that says "Enter your payment information to book the listing from the dates between" . Within this <Paragraph /> is where we’ll want to show the check-in and check-out dates. To have the dates displayed as strings in the format "MMMM Do YYYY" , we’ll use the moment.format() function. In the paragraph section, we’ll place the dates within <Text /> components that have the strong and mark prop. We’ll also import the moment function from the moment library.
With these changes, the <ListingCreateBookingModal /> component will appear as follows:
// ...

const ListingCreateBookingModal = ({
  price,
  modalVisible,
  checkInDate,
  checkOutDate,
  setModalVisible
}: Props) => {
  const daysBooked = checkOutDate.diff(checkInDate, "days") + 1;
  const listingPrice = price * daysBooked;

  return (
    <Modal
      visible={modalVisible}
      centered
      footer={null}
      onCancel={() => setModalVisible(false)}
    >
      <div className="listing-booking-modal">
        <div className="listing-booking-modal__intro">
          <Title className="listing-boooking-modal__intro-title">
            <Icon type="key"></Icon>
          </Title>
          <Title level={3} className="listing-boooking-modal__intro-title">
            Book your trip
          </Title>
          <Paragraph>
            Enter your payment information to book the listing from the dates between{" "}
            <Text mark strong>
              {moment(checkInDate).format("MMMM Do YYYY")}
            </Text>{" "}
            and{" "}
            <Text mark strong>
              {moment(checkOutDate).format("MMMM Do YYYY")}
            </Text>
            , inclusive.
          </Paragraph>
        </div>
      </div>
    </Modal>
  );
};
We’ll place a <Divider /> after the introduction section and then look to display information about the summary of the pricing the user will pay. In the first paragraph element, we’ll essentially want to tell the user that the price per day multiplied by the number of days booked will be equal to this total price that they would pay. We’ll import the formatListingPrice() utility function from our client’s src/lib/utils/ folder and use it to format the listing price.
In the price charges summary section, we’ll also have a <Paragraph /> element that attempts to summarize the total calculated price.
// ...
import { formatListingPrice } from "../../../../lib/utils";

const ListingCreateBookingModal = ({
  price,
  modalVisible,
  checkInDate,
  checkOutDate,
  setModalVisible
}: Props) => {
  const daysBooked = checkOutDate.diff(checkInDate, "days") + 1;
  const listingPrice = price * daysBooked;

  return (
    <Modal
      visible={modalVisible}
      centered
      footer={null}
      onCancel={() => setModalVisible(false)}
    >
      <div className="listing-booking-modal">
        <div className="listing-booking-modal__intro">{/* ... */}</div>

        <Divider />

        <div className="listing-booking-modal__charge-summary">
          <Paragraph>
            {formatListingPrice(price, false)} x {daysBooked} days ={" "}
            <Text strong>{formatListingPrice(listingPrice, false)}</Text>
          </Paragraph>
          <Paragraph className="listing-booking-modal__charge-summary-total">
            Total = <Text mark>{formatListingPrice(listingPrice, false)}</Text>
          </Paragraph>
        </div>
      </div>
    </Modal>
  );
};
Finally, we’ll have the modal component display a button that will be the confirmation button to actually make the booking. We’ll place another <Divider /> and render the <Button /> component that will be of type "primary" and size "large" , and have text says "Book" . With this change and all the changes we’ve made for the <ListingCreateBookingModal /> component, the src/sections/Listing/components/ListingCreateBookingModal/index.tsx file will appear as follows:
client/src/sections/Listing/components/ListingCreateBookingModal/index.tsx
import React from "react";
import { Button, Divider, Icon, Modal, Typography } from "antd";
import moment, { Moment } from "moment";
import { formatListingPrice } from "../../../../lib/utils";

interface Props {
  price: number;
  modalVisible: boolean;
  checkInDate: Moment;
  checkOutDate: Moment;
  setModalVisible: (modalVisible: boolean) => void;
}

const { Paragraph, Text, Title } = Typography;

export const ListingCreateBookingModal = ({
  price,
  modalVisible,
  checkInDate,
  checkOutDate,
  setModalVisible
}: Props) => {
  const daysBooked = checkOutDate.diff(checkInDate, "days") + 1;
  const listingPrice = price * daysBooked;

  return (
    <Modal
      visible={modalVisible}
      centered
      footer={null}
      onCancel={() => setModalVisible(false)}
    >
      <div className="listing-booking-modal">
        <div className="listing-booking-modal__intro">
          <Title className="listing-boooking-modal__intro-title">
            <Icon type="key"></Icon>
          </Title>
          <Title level={3} className="listing-boooking-modal__intro-title">
            Book your trip
          </Title>
          <Paragraph>
            Enter your payment information to book the listing from the dates between{" "}
            <Text mark strong>
              {moment(checkInDate).format("MMMM Do YYYY")}
            </Text>{" "}
            and{" "}
            <Text mark strong>
              {moment(checkOutDate).format("MMMM Do YYYY")}
            </Text>
            , inclusive.
          </Paragraph>
        </div>

        <Divider />

        <div className="listing-booking-modal__charge-summary">
          <Paragraph>
            {formatListingPrice(price, false)} * {daysBooked} days ={" "}
            <Text strong>{formatListingPrice(listingPrice, false)}</Text>
          </Paragraph>
          <Paragraph className="listing-booking-modal__charge-summary-total">
            Total = <Text mark>{formatListingPrice(listingPrice, false)}</Text>
          </Paragraph>
        </div>

        <Divider />

        <div className="listing-booking-modal__stripe-card-section">
          <Button size="large" type="primary" className="listing-booking-modal__cta">
            Book
          </Button>
        </div>
      </div>
    </Modal>
  );
};
In the parent <Listing /> component, we’ll need to ensure we pass the props that our modal component is to accept. The price will be the price of the listing. The values for the checkInDate and checkOutDate props will come from the state properties in the <Listing /> component of the same name.
We’ll only want to pass the values for the price and checkIn/checkOut dates when the listing object and the checkIn / checkOut state properties are defined. As a result, we’ll place a ternary statement and say the <ListingCreateBookingModal /> component should only be rendered when the listing object exists and the checkInDate and checkOutDate properties are defined. Otherwise, the element constant will be null .
client/src/sections/Listing/index.tsx
  const listingCreateBookingModalElement =
    listing && checkInDate && checkOutDate ? (
      <ListingCreateBookingModal
        price={listing.price}
        modalVisible={modalVisible}
        checkInDate={checkInDate}
        checkOutDate={checkOutDate}
        setModalVisible={setModalVisible}
      />
    ) : null;
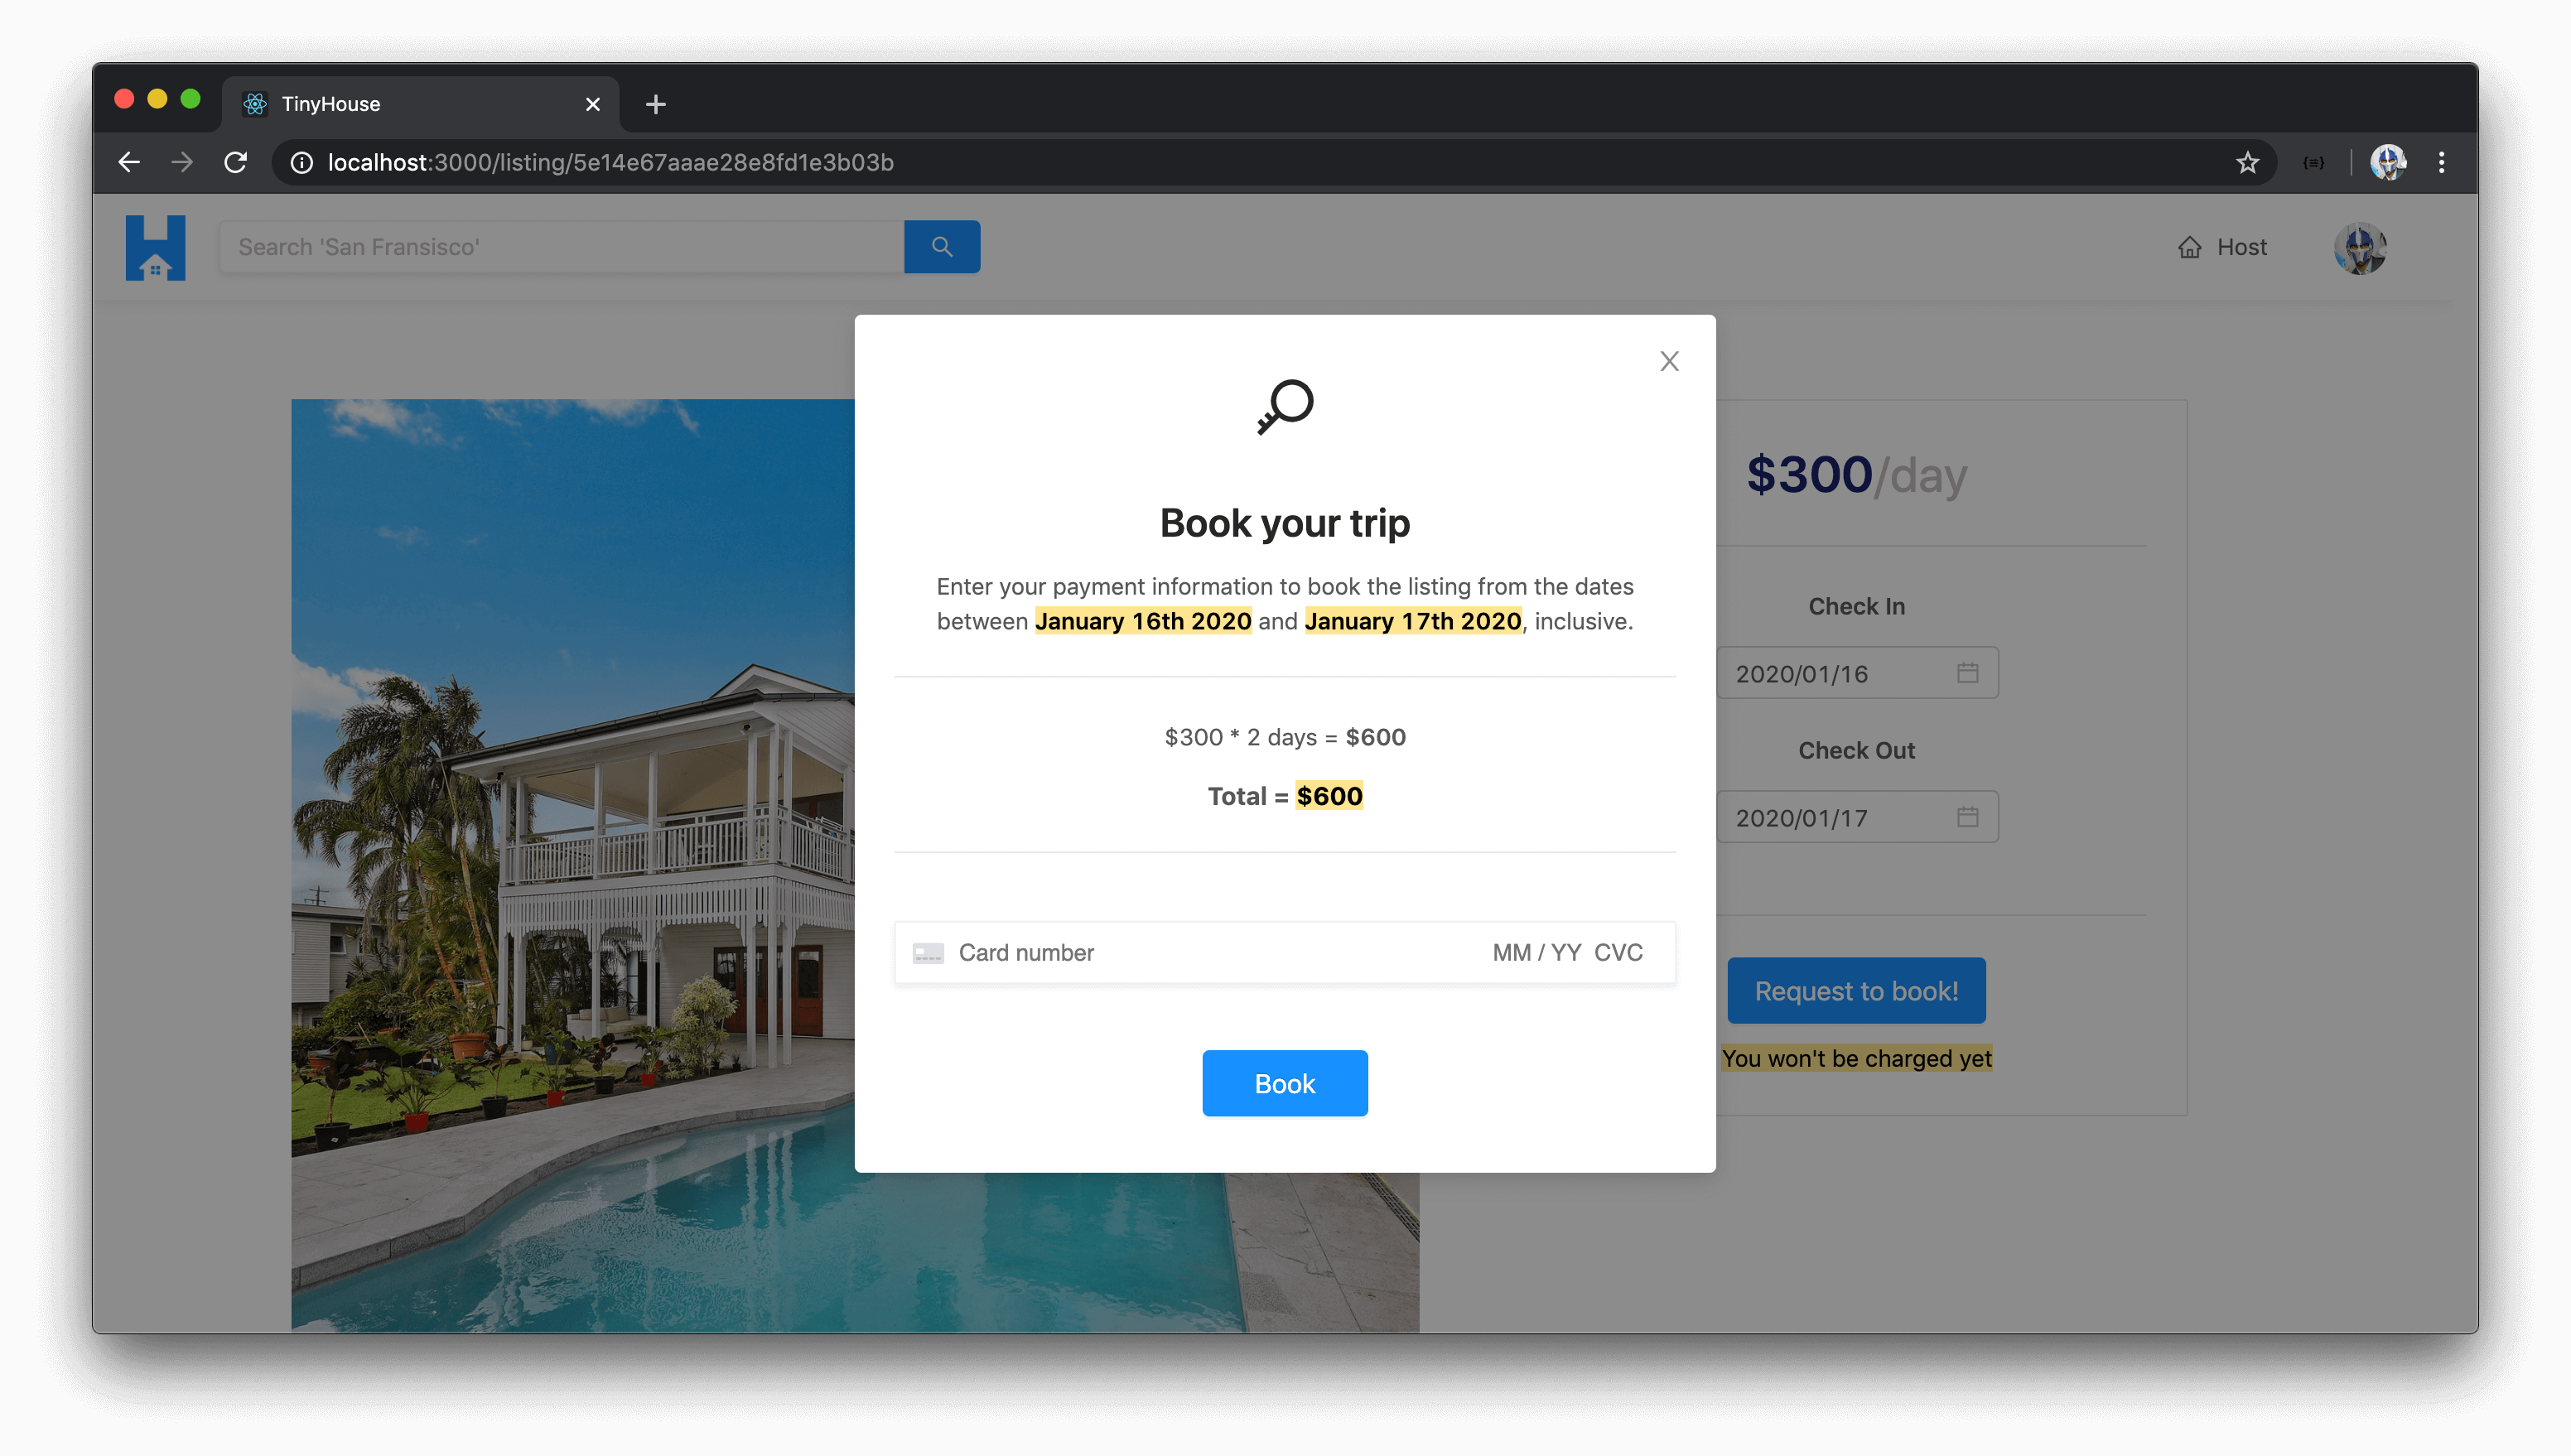
At this moment in time, if we were to select dates to check-in and check-out for a booking to be made to a listing and launch the confirmation modal - we’ll be presented with a summary of the pricing that needs to be made and the dates we’re interested in booking for.
There is still a big piece missing in our model and that is the actual section where the user will be able to provide their payment information. In the next lesson, we’ll introduce this capability.
DISPLAYING THE PAYMENT FORM WITH REACT STRIPE ELEMENTS
With the <ListingCreateBookingModal /> now presented and shown when a user attempts to request a booking, let’s attempt to present the UI element where we’ll be able to capture a user’s credit or debit card information.
Stripe provides a library known as Stripe Elements which are prebuilt UI components that help capture payment information from users. Stripe Elements provides many different UI elements to capture debit/credit card information, apple pay, bank information, etc. In our app, we’re only going to be accepting debit or card credit information from a user interested in making a booking.
The Stripe Elements examples are often shown with HTML, CSS, and normal JavaScript. However, Stripe does offer a React component library that provides these Stripe elements as React components - Stripe Elements in React . We’ll be using the React library to introduce a Stripe component element to capture debit/credit card information.
Here are some of the steps that can be taken to introduce a Stripe React element as documented in the Stripe Elements in React documentation.
- We’ll need to install the
react-stripe-elementslibrary. - When the
react-stripe-elementsis installed, we’re told to add a<script />tag in theindex.htmlfile of thepublic/folder of our React application to load the Stripe library. This is for PCI (i.e. Payment Card Industry) compliance and we’re told we must load theStripe.jslibrary directly from Stripe’s servers at runtime and not install it from npm or as an app dependency . - The next step is to create the payment form. The
react-stripe-elementslibrary gives us a<CardElement/ >component and aninjectStripe()higher-order function.
- The
<CardElement/>component is the card element we’ll want to show the user. - The
injectStripe()function allows us to create a higher-order component that provides an injectedstripeprop object we can use to determine the details of the payment.
- In the uppermost parent component, we should have our app contained within a
<StripeProvider />component fromreact-stripe-elementswhich initializes Stripe and accepts an API key with which we’ll pass the publishable key of our Stripe account. - We can then use the
<Elements />component fromreact-stripe-elementsto wrap the payment form. The documentation tells us the<Elements />component is to wrap the parent that is to contain the different Stripe components. - Finally, when a payment is made from the client, we can retrieve the
tokeninformation from the injectedstripeobject prop with which theidwill be thesourceinformation that we’ll pass into our server from our client to dictate the payment source that was made. - The rest of the documentation talks about how the server will then conduct the charge - with which we’ve already done.
For more details on the steps above, be sure to check out the Using Stripe Elements in React documentation.
Let’s achieve the above step by step. First, we’ll install the react-stripe-elements library in our client application. We’ll also install the community prepared typings from the DefinitelyTyped repository.
npm i react-stripe-elements @types/react-stripe-elements
We’ll then head over to the public/index.html file in our client app and load the Stripe library directly from Stripe’s servers.
client/public/index.html
<script src="https://js.stripe.com/v3/"></script>
In our root level <App /> component file ( src/index.tsx ), we’ll import the <StripeProvider /> and <Elements /> components from the react-stripe-elements library.
client/src/index.tsx
import { StripeProvider, Elements } from "react-stripe-elements";
In the return statement of our parent <App /> component, we’ll wrap our entire app with the <StripeProvider /> component to have stripe available everywhere. For the apiKey prop of <StripeProvider /> , we’ll provide the value of the REACT_APP_S_PUBLISHABLE_KEY environment variable we have in our client project.
TypeScript will warn us that the apiKey prop should be a string and the environment variable we provide can either be a string or undefined . In this case, we’ll assume when our app starts, the key will always be available as a string from the environment configuration. With that said, we’ll cast the type as a string .
const App = () => {
  // ...

  // ...

  return (
    <StripeProvider apiKey={process.env.REACT_APP_S_PUBLISHABLE_KEY as string}>
      <Router>{/* ... */}</Router>
    </StripeProvider>
  );
};
The <Elements /> component from react-stripe-elements should be the parent of all Stripe components we’ll want to display. We’ll only display the Stripe <CardElement /> component within the <Listing /> section component so with that said - we’ll wrap the <Listing /> component rendered in the /listing/:id route of our <App /> component with <Elements /> .
client/src/index.tsx
            <Route
              exact
              path="/listing/:id"
              render={props => (
                <Elements>
                  <Listing {...props} viewer={viewer} />
                </Elements>
              )}
            />
Next, we’ll head over to the <ListingCreateBookingModal /> component (in the src/sections/Listing/components/ListingCreateBookingModal/index.tsx file) and import three things we’ll need from react-stripe-elements , the <CardElement /> , the injectStripe() higher-order function, and a namespace labeled ReactStripeElements .
client/src/sections/Listing/components/ListingCreateBookingModal/index.tsx
import { CardElement, injectStripe, ReactStripeElements } from "react-stripe-elements";
At the bottom of our <ListingCreateBookingModal /> file, we’ll create and export a new constant called WrappedListingCreateBookingModal that is to use the injectStripe() higher order function and place the <ListingCreateBookingModal /> component within.
client/src/sections/Listing/components/ListingCreateBookingModal/index.tsx
export const WrappedListingCreateBookingModal = injectStripe(ListingCreateBookingModal);
At this moment, our <ListingCreateBookingModal /> component function is the result of a higher-order component that is to receive a stripe object prop. To help define the shape of this object prop, we’ll use the ReactStripeElements namespace.
ReactStripeElements isn’t an interface of its own but instead a namespace. In TypeScript, namespaces act as internal modules that help organize the types and interfaces within a module. Within the ReactStripeElements namespace, there exists an interface called InjectedStripeProps which is the object interface that indicates the type of the stripe object available in our component.
In the ListingCreateBookingModal() function, we’ll declare the stripe prop that it is to exist and we’ll declare the shape of all our props as Props & ReactStripeElements.InjectedStripeProps .
// ...

export const ListingCreateBookingModal = ({
  price,
  modalVisible,
  checkInDate,
  checkOutDate,
  setModalVisible,
  stripe
}: Props & ReactStripeElements.InjectedStripeProps) => {
  // ...
};
Right above the <Button /> element in the returned template of the <ListingCreateBookingModal /> component, we’ll place the <CardElement /> component. The one thing we’ll want from the <CardElement /> component is to have the postal code section hidden and we’ll achieve this by using the hidePostalCode prop. We don’t plan on showing postal code information in our payment form since we don’t plan on capturing a user’s postal code when a payment is made.
export const ListingCreateBookingModal = ({
  price,
  modalVisible,
  checkInDate,
  checkOutDate,
  setModalVisible,
  stripe
}: Props & ReactStripeElements.InjectedStripeProps) => {
  // ...

  // ...

  return (
    <Modal
      visible={modalVisible}
      centered
      footer={null}
      onCancel={() => setModalVisible(false)}
    >
      {/* ... */}

      <div className="listing-booking-modal__stripe-card-section">
        <CardElement hidePostalCode className="listing-booking-modal__stripe-card" />
        <Button size="large" type="primary" className="listing-booking-modal__cta">
          Book
        </Button>
      </div>
    </Modal>
  );
};
At this moment, we’ll need to ensure we’re importing the higher-order component in the parent. In the <Listing /> component file, we’ll import WrappedListingCreateBookingModal as ListingCreateBookingModal .
client/src/sections/Listing/index.tsx
import {
  ListingBookings,
  ListingCreateBooking,
  WrappedListingCreateBookingModal as ListingCreateBookingModal,
  ListingDetails
} from "./components";
If we launch our client application, visit a valid listing page and attempt to book the listing for a period of time - we’ll be presented with the confirmation modal that has the Stripe card element shown to us! The card element requests the card number, the expiry date, and the three-digit CVC code.
The card element validates the payment information provided. If we were to type a random set of numbers for the card number input, it would recognize that this is an invalid card!

If we were to provide an expiry date in the past, it would recognize that this is invalid as well.

Amazing! We’re still in the testing environment of our Stripe set-up. In the testing section of the Stripe documentation, Stripe tells us that genuine card information cannot be used in test mode . Instead, we can use a large list of valid test card numbers. For example, we’ll be able to mimic a Visa card by providing a card number of 4242 4242 4242 4242 . The expiry time could be any future date and the CVC code could be any three digits.
What are we interested in happening when we click the "Book" button after valid payment information is provided? We know that we would want the createBooking mutation in our API to run. Before we build the functionality to have the createBooking mutation executed, let’s try and get the token information from the payment element when the "Book" button is clicked.
In the <ListingCreateBookingModal/> component, we’ll attach an onClick prop to the "Book" button in the modal that is to call a function we’ll soon create called handleCreateBooking() .
export const ListingCreateBookingModal = ({
  price,
  modalVisible,
  checkInDate,
  checkOutDate,
  setModalVisible,
  stripe
}: Props & ReactStripeElements.InjectedStripeProps) => {
  // ...

  // ...

  return (
    <Modal
      visible={modalVisible}
      centered
      footer={null}
      onCancel={() => setModalVisible(false)}
    >
      {/* ... */}

      <div className="listing-booking-modal__stripe-card-section">
        <CardElement hidePostalCode className="listing-booking-modal__stripe-card" />
        <Button
          size="large"
          type="primary"
          className="listing-booking-modal__cta"
          onClick={handleCreateBooking}
        >
          Book
        </Button>
      </div>
    </Modal>
  );
};
We’ll create the handleCreateBooking() function in the component. The first thing we can check for in the function is to see if the injected stripe object is defined. If for some reason, the stripe object doesn’t exist or is undefined, we’ll want to display an error of sorts later, but for now, we’ll just return early.
const handleCreateBooking = async () => {
  if (!stripe) {
    return;
  }
};
If the stripe object prop does exist, the moment that this payment is made and the user wants to create the booking, we can look to run the stripe.createToken() function. The stripe.createToken() function will give us the token of the payment that has been made. We’ll destruct this token and alias it to a variable labeled stripeToken . At this moment, we’ll simply place a console.log() at the end of the handleCreateBooking() function and try to see what this token will look like.
client/src/sections/Listing/components/ListingCreateBookingModal/index.tsx
  const handleCreateBooking = async () => {
    if (!stripe) {
      return;
    }

    let { token: stripeToken } = await stripe.createToken();
    console.log(stripeToken);
  };
If we head back to our app, launch the confirmation modal, provide valid payment information, and click "Book" - we’ll get information about the payment source that was provided (such as the brand, country, funding, etc.).
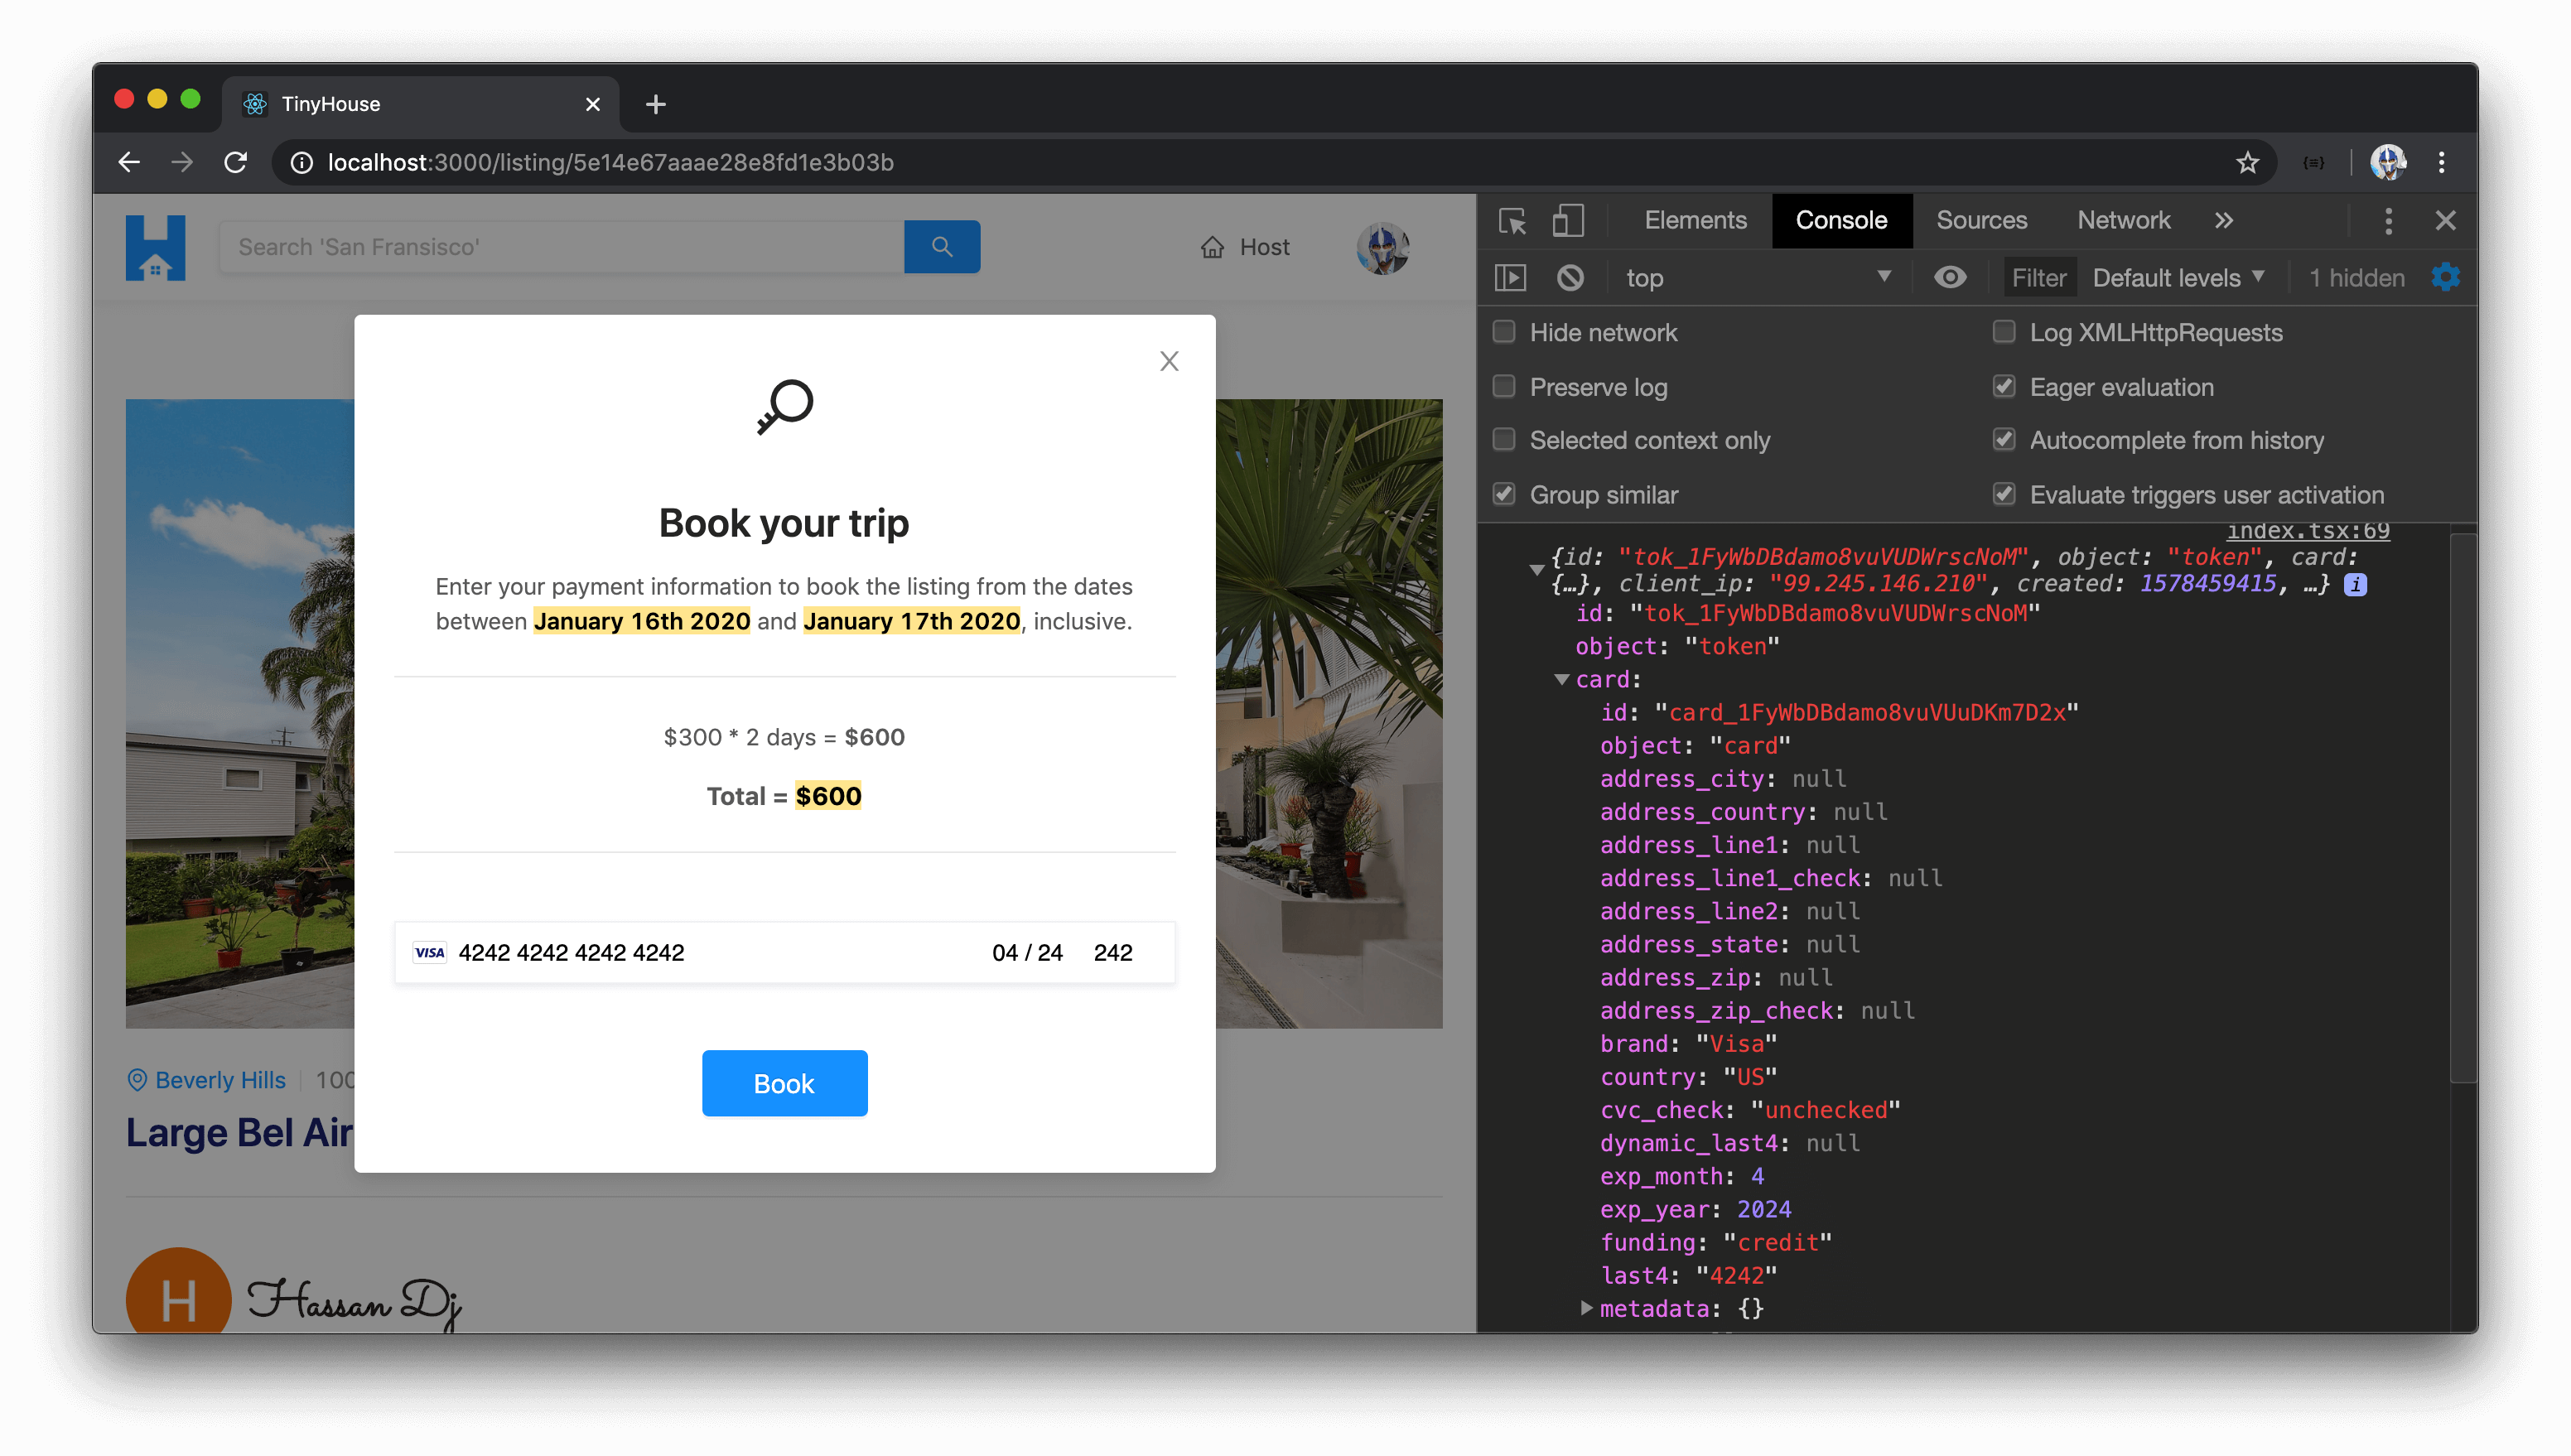
From this token information, we’ll be interested in capturing the id of the token which is to be the source of payment being made that we’ll pass over as part of the input to the createBooking mutation. In the next lesson, we’ll investigate this and look to finalize where we’ve done here by triggering the createBooking mutation.