EXECUTING THE CREATEBOOKING MUTATION
With the <ListingCreateBookingModal /> component prepared and presenting the payment element, we’ll now focus on executing the createBooking mutation when the user provides their payment information and is ready to book!
CREATEBOOKING
We’ll first create the GraphQL document for the createBooking mutation. In the src/lib/graphql/mutations/ folder, we’ll create a CreateBooking/ folder that is to have an index.ts file.
client/
  src/
    lib/
      // ...
      graphql/
        mutations/
          // ...
          CreateBooking/
            index.ts
          // ...
        // ...
      // ...
    // ...
  // ...
In the src/lib/graphql/mutations/CreateBooking/index.ts file, we’ll import the gql tag from apollo-boost and construct a constant called CREATE_BOOKING that is to be the GraphQL mutation document. We’ll name the mutation of the same name and it will expect a required input of GraphQL type CreateBookingInput . We’ll specify the createBooking field as the mutation we’ll want to run.
We won’t need much returned from the createBooking mutation at all since when the mutation is successful, we’ll simply close the confirmation modal in the listing page and tell the user that the listing has been booked. As a result, we’ll only have the id of the booking result be returned and we may not even use it.
client/src/lib/graphql/mutations/CreateBooking/index.ts
import { gql } from "apollo-boost";

export const CREATE_BOOKING = gql`
  mutation CreateBooking($input: CreateBookingInput!) {
    createBooking(input: $input) {
      id
    }
  }
`;
In the src/lib/graphql/mutations/index.ts file, we’ll re-export the CREATE_BOOKING mutation document.
client/src/lib/graphql/mutations/index.ts
export * from "./CreateBooking";
We’ll then head over to the terminal and run the codegen:schema command to update the schema file in our client project.
npm run codegen:schema
We’ll also run the codegen:generate command to regenerate our GraphQL related typings in the client.
npm run codegen:generate
In our <ListingCreateBooking /> modal file, we’ll import the useMutation Hook, the CREATE_BOOKING mutation document, and the autogenerated data and variable typings associated with the mutation.
Since we’ll need this shortly as well, we’ll also import the displaySuccessNotification() and displayErrorMessage() functions we have in our src/lib/utils/ folder.
client/src/sections/Listing/components/ListingCreateBookingModal/index.tsx
import { useMutation } from "@apollo/react-hooks";
client/src/sections/Listing/components/ListingCreateBookingModal/index.tsx
import { CREATE_BOOKING } from "../../../../lib/graphql/mutations";
import {
  CreateBooking as CreateBookingData,
  CreateBookingVariables
} from "../../../../lib/graphql/mutations/CreateBooking/__generated__/CreateBooking";
import {
  formatListingPrice,
  displaySuccessNotification,
  displayErrorMessage
} from "../../../../lib/utils";
At the beginning of our <ListingCreateBookingModal /> component function, we’ll declare the useMutation Hook, specify the shape of data and variables associated with the mutation, and we’ll only destruct the mutation function and the loading property from the mutation result.
const [createBooking, { loading }] = useMutation<
  CreateBookingData,
  CreateBookingVariables
>(CREATE_BOOKING);
We have a function in the component called handleCreateBooking() that runs when the user clicks the "Book" button and where the injected stripe object is available to us that has details on the payment information the user provides.
At the beginning of the handleCreateBooking() function, we’ll check if the stripe prop object doesn’t exist for some reason and if so, we’ll run the displayErrorMessage() function and say "Sorry! We weren't able to connect with Stripe" .
const handleCreateBooking = async () => {
  if (!stripe) {
    return displayErrorMessage("Sorry! We weren't able to connect with Stripe");
  }

  // ...
};
From the stripe.createToken() function we executed before within the handleCreateBooking() function, we’ll be able to destruct an error property as well. This error will be populated based on invalid payment information provided in the stripe element.
const handleCreateBooking = async () => {
  if (!stripe) {
    return displayErrorMessage("Sorry! We weren't able to connect with Stripe");
  }

  let { token: stripeToken, error } = await stripe.createToken();
  // ...
};
We can then check to see if the stripeToken property is available, and if so, run the createBooking mutation with the input variable it is to expect.
In the input variable object, the source will be the id from the stripe token. The checkIn and checkOut variables within input expect the dates in string format. We have the checkIn and checkOut date state properties available in the component so we can use moment to format the date objects as strings in the format we’ll want - YYYY-MM-DD .
const handleCreateBooking = async () => {
  if (!stripe) {
    return displayErrorMessage("Sorry! We weren't able to connect with Stripe");
  }

  let { token: stripeToken, error } = await stripe.createToken();
  if (stripeToken) {
    createBooking({
      variables: {
        input: {
          source: stripeToken.id,
          checkIn: moment(checkInDate).format("YYYY-MM-DD"),
          checkOut: moment(checkOutDate).format("YYYY-MM-DD")
        }
      }
    });
  }
};
If for some reason, this stripe token doesn’t exist, this probably means that the user has either provided invalid payment information or hasn’t provided payment information appropriately. If this is to happen, we’ll run the displayErrorMessage() function. However, in this case, the error property destructed from the stripe token function should have a value that determines what went wrong. In the displayErrorMessage() function in this condition, if the error property from Stripe exists and the message property within exists - we’ll display it as the message. If not, we’ll show our own generic error message of "Sorry! We weren't able to book the listing. Please try again later!" .
const handleCreateBooking = async () => {
  if (!stripe) {
    return displayErrorMessage("Sorry! We weren't able to connect with Stripe.");
  }

  let { token: stripeToken, error } = await stripe.createToken();
  if (stripeToken) {
    createBooking({
      variables: {
        input: {
          source: stripeToken.id,
          checkIn: moment(checkInDate).format("YYYY-MM-DD"),
          checkOut: moment(checkOutDate).format("YYYY-MM-DD")
        }
      }
    });
  } else {
    displayErrorMessage(
      error && error.message
        ? error.message
        : "Sorry! We weren't able to book the listing. Please try again later."
    );
  }
};
We’re still not passing in the value of the id property in the input variable of the mutation which is to reference the id of the listing being booked. We have the listing object queried in the parent <Listing /> component. We can look to pass the id of the listing as a prop called id down to the <ListingCreateBookingModal /> component.
const listingCreateBookingModalElement =
  listing && checkInDate && checkOutDate ? (
    <ListingCreateBookingModal
      id={listing.id}
      price={listing.price}
      modalVisible={modalVisible}
      checkInDate={checkInDate}
      checkOutDate={checkOutDate}
      setModalVisible={setModalVisible}
    />
  ) : null;
There are two other things we’ll want to pass in from the parent <Listing /> component down to the modal child and involves what we want to happen in the UI after a booking is made successfully. When a booking is made successfully, we’ll want the modal closed and the input values in our check-in and check-out inputs cleared out. The state values in the parent <Listing /> component determine these values here so we’ll prepare a function in the parent called clearBookingData() which will be responsible in setting the state values back to their predefined states. We’ll run the setModalVisible() function and pass a value of false. We’ll run the setCheckIn and setCheckOut functions and pass values of null .
client/src/sections/Listing/index.tsx
  const clearBookingData = () => {
    setModalVisible(false);
    setCheckInDate(null);
    setCheckOutDate(null);
  };
We’ll then pass the clearBookingData() function as a prop down to the modal component.
const listingCreateBookingModalElement =
  listing && checkInDate && checkOutDate ? (
    <ListingCreateBookingModal
      id={listing.id}
      price={listing.price}
      modalVisible={modalVisible}
      checkInDate={checkInDate}
      checkOutDate={checkOutDate}
      setModalVisible={setModalVisible}
      clearBookingData={clearBookingData}
    />
  ) : null;
When the createBooking mutation is complete successfully in the modal, we’ll also want the listing information presented to us on the listing page to be updated. What part of the /listing/:id page would we want to be updated after the mutation is complete? That is to be primarily the bookingsIndex of the listing. If we recall, in the <ListingCreateBooking /> component within the /listing/:id page, we attempt to disable the dates of the date pickers where the dates have been specified and selected in the bookingsIndex of the listing (i.e. the dates have been booked).
When the user makes a new booking and if they were to remain in the /listing/:id page without refreshing, by opening the datepickers again - they should see the dates they’ve just booked be disabled in the datepickers! To help achieve this, we can attempt to refetch the listing query after the createBooking mutation is successful.
With that said, we’ll destruct the refetch property from the useQuery Hook in the <Listing /> component.
client/src/sections/Listing/index.tsx
  const { loading, data, error, refetch } = useQuery<ListingData, ListingVariables>(
    LISTING,
    {
      variables: {
        id: match.params.id,
        bookingsPage,
        limit: PAGE_LIMIT
      }
    }
  );
We’ll then create an asynchronous function in the <Listing /> component called handleListingRefetch() that simply runs the refetch() function.
client/src/sections/Listing/index.tsx
  const handleListingRefetch = async () => {
    await refetch();
  };
We’ll then pass the handleListingRefetch() function down as props to the <ListingCreateBookingModal /> component.
client/src/sections/Listing/index.tsx
  const listingCreateBookingElement = listing ? (
    <ListingCreateBooking
      viewer={viewer}
      host={listing.host}
      price={listing.price}
      bookingsIndex={listing.bookingsIndex}
      checkInDate={checkInDate}
      checkOutDate={checkOutDate}
      setCheckInDate={setCheckInDate}
      setCheckOutDate={setCheckOutDate}
      setModalVisible={setModalVisible}
    />
  ) : null;
In the modal component, let’s define the new props it is to accept. The new props will involve an id of type string , a clearBookingData() function that returns void , and a handleRefetch() function that returns a promise that when resolved is void .
client/src/sections/Listing/components/ListingCreateBookingModal/index.tsx
interface Props {
  id: string;
  price: number;
  modalVisible: boolean;
  checkInDate: Moment;
  checkOutDate: Moment;
  setModalVisible: (modalVisible: boolean) => void;
  clearBookingData: () => void;
  handleListingRefetch: () => Promise<void>;
}
In the <ListingCreateBookingModal /> component function, we’ll declare the new props that it is to accept: id , clearBookingData , and handleListingRefetch .
export const ListingCreateBookingModal = ({
  id,
  price,
  modalVisible,
  checkInDate,
  checkOutDate,
  setModalVisible,
  clearBookingData,
  handleListingRefetch,
  stripe
}: Props & ReactStripeElements.InjectedStripeProps) => {
  // ...
};
In the handleCreateBooking() function call, we’ll pass the id available as props to the id variable of the input for the createBooking mutation.
client/src/sections/Listing/components/ListingCreateBookingModal/index.tsx
  const handleCreateBooking = async () => {
    if (!stripe) {
      return displayErrorMessage("Sorry! We weren't able to connect with Stripe.");
    }

    let { token: stripeToken, error } = await stripe.createToken();
    if (stripeToken) {
      createBooking({
        variables: {
          input: {
            id,
            source: stripeToken.id,
            checkIn: moment(checkInDate).format("YYYY-MM-DD"),
            checkOut: moment(checkOutDate).format("YYYY-MM-DD")
          }
        }
      });
    } else {
      displayErrorMessage(
        error && error.message
          ? error.message
          : "Sorry! We weren't able to book the listing. Please try again later."
      );
    }
  };
We’ll then look to handle the success and error states of our mutation by using the onCompleted() and onError() callbacks of the useMutation Hook used for the createBooking mutation.
For the onCompleted() callback, we’ll clear booking data in the parent and display a success notification with a title of "You've successfully booked the listing!" and a description of "Booking history can always be found in your User page." . We’ll then run the handleListingRefetch() function.
For the onError() callback, we’ll simply display a generic error message of "Sorry! We weren't able to successfully book the listing. Please try again later!" .
client/src/sections/Listing/components/ListingCreateBookingModal/index.tsx
  const [createBooking, { loading }] = useMutation<
    CreateBookingData,
    CreateBookingVariables
  >(CREATE_BOOKING, {
    onCompleted: () => {
      clearBookingData();
      displaySuccessNotification(
        "You've successfully booked the listing!",
        "Booking history can always be found in your User page."
      );
      handleListingRefetch();
    },
    onError: () => {
      displayErrorMessage(
        "Sorry! We weren't able to successfully book the listing. Please try again later!"
      );
    }
  });
Lastly, we’ll use the loading property from our mutation result and place it as a value for the loading prop of the actual "Book" button in the template.
client/src/sections/Listing/components/ListingCreateBookingModal/index.tsx
          <Button
            size="large"
            type="primary"
            className="listing-booking-modal__cta"
            loading={loading}
            onClick={handleCreateBooking}
          >
            Book
          </Button>
With this change and all the changes we’ve made for the <ListingCreateBookingModal /> component, the src/sections/Listing/components/ListingCreateBookingModal/index.tsx file will appear as follows.
client/src/sections/Listing/components/ListingCreateBookingModal/index.tsx
import React from "react";
import { useMutation } from "@apollo/react-hooks";
import { CardElement, injectStripe, ReactStripeElements } from "react-stripe-elements";
import { Button, Divider, Icon, Modal, Typography } from "antd";
import moment, { Moment } from "moment";
import { CREATE_BOOKING } from "../../../../lib/graphql/mutations";
import {
  CreateBooking as CreateBookingData,
  CreateBookingVariables
} from "../../../../lib/graphql/mutations/CreateBooking/__generated__/CreateBooking";
import {
  formatListingPrice,
  displaySuccessNotification,
  displayErrorMessage
} from "../../../../lib/utils";

interface Props {
  id: string;
  price: number;
  modalVisible: boolean;
  checkInDate: Moment;
  checkOutDate: Moment;
  setModalVisible: (modalVisible: boolean) => void;
  clearBookingData: () => void;
  handleListingRefetch: () => Promise<void>;
}

const { Paragraph, Text, Title } = Typography;

export const ListingCreateBookingModal = ({
  id,
  price,
  modalVisible,
  checkInDate,
  checkOutDate,
  setModalVisible,
  clearBookingData,
  handleListingRefetch,
  stripe
}: Props & ReactStripeElements.InjectedStripeProps) => {
  const [createBooking, { loading }] = useMutation<
    CreateBookingData,
    CreateBookingVariables
  >(CREATE_BOOKING, {
    onCompleted: () => {
      clearBookingData();
      displaySuccessNotification(
        "You've successfully booked the listing!",
        "Booking history can always be found in your User page."
      );
      handleListingRefetch();
    },
    onError: () => {
      displayErrorMessage(
        "Sorry! We weren't able to successfully book the listing. Please try again later!"
      );
    }
  });

  const daysBooked = checkOutDate.diff(checkInDate, "days") + 1;
  const listingPrice = price * daysBooked;

  const handleCreateBooking = async () => {
    if (!stripe) {
      return displayErrorMessage("Sorry! We weren't able to connect with Stripe.");
    }

    let { token: stripeToken, error } = await stripe.createToken();
    if (stripeToken) {
      createBooking({
        variables: {
          input: {
            id,
            source: stripeToken.id,
            checkIn: moment(checkInDate).format("YYYY-MM-DD"),
            checkOut: moment(checkOutDate).format("YYYY-MM-DD")
          }
        }
      });
    } else {
      displayErrorMessage(
        error && error.message
          ? error.message
          : "Sorry! We weren't able to book the listing. Please try again later."
      );
    }
  };

  return (
    <Modal
      visible={modalVisible}
      centered
      footer={null}
      onCancel={() => setModalVisible(false)}
    >
      <div className="listing-booking-modal">
        <div className="listing-booking-modal__intro">
          <Title className="listing-boooking-modal__intro-title">
            <Icon type="key"></Icon>
          </Title>
          <Title level={3} className="listing-boooking-modal__intro-title">
            Book your trip
          </Title>
          <Paragraph>
            Enter your payment information to book the listing from the dates between{" "}
            <Text mark strong>
              {moment(checkInDate).format("MMMM Do YYYY")}
            </Text>{" "}
            and{" "}
            <Text mark strong>
              {moment(checkOutDate).format("MMMM Do YYYY")}
            </Text>
            , inclusive.
          </Paragraph>
        </div>

        <Divider />

        <div className="listing-booking-modal__charge-summary">
          <Paragraph>
            {formatListingPrice(price, false)} * {daysBooked} days ={" "}
            <Text strong>{formatListingPrice(listingPrice, false)}</Text>
          </Paragraph>
          <Paragraph className="listing-booking-modal__charge-summary-total">
            Total = <Text mark>{formatListingPrice(listingPrice, false)}</Text>
          </Paragraph>
        </div>

        <Divider />

        <div className="listing-booking-modal__stripe-card-section">
          <CardElement hidePostalCode className="listing-booking-modal__stripe-card" />
          <Button
            size="large"
            type="primary"
            className="listing-booking-modal__cta"
            loading={loading}
            onClick={handleCreateBooking}
          >
            Book
          </Button>
        </div>
      </div>
    </Modal>
  );
};

export const WrappedListingCreateBookingModal = injectStripe(ListingCreateBookingModal);
Perfect! Let’s know test what happens when we attempt to make a booking for a certain listing!
TESTING OUR WORK
First, let’s ensure we have a listing created from an account in our application.

We’ll then have another user make a booking in the aforementioned listing. We’ll provide check-in/check-out dates for the booking and for payment information, we’ll provide Visa card details from the list of test card numbers noted in the Stripe documentation.
In the example scenario being undertaken in this lesson documentation, the tenant is to pay the host $600 to book the host’s listing for two days.

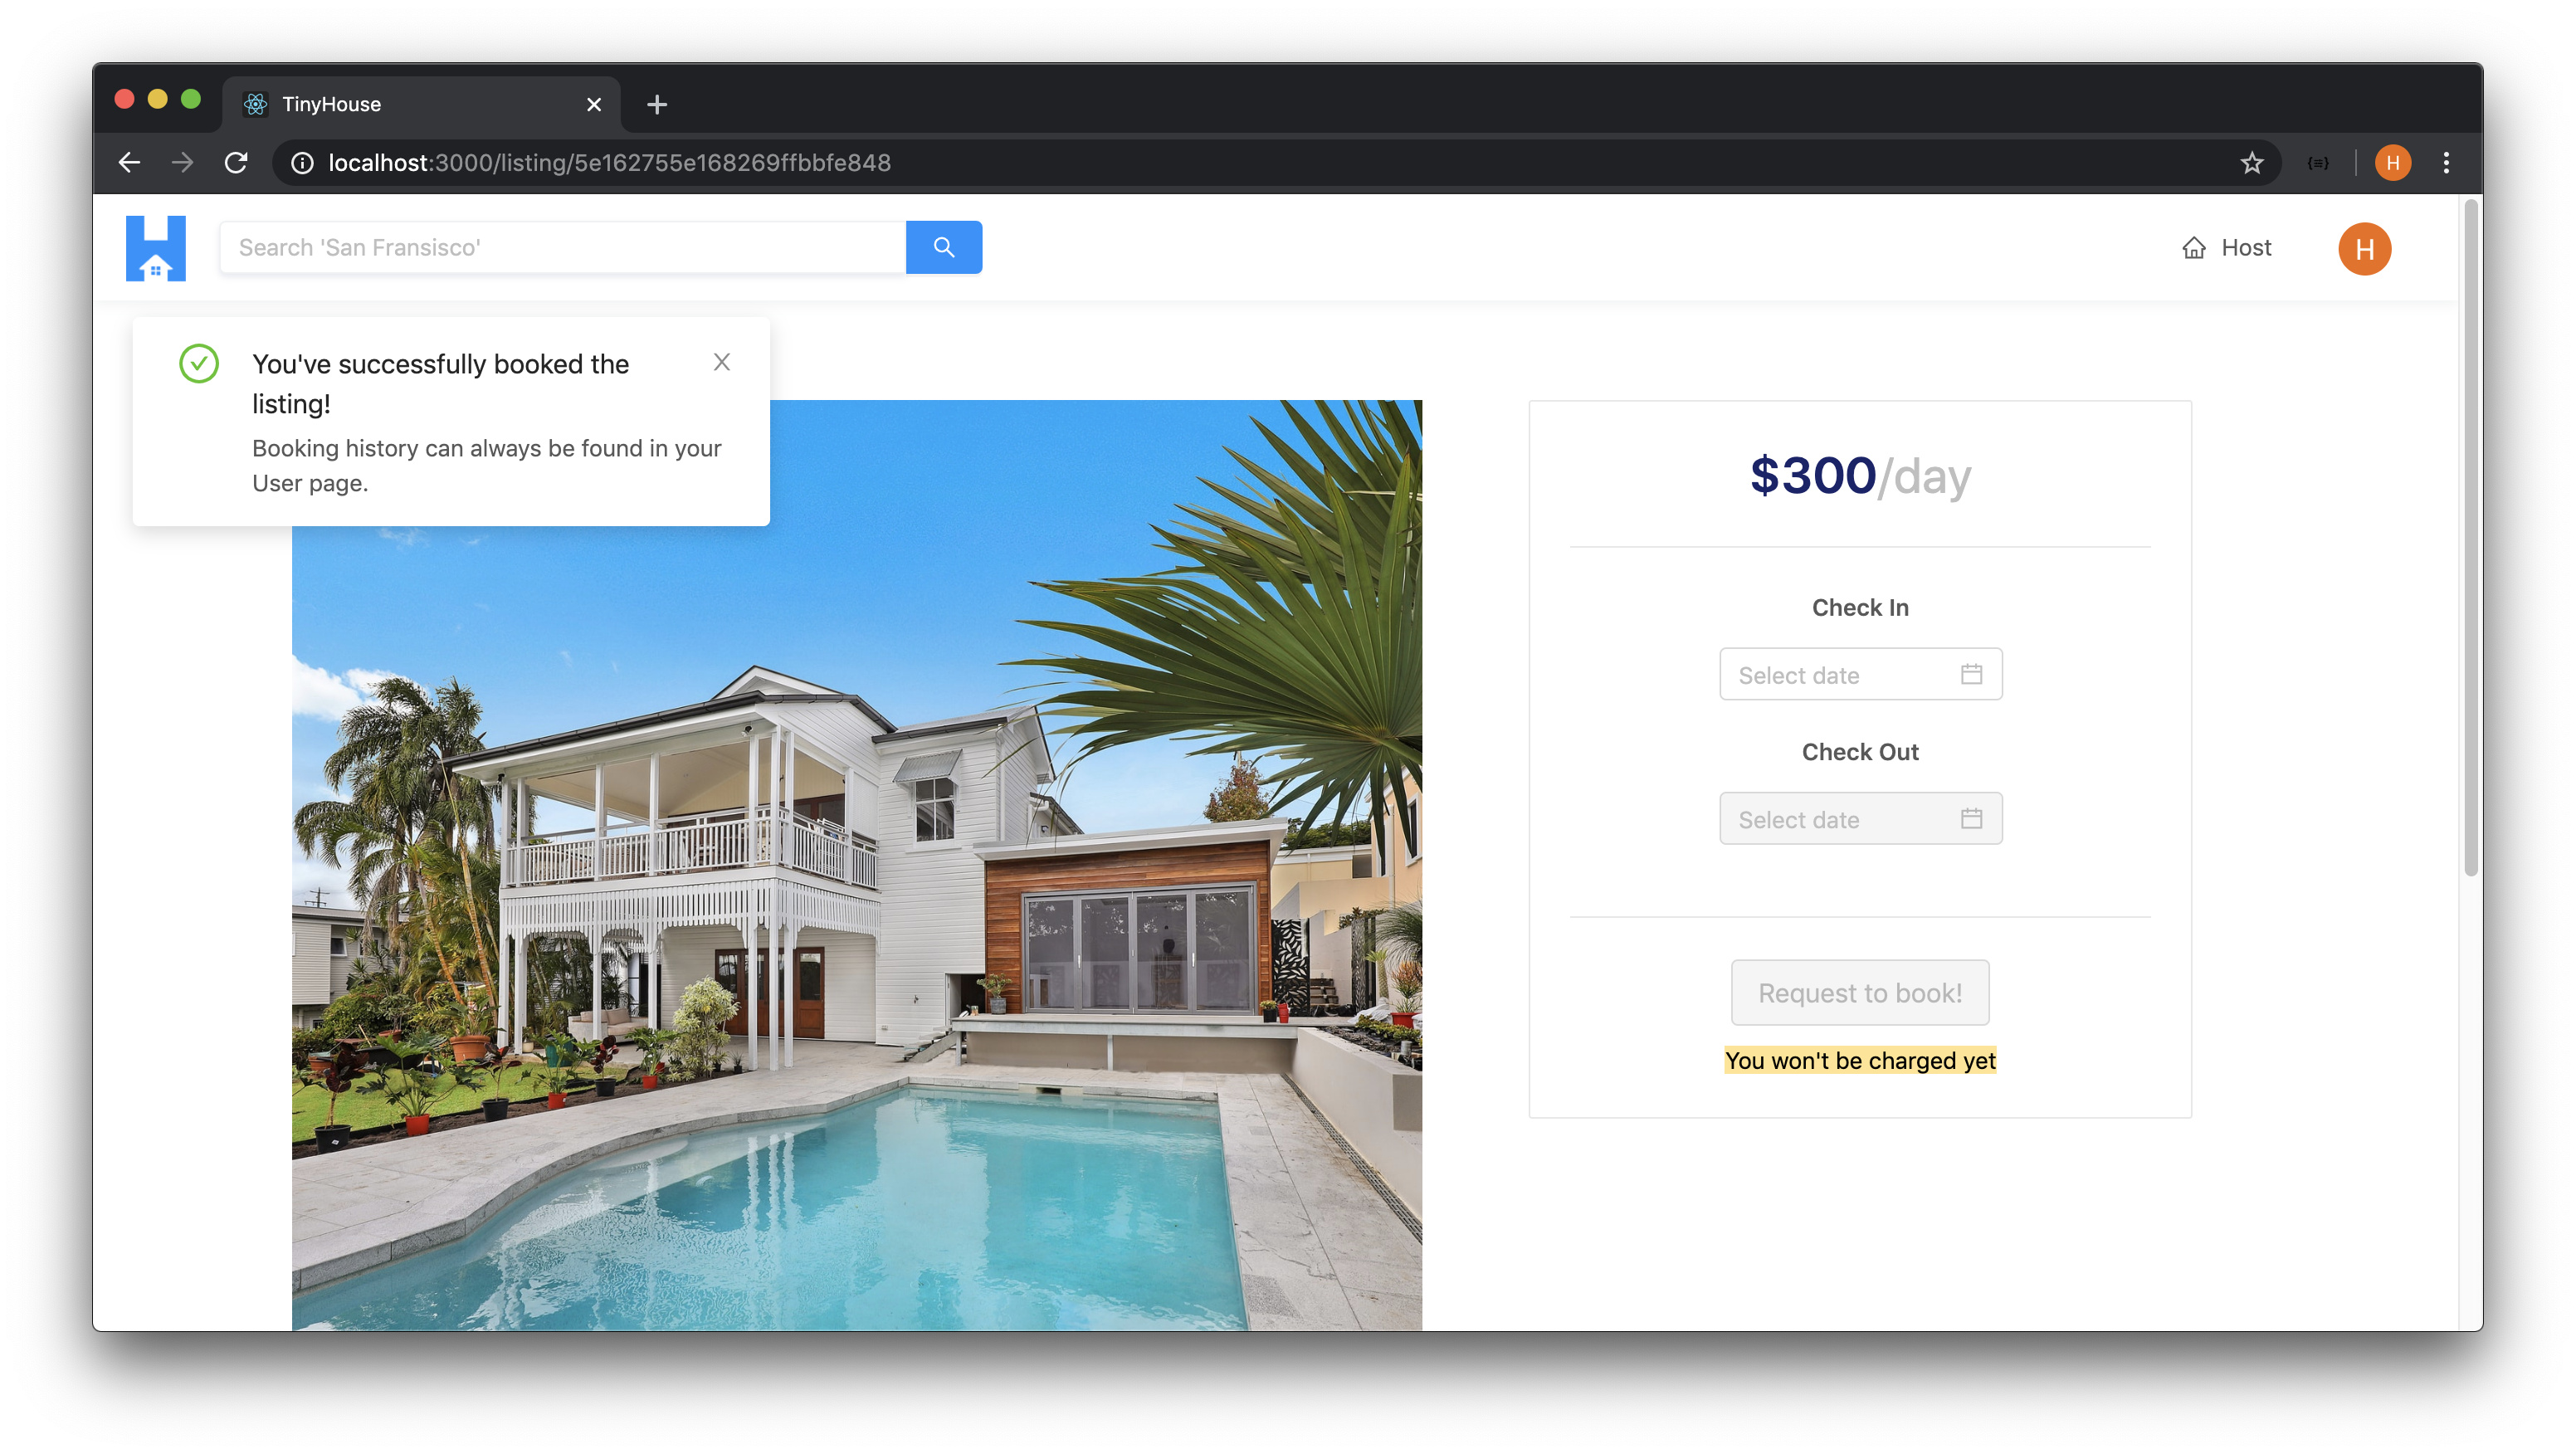
When the booking is complete, the modal is closed and a success notification is shown notifying the tenant that the booking was made successfully.
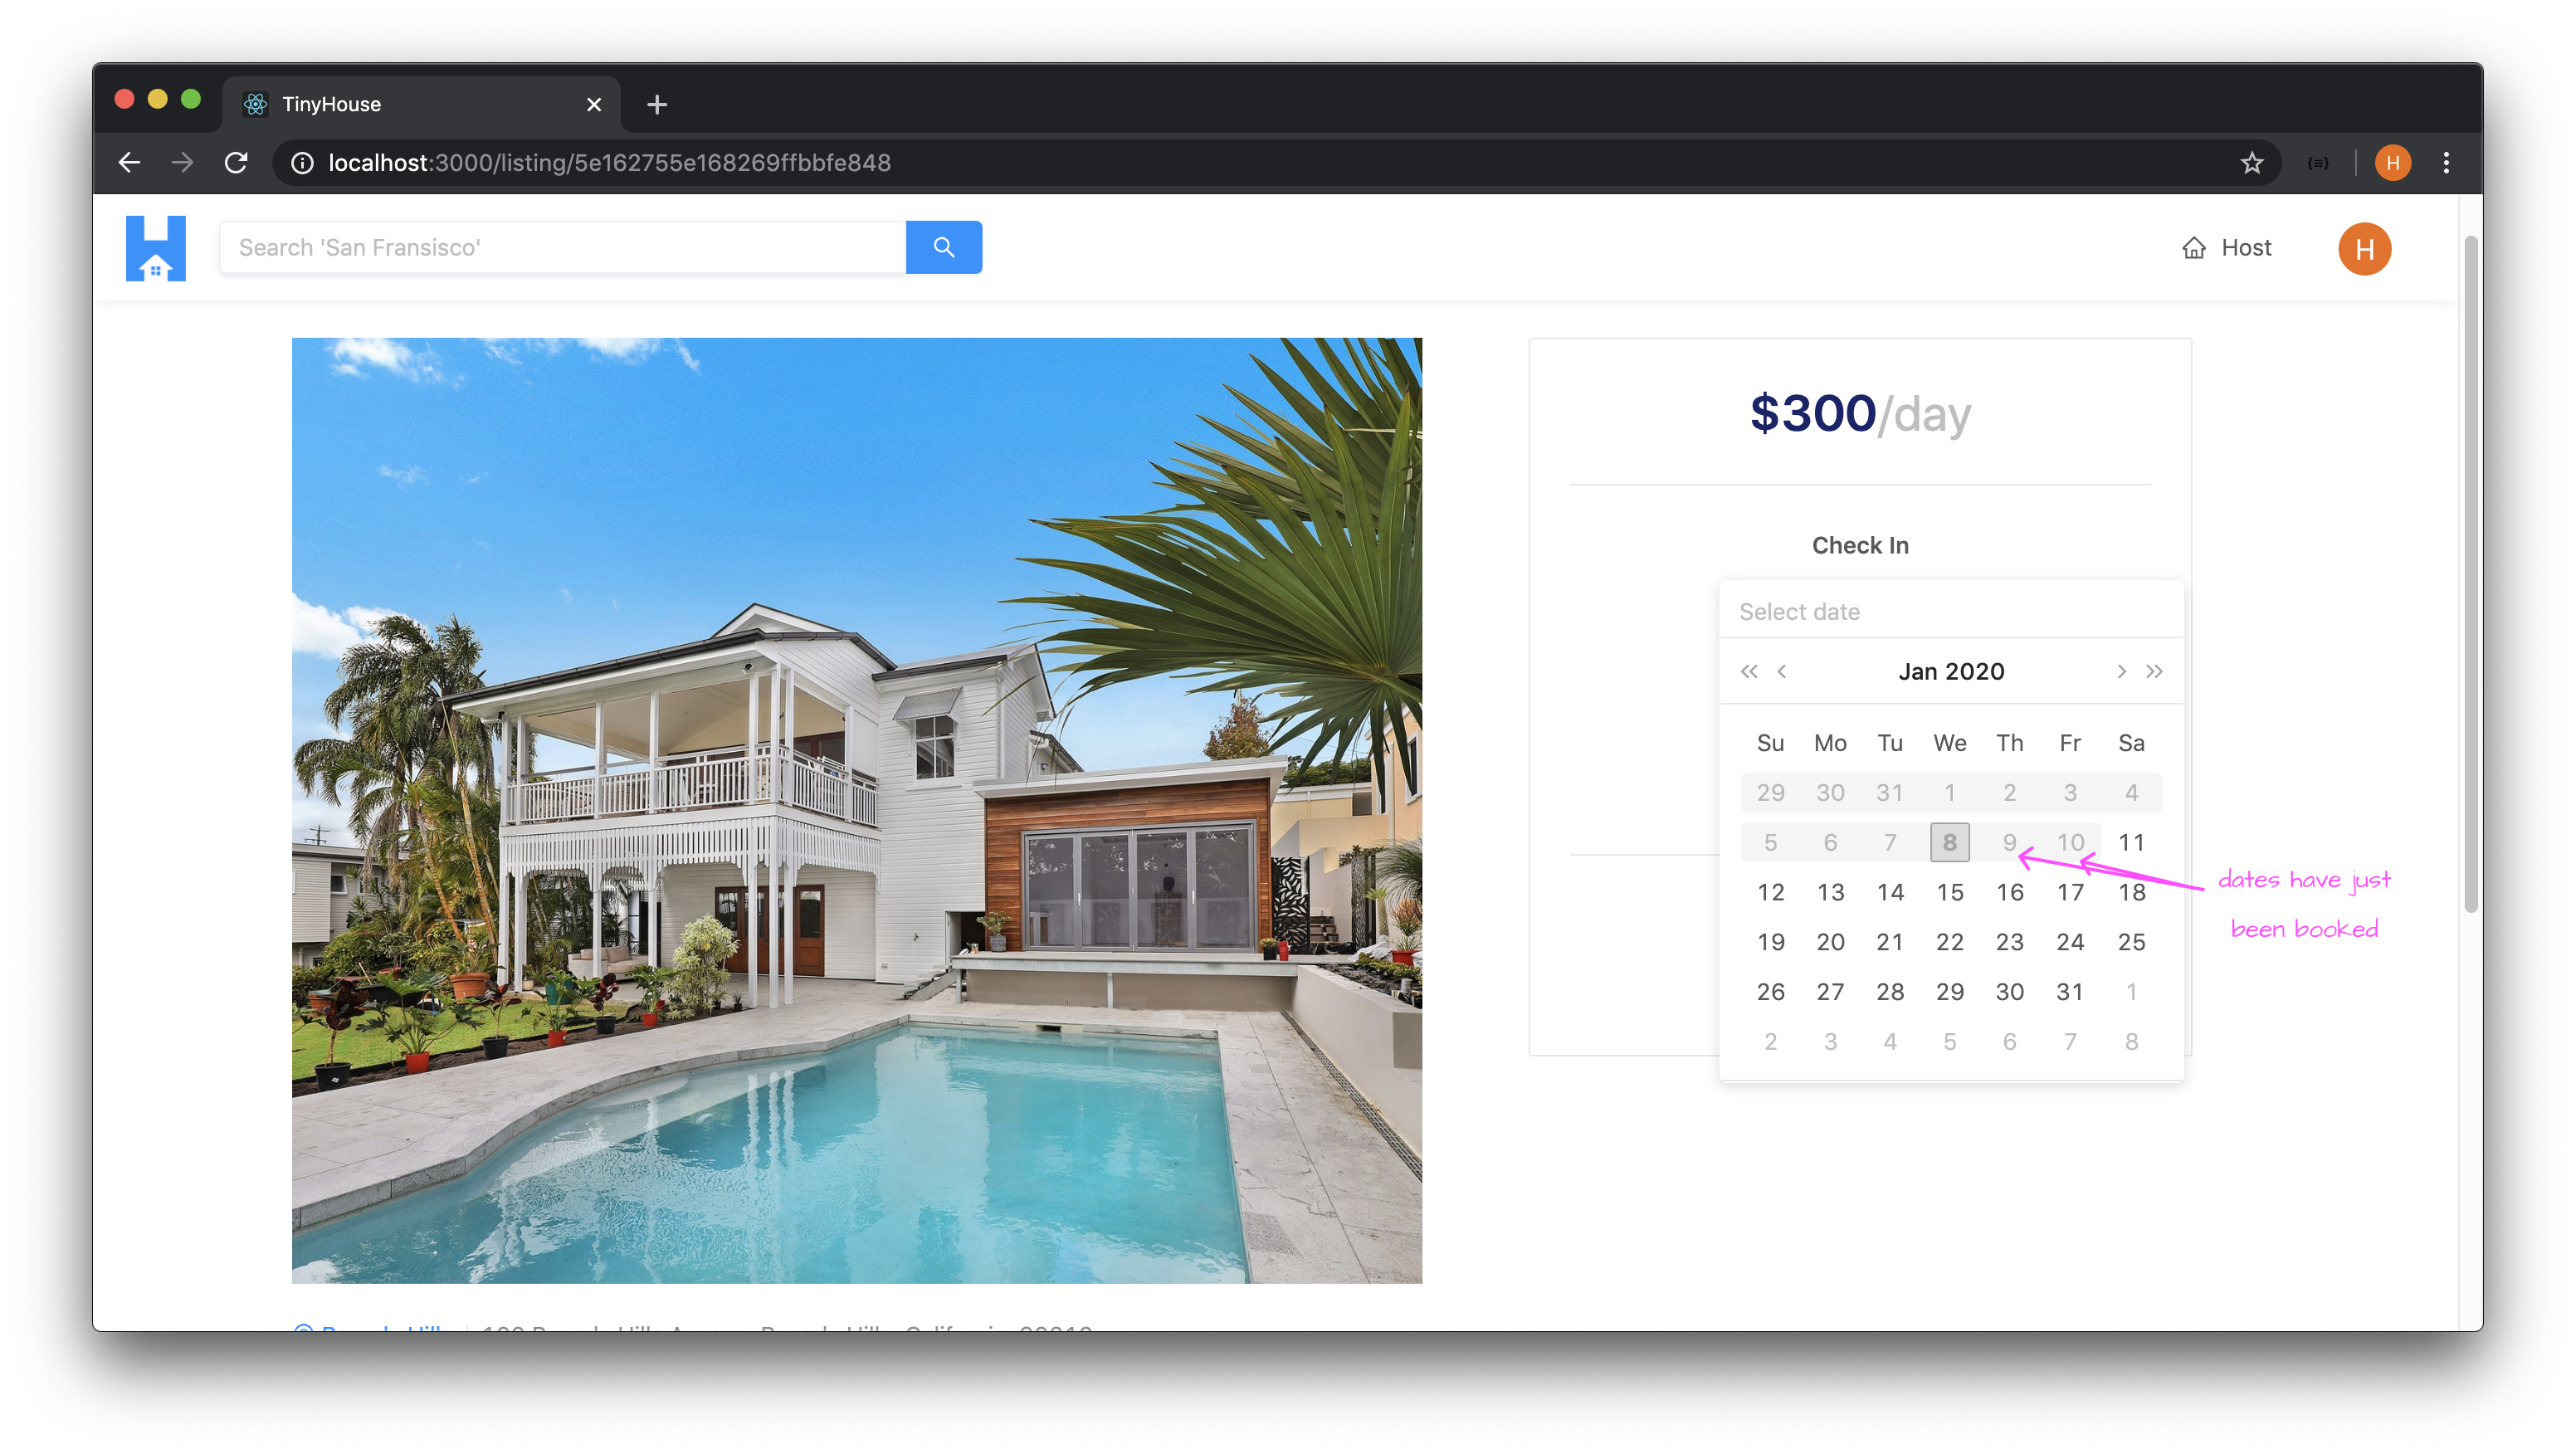
If we were to open the datepickers in the same /listing/:id page without navigating away, we’ll notice the dates that have just been booked are now disabled!
When the tenant (i.e. the user who made the booking) visits their own user page at the appropriate /user/:id route, they’ll notice the booking they’ve just made is reflected in the bookings history section.

When the host (i.e. the user who owns the booking) visits the listing page of the listing that has been booked at the appropriate /listing/:id route, they’ll notice the booking reflected in the bookings history section of the listing.

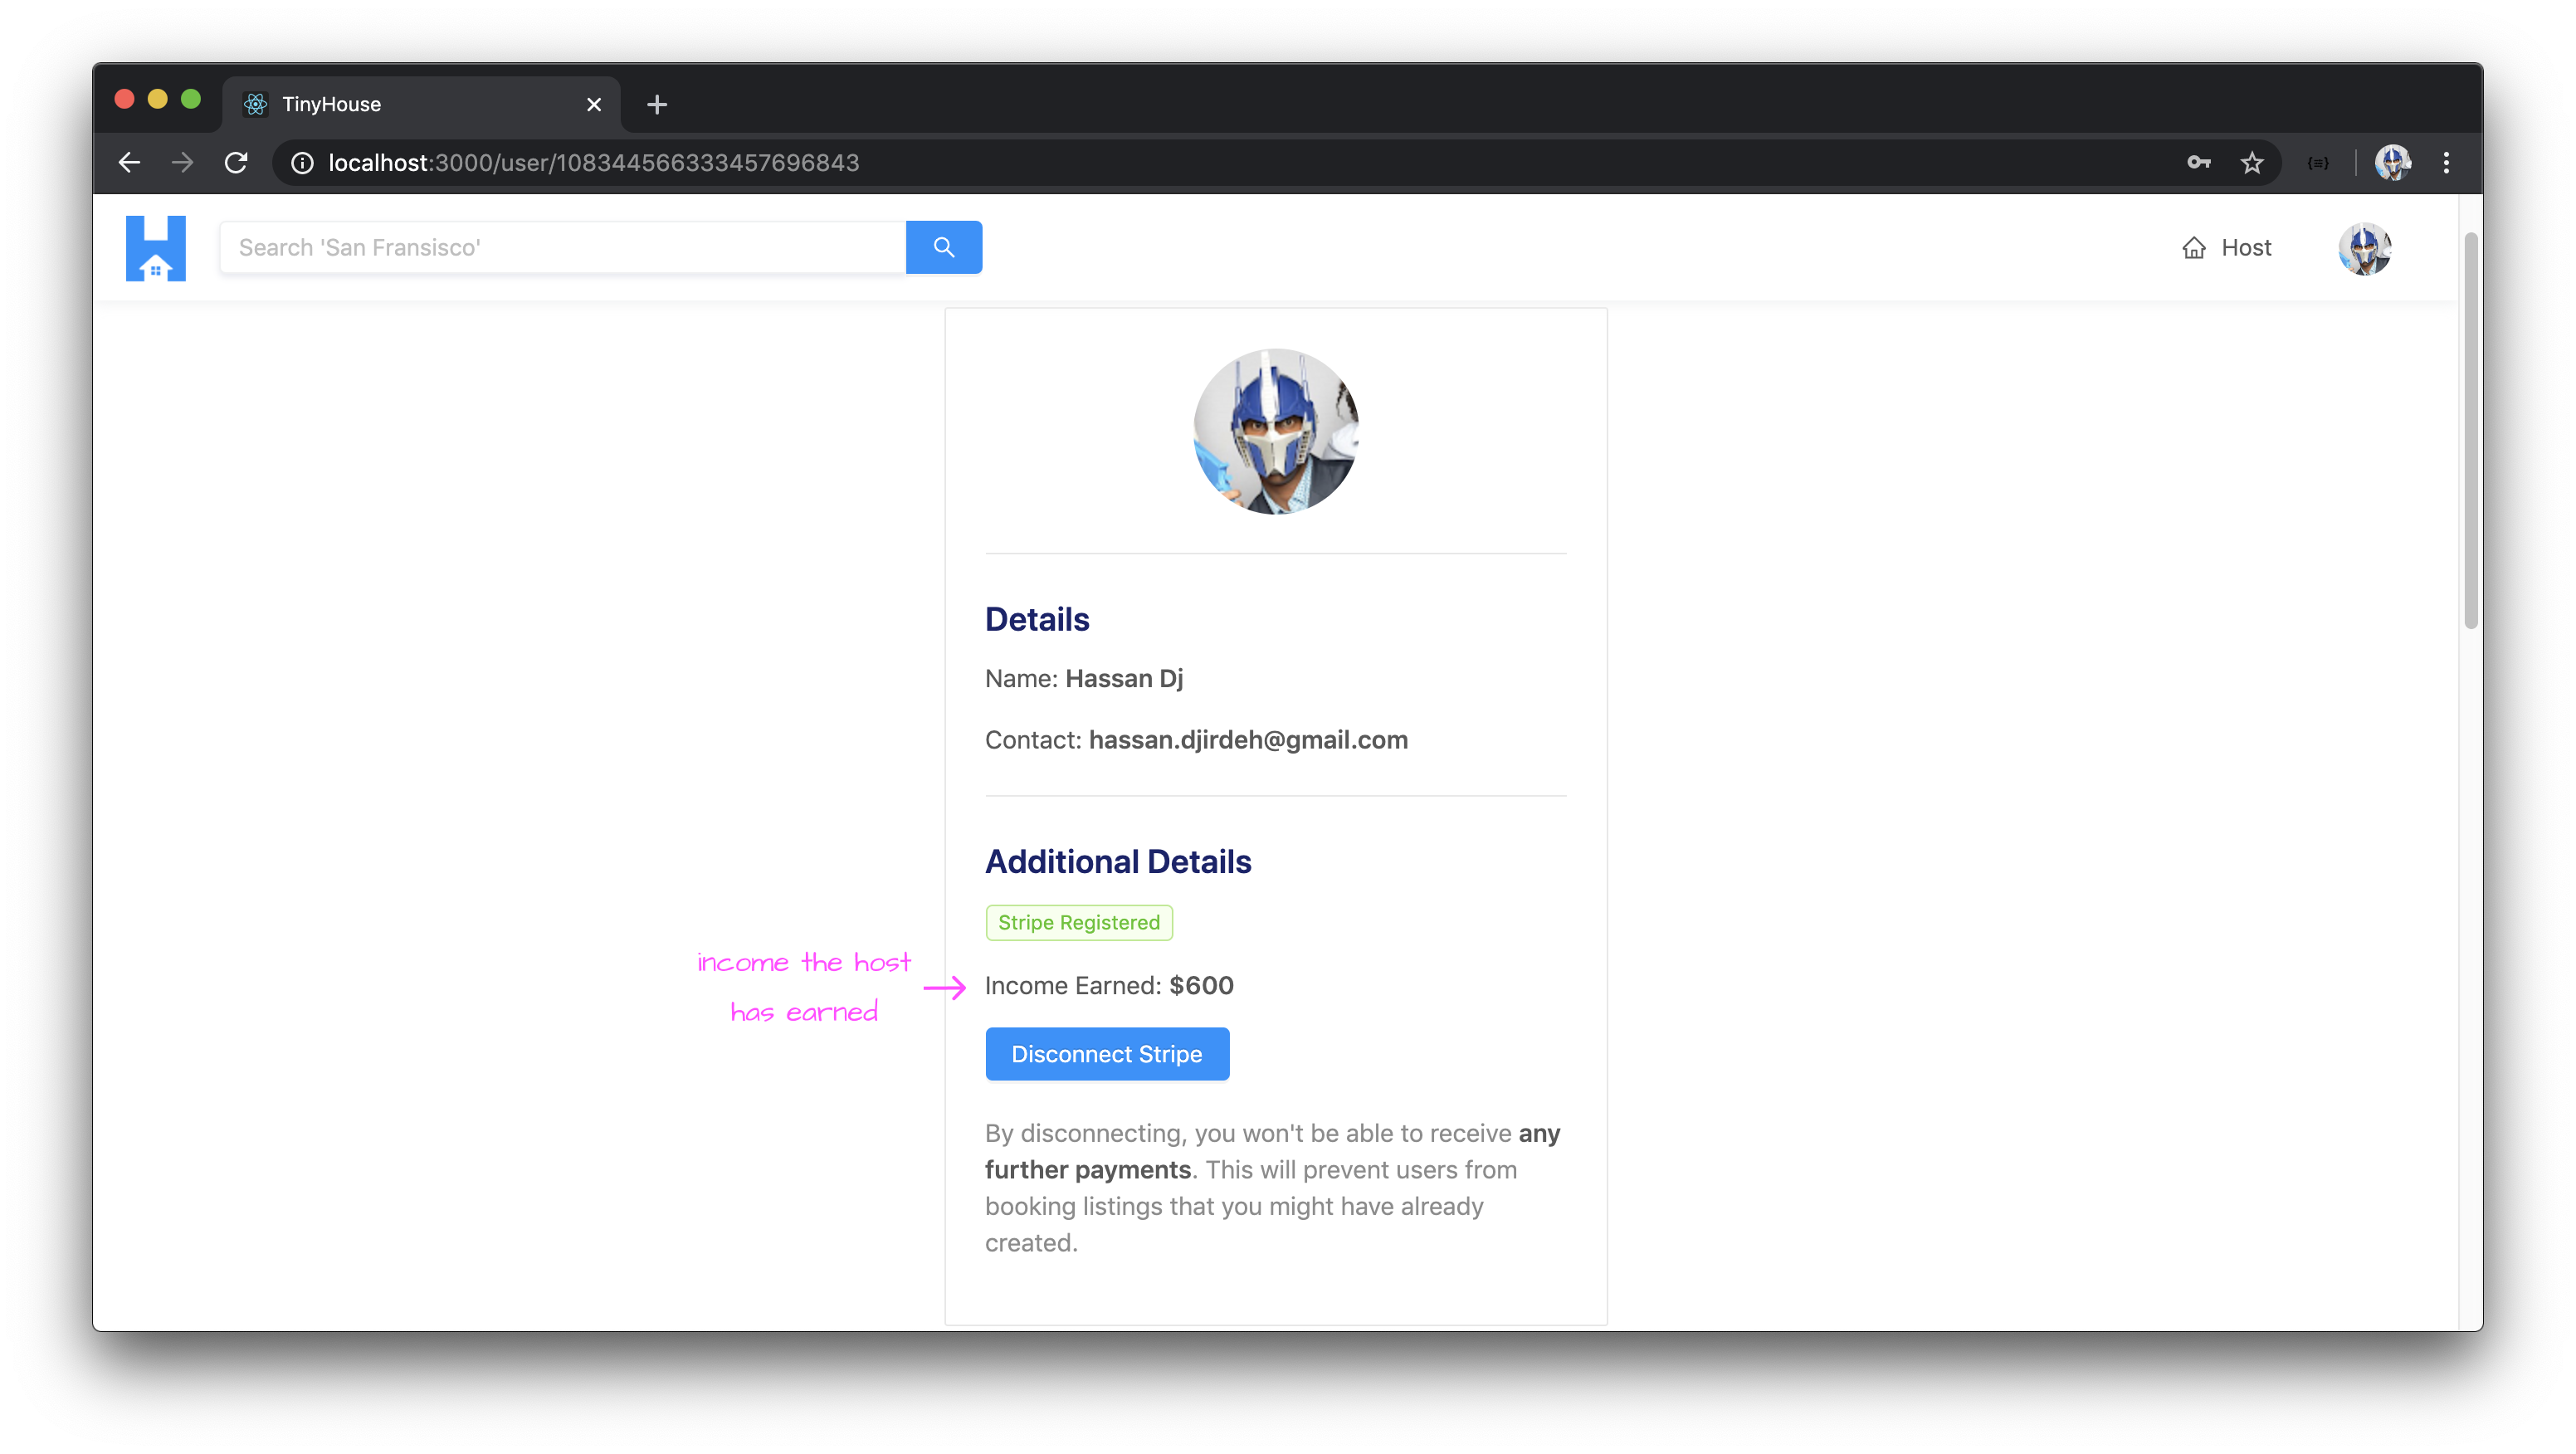
If the host visits their own user page at the appropriate /user/:id route, they’ll notice the income they’ve just made in their user profile section.
If the host was to visit the Payments section of their Stripe dashboard account (while viewing test data), they’ll see the recent payment that has been paid to them!

If the host looks to view at details about the specific payment, they’ll notice the amount extracted for the Stripe and TinyHouse application fees! If we recall, Standard accounts in the Stripe Connect setting are the accounts responsible for paying the fees associated with Stripe and the application marketplace.

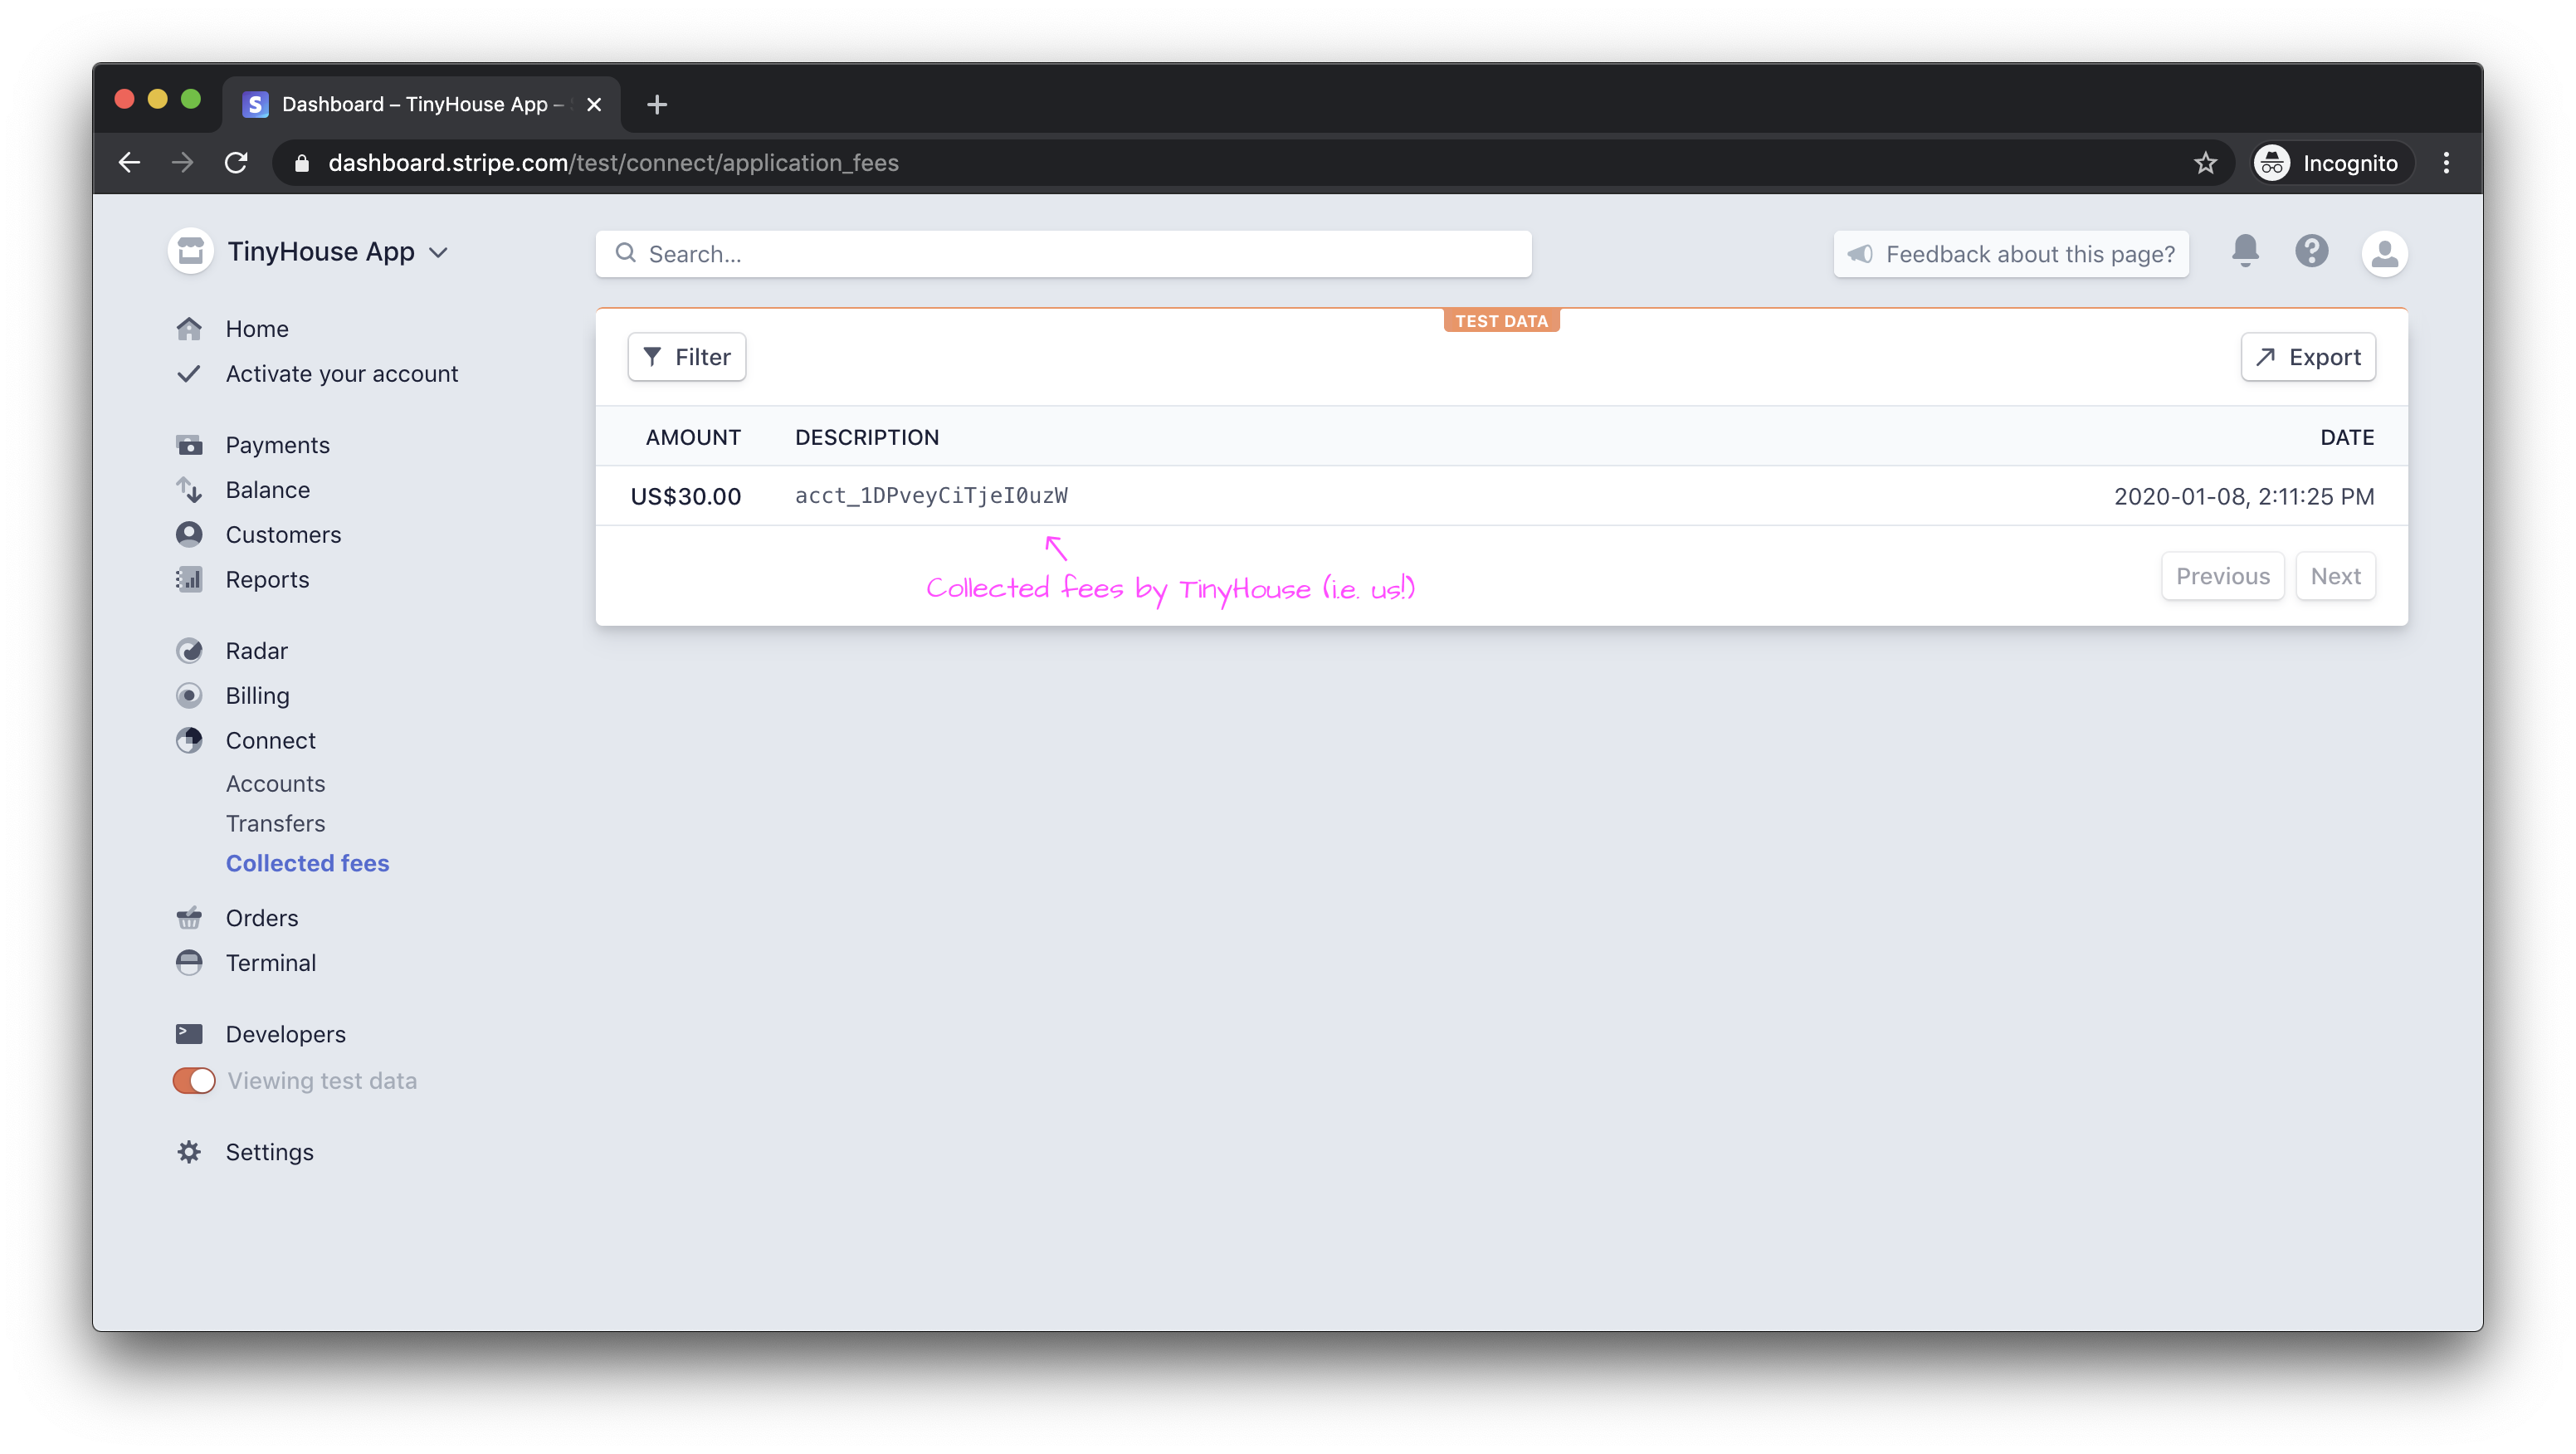
Last but not least, if TinyHouse (i.e. us) visit the Stripe dashboard of our Connect platform account (while viewing test data), we’ll notice the revenue we’ve made as part of the application fee of the payment that was just transferred from tenant to host. This can be seen in the Collected fees section of the Connect tab.
5% of the payment made from tenant to host in this example is $30 .
Amazing! We did it! The main core functionality of our application is now complete! Users can view listings, book new listings, and create listings. For the users that book listings, they pay the person who owns the listing and TinyHouse (i.e. us) receives a small 5% charge of the payment.
Note: For the Stripe payments we collect for a listing, we’ve kept things simple as we only captured a user’s credit card/debit card number, their card expiry date, & CVC code. Depending on the application you’re building, there may be other information you need to capture (e.g the user’s address, postal code, etc.). Stripe Elements provides many different UI elements for us to use to capture the information we may be looking for.
Fantastic job so far! In the next coming module, we’ll address deployment and how we can have our local development app now hosted with the help of Heroku.
MODULE 13 SUMMARY
In this module, we’ve created the capability for users to book listings in our application.
SERVER PROJECT
SRC/GRAPHQL/TYPEDEFS.TS
In the GraphQL API type definitions of our server project, we introduced a new root-level mutation field labeled createBooking .
server/src/graphql/typeDefs.ts
  type Mutation {
    logIn(input: LogInInput): Viewer!
    logOut: Viewer!
    connectStripe(input: ConnectStripeInput!): Viewer!
    disconnectStripe: Viewer!
    hostListing(input: HostListingInput!): Listing!
    createBooking(input: CreateBookingInput!): Booking!
  }
The createBooking mutation accepts an input that is to have an object type of CreateBookingInput . The input is to contain a series of field values that describe the booking that is to be created, such as the id of the listing being booked, the payment source being made, and the check-in/check-out dates of the booking
server/src/graphql/typeDefs.ts
  input CreateBookingInput {
    id: ID!
    source: String!
    checkIn: String!
    checkOut: String!
  }
SRC/GRAPHQL/RESOLVERS/BOOKING/INDEX.TS
We’ve constructed the resolver function for the createBooking mutation in the bookingResolvers map within the src/graphql/resolvers/Booking/index.ts file. The createBooking() resolver function does a few different things:
- The utility
authorize()function is first called to verify the viewer making the request. - The listing document being booked is found from the
idargument passed in as input to the mutation. - A check is made to verify the viewer making the booking is not the host of the listing.
- Another check is made to verify the check-out date is not before the check-in date of the booking.
- The
bookingsIndexobject of the listing is updated to recognize the new dates that have been booked for the listing. - The total price of the booking is determined based on the number of days the listing is being booked.
- A check is made to verify the host is still connected with Stripe such that they will be able to receive payment.
- A Stripe charge is conducted to pay the host from the person creating the booking.
- The
"bookings"collection is updated with a new booking document. - The
incomeof the user document of the host is updated with the new amount of income earned. - The
bookingsfield of the user document of the viewer is updated with theidof the new booking that has been made. - The listing document of the listing being booked is updated to have a new
bookingsIndexobject. Thebookingsfield of the listing document is also updated with theidof the new booking that has been made.
server/src/graphql/resolvers/Booking/index.ts
export const bookingResolvers: IResolvers = {  Mutation: {
    createBooking: async (
      _root: undefined,
      { input }: CreateBookingArgs,
      { db, req }: { db: Database; req: Request }
    ): Promise<Booking> => {
      try {
        const { id, source, checkIn, checkOut } = input;

        let viewer = await authorize(db, req);
        if (!viewer) {
          throw new Error("viewer cannot be found");
        }

        const listing = await db.listings.findOne({
          _id: new ObjectId(id)
        });
        if (!listing) {
          throw new Error("listing can't be found");
        }

        if (listing.host === viewer._id) {
          throw new Error("viewer can't book own listing");
        }

        const checkInDate = new Date(checkIn);
        const checkOutDate = new Date(checkOut);

        if (checkOutDate < checkInDate) {
          throw new Error("check out date can't be before check in date");
        }

        const bookingsIndex = resolveBookingsIndex(
          listing.bookingsIndex,
          checkIn,
          checkOut
        );

        const totalPrice =
          listing.price *
          ((checkOutDate.getTime() - checkInDate.getTime()) / 86400000 + 1);

        const host = await db.users.findOne({
          _id: listing.host
        });

        if (!host || !host.walletId) {
          throw new Error(
            "the host either can't be found or is not connected with Stripe"
          );
        }

        await Stripe.charge(totalPrice, source, host.walletId);

        const insertRes = await db.bookings.insertOne({
          _id: new ObjectId(),
          listing: listing._id,
          tenant: viewer._id,
          checkIn,
          checkOut
        });

        const insertedBooking: Booking = insertRes.ops[0];

        await db.users.updateOne(
          {
            _id: host._id
          },
          {
            $inc: { income: totalPrice }
          }
        );

        await db.users.updateOne(
          {
            _id: viewer._id
          },
          {
            $push: { bookings: insertedBooking._id }
          }
        );

        await db.listings.updateOne(
          {
            _id: listing._id
          },
          {
            $set: { bookingsIndex },
            $push: { bookings: insertedBooking._id }
          }
        );

        return insertedBooking;
      } catch (error) {
        throw new Error(`Failed to create a booking: ${error}`);
      }
    }
  },};
SRC/LIB/API/STRIPE.TS
In the Stripe object instance within the src/lib/api/Stripe.ts file, a charge() function is established to help create a payment charge from the tenant to the host of the listing. The charge() function receives the total amount to be charged, the payment source being made, and the stripe_user_id value of the host account.
When a charge is conducted, 5% of the total amount is additionally charged to the host as an application fee where we (i.e. TinyHouse) receive as revenue.
server/src/lib/api/Stripe.ts
export const Stripe = {  charge: async (amount: number, source: string, stripeAccount: string) => {
    /* eslint-disable @typescript-eslint/camelcase */
    const res = await client.charges.create(
      {
        amount,
        currency: "usd",
        source,
        application_fee_amount: Math.round(amount * 0.05)
      },
      {
        stripe_account: stripeAccount
      }
    );
    /* eslint-enable @typescript-eslint/camelcase */

    if (res.status !== "succeeded") {
      throw new Error("failed to create charge with Stripe");
    }
  }};
CLIENT PROJECT
SRC/LIB/GRAPHQL/MUTATIONS/CREATEBOOKING/INDEX.TS
On the client project, we create the GraphQL document for the new root-level mutation field - createBooking .
client/src/lib/graphql/mutations/CreateBooking/index.ts
import { gql } from "apollo-boost";

export const CREATE_BOOKING = gql`
  mutation CreateBooking($input: CreateBookingInput!) {
    createBooking(input: $input) {
      id
    }
  }
`;
SRC/SECTIONS/LISTING/COMPONENTS/LISTINGCREATEBOOKINGMODAL/INDEX.TSX
The <ListingCreateBookingModal /> component is a child of the <Listing /> section component and is rendered to the user when the user has selected dates to book in the listing page and is ready to make the booking. We use the injectStripe() higher-order function from the react-stripe-elements library to provide a stripe prop object that is to contain information about the payment the user is about to make. We also use the <CardElement /> component from react-stripe-elements to help display the payment element where we can receive payment information from the user.
When the user has provided their payment information and confirmed their booking, the createBooking mutation is triggered. When the createBooking mutation is successful, the modal is closed and the user is notified that the listing has been created.
client/src/sections/Listing/components/ListingCreateBookingModal/index.tsx
export const ListingCreateBookingModal = ({
  id,
  price,
  modalVisible,
  checkInDate,
  checkOutDate,
  setModalVisible,
  clearBookingData,
  handleListingRefetch,
  stripe
}: Props & ReactStripeElements.InjectedStripeProps) => {
  const [createBooking, { loading }] = useMutation<
    CreateBookingData,
    CreateBookingVariables
  >(CREATE_BOOKING, {
    onCompleted: () => {
      clearBookingData();
      displaySuccessNotification(
        "You've successfully booked the listing!",
        "Booking history can always be found in your User page."
      );
      handleListingRefetch();
    },
    onError: () => {
      displayErrorMessage(
        "Sorry! We weren't able to successfully book the listing. Please try again later!"
      );
    }
  });

  const daysBooked = checkOutDate.diff(checkInDate, "days") + 1;
  const listingPrice = price * daysBooked;

  const handleCreateBooking = async () => {
    if (!stripe) {
      return displayErrorMessage("Sorry! We weren't able to connect with Stripe.");
    }

    let { token: stripeToken, error } = await stripe.createToken();
    if (stripeToken) {
      createBooking({
        variables: {
          input: {
            id,
            source: stripeToken.id,
            checkIn: moment(checkInDate).format("YYYY-MM-DD"),
            checkOut: moment(checkOutDate).format("YYYY-MM-DD")
          }
        }
      });
    } else {
      displayErrorMessage(
        error && error.message
          ? error.message
          : "Sorry! We weren't able to book the listing. Please try again later."
      );
    }
  };

  return (
    <Modal
      visible={modalVisible}
      centered
      footer={null}
      onCancel={() => setModalVisible(false)}
    >
      <div className="listing-booking-modal">
        <div className="listing-booking-modal__intro">
          <Title className="listing-boooking-modal__intro-title">
            <Icon type="key"></Icon>
          </Title>
          <Title level={3} className="listing-boooking-modal__intro-title">
            Book your trip
          </Title>
          <Paragraph>
            Enter your payment information to book the listing from the dates between{" "}
            <Text mark strong>
              {moment(checkInDate).format("MMMM Do YYYY")}
            </Text>{" "}
            and{" "}
            <Text mark strong>
              {moment(checkOutDate).format("MMMM Do YYYY")}
            </Text>
            , inclusive.
          </Paragraph>
        </div>

        <Divider />

        <div className="listing-booking-modal__charge-summary">
          <Paragraph>
            {formatListingPrice(price, false)} * {daysBooked} days ={" "}
            <Text strong>{formatListingPrice(listingPrice, false)}</Text>
          </Paragraph>
          <Paragraph className="listing-booking-modal__charge-summary-total">
            Total = <Text mark>{formatListingPrice(listingPrice, false)}</Text>
          </Paragraph>
        </div>

        <Divider />

        <div className="listing-booking-modal__stripe-card-section">
          <CardElement hidePostalCode className="listing-booking-modal__stripe-card" />
          <Button
            size="large"
            type="primary"
            className="listing-booking-modal__cta"
            loading={loading}
            onClick={handleCreateBooking}
          >
            Book
          </Button>
        </div>
      </div>
    </Modal>
  );
};

export const WrappedListingCreateBookingModal = injectStripe(ListingCreateBookingModal);
MODULE 14 INTRODUCTION
For the last core module of Part II of the course, we’ll investigate how we can deploy our application!
In this module, we’ll:
- Briefly talk about cloud computing and the difference between Platform as a service , Infrastructure as a service , and Software as a service .
- Leverage Heroku to have our application deployed!
CLOUD COMPUTING
We’ve finished building the application that we’ve wanted so we’ll now focus on deployment. There’s no use in having a great app if we can’t deploy it for others to use!
Before we dive into what form of deployment we’re going to conduct, let’s talk about an important topic that might be obvious to some and pretty new to others, and that is cloud computing . Microsoft Azure’s documentation on cloud computing has a very good paragraph in introducing what this means:
“… cloud computing is the delivery of computing services—including servers, storage, databases, networking, software, analytics, and intelligence—over the Internet (“the cloud”) to offer faster innovation, flexible resources, and economies of scale…”
Why is the topic of cloud computing important within the concept of deployment? Before cloud computing became widely adopted, if we wanted to deploy an application over the web (like what we want to do with TinyHouse), we most likely had to:
- Buy the hardware (e.g. CPU, RAM, Hard Drive, Routers, etc.).
- Install the hardware.
- Setup networking and security.
- Install an operating system (e.g. Linux).
- Install any other required software to run our application (e.g. the Node runtime environment).
- And once all of the above steps are complete, host our application on the internet.
What happens if our CPU/RAM (or any other piece of hardware) fails? Our app would become offline. What happens if our app becomes very popular and our hardware cannot keep up? Our app would become sluggish and we’ll have to buy more hardware. What if there is a usage peak at certain hours of the day? We’ll have to buy hardware to handle just that peak, and for the remainder of the day, some of our hardware might be unnecessary to have.
Cloud computing helps address all of these concerns! For the same reasons we’re hosting our database in the cloud with MongoDB Atlas, we’re going to deploy our application to the cloud. By deploying our application to the cloud, we’ll have the following advantages:
- No maintenance - no hardware maintenance to perform.
- High reliability and availability - we can configure your app to have multiple instances (i.e. multiple copies) deployed around the globe which minimizes latency and can ensure our app stays online even if one instance fails.
- Easier scalability - no hardware upgrades to perform and scaling can be done with a few button clicks. For some services like AWS or Google Cloud Platform, we can even choose to scale automatically depending on the real-time load.
A lot of these factors come into play to lead to lower overall costs .
IAAS VS PAAS VS SAAS
With that said, let’s gather and explain some definitions. If you’ve ever looked into cloud computing, you’ve probably heard one of these upcoming terms.
Infrastructure as a service (IaaS)
Instead of buying racks of hardware, maintaining and updating that hardware, and storing that hardware somewhere in our room, we can “rent” servers or computation power. AWS and Google Cloud (i.e. in particular Amazon EC2 and Google Compute Engine) are IaaS. With an IaaS, we’re still responsible for installing all the software to run our app .
Platform as a service (PaaS)
With PaaS, we get everything from an IaaS solution plus all the software required to run an application . In other words, we won’t have to worry about installing an Operating System like Linux, or the drivers, or any runtime environments. All we have to do is develop our application and upload it to a PaaS! Compared with an IaaS solution, there’s less customization here .
Software as a service (SaaS)
With SaaS, instead of software being installed on our computer, the software now resides in the cloud. In other words, someone else has a physical server that is running and hosting the software and we’re are just accessing a copy of it. The Maps app on macOS, when used, is physically installed on our computer. As a result, the Maps app is not a SaaS. If we, however, go to Google Maps on a browser, we are accessing an application hosted on Google’s server. Google Maps (at least the browser version) is a SaaS.
For IaaS and PaaS, the end-user is the developer, the programmer, or in other words, you! These solutions are targeted towards the people building the application .
For a SaaS, the end-user is the person that is using the deployed app (e.g. the person logging onto TinyHouse and renting listings).
With these definitions in mind, we’ll be using a PaaS (Heroku) to deploy our SaaS app (TinyHouse) .
DEPLOYING WITH HEROKU
HEROKU SIGN UP
Heroku is a platform as a service (PaaS) that’s been around since June 2007. Heroku supports the deployment of several programming languages such as Ruby, Java, Node.js, Scala, Clojure, Python, PHP, and Go.
Traditionally established to help allow applications be deployed, Heroku now offers multiple different products like their Platform tool to help deploy applications and their data services solution which consists of Heroku allowing us to use a Postgres database on the cloud, Redis, and Kafka. There’s also Heroku’s Enterprise tool which is a more targeted solution for enterprises and large scale companies.
We’re particularly interested in their Platform product which is to help us deploy and run our app on Heroku’s Platform As A Service solution. The diagram shown below from Heroku’s documentation is a good illustration of how apps can be deployed with Heroku’s Platform.
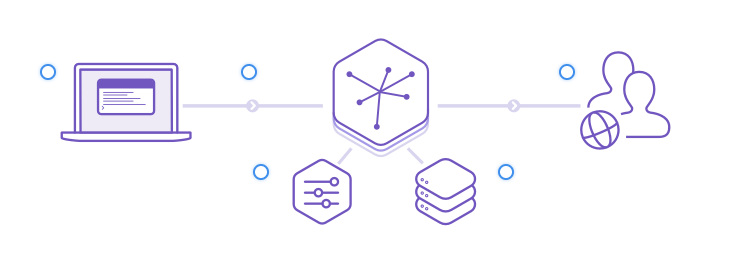
- At first, developers deploy the code.
- When an app is deployed onto Heroku’s platform, Heroku runs the app in containers that are labeled as Dynos. Dynos (or containers) are isolated environments that provide memory, an operating system, a filesystem/etc. and are the areas that package the application’s code and dependencies.
- The Heroku dashboard gives us information on how our app is running, the dynos that are being used, etc.
- When a user makes a request to an endpoint that Heroku serves for our application, the user can use the deployed app.
Heroku offers a pretty simple to understand pricing plan and the most primitive plan is Free which is perfect for testing and experimentation.
Note: With the free plan, an app will go to sleep after 30 min of inactivity and will awake as soon as a user tries to access it again (the awake process takes about 15 sec to complete). This isn’t ideal for applications we expect users to use often but is perfect for experimenting with the deployment of an application on the cloud. We’ll be sticking with the Free plan for this lesson but Heroku does provide very simple capabilities to move from one pricing plan to the next.
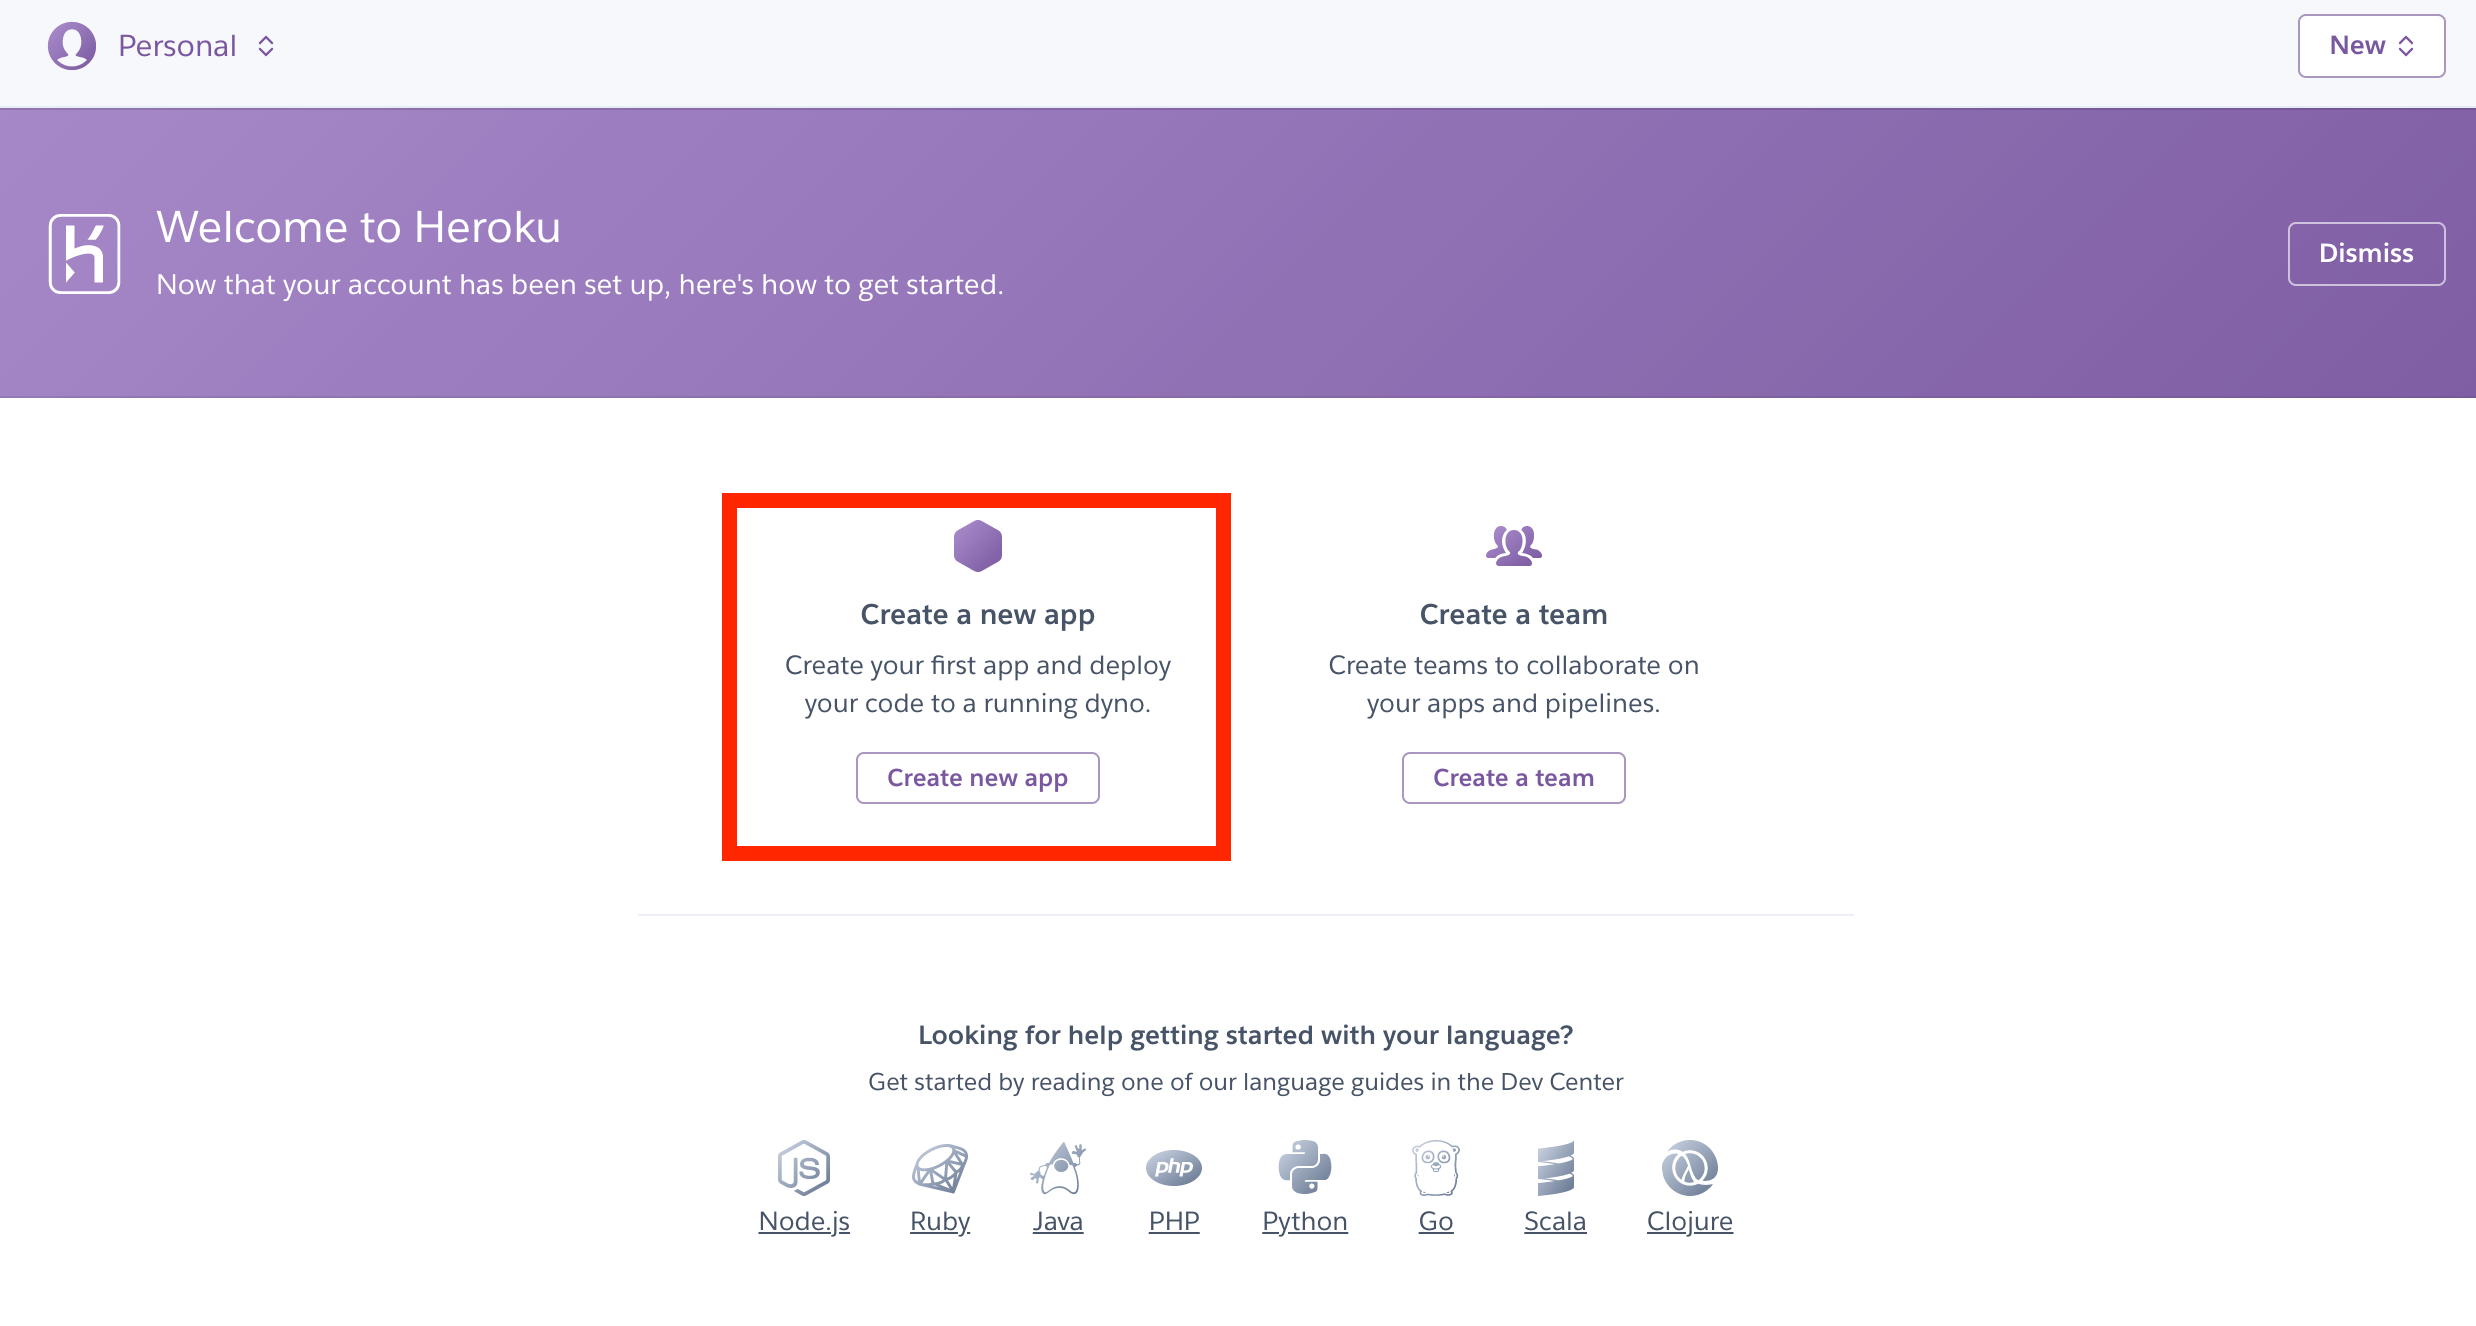
To use Heroku, you’ll need to sign in or create an account. Head over to https://www.heroku.com and click Sign up (or Log in if you already have an account). When logged in to Heroku, you’ll land in the following page and be prompted to create a new app or a team. Click Create a new app :
Next, enter your desired app name:

When an application name is provided, we’ll then be shown the dashboard for our Heroku application.
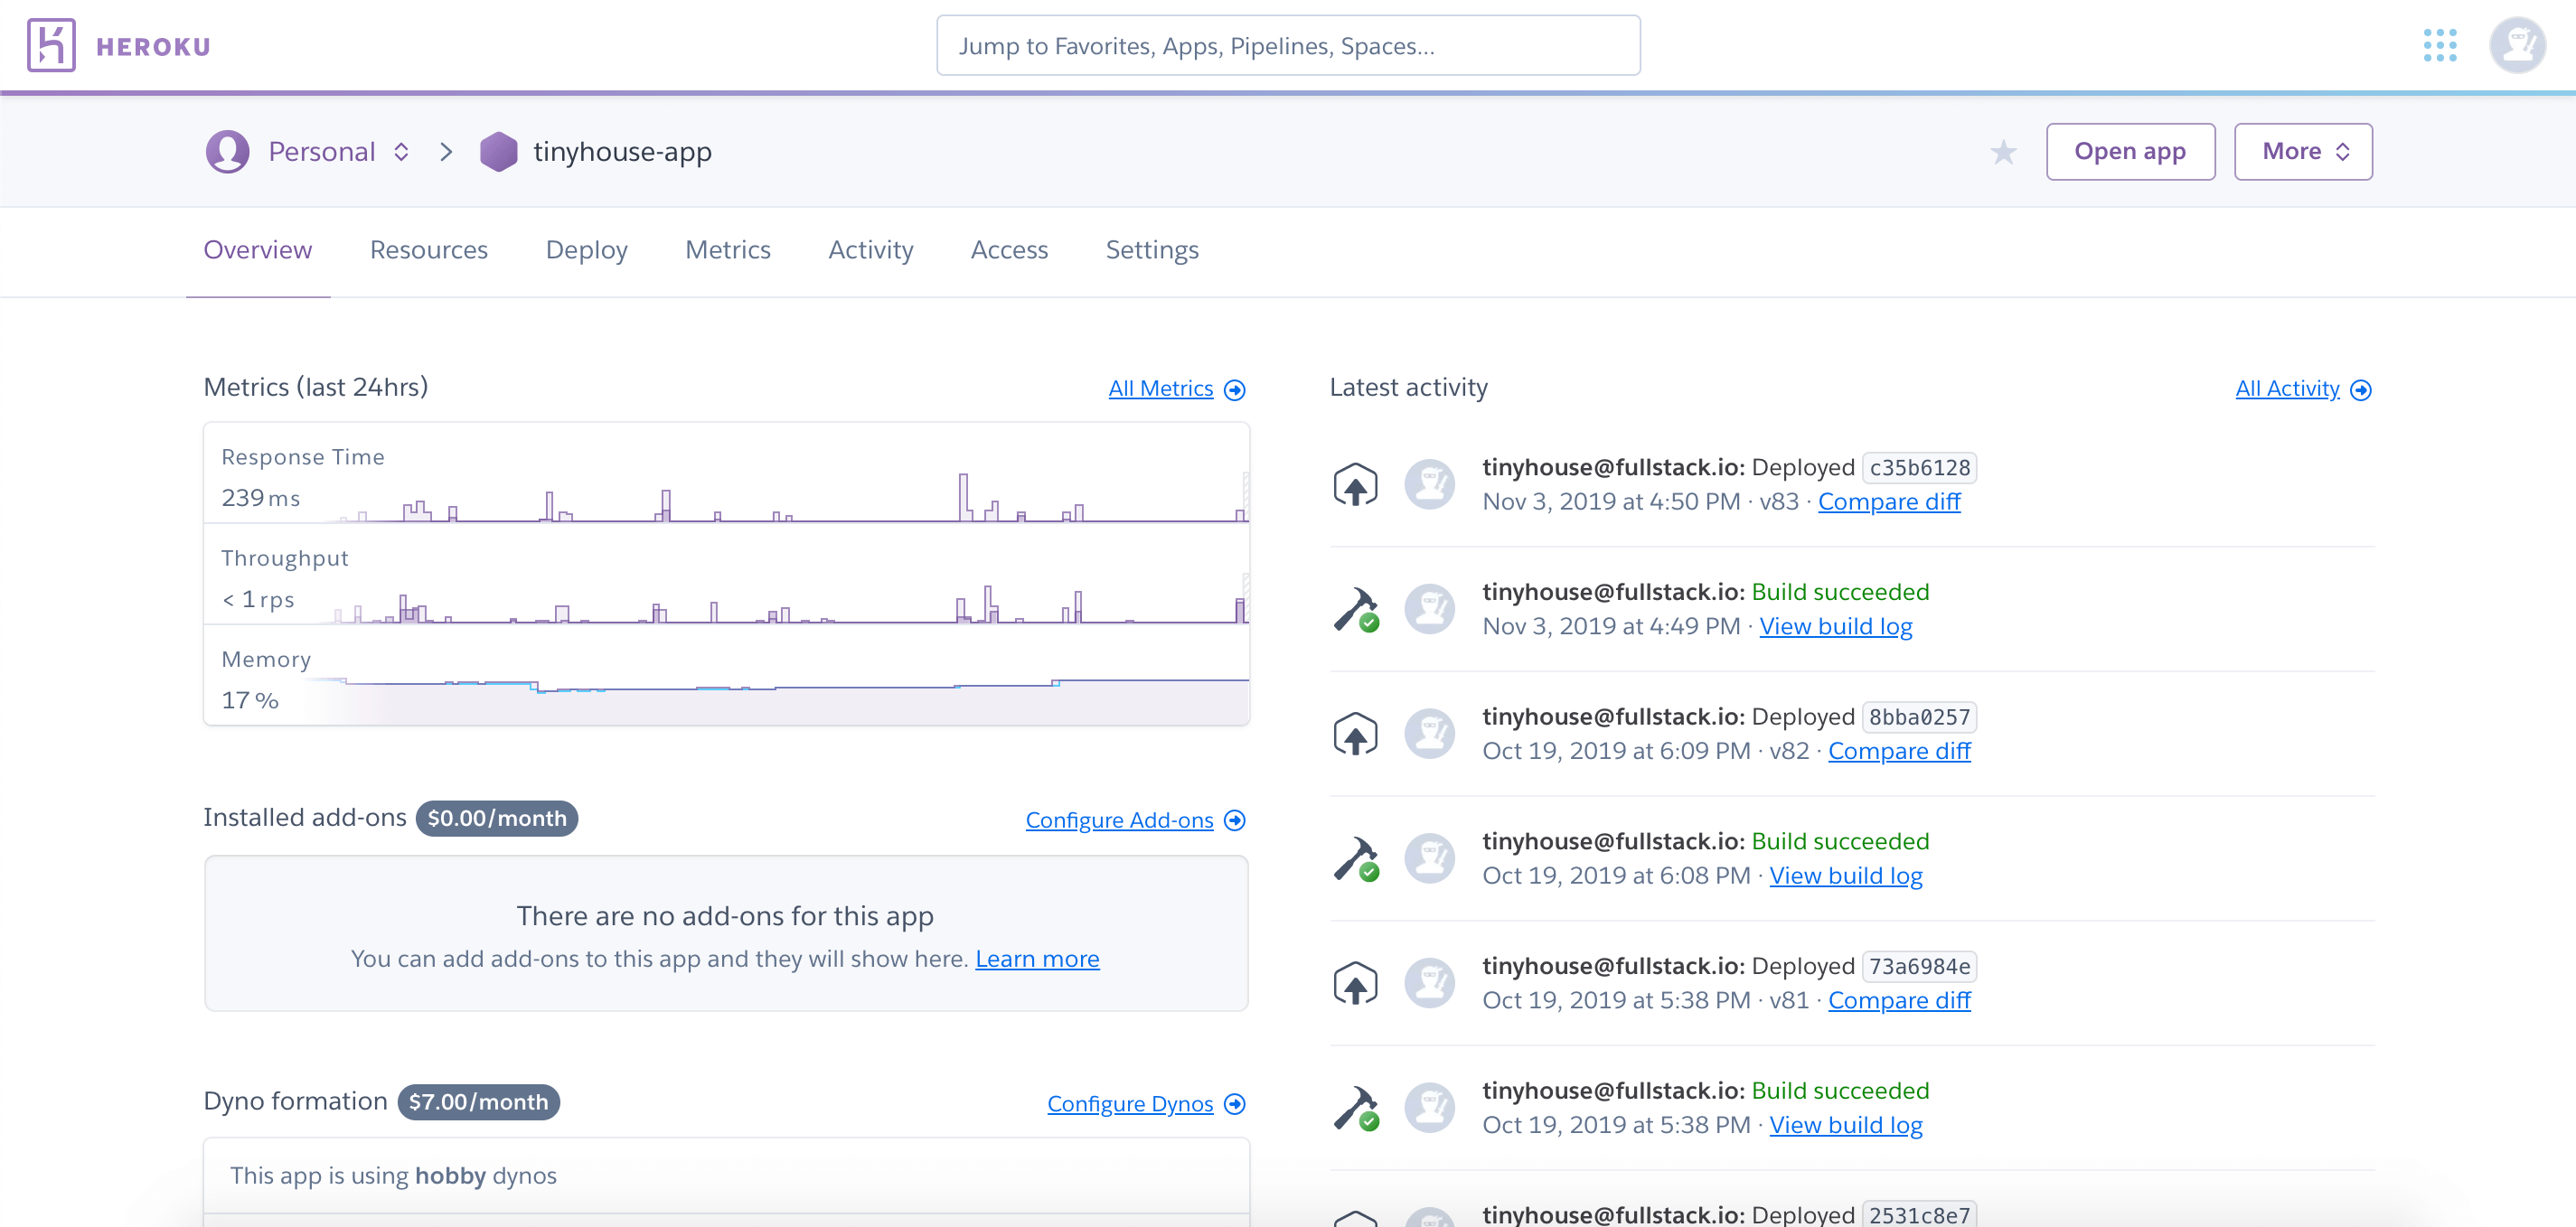
The dashboard is where we can see information and statistics of our application. We’ll be able to see an overview of the Heroku app, the resources, the dyno process types, the add-ons that we may have added, the cost of each of these add-ons, the metrics associated with our deployed application, any activity that’s been done, and other things as well.
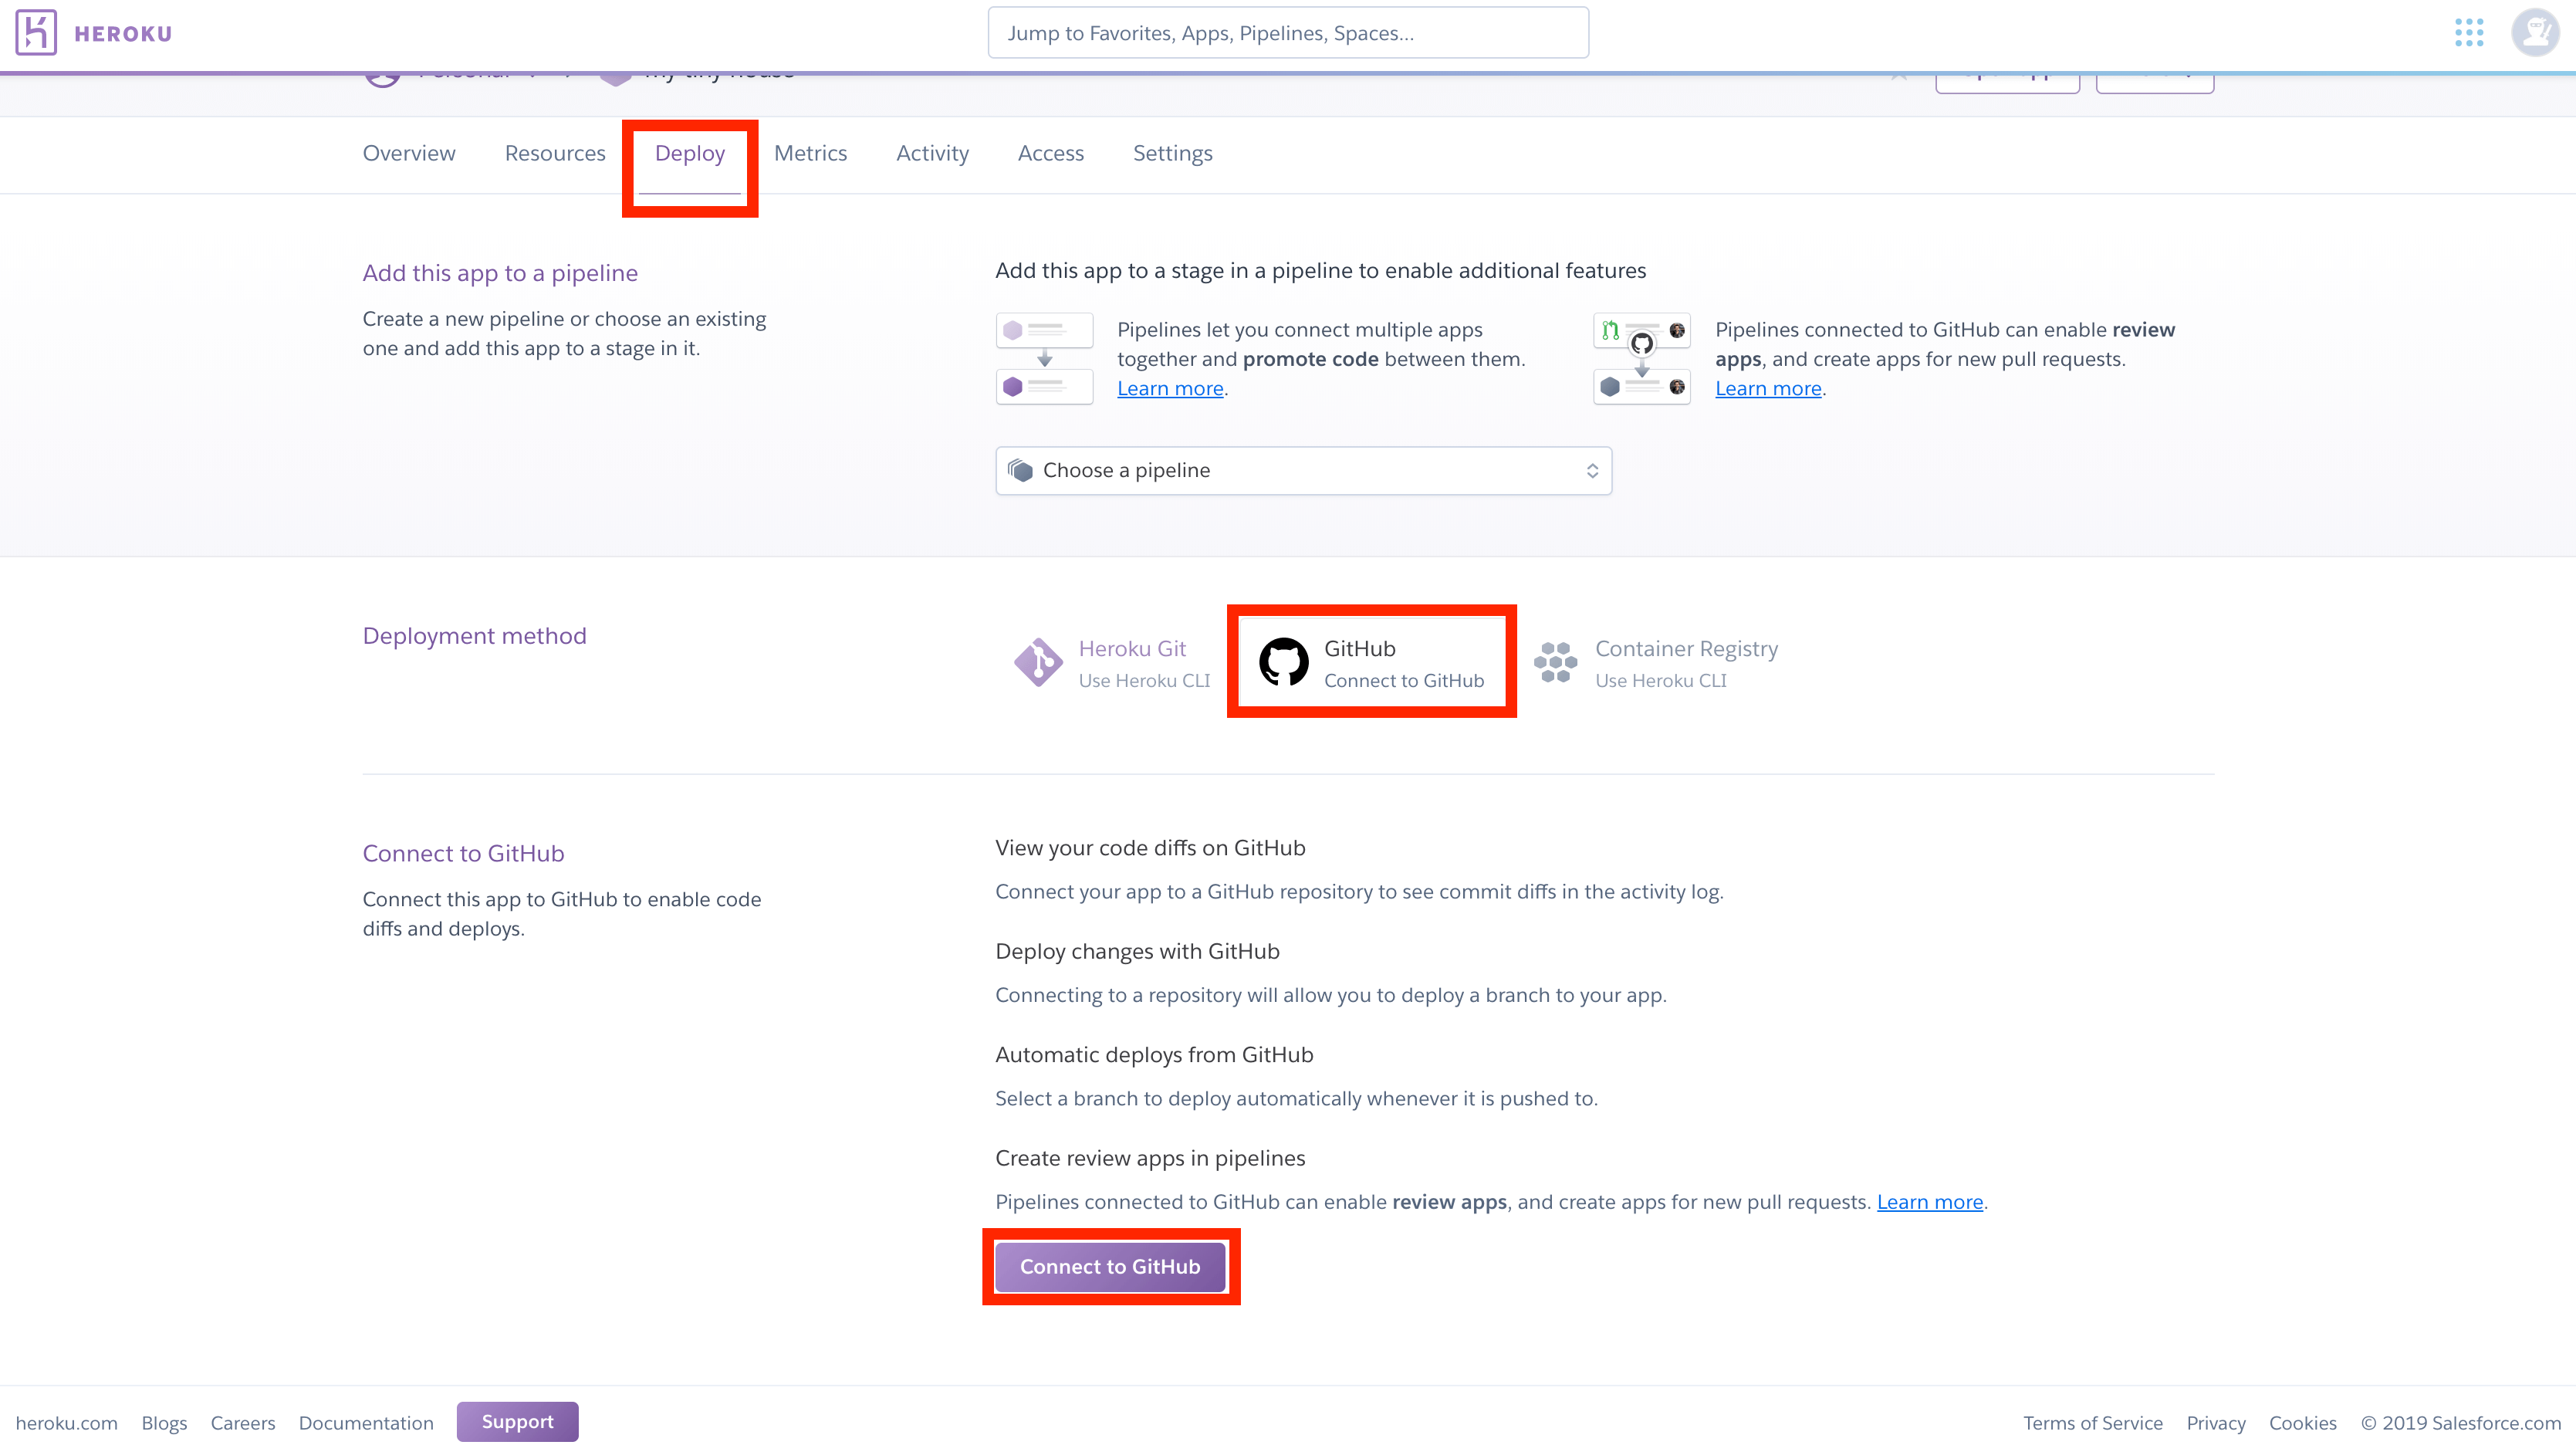
If we click the Deploy tab, we’re given some information on the different deployment methods that we can use. There are essentially three main deployment methods.
- We can use the Heroku CLI (i.e. Heroku Command Line Interface).
- We can connect directly to a GitHub project.
- We can use the Container Registry option.
We’re going to go with the approach of trying to connect our Heroku app onto an actual GitHub repository.
OVERVIEW OF DEPLOYMENT
In development, we have two separate applications.
- We have the server , which is the Node/Express/TypeScript application.
- We have the client , which is the React/Webpack/TypeScript app.
TypeScript
There are a few things we need to think about but the very first thing that might come to mind is that both our server and client projects are TypeScript projects. TypeScript is a development tool and is unrecognizable within a Node server or a web browser. The first thing we’ll have to do is ensure that both our server and client code are written in plain JavaScript. If we recall in the very beginning, within Part I of our course, we’ve mentioned how both the server and client projects have build scripts that allow us to build the projects into their actual JavaScript formats.
Single Node/Express Server
Node.js can be used within our Heroku deployment setup but React isn’t understood in the browser. To have our client application be deployed, we’ll need to run the build script within our Create React App project not to only compile the TypeScript code to JavaScript but to also compile the React specific code to standard HTML, CSS, and JavaScript .
To have our server and client projects deployed, we could follow the same format we have in development and deploy the Node server application in one location and have the compiled React application deployed in another location. The compiled client application can then interact with the API from the deployed server project.
Another approach would essentially involve keeping the client and server together and instead of having our Node/Express server just serve the API, we can have our Node/Express server also serve the client application . This is the approach we’ll be going with!
DEPLOYMENT TO HEROKU
Let’s get started in deploying our application. We’ll first create a new folder called tinyhouse-deploy/ that is to contain our prepared application to be deployed onto Heroku.
client/
server/
tinyhouse-deploy/
In our new tinyhouse-deploy/ folder, we’ll create a .gitignore file which is the file responsible for telling Git which files in our directory can be ignored. We’ll simply copy over what we had in our server project.
# dependencies
node_modules/

# production
build/

# misc
.DS_Store

# environment variables
.env

npm-debug.log*
yarn-debug.log*
yarn-error.log*
We’ll then create a package.json file in the tinyhouse-deploy/ directory and for now simply specify a few fields which consist of a start script that is to run the contents of a src/index.js file:
{
  "name": "tinyhouse-deploy",
  "version": "0.1.0",
  "private": true,
  "scripts": {
    "start": "node src/index.js"
  }
}
Before we begin to compile our server and client projects and bring the compiled output over to our new folder, there are a few changes we’ll first need to make.
When we deploy a Node project onto Heroku, we should tell Heroku which version of Node.js is being used such that it is to match the runtime we’ve been developing with. To accomplish this, we’ll need to add an engines property in our tinyhouse-deploy/ package.json file. The Heroku documentation states that it’s highly recommended to specify the Node version that is the same as the version that’s currently running in our development environment. We can check this when we head to our terminal and run node -v . For example, since we’re running Node version 12.4.0 , we’ll specify a Node version of 12.4.0 in the tinyhouse-deploy/ package.json file.
{
  // ...
  "engines": {
    "node": "12.14.0"
  },
  // ...
}
Compressing HTTP Responses
We’ll want our server app to serve our React client app which essentially will send a copy of the React client whenever a user loads the app in the browser. Since we’re interested in doing this, we should use a compression library to compress the files that are going to be served into a smaller size.
Oftentimes within the world of compression, the term Gzip is often used and it’s a form of data compression that is performed optimally on text-based assets like CSS, JavaScript, and HTML. Gzip can significantly reduce the bandwidth cost of launching a site and it helps contribute to the user having to download smaller files to have the web app launched. At the end of the day, this leads to better performance.
Heroku does not modify HTTP requests and responses sent by the application, and therefore does not implement HTTP compression on its own . The Heroku documentation points to different resources where compression can be applied depending on the languages being used. For our Node server project, we’ll use the compression library.
compression is a middleware built for Node/Express applications and is built by the Express team themselves. It supports both deflate and Gzip compression.
In our Node server development project, we’ll head over to the terminal and install the compression library as a dependency.
npm i compression
We’ll also install the community prepared type definitions.
npm i -D @types/compression
In the root index.ts file of our server project, we’ll import the compression() function from the compression library.
server/src/index.ts
import compression from "compression";
In the same file and where we declare all our server middleware, we’ll specify another middleware that is to have the compression() function be run.
server/src/index.ts
app.use(compression());
Serving the static client files
At this moment, let’s now see how we can have our Node/Express application serve the (to be built) client static files. When the client code gets compiled eventually to HTML, CSS, and JavaScript, we’ll assume that we’re going to place that compiled client code within a directory in our server project called client/ . To serve these client assets, we can specify another Express middleware and use the express.static() function which can be used to serve static files.
server/src/index.ts
app.use(express.static(`${__dirname}/client`));
__dirname__, in Node, references the directory name of the current module and helps provide the absolute path of the directory that contains the currently executed process.
Next, we’ll tell our Node/Express server that when a GET request is made to any route, we want to serve the index.html file that’s going to be contained within the client/ folder:
server/src/index.ts
  app.use(express.static(`${__dirname}/client`));
  app.get("/*", (_req, res) => res.sendFile(`${__dirname}/client/index.html`));
This essentially states that, regardless of what route the user hits, the server is going to serve and show the same index.html file . Why? This is because TinyHouse is a single-page application . Regardless of what route the user hits, the client will be served the same file. However, our client will then take the responsibility to determine which content to render depending on which route the user is in (remember how we’ve used React Router?). This is the definition of a single-page application which is different from server-rendered applications. Server-rendered React applications would have the server serve different files depending on the route the user hits.
require("dotenv")
We won’t actually need an environment file in our built server application since our Heroku app would declare all the environment variables at runtime. With that said, we can remove the require("dotenv").config() function at the very top of our src/index.ts file in our server project.
If we recall, we’ve introduced some environment variables in our React client application as well which consist of the Client ID and Publishable Key of our Stripe environment setup. It’s important to note that the environment variables within a React client application are different from the way it’s handled in our server application. When we build our React client project, our Create React App project simply takes the values of our environment variables and directly places them in the code upon build. This is why the environment variables within our React app should never be secret .
THE BUILD PROCESS
Let’s now begin the build process for both our server and client projects. We’ll head to the terminal and in our server project, we’ll run the npm run build command we have in our application scripts that will build the Node/Express/TypeScript code and compile it into valid JavaScript.
server: $ npm run build
After our build process is successful, we’ll now see a build/ folder that exists in our server project directory that represents our server code in JavaScript.
We’ll head back to the terminal and in our client project, we’ll run the npm run build command. Not only will this compile the TypeScript code to JavaScript, but it would also compile the React development code to valid HTML, CSS, and JavaScript.
client: $ npm run build
After the build is successful, if we were to take a look at our client project, there will be a new build/ folder. If we take a look inside the client/build/ folder, we’ll see an index.html file which is the index.html file that we want our Node/Express server application to serve on every single request that is made.
At this moment, there are build/ folders for both our client and server projects. We’ll move the build/ folder in our client/ directory into the build/ folder within our server/ project and we’ll rename it to say client/ within the server project.
Before :
client/
  build/
  // ...

server/
  build/
  // ...
After :
client/
  // ...

server/
  build/
    client/ <----- this was our client/build/ folder
  src/
  // ...
Within the build/ of our server, when any request is made, it’s going to serve and send the index.html file within the server/build/client/ folder.
The next thing we’ll do is move the server/build/ folder into the tinyhouse-deploy/ directory we’ve set up earlier. We’ll rename this build/ folder to then be called src/ . This src/ folder will be the entry point of our actual deployed Node.js application. When Heroku is to run the start script available in our tinyhouse-deploy/ directory, it’s going to run the index.js file of the src/ folder.
Before :
server/
  build/
    client/
  // ...
After :
server/
  // ...

tinyhouse-deploy/
  src/ <----- this was our server/build folder
    client/
  // ...
Finally, we’ll need to tell the Node/Express application we’re going to deploy what dependencies it’s going to need. To do this, we can simply copy over all the dependencies we have in our server/ project into our tinyhouse-deploy/ project. We won’t need to copy over the devDependencies since the development dependencies are utility packages that are used only for deployment .
{
  "name": "tinyhouse-deploy",
  "version": "0.1.0",
  "private": true,
  "engines": {
    "node": "12.14.0"
  },
  "dependencies": {
    "@google/maps": "^1.0.2",
    "apollo-server-express": "^2.6.4",
    "body-parser": "^1.19.0",
    "cloudinary": "^1.17.0",
    "cookie-parser": "^1.4.4",
    "express": "^4.17.1",
    "googleapis": "^42.0.0",
    "graphql": "^14.3.1",
    "lodash.merge": "^4.6.2",
    "mongodb": "^3.2.7",
    "stripe": "^7.13.1"
  },
  "scripts": {
    "start": "node src/index.js"
  }
}
That’s it. Our tinyhouse-deploy/ web app should now be ready to be deployed!
DEPLOYING WITH HEROKU
We’ll head over to the Heroku dashboard for our newly created Heroku application and navigate to the Deploy section. We’ll now try to connect our Heroku app with an actual GitHub repo. With that said, we’ll need to have our tinyhouse-deploy/ application source code pushed up to GitHub.
In a very brief explanation, Git is a version control system that helps control the flow of code being pushed. It can be used for both small and very large projects. There are many different hosting providers that exist, GitHub, GitLab, BitBucket, etc. We’re going to be using GitHub which is what Heroku supports.
Once we’ve pushed the code of our tinyhouse-deploy/ folder to a new GitHub repository, we’ll head back to our Heroku dashboard to search and connect our new repo to our Heroku app.
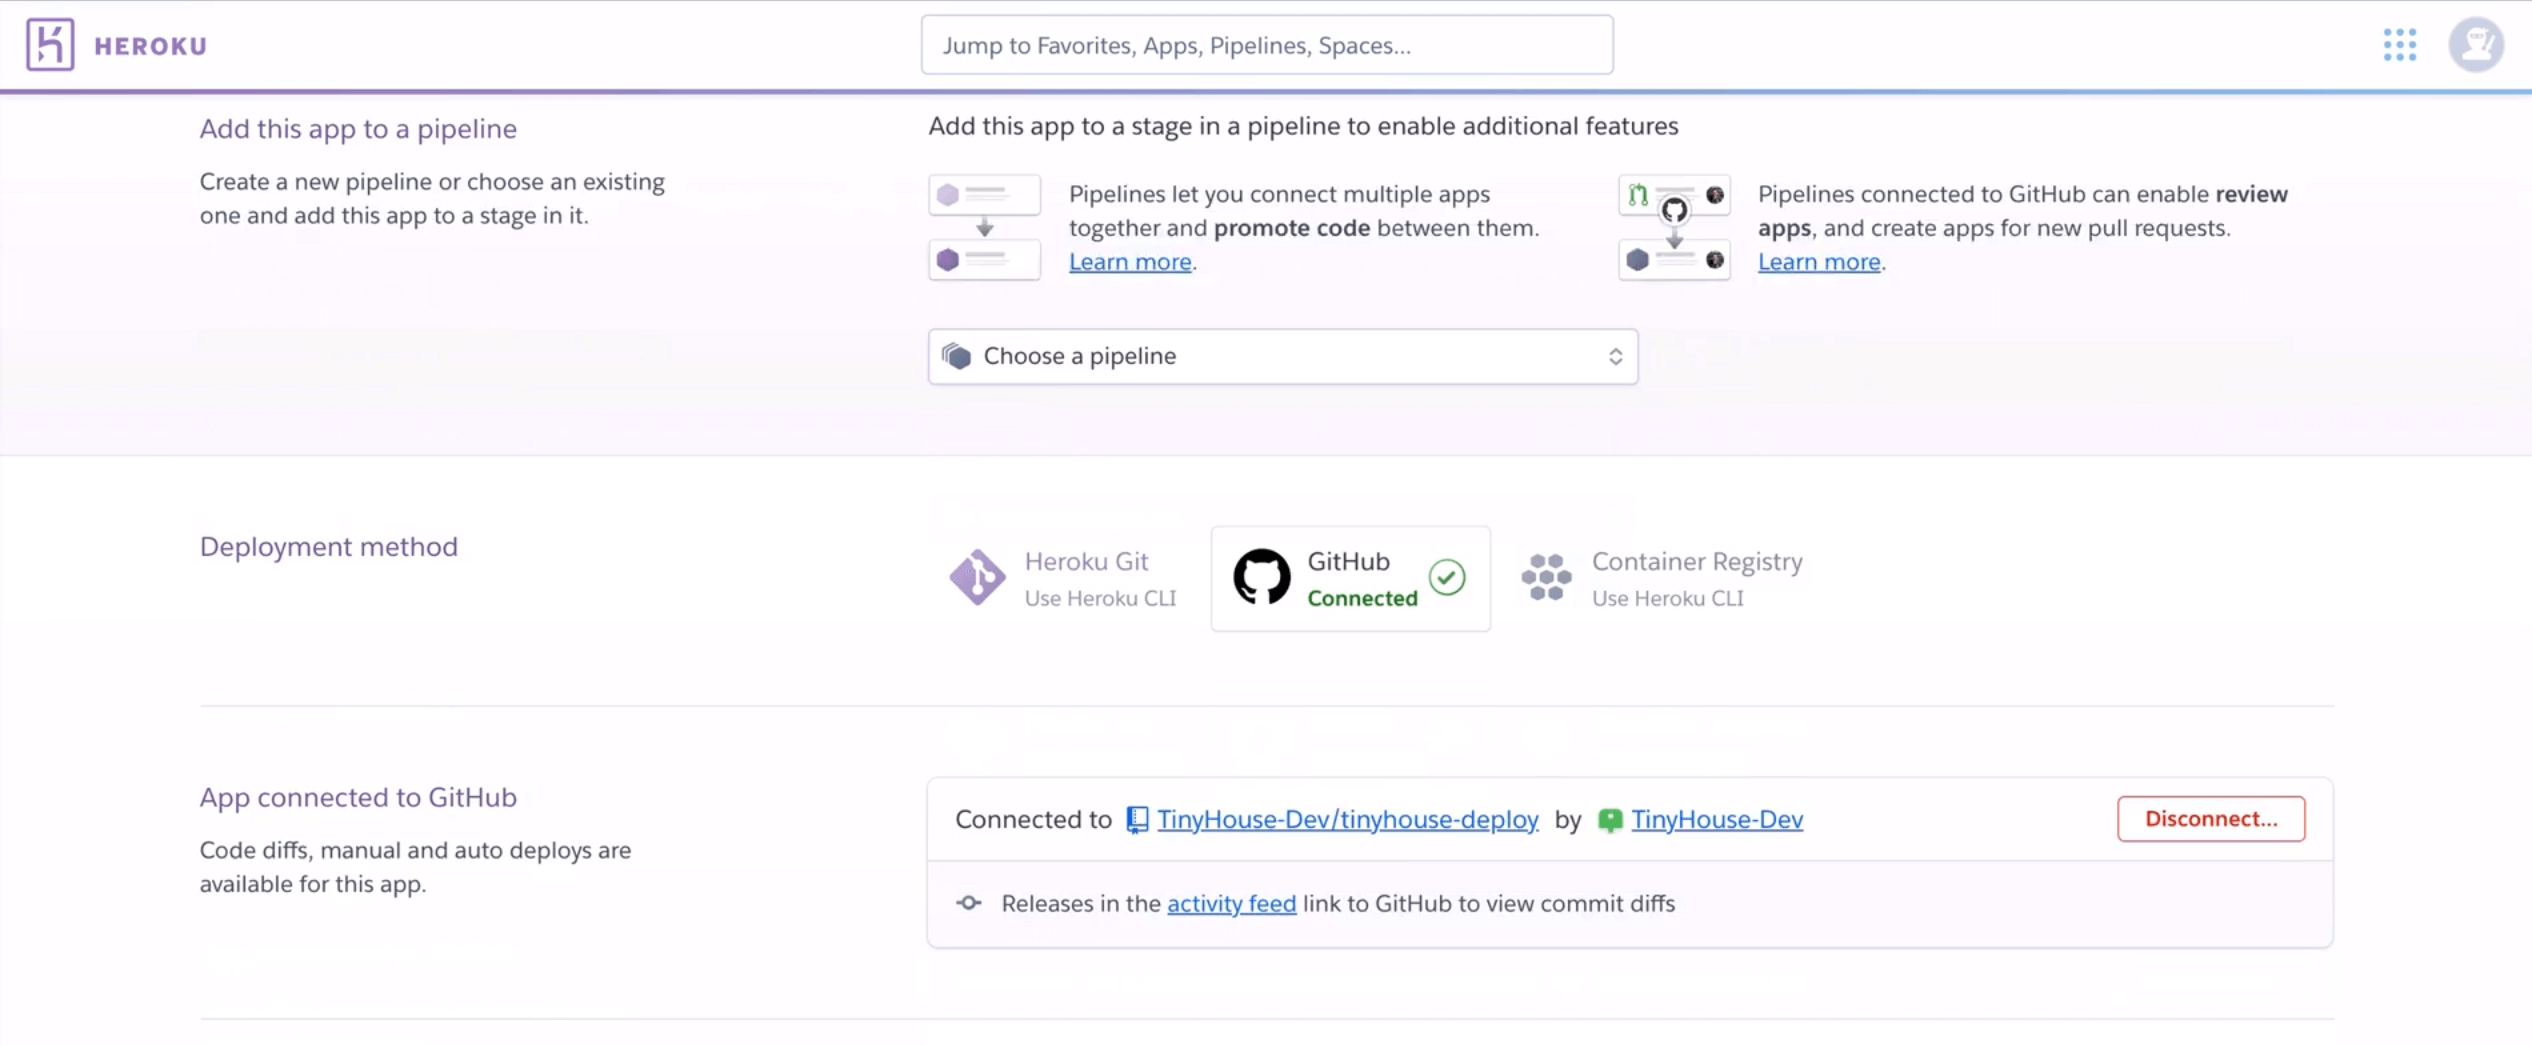
When our Github repo is connected, Heroku gives us options on how we want to conduct our deployment. For example, we can enable Automatic Deploys which is great if we want a deployment to automatically be triggered when new code is ever pushed to a certain branch of our Github repo.
In this lesson, we’ll conduct a simple manual deployment. To do this, we’ll click the Deploy Branch button that is available to deploy the master branch of our GitHub repo.

When we’ve deployed our branch successfully, Heroku would have taken a copy of the code in our GitHub repo and have it uploaded onto their servers. Heroku, then installs the dependencies in the package.json file of our deployed Node application and then automatically runs the npm start script available to start our deployed app on the cloud.
Once deployed, we can view the deployed application by navigating to the link Heroku provides or simply clicking this View button available in the Deploy tab. When we attempt to see our deployed application, we’ll see an application error!
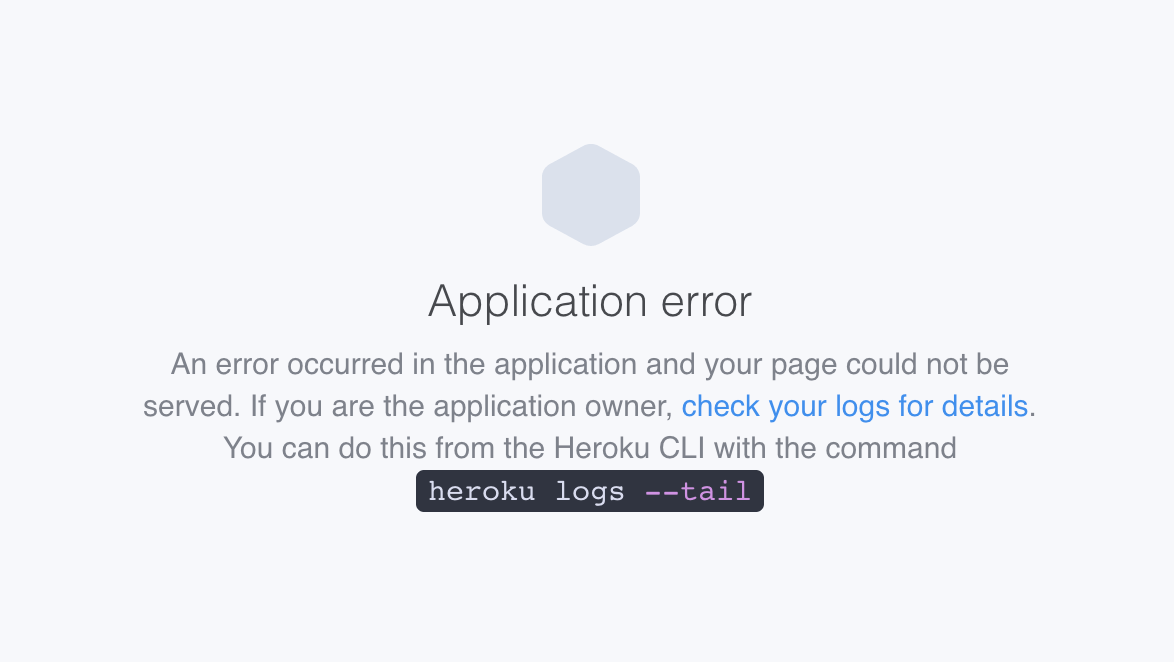
ENVIRONMENT VARIABLES
Heroku fails to start our application because we haven’t specified the values for the environment variables in our deployed project . To specify the values of the environment variables of our deployed project, we can go to the Settings tab and click the Reveal Config Vars button.
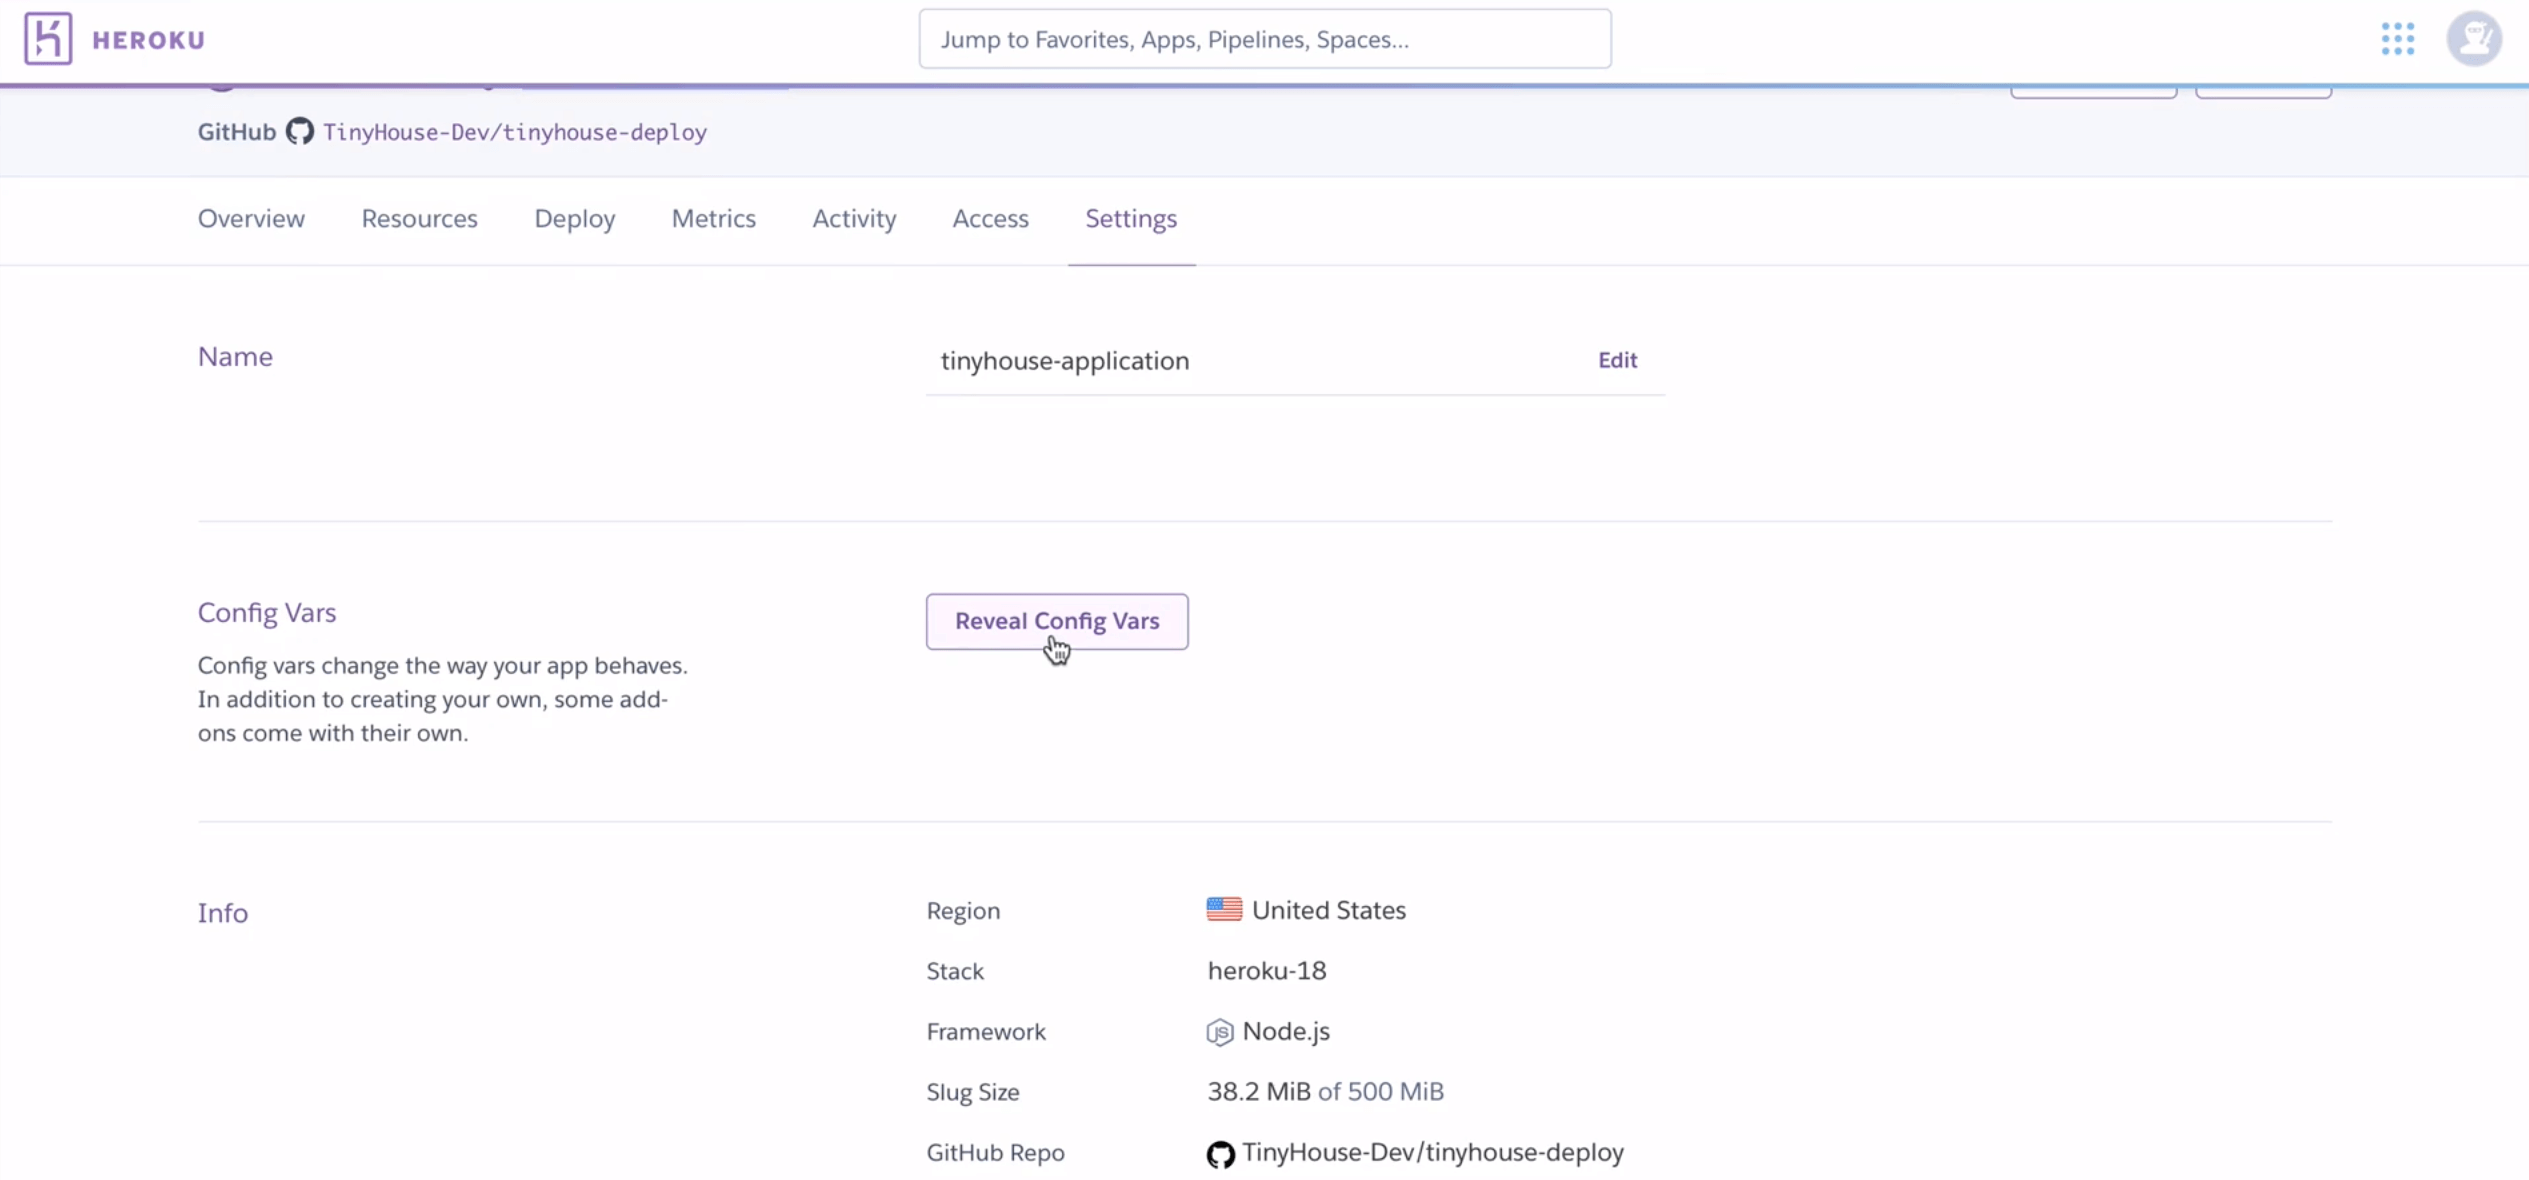
In this section, we can specify the values of environment variables during the Heroku runtime process.
This is the current .env file from our local development server project:
// server/.env

NODE_ENV=development
PORT=9000
PUBLIC_URL=http://localhost:3000
SECRET=*******************************************
DB_USER=*******************************************
DB_USER_PASSWORD=*******************************************
DB_CLUSTER=*******************************************
G_CLIENT_ID=*******************************************.apps.googleusercontent.com
G_CLIENT_SECRET=*******************************************
G_GEOCODE_KEY=*******************************************
S_SECRET_KEY=sk_test_*******************************************
CLOUDINARY_NAME=*******************************************
CLOUDINARY_KEY=*******************************************
CLOUDINARY_SECRET=********************************************
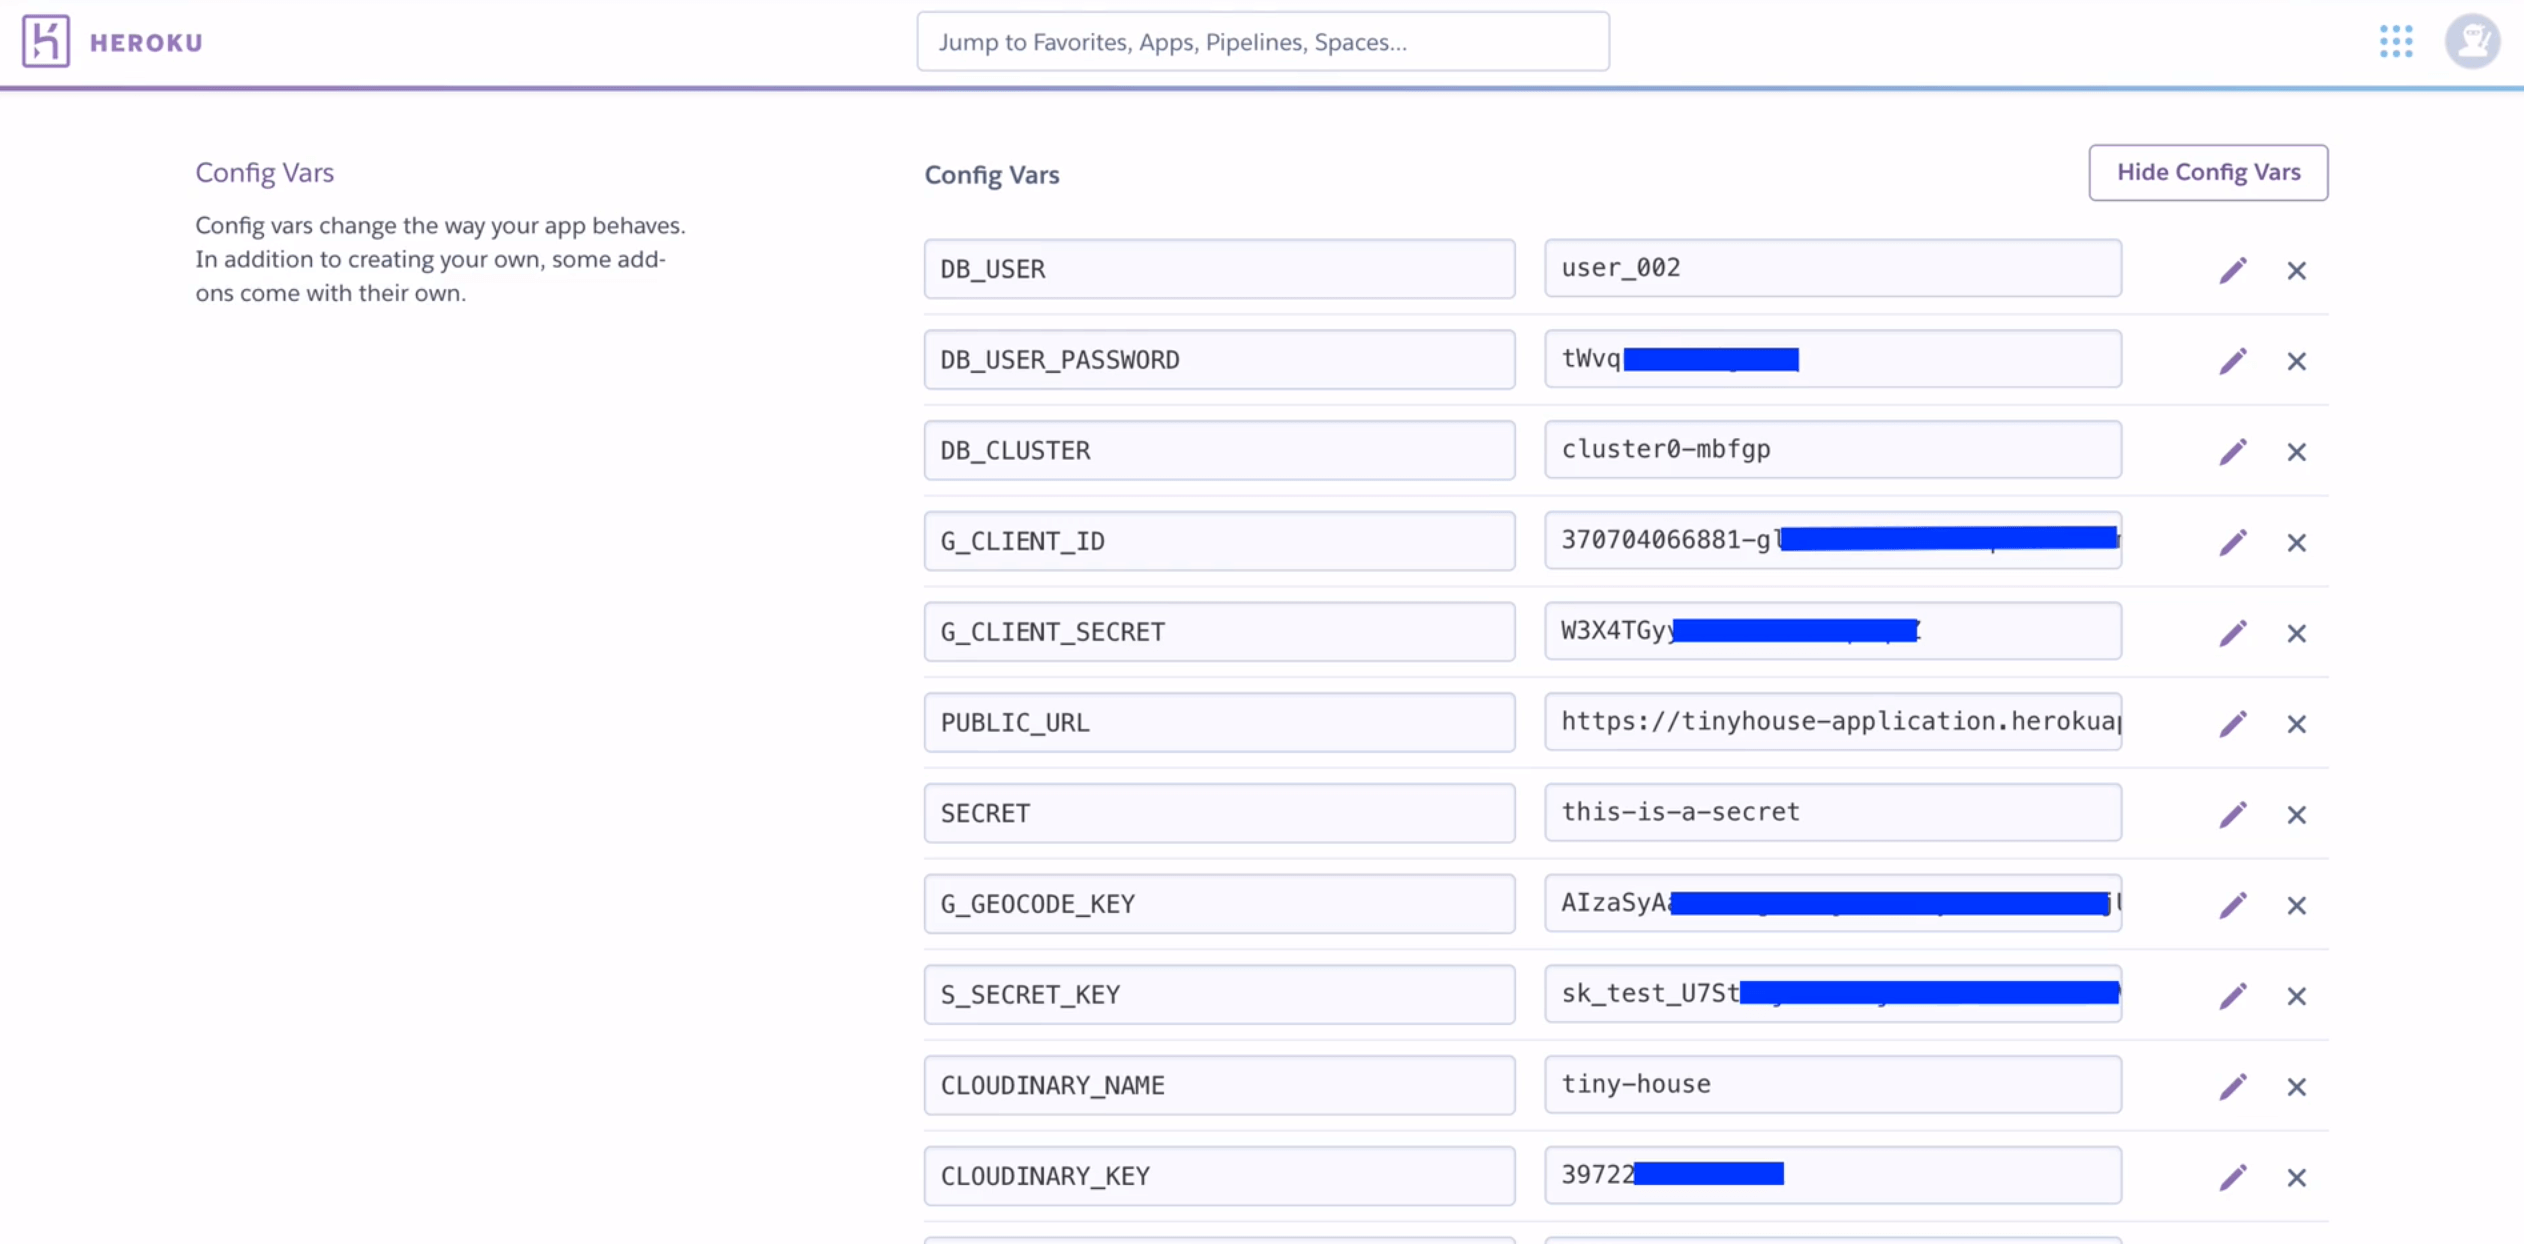
We can reuse the same environment variables from the .env file in our server for the Heroku app except for the following:
-
NODE_ENV- not needed because Heroku provides a value for this automatically. -
PORT- not needed because Heroku provides a value for this automatically. -
PUBLIC_URL- will need to be updated to the URL our deployed app is running on.
When all the keys we’ve mentioned have been transferred over and an update made for the PUBLIC_URL environment variable, our environment variables section of the Heroku app will look something like the following.
OAUTH REDIRECT URLS
There’s one other change we’re going to need to make. If we recall, when we’ve retrieved and/or obtained the credentials for Google OAuth as well as our Stripe authentication, we’ve always specified a redirect URL of our local development environment, http://localhost:3000 . This wouldn’t work for our production application . We’ll need to log-in to these services and update the redirect URLs to the same value as the PUBLIC_URL environment variable of our Heroku app.
Keep in mind that if we update the redirect URL values for the same credentials we use in our local development environment, this will affect our local development environment. Ideally, it’s probably beneficial to generate a set of environment credentials - one for our local development environment and one for production.
The credentials we’re using for Stripe refer to our Stripe test environment. When we’re ready for users to provide real payment information, we’ll need to use credentials from Stripe that refer to our live Stripe dashboard.
Awesome. We’ll now re-deploy our app with the updated environment variables. When complete, we’ll notice our application is now fully deployed.

We did it! We’ve managed to fully build and deploy the TinyHouse application. For anybody else who wants to see our app, all we need to do is share our deployed app URL with them and they’ll be able to log into our app, create listings, and even book listings of their own.