MODULE 17 INTRODUCTION
This is the first bonus module we’ve prepared and introduced after our course has been released! This module (and the following modules) are not core material to the TinyHouse Masterclass but instead serve to be small spin-off modules that teach and introduce a topic that wasn’t covered in the course!
Throughout the course, we’ve used MongoDB as our database of choice. As we’ve mentioned earlier in the course - NoSQL databases, like MongoDB, use a dynamic schema for unstructured or polymorphic data. This offers developers great flexibility when building apps that need to evolve constantly .
SQL databases , on the other hand, require us to use a defined schema for structured data . This offers developers consistency at the expense of flexibility. Therefore, if you value structure more than flexibility, you might just prefer a SQL database over a NoSQL database.
In this module, we’re going to:
- Compare SQL and NoSQL databases using some live data.
- Install PostgreSQL and learn some basic SQL.
- Convert our apps to use PostgreSQL as our database.
SQL VS. NOSQL
SQL databases use a defined schema for structured data and NoSQL databases use a dynamic schema for unstructured or polymorphic data. We’ve heard this quite a bit but what does this actually mean?
To get a better understanding, let’s take a look at some live data.
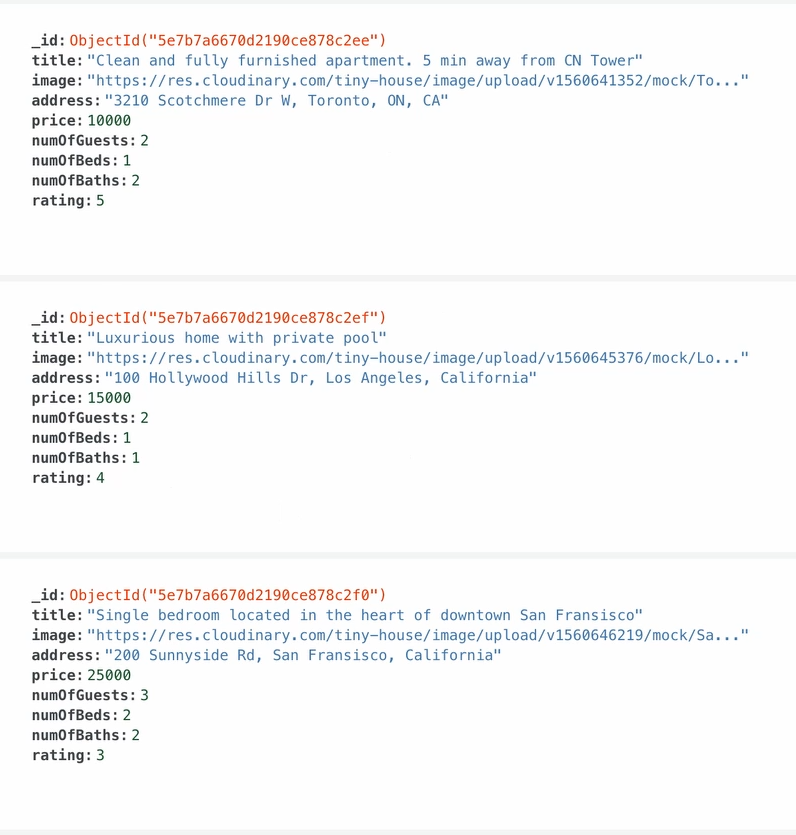
In one browser tab, we’ll have a MongoDB database open. We’ll refer to the database that was first created with MongoDB Atlas from lesson 4.9 in Part I of the course. In our database, we’ll notice each piece of data is stored as a JSON-like document .
In another browser tab, we’ll have a PostgreSQL database. We’ll show you how to install and seed your own PostgreSQL database in the next few lessons. When we take a look at our PostgreSQL database, we’ll notice data is stored in tables much like a spreadsheet .

Both databases contain the same listing data . However, in PostgreSQL, there is a defined schema governing the shape of each listing.
To demonstrate some more, we’ll head over to VSCode and start our Node server:
npm start
At this moment, our server is still connected to our MongoDB database. If we execute a query for all the listings, we’ll see our entire listings collection in the returned output.
STRUCTURE
When we developed our server in Part I and Part II of the course, we utilized TypeScript in our source code to help define the shape of our listing data in our source code.
export interface Listing {
  id: string;
  title: string;
  image: string;
  address: string;
  price: number;
  numOfGuests: number;
  numOfBeds: number;
  numOfBaths: number;
  rating: number;
}

export interface Database {
  listings: Repository<ListingEntity>;
}
Though the above helped, it didn’t really change the structure of how our data is accessible and mutable since our MongoDB database does not have a defined schema. In other words, despite having type definitions in our source code, we can go over to our MongoDB database and insert a new document like the following to our "listings" collection:
{ lunch: “pizza” }
If we were to run the same GraphQL query as we did before, we’ll see an error!

This error is GraphQL notifying us that a document/object exists where the title of the listing is not present which doesn’t match our GraphQL API structure.
Our MongoDB database will accept any form of document data because it has no defined schema . If we were to delete that piece of garbage data, our query will run without any errors.
If we were to try to do the same to a SQL database (e.g. insert a new listing with just a "lunch" field of value "pizza" ), we wouldn’t be able to. This (i.e. having structured data) is the core advantage of having a defined schema.

FLEXIBILITY
By using a dynamic schema for unstructured or polymorphic data, our MongoDB database embraces flexibility. Consider this, imagine for some reason going forward:
- Instead of the
numOfGuestsfield in a single listing, we want to call this propertyguests. - And instead of having
numOfGuestsbe anumbervalue, we want this property to capture astring.
Implementing this in MongoDB is easy because there is no specific change we’ll need to do. We can just start inserting data in the new format we want, or update any of our existing data to the new format, and MongoDB won’t complain.
By making the above change in a few listing documents, we’ll have a mix of document shapes in our "listings" collection. In other words, we now have polymorphic data . We’re allowed to do this because of our dynamic schema.

In our source code, we’ll still need to update our Node server to process this newly added guests property and the different types of numOfGuests but there is nothing else we’ll need to do in our database.
To achieve the same in a SQL database, we’ll most likely need to perform a database migration which can involve:
- Inserting a new
guestscolumn in our table. - Writing a script to convert
numOfGuestsintoguests. - Dropping the old
numOfGuestscolumn from our table. - And updating our server to use the new
guestsproperty.
Depending on the size and complexity of a SQL database, a migration could take minutes to hours to complete! Therefore, to affect the least number of users, one may also want to perform a migration when their app usage is low.
Flexibility is the reason why NoSQL databases have become so popular in recent years, especially with start-ups, where they need to be flexible and agile. With that said, if you value structure more than flexibility, you might just prefer a SQL database over a NoSQL database.
POSTGRESQL
We’ll use PostgreSQL as our SQL database. PostgreSQL is a powerful relational database and has the highest rating for SQL compliance. It is a fully open-source project and is developed and maintained by a large and active community. PostgreSQL has earned a strong reputation for its reliability and robust feature set, becoming the relational database of choice for many developers.
INSTALLATION
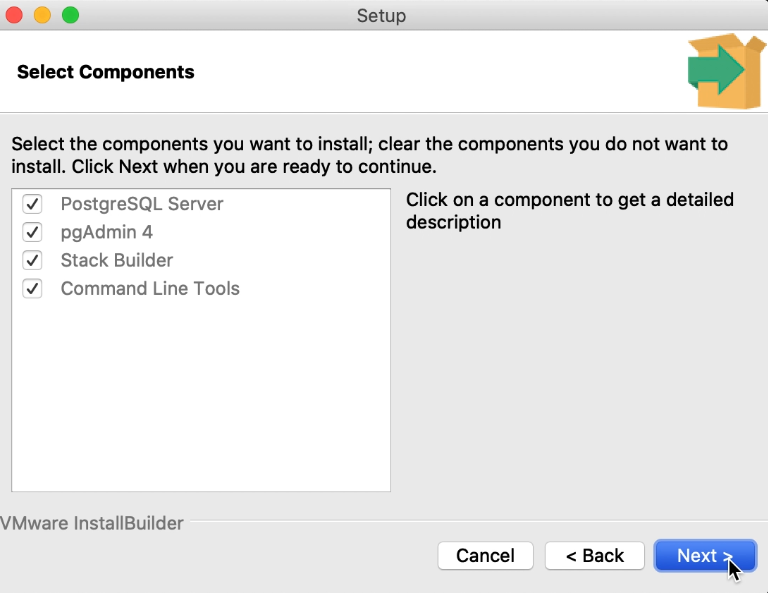
To install PostgreSQL, head over to their official download page and select the operating system you use. Next, click the “Download the installer” button and choose the latest version for your operating system.
Once the download is complete, run the PostgreSQL installer. Make sure you select all the components for installation.
If you’re installing PostgreSQL for the first time, you’ll be asked to:
- Pick a directory to store your data.
- Create a password for a superuser.
- Choose a port number for your PostgreSQL server (for this, we recommend to use the default
5432port number).
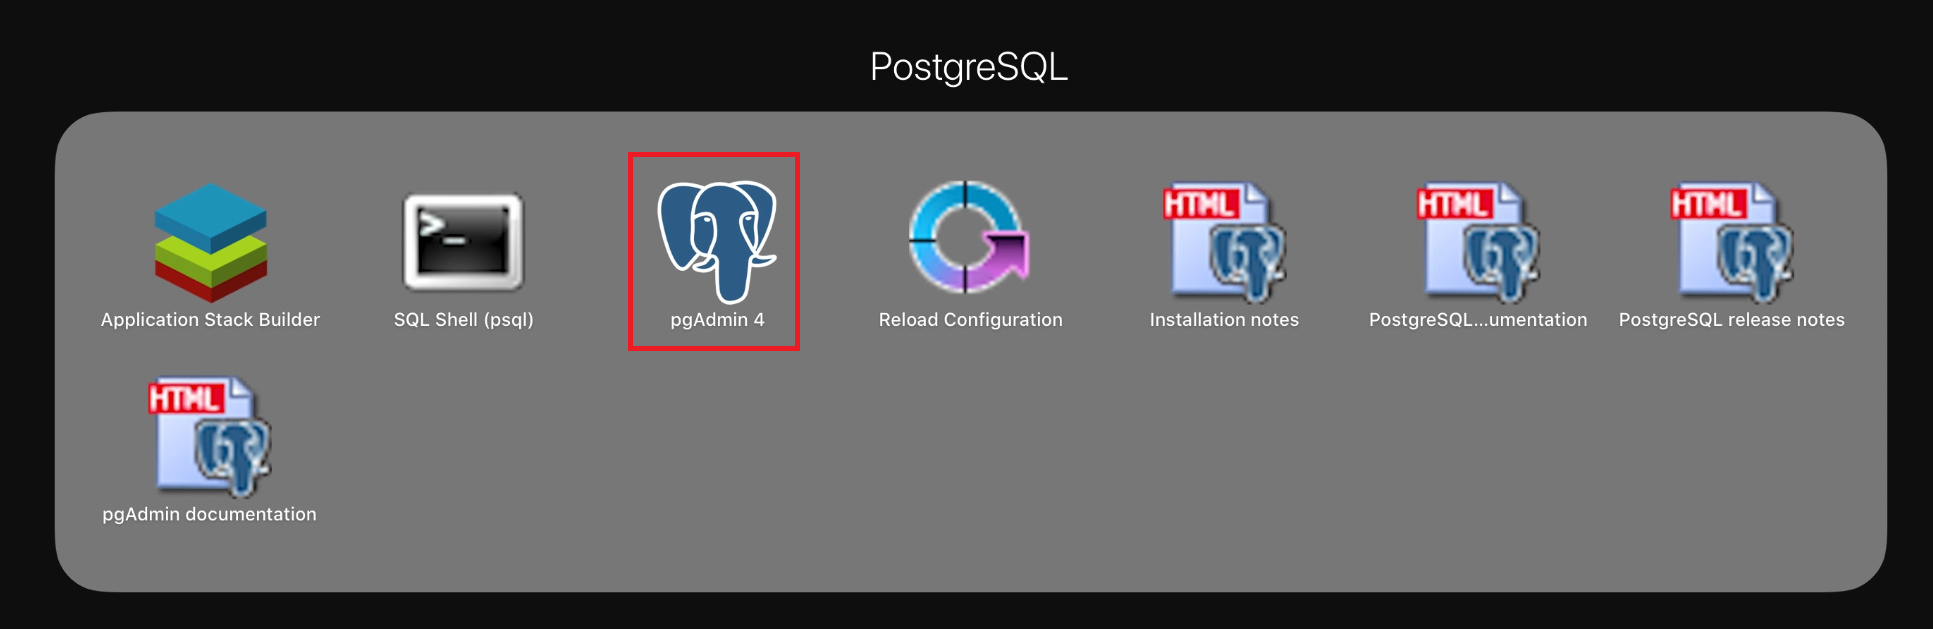
PGADMIN
Once the installation is complete, you should be able to find pgAdmin on your computer. pgAdmin is an application that can be used to create, modify, and delete your PostgreSQL databases using either SQL (Structured Query Language) or a GUI (Graphical User Interface).
When you launch pgAdmin, you will be asked to enter a password. This is the same password you set up during the installation process.

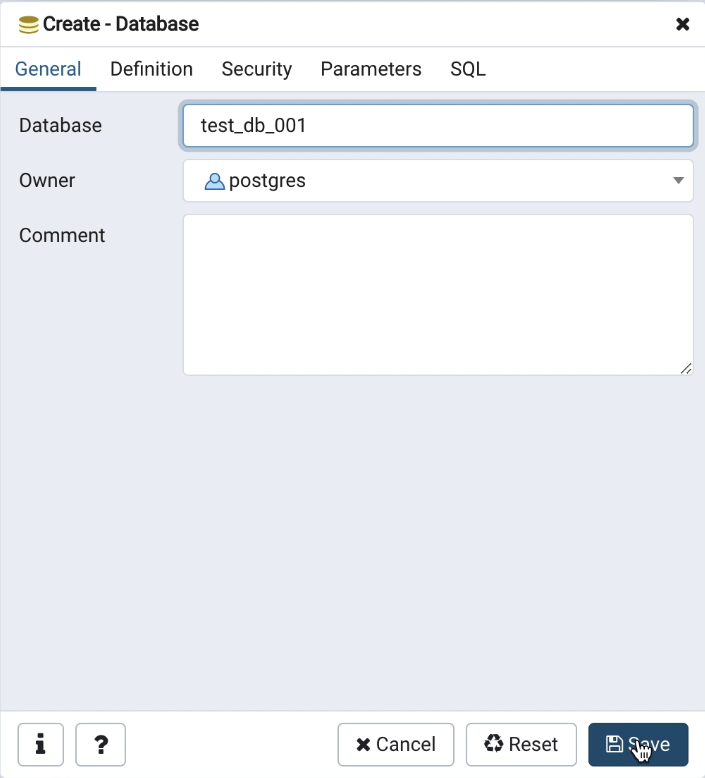
On the left navigation panel, you’ll find your databases. To create a new database, simply right-click on “Databases” and select “Create/Database…”.

Next, enter a name for your new database (e.g. test_db_001 ). Then, hit “Save”.
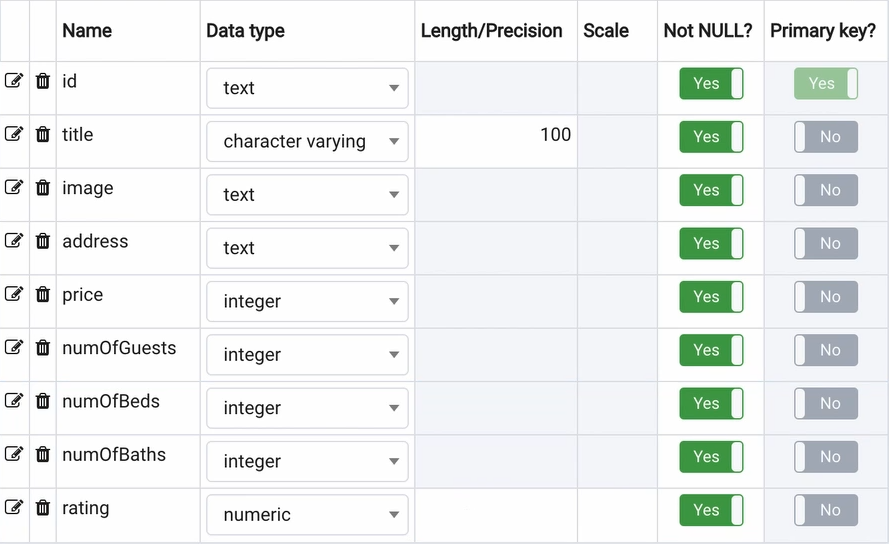
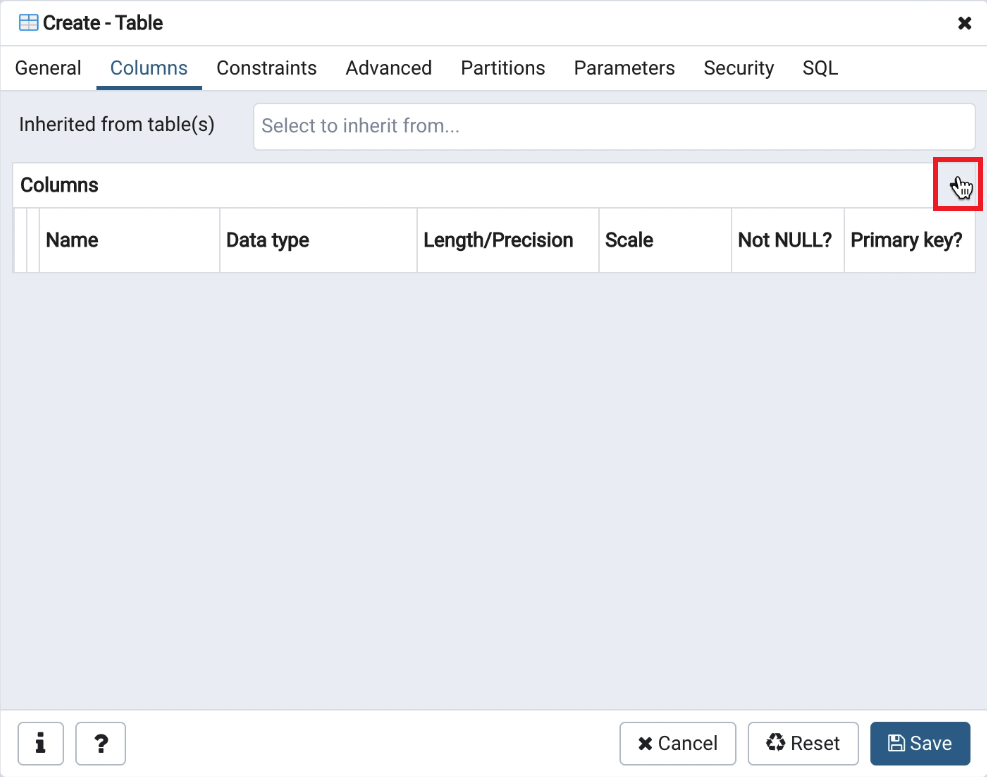
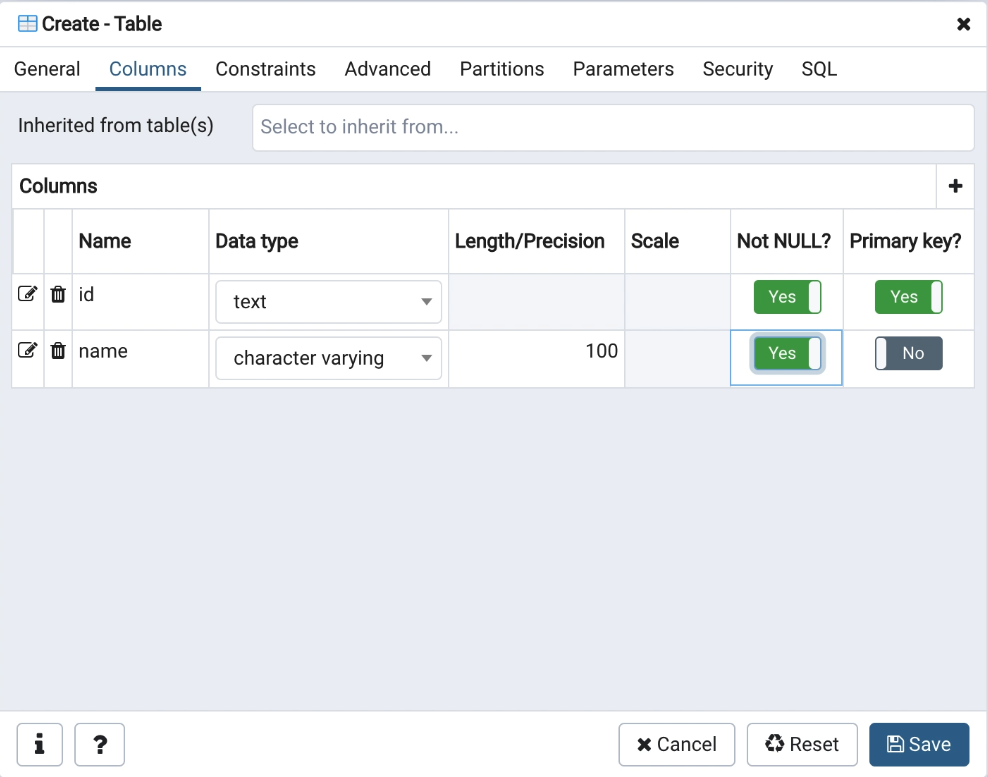
To create a table for your database, select “Schemas” on the left-hand panel, then right-click on “Tables”, and then select “Create/Table…”.

In the Create-Table dialog window, enter a name for your new table (e.g. test_users ).

Next, navigate to the “Columns” tab to start building a schema for your new table. Click the “+” icon to add a new column.
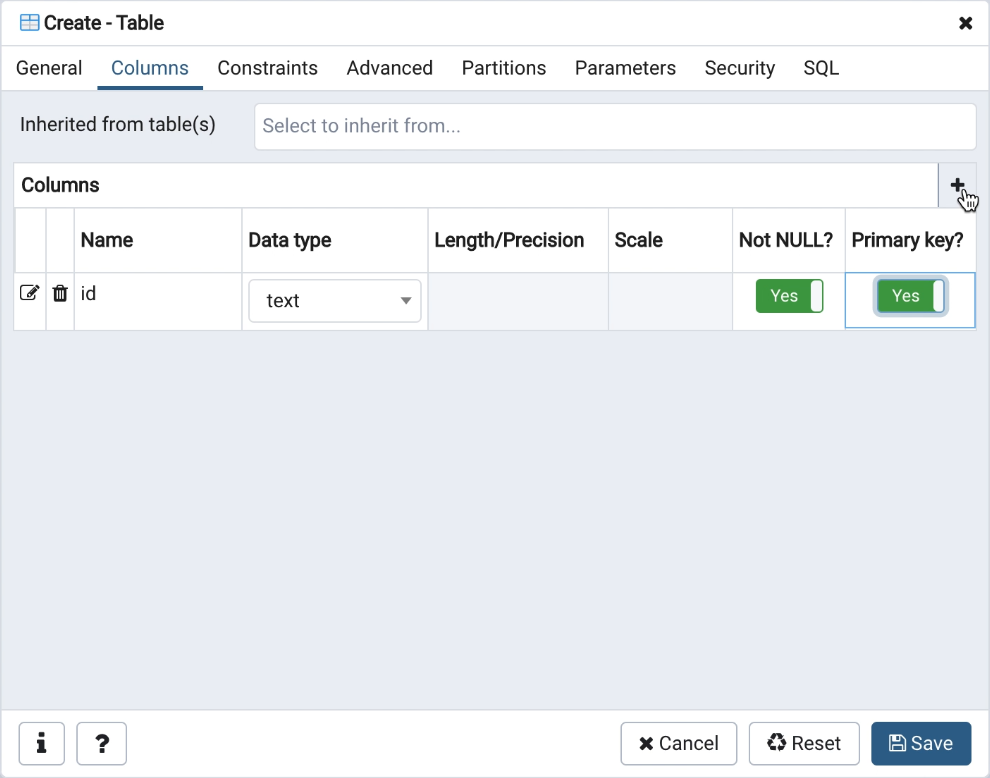
For the first column, we’ll specify id as the name and select text as the data type. We’ll set the Not NULL? and Primary key? constraints to “Yes”.
- The
Not NULL?constraint ensures a column cannot contain any null value. - The
Primary key?constraint ensures a column must contain unique values that can be used to identify each row of data.
We’ll add a second column which we’ll specify as name for the name of the column and select character varying as the data type. For this column, we’ll set the Not NULL? constraint to “Yes” and specify 100 for the Length constraint.
- The
textdata type in PostgreSQL is equivalent tostringin TypeScript. - The
character varyingdata type is the same astextexcept we can specify a maximum number of characters. In our case, we picked100characters as the max.
We’ll explore more data types in the next few lessons as we convert our apps to use PostgreSQL.
If you’re interested to take a look at the full list of PostgreSQL data types, we encourage you to check out the official documentation.
If we clicked on the “Save” button right now, we would have created a new table using the GUI. However, if we navigate to the “SQL” tab, we’ll see the SQL statement for doing the exact same thing.
CREATE TABLE public.test_users (
  id text NOT NULL,
  name character varying(100) NOT NULL,
  PRIMARY KEY (id)
);

ALTER TABLE public.test_users OWNER to postgres;
If we copy this statement, click “Cancel”, select “Tools/Query Tool” from the top navigation bar, and execute the copied statement - we would create a new table using SQL!

CRUD USING SQL
SQL which stands for Structured Query Language is the standard language used to access and manipulate data from relational databases. Let’s execute some CRUD (Create, Read, Update, and Delete) operations using SQL statements.
To insert data into a table, we can run the INSERT statement. This is equivalent to MongoDB’s insertOne({...}) function.
INSERT INTO public.test_users(id, name) VALUES ('001', 'bob');
INSERT INTO public.test_users(id, name) VALUES ('002', 'bobby');
INSERT INTO public.test_users(id, name) VALUES ('003', 'john');
INSERT INTO public.test_users(id, name) VALUES ('004', 'johnson');
To see all of the data in a table, we can run the SELECT statement. This is equivalent to MongoDB’s find() function.
SELECT * FROM public.test_users
To find a specific row of data, we can also run the SELECT statement with a WHERE clause. This is equivalent to MongoDB’s find({ _id: ... }) function.
SELECT * FROM public.test_users WHERE id='001';
To update an existing row of data, we can run the UPDATE statement. This is equivalent to MongoDB’s updateOne({...}) function.
UPDATE public.test_users SET name='bob_name_updated' WHERE id='001';
To delete an existing row of data, we can run the DELETE statement. This is equivalent to MongoDB’s deleteOne({...}) function.
DELETE FROM public.test_users WHERE id='001';
We can modify our table using the ALTER TABLE statement. With the RENAME COLUMN and the ADD COLUMN clauses, we can rename one of our existing columns into username and can add a new column called email respectively. With this change, we’ve modified our database schema using SQL!
ALTER TABLE public.test_users RENAME COLUMN "name" TO "username";
ALTER TABLE public.test_users ADD COLUMN email character varying(100);
Finally, let’s test our new database schema by inserting a new user:
INSERT INTO public.test_users(id, username, email) VALUES ('005', 'bob', 'bob@email.com');
There are a lot more SQL statements than the ones we just explored. If you’re interested in learning more SQL, we encourage you to check out SQL tutorials that are freely available such as the one from w3schools.
The ultimate goal for us is not to create SQL statements manually. We want our Node server to generate SQL statements based on the user inputs from our React application. For this, an ORM is a great tool to use with which we’ll talk more about in the next lesson!
TYPEORM
WHAT IS ORM?
In our previous lesson, we wrote SQL statements like the following to perform CRUD operations on our PostgreSQL database:
INSERT INTO public.test_users(id, name) VALUES ('001', 'bob');

SELECT * FROM public.test_users WHERE id='001';

UPDATE public.test_users SET name='bob_name_updated' WHERE id='001';

DELETE FROM public.test_users WHERE id='001';
SQL statements like the above are the most basic and simple statements that are often taught to new developers. Depending on what you want to achieve and the complexity of your database, SQL statements can become extremely complex . Some SQL statements can be hundreds of lines of code and many companies have dedicated SQL developers!
Object-Relational Mapping (ORM) is a technique that lets you access and modify data from a database using an object-oriented paradigm. In other words, instead of writing SQL statements manually, we can use a library to generate these SQL statements using some “virtual database object”. For example, to perform the same CRUD operations on our PostgreSQL database as the above while using an ORM, our code could look something like the following:
// INSERT INTO public.test_users(id, name) VALUES ('001', 'bob');
const user = await db.users.create({ id: "001", name: "bob" }).save();

// SELECT * FROM public.test_users WHERE id='001';
const user = await db.listings.findOne({ id: "001" });

// UPDATE public.test_users SET name='bob_name_updated' WHERE id='001';
const user = await db.users.findOne({ id: "001" });
user.name = "bob_name_updated";
await user.save();

// DELETE FROM public.test_users WHERE id='001';
const user = await db.users.findOne({ id: "001" });
await user.remove();
As we can see, an ORM can abstract away our SQL implementation. With that said, there are some advantages and disadvantages of using an ORM.
PROS OF ORM 
- We can write in the language of our choice. For us, this will be TypeScript.
- It abstracts away the database so switching from MongoDB to PostgreSQL (as an example) is extremely easy.
- Many ORMs support advanced features such as database migrations.
- Unless you’re a master at SQL, statements generated by an ORM will most likely perform better than the ones you write yourself.
CONS OF ORM 
- An ORM must be configured before usage.
- By abstracting away the database, many new developers won’t understand what’s happening under the hood.
TYPEORM
The ORM we’ll be using for this course is TypeORM . TypeORM is an extremely popular ORM that supports multiple database systems such as MySQL, PostgreSQL, MongoDB, and more. It also integrates extremely well with TypeScript.
Before we start to integrate TypeORM into our TinyHouse application, let’s spend some time getting familiar with TypeORM’s API using a simple Node server. To begin, we’ll clone the source code from lesson 4.9 in Part I of the course.
INSTALL & UPDATE
First, we’ll make sure our npm packages are installed:
npm install
Next, we’ll make sure our npm packages are updated:
npm update
If npm warns about any vulnerabilities from our packages, we’ll also want to make sure we fix those:
npm audit fix
Since we’ll be using TypeORM and PostgreSQL instead of MongoDB, we’ll uninstall the MongoDB driver and the accompanying type definitions file:
npm uninstall mongodb --save
npm uninstall @types/mongodb --save-dev
To integrate TypeORM into our Node server, we’ll simply follow the instruction found on their official documentation. First, we’ll install the packages that TypeORM requires:
npm install typeorm reflect-metadata
Next, we’ll install the PostgreSQL database driver:
npm install pg
Next, we’ll enable the following settings in our tsconfig.json :
server/tsconfig.json
    "emitDecoratorMetadata": true,
    "experimentalDecorators": true,
CONFIG
In our server project, we’ll create a new .env file with a PORT variable set to 9000 :
PORT=9000
Remember that when we were using MongoDB, we had to setup DB_USER , DB_USER_PASSWORD , and DB_CLUSTER values in our .env file to specify the configuration variables we’ll need to connect to our database? TypeORM on the other hand, uses an ormconfig.json file to store these variables. We’ll head over to their official quick start guide to get a copy of this file and place it in the root of our server project.
{
  "type": "mysql",
  "host": "localhost",
  "port": 3306,
  "username": "test",
  "password": "test",
  "database": "test",
  "synchronize": true,
  "logging": false,
  "entities": ["src/entity/**/*.ts"],
  "migrations": ["src/migration/**/*.ts"],
  "subscribers": ["src/subscriber/**/*.ts"]
}
With the copied over ormconfig.json file, we’ll make the following modifications:
- Change
typetopostgres. - Change
portto the port our PostgreSQL server runs on (e.g. for us, this is5432). - Change
usernameto our PostgreSQL superuser (e.g. for us, this is simplypostgres). - Change
passwordto our superuser’s password (e.g. for us, this ismyPassword). - Change
databaseto the PostgreSQL database we wish to connect to (e.g. for us, we’ll reference the database from the previous lesson,test_db_001). - We’ll leave
synchronizetotruewhich tells TypeORM to update the schema in our PostgreSQL server automatically when we update the schema in our source code. - We’ll leave
loggingtofalse. However, if we want to see the SQL statements generated by TypeORM in our console, we can turn this option totrue. - Finally, we’ll update the path to the
entities,migrations, andsubscribersfields to a location within thesrc/database/directory in our server project.
With these changes, our server ormconfig.json file will look like the following:
server/ormconfig.json
{
  "type": "postgres",
  "host": "localhost",
  "port": 5432,
  "username": "postgres",
  "password": "myPassword",
  "database": "test_db_001",
  "synchronize": true,
  "logging": false,
  "entities": ["src/database/entity/**/*.ts"],
  "migrations": ["src/database/migration/**/*.ts"],
  "subscribers": ["src/database/subscriber/**/*.ts"]
}
By updating the variables in this ormconfig.json file, TypeORM can be configured to connect to other databases, such as MongoDB or MySQL!
SET-UP
According to TypeORM’s installation instructions, we’ll first need to import reflect-metadata at the beginning of our code. We’ll do this in the root src/index.ts file of our server project.
server/src/index.ts
import "reflect-metadata";
Next, we’ll head over to our src/database/index.ts file and modify our connectDatabase() function to use TypeORM’s createConnection() method, which takes the information from our ormconfig.json file to connect our Node server to our PostgreSQL database.
import { createConnection } from "typeorm";
import { Database } from "../lib/types";

export const connectDatabase = async (): Promise<Database> => {
  const connection = await createConnection();
};
Next, we’ll create a new folder called entity/ in our src/database/ directory. Because TypeORM is designed to support multiple database systems, such as PostgreSQL and MongoDB, the term entity is used to represent a SQL table or a MongoDB collection . This entity/ folder is where we’ll define our database schema.
Inside this folder, we’ll create and export a ListingEntity . We’ll specify the shape of the ListingEntity to resemble the shape of a listing as we’ve seen in Part I of our course (e.g. with id , title , image , etc.)
-
@Entity()will be used to specify the name of our SQL table. -
@PrimaryColumn()ensures a column must contain unique values that can be used to identify each row of data.
server/src/database/entity/ListingEntity.ts
import { Entity, BaseEntity, PrimaryColumn, Column } from "typeorm";

/* eslint-disable @typescript-eslint/explicit-member-accessibility */

@Entity("test_listings")
export class ListingEntity extends BaseEntity {
  @PrimaryColumn("text")
  id: string;

  @Column("varchar", { length: 100 })
  title: string;

  @Column("text")
  image: string;

  @Column("text")
  address: string;

  @Column("integer")
  price: number;

  @Column("integer")
  numOfGuests: number;

  @Column("integer")
  numOfBeds: number;

  @Column("integer")
  numOfBaths: number;

  @Column("decimal")
  rating: number;
}
In our ListingEntity , we introduced some data types:
-
textrepresents astringwhich we learned about in the previous lesson. -
varchar(a.k.a. character varying) also represents astring, however, we can set a maximum length to this data type. -
integerrepresents an integer number. -
decimalrepresents a decimal or floating-point number.
To see a full list of data types TypeORM supports, head over to their official documentation.
To remove the no initializer TypeScript error that we might see, we’ll disable the strictPropertyInitialization in our server’s tsconfig.json file:
server/tsconfig.json
"strictPropertyInitialization": false
With these changes made, we’ll head back to our connectDatabase() function to import the new ListingEntity and export a Database object to contain a listings property that is to represent the Listing table/entity in our database. We’ll use TypeORM’s getRepository() method to do this.
server/src/database/index.ts
import { createConnection } from "typeorm";
import { Database } from "../lib/types";
import { ListingEntity } from "./entity";

export const connectDatabase = async (): Promise<Database> => {
  const connection = await createConnection();

  return {
    listings: connection.getRepository(ListingEntity),
  };
};
Next, we’ll need to modify our TypeScript definitions to:
- Instead of using MongoDB’s
Collectiontype, we’ll use TypeORM’sRepositorytype. - Instead of specifying MongoDB’s
_idasObjectId's, we’ll specifyidfields of typestring.
Making these changes, our server’s src/lib/types.ts file will look like the following.
server/src/lib/types.ts
import { Repository } from "typeorm";
import { ListingEntity } from "../database/entity";

export interface Listing {
  id: string;
  title: string;
  image: string;
  address: string;
  price: number;
  numOfGuests: number;
  numOfBeds: number;
  numOfBaths: number;
  rating: number;
}

export interface Database {
  listings: Repository<ListingEntity>;
}
To explore TypeORM’s API a bit more, let’s head over to our GraphQL typeDefs file and make the following changes to our GraphQL API:
- We’ll add a new
listingquery which will find one listing based on user input. - We’ll add a new
createListingmutation which will insert a new listing into our database. - We’ll add a new
updateListingmutation which will find and update one listing based on user input. - We’ll change the
idfield of theListingGraphQL object to be nullable (i.e. fromID!toID). This is because TypeORM’sdeleteOne()method that we’ll eventually use will return the deleted object without theid.
server/src/graphql/typeDefs.ts
import { gql } from "apollo-server-express";

export const typeDefs = gql`
  type Listing {
    id: ID
    title: String!
    image: String!
    address: String!
    price: Int!
    numOfGuests: Int!
    numOfBeds: Int!
    numOfBaths: Int!
    rating: Float!
  }

  type Query {
    listing(id: ID!): Listing!
    listings: [Listing!]!
  }

  type Mutation {
    createListing: Listing!
    updateListing(id: ID!): Listing!
    deleteListing(id: ID!): Listing!
  }
`;
Before we start to modify our GraphQL resolvers to use TypeORM instead of the MongoDB driver methods, let’s seed our PostgreSQL database with some data. In the previous lesson, we learned how to manually insert data into a PostgreSQL database using the INSERT SQL statement. We’ll look to do the same from our source code with TypeORM’s create() and save() methods. We’ll make these changes in our server’s temp/seed.ts file. Instead of using MongoDB’s ObjectId() method to represent a unique id , we’ll use Node’s crypto module instead.
require("dotenv").config();

import crypto from "crypto";
import { connectDatabase } from "../src/database";
import { Listing } from "../src/lib/types";

const seed = async () => {
  try {
    console.log("[seed] : running...");

    const db = await connectDatabase();

    const listings: Listing[] = [
      {
        id: crypto.randomBytes(16).toString("hex"),
        title: "Clean and fully furnished apartment. 5 min away from CN Tower",
        image:
          "https://res.cloudinary.com/tiny-house/image/upload/v1560641352/mock/Toronto/toronto-listing-1_exv0tf.jpg",
        address: "3210 Scotchmere Dr W, Toronto, ON, CA",
        price: 10000,
        numOfGuests: 2,
        numOfBeds: 1,
        numOfBaths: 2,
        rating: 5,
      },
      {
        id: crypto.randomBytes(16).toString("hex"),
        title: "Luxurious home with private pool",
        image:
          "https://res.cloudinary.com/tiny-house/image/upload/v1560645376/mock/Los%20Angeles/los-angeles-listing-1_aikhx7.jpg",
        address: "100 Hollywood Hills Dr, Los Angeles, California",
        price: 15000,
        numOfGuests: 2,
        numOfBeds: 1,
        numOfBaths: 1,
        rating: 4,
      },
      {
        id: crypto.randomBytes(16).toString("hex"),
        title: "Single bedroom located in the heart of downtown San Fransisco",
        image:
          "https://res.cloudinary.com/tiny-house/image/upload/v1560646219/mock/San%20Fransisco/san-fransisco-listing-1_qzntl4.jpg",
        address: "200 Sunnyside Rd, San Fransisco, California",
        price: 25000,
        numOfGuests: 3,
        numOfBeds: 2,
        numOfBaths: 2,
        rating: 3,
      },
    ];

    for (const listing of listings) {
      await db.listings.create(listing).save();
    }

    console.log("[seed] : success");
  } catch {
    throw new Error("failed to seed database");
  }
};

seed();
With our seed file updated, let’s run our server’s seed script.
npm run seed
When our seed script is complete, we’ll be able to see our seeded data in our test_listings table from the pgAdmin application:

RESOLVERS
Finally, we’ll modify our GraphQL resolvers to use TypeORM. We’ll start simple and find one listing from our test_listings table and we’ll use TypeORM’s findOne() method to do so.
We’ll specify the listing() resolver in our server’s src/graphql/resolvers/Listing/index.ts file to fetch a single listing based on an id argument provided.
import crypto from "crypto";
import { IResolvers } from "apollo-server-express";
import { Database, Listing } from "../../../lib/types";

export const listingResolvers: IResolvers = {
  Query: {
    listing: async (
      _root: undefined,
      { id }: { id: string },
      { db }: { db: Database }
    ): Promise<Listing> => {
      const listing = await db.listings.findOne({ id });

      if (!listing) {
        throw new Error(`failed to find listing with id: ${id}`);
      }

      return listing;
    },
  },
};
To find all the listings in our test_listings table, we’ll use TypeORM’s find() method.
server/src/graphql/resolvers/Listing/index.ts
export const listingResolvers: IResolvers = {  Query: {
    listing: async (
      _root: undefined,
      { id }: { id: string },
      { db }: { db: Database }
    ): Promise<Listing> => {
      const listing = await db.listings.findOne({ id });

      if (!listing) {
        throw new Error(`failed to find listing with id: ${id}`);
      }

      return listing;
    },

    listings: async (
      _root: undefined,
      _args: {},
      { db }: { db: Database }
    ): Promise<Listing[]> => {
      return await db.listings.find();
    },
  },};
Next, we’ll specify some of the mutations we’ll want our API to handle. To insert a new listing in our test_listings table, we’ll use TypeORM’s create() method to create a new instance of an entity locally, then we’ll use the save() method to save it to our database. In this instance, we’ll have our createListing() resolver simply create the same mock listing whenever run.
import crypto from "crypto";
import { IResolvers } from "apollo-server-express";
import { Database, Listing } from "../../../lib/types";

export const listingResolvers: IResolvers = {
  // ...
  Mutation: {
    createListing: async (
      _root: undefined,
      _args: {},
      { db }: { db: Database }
    ): Promise<Listing> => {
      const newListing: Listing = {
        id: crypto.randomBytes(16).toString("hex"),
        title: "[NEW] Clean and fully furnished apartment. 5 min away from CN Tower",
        image:
          "https://res.cloudinary.com/tiny-house/image/upload/v1560641352/mock/Toronto/toronto-listing-1_exv0tf.jpg",
        address: "3210 Scotchmere Dr W, Toronto, ON, CA",
        price: 10000,
        numOfGuests: 2,
        numOfBeds: 1,
        numOfBaths: 2,
        rating: 5,
      };

      return await db.listings.create(newListing).save();
    },
  },
};
We’ll then create a mutation to update a listing in our test_listings table and we’ll use TypeORM’s save() method to save any entity changes to our database. In this mutation, we’ll have the mutation receive an id argument of the listing to be updated and simply have the title of the intended listing be updated to a string of "[UPDATED] This is my updated title!" .
import crypto from "crypto";
import { IResolvers } from "apollo-server-express";
import { Database, Listing } from "../../../lib/types";

export const listingResolvers: IResolvers = {
  // ...

  Mutation: {
    // ...
    updateListing: async (
      _root: undefined,
      { id }: { id: string },
      { db }: { db: Database }
    ): Promise<Listing> => {
      const listing = await db.listings.findOne({ id });

      if (!listing) {
        throw new Error(`failed to find listing with id: ${id}`);
      }

      listing.title = "[UPDATED] This is my updated title!";

      return await listing.save();
    },
  },
};
Finally, to delete a listing from our test_listings table, we’ll use TypeORM’s remove() method. With all these changes, our server src/graphql/resolvers/Listing/index.ts file will look like the following:
server/src/graphql/resolvers/Listing/index.ts
import crypto from "crypto";
import { IResolvers } from "apollo-server-express";
import { Database, Listing } from "../../../lib/types";

export const listingResolvers: IResolvers = {
  Query: {
    listing: async (
      _root: undefined,
      { id }: { id: string },
      { db }: { db: Database }
    ): Promise<Listing> => {
      const listing = await db.listings.findOne({ id });

      if (!listing) {
        throw new Error(`failed to find listing with id: ${id}`);
      }

      return listing;
    },

    listings: async (
      _root: undefined,
      _args: {},
      { db }: { db: Database }
    ): Promise<Listing[]> => {
      return await db.listings.find();
    },
  },

  Mutation: {
    createListing: async (
      _root: undefined,
      _args: {},
      { db }: { db: Database }
    ): Promise<Listing> => {
      const newListing = {
        id: crypto.randomBytes(16).toString("hex"),
        title: "[NEW] Clean and fully furnished apartment. 5 min away from CN Tower",
        image: `https://res.cloudinary.com/tiny-house/image/
          upload/v1560641352/mock/Toronto/toronto-listing-1_exv0tf.jpg`,
        address: "3210 Scotchmere Dr W, Toronto, ON, CA",
        price: 10000,
        numOfGuests: 2,
        numOfBeds: 1,
        numOfBaths: 2,
        rating: 5,
      };

      return await db.listings.create(newListing).save();
    },

    updateListing: async (
      _root: undefined,
      { id }: { id: string },
      { db }: { db: Database }
    ): Promise<Listing> => {
      const listing = await db.listings.findOne({ id });

      if (!listing) {
        throw new Error(`failed to find listing with id: ${id}`);
      }

      listing.title = "[UPDATED] This is my updated title!";

      return await listing.save();
    },

    deleteListing: async (
      _root: undefined,
      { id }: { id: string },
      { db }: { db: Database }
    ): Promise<Listing> => {
      const listing = await db.listings.findOne({ id });

      if (!listing) {
        throw new Error(`failed to find listing with id: ${id}`);
      }

      return await listing.remove();
    },
  },
};
To see a full list of different actions that can be with TypeORM’s repository API, check out their official documentation.
Finally, we can start our Node server and test out our GraphQL API:
npm start
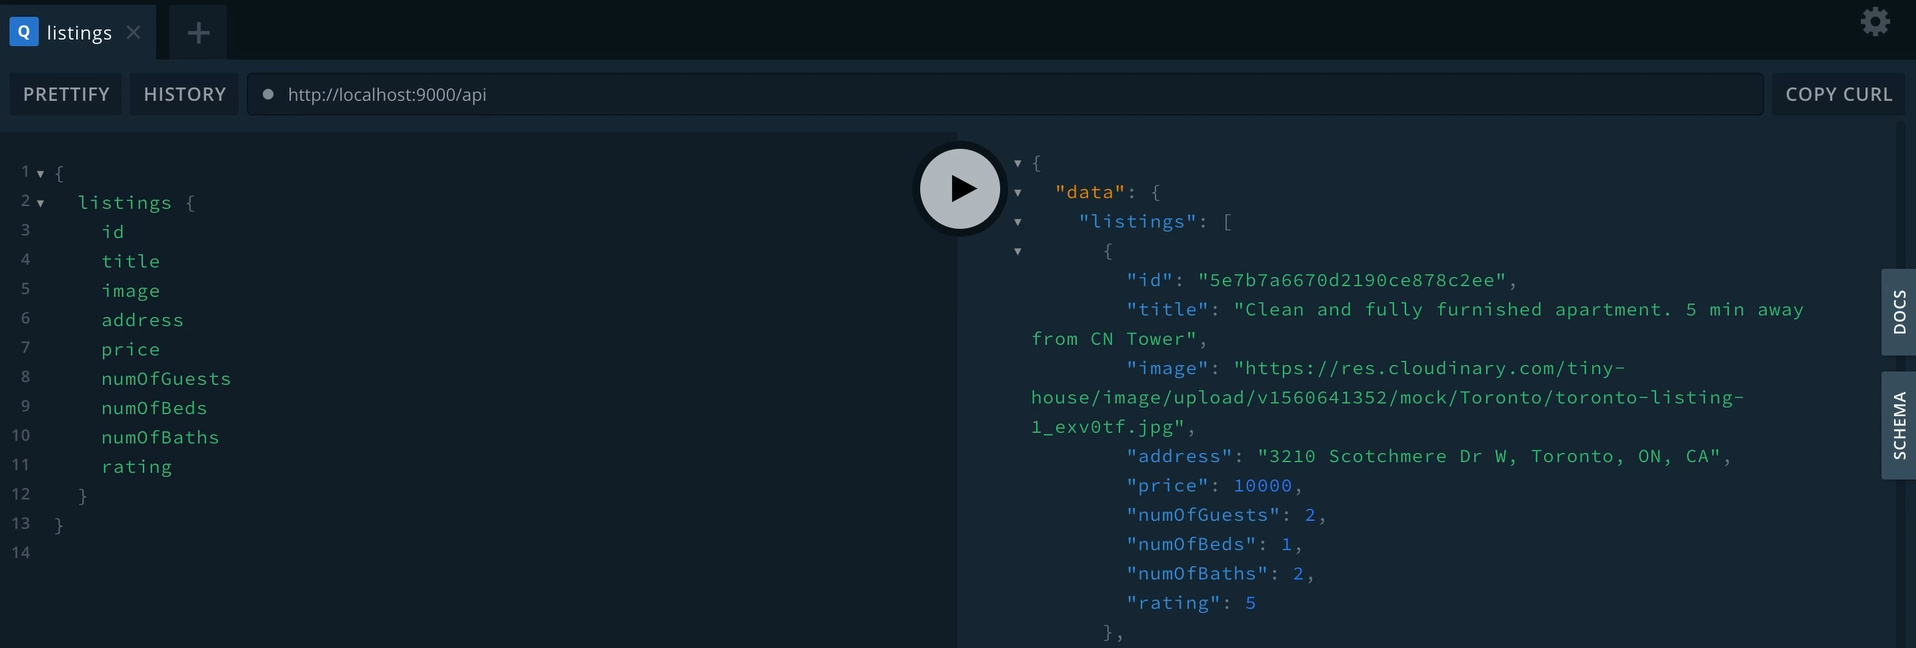
In the GraphQL Playground, we should now be able to:
- Find all listings using the
listingsquery. - Find a certain listing using the
listing(id: ID!)query. - Create a new listing using the
createListingmutation. - Update a listing using the
updateListing(id: ID!)mutation. - Delete a listing using the
deleteListing(id: ID!)mutation.
Now that we have gotten familiar with TypeORM’s API, in the next lesson, we’ll integrate PostgreSQL & TypeORM into our TinyHouse application (i.e. code for Part II of the course)!
TINYHOUSE - POSTGRESQL & TYPEORM
In this lesson, we’ll be using the following seed data to populate our database - listings and users. This seed data does not reference MongoDB’s
ObjectIdproperty which is important as we upload this data to our PostgreSQL database.
In this lesson, we’ll integrate PostgreSQL and TypeORM into our TinyHouse application. To begin, we’ll clone the source code from lesson 15.6 from Part 2 of the course.
We are beginning this lesson from the last point of our source code for the TinyHouse app. Whatever you’ve managed to complete Part II of the course with will be a good starting point for this lesson.
INSTALL & UPDATE
First, we’ll head over to our client application and make sure our npm packages are installed:
npm install
That will be all we’ll do for our React client. All the further changes we need to make to integrate PostgreSQL & TypeORM into TinyHouse will be on the server-side!
We’ll head over to our Node server and make sure our npm packages are installed:
npm install
Next, we’ll make sure our npm packages are updated:
npm update
If npm warns about any vulnerabilities from our packages, we’ll also want to make sure we fix those:
npm audit fix
Since we’ll be using TypeORM and PostgreSQL instead of MongoDB, we’ll be uninstalling the MongoDB driver and accompanying type definitions:
npm uninstall mongodb --save
npm uninstall @types/mongodb --save-dev
Like what we did in the previous lesson, we’ll first install the packages TypeORM requires:
npm install typeorm reflect-metadata
Next, we’ll install the PostgreSQL database driver:
npm install pg
Next, we’ll enable the following settings in the tsconfig.json file to complement some of the code we’ll write with TypeORM:
server/tsconfig.json
    "emitDecoratorMetadata": true,
    "experimentalDecorators": true,
    "strictPropertyInitialization": false
CONFIGURATION
We’ll create a new .env file (or update our existing available .env file) with the following variables set.
PORT=9000
G_CLIENT_ID=******************
G_CLIENT_SECRET=******************
PUBLIC_URL=http://localhost:3000
SECRET=******************
NODE_ENV=development
G_GEOCODE_KEY=******************
S_SECRET_KEY=******************
S_CLIENT_ID=******************
CLOUDINARY_NAME=******************
CLOUDINARY_KEY=******************
CLOUDINARY_SECRET=******************
In this lesson, we’re focused on swapping our server interaction from MongoDB to PostgreSQL. You can use the same environment variables you used when going through Part 2 of the course but remove the
DB_USER,DB_USER_PASSWORD, andDB_CLUSTERenvironment variables since we won’t need these any longer.
Next, we’ll copy over the same ormconfig.json from our previous lesson and drop it into our TinyHouse server project since we are to have a similar ORM configuration. We’ll also need to create a new PostgreSQL database. To do this, we’ll open pgAdmin and create a new database called tinyhouse and we’ll update our ormconfig.json with our new database name.
The ormconfig.json file of our server project will look like the following:
server/ormconfig.json
{
  "type": "postgres",
  "host": "localhost",
  "port": 5432,
  "username": "postgres",
  "password": "myPassword",
  "database": "tinyhouse",
  "synchronize": true,
  "logging": false,
  "entities": ["src/database/entity/**/*.ts"],
  "migrations": ["src/database/migration/**/*.ts"],
  "subscribers": ["src/database/subscriber/**/*.ts"]
}
Some of your ORM config values may look different depending on your database username, password, etc.
SET-UP
Like what we did in the previous lesson, we’ll first need to import reflect-metadata at the beginning of our server project which we’ll do in our server src/index.ts file.
server/src/index.ts
import "reflect-metadata";
Next, we’ll head over to our database folder and modify our connectDatabase() function to use TypeORM’s createConnection() method to connect our Node server to our PostgreSQL database. We’ll also import entities that we’ll soon create - BookingEntity , ListingEntity , and UserEntity .
server/src/database/index.ts
import { createConnection } from "typeorm";
import { Database } from "../lib/types";
import { BookingEntity, ListingEntity, UserEntity } from "./entity";

export const connectDatabase = async (): Promise<Database> => {
  const connection = await createConnection();

  return {
    bookings: connection.getRepository(BookingEntity),
    listings: connection.getRepository(ListingEntity),
    users: connection.getRepository(UserEntity),
  };
};
TYPEORM ENTITIES
We’ll create a new folder called entity/ in our server src/database/ directory to define our database schema. Inside the entity/ folder, we’ll create and export a BookingEntity , ListingEntity , and a UserEntity in separate files. When building our entities, we’ll reference our TypeScript definitions since they’ll represent how our entities are to be shaped. The only difference would be that our Listing and User TypeScript type definitions are to have an authorized?: boolean property whereas our database equivalents would not.
With this in mind, our BookingEntity will look like the following:
server/src/database/entity/BookingEntity.ts
import { Entity, BaseEntity, PrimaryColumn, Column } from "typeorm";

/* eslint-disable @typescript-eslint/explicit-member-accessibility */

@Entity("bookings")
export class BookingEntity extends BaseEntity {
  @PrimaryColumn("text")
  id: string;

  @Column("text")
  listing: string;

  @Column("text")
  tenant: string;

  @Column("text")
  checkIn: string;

  @Column("text")
  checkOut: string;
}
Our ListingEntity will appear as follows:
server/src/database/entity/ListingEntity.ts
import { Entity, BaseEntity, PrimaryColumn, Column } from "typeorm";
import { BookingsIndex, ListingType } from "../../lib/types";

/* eslint-disable @typescript-eslint/explicit-member-accessibility */

@Entity("listings")
export class ListingEntity extends BaseEntity {
  @PrimaryColumn("text")
  id: string;

  @Column("varchar", { length: 100 })
  title: string;

  @Column("varchar", { length: 5000 })
  description: string;

  @Column("text")
  image: string;

  @Column("text")
  host: string;

  @Column({ type: "enum", enum: ListingType })
  type: ListingType;

  @Column("text")
  address: string;

  @Column("text")
  country: string;

  @Column("text")
  admin: string;

  @Column("text")
  city: string;

  @Column("simple-array")
  bookings: string[];

  @Column("simple-json")
  bookingsIndex: BookingsIndex;

  @Column("integer")
  price: number;

  @Column("integer")
  numOfGuests: number;
}
And our UserEntity will look like the following:
server/src/database/entity/UserEntity.ts
import { Entity, BaseEntity, PrimaryColumn, Column } from "typeorm";

/* eslint-disable @typescript-eslint/explicit-member-accessibility */

@Entity("users")
export class UserEntity extends BaseEntity {
  @PrimaryColumn("text")
  id: string;

  @Column("text")
  token: string;

  @Column("text")
  name: string;

  @Column("text")
  avatar: string;

  @Column("text")
  contact: string;

  @Column("text", { nullable: true })
  walletId?: string | null;

  @Column("integer")
  income: number;

  @Column("simple-array")
  bookings: string[];

  @Column("simple-array")
  listings: string[];
}
In our newly prepared entities, we introduced some new data types:
-
enumis equivalent to TypeScript’senumand we can provide a reference to ourListingTypeenum that we’ve defined in our serversrc/lib/types.tsfile -
simple-arraystore array values in a singlestringcolumn under the hood. -
simple-jsonstores JSON objects in a singlestringcolumn usingJSON.stringifyunder the hood.
To see a full list of data types TypeORM supports for each database system, head over to their official documentation
Next, we’ll modify our TypeScript definitions to match our database schema:
- Instead of using MongoDB’s
Collectiontype, we’ll use TypeORM’sRepositorytype. - Instead of using MongoDB’s
_idfield ofObjectId's, we’ll referenceidfields of typestring.
With these changes, our server src/lib/types.ts file in its entirety will look like the following:
server/src/lib/types.ts
import { Repository } from "typeorm";
import { BookingEntity, ListingEntity, UserEntity } from "../database/entity";

export interface Viewer {
  id?: string;
  token?: string;
  avatar?: string;
  walletId?: string | null;
  didRequest: boolean;
}

export enum ListingType {
  Apartment = "APARTMENT",
  House = "HOUSE",
}

export interface BookingsIndexMonth {
  [key: string]: boolean;
}

export interface BookingsIndexYear {
  [key: string]: BookingsIndexMonth;
}

export interface BookingsIndex {
  [key: string]: BookingsIndexYear;
}

export interface Booking {
  id: string;
  listing: string;
  tenant: string;
  checkIn: string;
  checkOut: string;
}

export interface Listing {
  id: string;
  title: string;
  description: string;
  image: string;
  host: string;
  type: ListingType;
  address: string;
  country: string;
  admin: string;
  city: string;
  bookings: string[];
  bookingsIndex: BookingsIndex;
  price: number;
  numOfGuests: number;
  authorized?: boolean;
}

export interface User {
  id: string;
  token: string;
  name: string;
  avatar: string;
  contact: string;
  walletId?: string | null;
  income: number;
  bookings: string[];
  listings: string[];
  authorized?: boolean;
}

export interface Database {
  bookings: Repository<BookingEntity>;
  listings: Repository<ListingEntity>;
  users: Repository<UserEntity>;
}
SEED DATABASE
Before we start to modify our GraphQL resolvers to use TypeORM instead of the MongoDB driver methods, we’ll first seed our PostgreSQL database with some data.
Instead of using MongoDB’s insertOne() method, we’ll use TypeORM’s create() method to create a new instance of an entity locally, then we’ll use the save() method to save it to our database.
Our server temp/seed.ts file will appear as follows:
require("dotenv").config();

import { connectDatabase } from "../src/database";
import { Listing, ListingType, User } from "../src/lib/types";

const listings: Listing[] = [
  // ...
];

const users: User[] = [
  // ...
];

const seed = async () => {
  try {
    console.log("[seed] : running...");

    const db = await connectDatabase();

    for (const listing of listings) {
      await db.listings.create(listing).save();
    }

    for (const user of users) {
      await db.users.create(user).save();
    }

    console.log("[seed] : success");
  } catch {
    throw new Error("failed to seed database");
  }
};

seed();
Do obtain a copy of the mock listings and users for this lesson from the following links - mock listings and mock users. The seed data we use here is modified to remove MongoDB’s
ObjectIdusage within each mock listing and user object.
We’ll also update our clear() script just in case we need to reset our database. Instead of using MongoDB’s drop() method, we’ll use TypeORM’s clear() method instead.
Our server temp/clear.ts file will look like the following:
server/temp/clear.ts
require("dotenv").config();

import { connectDatabase } from "../src/database";

const clear = async () => {
  try {
    console.log("[clear] : running...");

    const db = await connectDatabase();

    await db.bookings.clear();
    await db.listings.clear();
    await db.users.clear();

    console.log("[clear] : success");
  } catch {
    throw new Error("failed to clear database");
  }
};

clear();
With these changes, we’ll now run our seed() function to populate our PostgreSQL database with mock data:
npm run seed
When our seed script is complete, we’ll be able to see our seeded data in our tinyhouse database from the pgAdmin application.
USER RESOLVERS
We’ll now begin to modify our GraphQL resolvers to use TypeORM. We’ll start by updating our Query.user resolver:
- We won’t need to do anything to our
findOne()method because MongoDB and TypeORM’s API forfindOne()is identical. - We’ll cast the
userobject of the found user as our TypeScriptUsertype. This is done so that we can assign anauthorizedproperty to it later on in the function. - Since our PostgreSQL table uses an
idcolumn instead of an_idfield, we’ll change that across the entire file as well. We can also remove our customUser.idresolver since this will be handled trivially by our GraphQL server.
Our Query.user resolver function will look like the following:
export const userResolvers: IResolvers = {
  Query: {
    user: async (
      _root: undefined,
      { id }: UserArgs,
      { db, req }: { db: Database; req: Request }
    ): Promise<User> => {
      try {
        const user = (await db.users.findOne({ id })) as User;

        if (!user) {
          throw new Error("user can't be found");
        }

        const viewer = await authorize(db, req);

        if (viewer && viewer.id === user.id) {
          user.authorized = true;
        }

        return user;
      } catch (error) {
        throw new Error(`Failed to query user: ${error}`);
      }
    },
  },
  User: {
    // ...
  },
};
Next, we’ll update our User.bookings resolver:
- Instead of using MongoDB’s
find()method, we’ll use TypeORM’sfindByIds()method. TypeORM’sfindByIds()method takes optional parameters forskipandtakewhich work similarly to MongoDB’sskipandlimitparameters respectively.
TypeORM has additional options for their find methods. To learn more, check out their official documentation.
Our User.bookings resolver will appear as follows:
export const userResolvers: IResolvers = {
  Query: {
    // ...
  },
  User: {
    // ...
    bookings: async (
      user: User,
      { limit, page }: UserBookingsArgs,
      { db }: { db: Database }
    ): Promise<UserBookingsData | null> => {
      try {
        if (!user.authorized) {
          return null;
        }

        const data: UserBookingsData = {
          total: 0,
          result: [],
        };

        const bookings = await db.bookings.findByIds(user.bookings, {
          skip: page > 0 ? (page - 1) * limit : 0,
          take: limit,
        });

        data.total = user.bookings.length;
        data.result = bookings;

        return data;
      } catch (error) {
        throw new Error(`Failed to query user bookings: ${error}`);
      }
    },
  },
};
Similarly, we’ll also update our User.listings resolver.
- We’ll use TypeORM’s
findByIds()method with theskipandtakeoptional parameters.
With all the changes we’ve made, our src/graphql/resolvers/User/index.ts file will look like the following:
server/src/graphql/resolvers/User/index.ts
import { Request } from "express";
import { IResolvers } from "apollo-server-express";
import { Database, User } from "../../../lib/types";
import { authorize } from "../../../lib/utils";
import {
  UserArgs,
  UserBookingsArgs,
  UserBookingsData,
  UserListingsArgs,
  UserListingsData,
} from "./types";

export const userResolvers: IResolvers = {
  Query: {
    user: async (
      _root: undefined,
      { id }: UserArgs,
      { db, req }: { db: Database; req: Request }
    ): Promise<User> => {
      try {
        const user = (await db.users.findOne({ id })) as User;

        if (!user) {
          throw new Error("user can't be found");
        }

        const viewer = await authorize(db, req);

        if (viewer && viewer.id === user.id) {
          user.authorized = true;
        }

        return user;
      } catch (error) {
        throw new Error(`Failed to query user: ${error}`);
      }
    },
  },
  User: {
    hasWallet: (user: User): boolean => {
      return Boolean(user.walletId);
    },
    income: (user: User): number | null => {
      return user.authorized ? user.income : null;
    },
    bookings: async (
      user: User,
      { limit, page }: UserBookingsArgs,
      { db }: { db: Database }
    ): Promise<UserBookingsData | null> => {
      try {
        if (!user.authorized) {
          return null;
        }

        const data: UserBookingsData = {
          total: 0,
          result: [],
        };

        const bookings = await db.bookings.findByIds(user.bookings, {
          skip: page > 0 ? (page - 1) * limit : 0,
          take: limit,
        });

        data.total = user.bookings.length;
        data.result = bookings;

        return data;
      } catch (error) {
        throw new Error(`Failed to query user bookings: ${error}`);
      }
    },
    listings: async (
      user: User,
      { limit, page }: UserListingsArgs,
      { db }: { db: Database }
    ): Promise<UserListingsData | null> => {
      try {
        const data: UserListingsData = {
          total: 0,
          result: [],
        };

        const listings = await db.listings.findByIds(user.listings, {
          skip: page > 0 ? (page - 1) * limit : 0,
          take: limit,
        });

        data.total = user.listings.length;
        data.result = listings;

        return data;
      } catch (error) {
        throw new Error(`Failed to query user listings: ${error}`);
      }
    },
  },
};
VIEWER RESOLVERS
We’ll now navigate and make changes to our viewerResolvers . First, we’ll replace any references with MongoDB’s _id property with just id . We’ll also delete the Viewer.id resolver since this will be resolved trivially.
Next, we’ll modify the logInViaGoogle() function with the following changes.
- Instead of using MongoDB’s
findOneAndUpdate()method, we’ll use TypeORM’ssave()method to save any entity changes to our database. - We’ll also use TypeORM’s
create()method to create a new instance of an entity locally then we’ll use thesave()method to save it to our database.
const logInViaGoogle = async (
  code: string,
  token: string,
  db: Database,
  res: Response
): Promise<User | undefined> => {
  // ...
  // access userId, userName, userAvatar, and userEmail
  // ...

  if (!userId || !userName || !userAvatar || !userEmail) {
    throw new Error("Google login error");
  }

  let viewer = await db.users.findOne({ id: userId });

  if (viewer) {
    viewer.name = userName;
    viewer.avatar = userAvatar;
    viewer.contact = userEmail;
    viewer.token = token;
    await viewer.save();
  } else {
    const newUser: User = {
      id: userId,
      token,
      name: userName,
      avatar: userAvatar,
      contact: userEmail,
      income: 0,
      bookings: [],
      listings: [],
    };

    viewer = await db.users.create(newUser).save();
  }

  res.cookie("viewer", userId, {
    ...cookieOptions,
    maxAge: 365 * 24 * 60 * 60 * 1000,
  });

  return viewer;
};
Next, we’ll modify our logInViaCookie() function:
- Instead of using MongoDB’s
findOneAndUpdate()method, we’ll use TypeORM’sfindOne()method to find our viewer from our database. - We’ll then use TypeORM’s
save()method to save any entity changes to our database.
server/src/graphql/resolvers/Viewer/index.ts
const logInViaCookie = async (
  token: string,
  db: Database,
  req: Request,
  res: Response
): Promise<User | undefined> => {
  const viewer = await db.users.findOne({ id: req.signedCookies.viewer });

  if (viewer) {
    viewer.token = token;
    await viewer.save();
  } else {
    res.clearCookie("viewer", cookieOptions);
  }

  return viewer;
};
Next, we’ll modify the Mutation.connectStripe and Mutation.disconnectStripe resolvers in our viewerResolvers map:
- For both of these resolvers, instead of using MongoDB’s
findOneAndUpdate()method, we’ll use TypeORM’ssave()method to save any entity changes to our database.
export const viewerResolvers: IResolvers = {
  Query: {
    // ...
  },
  Mutation: {
    // ...
    connectStripe: async (
      _root: undefined,
      { input }: ConnectStripeArgs,
      { db, req }: { db: Database; req: Request }
    ): Promise<Viewer> => {
      try {
        const { code } = input;

        const viewer = await authorize(db, req);
        if (!viewer) {
          throw new Error("viewer cannot be found");
        }

        const wallet = await Stripe.connect(code);
        if (!wallet) {
          throw new Error("stripe grant error");
        }

        viewer.walletId = wallet.stripe_user_id;
        await viewer.save();

        return {
          id: viewer.id,
          token: viewer.token,
          avatar: viewer.avatar,
          walletId: viewer.walletId,
          didRequest: true,
        };
      } catch (error) {
        throw new Error(`Failed to connect with Stripe: ${error}`);
      }
    },
    disconnectStripe: async (
      _root: undefined,
      _args: {},
      { db, req }: { db: Database; req: Request }
    ): Promise<Viewer> => {
      try {
        const viewer = await authorize(db, req);
        if (!viewer || !viewer.walletId) {
          throw new Error("viewer cannot be found or has not connected with Stripe");
        }

        const wallet = await Stripe.disconnect(viewer.walletId);
        if (!wallet) {
          throw new Error("stripe disconnect error");
        }

        viewer.walletId = null;
        await viewer.save();

        return {
          id: viewer.id,
          token: viewer.token,
          avatar: viewer.avatar,
          walletId: viewer.walletId,
          didRequest: true,
        };
      } catch (error) {
        throw new Error(`Failed to disconnect with Stripe: ${error}`);
      }
    },
  },
};
We’ll also need to modify our utility authorize() function to return a UserEntity so that we can use TypeORM’s save() method elsewhere in our resolvers. We’ll update the src/lib/utils/index.ts file with these changes:
server/src/lib/utils/index.ts
import { Request } from "express";
import { Database } from "../types";
import { UserEntity } from "../../database/entity";

export const authorize = async (
  db: Database,
  req: Request
): Promise<UserEntity | null> => {
  const token = req.get("X-CSRF-TOKEN");
  const viewer = await db.users.findOne({
    id: req.signedCookies.viewer,
    token,
  });

  if (!viewer) return null;

  return viewer;
};
LISTING RESOLVERS
We’ll now update the resolvers in our listingResolvers map and begin with the Query.listing resolver with these changes:
- We won’t need to do anything to our
findOne()method because MongoDB and TypeORM’s API forfindOne()are identical. - We’ll cast the
listingconstant as the TypeScriptListingtype so that we can assign anauthorizedproperty to it later on in the function. - Since our PostgreSQL table uses an
idcolumn instead of an_idfield, we’ll change that across the entire file as well. This will also mean we can remove our customListing.idresolver since that will be handled trivially.
export const listingResolvers: IResolvers = {
  Query: {
    listing: async (
      _root: undefined,
      { id }: ListingArgs,
      { db, req }: { db: Database; req: Request }
    ): Promise<Listing> => {
      try {
        const listing = (await db.listings.findOne({ id })) as Listing;
        if (!listing) {
          throw new Error("listing can't be found");
        }

        const viewer = await authorize(db, req);
        if (viewer && viewer.id === listing.host) {
          listing.authorized = true;
        }

        return listing;
      } catch (error) {
        throw new Error(`Failed to query listing: ${error}`);
      }
    },
    // ...
  },
  // ...
};
Next, we’ll look to update our Query.listings resolver:
- Here, we’ll introduce TypeORM’s
orderoption for their find methods. - We’ll also need to create a new
OrderTypeScript definition for ourordervariable. This will be done in the serversrc/graphql/resolvers/Listing/types.tsfile:
server/src/graphql/resolvers/Listing/types.ts
export interface Order {
  price: 1 | "ASC" | "DESC" | -1 | undefined;
}
- TypeORM’s
find()method takes optional parameters fororder,skip, andtakewhich work similarly to MongoDB’ssort,skip, andlimitparameters. - We’ll also utilize TypeORM’s
count()method to return the total number of listings that match ourwherequery. This is used by our React client to compute the total number of pages for pagination.
export const listingResolvers: IResolvers = {
  Query: {
    // ...
    listings: async (
      _root: undefined,
      { location, filter, limit, page }: ListingsArgs,
      { db }: { db: Database }
    ): Promise<ListingsData> => {
      try {
        const query: ListingsQuery = {};
        const data: ListingsData = {
          region: null,
          total: 0,
          result: [],
        };

        if (location) {
          const { country, admin, city } = await Google.geocode(location);

          if (city) query.city = city;
          if (admin) query.admin = admin;
          if (country) {
            query.country = country;
          } else {
            throw new Error("no country found");
          }

          const cityText = city ? `${city}, ` : "";
          const adminText = admin ? `${admin}, ` : "";
          data.region = `${cityText}${adminText}${country}`;
        }

        let order: Order | null = null;

        if (filter && filter === ListingsFilter.PRICE_LOW_TO_HIGH) {
          order = { price: "ASC" };
        }

        if (filter && filter === ListingsFilter.PRICE_HIGH_TO_LOW) {
          order = { price: "DESC" };
        }

        const count = await db.listings.count(query);
        const listings = await db.listings.find({
          where: { ...query },
          order: { ...order },
          skip: page > 0 ? (page - 1) * limit : 0,
          take: limit,
        });

        data.total = count;
        data.result = listings;

        return data;
      } catch (error) {
        throw new Error(`Failed to query listings: ${error}`);
      }
    },
  },
  // ...
};
Next, we’ll modify our Mutation.hostListing resolver with the following changes:
- Instead of using MongoDB’s
ObjectId()method, we’ll use Node’scryptolibrary instead. - Instead of using MongoDB’s
insertOne()method, we’ll use TypeORM’screate()method to create a new instance of an entity locally and we’ll use thesave()method to save it to our database.
export const listingResolvers: IResolvers = {
  Query: {
    // ...
  },
  Mutation: {
    hostListing: async (
      _root: undefined,
      { input }: HostListingArgs,
      { db, req }: { db: Database; req: Request }
    ): Promise<Listing> => {
      verifyHostListingInput(input);

      const viewer = await authorize(db, req);
      if (!viewer) {
        throw new Error("viewer cannot be found");
      }

      const { country, admin, city } = await Google.geocode(input.address);
      if (!country || !admin || !city) {
        throw new Error("invalid address input");
      }

      const imageUrl = await Cloudinary.upload(input.image);

      const newListing: Listing = {
        id: crypto.randomBytes(16).toString("hex"),
        ...input,
        image: imageUrl,
        bookings: [],
        bookingsIndex: {},
        country,
        admin,
        city,
        host: viewer.id,
      };

      const insertedListing = await db.listings.create(newListing).save();

      viewer.listings.push(insertedListing.id);
      await viewer.save();

      return insertedListing;
    },
  },
  // ...
};
We’ll now make an update for our Listing.bookings resolver.
- Instead of using MongoDB’s
find()method, we’ll use TypeORM’sfindByIds()method. - We’ll use the optional parameters
skipandtaketo enable pagination.
export const listingResolvers: IResolvers = {
  // ...
  Listing: {
    // ...
    bookings: async (
      listing: Listing,
      { limit, page }: ListingBookingsArgs,
      { db }: { db: Database }
    ): Promise<ListingBookingsData | null> => {
      try {
        if (!listing.authorized) {
          return null;
        }

        const data: ListingBookingsData = {
          total: 0,
          result: [],
        };

        const bookings = await db.bookings.findByIds(listing.bookings, {
          skip: page > 0 ? (page - 1) * limit : 0,
          take: limit,
        });

        data.total = listing.bookings.length;
        data.result = bookings;

        return data;
      } catch (error) {
        throw new Error(`Failed to query listing bookings: ${error}`);
      }
    },
  },
};
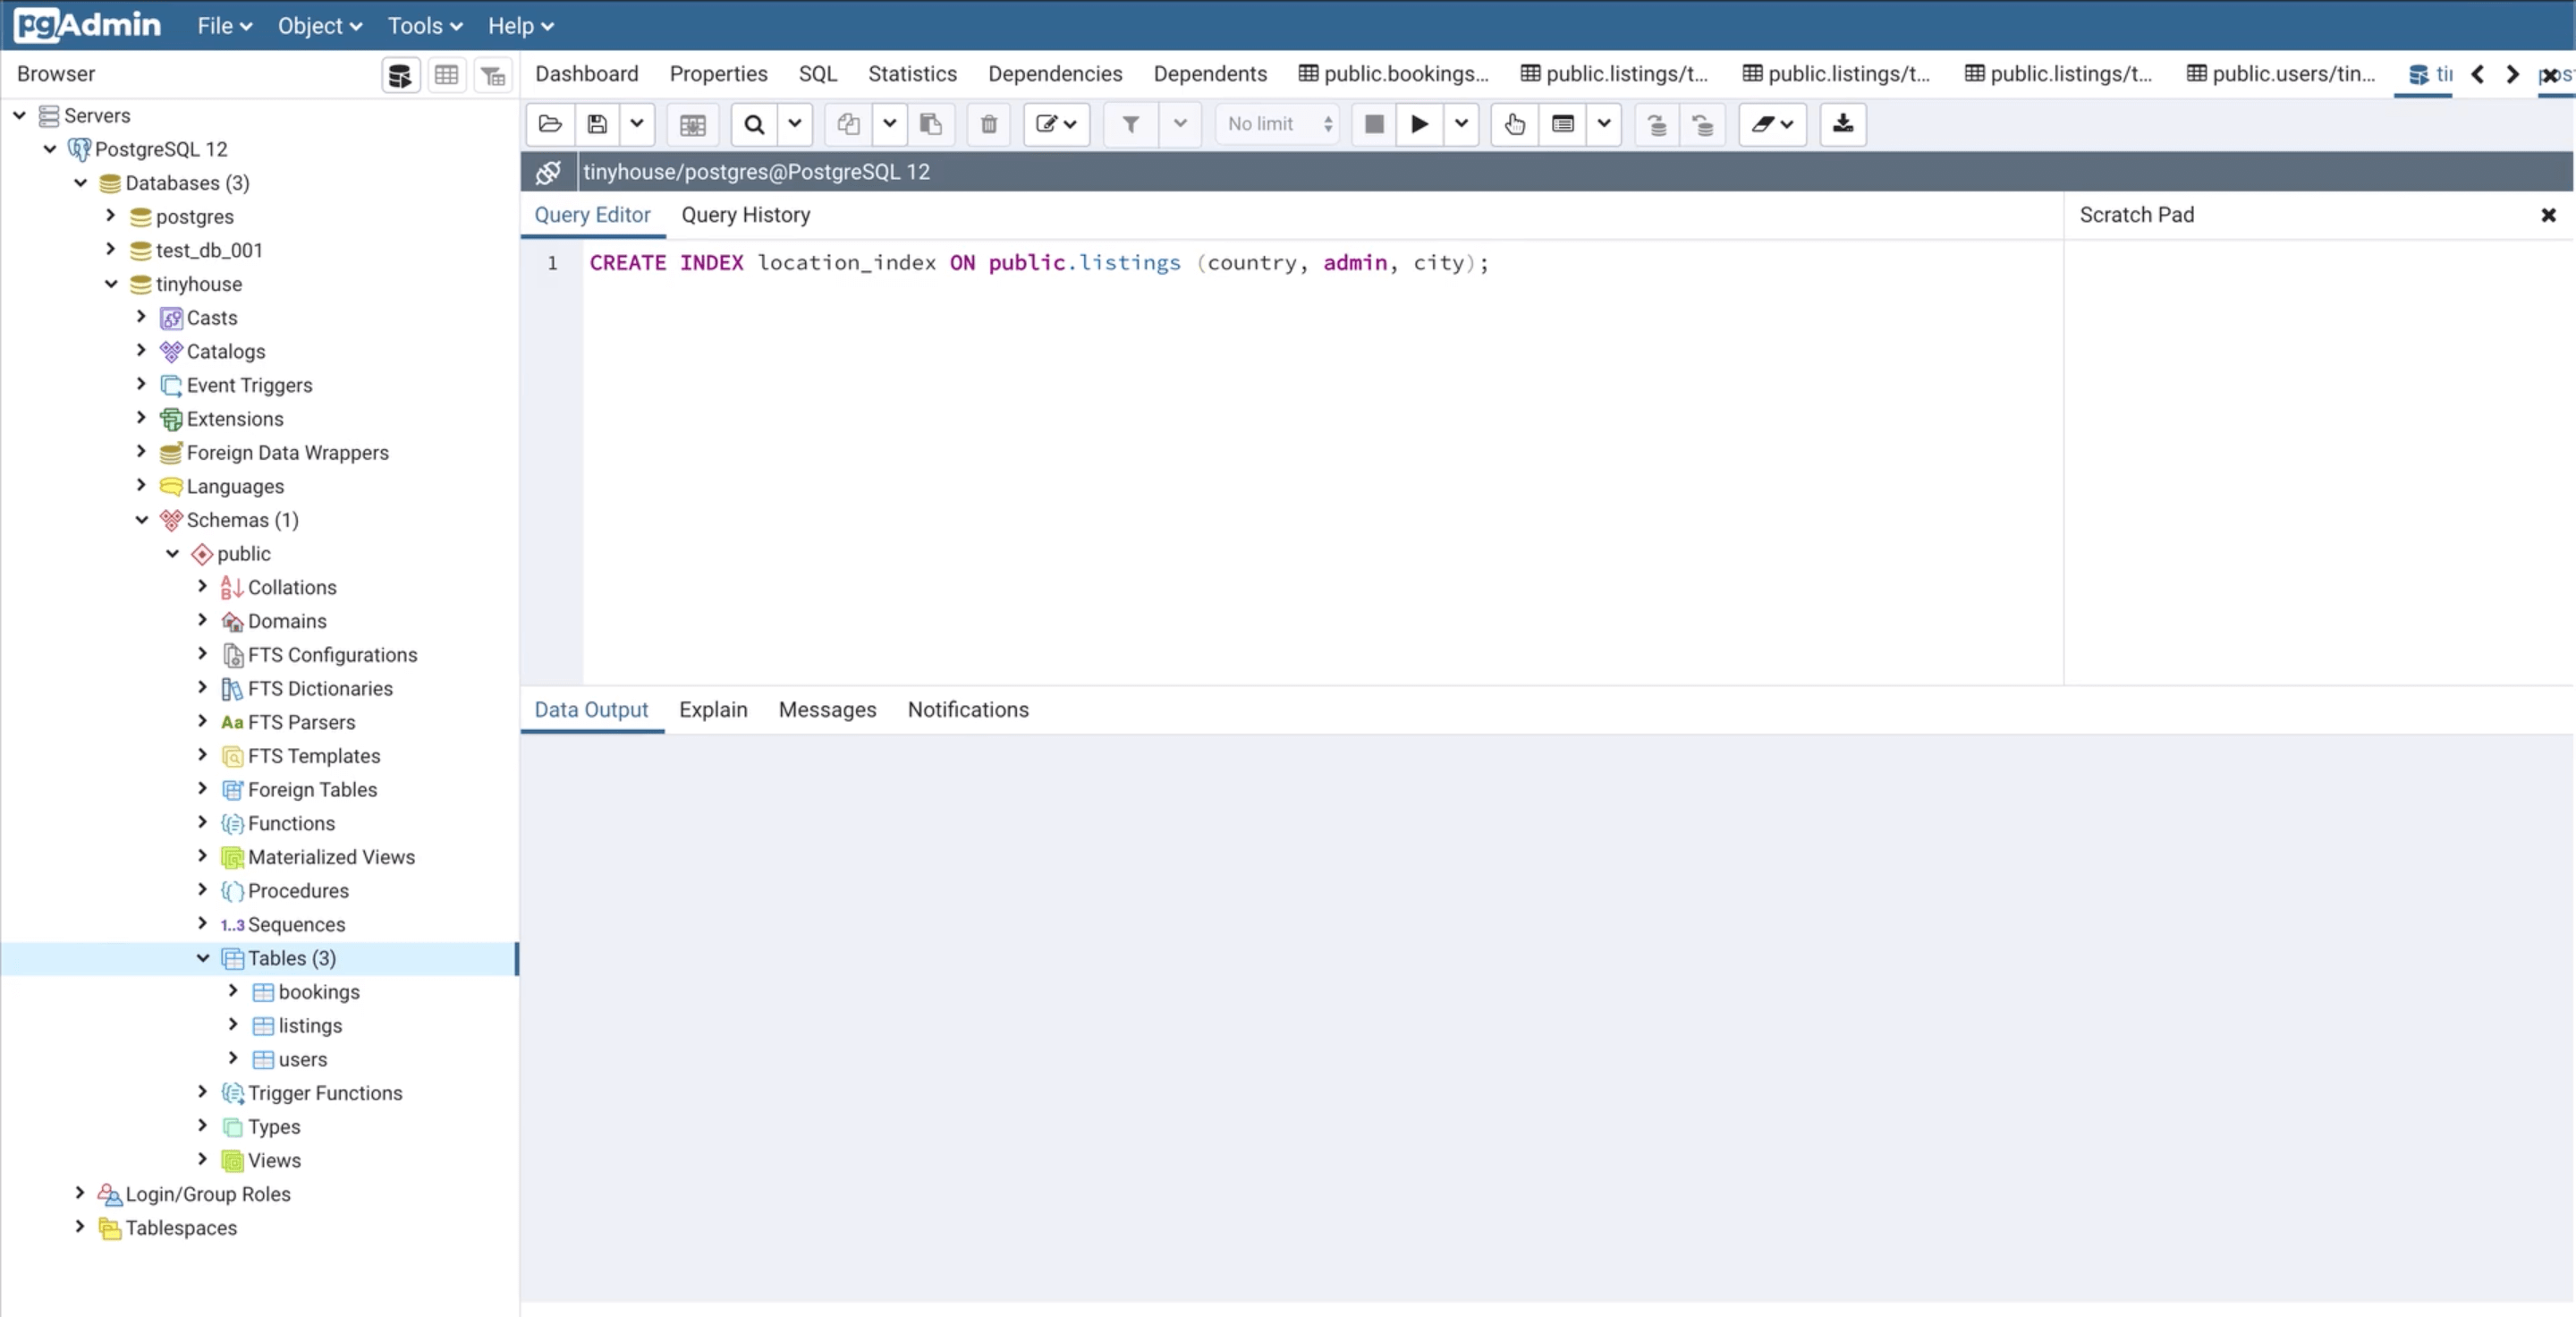
POSTGRESQL - INDEXING
Indexes support the efficient execution of queries in a table. Without indexes, PostgreSQL must scan through every row of data to select the records that match the query statement. If an appropriate index exists for a query, PostgreSQL can use that index to limit the number of records to check.
For our MongoDB database, we created a compound index using the country , admin , and city fields for our listings collection. For our PostgreSQL database, we’ll do something very similar by creating a multicolumn index for our listings table using the following SQL statement:
CREATE INDEX location_index ON public.listings (country, admin, city);
We’ll create and run the above query in the “Tools/Query Tool” action from the top navigation bar of pgAdmin for our tinyhouse PostgreSQL database.
BOOKING RESOLVERS
Finally, we’ll now update our Mutation.createBooking resolver with the following changes.
- Instead of using MongoDB’s
ObjectId()method, we’ll use Node’scryptolibrary instead. - Since our PostgreSQL table uses an
idcolumn instead of an_idfield, we’ll change that across the entire file as well. We can also remove our customBooking.idresolver since that will be handled trivially by our GraphQL server. - Instead of using MongoDB’s
insertOne()method, we’ll use TypeORM’screate()method to create a new instance of an entity locally and we’ll then use thesave()method to save it to our database. - Instead of using MongoDB’s
updateOne()method, we’ll use TypeORM’ssave()method to save any entity changes to our database.
With these changes, our createBooking resolver in our bookingResolvers map within src/graphql/Booking/index.ts will look like the following:
export const bookingResolvers: IResolvers = {
  Mutation: {
    createBooking: async (
      _root: undefined,
      { input }: CreateBookingArgs,
      { db, req }: { db: Database; req: Request }
    ): Promise<Booking> => {
      try {
        const { id, source, checkIn, checkOut } = input;

        let viewer = await authorize(db, req);
        if (!viewer) {
          throw new Error("viewer cannot be found");
        }

        const listing = await db.listings.findOne({ id });
        if (!listing) {
          throw new Error("listing can't be found");
        }

        if (listing.host === viewer.id) {
          throw new Error("viewer can't book own listing");
        }

        const today = new Date();
        const checkInDate = new Date(checkIn);
        const checkOutDate = new Date(checkOut);

        if (checkInDate.getTime() > today.getTime() + 90 * millisecondsPerDay) {
          throw new Error("check in date can't be more than 90 days from today");
        }

        if (checkOutDate.getTime() > today.getTime() + 90 * millisecondsPerDay) {
          throw new Error("check out date can't be more than 90 days from today");
        }

        if (checkOutDate < checkInDate) {
          throw new Error("check out date can't be before check in date");
        }

        const bookingsIndex = resolveBookingsIndex(
          listing.bookingsIndex,
          checkIn,
          checkOut
        );

        const totalPrice =
          listing.price *
          ((checkOutDate.getTime() - checkInDate.getTime()) / millisecondsPerDay + 1);

        const host = await db.users.findOne({ id: listing.host });

        if (!host || !host.walletId) {
          throw new Error(
            "the host either can't be found or is not connected with Stripe"
          );
        }

        await Stripe.charge(totalPrice, source, host.walletId);

        const newBooking: Booking = {
          id: crypto.randomBytes(16).toString("hex"),
          listing: listing.id,
          tenant: viewer.id,
          checkIn,
          checkOut,
        };

        const insertedBooking = await db.bookings.create(newBooking).save();

        host.income = host.income + totalPrice;
        await host.save();

        viewer.bookings.push(insertedBooking.id);
        await viewer.save();

        listing.bookingsIndex = bookingsIndex;
        listing.bookings.push(insertedBooking.id);
        await listing.save();

        return insertedBooking;
      } catch (error) {
        throw new Error(`Failed to create a booking: ${error}`);
      }
    },
  },
  // ...
};
TESTING OUR APPLICATION
We’ve made all the changes we need to do! Now will be a great time to test our PostgreSQL database and TypeORM integration. First, we’ll start our Node server by running the following command on the server directory.
npm start
Then, we’ll start our React client by running the following command on the client directory.
npm start
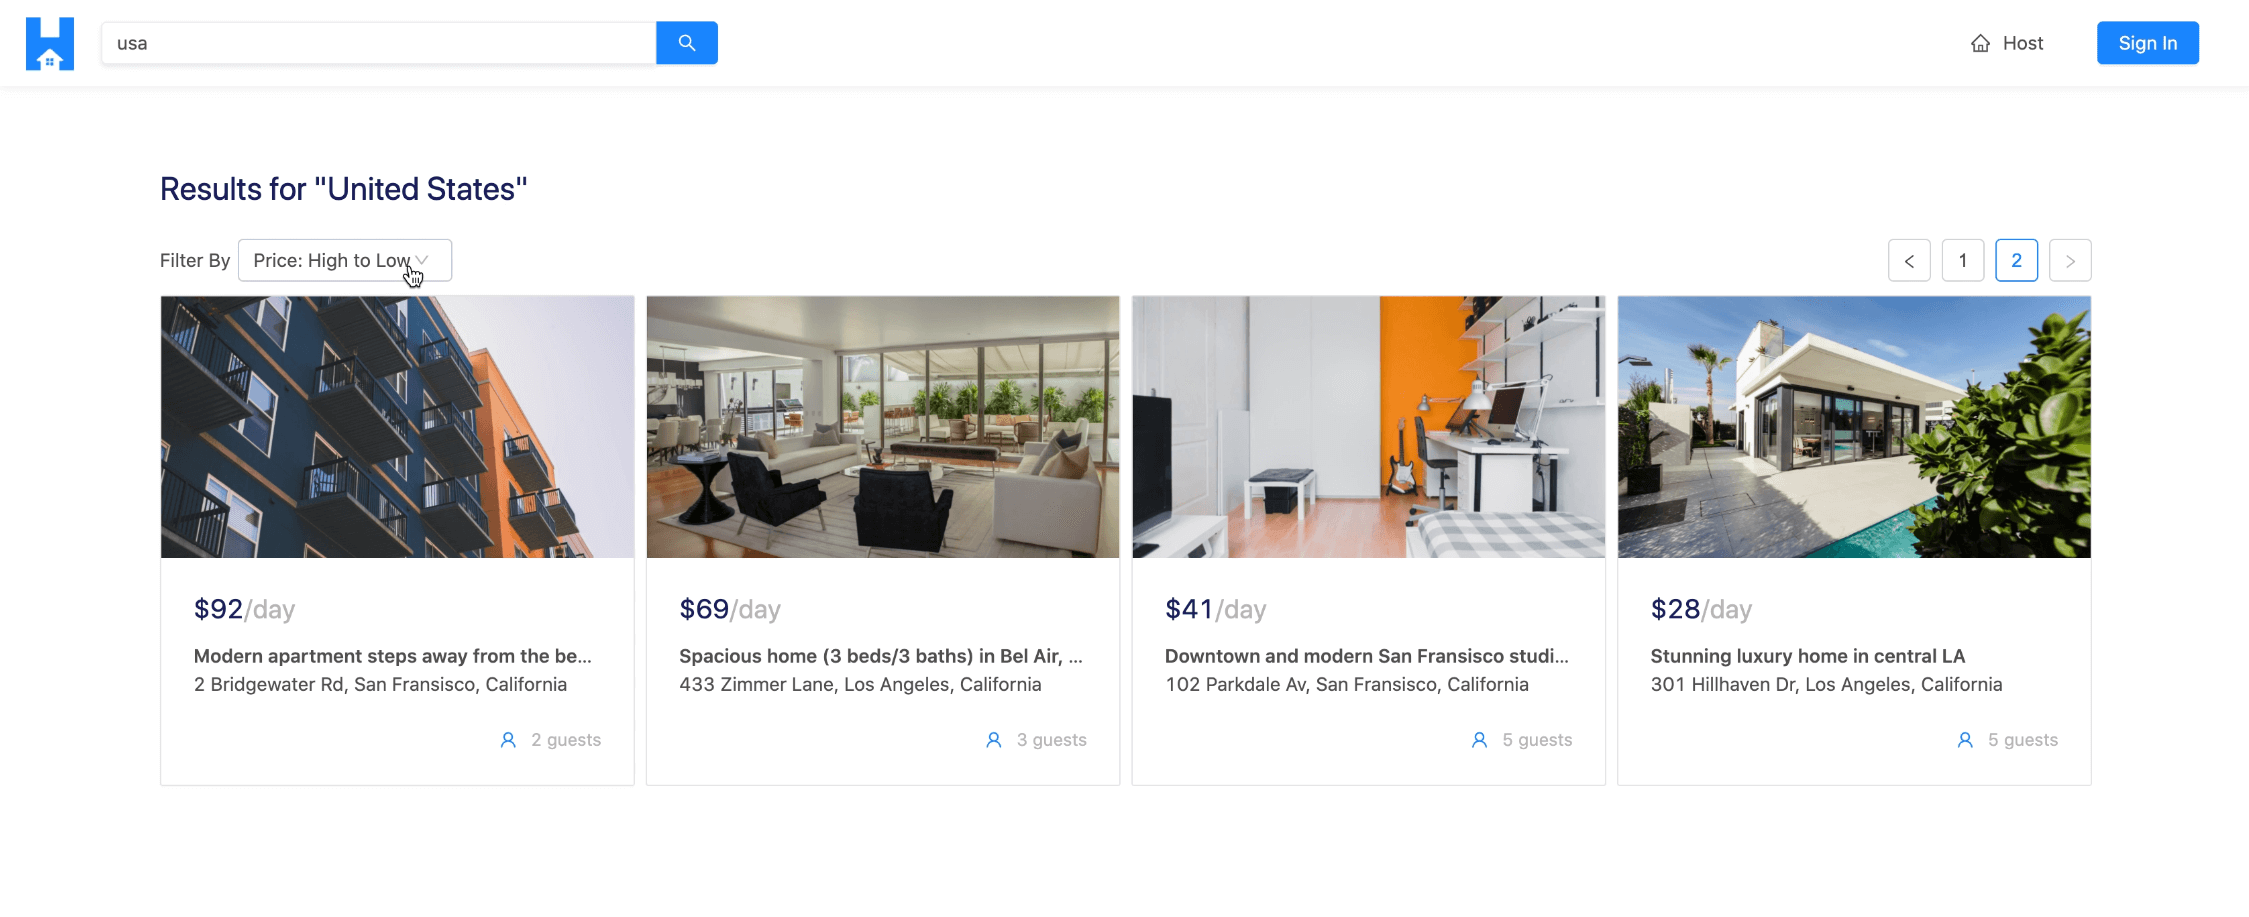
First, we’ll look to make sure our location search, pagination, and price sorting work as intended.
Next, we’ll attempt to sign in with a Google account.

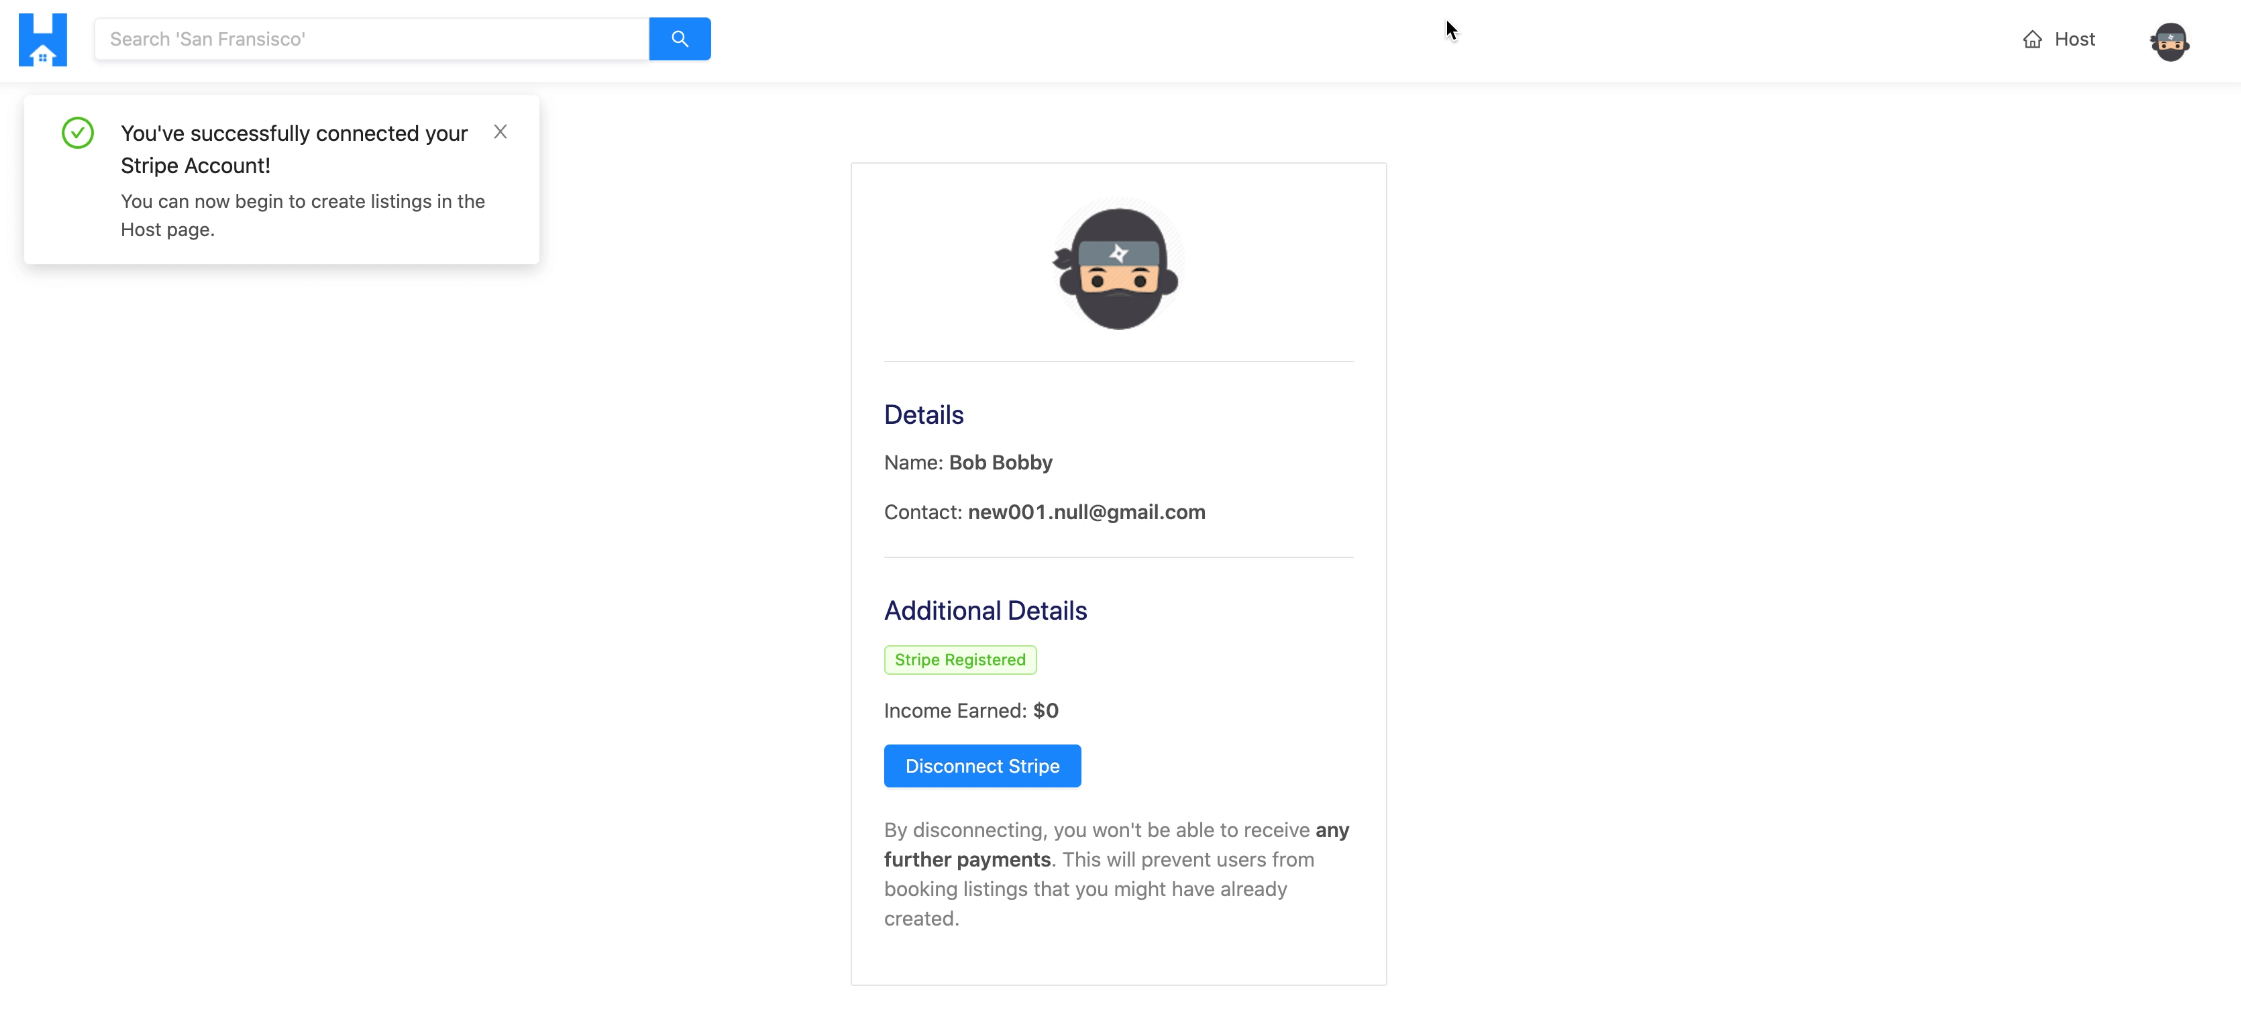
We’ll check to see that connecting with Stripe works.
We’ll make sure our host listing functionality works.

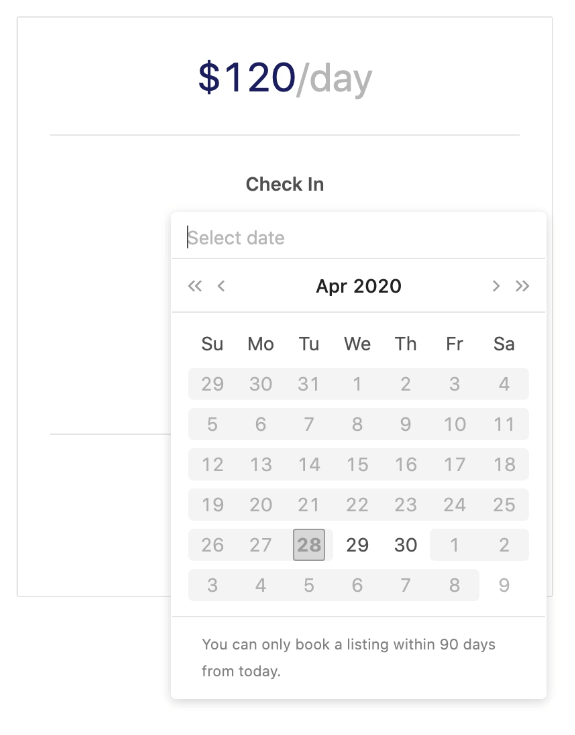
We’ll look to see if we can book a listing with no issues.
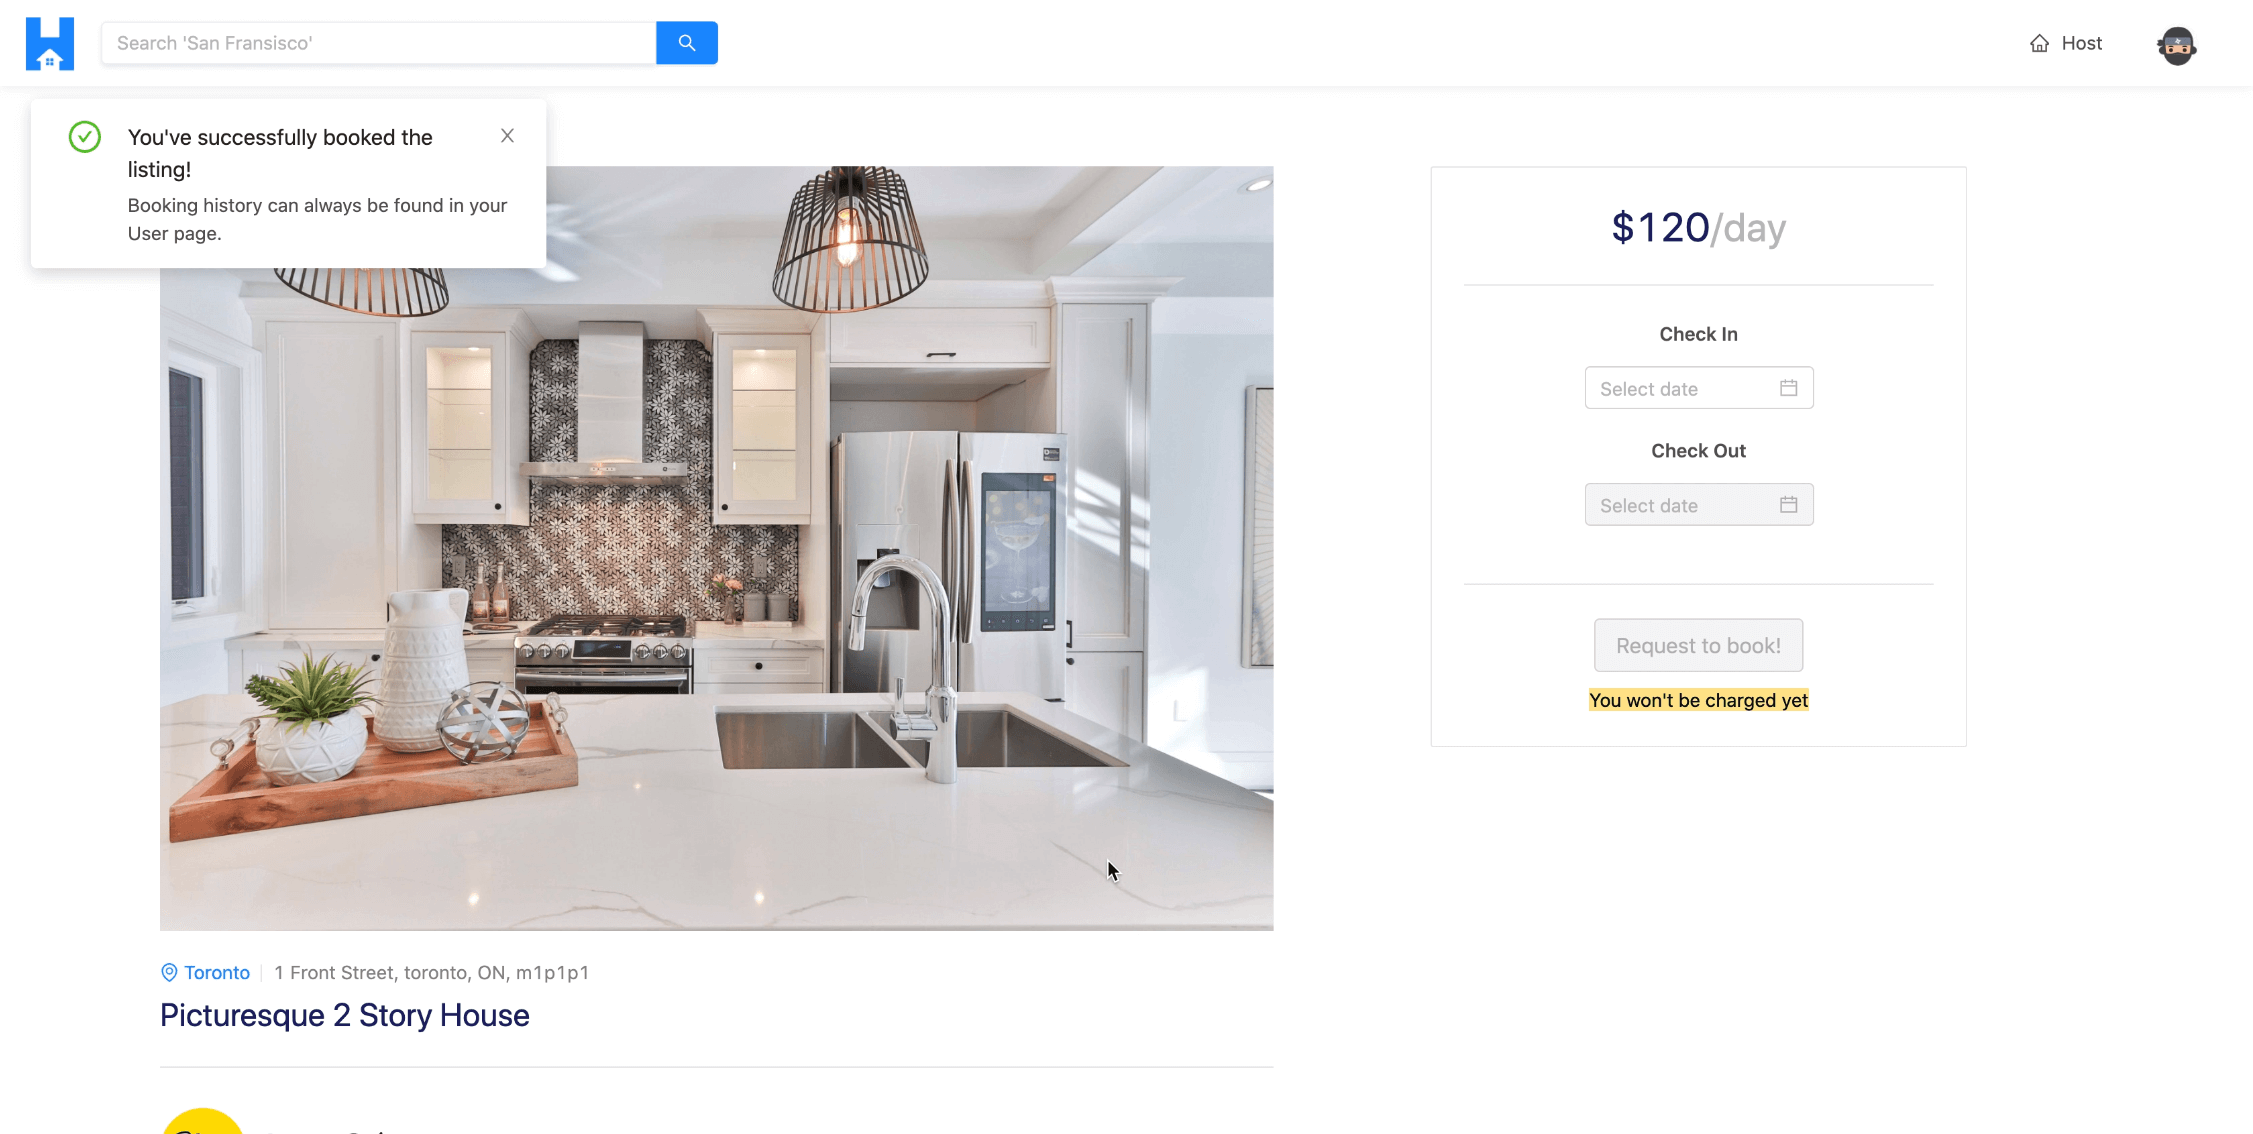
When a booking has just been booked, we’ll be able to confirm that the booked dates are disabled in the datepicker. Great!
We’ll then be able to head over to the profile page where we can see the booking we just made.
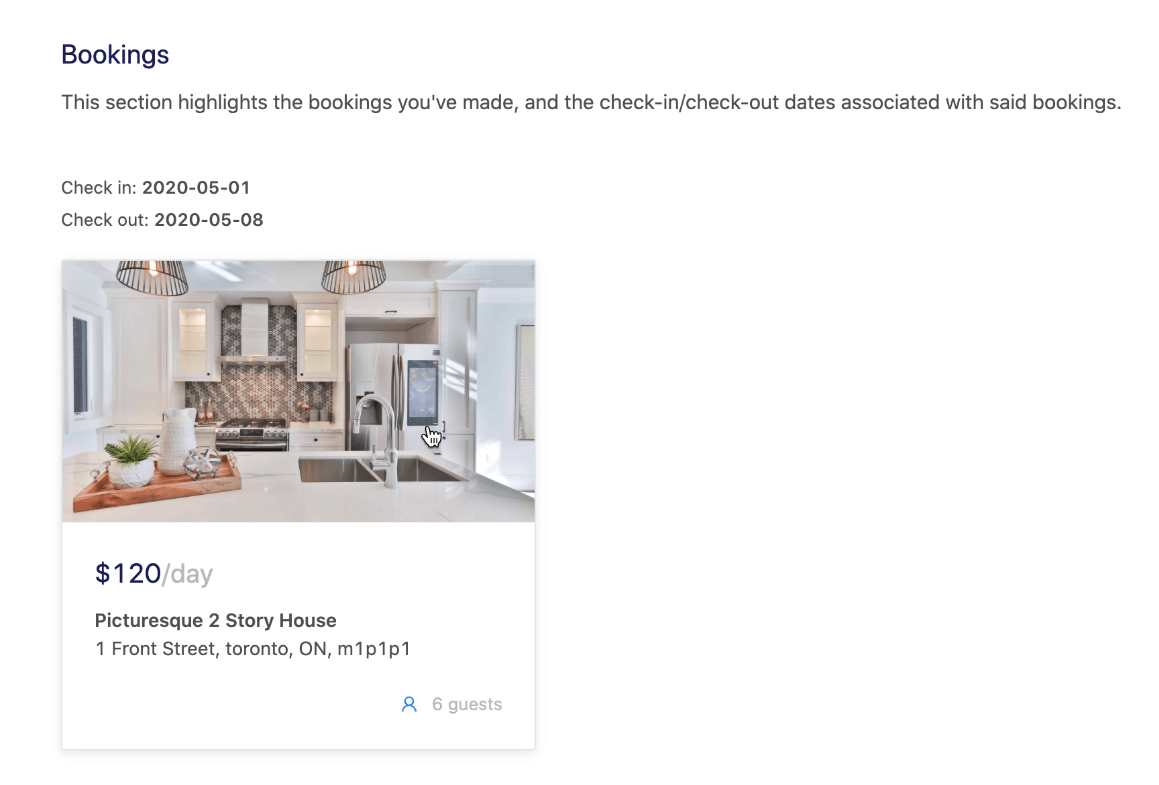
And finally, for the tenant whose listing has been booked, we can confirm that the income shows the newly earned amount from the person who’s booked the listing.

Perfect! We just successfully removed MongoDB from our stack and added PostgreSQL & TypeORM to our TinyHouse application  .
.