MODULE 6 INTRODUCTION
In this module, we’ll build the User page. In the User page, we’ll display information of a certain user as well as the show the listings the user hosts. In addition, when a user views their own User page, they’ll be able to see the sensitive booking information only available to them.
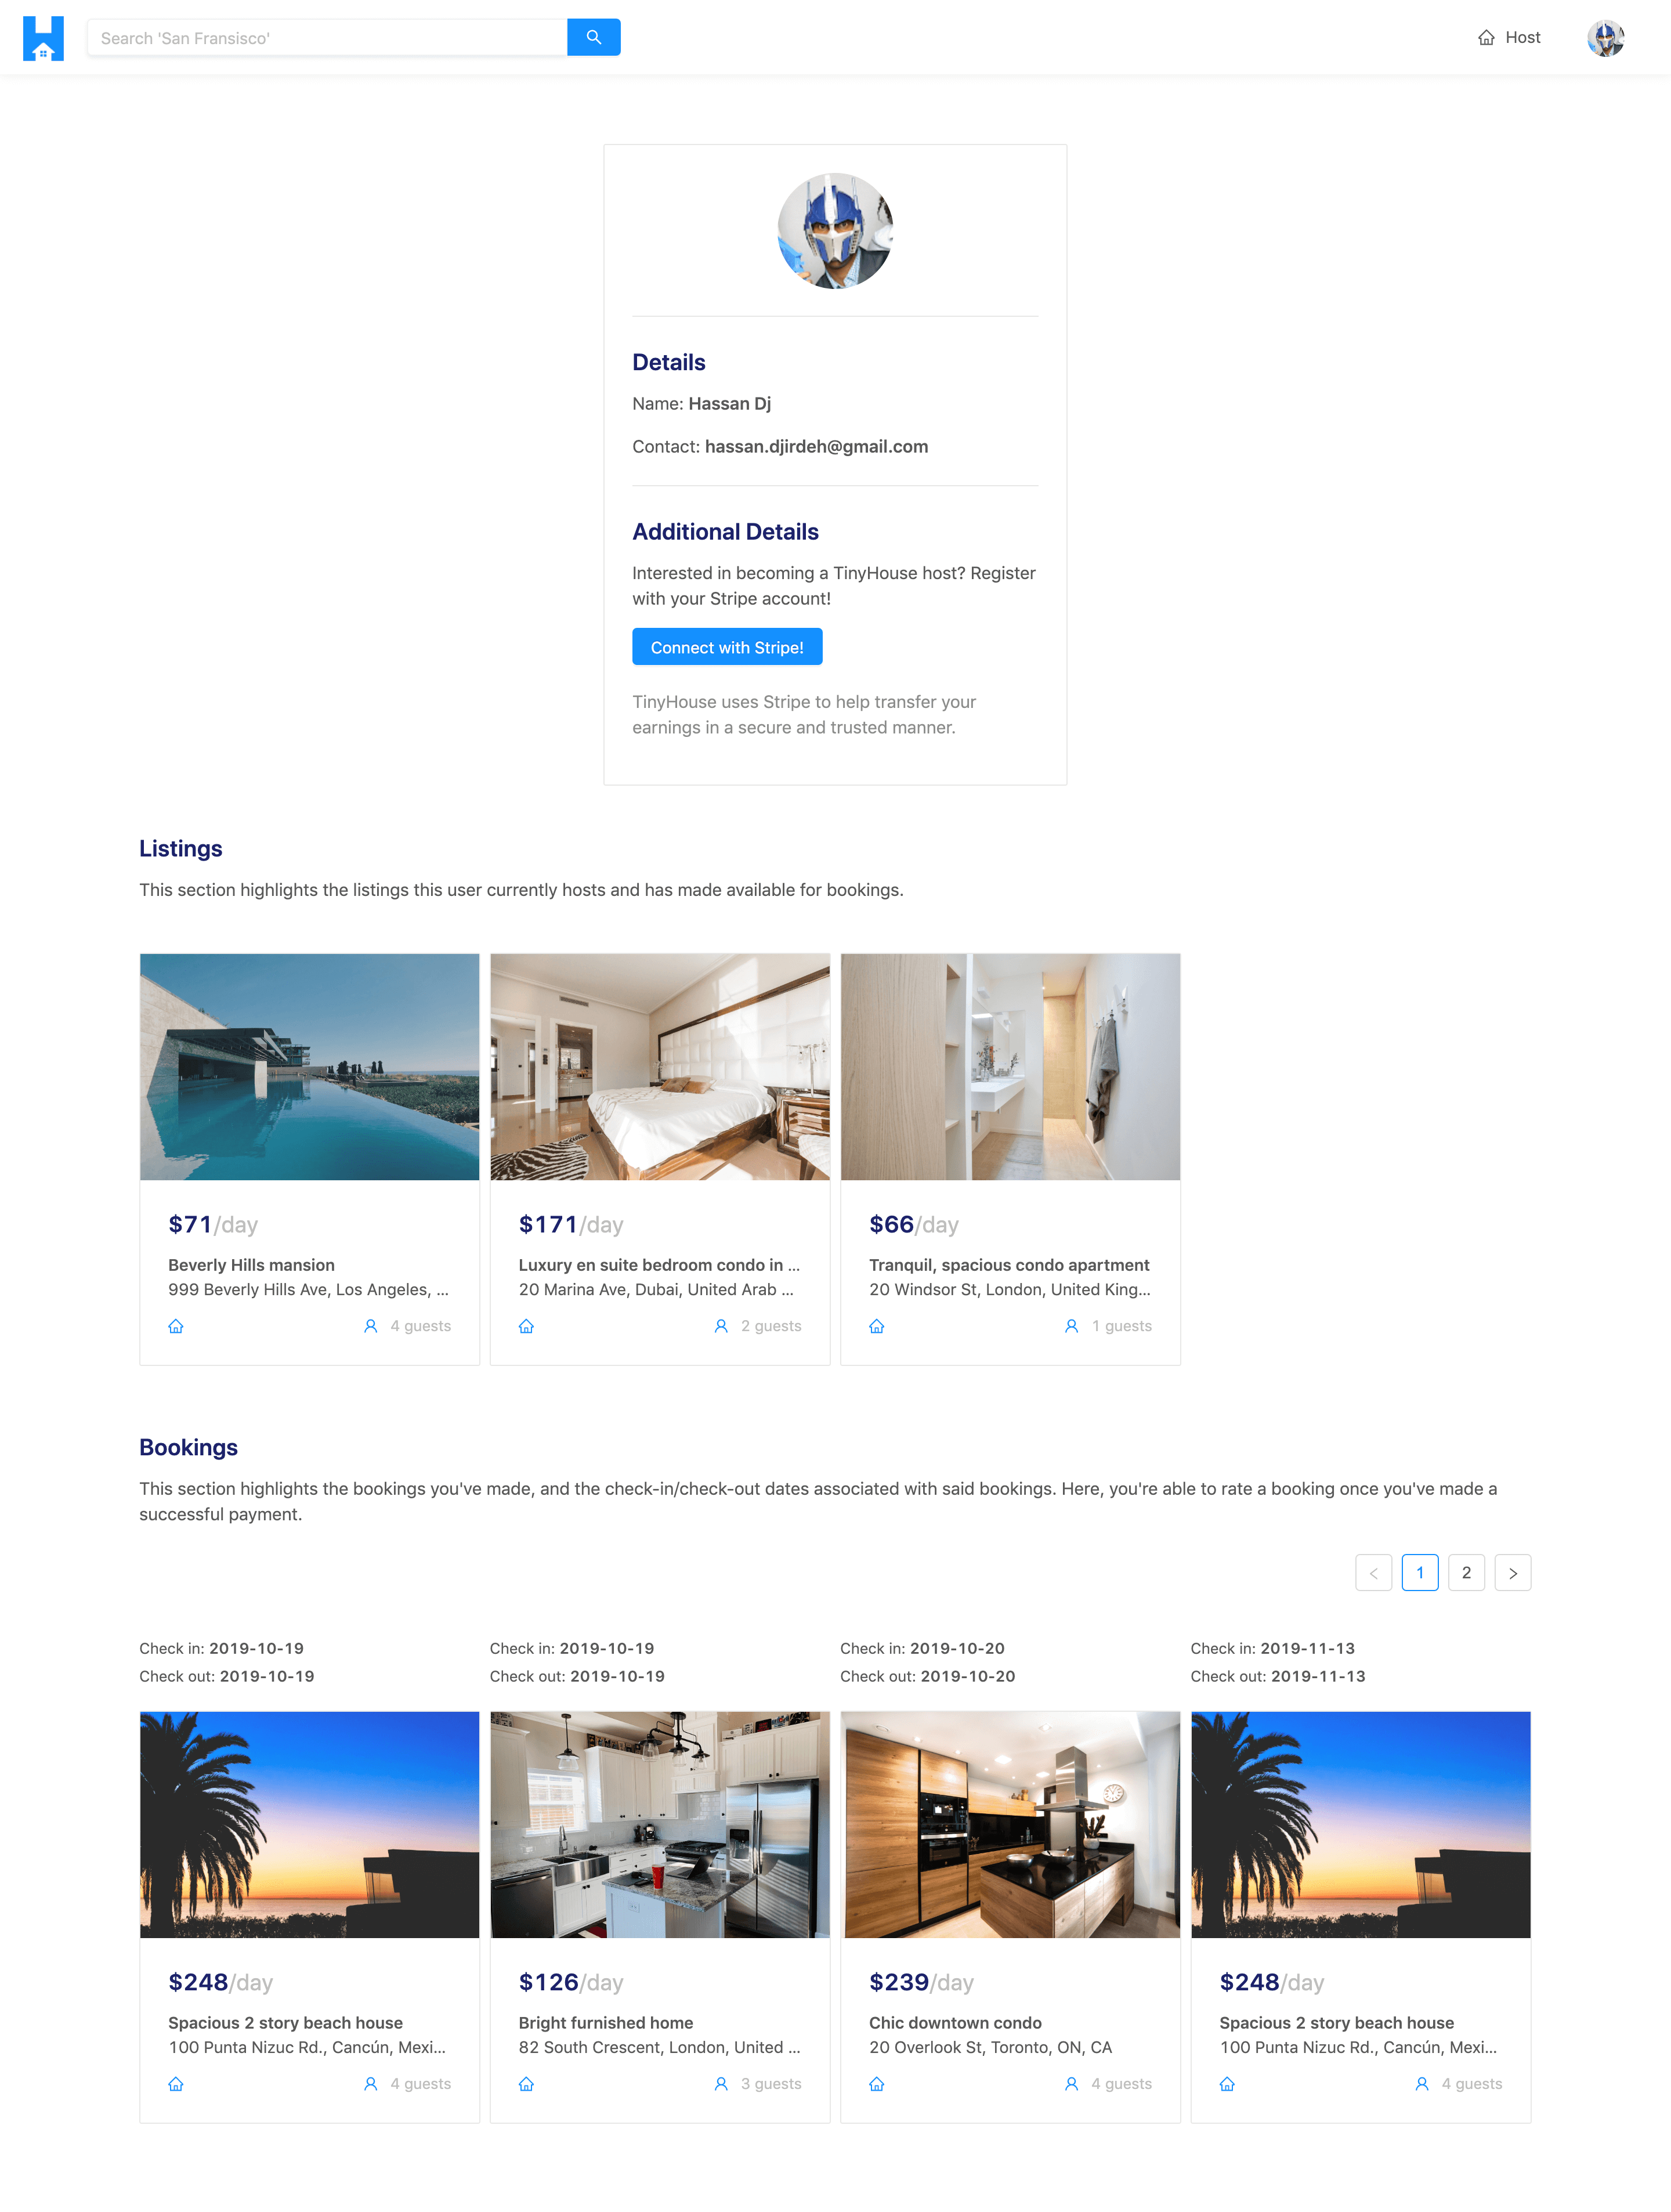
The User page is to be displayed in the /user/:id route of our app and in its complete state will look similar to the following:
In this module, we’ll:
- Create the GraphQL fields in our API to query information for a certain user from the
"users"collection. - Build the GraphQL resolver functions to resolve the data for the certain fields we want to be returned for a single user.
- Discuss the difference between offset and cursor-based pagination, and implement offset-based pagination for a few fields in our
UserGraphQL object. - Finally, build the UI of the User page in our client.
USER GRAPHQL FIELDS
To display information about our users in our client application, we’ll need to have our client be able to query & resolve user data from our server. With that said, we’ll brainstorm exactly what GraphQL fields we’ll need to accomplish this.
For our application, we’ll need a single root-level user query since we’ll want the client to query a single user at a time. This should be fairly straightforward to implement on the server since we’ll only need to find a single user document from the users collection, and return that document! The only complication with this field is that we’ll look to return sensitive user data only when the user requests their own information. For example, we won’t want to query the income of another user.
In our GraphQL type definitions in the src/graphql/typeDefs.ts file, let’s create a new user field in the root Query object that is to resolve to a non-null string value.
import { gql } from "apollo-server-express";

export const typeDefs = gql`
  #...

  type Query {
    #...
    user: String!
  }

  #...
`;
Next, we’ll set up the resolver function for the user field we’ve created in our schema. Since user isn’t directly related to the concept of a viewer, we’ll create a new resolvers map to contain the resolver function within the user module.
We’ll create a new folder called User/ in our src/graphql/resolvers/ folder that is to have an index.ts file.
server/
  src/
    // ...
    graphql/
      resolvers/
        User/
          index.ts
        // ...
      // ...
    // ...
  // ...
In the index.ts file within src/graphql/resolvers/User/ , we’ll export a userResolvers map and assign its type with the IResolvers interface from apollo-server-express .
import { IResolvers } from "apollo-server-express";

export const userResolver: IResolvers = {};
For now, we’ll have the user resolver simply return a string that references the field being queried - "Query.user" .
server/src/graphql/resolvers/User/index.ts
import { IResolvers } from "apollo-server-express";

export const userResolvers: IResolvers = {
  Query: {
    user: () => {
      return "Query.user";
    }
  }
};
To connect our new resolver map, we’ll import the userResolvers map in the src/graphql/resolvers/index.ts file and place it in the lodash merge() function.
server/src/graphql/resolvers/index.ts
import merge from "lodash.merge";
import { userResolvers } from "./User";
import { viewerResolvers } from "./Viewer";

export const resolvers = merge(userResolvers, viewerResolvers);
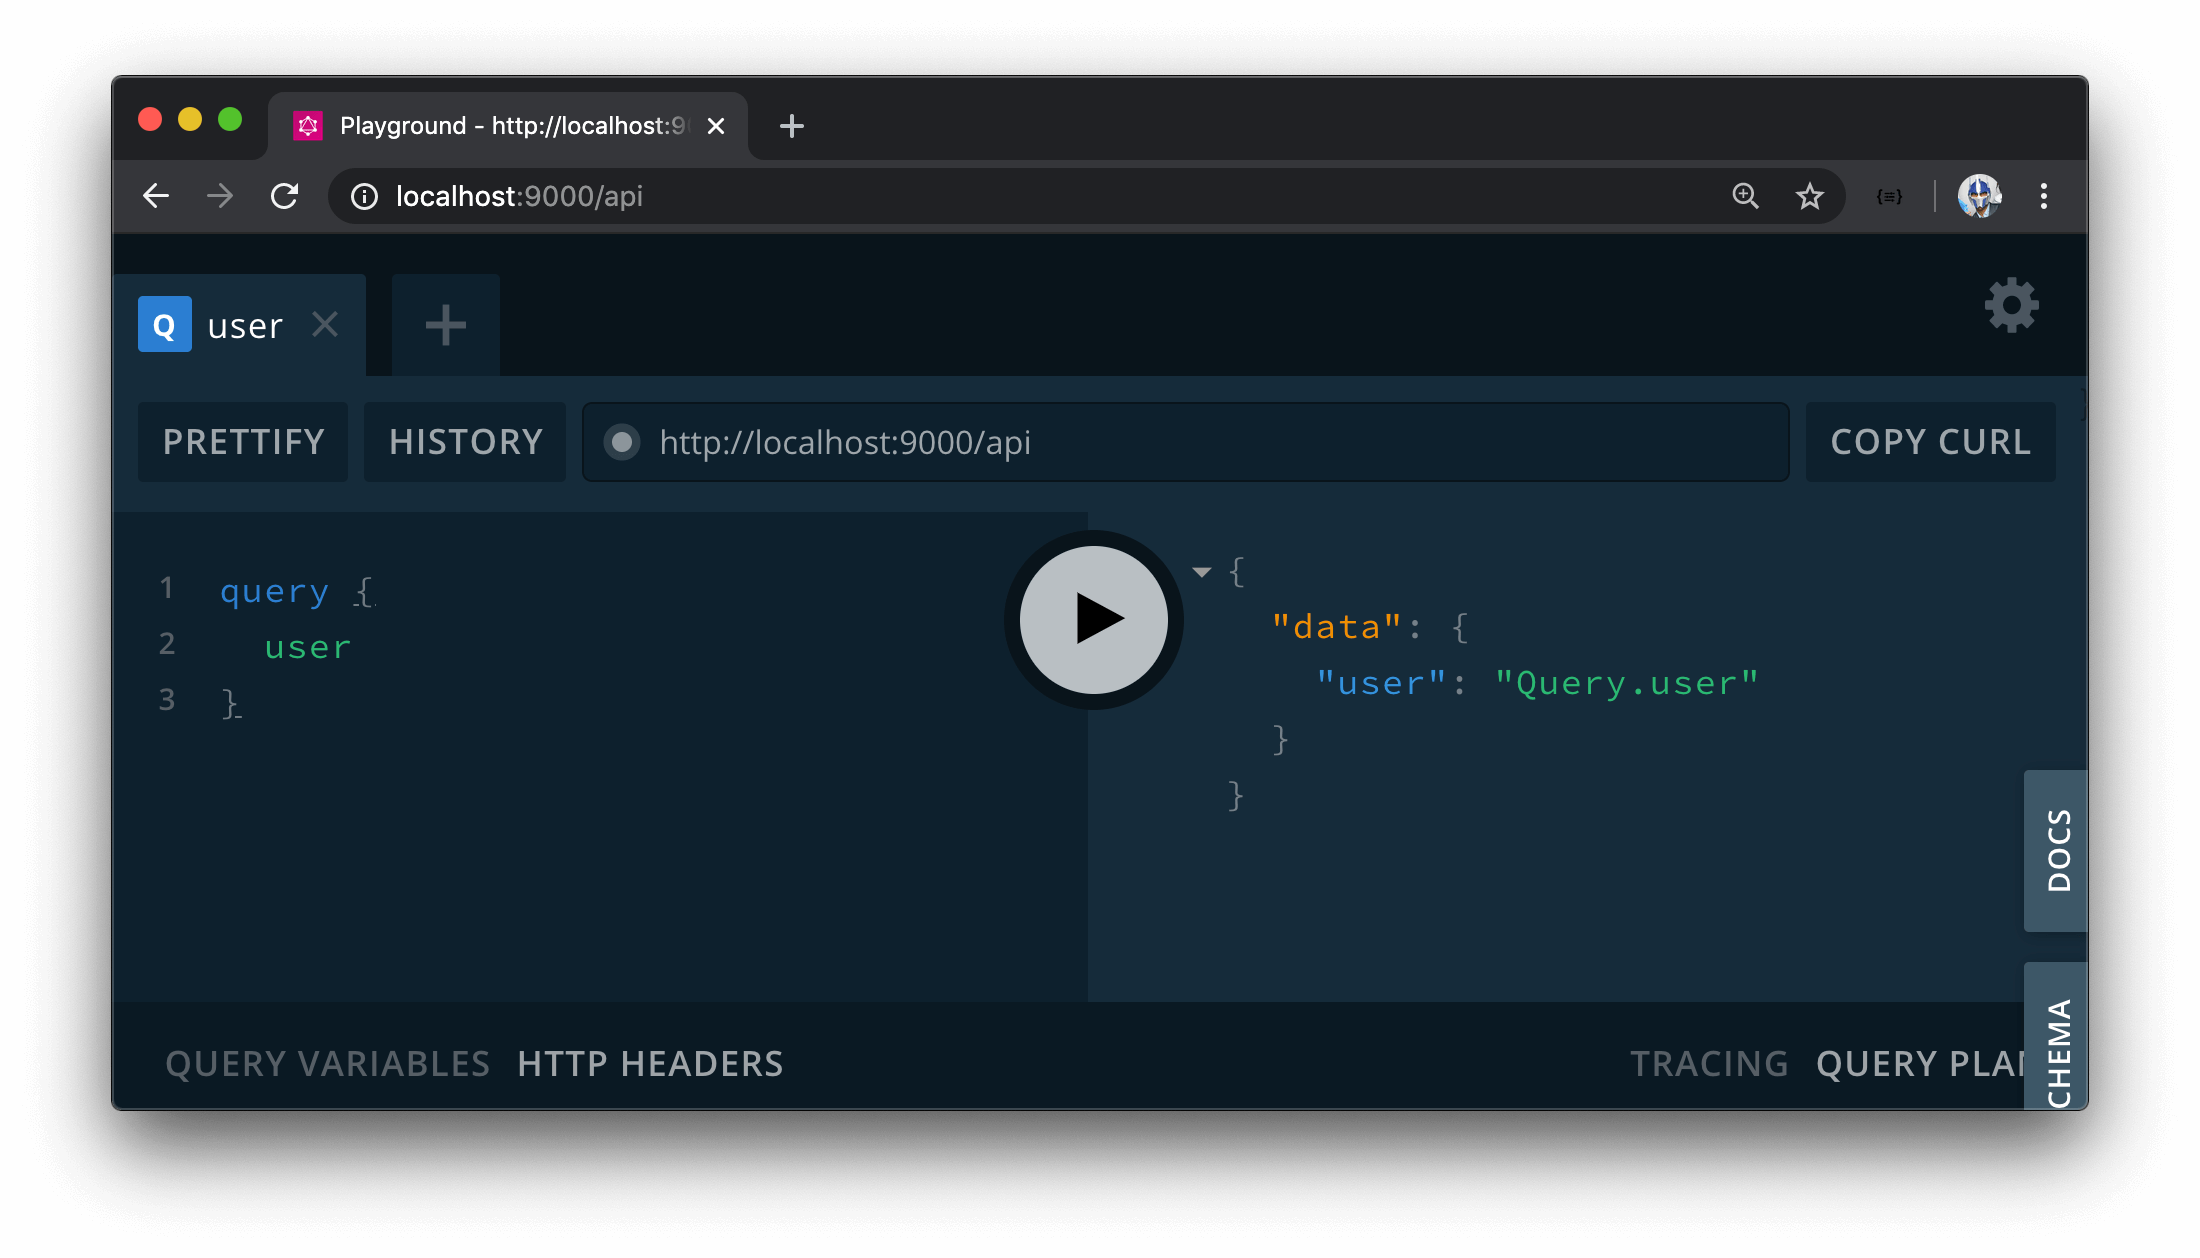
With our server project running, if we were to visit GraphQL Playground at http://localhost:9000/api and run the user query, we’ll see the expected "Query.user" output.
MODIFYING THE USER, LISTING, AND BOOKING GRAPHQL TYPEDEFS
USER
With our user query field established, let’s set up the type definitions and accompanying resolver function for the user field such that we’re able to resolve and query user information.
First, we’ll look to have a User object type in our GraphQL schema to represent the fields we expect can be queried for a certain user. Our GraphQL schema definition of a User will be very similar to the TypeScript definition we’ve established for how a user document is shaped in our database. We’ll want to query the id , name , avatar , contact , and the listings and bookings the user is to have.
However, there are a few differences between our GraphQL User object type and the User TypeScript interface we’ve set up.
- In the
UserGraphQL object type, there will exist anidfield, not an_idfield. - There won’t be a
tokenfield in theUserGraphQL object type.tokenis a field in aUserMongoDB document that is used for login session information which we learned in the previous module. We won’t find the need to expose thistokenfield in ourUserGraphQL object. - The
UserGraphQL object will have ahasWalletfield instead of awalletIdfield.walletIdwill be the actual wallet ID from Stripe we’ll store in the database and we won’t want to pass this sensitive information to the client. The client will only need to know if the user has a wallet or not with which will be exposed through ahasWalletboolean field (similar to how thehasWalletfield behaves for theViewerGraphQL object). - The
bookingsfield in theUserGraphQL object will return an array ofBookingobjects, not an array ofBookingids. - Similarly, the
listingsfield in theUserGraphQL object will return an array ofListingobjects, not an array ofListingids.
Let’s create this User object type in our type definitions file. In the src/graphql/typeDef.ts file, we’ll create a User object type above our existing Viewer type and say it is to have the following fields.
-
idfield of typeID!. -
name,avatar, andcontactfields of typeString!. -
hasWalletfield of typeBoolean!. -
incomefield of typeInt. -
bookingsfield of aBookingsobject type. -
listingsfield of aListings!object type.
import { gql } from "apollo-server-express";

export const typeDefs = gql`
  type User {
    id: ID!
    name: String!
    avatar: String!
    contact: String!
    hasWallet: Boolean!
    income: Int
    bookings: Bookings
    listings: Listings!
  }

  #...
`;
There are a few things to consider on how we’ve structured our User GraphQL object type.
income & bookings
We’ve stated all fields within the User object type are to be non-null except for the income and bookings information. When we query for the user field from our client, we will expect to receive values for most of these fields except for income and bookings . This is because we’ll treat the income and bookings fields as protected fields where we’ll only allow these fields to be resolved to the intended values when a user is querying their own user information . We consider the bookings a user is to make to be sensitive information since we wouldn’t want another person to query for a certain user and know the bookings they’ve made. This is the same for a user’s income.
The way we intend to handle the income and bookings fields is to check for the viewer id making the request and to see if the viewer id matches the user id being queried - if so, we’ll return the intended values. If not, we’ll return null values.
bookings & listings
bookings and listings are to be paginated fields. Pagination is the process of dividing a large list of data into smaller discrete chunks (or pages) . We’re going to address how we handle pagination when we build our resolver functions. In summary, the client is to going to be able to pass two arguments to these two fields ( bookings and listings ) to determine the paginated content that is to be returned. The client will pass a limit field and a page field to both bookings and listings .
-
limitwill dictate the amount or limit of data that is to be queried for a single page. -
pagewill reference the chunk or page of data being queried.
We’ll get a better understanding of this when we build our resolver functions. However, with this in mind, the User GraphQL object type will appear as follows.
import { gql } from "apollo-server-express";

export const typeDefs = gql`
  type User {
    id: ID!
    name: String!
    avatar: String!
    contact: String!
    hasWallet: Boolean!
    income: Int
    bookings(limit: Int!, page: Int!): Bookings
    listings(limit: Int!, page: Int!): Listings!
  }

  #...
`;
BOOKINGS & LISTINGS
Since Bookings and Listings are custom object types, we’ll need to create what they are. We’ve said we want the bookings and the listings fields of User to return lists but we haven’t stated that these fields are to resolve to GraphQL lists. This is because the Bookings and Listings objects are to contain two fields each.
The Bookings object type will have a total field to reference the total amount of objects with which our client will be able to use. It will also contain a result field which is to be a GraphQL list of Booking objects.
import { gql } from "apollo-server-express";

export const typeDefs = gql`
  type Bookings {
    total: Int!
    result: [Booking!]!
  }

  type User {
    id: ID!
    name: String!
    avatar: String!
    contact: String!
    hasWallet: Boolean!
    income: Int
    bookings(limit: Int!, page: Int!): Bookings
    listings(limit: Int!, page: Int!): Listings!
  }

  #...
`;
The Listings object type will be similar. It will have a total integer field and a result field which is to be a GraphQL list of Listing object.
import { gql } from "apollo-server-express";

export const typeDefs = gql`
  type Bookings {
    total: Int!
    result: [Booking!]!
  }

  type Listings {
    total: Int!
    result: [Listing!]!
  }

  type User {
    id: ID!
    name: String!
    avatar: String!
    contact: String!
    hasWallet: Boolean!
    income: Int
    bookings(limit: Int!, page: Int!): Bookings
    listings(limit: Int!, page: Int!): Listings!
  }

  #...
`;
LISTING
We’ll now need to create the Booking and Listing GraphQL object types.
The Listing GraphQL object type will appear similar to the Listing TypeScript interface we’ve created before to describe the shape of a single listing document, with a few exceptions.
- The
ListingGraphQL type will have anidfield instead of_id. - The
hostfield in theListingGraphQL type will resolve to theUserobject type. In a listing document in our database,hostis a reference to theidof the particular user. However, in our GraphQL API, we’ll want thehostfield forListingto resolve to the user object who owns the listing. - The
bookingsfield of theListingGraphQL type will return an array ofBookingobjects which will be paginated. Thebookingsfor a listing refer to the bookings made for this listing by all the different users. - The
bookingsIndexfield ofListingis defined as a key-value pair in our TypeScript definition. GraphQL, however, doesn’t have a type for this. We can get around this problem by simply stringifying abookingsIndexobject and having it resolved as a string when queried.
With all the above in mind, let’s create the Listing object type in our GraphQL schema.
import { gql } from "apollo-server-express";

export const typeDefs = gql`
  type Bookings {
    total: Int!
    result: [Booking!]!
  }

  type Listing {
    id: ID!
    title: String!
    description: String!
    image: String!
    host: User!
    type: ListingType!
    address: String!
    city: String!
    bookings(limit: Int!, page: Int!): Bookings
    bookingsIndex: String!
    price: Int!
    numOfGuests: Int!
  }

  type Listings {
    total: Int!
    result: [Listing!]!
  }

  type User {
    id: ID!
    name: String!
    avatar: String!
    contact: String!
    hasWallet: Boolean!
    income: Int
    bookings(limit: Int!, page: Int!): Bookings
    listings(limit: Int!, page: Int!): Listings!
  }

  #...
`;
We’ll create a GraphQL Enum, ListingType , to specify the two different listing type properties - apartment and house for the type field of the Listing object. As good practice, we’ll have our Enum properties in capital letters.
import { gql } from "apollo-server-express";

export const typeDefs = gql`
  type Bookings {
    total: Int!
    result: [Booking!]!
  }

  enum ListingType {
    APARTMENT
    HOUSE
  }

  type Listing {
    id: ID!
    title: String!
    description: String!
    image: String!
    host: User!
    type: ListingType!
    address: String!
    city: String!
    bookings(limit: Int!, page: Int!): Bookings
    bookingsIndex: String!
    price: Int!
    numOfGuests: Int!
  }

  type Listings {
    total: Int!
    result: [Listing!]!
  }

  type User {
    id: ID!
    name: String!
    avatar: String!
    contact: String!
    hasWallet: Boolean!
    income: Int
    bookings(limit: Int!, page: Int!): Bookings
    listings(limit: Int!, page: Int!): Listings!
  }

  #...
`;
In GraphQL, Enumeration types are a special kind of scalar type that is restricted to a defined set of allowed values.
By stating the
typefield of ourListingobject to resolve to theListingTypeEnum, the value fortypemust be one of a certain number of values that constitutes aListingType(APARTMENTorHOUSE).
BOOKING
We’ll create the Booking GraphQL type that describes a booking object. The Booking GraphQL object type will be similar to the shape of a booking document in our database except for:
- The
BookingGraphQL type is to have anidfield instead of_id. - The
listingfield in theBookingGraphQL type is to resolve to aListingobject instead of an_idvalue that refers to theidof the listing. - The
tenantfield in theBookingGraphQL type will resolve to aUserobject instead of a string that refers to theuserid.
import { gql } from "apollo-server-express";

export const typeDefs = gql`
  type Booking {
    id: ID!
    listing: Listing!
    tenant: User!
    checkIn: String!
    checkOut: String!
  }

  type Bookings {
    total: Int!
    result: [Booking!]!
  }

  enum ListingType {
    APARTMENT
    HOUSE
  }

  type Listing {
    id: ID!
    title: String!
    description: String!
    image: String!
    host: User!
    type: ListingType!
    address: String!
    city: String!
    bookings(limit: Int!, page: Int!): Bookings
    bookingsIndex: String!
    price: Int!
    numOfGuests: Int!
  }

  type Listings {
    total: Int!
    result: [Listing!]!
  }

  type User {
    id: ID!
    name: String!
    avatar: String!
    contact: String!
    hasWallet: Boolean!
    income: Int
    bookings(limit: Int!, page: Int!): Bookings
    listings(limit: Int!, page: Int!): Listings!
  }

  #...
`;
QUERY.USER
Finally, we’ll update the root level query field user as well. The user field will take an id input of type GraphQL ID! and return a User object from when resolved.
import { gql } from "apollo-server-express";

export const typeDefs = gql`
  #...

  type Query {
    #...
    user(id: ID!): User!
  }

  type Mutation {
    #...
  }
`;
With all these changes made, the src/graphql/typeDefs.ts file will look like the following:
server/src/graphql/typeDefs.ts
import { gql } from "apollo-server-express";

export const typeDefs = gql`
  type Booking {
    id: ID!
    listing: Listing!
    tenant: User!
    checkIn: String!
    checkOut: String!
  }

  type Bookings {
    total: Int!
    result: [Booking!]!
  }

  enum ListingType {
    APARTMENT
    HOUSE
  }

  type Listing {
    id: ID!
    title: String!
    description: String!
    image: String!
    host: User!
    type: ListingType!
    address: String!
    city: String!
    bookings(limit: Int!, page: Int!): Bookings
    bookingsIndex: String!
    price: Int!
    numOfGuests: Int!
  }

  type Listings {
    total: Int!
    result: [Listing!]!
  }

  type User {
    id: ID!
    name: String!
    avatar: String!
    contact: String!
    hasWallet: Boolean!
    income: Int
    bookings(limit: Int!, page: Int!): Bookings
    listings(limit: Int!, page: Int!): Listings!
  }

  type Viewer {
    id: ID
    token: String
    avatar: String
    hasWallet: Boolean
    didRequest: Boolean!
  }

  input LogInInput {
    code: String!
  }

  type Query {
    authUrl: String!
    user(id: ID!): User!
  }

  type Mutation {
    logIn(input: LogInInput): Viewer!
    logOut: Viewer!
  }
`;
This is where we’ll stop for now. Not all the fields we’ve defined here are going to be used solely for when we build the /user/:id page in the client. A lot of the types we’ve defined here are going to be used when we build the other pages in our UI. For example, a lot of the fields we’ve defined for the Listing object type will be utilized when we build out the /listing/:id page for a single listing.
In the next lesson, we’ll continue what we’ve done by building out the resolver functions for the User object in our userResolvers map.
BUILDING THE USER RESOLVERS
GraphQL documentation on pagination can be found - here.
Apollo documentation on pagination can be found - here.
With the GraphQL type definitions established for the root-level user query, in this lesson we’ll modify the resolver function we have to help query for a certain user based on the id provided. To implement this, we’ll update the user() resolver function in the src/graphql/resolvers/User/index.ts file.
We’ll expect an id argument to be passed into the user() resolver function. We’ll define the shape of the arguments for this resolver as an interface called UserArgs which is to contain an id of type string . We’ll define this in a types.ts file adjacent to the index.ts where we establish the userResolvers map.
server/src/graphql/resolvers/User/types.ts
export interface UserArgs {
  id: string;
}
We’ll import this UserArgs interface in the userResolvers map file. We’ll also import the Database and User interfaces defined in the src/lib/types.ts file. In the user() resolver function, we’ll destruct the id argument and db object from context and when this resolver function is to be complete, it will resolve to a Promise of a User .
import { IResolvers } from "apollo-server-express";
import { Database, User } from "../../../lib/types";
import { UserArgs } from "./types";

export const userResolver: IResolvers = {
  Query: {
    user: async (
      _root: undefined,
      { id }: UserArgs,
      { db }: { db: Database }
    ): Promise<User> => {
      // ...
    }
  }
};
The user() resolver function itself is going to be a fairly simple resolver. We’ll have a try...catch block and wherein the try statement, we’ll use Mongo’s findOne() function to find a user document from the users collection where the _id field matches the id argument passed in.
We’ll throw an error if this user can’t be found and if it is found, we’ll return the user. In the catch block - we’ll capture the error fired and state an error along the lines of "Failed to query user" .
import { IResolvers } from "apollo-server-express";
import { Database, User } from "../../../lib/types";
import { UserArgs } from "./types";

export const userResolver: IResolvers = {
  Query: {
    user: async (
      _root: undefined,
      { id }: UserArgs,
      { db }: { db: Database }
    ): Promise<User> => {
      try {
        const user = await db.users.findOne({ _id: id });

        if (!user) {
          throw new Error("user can't be found");
        }

        return user;
      } catch (error) {
        throw new Error(`Failed to query user: ${error}`);
      }
    }
  }
};
AUTHORIZATION
Since the user field is the entry point from our client, the user() resolver function will be the first function to run when someone attempts to query the user field. The other resolver functions that the user object depends on will be run after. We’ve mentioned that we want certain fields in our user object to be protected and only shown when someone is querying their own information. To determine whether a user is authorized to make the query, we’ll introduce a new field in the User TypeScript interface (in the src/lib/types.ts file) called authorized that is to be a boolean when defined.
server/src/lib/types.ts
export interface User {
  _id: string;
  token: string;
  name: string;
  avatar: string;
  contact: string;
  walletId?: string;
  income: number;
  bookings: ObjectId[];
  listings: ObjectId[];
  authorized?: boolean;
}
This authorized field is unique since it’s not part of the user document stored in our database collection. It’ll be used in our resolver functions to determine whether a user has the authorization to resolve certain fields.
Since the user() resolver function will be the first function run when someone queries the user field, we’ll determine right in the user() resolver whether the user is authorized . We’ll achieve this by comparing the id of the viewer making the request and see if it matches the id of the user being queried. How would we get information about the viewer making the request?
In the last module, we’ve created an authorize() function in the src/lib/utils/index.ts file that accepts the db and req objects as parameters and returns the viewer object based on the cookie and token of the request being made.
server/src/lib/utils/index.ts
import { Request } from "express";
import { Database, User } from "../types";

export const authorize = async (
  db: Database,
  req: Request
): Promise<User | null> => {
  const token = req.get("X-CSRF-TOKEN");
  const viewer = await db.users.findOne({
    _id: req.signedCookies.viewer,
    token
  });

  return viewer;
};
In our user() resolver function, we have the req object as part of our context so we’ll destruct it in the parameters of the function and set its type to the Request interface that we’ll import from express .
import { Request } from "express";
import { IResolvers } from "apollo-server-express";
import { Database, User } from "../../../lib/types";
import { UserArgs } from "./types";

export const userResolver: IResolvers = {
  Query: {
    user: async (
      _root: undefined,
      { id }: UserArgs,
      { db, req }: { db: Database; req: Request }
    ): Promise<User> => {
      try {
        const user = await db.users.findOne({ _id: id });

        if (!user) {
          throw new Error("user can't be found");
        }

        return user;
      } catch (error) {
        throw new Error(`Failed to query user: ${error}`);
      }
    }
  }
};
In the userResolvers map file, we’ll import the authorize() function from the src/lib/utils/ folder and use it in the user() resolver function by passing in the db and req objects. We’ll then check to see if this viewer exists and we’ll check to see if the _id field of this viewer object matches that of the user being queried. If it does, this means the person making the query is authorized and we’ll set the authorized field of the user object to true .
import { IResolvers } from "apollo-server-express";
import { Request } from "express";
import { Database, User } from "../../../lib/types";
import { authorize } from "../../../lib/utils";
import { UserArgs } from "./types";

export const userResolver: IResolvers = {
  Query: {
    user: async (
      _root: undefined,
      { id }: UserArgs,
      { db, req }: { db: Database; req: Request }
    ): Promise<User> => {
      try {
        const user = await db.users.findOne({ _id: id });

        if (!user) {
          throw new Error("user can't be found");
        }

        const viewer = await authorize(db, req);

        if (viewer && viewer._id === user._id) {
          user.authorized = true;
        }

        return user;
      } catch (error) {
        throw new Error(`Failed to query user: ${error}`);
      }
    }
  }
};
For our upcoming resolver functions in the user object that are to be protected, we’ll check to see if authorized is true before we resolve to the requested data. With that said, let’s now create the resolver functions for certain fields in our user object.
We’ve mentioned before how GraphQL server implementations often handle trivial resolvers for us (which are resolver functions that simply return a field from the object passed in with the same name as the field itself). Many of our fields in the user object will be handled as trivial resolvers except for a couple with which we’ll create explicit resolver functions. The resolver functions we’ll define are id() , hasWallet() , income() , bookings() , and listings() .
// ...

export const userResolver: IResolvers = {
  Query: {
    // ...
  },
  User: {
    id: () => {},
    hasWallet: () => {},
    income: () => {},
    bookings: () => {},
    listings: () => {}
  }
};
id()
The id() resolver function is straightforward and will simply return the _id value from the root user object.
// ...

export const userResolver: IResolvers = {
  Query: {
    // ...
  },
  User: {
    id: (user: User): string => {
      return user._id;
    },
    hasWallet: () => {},
    income: () => {},
    bookings: () => {},
    listings: () => {}
  }
};
hasWallet()
The hasWallet() function will return a boolean indicating if the user has connected to their Stripe account to be able to accept payments. We’ll use the JavaScript Boolean() operator to return a boolean based on the presence of the user.walletId field.
// ...

export const userResolver: IResolvers = {
  Query: {
    // ...
  },
  User: {
    id: (user: User): string => {
      return user._id;
    },
    hasWallet: (user: User): boolean => {
      return Boolean(user.walletId);
    },
    income: () => {},
    bookings: () => {},
    listings: () => {}
  }
};
income()
income() is one of the resolver functions that are to be protected. If the user.authorized field is true , we’ll return the sensitive user.income value. Otherwise, we’ll return null .
// ...

export const userResolver: IResolvers = {
  Query: {
    // ...
  },
  User: {
    id: (user: User): string => {
      return user._id;
    },
    hasWallet: (user: User): boolean => {
      return Boolean(user.walletId);
    },
    income: (user: User): number | null => {
      return user.authorized ? user.income : null;
    },
    bookings: () => {},
    listings: () => {}
  }
};
PAGINATION
The bookings() and listings() resolver functions are to be a little more complicated but are to be similar to one another. This is because the bookings and listings field in a user are to be paginated fields.
We’ll take a brief tangent to discuss how we attempt to help conduct pagination before we begin writing our implementations of the bookings() and listings() resolvers.
First of all, whenever one attempts to return a large list of information to the client, a good practice is to use pagination. Pagination is the process of dividing a large collection of data into smaller discrete chunks (within pages) .
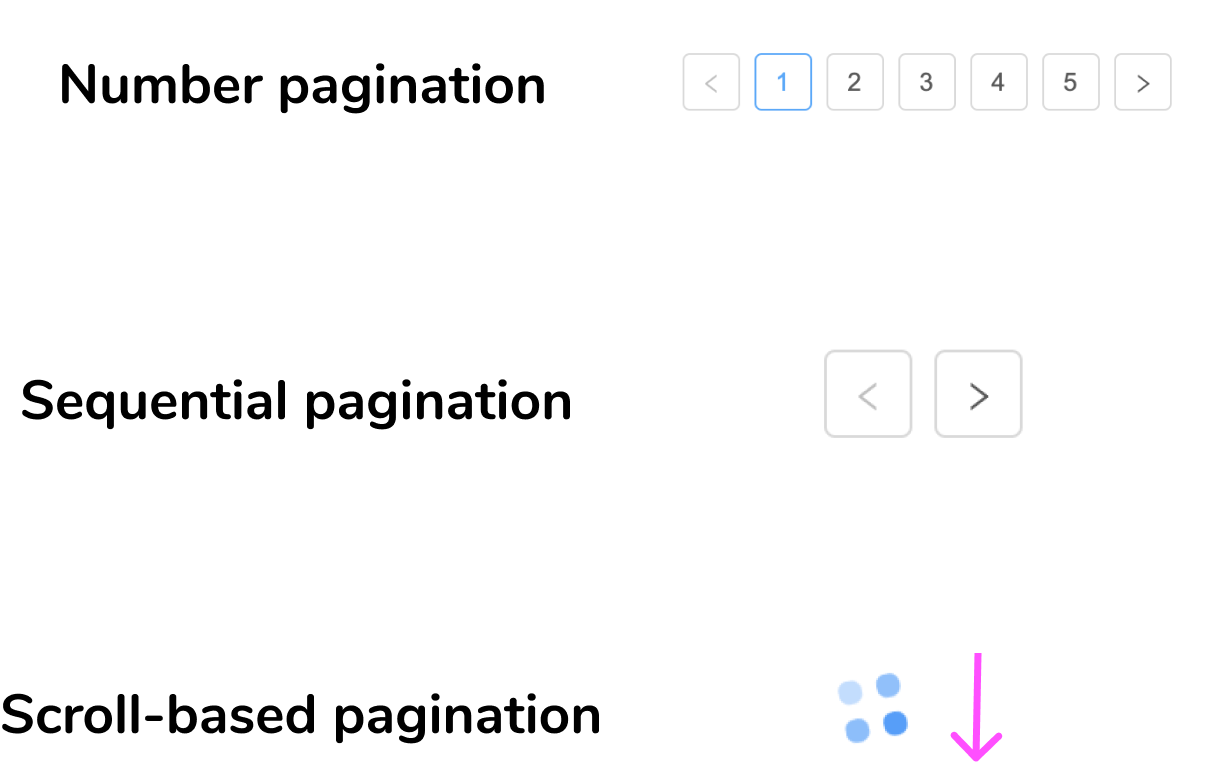
Pagination is pretty much used in almost all applications we use today. There’s the simple number pagination, sequential pagination where a user can click next or previous to move from page to page, and in more recent web design - scroll-based pagination (sometimes known as infinite scroll) that has become popular since this helps show more paginated content as a user scrolls a “page”.
At the end of the day, pagination is used to reduce latency because clients don’t have to wait for a full data dump and can start to present data with small chunks at a time.
Though there are different ways to conduct pagination, there are two popular ways one can go about doing it.
- Offset-based pagination (or numbered pages)
- Cursor based pagination
OFFSET-BASED PAGINATION
Offset-based pagination (or numbered pages) is often the easiest to implement since the backend simply retrieves limit and page values and determines the limit of content to be shown for a certain page.
query Listings($limit: Int!, $page: Int!) {
  listings(limit: $limit, page: $page) {
    id
    title
  }
}
Though easy to implement, there is a certain disadvantage with offset-based pagination. When items are inserted or removed while a user is going through pages, there’s a large chance of seeing the same item twice or skipping an additional item. This is due to the concept of boundaries between data within pages and limits. As an example, this can happen if an item is added to the beginning of a list where a user is already paginating through the list and see the same item as the user goes to the next page as it might satisfy both boundaries. As a result, offset-based pagination may not be ideal for applications where users find themselves scrolling through pages fairly quickly and items are added or deleted often. A social media app is a good example of this.
CURSOR-BASED PAGINATION
Cursor-based pagination uses a “cursor” to keep track of the data within a set of items. This cursor can just be a reference to the id of the last object fetched or in more complicated scenarios have a reference to the sorting criteria that has been encoded.
From the client perspective, a cursor is simply passed in and the server determines the set of data that is to be returned from this cursor.
query Listings($cursor: String!) {
  listings(cursor: $cursor) {
    id
    title
    cursor
  }
}
Since this cursor is more accurate, it helps avoid the disadvantages we can see with offset-based pagination as a user goes from page to page and items are being added or removed.
RELAY CURSOR-BASED PAGINATION
In even more complicated scenarios, there’s also relay-style pagination that takes the cursor model but also returns data in a more particular format. Data is returned within edges and nodes . Additional data such as pageInfo may also be returned that has a reference to when the cursor has an end and whether previous or next page information exists.
query Listings($cursor: String!) {
  listings(cursor: $cursor) {
    edges {
      nodes {
        id
      }
    }
    pageInfo {
      endCursor
      hasNextPage
    }
  }
}
We’ll suggest using cursor-based pagination or relay-style cursor-based pagination if you intend on building a large application that’ll have a large number of pages where many users are going to be using the app. Offset-based pagination is by far the easiest to get started with and is fairly straightforward to implement with MongoDB. We’ll be implementing our pagination as offset-based pagination (i.e. pagination based on limits and pages).
The Apollo Client documentation does a great job in documenting the different types of pagination that can often be conducted with GraphQL. Check it out here if you’re interested in reading more about this!
bookings()
We’ll go back to the code and begin with the bookings() resolver function. The bookings() resolver function will receive a limit and page arguments where:
-
limitdescribes how many data objects to show per page. -
pagedescribes the page number the user wants to view.
We’ll define the type of arguments the bookings() resolver is to expect in an interface in the types.ts file we have within the src/graphql/resolvers/User/ folder. We’ll call the interface UserBookingsArgs and state that it expects a limit and page fields that are to be numbers.
server/src/graphql/resolvers/User/types.ts
export interface UserBookingsArgs {
  limit: number;
  page: number;
}
We’ll also describe the shape of data we want the bookings() resolver to return. We’ll create and call this interface UserBookingsData and say it is to have a total field of type number and a result field which is to be an array of the Booking interface, with which we’ll import from the lib/types file.
import { Booking } from "../../../lib/types";

// ...

export interface UserBookingsData {
  total: number;
  result: Booking[];
}
We’ll import the UserBookingsArgs and UserBookingsData interfaces in our userResolvers map file. In the bookings() resolver, we’ll declare the limit and page parameters the function is to expect and we’ll access the db object from context. We’ll state that the resolver is to be asynchronous since it is to make a database call, and when successfully resolved - it’ll resolve to the UserBookingsData interface or null .
// ...
import { UserArgs, UserBookingsArgs, UserBookingsData } from "./types";

export const userResolver: IResolvers = {
  Query: {
    // ...
  },
  User: {
    // ...,
    bookings: async (
      user: User,
      { limit, page }: UserBookingsArgs,
      { db }: { db: Database }
    ): Promise<UserBookingsData | null> => {},
    listings: () => {}
  }
};
Recall that we’ve said the bookings field within a user object is to be protected and we won’t want an unauthorized user from seeing the bookings made by another user. We’ll use a try...catch statement like before and in the try block, we’ll place an if statement to say if the user is not authorized, the bookings resolver will return null .
// ...
import { UserArgs, UserBookingsArgs, UserBookingsData } from "./types";

export const userResolver: IResolvers = {
  Query: {
    // ...
  },
  User: {
    // ...,
    bookings: async (
      user: User,
      { limit, page }: UserBookingsArgs,
      { db }: { db: Database }
    ): Promise<UserBookingsData | null> => {
      try {
        if (!user.authorized) {
          return null;
        }
      } catch {}
    },
    listings: () => {}
  }
};
If the user is authorized, we’ll first construct a data object that initializes the data we will update and return. Within this data object, we’ll say it is to have a total field with an initial value of 0 and a result field with an initial value of an empty array.
// ...
import { UserArgs, UserBookingsArgs, UserBookingsData } from "./types";

export const userResolver: IResolvers = {
  Query: {
    // ...
  },
  User: {
    // ...,
    bookings: async (
      user: User,
      { limit, page }: UserBookingsArgs,
      { db }: { db: Database }
    ): Promise<UserBookingsData | null> => {
      try {
        if (!user.authorized) {
          return null;
        }

        const data: UserBookingsData = {
          total: 0,
          result: []
        };
      } catch {}
    },
    listings: () => {}
  }
};
We’ll then use Mongo’s find() method to find all documents in the bookings collection where the _id field is in the user bookings array. If we recall, in a user document there exists a bookings field that contains the id 's of bookings that the user has booked. With Mongo’s find() method, the $in operator will allow finding all the actual booking documents where the id’s of these documents are in the user.bookings array. We’ll assign this to a constant called the cursor .
// ...
import { UserArgs, UserBookingsArgs, UserBookingsData } from "./types";

export const userResolver: IResolvers = {
  Query: {
    // ...
  },
  User: {
    // ...,
    bookings: async (
      user: User,
      { limit, page }: UserBookingsArgs,
      { db }: { db: Database }
    ): Promise<UserBookingsData | null> => {
      try {
        if (!user.authorized) {
          return null;
        }

        const data: UserBookingsData = {
          total: 0,
          result: []
        };

        let cursor = await db.bookings.find({
          _id: { $in: user.bookings }
        });
      } catch {}
    },
    listings: () => {}
  }
};
The cursor we’re creating here isn’t related to the cursor we’ve talked about with regards to cursor-based pagination but more along the lines of how MongoDB labels this a cursor. A MongoDB cursor has skip() and limit() functions (among others) that allow us to easily offset the number of data within a certain page.
The MongoDB cursor.skip() function allows us to skip a certain number of documents. We’ll use the skip() function to update the cursor if page is greater than 0 .
// ...
import { UserArgs, UserBookingsArgs, UserBookingsData } from "./types";

export const userResolver: IResolvers = {
  Query: {
    // ...
  },
  User: {
    // ...,
    bookings: async (
      user: User,
      { limit, page }: UserBookingsArgs,
      { db }: { db: Database }
    ): Promise<UserBookingsData | null> => {
      try {
        if (!user.authorized) {
          return null;
        }

        const data: UserBookingsData = {
          total: 0,
          result: []
        };

        let cursor = await db.bookings.find({
          _id: { $in: user.bookings }
        });

        cursor = cursor.skip(page > 0 ? (page - 1) * limit : 0);
      } catch {}
    },
    listings: () => {}
  }
};
If page is 1 and limit is 10, we don’t skip anything since we’re on the first page. If page is 2 and limit is 10, we skip the first 10 documents. And so on…
To control the number of elements to show, we’ll use the cursor.limit() function. When we run cursor.limit() , we’ll pass in the value of the limit argument passed into our resolver function.
// ...
import { UserArgs, UserBookingsArgs, UserBookingsData } from "./types";

export const userResolver: IResolvers = {
  Query: {
    // ...
  },
  User: {
    // ...,
    bookings: async (
      user: User,
      { limit, page }: UserBookingsArgs,
      { db }: { db: Database }
    ): Promise<UserBookingsData | null> => {
      try {
        if (!user.authorized) {
          return null;
        }

        const data: UserBookingsData = {
          total: 0,
          result: []
        };

        let cursor = await db.bookings.find({
          _id: { $in: user.bookings }
        });

        cursor = cursor.skip(page > 0 ? (page - 1) * limit : 0);
        cursor = cursor.limit(limit);
      } catch {}
    },
    listings: () => {}
  }
};
In this instance, if the limit is 10; we’ll only get 10 documents in total in our cursor.
Finally, we’ll say the data.total field is equal to the value of the cursor.count() function which is how MongoDB allows us to get the total count of the initial query while ignoring the limit() modifier. For the data.result field, we’ll ensure it is to be an array of results from the cursor by stating cursor.toArray() . We’ll finally have the resolver then return the data object constructed.
In the catch statement of our function, we’ll conform to our usual error handling by catching and throwing an error along the lines of "Failed to query user bookings" .
// ...
import { UserArgs, UserBookingsArgs, UserBookingsData } from "./types";

export const userResolver: IResolvers = {
  Query: {
    // ...
  },
  User: {
    // ...,
    bookings: async (
      user: User,
      { limit, page }: UserBookingsArgs,
      { db }: { db: Database }
    ): Promise<UserBookingsData | null> => {
      try {
        if (!user.authorized) {
          return null;
        }

        const data: UserBookingsData = {
          total: 0,
          result: []
        };

        let cursor = await db.bookings.find({
          _id: { $in: user.bookings }
        });

        cursor = cursor.skip(page > 0 ? (page - 1) * limit : 0);
        cursor = cursor.limit(limit);

        data.total = await cursor.count();
        data.result = await cursor.toArray();

        return data;
      } catch (error) {
        throw new Error(`Failed to query user bookings: ${error}`);
      }
    },
    listings: () => {}
  }
};
listings()
The listings() resolver function will be practically identical to the bookings() resolver function except for the fact that it’s going to return listings from the listings collection in our database and it won’t be a protected field.
Let’s first create the types we’ll need for the listings() resolver in the src/graphql/resolvers/User/types.ts file. We’ll create an interface called UserListingArgs that will describe the shape of arguments that is to be passed to the listings() resolver and will have a limit and page fields of type number . The UserListingsData interface we’ll create will describe the shape of data to be returned from the listings() resolver and will have a total and result field where total is a number and result is an array of items that match the Listing document interface (which we’ll import from the src/lib/types.ts file).
In its entirety, the src/graphql/resolvers/User/types.ts file will look like the following:
server/src/graphql/resolvers/User/types.ts
import { Booking, Listing } from "../../../lib/types";

export interface UserArgs {
  id: string;
}

export interface UserBookingsArgs {
  limit: number;
  page: number;
}

export interface UserBookingsData {
  total: number;
  result: Booking[];
}

export interface UserListingsArgs {
  limit: number;
  page: number;
}

export interface UserListingsData {
  total: number;
  result: Listing[];
}
One could also have a single interface for the
argsfor both thebookings()andlistings()resolver function. Additionally, one can create a base interface for thedatato be returned from thebookings()andlistings()resolvers and have this base extended for the interfaces forUserBookingsDataandUserListingsData.
In the userResolvers map file, we’ll import the UserListingsArgs and UserListingsData interfaces. We’ll copy the bookings() resolver over for the listings() resolver and make some minor changes. We’ll reference the correct types, find documents from the listings collection, reference the id in user.listings (not user.bookings ), remove the authorized field check, and update the error statement.
This will have the listings() resolver function as follows:
// ...
import {
  UserArgs,
  UserBookingsArgs,
  UserBookingsData,
  UserListingsArgs,
  UserListingsData
} from "./types";

export const userResolver: IResolvers = {
  Query: {
    // ...
  },
  User: {
    // ...,
    listings: async (
      user: User,
      { limit, page }: UserListingsArgs,
      { db }: { db: Database }
    ): Promise<UserListingsData | null> => {
      try {
        const data: UserListingsData = {
          total: 0,
          result: []
        };

        let cursor = await db.listings.find({
          _id: { $in: user.listings }
        });

        cursor = cursor.skip(page > 0 ? (page - 1) * limit : 0);
        cursor = cursor.limit(limit);

        data.total = await cursor.count();
        data.result = await cursor.toArray();

        return data;
      } catch (error) {
        throw new Error(`Failed to query user listings: ${error}`);
      }
    }
  }
};
With all the changes we’ve made to the userResolvers map, the src/graphql/resolvers/User/index.ts file in our server project will look like the following.
server/src/graphql/resolvers/User/index.ts
import { Request } from "express";
import { IResolvers } from "apollo-server-express";
import { Database, User } from "../../../lib/types";
import { authorize } from "../../../lib/utils";
import {
  UserArgs,
  UserBookingsArgs,
  UserBookingsData,
  UserListingsArgs,
  UserListingsData
} from "./types";

export const userResolvers: IResolvers = {
  Query: {
    user: async (
      _root: undefined,
      { id }: UserArgs,
      { db, req }: { db: Database; req: Request }
    ): Promise<User> => {
      try {
        const user = await db.users.findOne({ _id: id });

        if (!user) {
          throw new Error("user can't be found");
        }

        const viewer = await authorize(db, req);

        if (viewer && viewer._id === user._id) {
          user.authorized = true;
        }

        return user;
      } catch (error) {
        throw new Error(`Failed to query user: ${error}`);
      }
    }
  },
  User: {
    id: (user: User): string => {
      return user._id;
    },
    hasWallet: (user: User): boolean => {
      return Boolean(user.walletId);
    },
    income: (user: User): number | null => {
      return user.authorized ? user.income : null;
    },
    bookings: async (
      user: User,
      { limit, page }: UserBookingsArgs,
      { db }: { db: Database }
    ): Promise<UserBookingsData | null> => {
      try {
        if (!user.authorized) {
          return null;
        }

        const data: UserBookingsData = {
          total: 0,
          result: []
        };

        let cursor = await db.bookings.find({
          _id: { $in: user.bookings }
        });

        cursor = cursor.skip(page > 0 ? (page - 1) * limit : 0);
        cursor = cursor.limit(limit);

        data.total = await cursor.count();
        data.result = await cursor.toArray();

        return data;
      } catch (error) {
        throw new Error(`Failed to query user bookings: ${error}`);
      }
    },
    listings: async (
      user: User,
      { limit, page }: UserListingsArgs,
      { db }: { db: Database }
    ): Promise<UserListingsData | null> => {
      try {
        const data: UserListingsData = {
          total: 0,
          result: []
        };

        let cursor = await db.listings.find({
          _id: { $in: user.listings }
        });

        cursor = cursor.skip(page > 0 ? (page - 1) * limit : 0);
        cursor = cursor.limit(limit);

        data.total = await cursor.count();
        data.result = await cursor.toArray();

        return data;
      } catch (error) {
        throw new Error(`Failed to query user listings: ${error}`);
      }
    }
  }
};
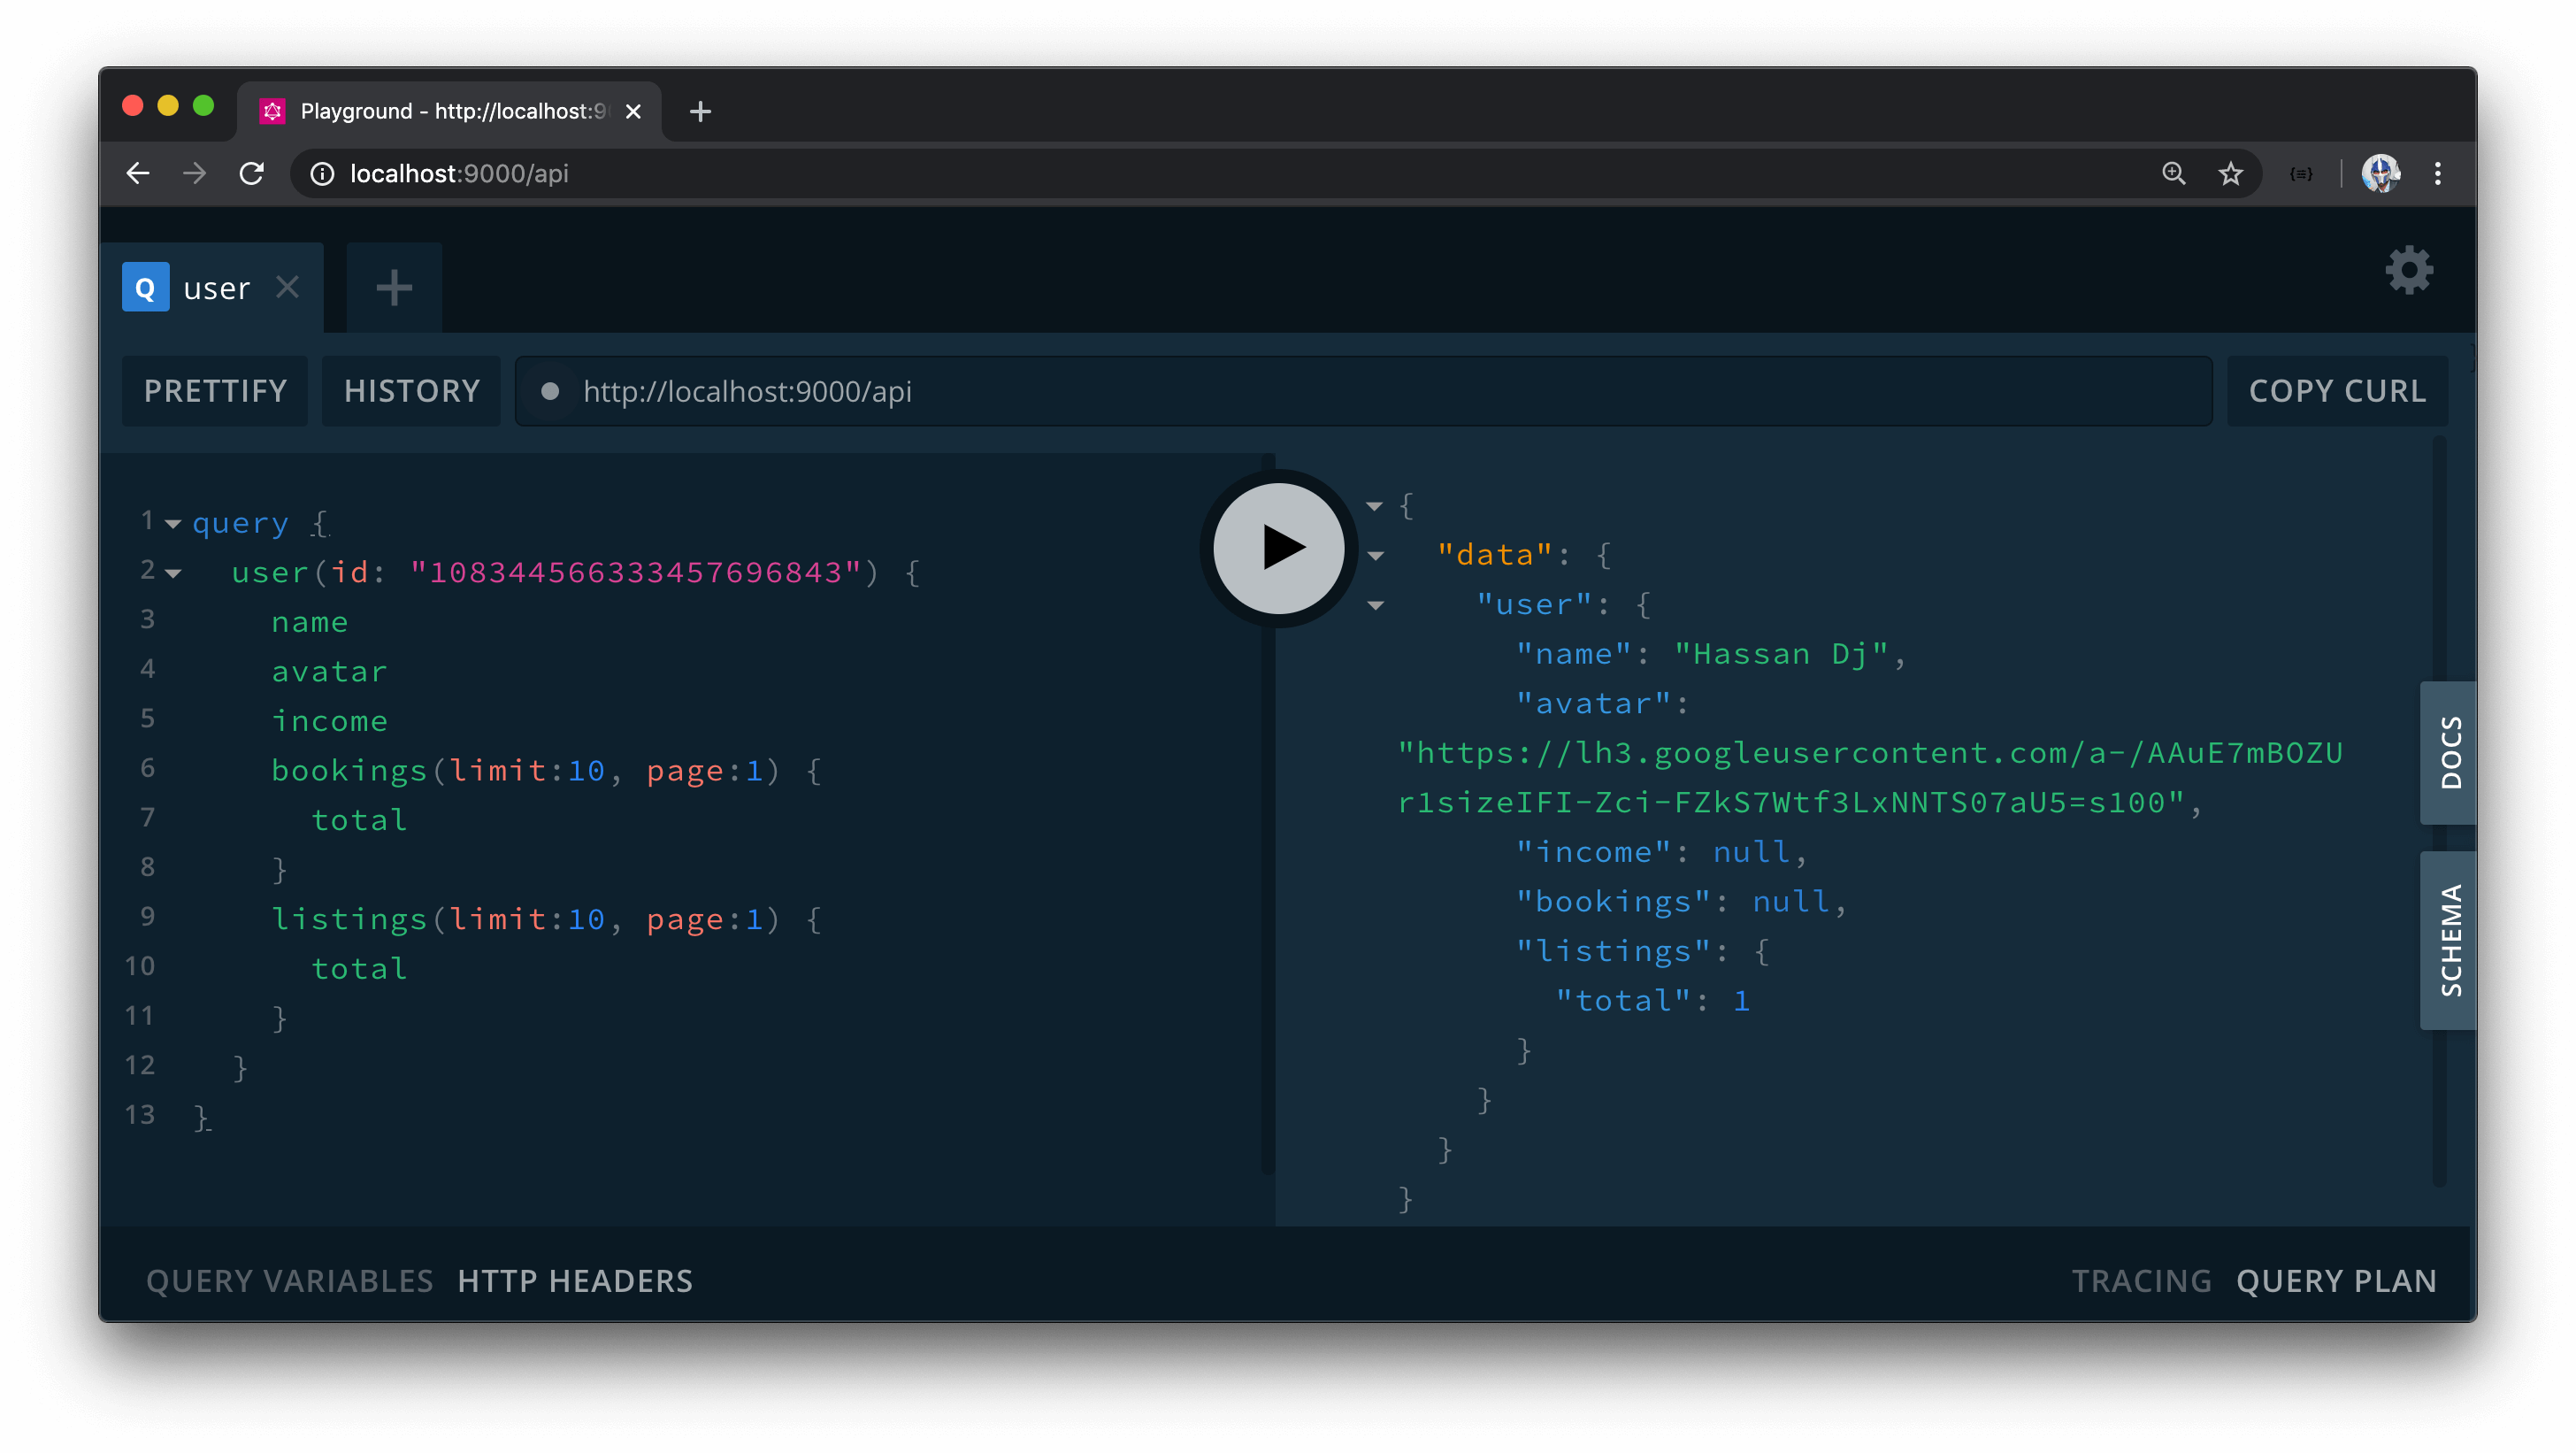
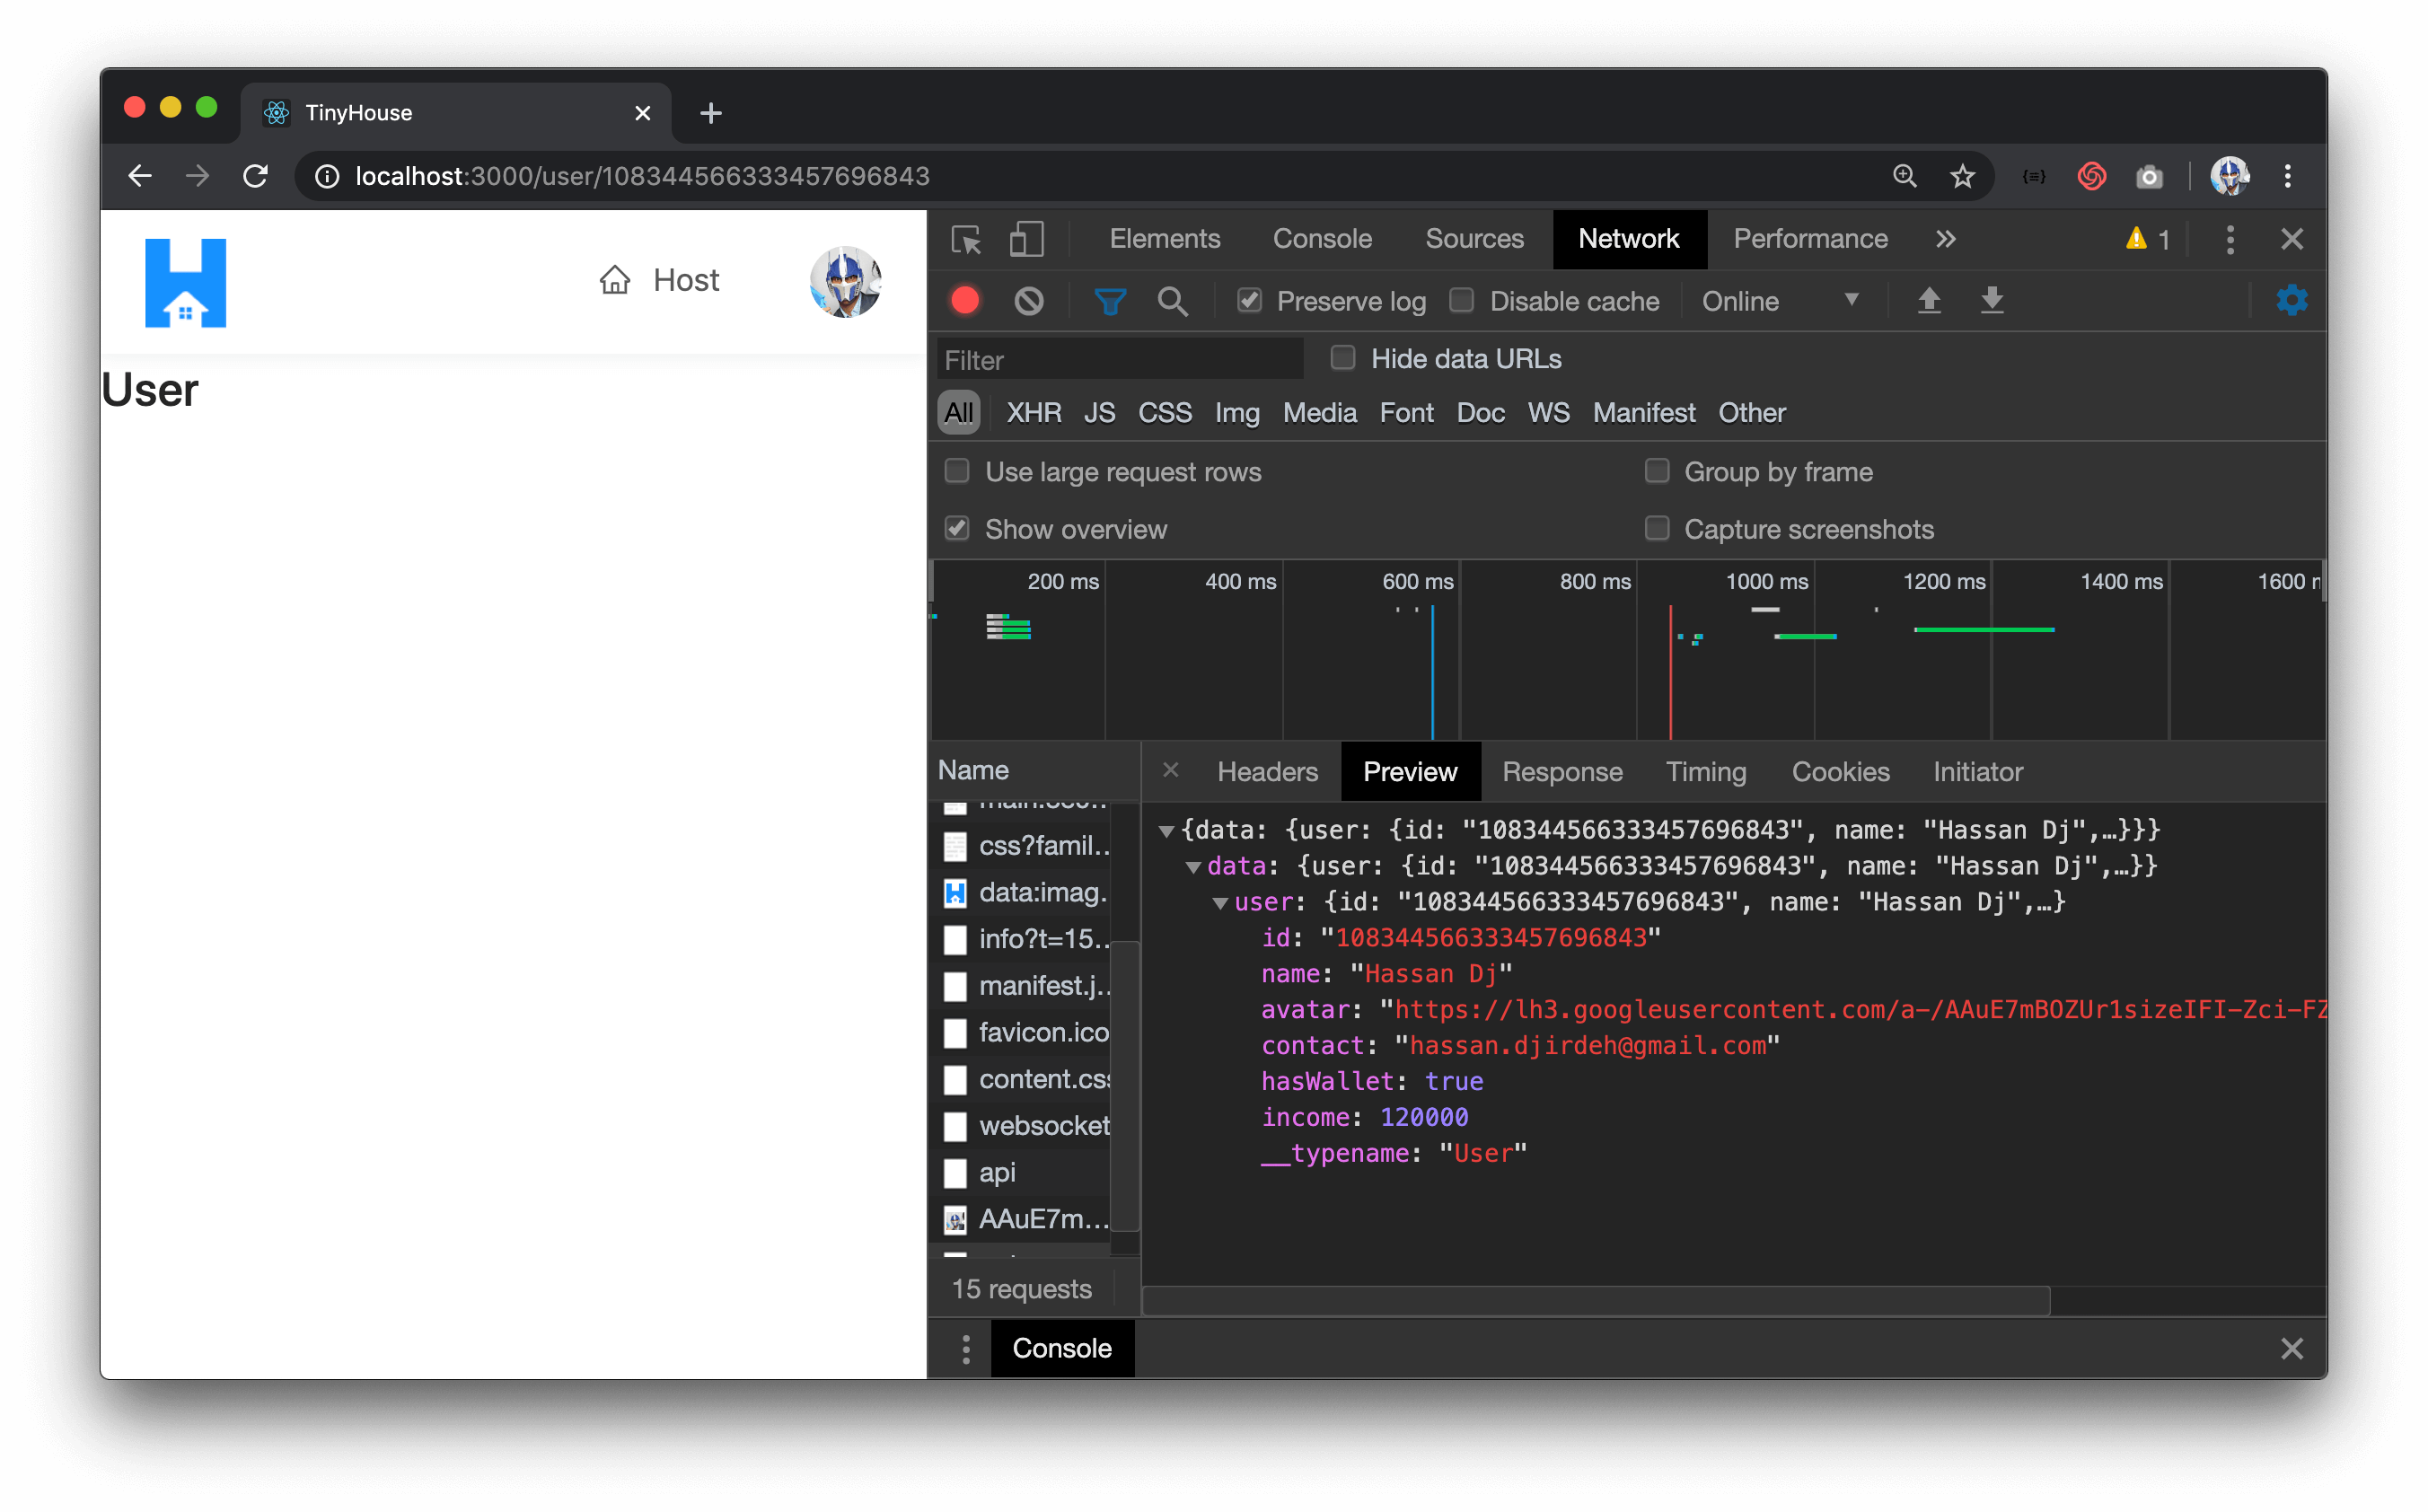
That’s it! We’ll now be able to query for a certain user by providing the id of said user. We can test this out in GraphQL Playground. We can grab the id of a valid user stored in the users collection of our database and if we were to place it as the argument value of the user query field and make the query, we’ll get information on the user!
In the next lesson, we’ll begin building the /user/:id page in our client to surface information about a user.
THE USERPROFILE REACT COMPONENT
With our GraphQL API now able to allow us to query information for a single user, let’s focus our efforts on building the user page component in our app which will live in the /user/:id route. The UI for our user page is going to be a little robust with a few different child components we’ll create.
Here’s how we’ll want the UI for the page shown in the /user/:id route to look. For a user viewing their own user profile page, they’ll be able to see their user profile information, a list of listings they’ve created, and a list of all the bookings they’ve made as well.
- The profile section would be a
<UserProfile />child component. - The listings section will be a
<UserListings />child component. - The bookings section will be a
<UserBookings />child component.
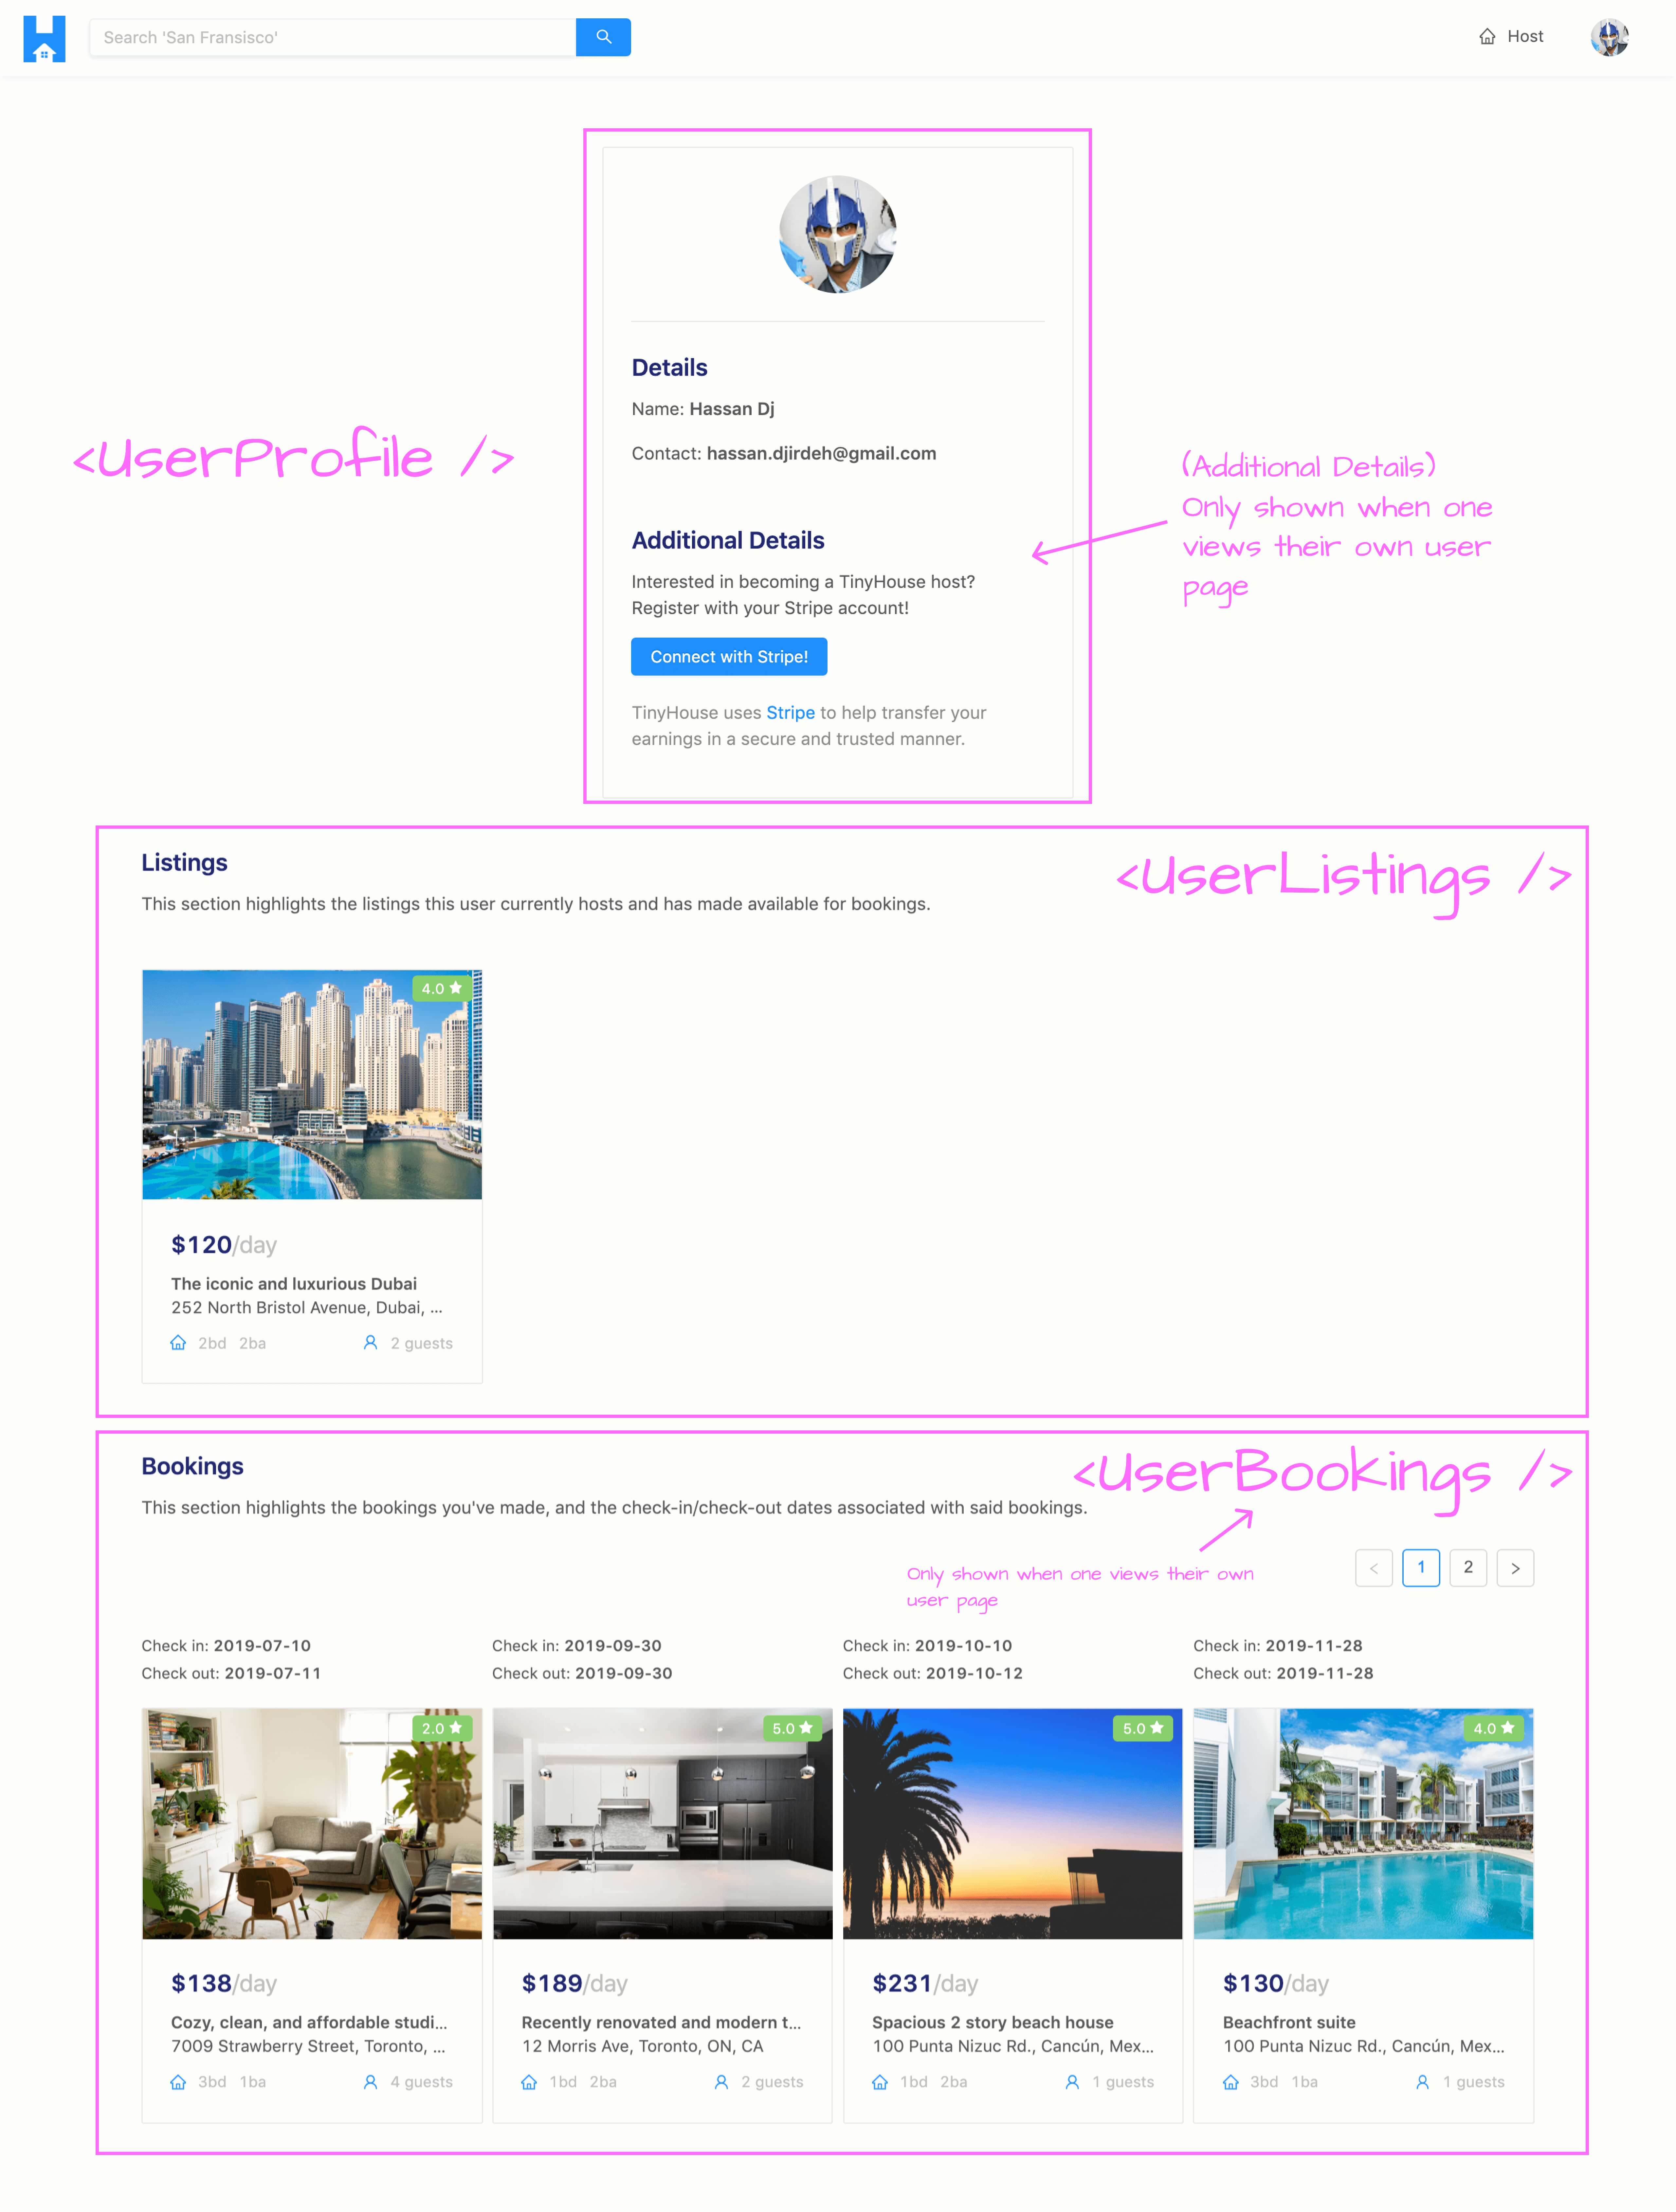
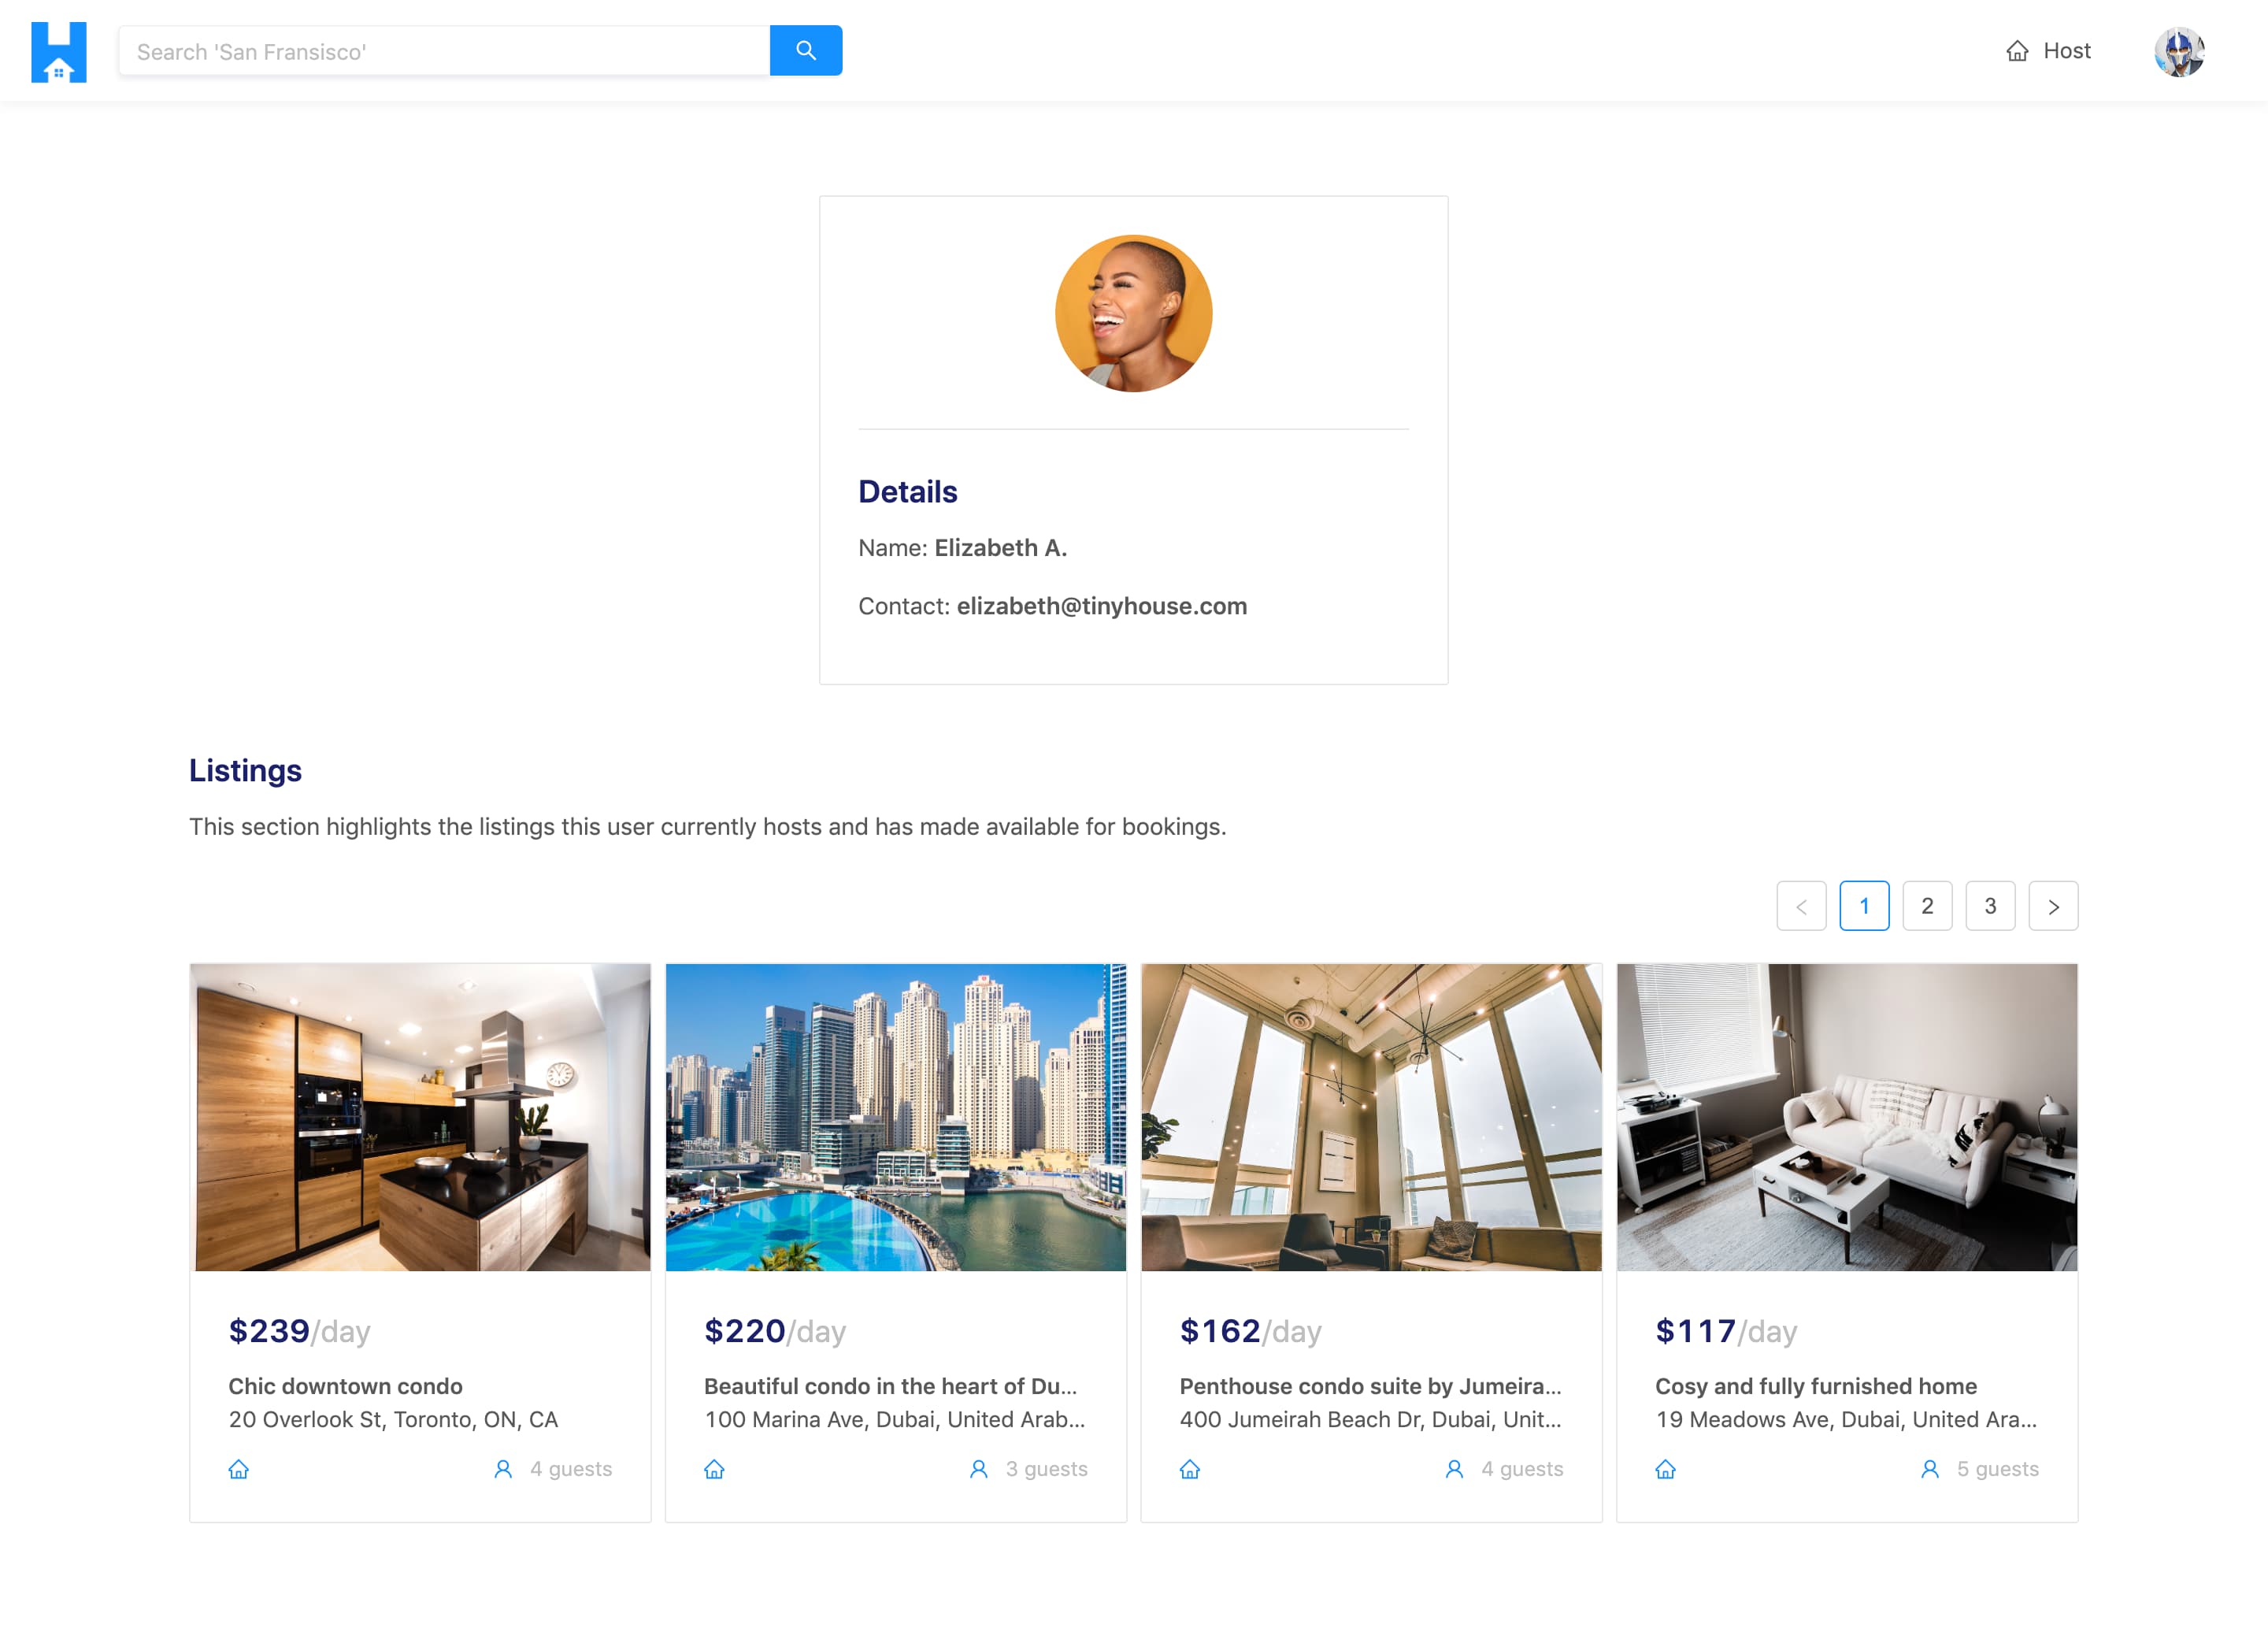
When a user is to view the page for another user, the viewer is only able to see the other user’s profile and available listings. In the profile of the other user being viewed, the UI that conforms with how one can connect with Stripe won’t be shown as well.
There’s a decent amount of UI we’re going to build here so we’ll break it up in pieces. In this first client lesson for the user page, we’ll look to make the query for the user field in our API and query for all the information of a user except for bookings and listings. We’ll then create the <UserProfile /> card component and attempt to display the details of the user. When a viewer is to look at their own user page, they’ll see an additional section in the <UserProfile /> card highlighting how they can connect with Stripe. We’ll display this but we won’t set up the functionality to connect with Stripe in this lesson.
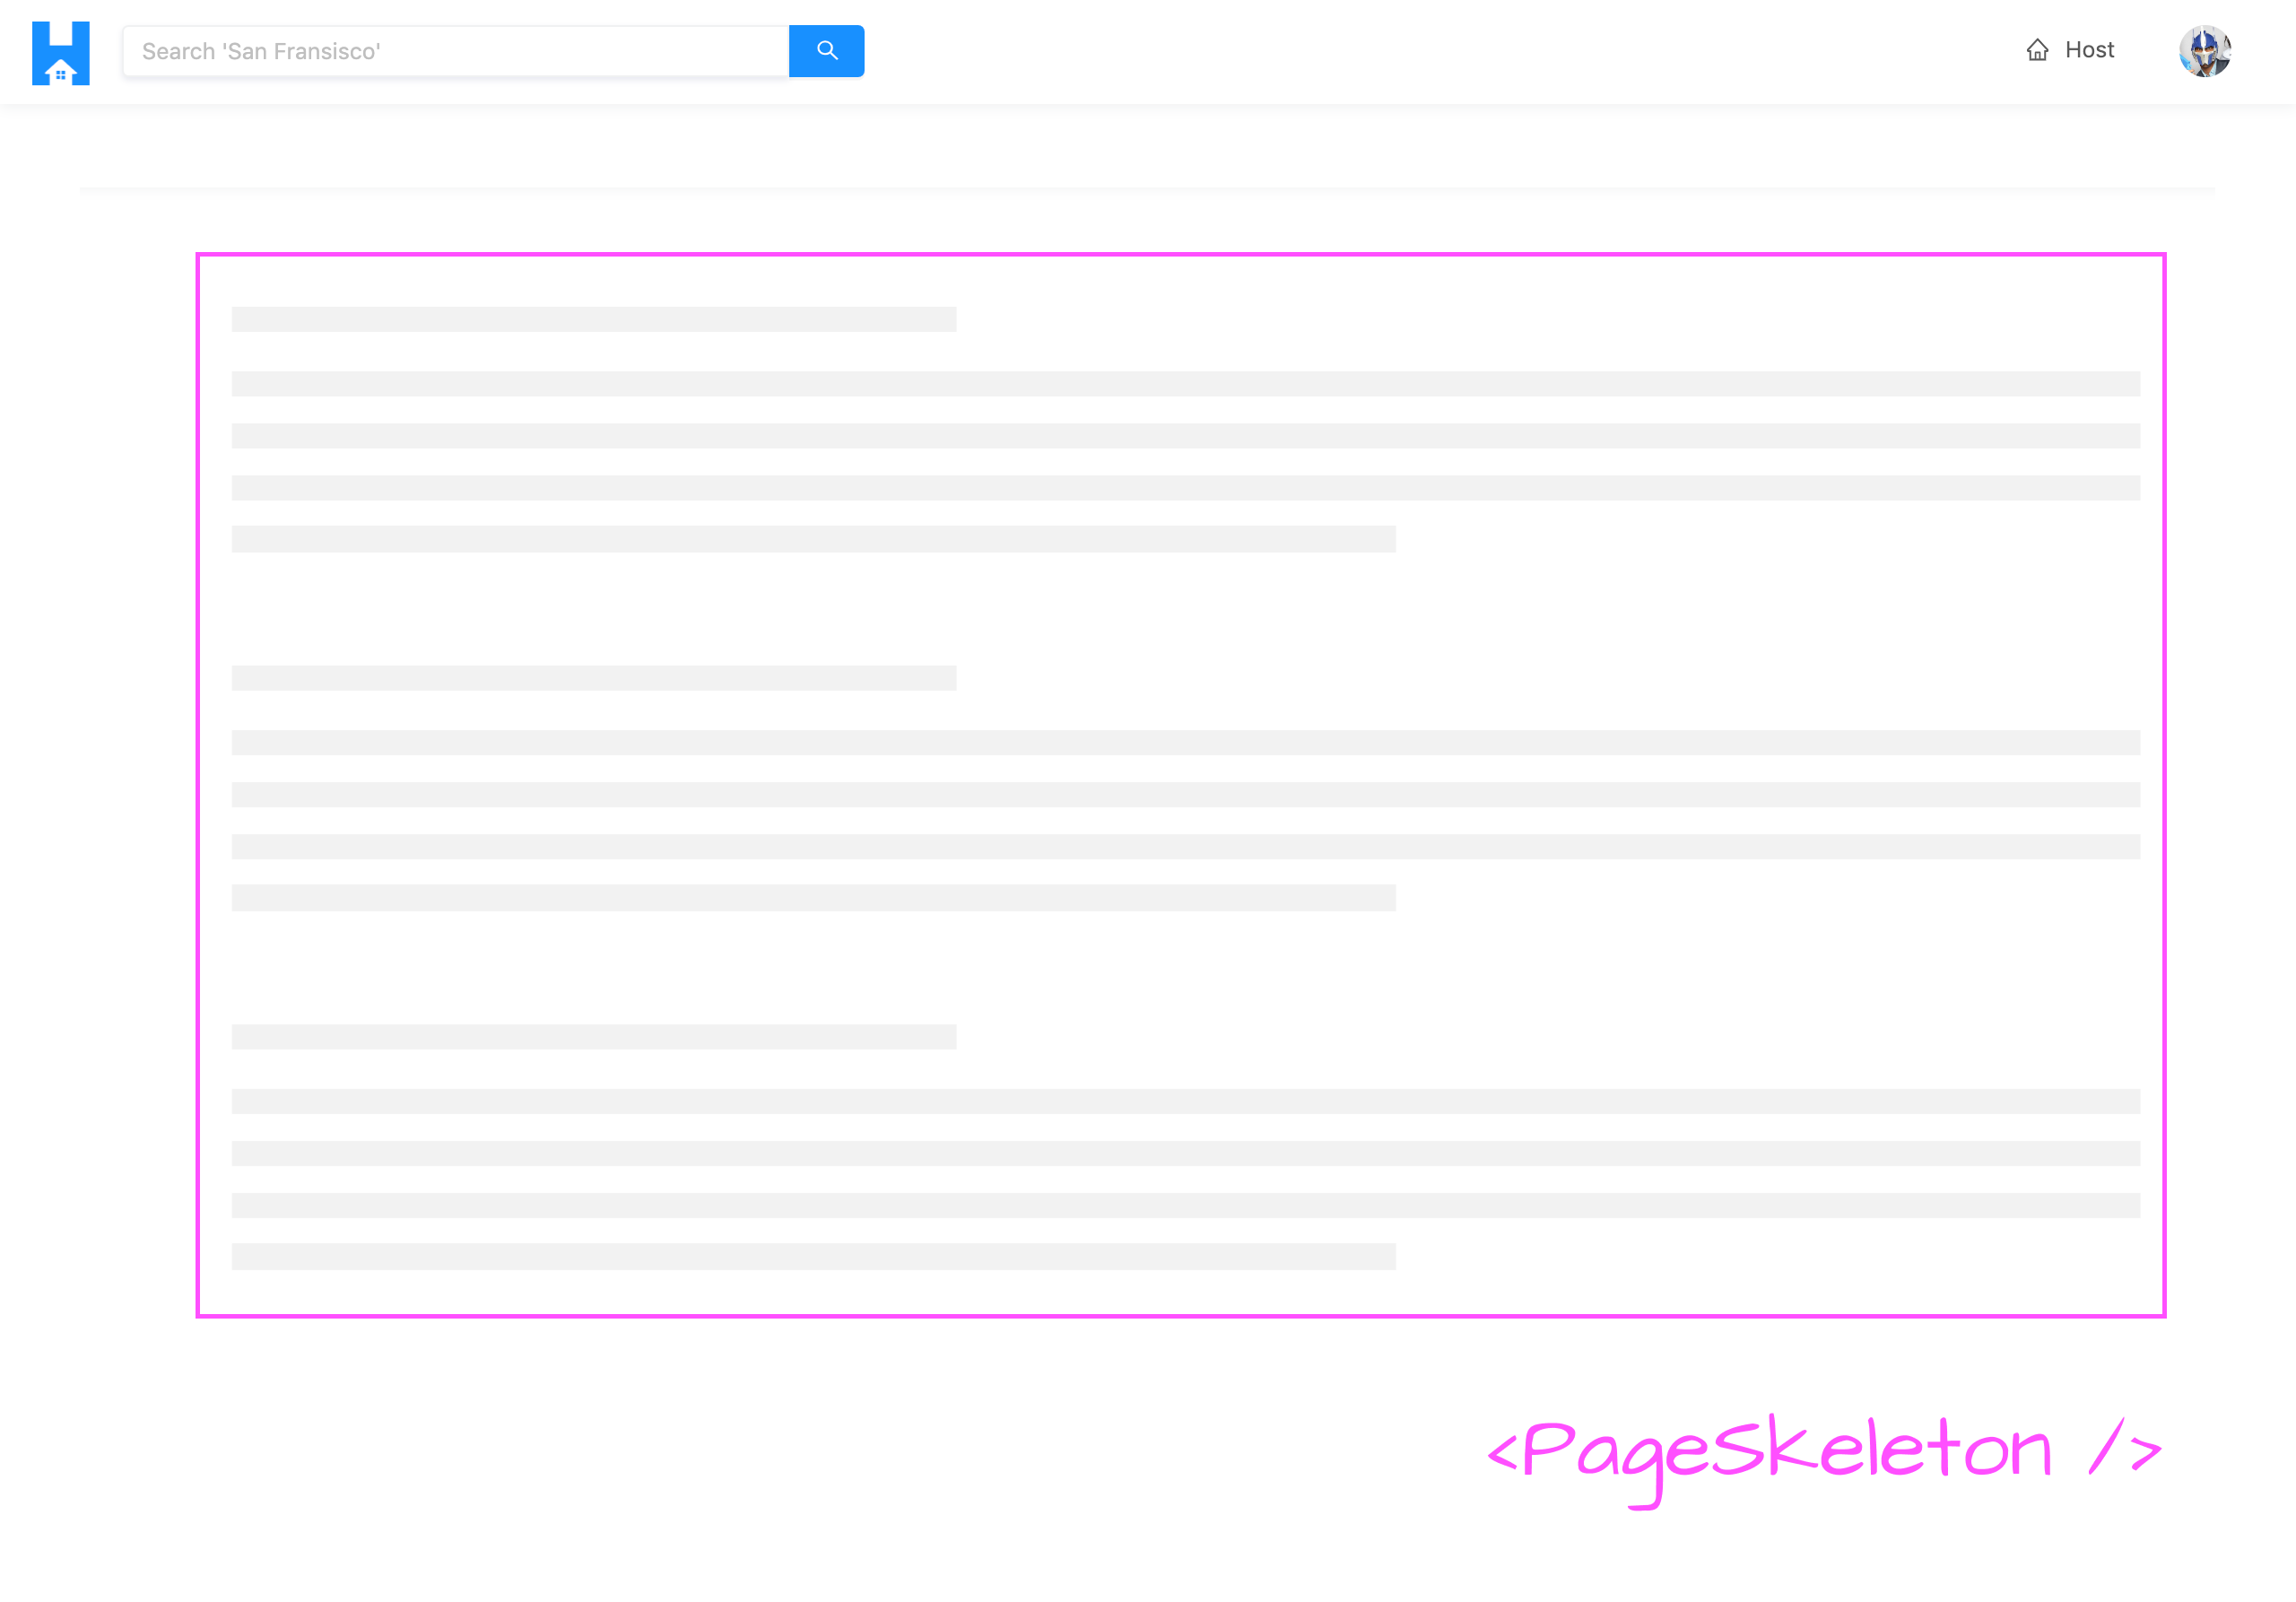
Additionally, we’ll create a custom <PageSkeleton /> component that will be shared for a few different pages and will be the “loading” page when a root-level query is in flight.
USER QUERY
Let’s begin. We’ll first look to construct the user query document in our src/lib/graphql/queries/ folder. We’ll create a User/ folder within that has an index.ts file.
client/
  // ...
  src/
    lib/
      graphql/
        queries/
          // ...
          User/
            index.ts
    // ...
  // ...
In the src/lib/graphql/queries/User/index.ts file, we’ll set up the user query document. We know the user query needs to accept an id to query for a certain user. We’ll state id is an argument to the query, and we’ll query for the id , name , avatar , contact , hasWallet , and income fields.
client/src/lib/graphql/queries/User/index.ts
import { gql } from "apollo-boost";

export const USER = gql`
  query User($id: ID!) {
    user(id: $id) {
      id
      name
      avatar
      contact
      hasWallet
      income
    }
  }
`;
We’ll then re-export the USER document constant from the src/lib/graphql/queries/index.ts file.
client/src/lib/graphql/queries/index.ts
export * from "./User";
To autogenerate the TypeScript definitions related to the user query, we’ll first run the codegen:schema script in the client project to update the schema file we have in our client.
npm run codegen:schema
We’ll then run the codegen:generate script to generate the TypeScript definitions for our new query.
npm run codegen:generate
In the <User /> component file ( src/sections/User/index.tsx ), the first thing we’ll look to do is run the user query when the <User /> component first renders. To help us achieve this, we’ll import the useQuery Hook from React Apollo. In the same file, we’ll also import the USER query document and the autogenerated TypeScript definitions for the user query.
In the <User /> component function, we’ll use the useQuery Hook at the top of our component and say we’re interested in having the data , loading and error information from our user query result and we’ll want to pass in an id for the query as a variable.
import React from "react";
import { useQuery } from "@apollo/react-hooks";
import { USER } from "../../lib/graphql/queries";
import {
  User as UserData,
  UserVariables
} from "../../lib/graphql/queries/User/__generated__/User";

export const User = () => {
  const { data, loading, error } = useQuery<UserData, UserVariables>(USER, {
    variables: {
      id
    }
  });

  return (
    <div>
      <h2>User</h2>
    </div>
  );
};
Our query won’t run successfully until we provide an appropriate value for the id variable it expects. When we render the <User /> component in our client, the id of the user is available as the query parameter of our URL.
http://localhost:3000/user/108344566333457696843 # id of user is 108344566333457696843
React Router provides a pretty intuitive way of being able to access the value of query parameters as part of props in a component. The <Route /> component in React Router automatically provides a prop known as the match prop, to the component being rendered, which gives details about the route path for a certain URL.
export const User = ({ match }) => {...};
React Router has now introduced Hooks! Be sure to check out the React Router Hooks video in Module 15 of the course to highlight how the above can be done with Hooks.
Of interest to us is the params property within this match object prop which will provide the value of the id parameter in the /user/:id route. React Router gives us a RouteComponentProps interface that acts as a generic and allows us to help the shape of the props for a certain route.
We’ll import RouteComponentProps from react-router-dom , create an interface that represents our match params (with which we’ll call MatchParams ) and state that the id param in this interface is to be a string. We’ll then assign the type of the props the <User /> component is to receive as RouteComponentProps<MatchParams> .
With these changes, we’ll then be able to access match.params.id and provide it as the value of the id variable in our useQuery Hook. match.params.id will represent the id of the user we want to query.
import React from "react";
import { RouteComponentProps } from "react-router-dom";
import { useQuery } from "@apollo/react-hooks";
import { USER } from "../../lib/graphql/queries";
import {
  User as UserData,
  UserVariables
} from "../../lib/graphql/queries/User/__generated__/User";

interface MatchParams {
  id: string;
}

export const User = ({ match }: RouteComponentProps<MatchParams>) => {
  const { data, loading, error } = useQuery<UserData, UserVariables>(USER, {
    variables: {
      id: match.params.id
    }
  });

  return (
    <div>
      <h2>User</h2>
    </div>
  );
};
At this moment in time, if we take a look at the network tab of our client app and visit a valid /user/:id route, we’ll see the query call being made and user information being returned.
<USERPROFILE />
With the user query now being made, let’s look to construct the profile card we want to show in the user page. We’ll have the profile card of the user be created as the <UserProfile /> component that will be a child to the <User /> component.
Let’s attempt to render the <UserProfile /> component within <User /> before we create it. First, we’ll look to get the user object from query data if data is available. If this user object exists, we’ll have a constant element labeled userProfileElement that will contain the <UserProfile /> component and we’ll pass the user object as props along.
import React from "react";
import { RouteComponentProps } from "react-router-dom";
import { useQuery } from "@apollo/react-hooks";
import { USER } from "../../lib/graphql/queries";
import {
  User as UserData,
  UserVariables
} from "../../lib/graphql/queries/User/__generated__/User";

export const User = ({ match }: RouteComponentProps<MatchParams>) => {
  const { data, loading, error } = useQuery<UserData, UserVariables>(USER, {
    variables: {
      id: match.params.id
    }
  });

  const user = data ? data.user : null;
  const userProfileElement = user ? <UserProfile user={user} /> : null;

  return (
    <div>
      <h2>User</h2>
    </div>
  );
};
In our <User /> component’s return statement, we’ll use a few components from Ant Design to help style how our layout is to be shown. We’ll import the <Layout /> , <Row /> , and <Col /> components from Ant Design. <Row /> and <Col /> is part of how Ant Design helps provide a Grid UI system.
We’ll use the <Content /> component from <Layout /> and the <Row /> and <Col /> components to return the userProfileElement .
import React from "react";
import { RouteComponentProps } from "react-router-dom";
import { useQuery } from "@apollo/react-hooks";
import { Col, Layout, Row } from "antd";
import { USER } from "../../lib/graphql/queries";
import {
  User as UserData,
  UserVariables
} from "../../lib/graphql/queries/User/__generated__/User";

interface MatchParams {
  id: string;
}

const { Content } = Layout;

export const User = ({ match }: RouteComponentProps<MatchParams>) => {
  const { data, loading, error } = useQuery<UserData, UserVariables>(USER, {
    variables: {
      id: match.params.id
    }
  });

  const user = data ? data.user : null;
  const userProfileElement = user ? <UserProfile user={user} /> : null;

  return (
    <Content className="user">
      <Row gutter={12} type="flex" justify="space-between">
        <Col xs={24}>{userProfileElement}</Col>
      </Row>
    </Content>
  );
};
The Ant Design
<Col />component provides prop options to determine the amount of spacing the children elements should take.xsrefers to extra-small viewports and the size of24states the entire width of the screen. There also exist values for small viewports, medium viewports, and so on.The
<Row />component allows us to specify gutter spacing between columns and whether we want to justify additional information for how we want the columns in a row to be shown (e.g. withspace-between). Be sure to check out Ant Design’s grid documentation if you’re interested in seeing more about how these components work.
The <User /> component won’t render until we create <UserProfile /> . We’ll create the <UserProfile /> component in an index.tsx file placed within a src/sections/User/components/ folder.
client/
  // ...
  src/
    sections/
      // ...
      User/
        components/
          UserProfile/
            index.tsx
        index.ts
      index.tsx
  // ...
In the src/sections/User/components/index.ts file, we’ll re-export the <UserProfile /> component we hope to soon create.
client/src/sections/User/components/index.ts
export * from "./UserProfile";
In the <UserProfile /> index file, we’ll create the function component and state it is to expect a prop labeled user .
import React from "react";

interface Props {
  user: // ...
}

export const UserProfile = ({ user }: Props) => {
  return <h2>UserProfile</h2>;
};
We want this user prop to represent the user object we query from our API. What would the shape of this user prop object be? We could look to create our own interface to represent the types of the fields the object might contain but this will be prone to errors if we ever change what fields we’re querying from our API. As we’ve seen before, we should take advantage of the autogenerated type definitions .
The autogenerated data interface to describe the shape of the data and the user object queried from the root-level user query looks like the following:
// Automatically generated types for the user query
// In src/lib/graphql/queries/User/__generated__/User.ts

export interface User_user {
  __typename: "User";
  id: string;
  name: string;
  avatar: string;
  contact: string;
  hasWallet: boolean;
  income: number | null;
}

export interface User {
  user: User_user; // we want to access the type of user here - User_user
}

// ...
We’re interested in accessing the type of the user field within the User interface in our autogenerated typings. To access the interface type of the child user field, we can achieve this in TypeScript with lookup types .
Let’s see this in action. In the <UserProfile /> component file, we’ll import the User interface from the autogenerated file that describes the shape of data returned from our user query. When looking to describe the shape of the user prop passed down to <UserProfile /> , we’ll use the [] square bracket syntax to set its type as the type of the user property within the User data interface.
import React from "react";
import { User as UserData } from "../../../../lib/graphql/queries/User/__generated__/User";

interface Props {
  user: UserData["user"];
}

export const UserProfile = ({ user }: Props) => {
  return <h2>UserProfile</h2>;
};
Look-up types (or otherwise labeled as indexed access types) appear very similar to how elements can be accessed in an object.
With the user prop available, we can begin to build the <UserProfile /> component. The <UserProfile /> component will be fairly straightforward and will mostly contain markup to represent the information we want to show.
We’ll import the <Avatar /> , <Card /> , <Divider /> , and <Typography /> components from Ant Design. We’ll destruct the <Paragraph /> , <Text /> , and <Title /> child components from <Typography /> . In the <UserProfile /> component’s return statement, we’ll return some simple markup that displays the user’s avatar, name, and information.
import React from "react";
import { Avatar, Card, Divider, Typography } from "antd";
import { User as UserData } from "../../../../lib/graphql/queries/User/__generated__/User";

interface Props {
  user: UserData["user"];
}

const { Paragraph, Text, Title } = Typography;

export const UserProfile = ({ user }: Props) => {
  return (
    <div className="user-profile">
      <Card className="user-profile__card">
        <div className="user-profile__avatar">
          <Avatar size={100} src={user.avatar} />
        </div>
        <Divider />
        <div className="user-profile__details">
          <Title level={4}>Details</Title>
          <Paragraph>
            Name: <Text strong>{user.name}</Text>
          </Paragraph>
          <Paragraph>
            Contact: <Text strong>{user.contact}</Text>
          </Paragraph>
        </div>
      </Card>
    </div>
  );
};
We’ll now import the <UserProfile /> component in the parent <User /> component file and save our changes.
client/src/sections/User/index.tsx
import { UserProfile } from "./components";
When we take a look at a valid /user/:id route in our app, we’ll now see the user profile card being shown! Amazing!
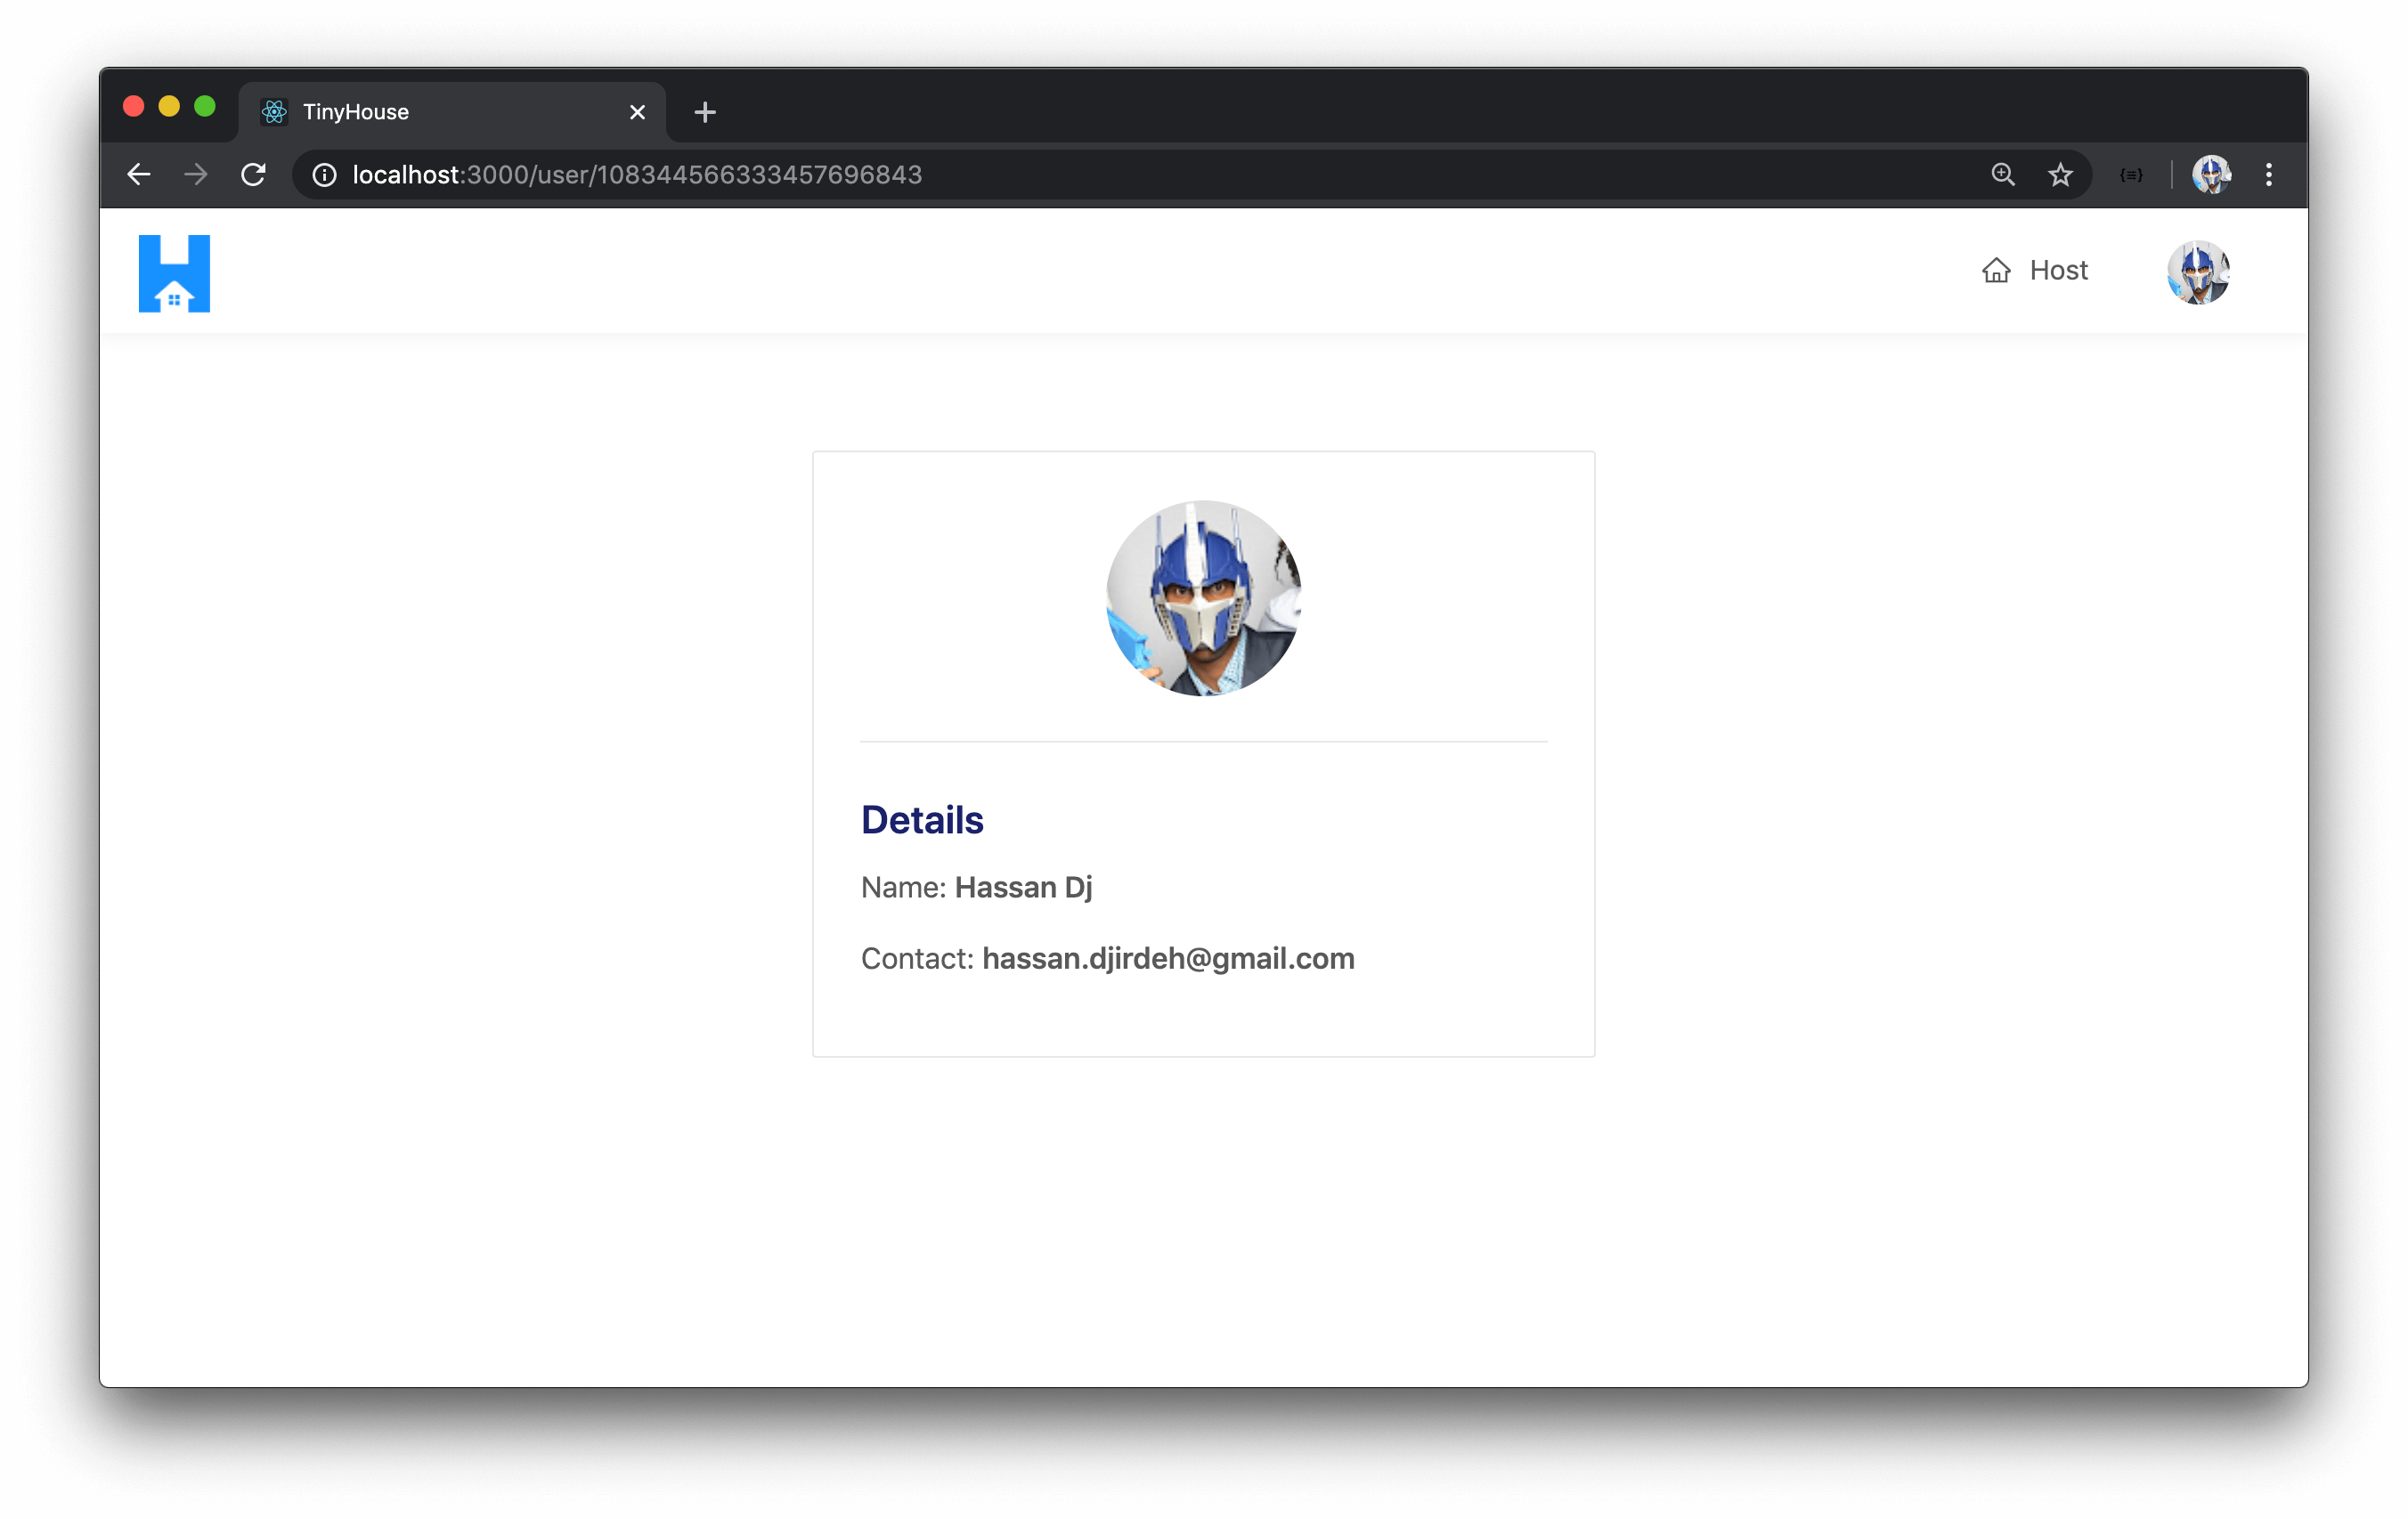
This is the <UserProfile /> card we’ll see when we go to any user profile page. Let’s look to add another section within the card for viewers viewing their own user page that addresses the capability to connect with Stripe.
<UserProfile /> - Connect with Stripe
To recognize whether the viewer is looking at their own user page, we can compare the id of the viewer with the id of the user. We have a viewer state object created in the uppermost parent <App /> component that is updated when a user signs in successfully. To have this viewer object available in the <User /> component, we’ll need to pass it down as props from the parent <App /> component.
In the src/index.tsx file, we’ll follow the render props pattern like we’ve seen before and pass the viewer state object along down to the <User /> component rendered in the /user/:id route.
client/src/index.tsx
          <Route
            exact
            path="/user/:id"
            render={props => <User {...props} viewer={viewer} />}
          />
In the <User /> component file, we’ll import the Viewer interface from the src/lib/types.ts file and declare a Props interface that has the viewer prop with type Viewer . We’ll have the viewer prop be destructured from the <User /> component function and we’ll use an intersection type to state the type of the props of the component is both the Props interface and the RouteComponentProps interface.
// ...
import { Viewer } from "../../lib/types";
import { UserProfile } from "./components";

interface Props {
  viewer: Viewer;
}

interface MatchParams {
  id: string;
}

const { Content } = Layout;

export const User = ({ viewer, match }: Props & RouteComponentProps<MatchParams>) => {
  // ...
};
With the viewer prop available in the <User /> component, we can create a constant called viewerIsUser that simply checks if the viewer.id is equal to user.id . We’ll pass the viewerIsUser value as a prop down to the <UserProfile /> component.
export const User = ({ viewer, match }: Props & RouteComponentProps<MatchParams>) => {
  const { data, loading, error } = useQuery<UserData, UserVariables>(USER, {
    variables: {
      id: match.params.id
    }
  });

  const user = data ? data.user : null;
  const viewerIsUser = viewer.id === match.params.id;

  const userProfileElement = user ? (
    <UserProfile user={user} viewerIsUser={viewerIsUser} />
  ) : null;

  return (
    <Content className="user">
      <Row gutter={12} type="flex" justify="space-between">
        <Col xs={24}>{userProfileElement}</Col>
      </Row>
    </Content>
  );
};
In the <UserProfile /> component, we’ll declare the viewerIsUser prop it is to expect and state it is to be a boolean . We’ll also destruct the viewerIsUser prop from the props argument in the component function.
// ...

interface Props {
  user: UserData["user"];
  viewerIsUser: boolean;
}

// ...

export const UserProfile = ({ user, viewerIsUser }: Props) => {
  // ...
};
In the <UserProfile /> component, we’ll create additional markup that is to be shown only if the viewer is the user. We’ll import the <Button /> component from Ant Design which will be used for the "Connect with Stripe" button we’ll show.
Within the <UserProfile /> component, we’ll create the additional markup a viewer viewing their own user page will see in a constant we can call additionalDetailsSection that will only be shown if the viewerIsUser boolean is true. We’ll have the element show a Divider and some text prompting the viewer to connect with Stripe. We’ll also have the button be displayed for the viewer to "Connect with Stripe" .
To ensure our additionalDetailsSection React element is to represent a single element, we’ll import and use React’s <Fragment /> component which will help us group the children elements without adding extra nodes to the DOM.
import React, { Fragment } from "react";
import { Avatar, Button, Card, Divider, Typography } from "antd";
import { User as UserData } from "../../../../lib/graphql/queries/User/__generated__/User";

interface Props {
  user: UserData["user"];
  viewerIsUser: boolean;
}

const { Paragraph, Text, Title } = Typography;

export const UserProfile = ({ user, viewerIsUser }: Props) => {
  const additionalDetailsSection = viewerIsUser ? (
    <Fragment>
      <Divider />
      <div className="user-profile__details">
        <Title level={4}>Additional Details</Title>
        <Paragraph>
          Interested in becoming a TinyHouse host? Register with your Stripe account!
        </Paragraph>
        <Button type="primary" className="user-profile__details-cta">
          Connect with Stripe!
        </Button>
        <Paragraph type="secondary">
          TinyHouse uses{" "}
          <a
            href="https://stripe.com/en-US/connect"
            target="_blank"
            rel="noopener noreferrer"
          >
            Stripe
          </a>{" "}
          to help transfer your earnings in a secure and trusted manner.
        </Paragraph>
      </div>
    </Fragment>
  ) : null;

  // ...
};
We’ll have the additionalDetailsSection element shown below the user profile details in our <UserProfile /> component return statement. With all the changes made, the <UserProfile /> component file will look like the following.
client/src/sections/User/components/UserProfile/index.tsx
import React, { Fragment } from "react";
import { Avatar, Button, Card, Divider, Typography } from "antd";
import { User as UserData } from "../../../../lib/graphql/queries/User/__generated__/User";

interface Props {
  user: UserData["user"];
  viewerIsUser: boolean;
}

const { Paragraph, Text, Title } = Typography;

export const UserProfile = ({ user, viewerIsUser }: Props) => {
  const additionalDetailsSection = viewerIsUser ? (
    <Fragment>
      <Divider />
      <div className="user-profile__details">
        <Title level={4}>Additional Details</Title>
        <Paragraph>
          Interested in becoming a TinyHouse host? Register with your Stripe account!
        </Paragraph>
        <Button type="primary" className="user-profile__details-cta">
          Connect with Stripe
        </Button>
        <Paragraph type="secondary">
          TinyHouse uses{" "}
          <a
            href="https://stripe.com/en-US/connect"
            target="_blank"
            rel="noopener noreferrer"
          >
            Stripe
          </a>{" "}
          to help transfer your earnings in a secure and truster manner.
        </Paragraph>
      </div>
    </Fragment>
  ) : null;

  return (
    <div className="user-profile">
      <Card className="user-profile__card">
        <div className="user-profile__avatar">
          <Avatar size={100} src={user.avatar} />
        </div>
        <Divider />
        <div className="user-profile__details">
          <Title level={4}>Details</Title>
          <Paragraph>
            Name: <Text strong>{user.name}</Text>
          </Paragraph>
          <Paragraph>
            Contact: <Text strong>{user.contact}</Text>
          </Paragraph>
        </div>
        {additionalDetailsSection}
      </Card>
    </div>
  );
};
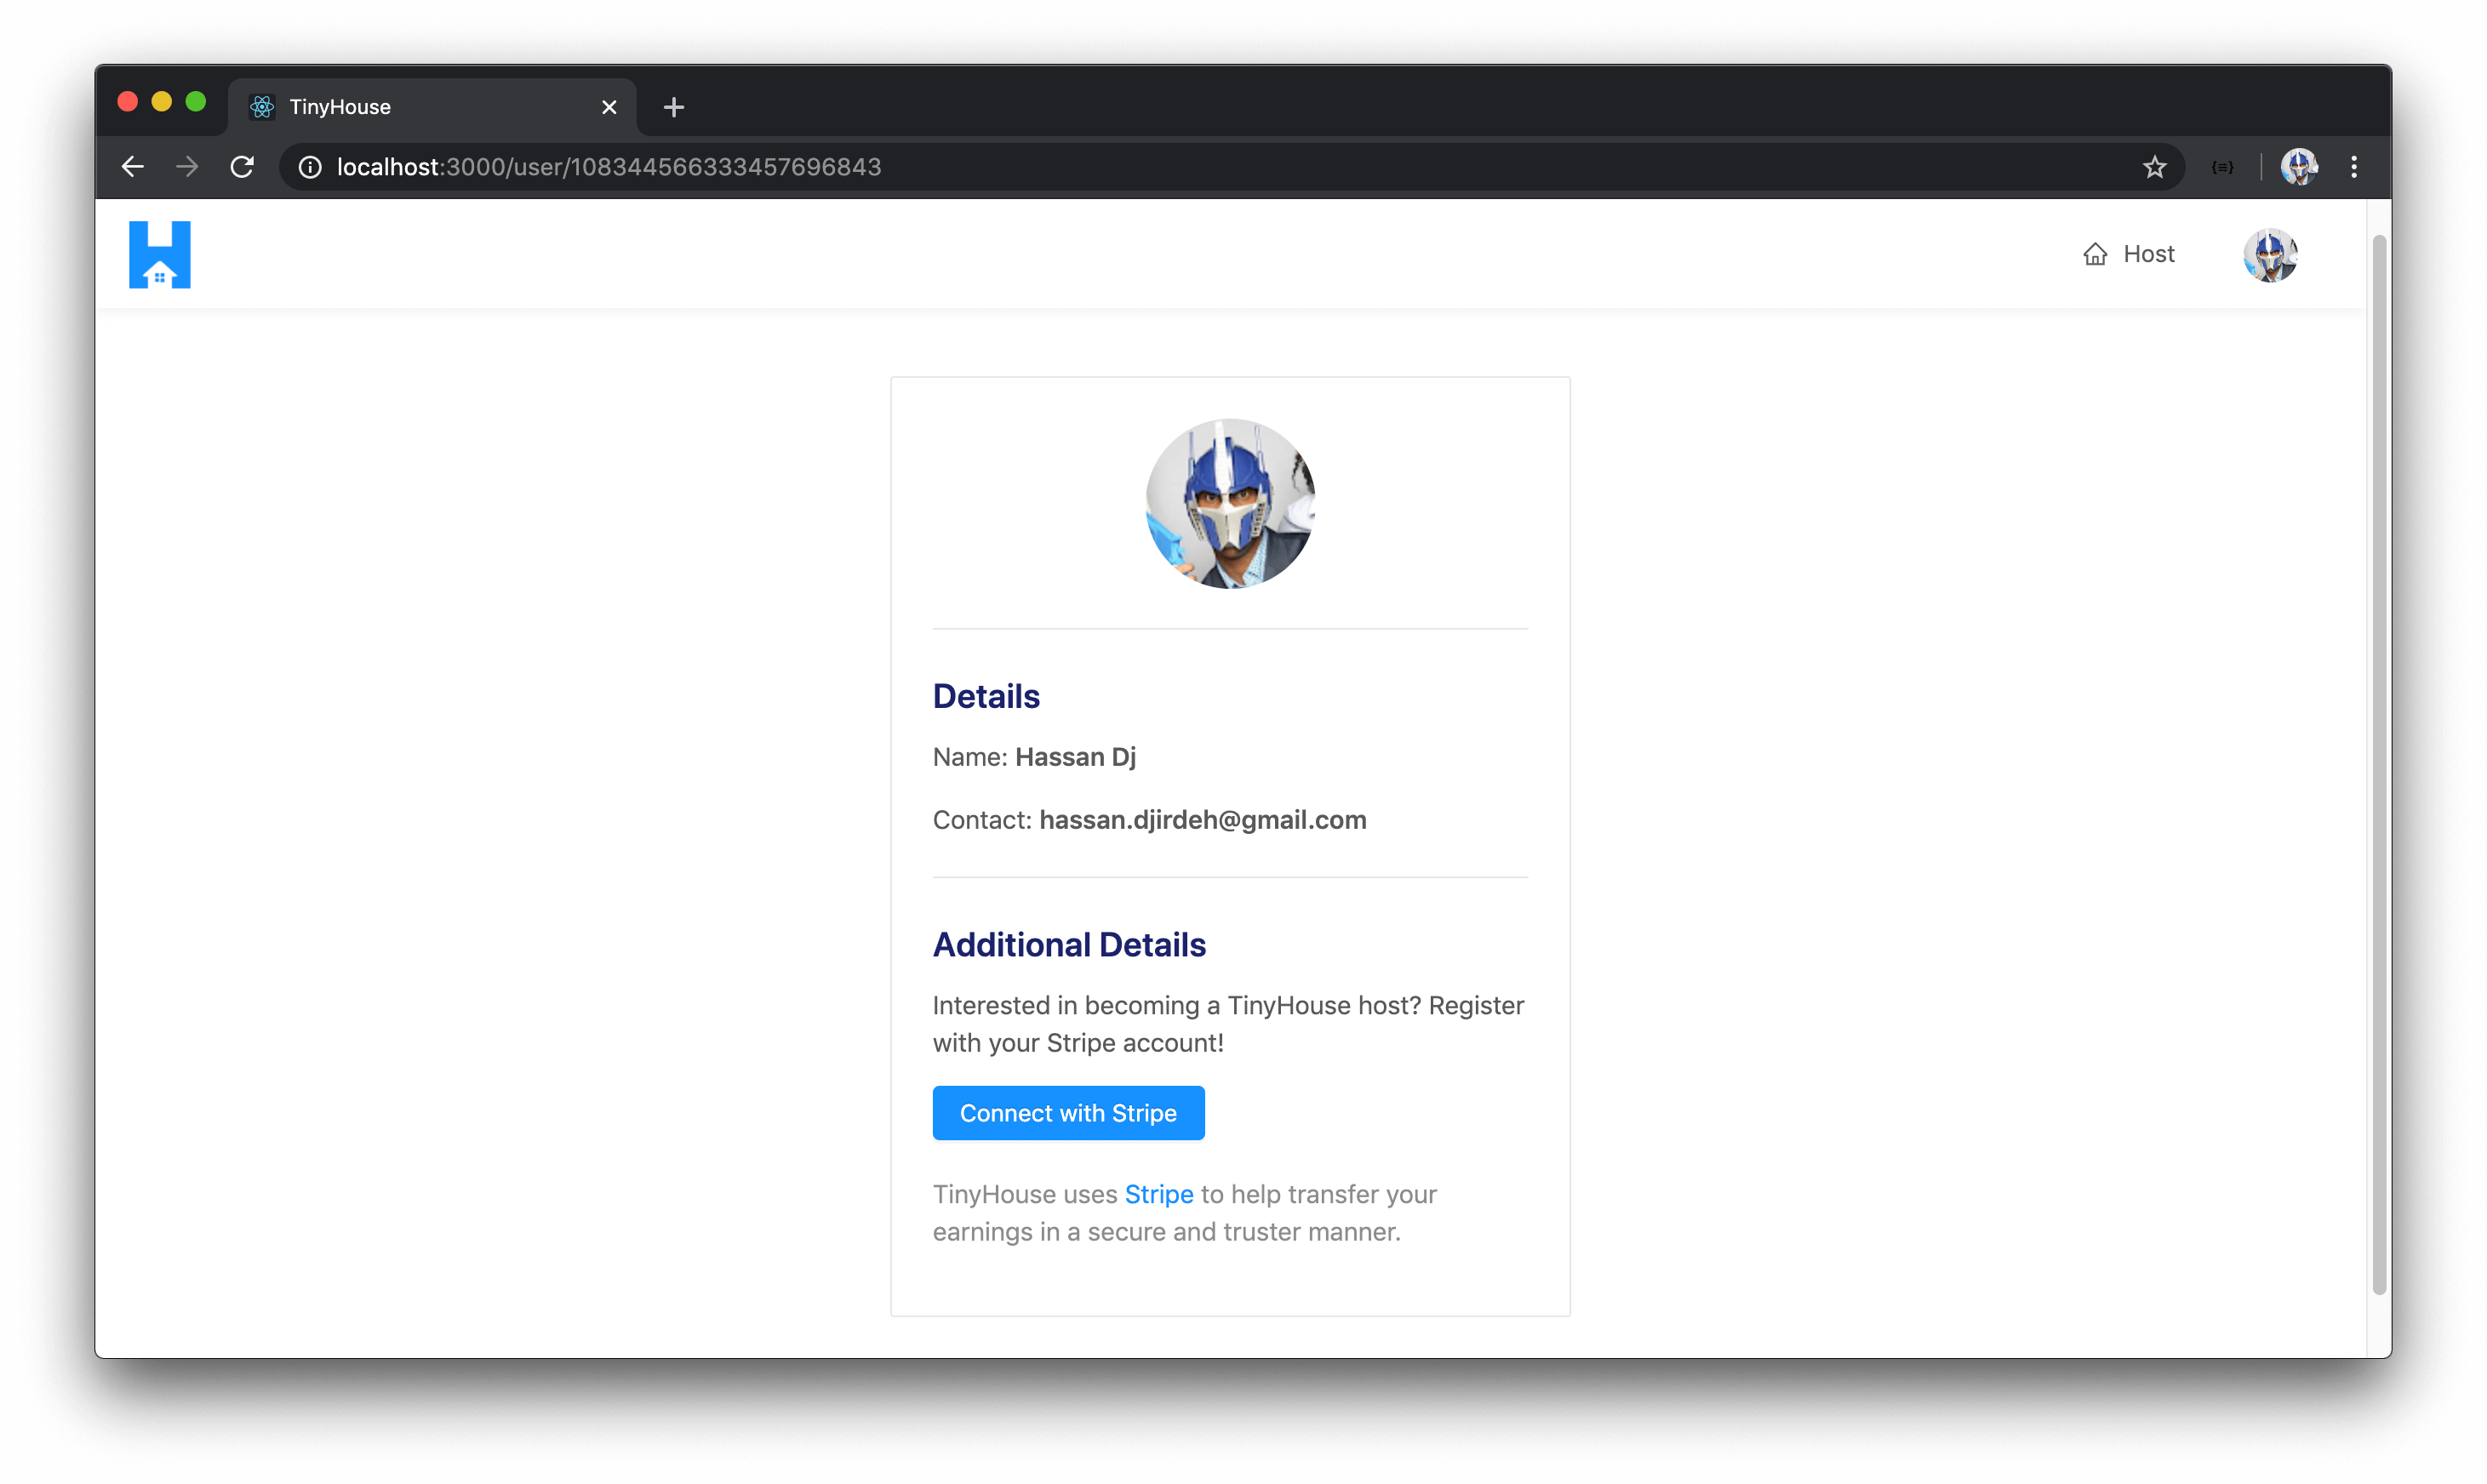
As a signed-in viewer, if we were to visit the /user/:id of our user page, we’ll see the new additional details section in the profile card that tells us - if you’re interested in becoming a TinyHouse host, register with Stripe.
Great! We’re now querying for a certain user and we have the <UserProfile /> card component be shown which displays information of the user being queried. Before we close this lesson, we’ll look to show a loading page of sorts when the user query is in flight and an error message if the user query was to ever fail.
<PAGESKELETON />
The page skeleton we’ll be interested in setting up will be used for most of the route pages in our app. With that said, we’ll create this component as a <PageSkeleton /> component in an index.tsx file within a src/lib/components/PageSkeleton/ folder.
client/
  // ...
  src/
    lib/
      components/
        // ...
        PageSkeleton/
          index.tsx
      // ...
    // ...
  // ...
In the src/lib/components/index.ts file, we’ll re-export the <PageSkeleton /> component we hope to soon create.
client/src/lib/components/index.ts
export * from "./PageSkeleton";
The <PageSkeleton /> component we’ll create will be straightforward. We’ll import React’s <Fragment /> component and the <Skeleton /> component from Ant Design. Our <PageSkeleton /> component will return three instances of the <Skeleton /> component with each of the <Skeleton /> components having 4 rows in a paragraph .
client/src/lib/components/PageSkeleton/index.tsx
import React, { Fragment } from "react";
import { Skeleton } from "antd";

export const PageSkeleton = () => {
  const skeletonParagraph = (
    <Skeleton
      active
      paragraph={{ rows: 4 }}
      className="page-skeleton__paragraph"
    />
  );

  return (
    <Fragment>
      {skeletonParagraph}
      {skeletonParagraph}
      {skeletonParagraph}
    </Fragment>
  );
};
In the <User /> component in the src/sections/User/index.tsx file, we’ll import the <PageSkeleton /> component from the src/lib/components/ folder. We’ll also import the <ErrorBanner /> component from the src/lib/components/ folder to help show an error banner when the user query is to ever error.
client/src/sections/User/index.tsx
import { ErrorBanner, PageSkeleton } from "../../lib/components";
In <UserProfile /> , when the loading of the user query is ever true , we’ll render the <PageSkeleton /> component within Ant Design’s <Content /> component. If the user query was to ever fail, we’ll render the <PageSkeleton /> component within <Content /> but also have the <ErrorBanner /> component be shown as well with an error statement of "This user may not exist or we've encountered an error. Please try again soon" .
With all the work we’ve done for the <User /> component, the src/sections/User/index.tsx file will appear as the following.
client/src/sections/User/index.tsx
import React from "react";
import { RouteComponentProps } from "react-router-dom";
import { useQuery } from "@apollo/react-hooks";
import { Col, Layout, Row } from "antd";
import { USER } from "../../lib/graphql/queries";
import {
  User as UserData,
  UserVariables
} from "../../lib/graphql/queries/User/__generated__/User";
import { ErrorBanner, PageSkeleton } from "../../lib/components";
import { Viewer } from "../../lib/types";
import { UserProfile } from "./components";

interface Props {
  viewer: Viewer;
}

interface MatchParams {
  id: string;
}

const { Content } = Layout;

export const User = ({ viewer, match }: Props & RouteComponentProps<MatchParams>) => {
  const { data, loading, error } = useQuery<UserData, UserVariables>(USER, {
    variables: {
      id: match.params.id
    }
  });

  if (loading) {
    return (
      <Content className="user">
        <PageSkeleton />
      </Content>
    );
  }

  if (error) {
    return (
      <Content className="user">
        <ErrorBanner description="This user may not exist or we've encountered an error. Please try again soon." />
        <PageSkeleton />
      </Content>
    );
  }

  const user = data ? data.user : null;
  const viewerIsUser = viewer.id === match.params.id;

  const userProfileElement = user ? (
    <UserProfile user={user} viewerIsUser={viewerIsUser} />
  ) : null;

  return (
    <Content className="user">
      <Row gutter={12} type="flex" justify="space-between">
        <Col xs={24}>{userProfileElement}</Col>
      </Row>
    </Content>
  );
};
When we visit the /user/:id page of a valid user and the user query is in flight, we’ll see the <PageSkeleton /> component be shown.
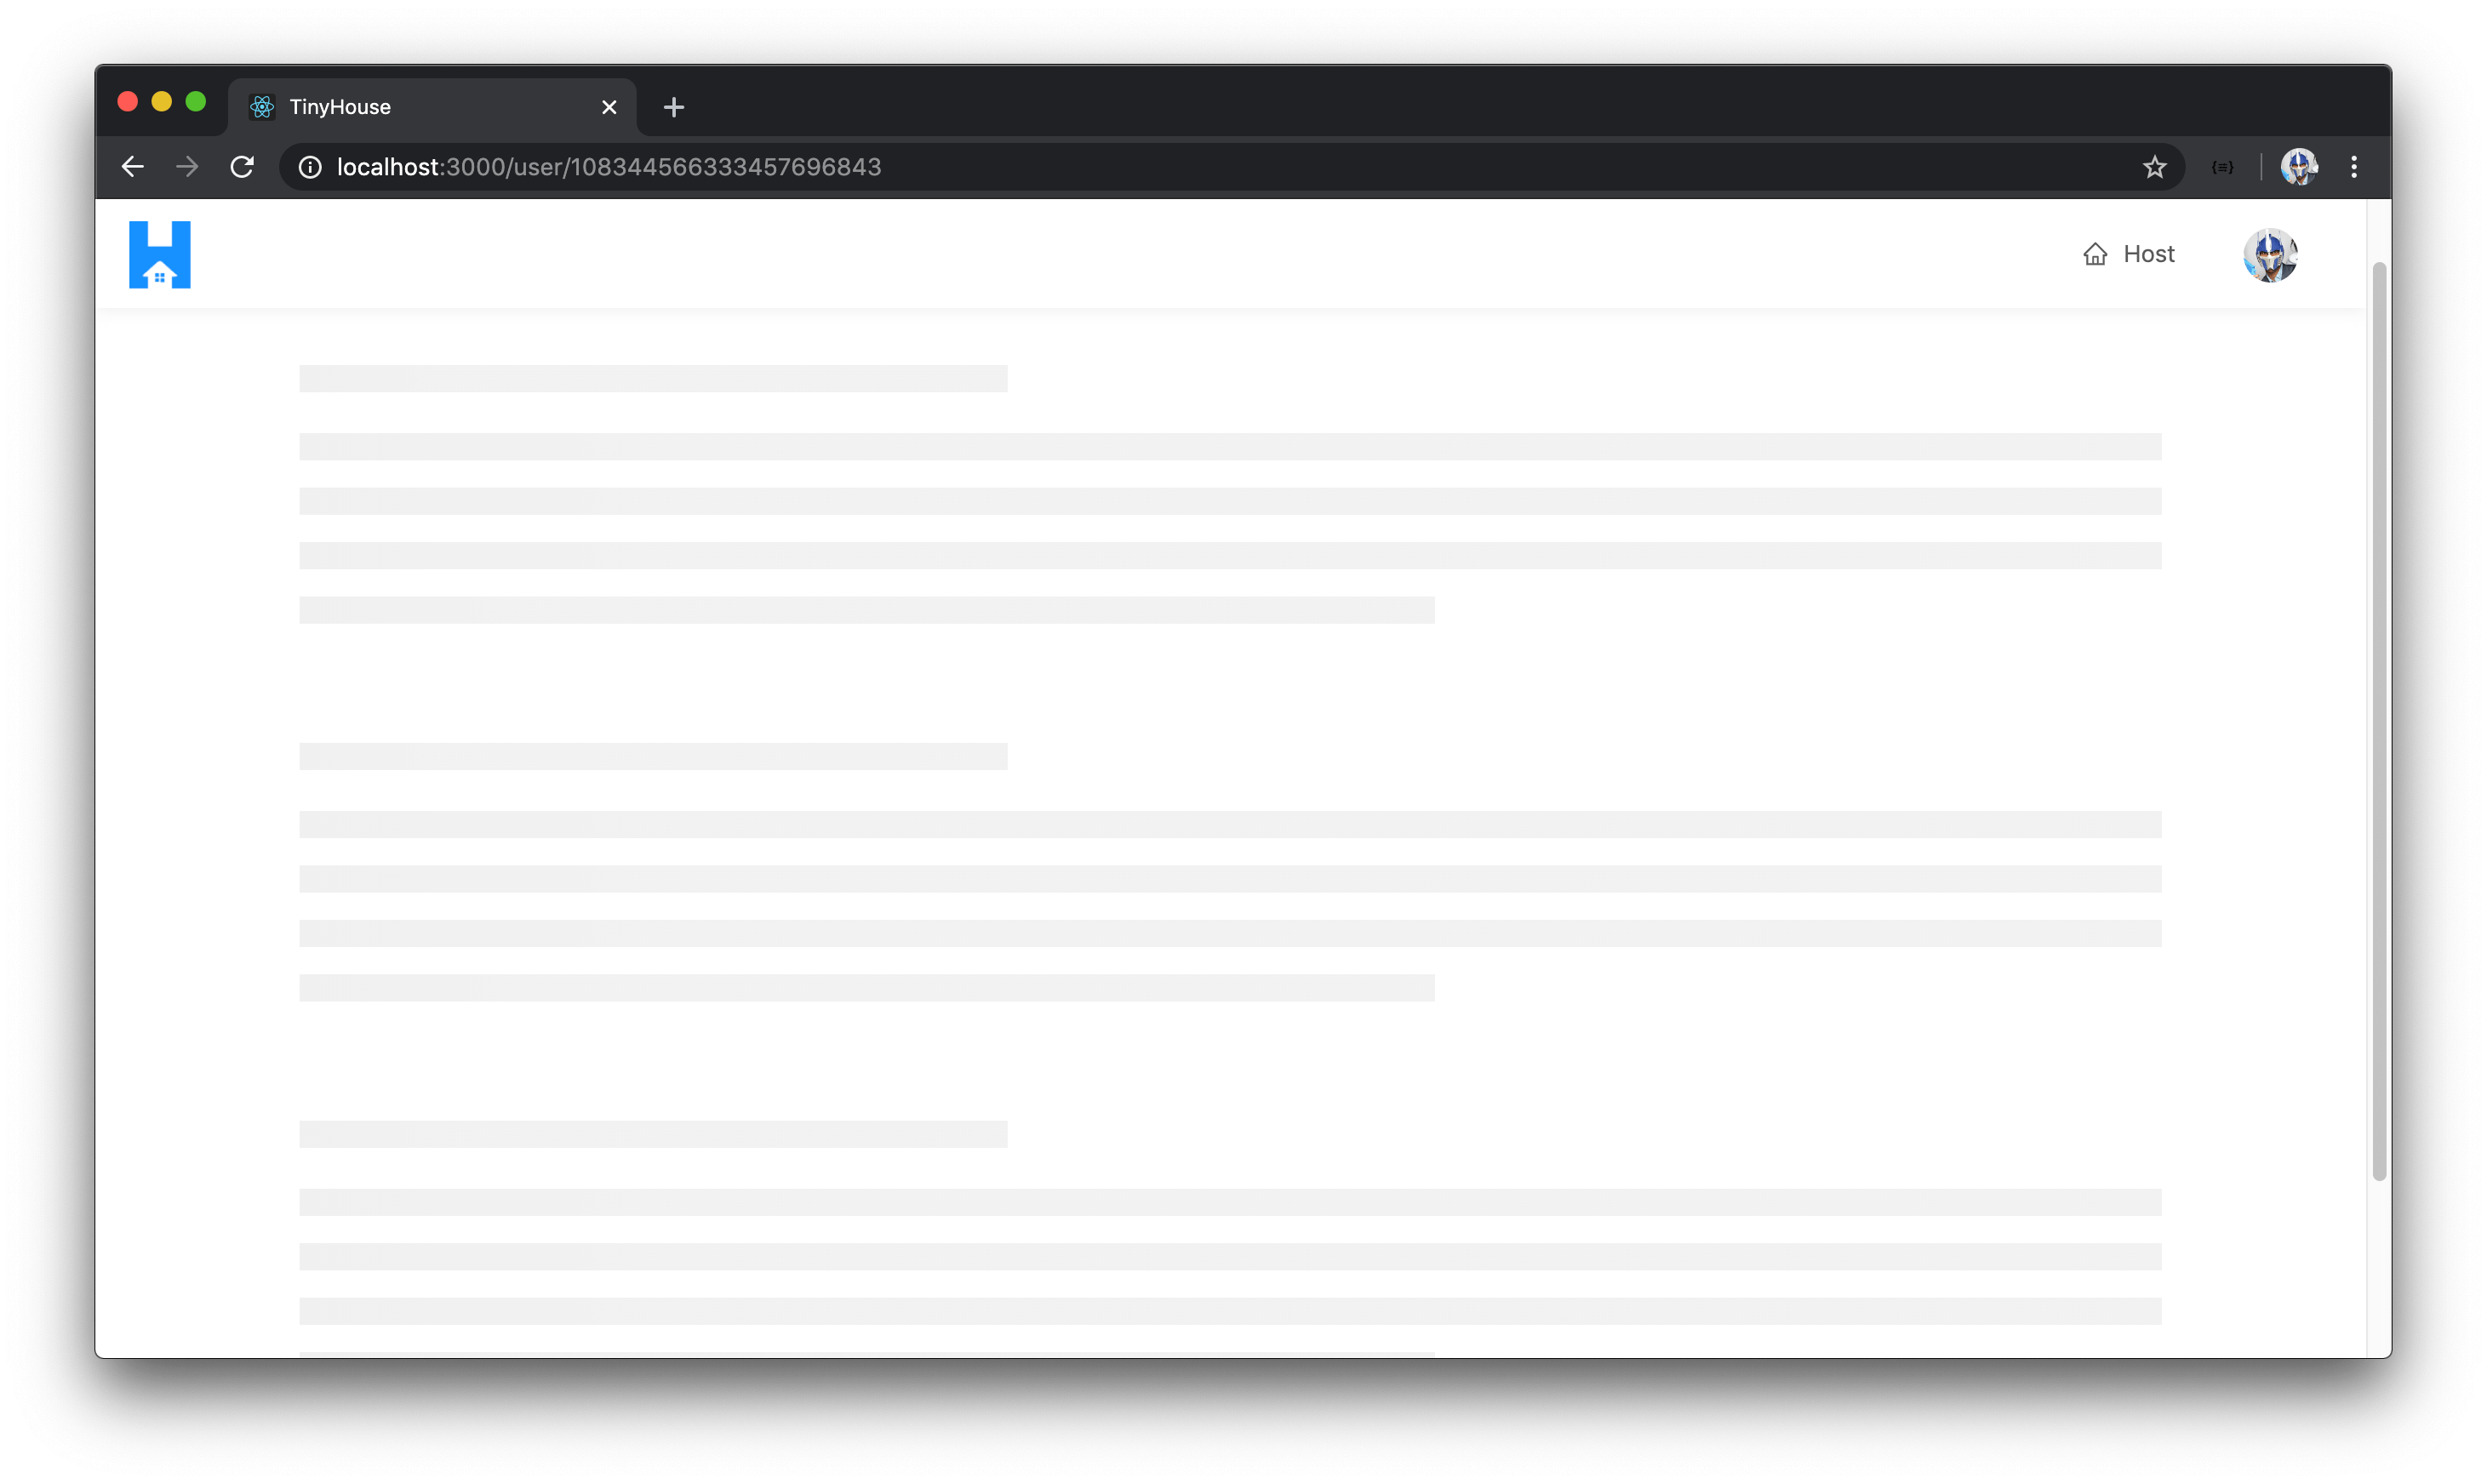
Note: The
<PageSkeleton />UI is shown after the loading status for when thelogInrequest is made to log a user in with their cookie.
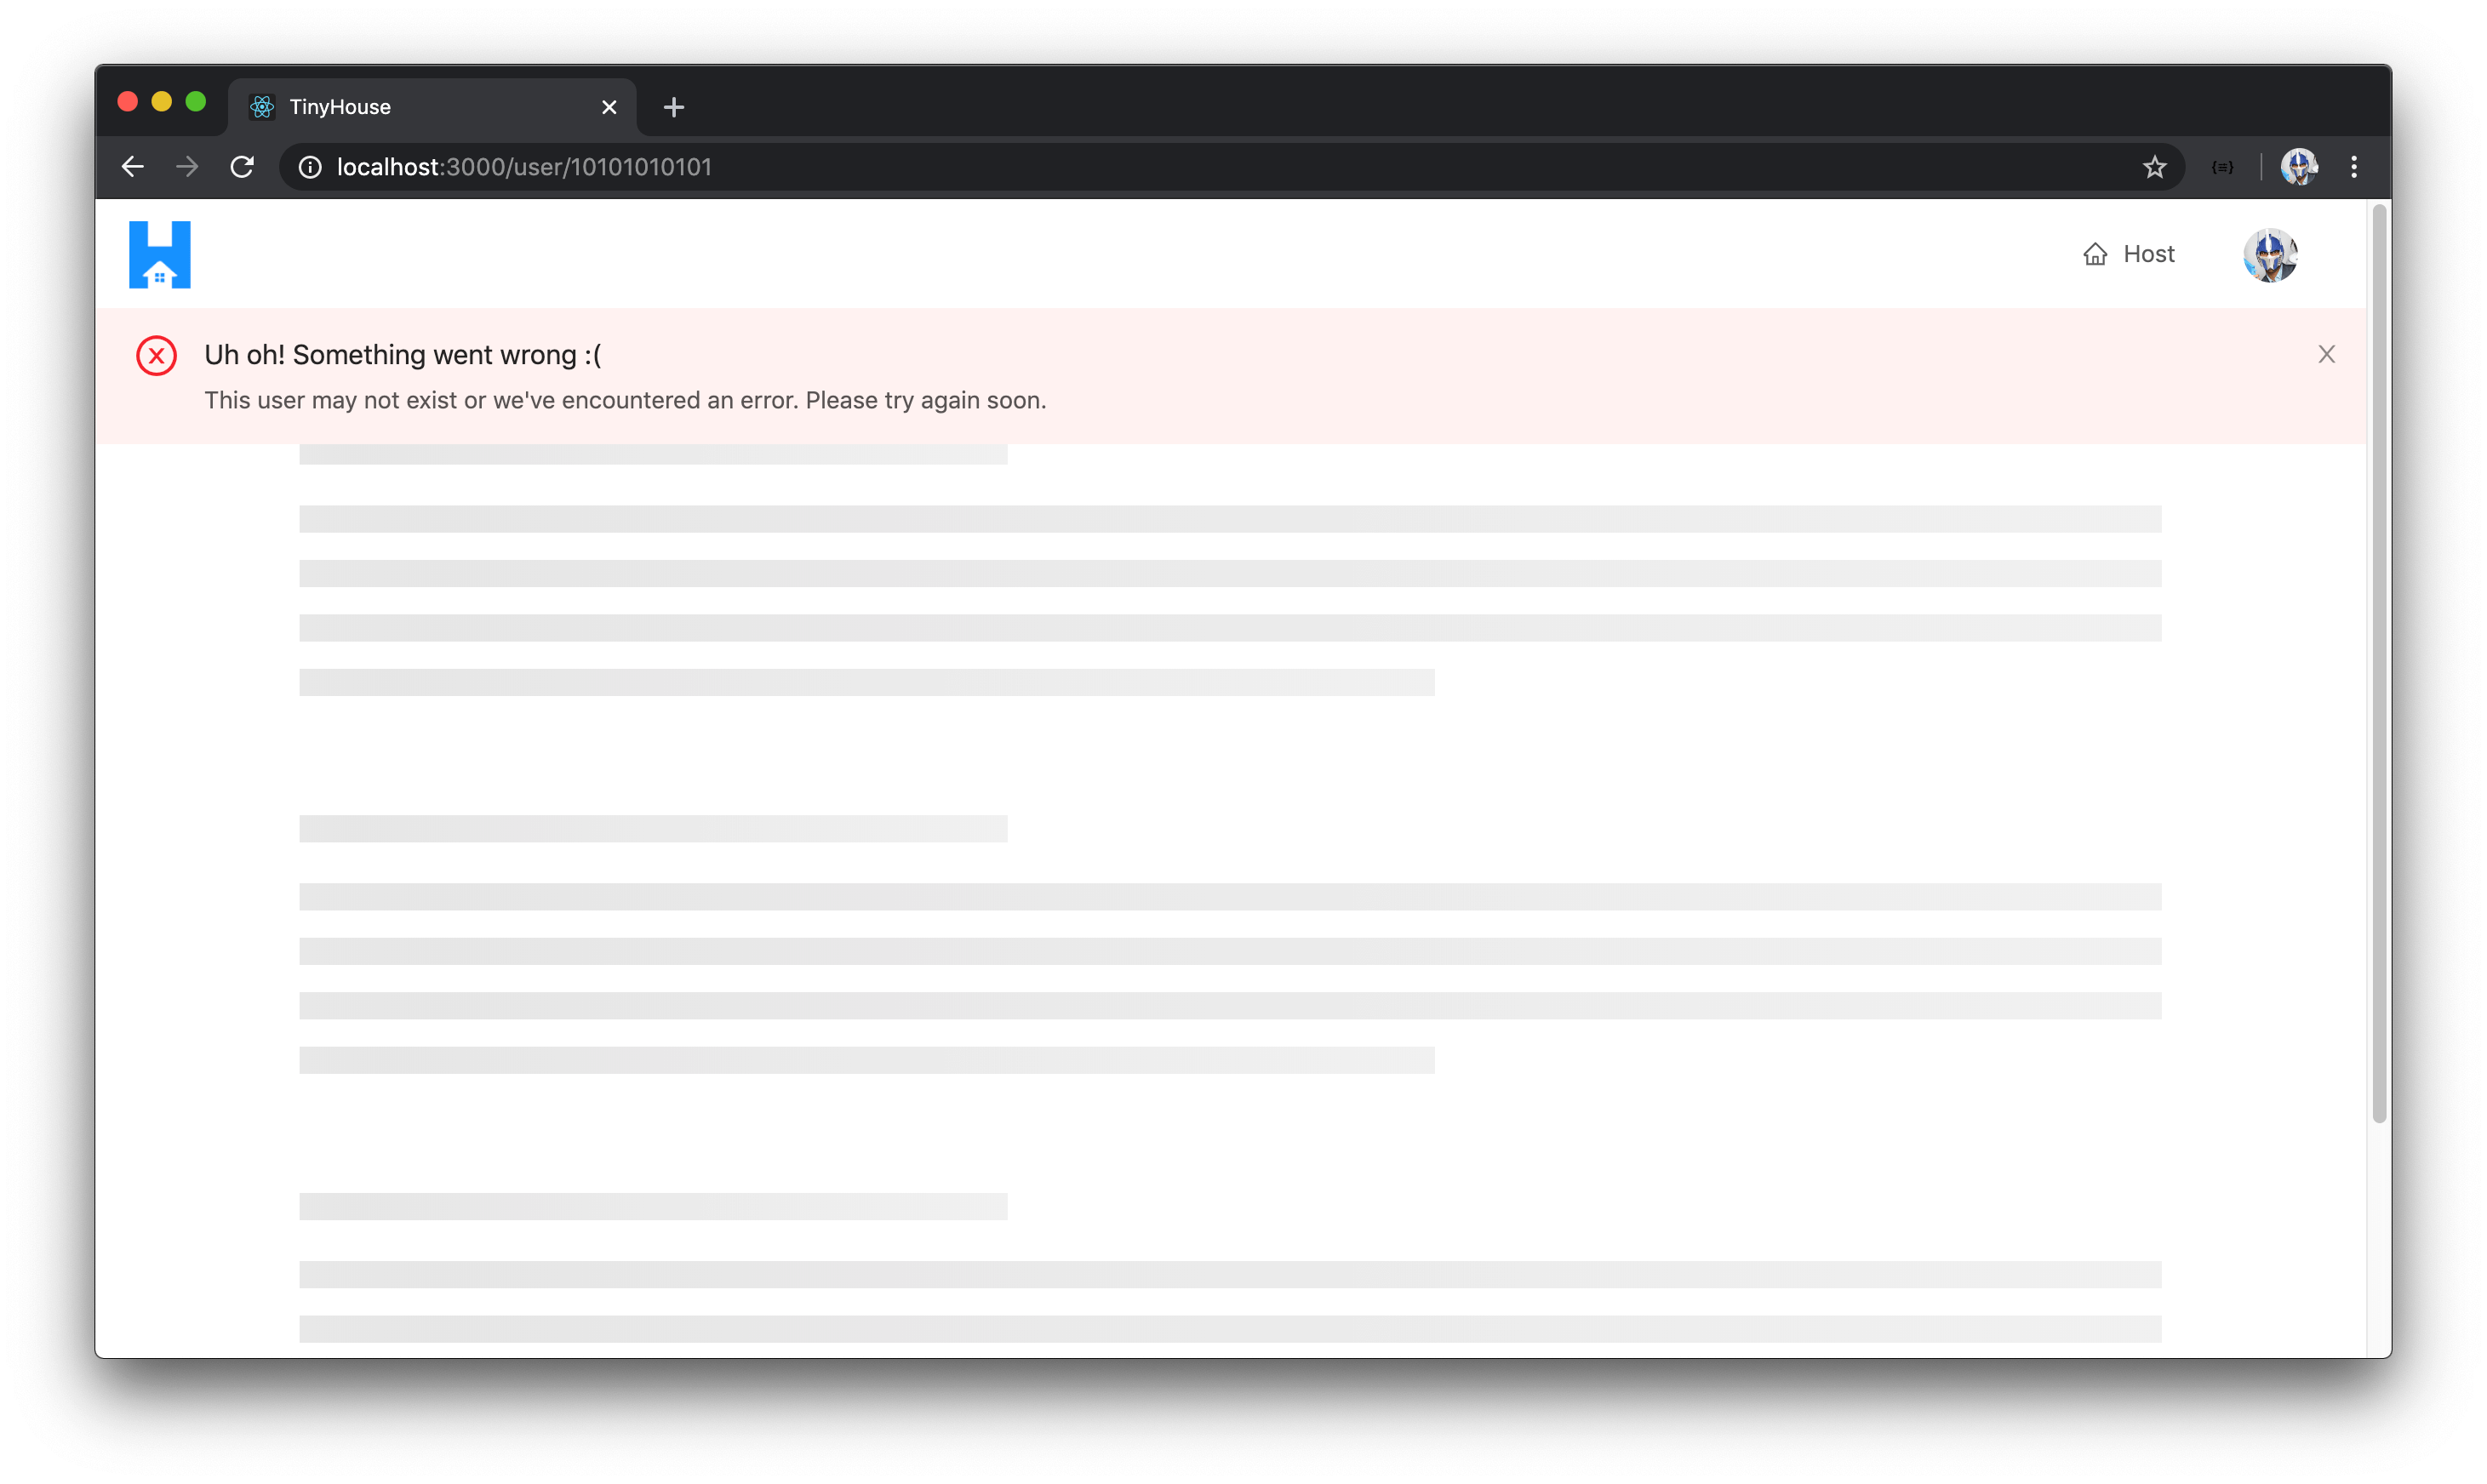
If we attempted to visit a /user/:id route with a user id that does not exist, our user query will be made but an error will occur. The error banner we’ve prepared will be presented which will tell the viewer that this user may not exist or an error has occurred.
Great! We’ll stop here for now. In the next lesson, we’ll set up the rest of the user page by having the listings section and bookings section of a user be shown.