MODULE 7 SUMMARY
In this module, we had the client be able to request and present information for a certain listing in the /listing/:id route of our application.
SERVER PROJECT
SRC/GRAPHQL/TYPEDEFS.TS
We created a single root-level listing field that can be queried from the client to receive the information for a certain listing. The listing query field queries for a listing in the "listings" collection of our database based on the id argument provided.
server/src/graphql/typeDefs.ts
  type Query {
    authUrl: String!
    user(id: ID!): User!
    listing(id: ID!): Listing!
  }
The Listing object returned from the listing query field is to have certain information about a listing we want the client to access.
server/src/graphql/typeDefs.ts
  type Listing {
    id: ID!
    title: String!
    description: String!
    image: String!
    host: User!
    type: ListingType!
    address: String!
    city: String!
    bookings(limit: Int!, page: Int!): Bookings
    bookingsIndex: String!
    price: Int!
    numOfGuests: Int!
  }
SRC/GRAPHQL/RESOLVERS/LISTING/INDEX.TS
In the listingResolvers map in the src/graphql/resolvers/Listing/index.ts file, we created the root-level query listing() resolver function to find a certain listing from the "listings" collection based on the id argument provided. If the viewer making the request is the user who owns the listing (i.e. is the host of the listing), we add an authorized property to the listing object to constitute that the viewer is authorized to see certain information about the listing.
server/src/graphql/resolvers/Listing/index.ts
export const listingResolvers: IResolvers = {  Query: {
    listing: async (
      _root: undefined,
      { id }: ListingArgs,
      { db, req }: { db: Database; req: Request }
    ): Promise<Listing> => {
      try {
        const listing = await db.listings.findOne({ _id: new ObjectId(id) });
        if (!listing) {
          throw new Error("listing can't be found");
        }

        const viewer = await authorize(db, req);
        if (viewer && viewer._id === listing.host) {
          listing.authorized = true;
        }

        return listing;
      } catch (error) {
        throw new Error(`Failed to query listing: ${error}`);
      }
    }
  },};
We’ve added a few other explicit resolver functions for the Listing GraphQL object.
- The
id()resolver returns the string representation of the_idvalue of a listing document. - The
host()resolver attempts to returns a user object for thelisting.hostid value.listing.idrepresents theidof the user who owns the listing. - The
bookingsIndex()resolver returns a string representation of thelisting.bookingsIndexmap object. - The
bookings()resolver returns the list of bookings that have been made to the listing.
server/src/graphql/resolvers/Listing/index.ts
  Listing: {
    id: (listing: Listing): string => {
      return listing._id.toString();
    },
    host: async (
      listing: Listing,
      _args: {},
      { db }: { db: Database }
    ): Promise<User> => {
      const host = await db.users.findOne({ _id: listing.host });
      if (!host) {
        throw new Error("host can't be found");
      }
      return host;
    },
    bookingsIndex: (listing: Listing): string => {
      return JSON.stringify(listing.bookingsIndex);
    },
    bookings: async (
      listing: Listing,
      { limit, page }: ListingBookingsArgs,
      { db }: { db: Database }
    ): Promise<ListingBookingsData | null> => {
      try {
        if (!listing.authorized) {
          return null;
        }

        const data: ListingBookingsData = {
          total: 0,
          result: []
        };

        let cursor = await db.bookings.find({
          _id: { $in: listing.bookings }
        });

        cursor = cursor.skip(page > 0 ? (page - 1) * limit : 0);
        cursor = cursor.limit(limit);

        data.total = await cursor.count();
        data.result = await cursor.toArray();

        return data;
      } catch (error) {
        throw new Error(`Failed to query listing bookings: ${error}`);
      }
    }
  }
};
CLIENT PROJECT
SRC/LIB/GRAPHQL/QUERIES/LISTING/INDEX.TS
In the client, we constructed the Listing GraphQL document in the src/lib/graphql/queries/Listing/index.ts file.
client/src/lib/graphql/queries/Listing/index.ts
import { gql } from "apollo-boost";

export const LISTING = gql`
  query Listing($id: ID!, $bookingsPage: Int!, $limit: Int!) {
    listing(id: $id) {
      id
      title
      description
      image
      host {
        id
        name
        avatar
        hasWallet
      }
      type
      address
      city
      bookings(limit: $limit, page: $bookingsPage) {
        total
        result {
          id
          tenant {
            id
            name
            avatar
          }
          checkIn
          checkOut
        }
      }
      bookingsIndex
      price
      numOfGuests
    }
  }
`;
SRC/SECTIONS/LISTING/INDEX.TSX
In the <Listing /> component rendered in the /listing/:id route, we construct the entire listing page that involves but is not limited to:
- Making the
listingquery when the component first mounts. - Presenting the listing details in the
<ListingDetails />child component. - Presenting the list of bookings that have been made for the listing in the
<ListingBookings />child component. - Presenting the section where a user will be able to book the listing in the
<ListingCreateBooking />child component.
Appropriate loading and error state UI is also presented when the listing query is in the loading or error state. When data is available from the query, the relevant listing information is shown to the user.
client/src/sections/Listing/index.tsx
export const Listing = ({ match }: RouteComponentProps<MatchParams>) => {
  const [bookingsPage, setBookingsPage] = useState(1);
  const [checkInDate, setCheckInDate] = useState<Moment | null>(null);
  const [checkOutDate, setCheckOutDate] = useState<Moment | null>(null);

  const { loading, data, error } = useQuery<ListingData, ListingVariables>(LISTING, {
    variables: {
      id: match.params.id,
      bookingsPage,
      limit: PAGE_LIMIT
    }
  });

  if (loading) {
    return (
      <Content className="listings">
        <PageSkeleton />
      </Content>
    );
  }

  if (error) {
    return (
      <Content className="listings">
        <ErrorBanner description="This listing may not exist or we've encountered an error. Please try again soon!" />
        <PageSkeleton />
      </Content>
    );
  }

  const listing = data ? data.listing : null;
  const listingBookings = listing ? listing.bookings : null;

  const listingDetailsElement = listing ? <ListingDetails listing={listing} /> : null;

  const listingBookingsElement = listingBookings ? (
    <ListingBookings
      listingBookings={listingBookings}
      bookingsPage={bookingsPage}
      limit={PAGE_LIMIT}
      setBookingsPage={setBookingsPage}
    />
  ) : null;

  const listingCreateBookingElement = listing ? (
    <ListingCreateBooking
      price={listing.price}
      checkInDate={checkInDate}
      checkOutDate={checkOutDate}
      setCheckInDate={setCheckInDate}
      setCheckOutDate={setCheckOutDate}
    />
  ) : null;

  return (
    <Content className="listings">
      <Row gutter={24} type="flex" justify="space-between">
        <Col xs={24} lg={14}>
          {listingDetailsElement}
          {listingBookingsElement}
        </Col>
        <Col xs={24} lg={10}>
          {listingCreateBookingElement}
        </Col>
      </Row>
    </Content>
  );
};
MOVING FORWARD
In the next module, we begin building the server and client implementation that will help allow us to retrieve and display information for a list of listings in the homepage (i.e. / route) of our application.
MODULE 8 INTRODUCTION
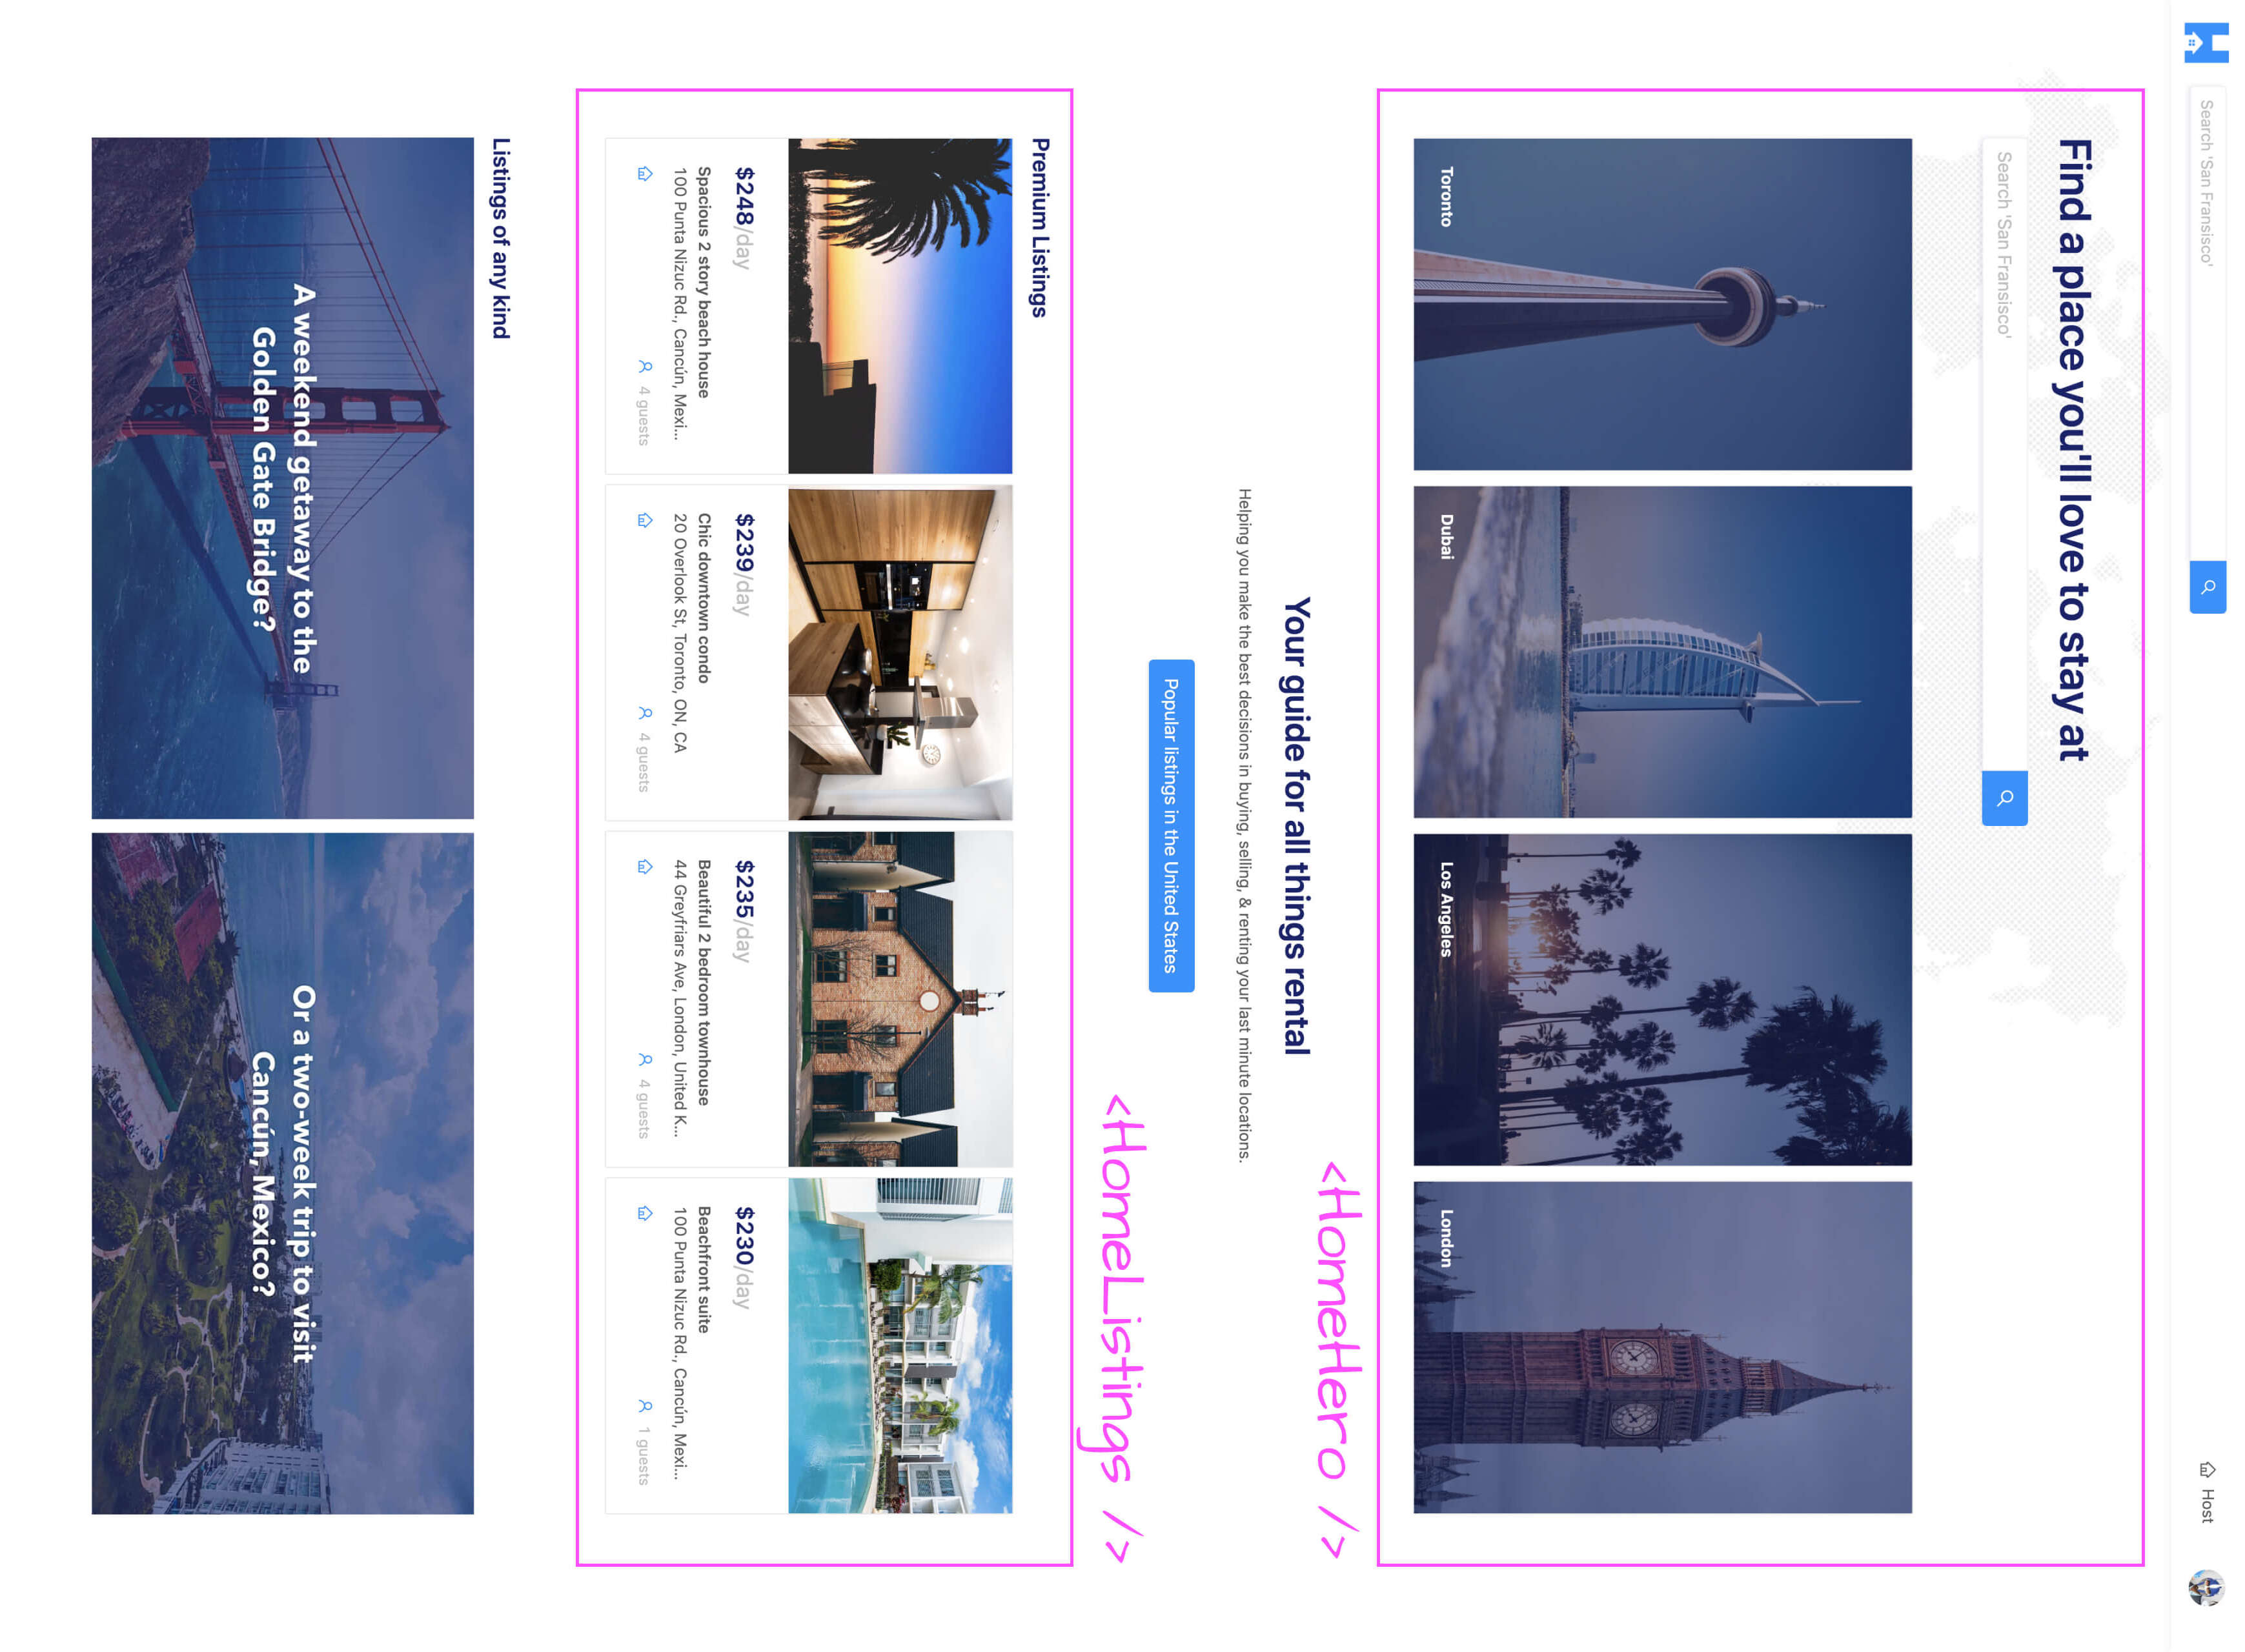
In this module, we’ll continue from what we’ve done in the previous module but now allow our client project to query for a list of listing objects from the server. For this module, we’ll do this to show the four highest priced listings (i.e. the premium listings) in the Home page of our app.
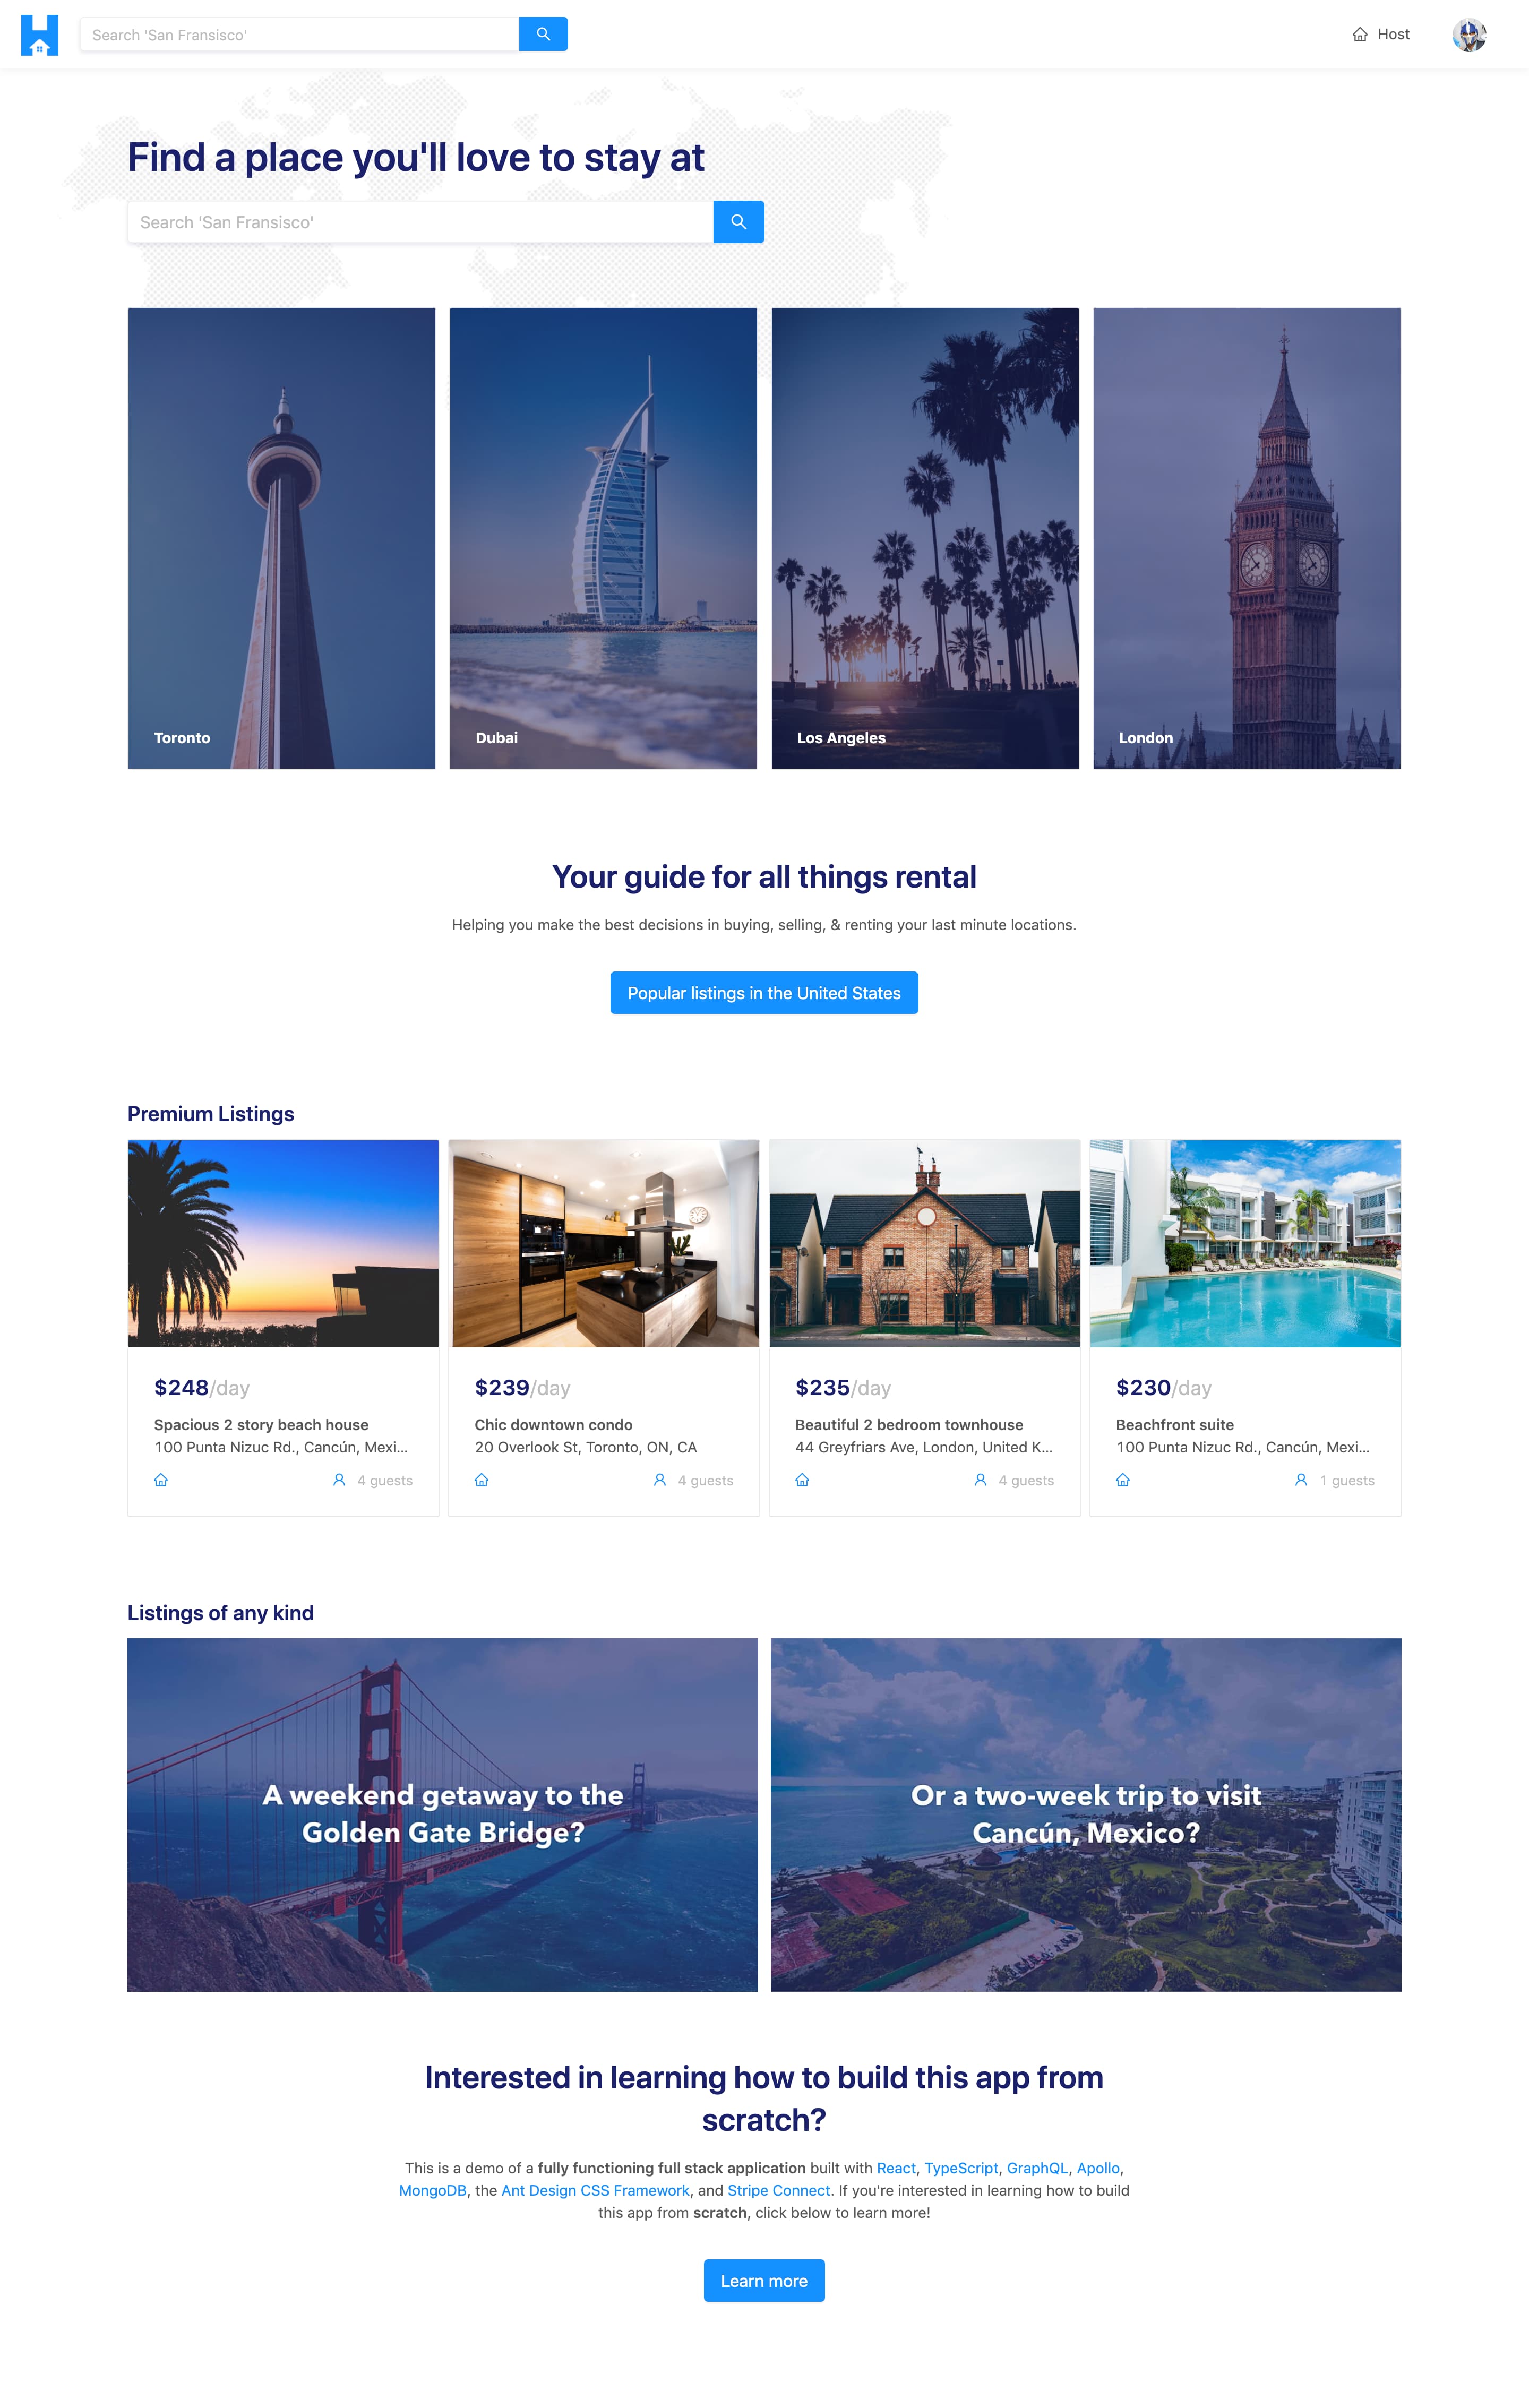
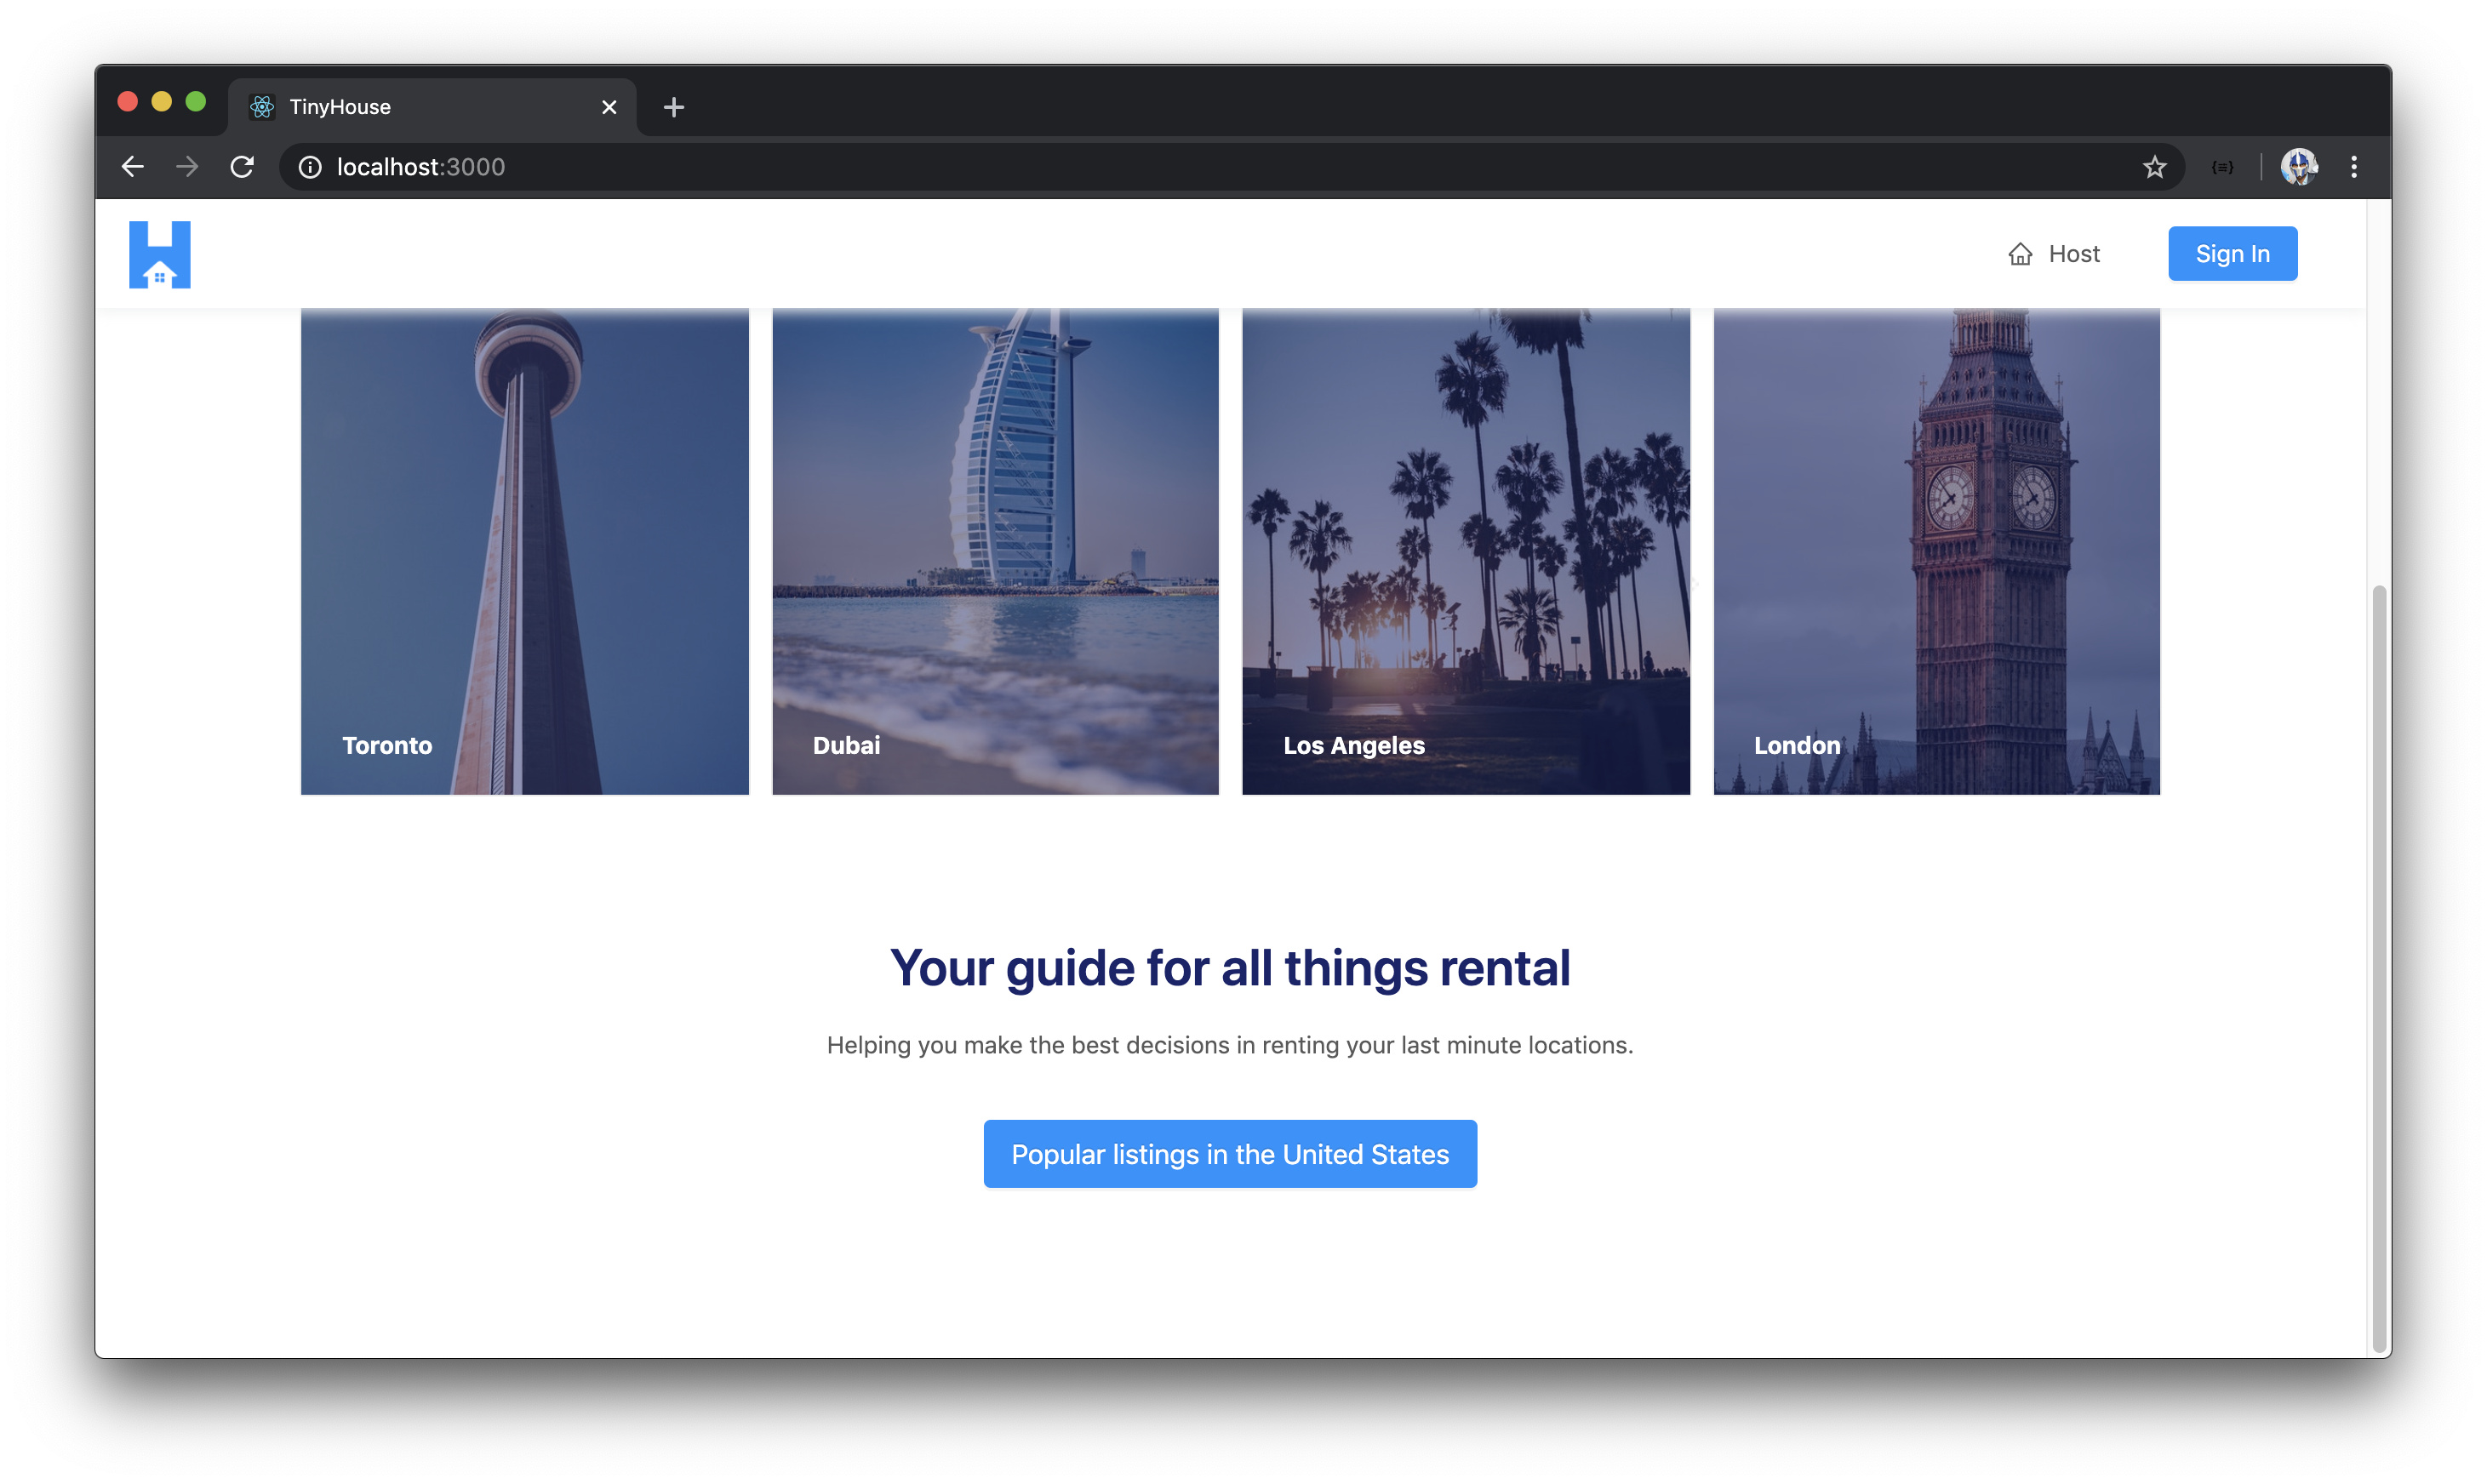
The Home page of our app is to be displayed in the / (i.e. index) route and in the complete state will look similar to the following:
In this module, we’ll:
- Update our API to allow the request of data for multiple listings at the same time.
- Build the UI for our Home page.
- Finally, see how we can apply a filter to our API request to fetch only the highest-priced listings.
LISTINGS GRAPHQL FIELDS
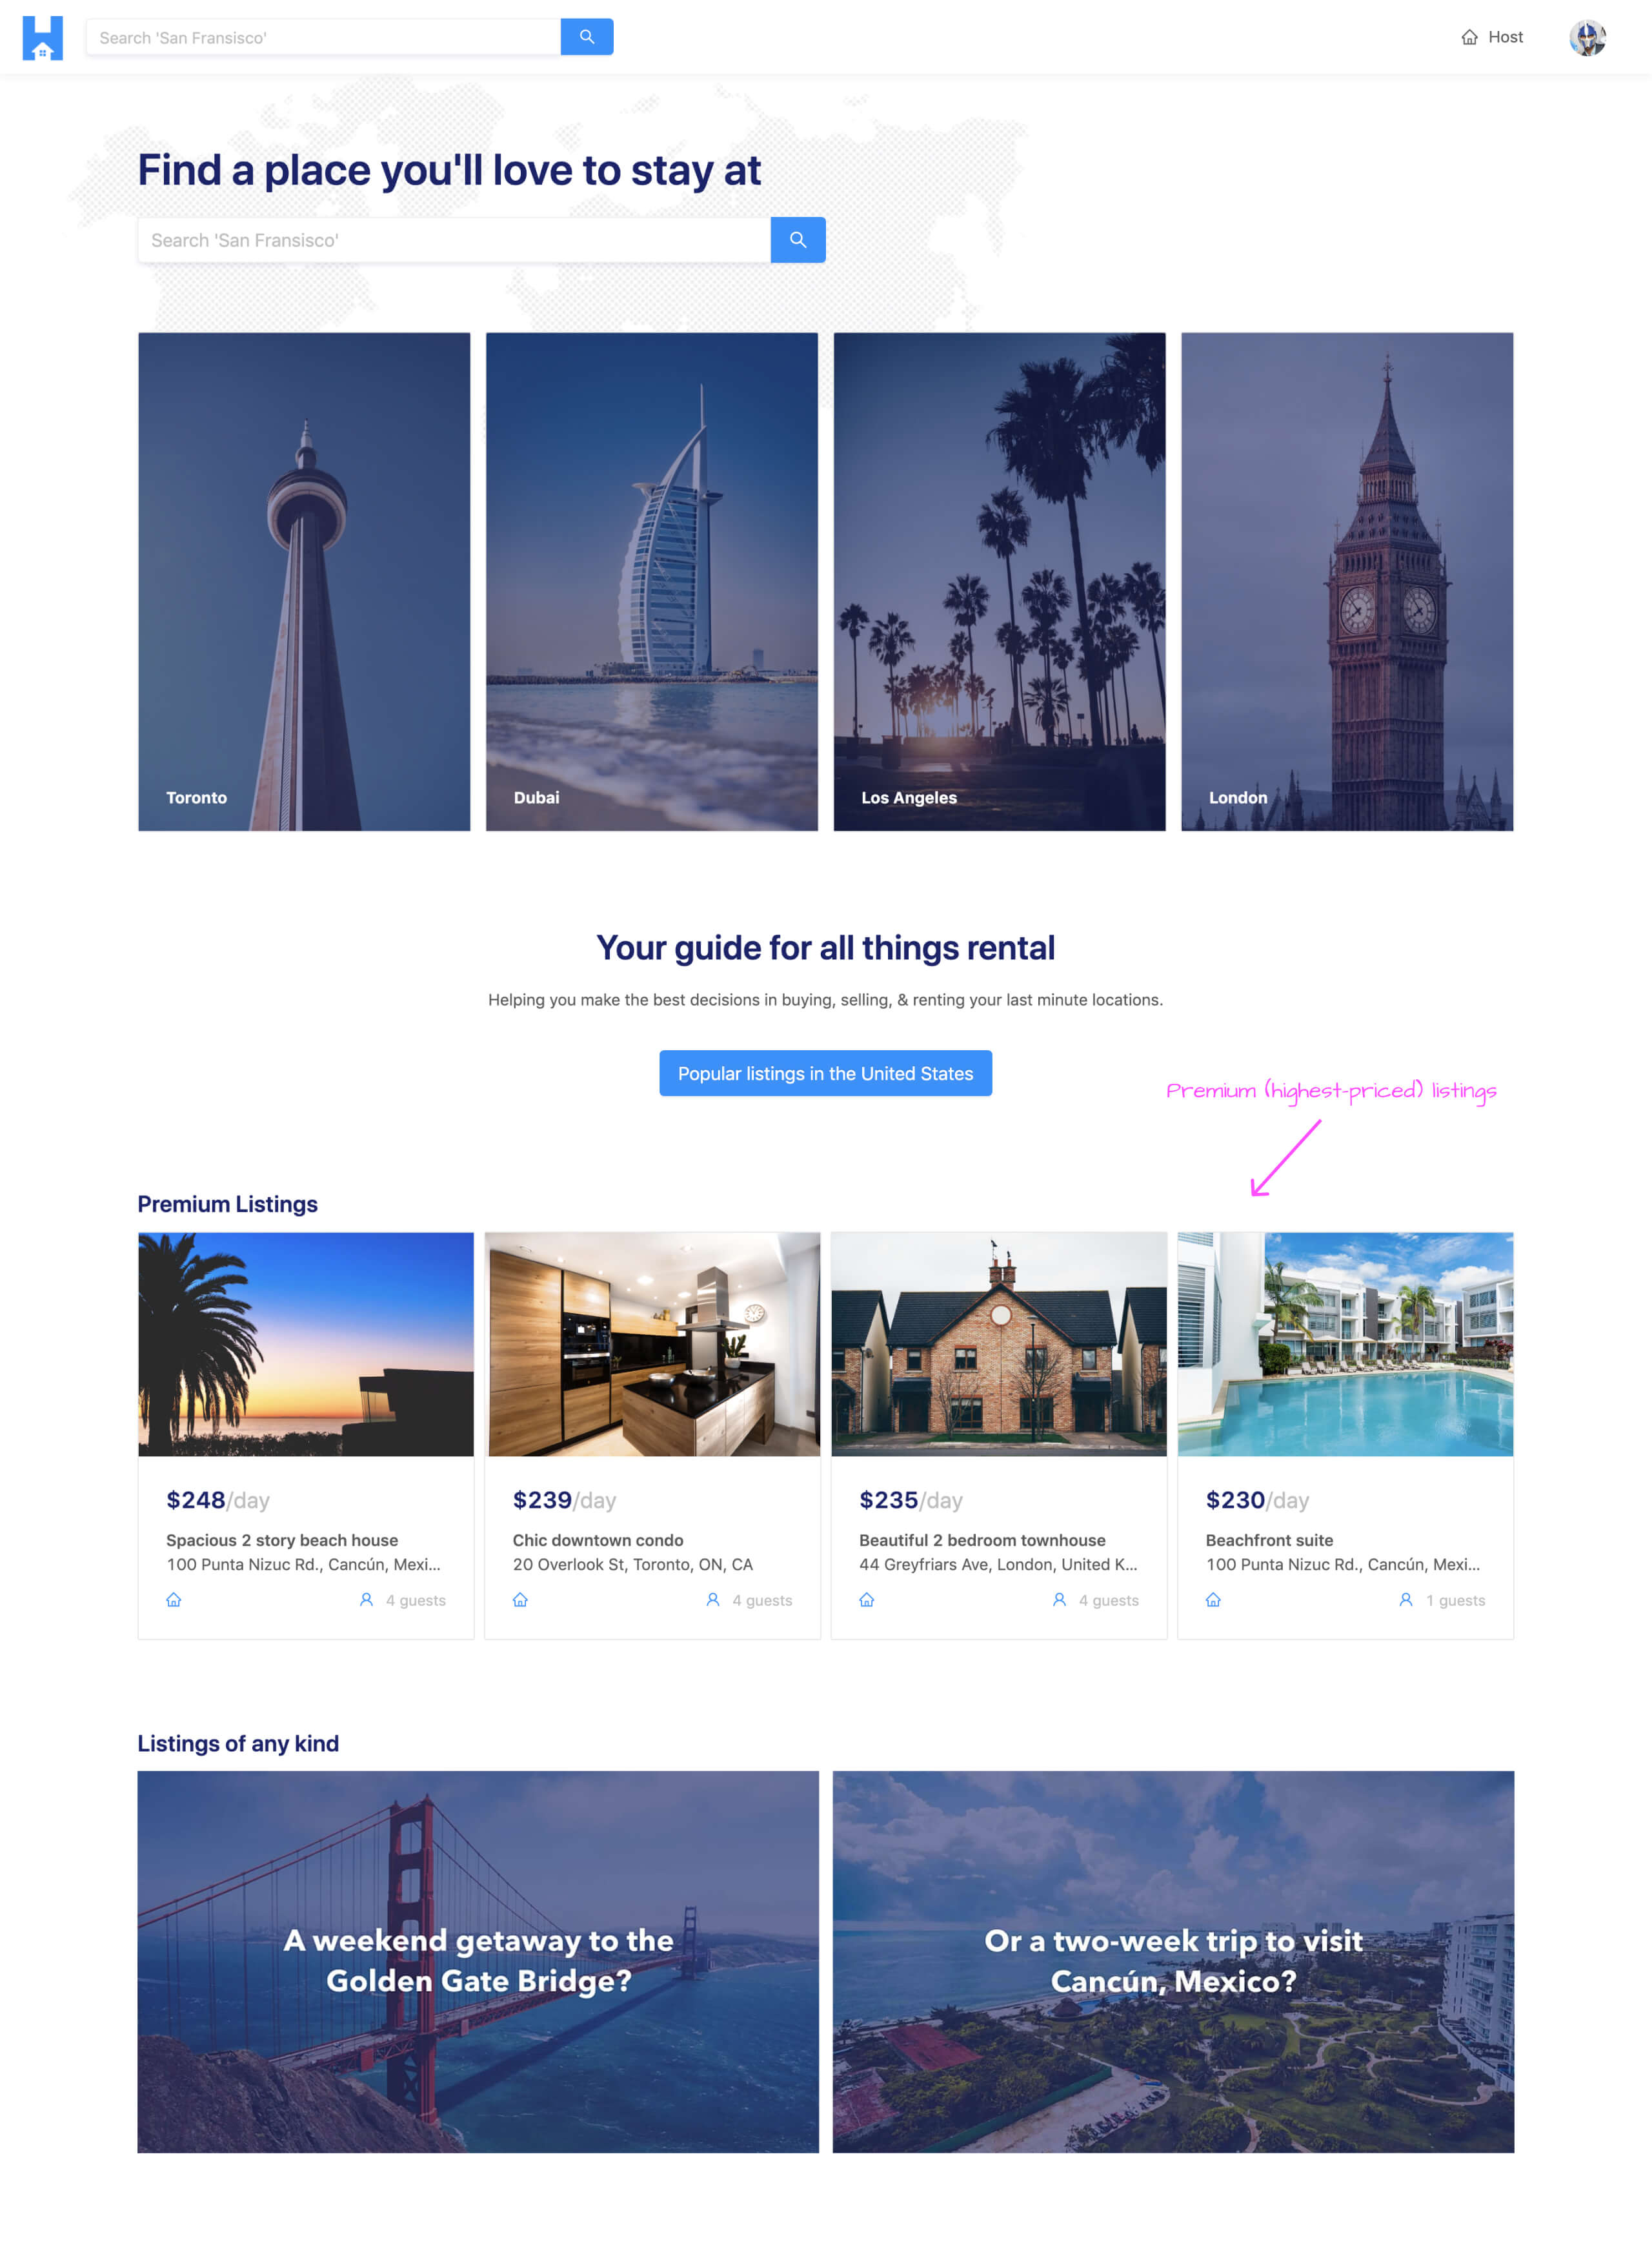
We’re going to want to build a homepage for our app that provides information about what our app does. One section we’ll hope to display on the homepage is a small list of the most premium listings available.
Premium is a term we’re using here to refer to the most expensive listings in our app. When we build the page that is to display listings for a certain location (i.e. the /listings/:location? page), we’re going to provide an option to user to sort the listings shown from highest price to lowest price and vice versa. On the homepage, however, we simply want to show the four most expensive listings in our app from any location at any given moment in time.
For both the /listings/:location? page we’ll create later and the homepage, we’ll need to have the client be able to query for multiple listings. We have a field in our API currently available that allows us to query for a single listing but now we’ll need to have a field for querying a list of listings .
We’ll need one root-level listings field from our API to help achieve this. This listings field will accept a series of arguments:
- Since its to be a paginated field, we’ll make it accept both a
pageandlimitarguments to help facilitate offset-based pagination. - It will also accept a
filterargument that we’ll use to tell the query to return listings in a certain format (e.g. we want listings from the highest price to the lowest price). - At a certain point in this course, we’ll add an optional
locationargument that will allow us to query for listings from a certain location.
We’re going to handle some of this server implementation in the next lesson but for this lesson, we’ll simply create the resolver for this listings field and we’ll have it return some dummy data.
In the GraphQL schema of our server project, in the root Query object definition, we’ll state that a listings field is to exist and is to return a string when resolved.
server/src/graphql/typeDefs.ts
  type Query {
    authUrl: String!
    user(id: ID!): User!
    listing(id: ID!): Listing!
    listings: String!
  }
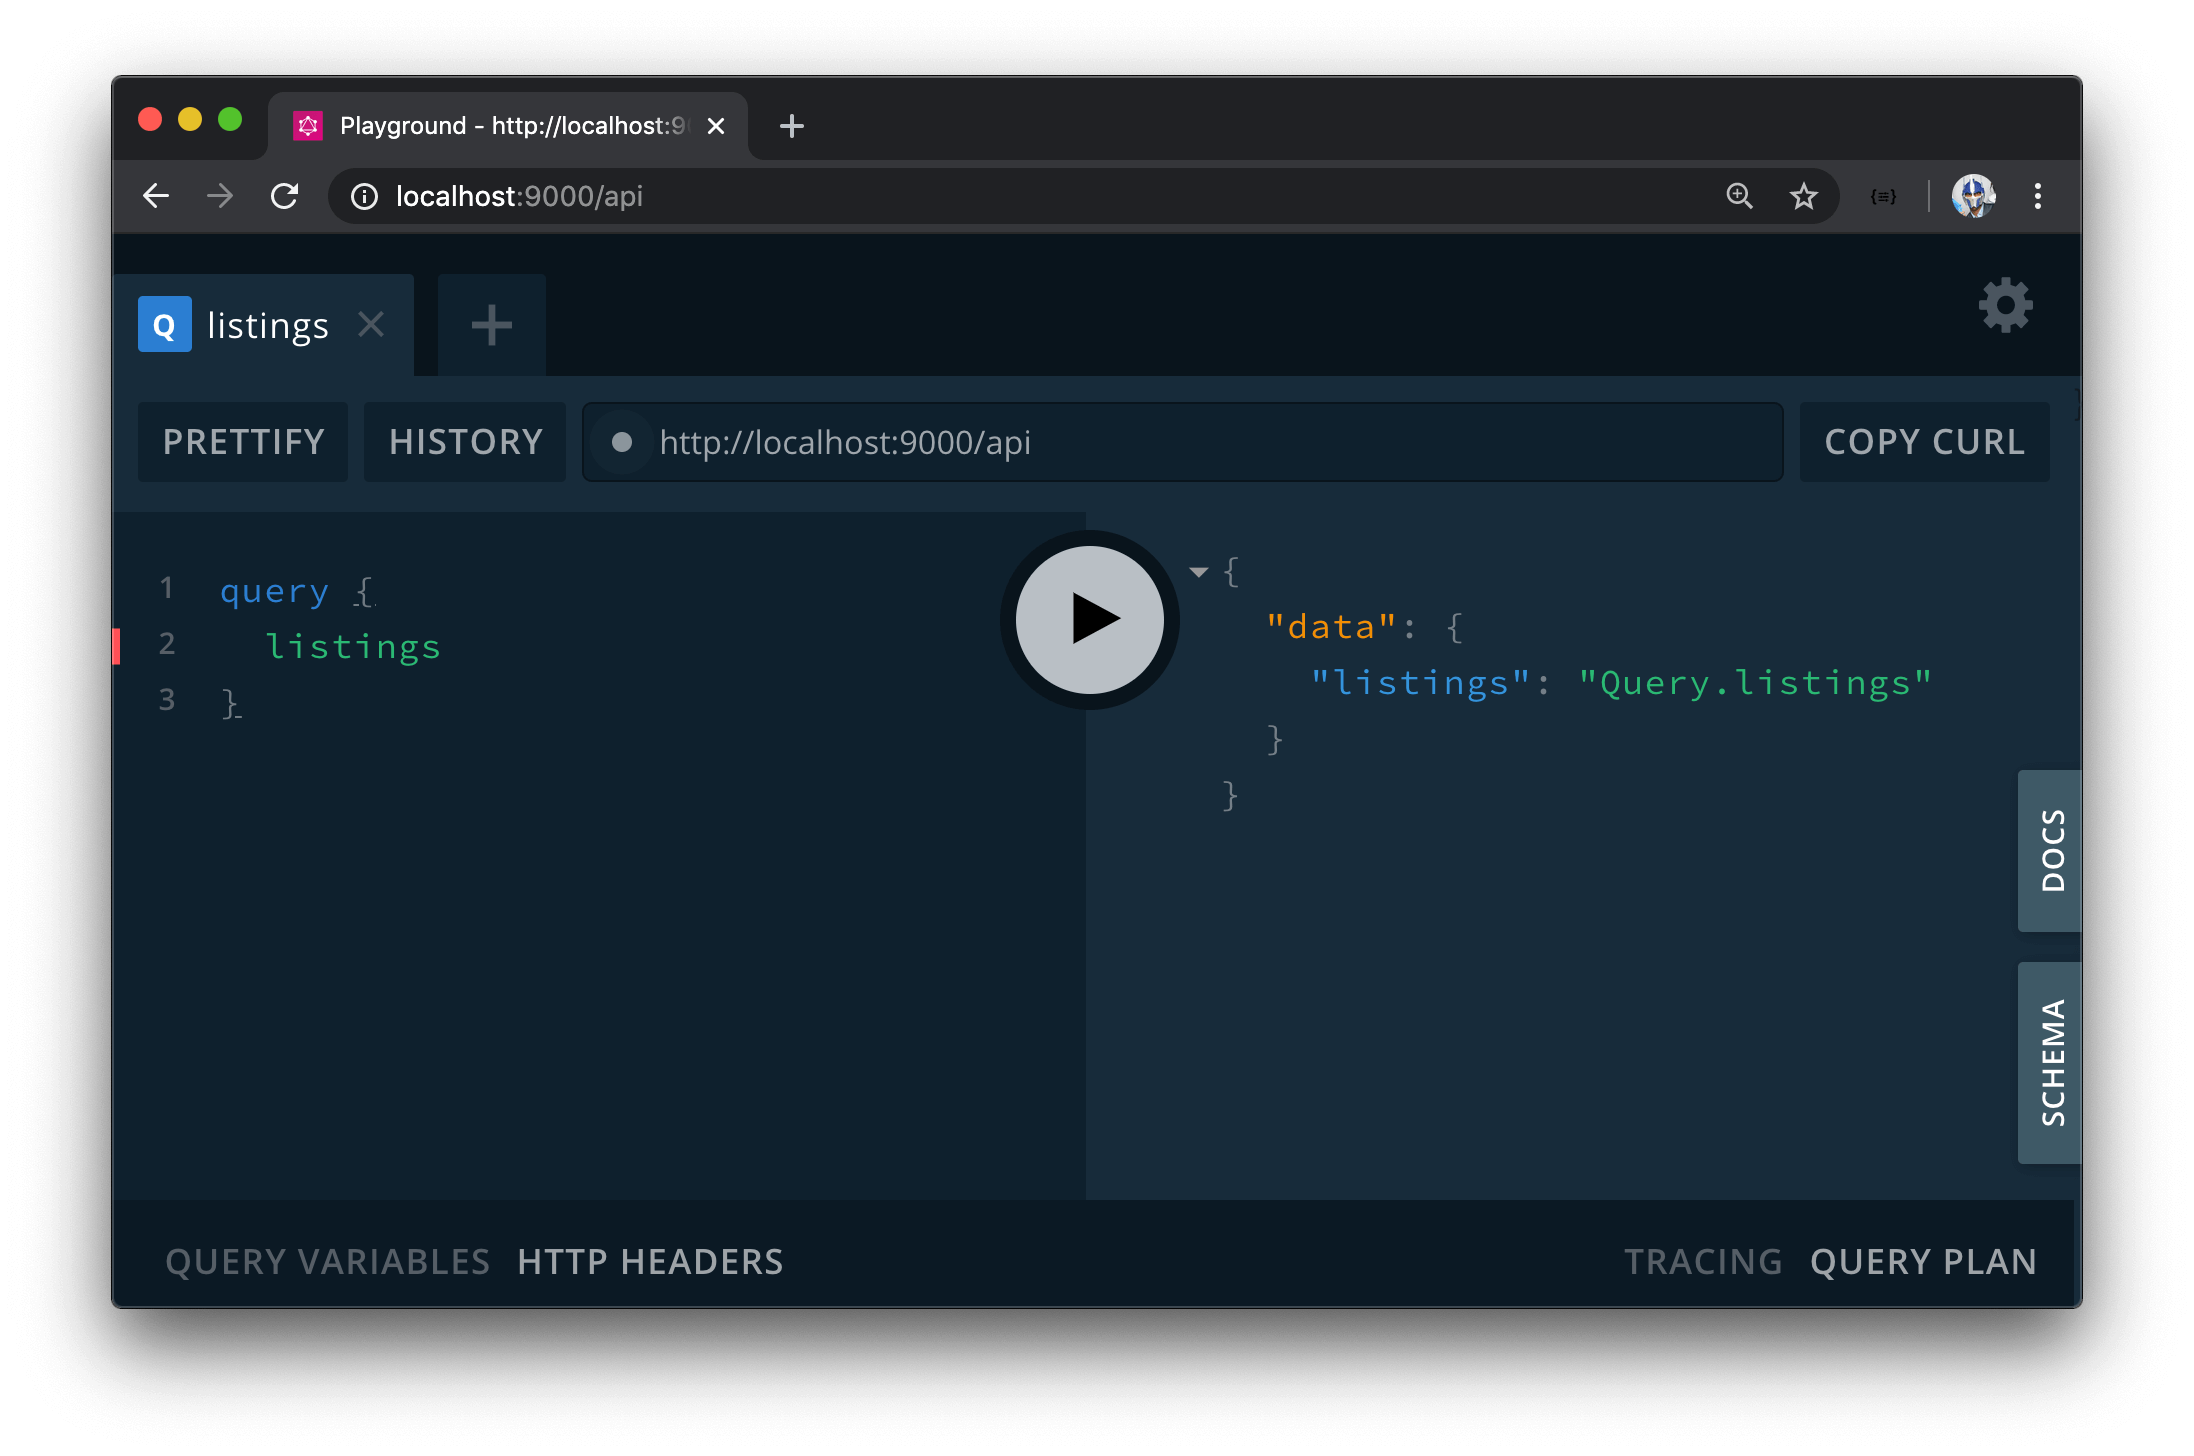
Next, we’ll create the resolver for this listings field. Since this listings field is within the domain of a listing - we’ll create this resolver in the listingResolvers map and we’ll have it return a string that says "Query.listings" .
// ...

export const listingResolvers: IResolvers = {
  Query: {
    // ...,
    listings: () => {
      return "Query.listings";
    }
  },
  Listing: {
    // ...
  }
};
With our server project running, if we were head to GraphQL Playground and query for the listings field; we’ll see the expected string "Query.listings" be returned.
BUILDING THE LISTINGS RESOLVERS
Now that we have the listings GraphQL query field established, let’s update the resolver function for this field such that it will retrieve a list of listings from the "listings" collection from our database when queried.
LISTINGS TYPEDEFS
We’ll first update the GraphQL type definitions of the listings field before implementing the resolver function.
The listings field will have three input arguments:
- It will have a
filterargument that will be of an Enum type we’ll create shortly calledListingsFilter. When thisfilterargument is passed in, it’ll allow the field to return a list of listings that are sorted based on the filter applied. - It will have a
limitargument which is to be an integer to determine the number of listings to return for a certain query. - It’ll have a
pageargument of type integer which is to determine the page (or in other words the sub-list) of listings to be returned.
When the listings field is to be resolved, it’ll return a Listings object type we’ve set up before which contains the total number of items returned and the list of items returned.
server/src/graphql/typeDefs.ts
  type Query {
    authUrl: String!
    user(id: ID!): User!
    listing(id: ID!): Listing!
    listings(filter: ListingsFilter!, limit: Int!, page: Int!): Listings!
  }
Next, we’ll set up the GraphQL type definition for the ListingsFilter Enum. There are to kinds of filters we’ll allow the client to specify for how it wants the collection of listings to be returned in this field. We’ll have a filter that will allow the client to query listings from the lowest price to the highest price and we can call the Enum value for this "PRICE_LOW_TO_HIGH" . Similarly, the client will also be able to pass in a filter value that will filter listings from the highest price to the lowest. We’ll call this filter Enum value "PRICE_HIGH_TO_LOW" .
server/src/graphql/typeDefs.ts
  enum ListingsFilter {
    PRICE_LOW_TO_HIGH
    PRICE_HIGH_TO_LOW
  }
LISTINGS() RESOLVER
With the GraphQL type definition for the root-level listings field prepared, we’ll now look to update the accompanying resolver function. The first thing we’ll do is define the TypeScript type definitions of the expected arguments and return value of the listings() function resolver. We’ll define these TypeScript types in the src/graphql/resolvers/Listing/types.ts file.
We’ll first define the shape of arguments that can be passed into the listings field and we’ll establish this in an interface we’ll call ListingsArgs . There are three current expected arguments - filter , limit , and page . limit and page are to be number 's while filter is to be a defined set of values or in other words an Enum. So we’ll declare a string-based TypeScript Enum, labeled ListingsFilter , to reflect the different listing filters that can be applied - "PRICE_LOW_TO_HIGH" and "PRICE_HIGH_TO_LOW" .
export enum ListingsFilter {
  PRICE_LOW_TO_HIGH = "PRICE_LOW_TO_HIGH",
  PRICE_HIGH_TO_LOW = "PRICE_HIGH_TO_LOW"
}

export interface ListingsArgs {
  filter: ListingsFilter;
  limit: number;
  page: number;
}
We’ll then create the shape of the data that is expected to be returned from the listings() resolver function. We’ll call this interface ListingsData and it is to have a total field of type number and a result field which is to be a list of listings. We have the definition of a single Listing document defined in our src/lib/types.ts types file so we’ll import it and use it within the ListingsData interface.
With these changes, the src/graphql/resolvers/Listing/types.ts file will now look like the following:
server/src/graphql/resolvers/Listing/types.ts
import { Booking, Listing } from "../../../lib/types";

export enum ListingsFilter {
  PRICE_LOW_TO_HIGH = "PRICE_LOW_TO_HIGH",
  PRICE_HIGH_TO_LOW = "PRICE_HIGH_TO_LOW"
}

export interface ListingArgs {
  id: string;
}

export interface ListingBookingsArgs {
  limit: number;
  page: number;
}

export interface ListingBookingsData {
  total: number;
  result: Booking[];
}

export interface ListingsArgs {
  filter: ListingsFilter;
  limit: number;
  page: number;
}

export interface ListingsData {
  total: number;
  result: Listing[];
}
We’ll now head over to the listingResolvers map file ( src/graphql/resolvers/Listing/index.ts ) and look to create the resolver functionality for the listings field. We’ll import the ListingsArgs and ListingsData interfaces from the adjacent types file and we’ll state the arguments and expected return statement for the listings() resolver. In the listing() resolver function, the root object argument will be undefined. The resolver will expect a filter , limit , and page arguments. We’ll need access to the db object available in context and when the resolver function is completed successfully, it’ll return a Promise that when resolved will resolve to an object that conforms to the ListingsData shape.
// ...
import {
  // ..
  ListingsArgs,
  ListingsData
} from "./types";

export const listingResolvers: IResolvers = {
  Query: {
    // ...,
    listings: async (
      _root: undefined,
      { filter, limit, page }: ListingsArgs,
      { db }: { db: Database }
    ): Promise<ListingsData> => {
      return "Query.listings";
    }
  },
  Listing: {
    // ...
  }
};
The listings field in the root Query object is going to be very similar to the listings field from the User GraphQL object since the resolver function will simply return a paginated list of listings from the "listings" collection in our database. With that said, we’ll head over to the userResolvers map and copy the functionality of the listings() resolver in the User object and paste it for the listings() resolver in the Query object within the listingResolvers map.
// ...
import {
  // ..
  ListingsArgs,
  ListingsData
} from "./types";

export const listingResolvers: IResolvers = {
  Query: {
    // ...,
    listings: async (
      _root: undefined,
      { filter, limit, page }: ListingsArgs,
      { db }: { db: Database }
    ): Promise<ListingsData> => {
      try {
        const data: UserListingsData = {
          total: 0,
          result: []
        };

        let cursor = await db.listings.find({
          _id: { $in: user.listings }
        });

        cursor = cursor.skip(page > 0 ? (page - 1) * limit : 0);
        cursor = cursor.limit(limit);

        data.total = await cursor.count();
        data.result = await cursor.toArray();

        return data;
      } catch (error) {
        throw new Error(`Failed to query user listings: ${error}`);
      }
    }
  },
  Listing: {
    // ...
  }
};
Some quick changes we’ll make.
- We’ll declare the type of data that is to be returned as
ListingsData. - For the
Userobject, we used the$inoperator in the MongoDBfind()method to find all listings where the_idfield of the listing was in theuser.listingsarray. We won’t want this restriction for the root-levellistingsfield (i.e. we’ll want listings from any user). With that said, we’ll simply find all the listings from the"listings"collection for our MongoDB cursor. - Lastly, we’ll update the final error message if ever to occur as
"Failed to query listings".
export const listingResolvers: IResolvers = {
  Query: {
    // ...,
    listings: async (
      _root: undefined,
      { filter, limit, page }: ListingsArgs,
      { db }: { db: Database }
    ): Promise<ListingsData> => {
      try {
        const data: ListingsData = {
          total: 0,
          result: []
        };

        let cursor = await db.listings.find({});

        cursor = cursor.skip(page > 0 ? (page - 1) * limit : 0);
        cursor = cursor.limit(limit);

        data.total = await cursor.count();
        data.result = await cursor.toArray();

        return data;
      } catch (error) {
        throw new Error(`Failed to query listings: ${error}`);
      }
    }
  },
  Listing: {
    // ...
  }
};
At this moment, we’re using the cursor limit and skip options to query for a certain limit of listings for a certain page, which is what we want. However, we haven’t used the filter argument that is to be passed into the resolver function to filter/sort the listings found from the collection.
The filter argument value in the resolver is an Enum of one of two values - "PRICE_LOW_TO_HIGH" and "PRICE_HIGH_TO_LOW" . When the client passes a filter of "PRICE_LOW_TO_HIGH" , we want to query for listings that are sorted from the lowest price to the highest price and vice versa for the other filter ( "PRICE_HIGH_TO_LOW" ).
To facilitate these two options, we’ll create if statements to determine what we’ll do to the MongoDB cursor in each condition. One if statement for when the filter value is "PRICE_LOW_TO_HIGH" and the other for when the filter value is "PRICE_HIGH_TO_LOW" .
export const listingResolvers: IResolvers = {
  Query: {
    // ...,
    listings: async (
      _root: undefined,
      { filter, limit, page }: ListingsArgs,
      { db }: { db: Database }
    ): Promise<ListingsData> => {
      try {
        const data: ListingsData = {
          total: 0,
          result: []
        };

        let cursor = await db.listings.find({});

        if (filter && filter === ListingsFilter.PRICE_LOW_TO_HIGH) {
          // filter listings from price low to high
        }

        if (filter && filter === ListingsFilter.PRICE_HIGH_TO_LOW) {
          // filter listings from price high to low
        }

        cursor = cursor.skip(page > 0 ? (page - 1) * limit : 0);
        cursor = cursor.limit(limit);

        data.total = await cursor.count();
        data.result = await cursor.toArray();

        return data;
      } catch (error) {
        throw new Error(`Failed to query listings: ${error}`);
      }
    }
  },
  Listing: {
    // ...
  }
};
The cursor is a pointer to the collection of documents that we’ve pulled (or found) from the find() method. When we apply a “filter”, we essentially want to sort our cursor around the price of listings. MongoDB gives us the option to run a sort() method in our cursor to help redefine the cursor as a new set of listing documents based on the sort criteria we’ll specify.
The sort() method allows us to define the order of the documents in our cursor collection and accepts an options object where we can specify the properties we’ll want the sort to occur in. In our instance, we want to sort based on the price field of a listing document. When it comes to sorting on a field from the highest to lowest value or the lowest to highest value (i.e. in ascending or descending order), all we’ll need to do is either pass a value of -1 or 1 to the field we want to sort. -1 denotes we’re interested in sorting our collection in descending order (from the highest to the lowest value). 1 denotes we’re interested in sorting our collection in ascending order (from the lowest to the highest value).
Since "PRICE_LOW_TO_HIGH" refers to the ascending condition, we’ll place a sort and state a value of 1 for the price field in a listing. In the other if statement referring to when the Enum value is "PRICE_HIGH_TO_LOW" , we’ll do the same but provide a sort value of -1 .
export const listingResolvers: IResolvers = {
  Query: {
    // ...,
    listings: async (
      _root: undefined,
      { filter, limit, page }: ListingsArgs,
      { db }: { db: Database }
    ): Promise<ListingsData> => {
      try {
        const data: ListingsData = {
          total: 0,
          result: []
        };

        let cursor = await db.listings.find({});

        if (filter && filter === ListingsFilter.PRICE_LOW_TO_HIGH) {
          cursor = cursor.sort({ price: 1 });
        }

        if (filter && filter === ListingsFilter.PRICE_HIGH_TO_LOW) {
          cursor = cursor.sort({ price: -1 });
        }

        cursor = cursor.skip(page > 0 ? (page - 1) * limit : 0);
        cursor = cursor.limit(limit);

        data.total = await cursor.count();
        data.result = await cursor.toArray();

        return data;
      } catch (error) {
        throw new Error(`Failed to query listings: ${error}`);
      }
    }
  },
  Listing: {
    // ...
  }
};
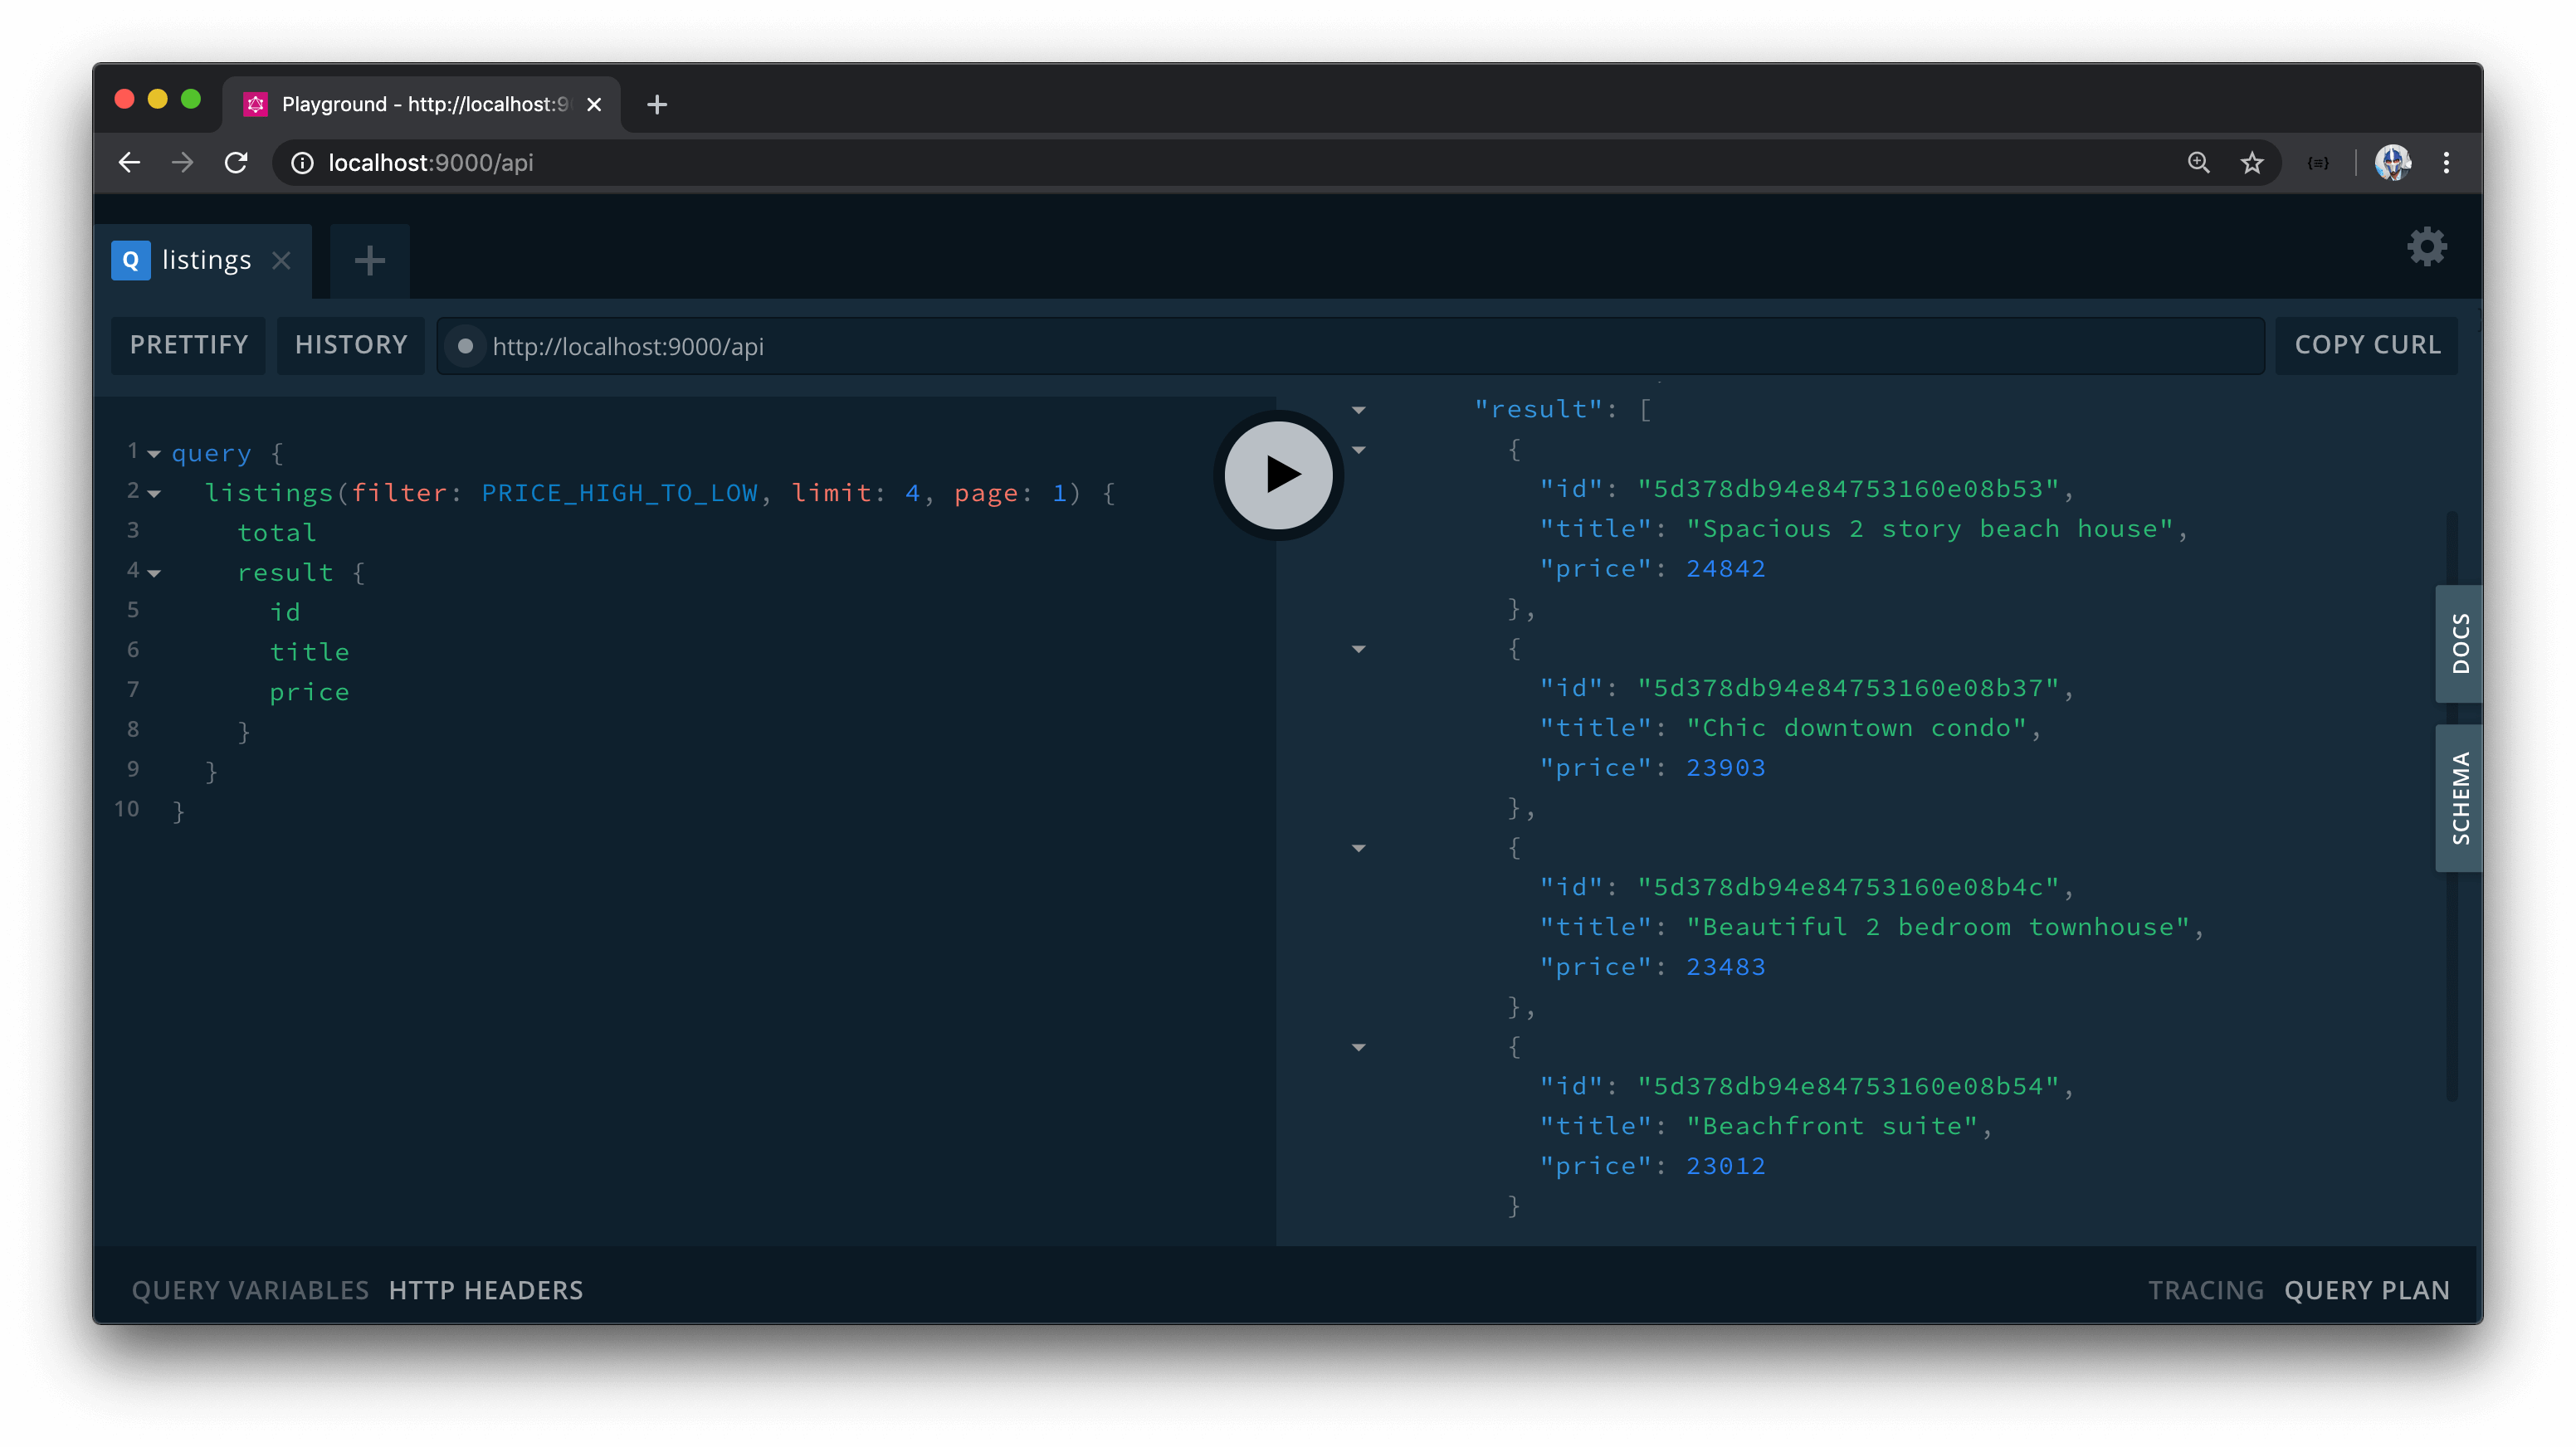
That should be it! We’ll now attempt to test what we’ve done in GraphQL Playground before we move to work on the client. We’ll query for the root-level listings field and we’ll inquire for the total and result sub-field that’s part of the Listings object. For the result , all we’ll ask for is the id , title and price of each listing. We’ll then provide some values for the required arguments - we’ll say the filter will be PRICE_LOW_TO_HIGH , we’ll want a limit of 4 listings, and we’ll want results only for page 1 .

When the query is made successfully, we can see the list of listings returned to us is sorted from the lowest price to the highest ! If we instead provide a filter value of PRICE_HIGH_TO_LOW , we’ll get listings sorted from the highest price to the lowest .
BUILDING THE UI OF THE HOMEPAGE
The
cancun.jpgimage asset used in this lesson can be found - here.
dubai.jpgimage asset used in this lesson can be found - here.
london.jpgimage asset used in this lesson can be found - here.
los-angeles.jpgimage asset used in this lesson can be found - here.
map-background.jpgimage asset used in this lesson can be found - here.
san-fransisco.jpgimage asset used in this lesson can be found - here.
toronto.jpgimage asset used in this lesson can be found - here.
The homepage we’re going to build is to be to mostly presentational and aims to serve the purpose of telling the user what our app does as well as provide useful links to direct them elsewhere. There will be two child components we’re going to create as part of the homepage:
- The
<HomeHero />component which is would be the upper portion of the homepage that is to have the search functionality and the different visual cards to help direct users to certain specific cities. - The
<HomeListings/>component which is the list of the highest priced listings we’ll display to the user.
Everything else in the homepage will just be part of the <Home /> parent component.
The first thing we’ll do as part as part of this lesson is to focus on the more presentational parts of the page while in the next lesson or so, we’ll look to make the query for the recently added root level listings field to give us the four highest priced listings.
Note: There are a couple of static image assets we’ll need for the homepage that is to be kept in an
assets/folder in thesrc/sections/Home/directory. At the top of this lesson manuscript, you’ll be able to find links to each of the image assets sources.
<HOMEHERO />
<HomeHero /> - Cards
We’ll work in the src/sections/Home/index.tsx file to create the <Home /> component that’s rendered in the index route of our app. The first thing we’ll do is create the <HomeHero /> component file and an index.ts file in a components/ folder within the src/sections/Home/ directory.
client/
  src/
    // ...
    sections/
      // ...
      Home/
        components/
          HomeHero/
            index.tsx
          index.ts
      // ...
  // ...
In the src/sections/Home/components/index.ts file, we’ll re-export the <HomeHero /> component function we’ll soon create.
client/src/sections/Home/components/index.ts
export * from "./HomeHero";
In the src/sections/Home/components/HomeHero/index.tsx file, we’ll import the React library and everything else we might need. We’ll import all the components we’ll need from Ant Design such as the <Card /> , <Col /> , <Input /> , <Row /> , and <Typography /> components. We’ll import the image assets we’ll use in this <HomeHero /> component from the assets/ directory in the parent Home / directory - which is the image assets of the cities of toronto, dubai, los angeles, and london.
We’ll destruct the <Title /> sub-component from <Typography /> and we’ll destruct the <Search /> sub-component from <Input /> . And we’ll export a component function named HomeHero .
import React from "react";
import { Card, Col, Input, Row, Typography } from "antd";

import torontoImage from "../../assets/toronto.jpg";
import dubaiImage from "../../assets/dubai.jpg";
import losAngelesImage from "../../assets/los-angeles.jpg";
import londonImage from "../../assets/london.jpg";

const { Title } = Typography;
const { Search } = Input;

export const HomeHero = () => {};
In the <HomeHero /> component return statement, we’ll return a parent <div /> element with two children - another <div /> element and the Ant Design <Row /> component. We’ll apply a gutter spacing between each columns that is to be shown within the <Row /> .
import React from "react";
import { Card, Col, Input, Row, Typography } from "antd";

import torontoImage from "../../assets/toronto.jpg";
import dubaiImage from "../../assets/dubai.jpg";
import losAngelesImage from "../../assets/los-angeles.jpg";
import londonImage from "../../assets/london.jpg";

const { Title } = Typography;
const { Search } = Input;

export const HomeHero = () => {
  return (
    <div className="home-hero">
      <div className="home-hero__search"></div>
      <Row gutter={12} className="home-hero__cards"></Row>
    </div>
  );
};
The .home-hero__search <div /> element will be responsible in displaying the <Title /> as well as the Search <Input /> where users will be able to search for listings in a certain city. The <Input /> component from Ant Design is fairly straightforward and essentially provides a text input where we can specify some additional variations. The <Search /> sub-component gives us the ability to have a search button alongside the input and gives us the capability to use a onSearch() callback prop which gets triggered either when the user presses the "Enter" key or clicks the search button.
With that said, in the <HomeHero /> component, let’s add a <Title /> that says "Find a place you'll love to stay at" and a <Search /> input that is to have a placeholder that says "Search San Fransisco" (we’re using San Fransisco as an example of a location that can be searched). In the <Search /> input, we’ll provide a size placeholder with a value of "large" which helps specify we want a visibly large input. We’ll also pass an "enterButton" prop which helps display the search button alongside the input.
import React from "react";
import { Card, Col, Input, Row, Typography } from "antd";

import torontoImage from "../../assets/toronto.jpg";
import dubaiImage from "../../assets/dubai.jpg";
import losAngelesImage from "../../assets/los-angeles.jpg";
import londonImage from "../../assets/london.jpg";

const { Title } = Typography;
const { Search } = Input;

export const HomeHero = () => {
  return (
    <div className="home-hero">
      <div className="home-hero__search">
        <Title className="home-hero__title">Find a place you'll love to stay at</Title>
        <Search placeholder="Search 'San Fransisco'" size="large" enterButton className="home-hero__search-input" />
      </div>
      <Row gutter={12} className="home-hero__cards"></Row>
    </div>
  );
};
Next, we’ll build out a row of cards for the different cities we’ll want the user to see in the home hero section. We’ll essentially set up four separate columns and in md and greater viewports, we’ll want each of the columns to take 1/4th of the entire width of the viewport.
import React from "react";
import { Card, Col, Input, Row, Typography } from "antd";

import torontoImage from "../../assets/toronto.jpg";
import dubaiImage from "../../assets/dubai.jpg";
import losAngelesImage from "../../assets/los-angeles.jpg";
import londonImage from "../../assets/london.jpg";

const { Title } = Typography;
const { Search } = Input;

export const HomeHero = () => {
  return (
    <div className="home-hero">
      <div className="home-hero__search">
        <Title className="home-hero__title">Find a place you'll love to stay at</Title>
        <Search placeholder="Search 'San Fransisco'" size="large" enterButton className="home-hero__search-input" />
      </div>
      <Row gutter={12} className="home-hero__cards">
        <Col md={6}></Col>
        <Col md={6}></Col>
        <Col md={6}></Col>
        <Col md={6}></Col>
      </Row>
    </div>
  );
};
In small viewports (that is to say mobile viewports), we’ll actually want to show just the first two columns side by side without showing the other two. With that said, we’ll give the first two columns a width of 12 spaces to take half the available grid and the last two columns with values of 0 to declare we don’t want it to be shown in small viewports.
import React from "react";
import { Card, Col, Input, Row, Typography } from "antd";

import torontoImage from "../../assets/toronto.jpg";
import dubaiImage from "../../assets/dubai.jpg";
import losAngelesImage from "../../assets/los-angeles.jpg";
import londonImage from "../../assets/london.jpg";

const { Title } = Typography;
const { Search } = Input;

export const HomeHero = () => {
  return (
    <div className="home-hero">
      <div className="home-hero__search">
        <Title className="home-hero__title">Find a place you'll love to stay at</Title>
        <Search placeholder="Search 'San Fransisco'" size="large" enterButton className="home-hero__search-input" />
      </div>
      <Row gutter={12} className="home-hero__cards">
        <Col xs={12} md={6}></Col>
        <Col xs={12} md={6}></Col>
        <Col xs={0} md={6}></Col>
        <Col xs={0} md={6}></Col>
      </Row>
    </div>
  );
};
For each of the columns, we’ll display a <Card /> component where in the card cover prop - we’ll provide a src for an accompanying image. We’ll also look to display the appropriate label within the card to convey which city is is. The first one will refer to Toronto, followed by Dubai, Los Angeles, and then London.
We’ll add an alt prop (i.e. alternate text prop) to each card cover img to comply with our React ESLint set-up and to explain what each of the images convey.
import React from "react";
import { Card, Col, Input, Row, Typography } from "antd";

import torontoImage from "../../assets/toronto.jpg";
import dubaiImage from "../../assets/dubai.jpg";
import losAngelesImage from "../../assets/los-angeles.jpg";
import londonImage from "../../assets/london.jpg";

const { Title } = Typography;
const { Search } = Input;

export const HomeHero = () => {
  return (
    <div className="home-hero">
      <div className="home-hero__search">
        <Title className="home-hero__title">Find a place you'll love to stay at</Title>
        <Search placeholder="Search 'San Fransisco'" size="large" enterButton className="home-hero__search-input" />
      </div>
      <Row gutter={12} className="home-hero__cards">
        <Col xs={12} md={6}>
          <Card cover={<img alt="Toronto" src={torontoImage} />}>Toronto</Card>
        </Col>
        <Col xs={12} md={6}>
          <Card cover={<img alt="Dubai" src={dubaiImage} />}>Dubai</Card>
        </Col>
        <Col xs={0} md={6}>
          <Card cover={<img alt="Los Angeles" src={losAngelesImage} />}>Los Angeles</Card>
        </Col>
        <Col xs={0} md={6}>
          <Card cover={<img alt="London" src={londonImage} />}>London</Card>
        </Col>
      </Row>
    </div>
  );
};
We want each of the cards shown in the homehero to be links to the listings page we’ll eventually create where the listings for the appropriate city is then to be shown. If we recall, we’ve created a /listings/:location? route that is to have a location parameter that’ll be used in the page to determine which listings to be shown for a certain location. At this moment, we’re not concerned with how that location parameter is going to be used to query for the correct listings - we’ll just need to direct the user to the listings page and provide the appropriate URL parameter.
Since we want to link the user somewhere in our app, we’ll import and use the <Link/> component from react-router-dom.
client/src/sections/Home/components/HomeHero/index.tsx
import { Link } from "react-router-dom";
We’ll then wrap each <Card /> in the columns with the <Link /> component and we’ll provide a target path to take the user to the listings/:location? page with the appropriate location in the route param.
- For Toronto, we’ll take them to
/listings/toronto. - For Dubai, we’ll take them to
/listings/dubai/. - For Los Angeles, we’ll take them to
/listings/los%20angeles. The%20value is a URL-safe character that is used to indicate a space between the wordslosandangeles. - For London, we’ll take them to
/listings/london/.
import React from "react";
import { Link } from "react-router-dom";
import { Card, Col, Input, Row, Typography } from "antd";

import torontoImage from "../../assets/toronto.jpg";
import dubaiImage from "../../assets/dubai.jpg";
import losAngelesImage from "../../assets/los-angeles.jpg";
import londonImage from "../../assets/london.jpg";

const { Title } = Typography;
const { Search } = Input;

export const HomeHero = () => {
  return (
    <div className="home-hero">
      <div className="home-hero__search">
        <Title className="home-hero__title">Find a place you'll love to stay at</Title>
        <Search placeholder="Search 'San Fransisco'" size="large" enterButton className="home-hero__search-input" />
      </div>
      <Row gutter={12} className="home-hero__cards">
        <Col xs={12} md={6}>
          <Link to="/listings/toronto">
            <Card cover={<img alt="toronto" src={torontoImage} />}>Toronto</Card>
          </Link>
        </Col>
        <Col xs={12} md={6}>
          <Link to="/listings/dubai">
            <Card cover={<img alt="dubai" src={dubaiImage} />}>Dubai</Card>
          </Link>
        </Col>
        <Col xs={0} md={6}>
          <Link to="/listings/los%20angeles">
            <Card cover={<img alt="los-angeles" src={losAngelesImage} />}>Los Angeles</Card>
          </Link>
        </Col>
        <Link to="/listings/london">
          <Col xs={0} md={6}>
            <Card cover={<img alt="london" src={londonImage} />}>London</Card>
          </Col>
        </Link>
      </Row>
    </div>
  );
};
That’s the majority of what we’ll want to do for the <HomeHero /> component. We’ll now import it and look to render it in the parent <Home /> page component. In the <Home /> component file, we’ll import the <Layout /> component from Ant Design and the <HomeHero /> component from the adjacent components/ folder, and we’ll destructure the <Content /> sub component from <Layout /> .
We’ll have our <Home /> component return statement return the <Content /> component with the <HomeHero /> as a child.
import React from "react";
import { Layout } from "antd";
import { HomeHero } from "./components";

const { Content } = Layout;

export const Home = () => {
  return (
    <Content className="home">
      <HomeHero />
    </Content>
  );
};
If we take a look at our home page right now, we’ll see the title + search input + the 4 different cards be shown. If we were to click one of these cards, we’ll be redirected to the listings page with the appropriate URL parameter.
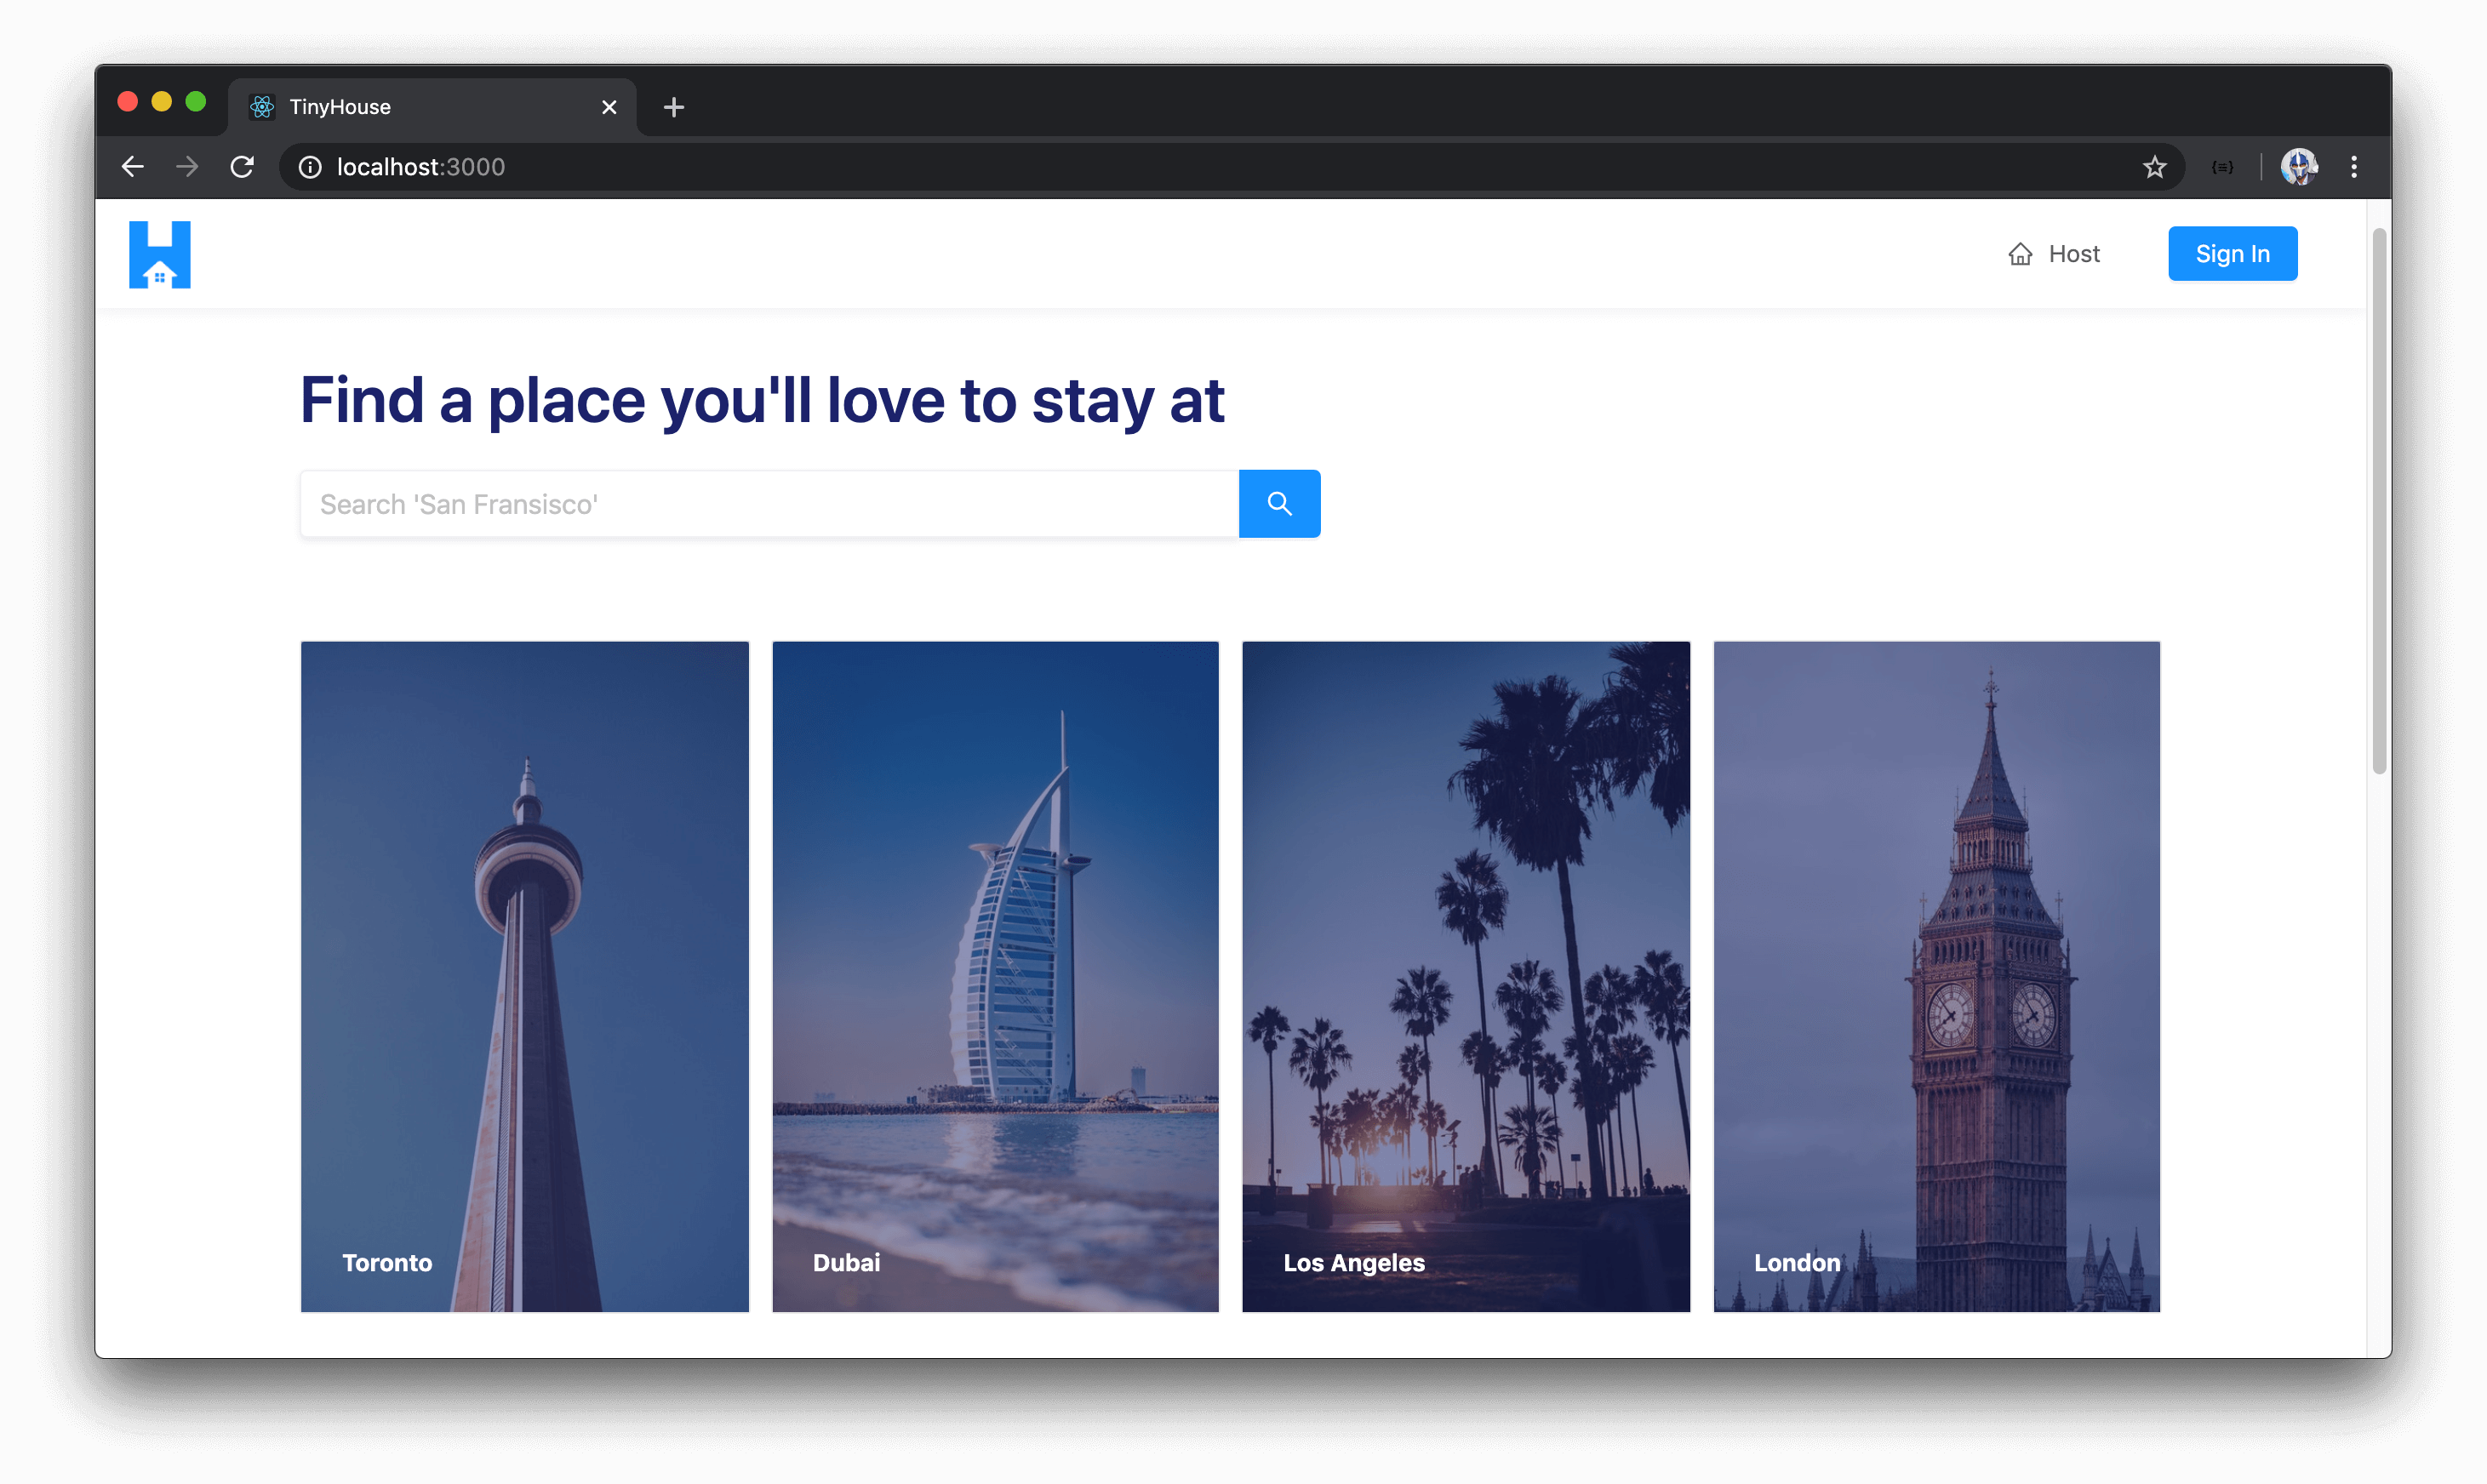
Note: There has been some CSS work to have the cover images within each listing card encompass the entire card. The
<Card />component from Ant Design doesn’t really appear this way so we’ve customized a few styles to get to this point. If you’re interested, do take a look at the rootsrc/index.cssfile of our client project to see how this might have been done!
Let’s make a few small changes before to the hero before we move towards the other sections in the homepage. We have a nice dotted map of the world available as an asset and we’ll look to make it the background-image of the parent content component of <Home/> .
We’ll import the map background asset and place it as the background-image of the <Content /> element in the <Home /> component.
import React from "react";
import { Layout } from "antd";
import { HomeHero } from "./components";

import mapBackground from "./assets/map-background.jpg";

const { Content } = Layout;

export const Home = () => {
  return (
    <Content className="home" style={{ backgroundImage: `url(${mapBackground})` }}>
      <HomeHero />
    </Content>
  );
};
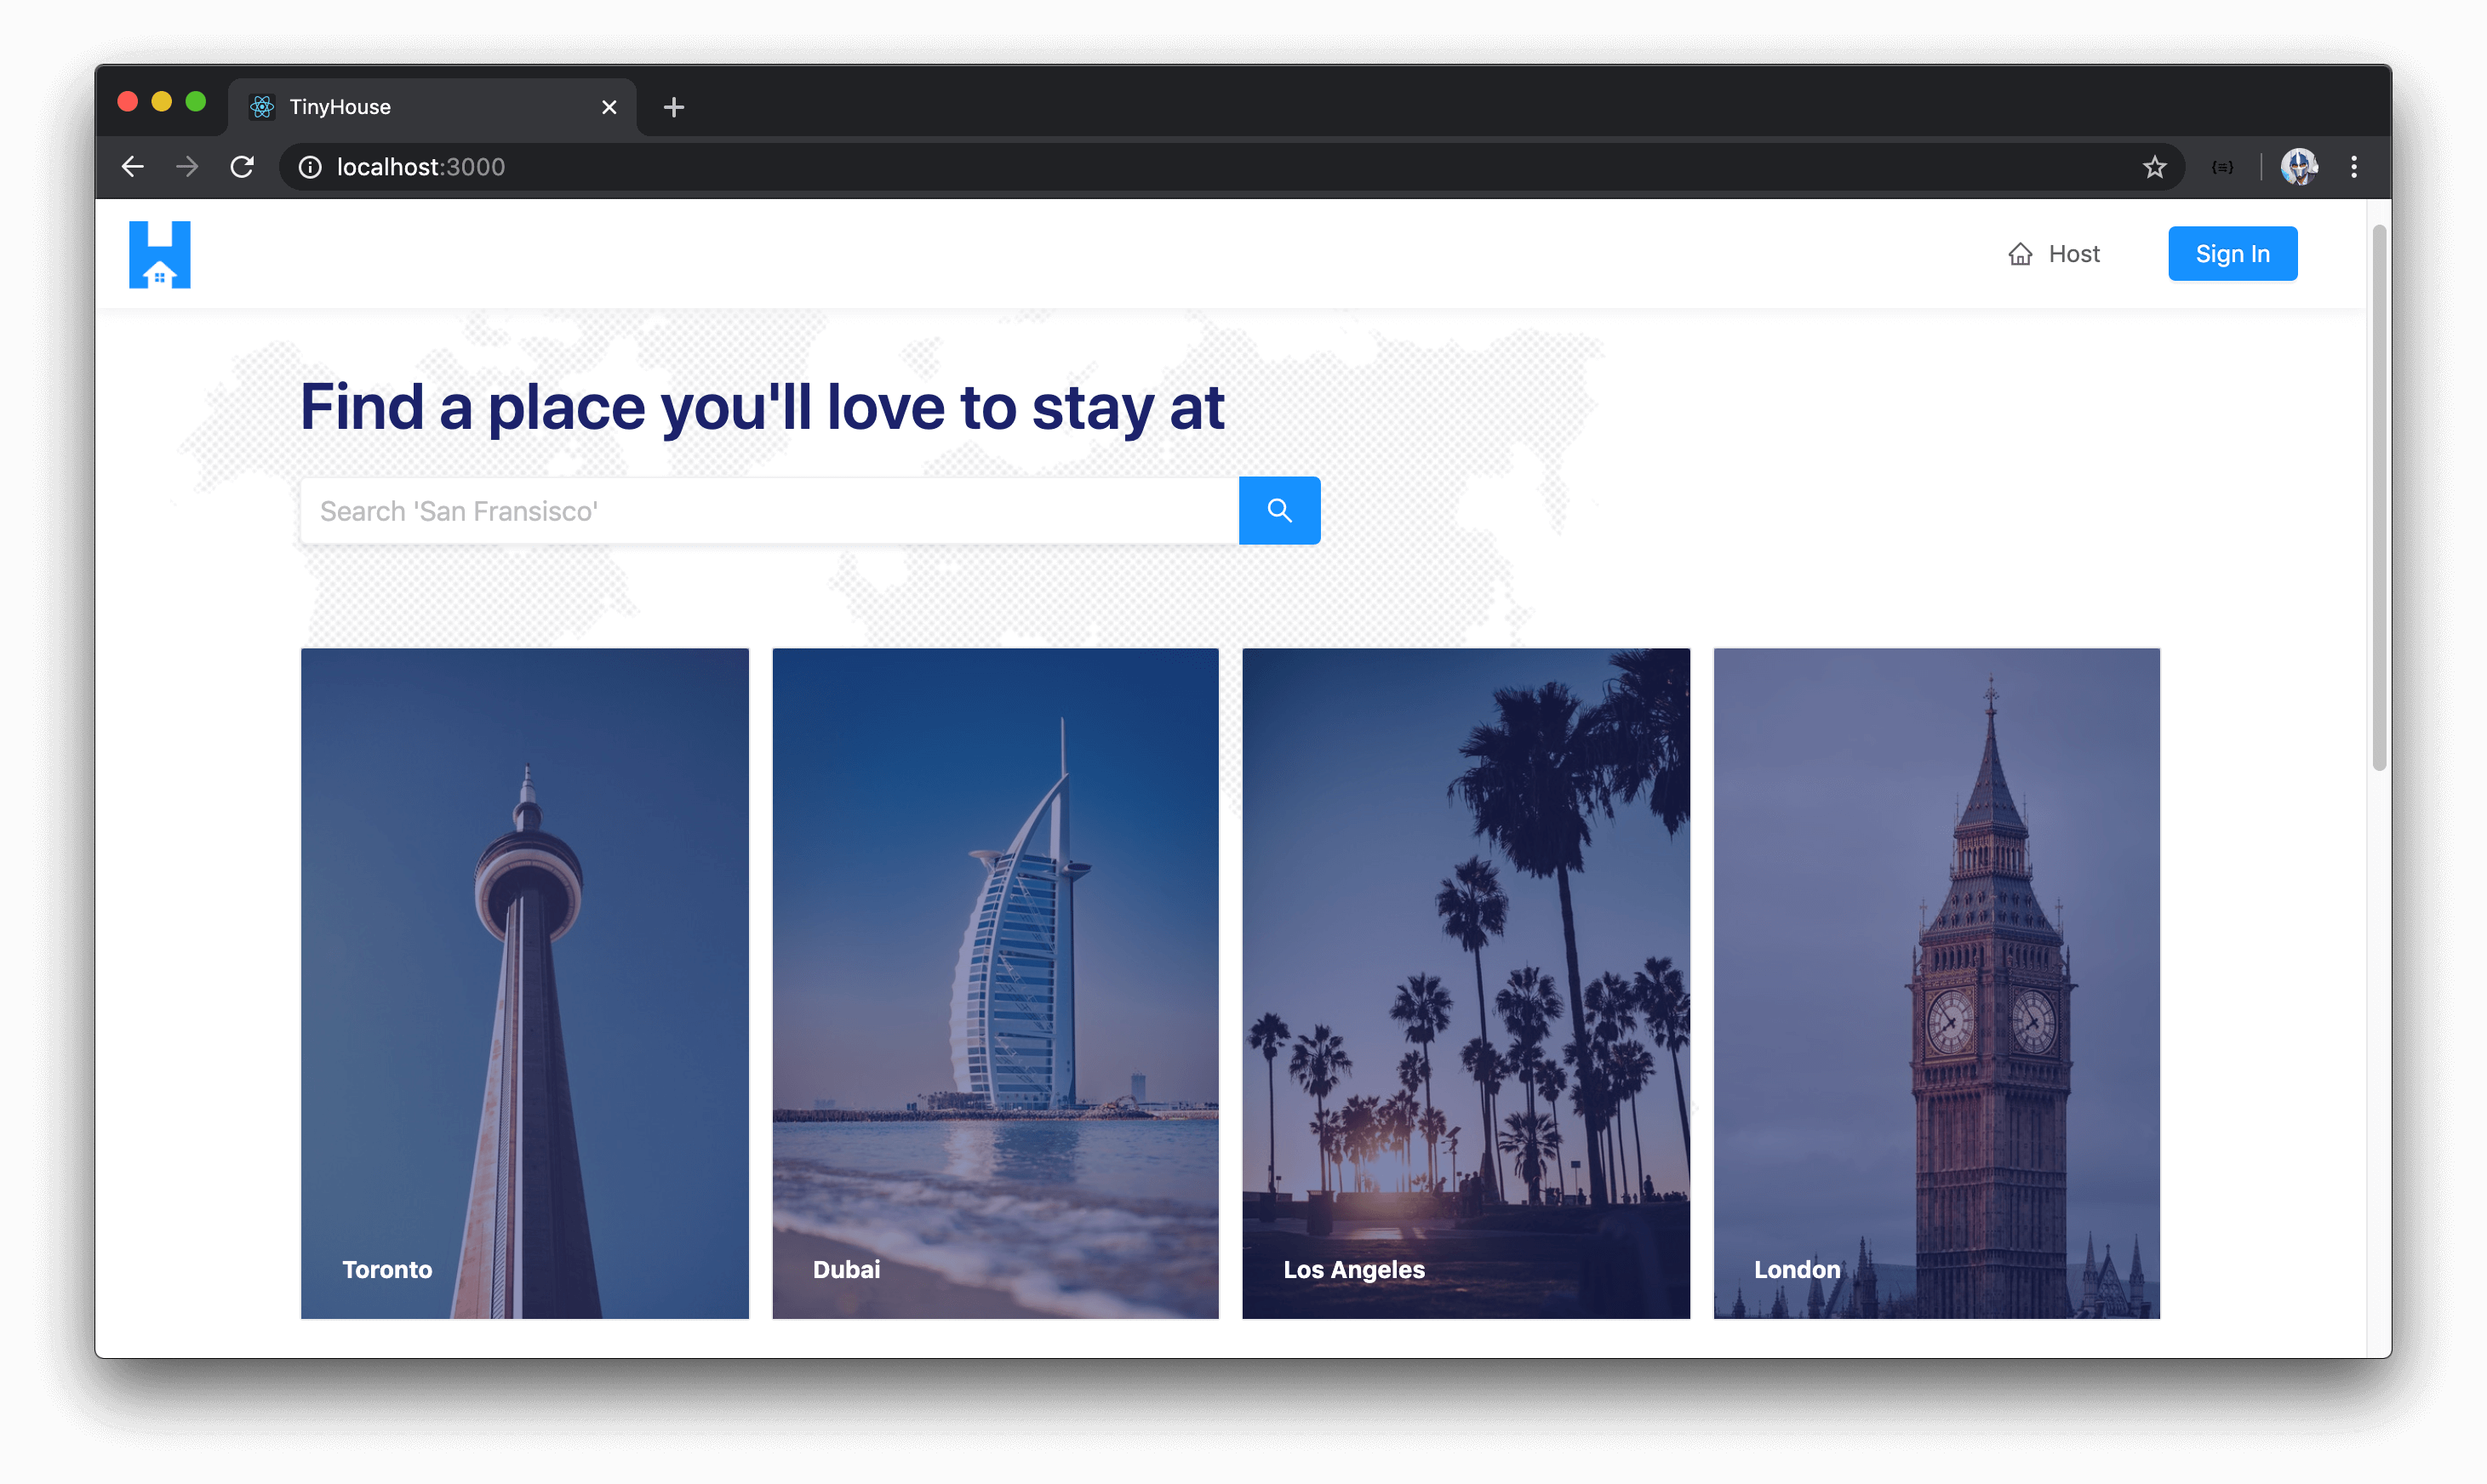
We’ll now get a nice background image at the hero level. Great!
<HomeHero /> - Search Input
At this moment, our search input here in the <HomeHero /> component doesn’t do anything when we press the enter key or even click the button available to us. When a user searches for listings with the search input, we’ll want to direct them to the /listings/:location? page with the search that they’ve made as part of the location URL parameter of the listings route. For example, if the user searches "San Fransisco" - we’ll want them to be directed to the /listings/ route where San%20Fransisco is the URL parameter.
We’ll create a function in the <Home /> component called onSearch() that’ll handle the functionality to make a redirect to the new route, and we’ll pass this function down as a prop to the <HomeHero/> component.
// ...

export const Home = () => {
  const onSearch = () => {};

  return (
    <Content className="home" style={{ backgroundImage: `url(${mapBackground})` }}>
      <HomeHero onSearch={onSearch} />
    </Content>
  );
};
The <Home /> component is a component that’s rendered as part of a <Route /> within the context of our React Router routes and components. Any component that’s rendered directly as the component of a <Route /> has access automatically to an object as a prop known as the history object which is a reference to the browser’s session history. We can use this history object to push a new entry to the history stack or in other words direct the user to a new location .
If the history object is available as a prop to the <Home /> component, we should be able to access it directly but we don’t know what its type is. Which is why we can use the RouteComponentProps interface from react-router-dom to help declare the shape of props a component receives when rendered as a route.
// ...
import { RouteComponentProps } from "react-router-dom";

// ...

export const Home = ({ history }: RouteComponentProps) => {
  const onSearch = () => {};

  return (
    <Content className="home" style={{ backgroundImage: `url(${mapBackground})` }}>
      <HomeHero onSearch={onSearch} />
    </Content>
  );
};
In the onSearch() component function, we can use the history.push() method to take the user to a certain route. The user is to provide what location they’ll want to go and see listings for so we’ll get this information as a parameter of the onSearch() function that we’ll label as a value and will be a string.
// ...
import { RouteComponentProps } from "react-router-dom";

// ...

export const Home = ({ history }: RouteComponentProps) => {
  const onSearch = (value: string) => {
    history.push(`/listings/${value}`);
  };

  return (
    <Content className="home" style={{ backgroundImage: `url(${mapBackground})` }}>
      <HomeHero onSearch={onSearch} />
    </Content>
  );
};
With our onSearch() function prepared and passed down, we’ll have to declared in <HomeHero /> component for the <Search /> input to use. In the <HomeHero /> component, we’ll state it is to accept a function prop called onSearch that is to accept a string argument and return void (i.e. nothing).
In the <HomeHero /> component file, we’ll declare the onSearch function prop and pass it to the <Search /> input to use. With all these changes made for the <HomeHero /> component, the src/sections/Home/components/HomeHero/index.tsx file will look like the following:
client/src/sections/Home/components/HomeHero/index.tsx
import React from "react";
import { Link } from "react-router-dom";
import { Card, Col, Input, Row, Typography } from "antd";

import torontoImage from "../../assets/toronto.jpg";
import dubaiImage from "../../assets/dubai.jpg";
import losAngelesImage from "../../assets/los-angeles.jpg";
import londonImage from "../../assets/london.jpg";

const { Title } = Typography;
const { Search } = Input;

interface Props {
  onSearch: (value: string) => void;
}

export const HomeHero = ({ onSearch }: Props) => {
  return (
    <div className="home-hero">
      <div className="home-hero__search">
        <Title className="home-hero__title">Find a place you'll love to stay at</Title>
        <Search
          placeholder="Search 'San Fransisco'"
          size="large"
          enterButton
          className="home-hero__search-input"
          onSearch={onSearch}
        />
      </div>
      <Row gutter={12} className="home-hero__cards">
        <Col xs={12} md={6}>
          <Link to="/listings/toronto">
            <Card cover={<img alt="Toronto" src={torontoImage} />}>Toronto</Card>
          </Link>
        </Col>
        <Col xs={12} md={6}>
          <Link to="/listings/dubai">
            <Card cover={<img alt="Dubai" src={dubaiImage} />}>Dubai</Card>
          </Link>
        </Col>
        <Col xs={0} md={6}>
          <Link to="/listings/los%20angeles">
            <Card cover={<img alt="Los Angeles" src={losAngelesImage} />}>
              Los Angeles
            </Card>
          </Link>
        </Col>
        <Col xs={0} md={6}>
          <Link to="/listings/london">
            <Card cover={<img alt="London" src={londonImage} />}>London</Card>
          </Link>
        </Col>
      </Row>
    </div>
  );
};
We can now see how the search input is to behave. If we typed something in the input available in the hero section of our homepage and pressed enter (or clicked the search button), we’ll be redirected to the /listings route with the appropriate URL parameter applied! Great!

The search input will behave mostly as we would want. We’re not going to spend too much time trying to come up with any strict field level validations. If the user types something completely incorrect - like a random sets of strings or numbers; what we’ll do is direct the user to the listings page and the query (we’ll eventually set up) to query for listings will fail.
However the one thing we’ll handle is an attempt to remove whitespace characters from the beginning and end of a string. For example, if a user is type something like " london " , we won’t want the whitespace characters in the beginning or end to be part of our route. If there’s whitespace characters in the middle, we’ll leave it as is; otherwise we’ll remove them from the beginning and end. There’s a JavaScript function that helps us achieve just this and is adoptable on almost all browsers and is called .trim() .
In the onSearch() function within the <Home /> component, we can create a constant value called trimmedValue that is the trimmed string and pass that as the URL parameter for the listings route.
// ...

export const Home = ({ history }: RouteComponentProps) => {
  const onSearch = (value: string) => {
    const trimmedValue = value.trim();
    history.push(`/listings/${trimmedValue}`);
  };

  return (
    <Content className="home" style={{ backgroundImage: `url(${mapBackground})` }}>
      <HomeHero onSearch={onSearch} />
    </Content>
  );
};
If we were now to type a string with whitespace characters in the beginning and end, we’ll have them removed in our URL parameter!
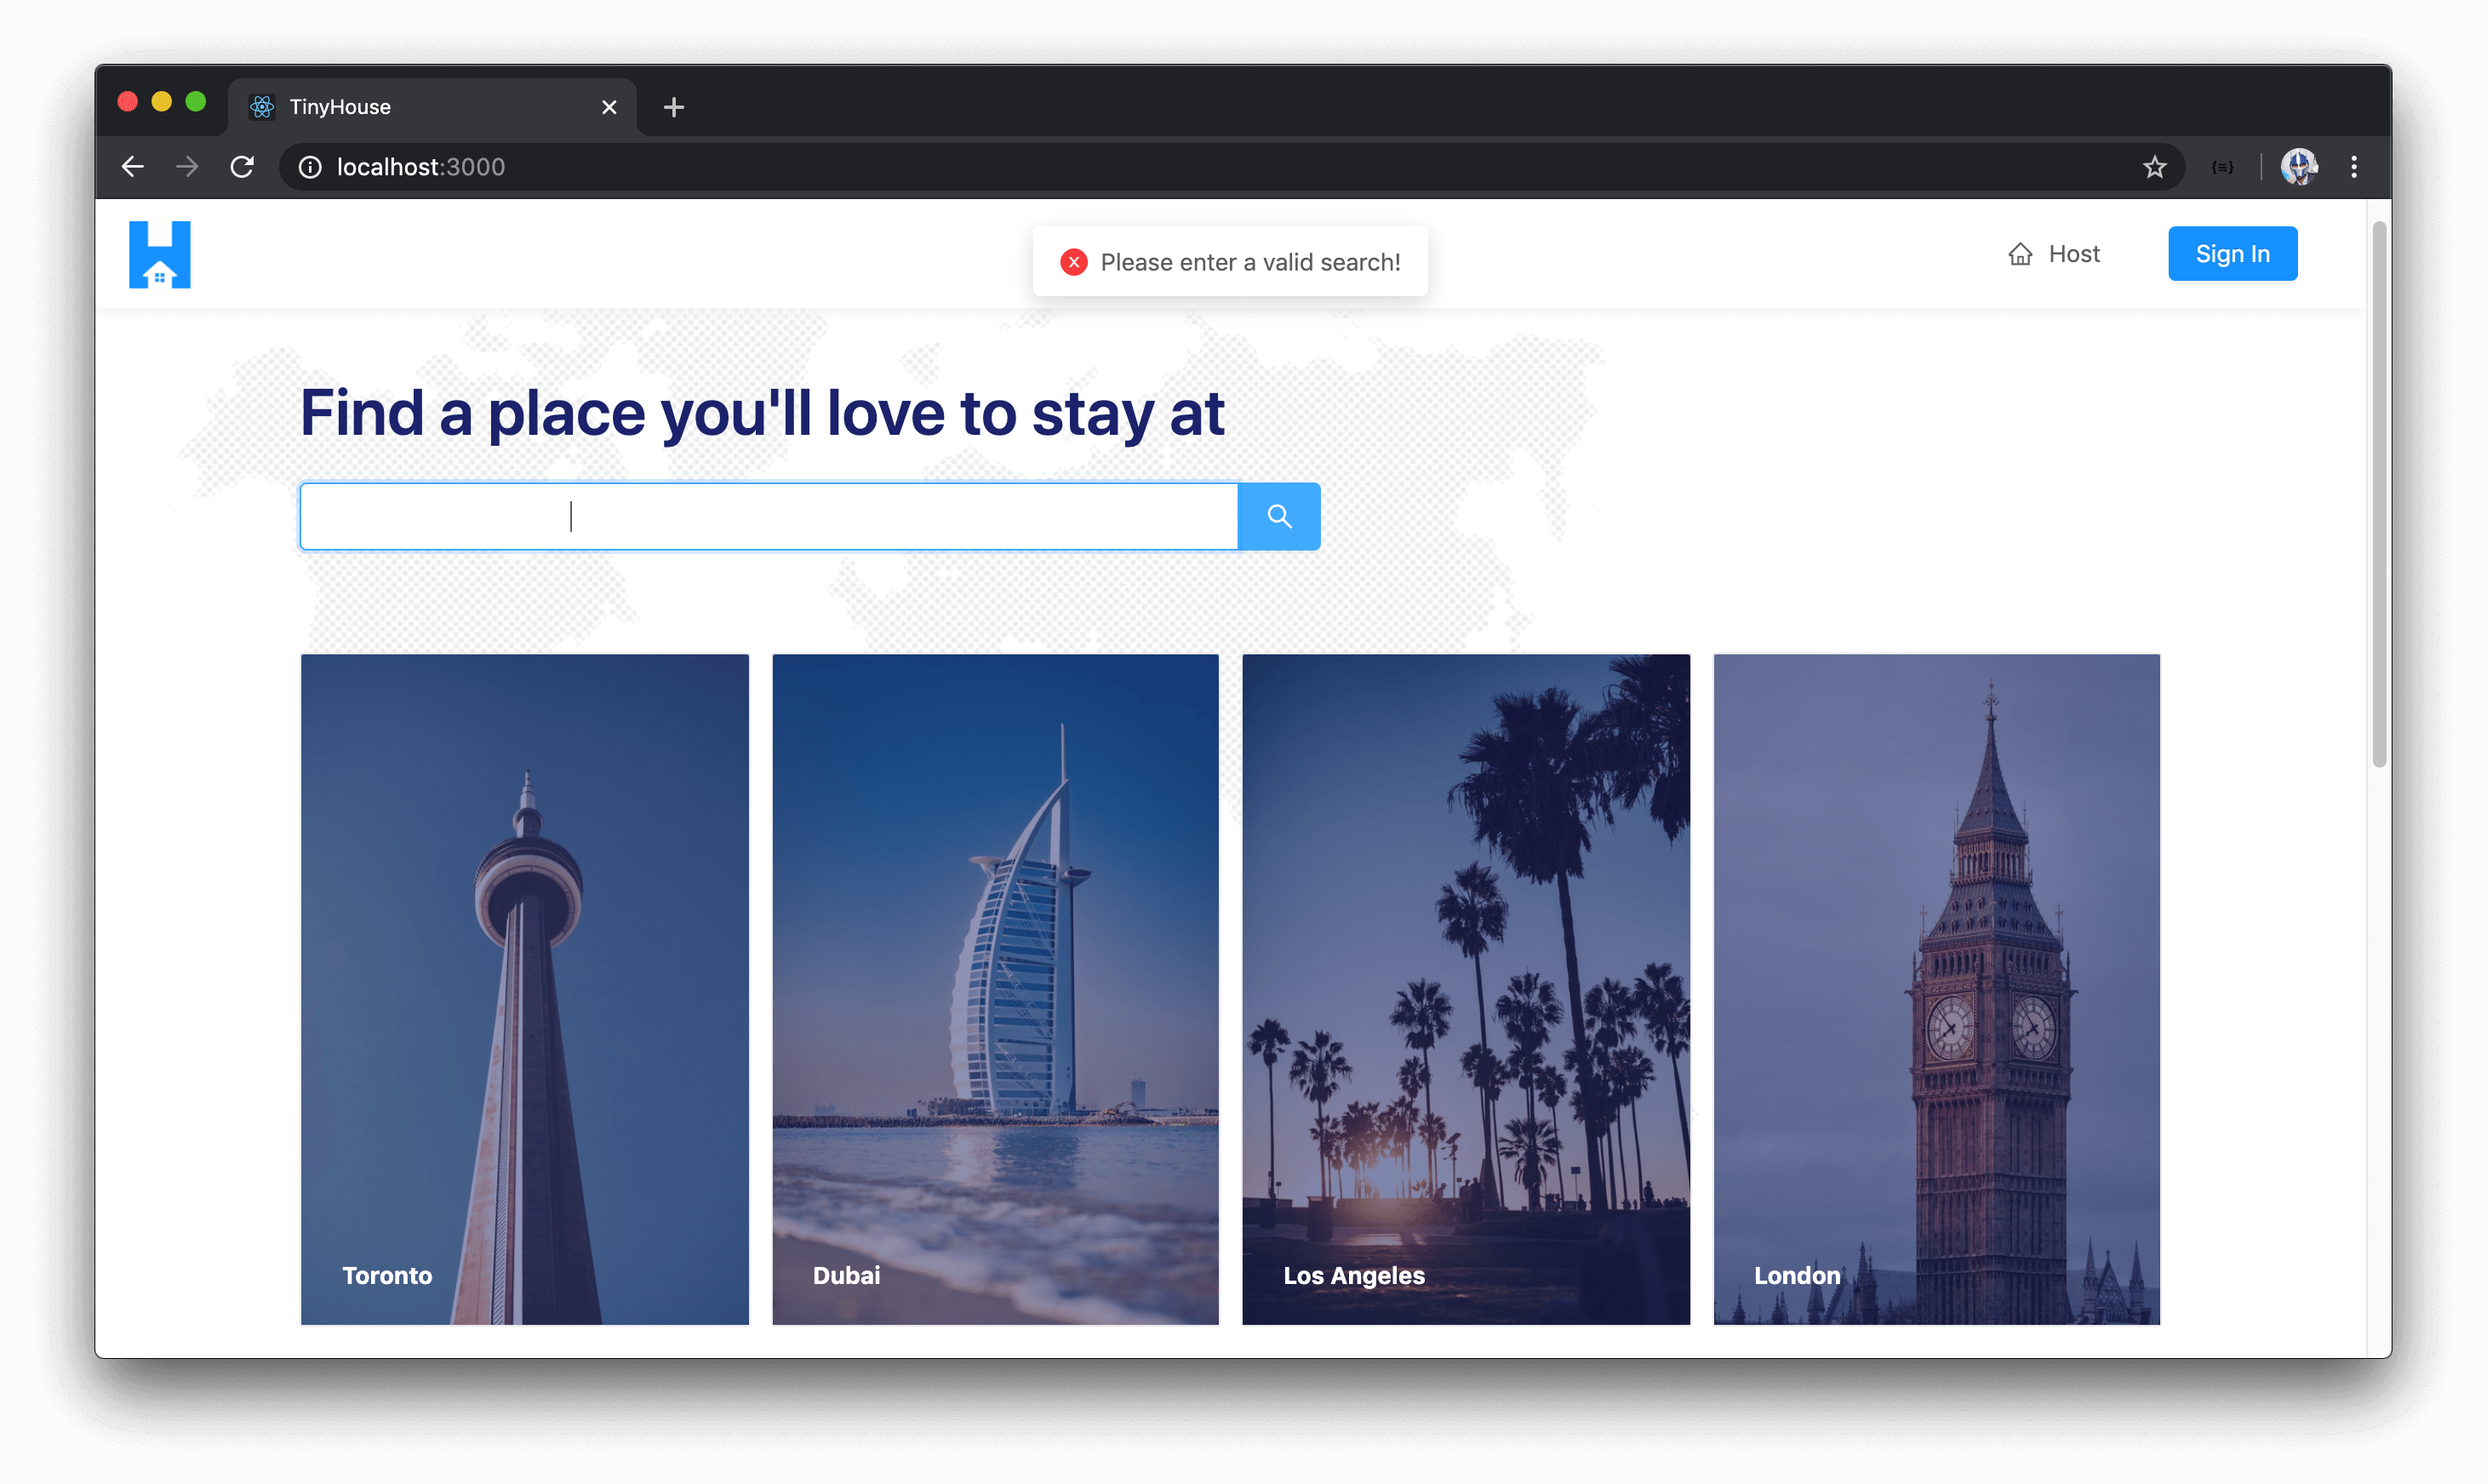
The one other condition we’ll guard for is if the user doesn’t type anything but just empty spaces and attempts to make a search. If the user was to type just empty spaces, the trim function will trim all those spaces away for it be an empty string. We can place an if statement in the onSearch() function and check if the searched string is empty, if so we’ll display an error message that says "'Please enter a valid search!'" and we’ll use the displayErrorMessage() utility function we’ve set up to help us here.
With the above implemented and the all the changes made for the <HomeHero /> component, the src/sections/Home/components/HomeHero/index.tsx file will look like the following:
client/src/sections/Home/components/HomeHero/index.tsx
import React from "react";
import { Link } from "react-router-dom";
import { Card, Col, Input, Row, Typography } from "antd";

import torontoImage from "../../assets/toronto.jpg";
import dubaiImage from "../../assets/dubai.jpg";
import losAngelesImage from "../../assets/los-angeles.jpg";
import londonImage from "../../assets/london.jpg";

const { Title } = Typography;
const { Search } = Input;

interface Props {
  onSearch: (value: string) => void;
}

export const HomeHero = ({ onSearch }: Props) => {
  return (
    <div className="home-hero">
      <div className="home-hero__search">
        <Title className="home-hero__title">Find a place you'll love to stay at</Title>
        <Search
          placeholder="Search 'San Fransisco'"
          size="large"
          enterButton
          className="home-hero__search-input"
          onSearch={onSearch}
        />
      </div>
      <Row gutter={12} className="home-hero__cards">
        <Col xs={12} md={6}>
          <Link to="/listings/toronto">
            <Card cover={<img alt="Toronto" src={torontoImage} />}>Toronto</Card>
          </Link>
        </Col>
        <Col xs={12} md={6}>
          <Link to="/listings/dubai">
            <Card cover={<img alt="Dubai" src={dubaiImage} />}>Dubai</Card>
          </Link>
        </Col>
        <Col xs={0} md={6}>
          <Link to="/listings/los%20angeles">
            <Card cover={<img alt="Los Angeles" src={losAngelesImage} />}>
              Los Angeles
            </Card>
          </Link>
        </Col>
        <Col xs={0} md={6}>
          <Link to="/listings/london">
            <Card cover={<img alt="London" src={londonImage} />}>London</Card>
          </Link>
        </Col>
      </Row>
    </div>
  );
};
Now, if we type just empty characters and attempt to make search, a visible error message will be shown to the user!
This is to be pretty much be our <HomeHero /> component. The rest of the homepage (without considering the home listings section) is pretty straightforward, so we’ll look to build it our fairly quickly.
<Home /> - CTAs
The next section after our hero section is going to have a title and description with some copy and there’ll be a call-to-action that when the user is to click it will take them to listings in the United States.
Let’s create this section. First, we’ll import the <Typography /> component from Ant Design in the <Home /> component file and we’ll destructue the <Title /> and <Paragraph /> sub components from <Typography /> . We’ll have a new <div /> element that has a title that says "Your guide for all things rental" and there’ll be a paragraph that says "Helping you make your best decisions in renting your last minute locations" .
// ...
import { Col, Row, Layout, Typography } from "antd";
// ...

// ...
const { Paragraph, Title } = Typography;

export const Home = ({ history }: RouteComponentProps) => {
  const onSearch = (value: string) => {
    const trimmedValue = value.trim();
    history.push(`/listings/${trimmedValue}`);
  };

  return (
    <Content className="home" style={{ backgroundImage: `url(${mapBackground})` }}>
      <HomeHero onSearch={onSearch} />

      <div className="home__cta-section">
        <Title level={2} className="home__cta-section-title">
          Your guide for all things rental
        </Title>
        <Paragraph>Helping you make the best decisions in renting your last minute locations.</Paragraph>
      </div>
    </Content>
  );
};
We’re interested in providing a call-to-action that appears as a button from Ant Design but behaves as a Link within the context of React Router. There’s a few ways we can try and achieve something like this - by either wrapping the Ant Design <Button /> element over React Router’s <Link /> component or vice versa. We can even create our own Button/Link component that will use React Router’s history object to push a new entry into the browser session.
The simplest way we’ll achieve this is to simply use React Router’s <Link /> component and provide the CSS classes that constitute how this link will look like. We can achieve this by using the following classes - .ant-btn to have it appear as an Ant Design button, .ant-btn-primary for it to appear as the primary blue color, and .ant-btn-lg for it to have a larger size. We’ll specify an additional class we’ve created before that adds a little margin to the element as well.
// ...
import { Col, Row, Layout, Typography } from "antd";
// ...

// ...
const { Paragraph, Title } = Typography;

export const Home = ({ history }: RouteComponentProps) => {
  const onSearch = (value: string) => {
    const trimmedValue = value.trim();
    history.push(`/listings/${trimmedValue}`);
  };

  return (
    <Content className="home" style={{ backgroundImage: `url(${mapBackground})` }}>
      <HomeHero onSearch={onSearch} />

      <div className="home__cta-section">
        <Title level={2} className="home__cta-section-title">
          Your guide for all things rental
        </Title>
        <Paragraph>Helping you make the best decisions in renting your last minute locations.</Paragraph>
        <Link to="/listings/united%20states" className="ant-btn ant-btn-primary ant-btn-lg home__cta-section-button">
          Popular listings in the United States
        </Link>
      </div>
    </Content>
  );
};
We’ve specified a target path for the link to be listings/united%20states . If we looked at our page now, we’ll see the new section and if we were to click the call-to-action - we’ll be taken to the /listings/ route with united%20states as the URL parameter.
The other section will add in the homepage will be a simple two column split that shows a nice image with some nice content for one of two cities - San Fransico, US and Cancun, Mexico. Each of these images will be links as well to take us to the listings page for each respective city, and these images are available to us as some of the assets we have.
First and foremost; we’ll import some additional Ant Design components in the <Home /> component file such as <Col /> and <Row /> , and we’ll import the the san-fransisco and cancun image files from the local assets/ folder kept in the parent.
import { Col, Row, Layout, Typography } from "antd";

// ...

import sanFransiscoImage from "./assets/san-fransisco.jpg";
import cancunImage from "./assets/cancun.jpg";

// ...
We’ll build the next section that’ll have a title of "Listings of any kind" and there’ll be a row where each column has full width in extra-small viewports and half width of the grid in small viewports and greater. Each of these columns will be a <Link /> with a <div /> and <img /> elements. The first link will take us to /listings/san%20fransisco and the second link will take us to /listings/cancún .
With this implemented, the src/sections/Home/index.tsx file will look as follows:
client/src/sections/Home/index.tsx
import React from "react";
import { Link, RouteComponentProps } from "react-router-dom";
import { Col, Row, Layout, Typography } from "antd";
import { displayErrorMessage } from "../../lib/utils";
import { HomeHero } from "./components";

import mapBackground from "./assets/map-background.jpg";
import sanFransiscoImage from "./assets/san-fransisco.jpg";
import cancunImage from "./assets/cancun.jpg";

const { Content } = Layout;
const { Paragraph, Title } = Typography;

export const Home = ({ history }: RouteComponentProps) => {
  const onSearch = (value: string) => {
    const trimmedValue = value.trim();

    if (trimmedValue) {
      history.push(`/listings/${trimmedValue}`);
    } else {
      displayErrorMessage("Please enter a valid search!");
    }
  };

  return (
    <Content className="home" style={{ backgroundImage: `url(${mapBackground})` }}>
      <HomeHero onSearch={onSearch} />

      <div className="home__cta-section">
        <Title level={2} className="home__cta-section-title">
          Your guide for all things rental
        </Title>
        <Paragraph>
          Helping you make the best decisions in renting your last minute locations.
        </Paragraph>
        <Link
          to="/listings/united%20states"
          className="ant-btn ant-btn-primary ant-btn-lg home__cta-section-button"
        >
          Popular listings in the United States
        </Link>
      </div>

      <div className="home__listings">
        <Title level={4} className="home__listings-title">
          Listings of any kind
        </Title>
        <Row gutter={12}>
          <Col xs={24} sm={12}>
            <Link to="/listings/san%20fransisco">
              <div className="home__listings-img-cover">
                <img
                  src={sanFransiscoImage}
                  alt="San Fransisco"
                  className="home__listings-img"
                />
              </div>
            </Link>
          </Col>
          <Col xs={24} sm={12}>
            <Link to="/listings/cancún">
              <div className="home__listings-img-cover">
                <img src={cancunImage} alt="Cancún" className="home__listings-img" />
              </div>
            </Link>
          </Col>
        </Row>
      </div>
    </Content>
  );
};
If we took a look at our homepage at this moment and scroll to the bottom, we’ll see the two separate images shown to us. If we click the one on the left, we will be directed to listings in San Francisco and if we were to click the image on the right will be navigated to listings in Cancún!

Our homepage now looks pretty good. In the next coming lessons, we’ll look to display the most premium (i.e. highest priced) listings in the homepage.
- Lesson
- Discussion
-
 Ask a question
DISPLAYING THE HIGHEST-PRICED LISTINGS IN THE HOMEPAGE
listing-loading-card-cover.jpgimage asset used in this lesson can be found - here.
Our homepage is mostly prepared except for displaying the most premium (i.e. highest price) listings. In this lesson, we’ll look to make the query we’ll need to retrieve the highest priced listings from our server and display that information on our homepage.
Note: We use an image asset labeled
listing-loading-card-cover.jpgin thesrc/sections/Home/assets/folder for help displaying the loading state for the request of the highest priced listings shown on the homepage. Find a source for this image asset - here.
LISTINGS QUERY
We’ve created a root-level listings field that allows us to query for listings from the "listings" collection in our database and we’re able to apply a filter argument to determine how we would want the results returned to be sorted based on price. With that said, let’s create the listings query document so our client will be able to request listings data from our API. We’ll create a Listings/ folder that has an index.ts file within the src/lib/graphql/queries/ folder.
client/
  src/
    lib/
      graphql/
        queries/
          // ...
          Listings/
            index.ts
          // ...
    // ...
  // ...
In the src/graphql/queries/index.ts file, we’ll re-export the soon to be created GraphQL document for the listings field.
client/src/lib/graphql/queries/index.ts
export * from "./Listings";
In the src/graphql/queries/Listings/index.ts file, we’ll import the gql tag from apollo-boost , export a constant labeled LISTINGS , and construct our Listings query. We’ll state that the query is to accept a filter argument of type ListingsFilter and limit / page arguments of type Int . All of these arguments are to be required and not optional. We’ll query for the listings field and pass those arguments down.
import { gql } from "apollo-boost";

export const LISTINGS = gql`
  query Listings($filter: ListingsFilter!, $limit: Int!, $page: Int!) {
    listings(filter: $filter, limit: $limit, page: $page) {

    }
  }
`;
All the information we’ll need from the listings query is just the information needed to populate the <ListingCard /> component we’ve created before which is a card preview of a certain listing. We’ll be using the <ListingCard /> component to show the premium listings on the homepage. With that said, we’ll query for the result returned from the listings field (which is the list of listings) and for each listing item we’ll look to get the id , title , image , address , price , and numOfGuests fields.
client/src/lib/graphql/queries/Listings/index.ts
import { gql } from "apollo-boost";

export const LISTINGS = gql`
  query Listings($filter: ListingsFilter!, $limit: Int!, $page: Int!) {
    listings(filter: $filter, limit: $limit, page: $page) {
      result {
        id
        title
        image
        address
        price
        numOfGuests
      }
    }
  }
`;
With our GraphQL query document established, we’ll autogenerate the TypeScript definitions with regards to this newly added listings GraphQL document. We’ll head to the terminal and first run the codegen:schema command to regenerate the schema in our client application.
npm run codegen:schema
We’ll then run the codegen:generate command to regenerate the TypeScript definitions of our GraphQL schema.
npm run codegen:generate
With our GraphQL query for the listings field prepared, we can now look to query for the listings field in our <HomePage /> component.
In the src/sections/Home/index.tsx file, we’ll first import the useQuery Hook from React Apollo.
client/src/sections/Home/index.tsx
import { useQuery } from "@apollo/react-hooks";
We’ll also import the LISTINGS query document and the autogenerated TypeScript definitions for the data and variables related to the LISTINGS query document.
client/src/sections/Home/index.tsx
import { LISTINGS } from "../../lib/graphql/queries";
import {
  Listings as ListingsData,
  ListingsVariables
} from "../../lib/graphql/queries/Listings/__generated__/Listings";
Remember how we’ve mentioned that the Apollo CLI creates a globalTypes.ts file when we generate our TypeScript definitions and contains the Enum and Input object types of our GraphQL schema in TypeScript format? When we run the listings query on the homepage, we’re going to pass in a filter value of "PRICE_HIGH_TO_LOW" to ensure we’re getting the highest priced listings. Instead of passing the value directly, we can use the autogenerated ListingsFilter Enum from the globalTypes.ts file to reference a value from the correct list of values. With that said, in the <Home /> component file - we’ll import the ListingsFilter Enum from the globalTypes.ts file generated by the Apollo CLI.
client/src/sections/Home/index.tsx
import { ListingsFilter } from "../../lib/graphql/globalTypes";
We’ll now prepare our query. We’ll run the useQuery Hook at the top of the <Home /> component function, pass the ListingsData and ListingsVariables interfaces, specify the LISTINGS GraphQL document, and we’ll say we’re interested in retrieving the loading and data information from our Query Result.
export const Home = ({ history }: RouteComponentProps) => {
  const { loading, data } = useQuery<ListingsData, ListingsVariables>(LISTINGS, {
    variables: {}
  });

  // ...
};
Let’s now pass the variables the listings query expects.
- We’ll state a
filtervariable and use theListingsFilterEnum to pass a filter value of"PRICE_HIGH_TO_LOW". - The
limitvariable helps dictate the number of listings we want to be returned. Since we only want to show a total of four listings on the homepage, we’ll pass a value of4. We’ll define the value for thislimitas aPAGE_LIMITconstant outside of the component function. - Since we want the first four listings in our collection (i.e. the first page of results), we’ll pass a value of
1for thepagevariable. We’ll define the value for thispagevariable as aPAGE_NUMBERconstant outside of the component function.
// ...

const PAGE_LIMIT = 4;
const PAGE_NUMBER = 1;

export const Home = ({ history }: RouteComponentProps) => {
  const { loading, data } = useQuery<ListingsData, ListingsVariables>(LISTINGS, {
    variables: {
      filter: ListingsFilter.PRICE_HIGH_TO_LOW,
      limit: PAGE_LIMIT,
      page: PAGE_NUMBER
    }
  });

  // ...
};
When the listings query is in flight (i.e. query result is loading ), we’ll want to show a more focused skeleton experience just around the listings section shown on the homepage. We’ll have three states that govern how the listings section on the homepage is going to be shown.
When the listings query is in flight, we’ll show a <HomeListingsSkeleton /> component.

When the listings query is complete, we’ll show a <HomeListings /> component.
If the listings query ever fails, we just don’t show anything. We could try and show an error message but from a UI perspective, we can see that the homepage shows other information than just the most premium listings. If the listings query errors, we won’t show any listings and the user can still move around and see everything else on the homepage.

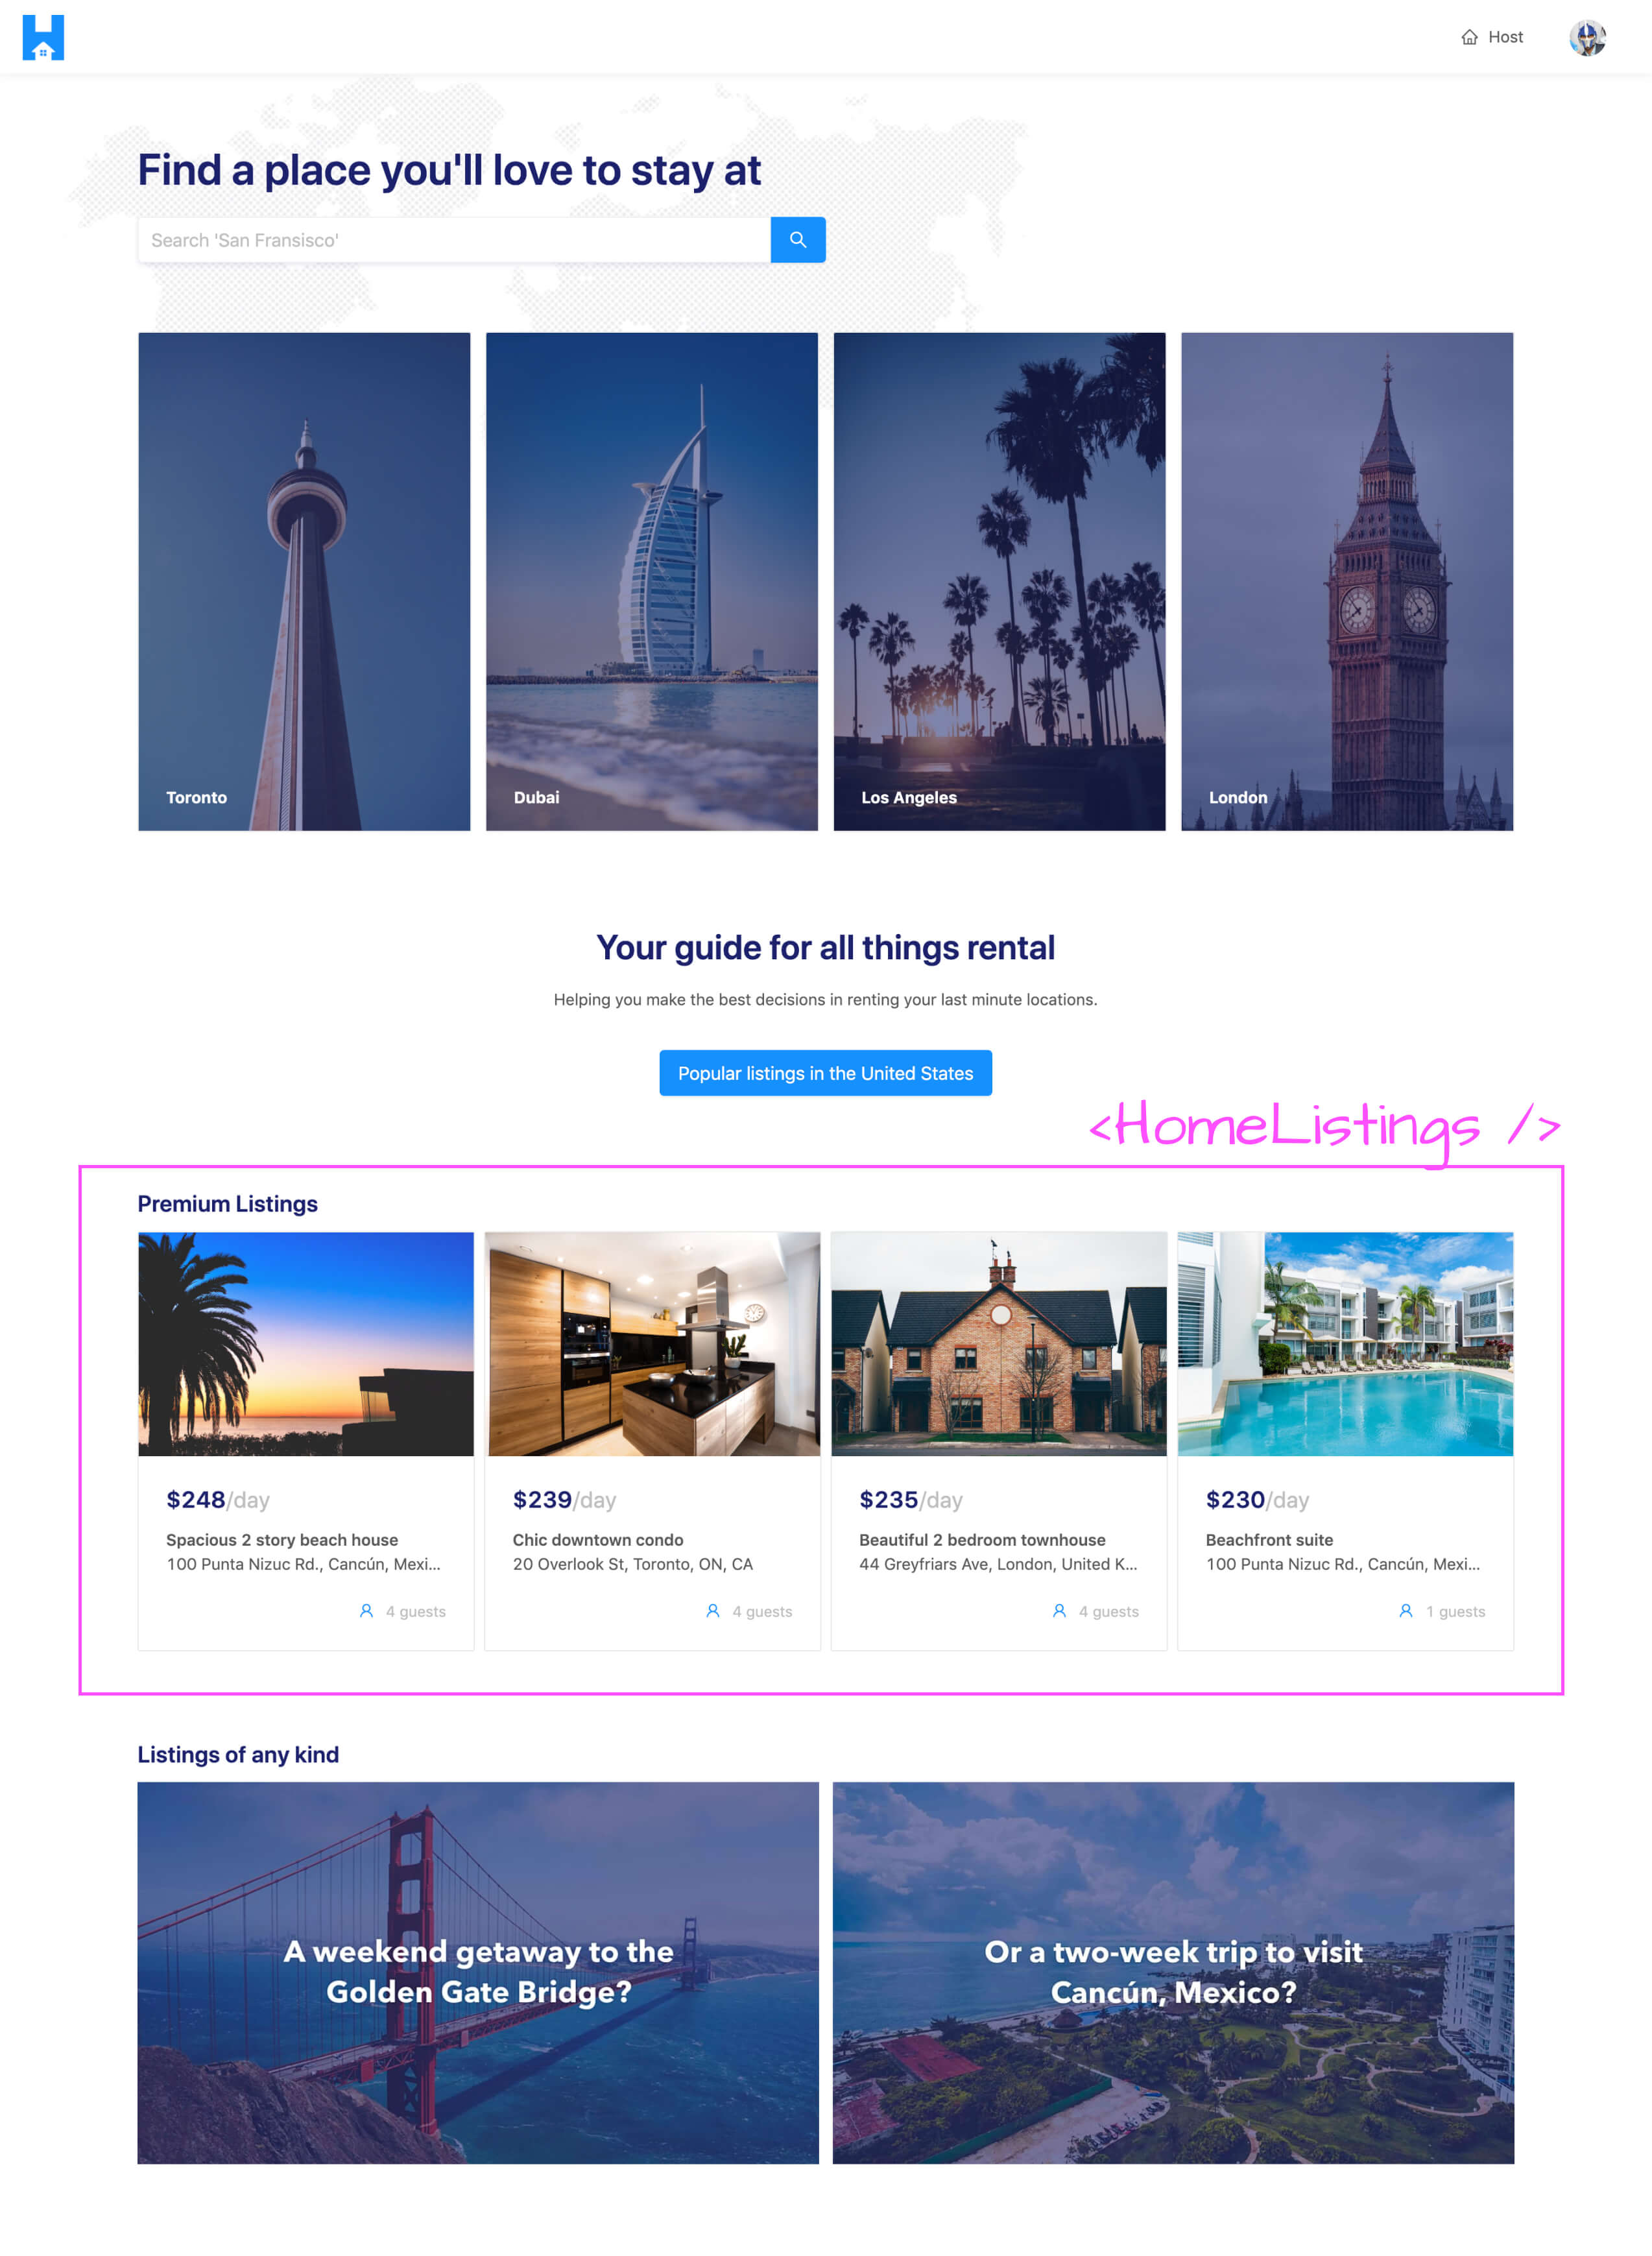
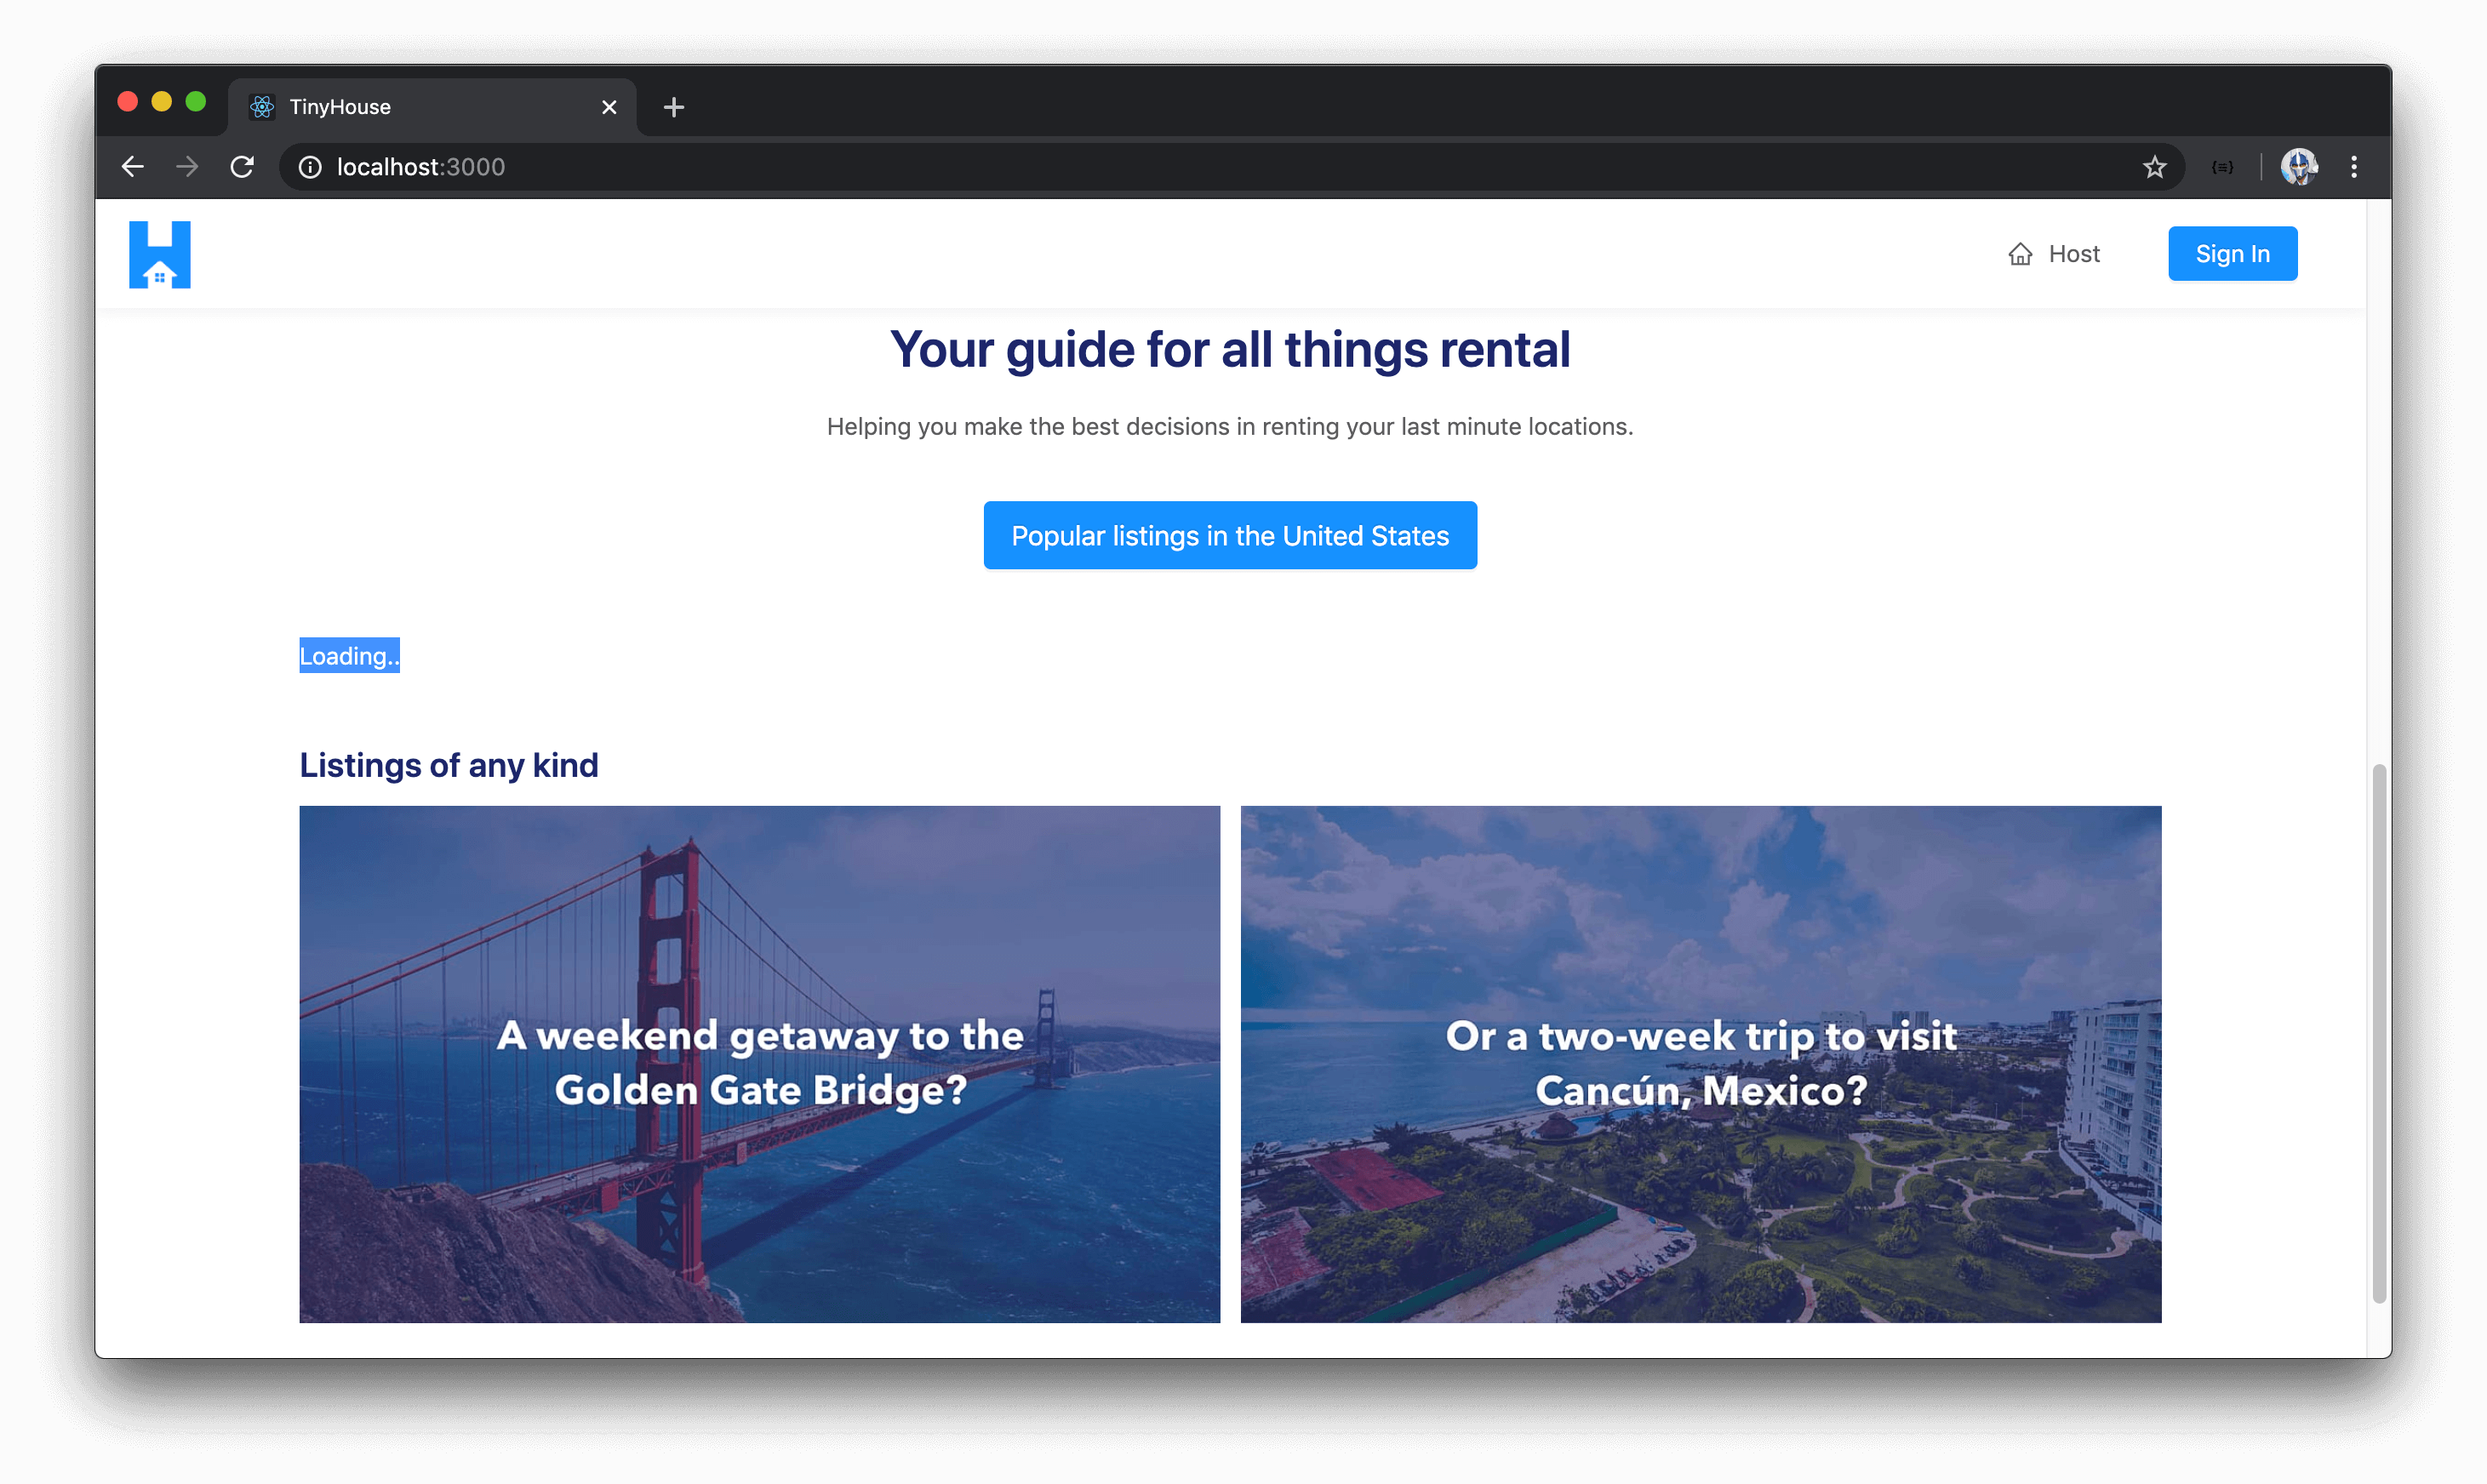
With this gameplan in mind, we can have a function in the <Home /> component called renderListingsSection() that will be responsible for rendering the correct listings related sub-component depending on the result of the query. If the query is loading - the function will return a "Loading.." message (for now). If data is available from the query, the function will return a child component we can call <HomeListings /> that will accept a title prop with a value of "Premium Listings" and a listings prop that is the listings array itself with which we can get from the query data. If data doesn’t exist and loading isn’t true, this probably means the query has failed so we’ll have the function return null .
// ...

export const Home = ({ history }: RouteComponentProps) => {
  const { loading, data } = useQuery<ListingsData, ListingsVariables>(LISTINGS, {
    variables: {
      filter: ListingsFilter.PRICE_HIGH_TO_LOW,
      limit: PAGE_LIMIT,
      page: PAGE_NUMBER
    }
  });

  const renderListingsSection = () => {
    if (loading) {
      return "Loading..";
    }

    if (data) {
      return <HomeListings title="Premium Listings" listings={data.listings.result} />;
    }

    return null;
  };

  // ...
};
We can then run the renderListingsSection() function in the <Home /> return statement to convey what would be shown depending on the state of the listings query. We’ll have the function be run right after the call-to-action section.
// ...

export const Home = ({ history }: RouteComponentProps) => {
  const { loading, data } = useQuery<ListingsData, ListingsVariables>(LISTINGS, {
    variables: {
      filter: ListingsFilter.PRICE_HIGH_TO_LOW,
      limit: PAGE_LIMIT,
      page: PAGE_NUMBER
    }
  });

  const renderListingsSection = () => {
    if (loading) {
      return <HomeListingsSkeleton />;
    }

    if (data) {
      return <HomeListings title="Premium Listings" listings={data.listings.result} />;
    }

    return null;
  };

  return (
    <Content className="home" style={{ backgroundImage: `url(${mapBackground})` }}>
      <HomeHero onSearch={onSearch} />

      <div className="home__cta-section">{/* ... */}</div>

      {renderListingsSection()}

      <div className="home__listings">{/* ... */}</div>
    </Content>
  );
};
We’re now missing the actual <HomeListings /> component which we haven’t created yet. In the src/sections/Home/components/ folder, we’ll create a HomeListings/ folder that is to have an index.tsx file.
client/
  src/
    // ...
    sections/
      // ...
      Home
        components/
          // ...
          HomeListings/
            index.tsx
        index.ts
      // ...
  // ...
In the src/sections/Home/components/index.ts file, we’ll re-export the soon to be created <HomeListings /> child component.
client/src/sections/Home/components/index.ts
export * from "./HomeListings";
The <HomeListings /> component is going to be very similar to how we’ve shown a list of listings in a /user/:id page albeit being simpler since there won’t be any form of pagination.
In the <HomeListings /> component file, we’ll import the React library. We’ll import the <List /> and <Typography /> components from Ant Design. We’ll import the <ListingCard /> component from the src/lib/components/ folder. Finally, we’ll import the interface for the data returned from the listings query from our generated TypeScript definitions. We’ll be using this to help describe the shape of the listings prop that’s going to be passed into this component.
client/src/sections/Home/components/HomeListings/index.tsx
import React from "react";
import { List, Typography } from "antd";
import { ListingCard } from "../../../../lib/components";
import { Listings } from "../../../../lib/graphql/queries/Listings/__generated__/Listings";
We’ll describe the shape of props the <HomeListings /> component is to receive. We’ll say it is to receive a title prop of type string and a listings prop which is to have the shape of the result field from the listings field from our auto-generated data interface.
We’ll also destruct the <Title /> sub component from <Typography /> and create the <HomeListings /> component function.
import React from "react";
import { List, Typography } from "antd";
import { ListingCard } from "../../../../lib/components";
import { Listings } from "../../../../lib/graphql/queries/Listings/__generated__/Listings";

interface Props {
  title: string;
  listings: Listings["listings"]["result"];
}

const { Title } = Typography;

export const HomeListings = ({ title, listings }: Props) => {};
The <HomeListings /> component return statement is going to be fairly straightforward. It’s simply going to render a <Title /> with the text content derived from the title prop, and it’ll render the <List /> component that we’ve seen before in earlier lessons. In the <List /> component, we’ll apply a grid layout with the intention of four items being shown in the list side by side in large viewports, two items taking the entire viewport width in small viewports, and one item taking the entire viewport width in extra-small viewports.
The source of data for the presented list is to be the listings prop available and for every item we want to render in the list - we’ll render the <ListingCard /> component and pass the iterated listing object down.
client/src/sections/Home/components/HomeListings/index.tsx
import React from "react";
import { List, Typography } from "antd";
import { ListingCard } from "../../../../lib/components";
import { Listings } from "../../../../lib/graphql/queries/Listings/__generated__/Listings";

interface Props {
  title: string;
  listings: Listings["listings"]["result"];
}

const { Title } = Typography;

export const HomeListings = ({ title, listings }: Props) => {
  return (
    <div className="home-listings">
      <Title level={4} className="home-listings__title">
        {title}
      </Title>
      <List
        grid={{
          gutter: 8,
          xs: 1,
          sm: 2,
          lg: 4
        }}
        dataSource={listings}
        renderItem={listing => (
          <List.Item>
            <ListingCard listing={listing} />
          </List.Item>
        )}
      />
    </div>
  );
};
In the parent <Home /> component file, we’ll now just need to import the <HomeListings /> component from the adjacent components/ folder.
import { HomeHero, HomeListings } from "./components";
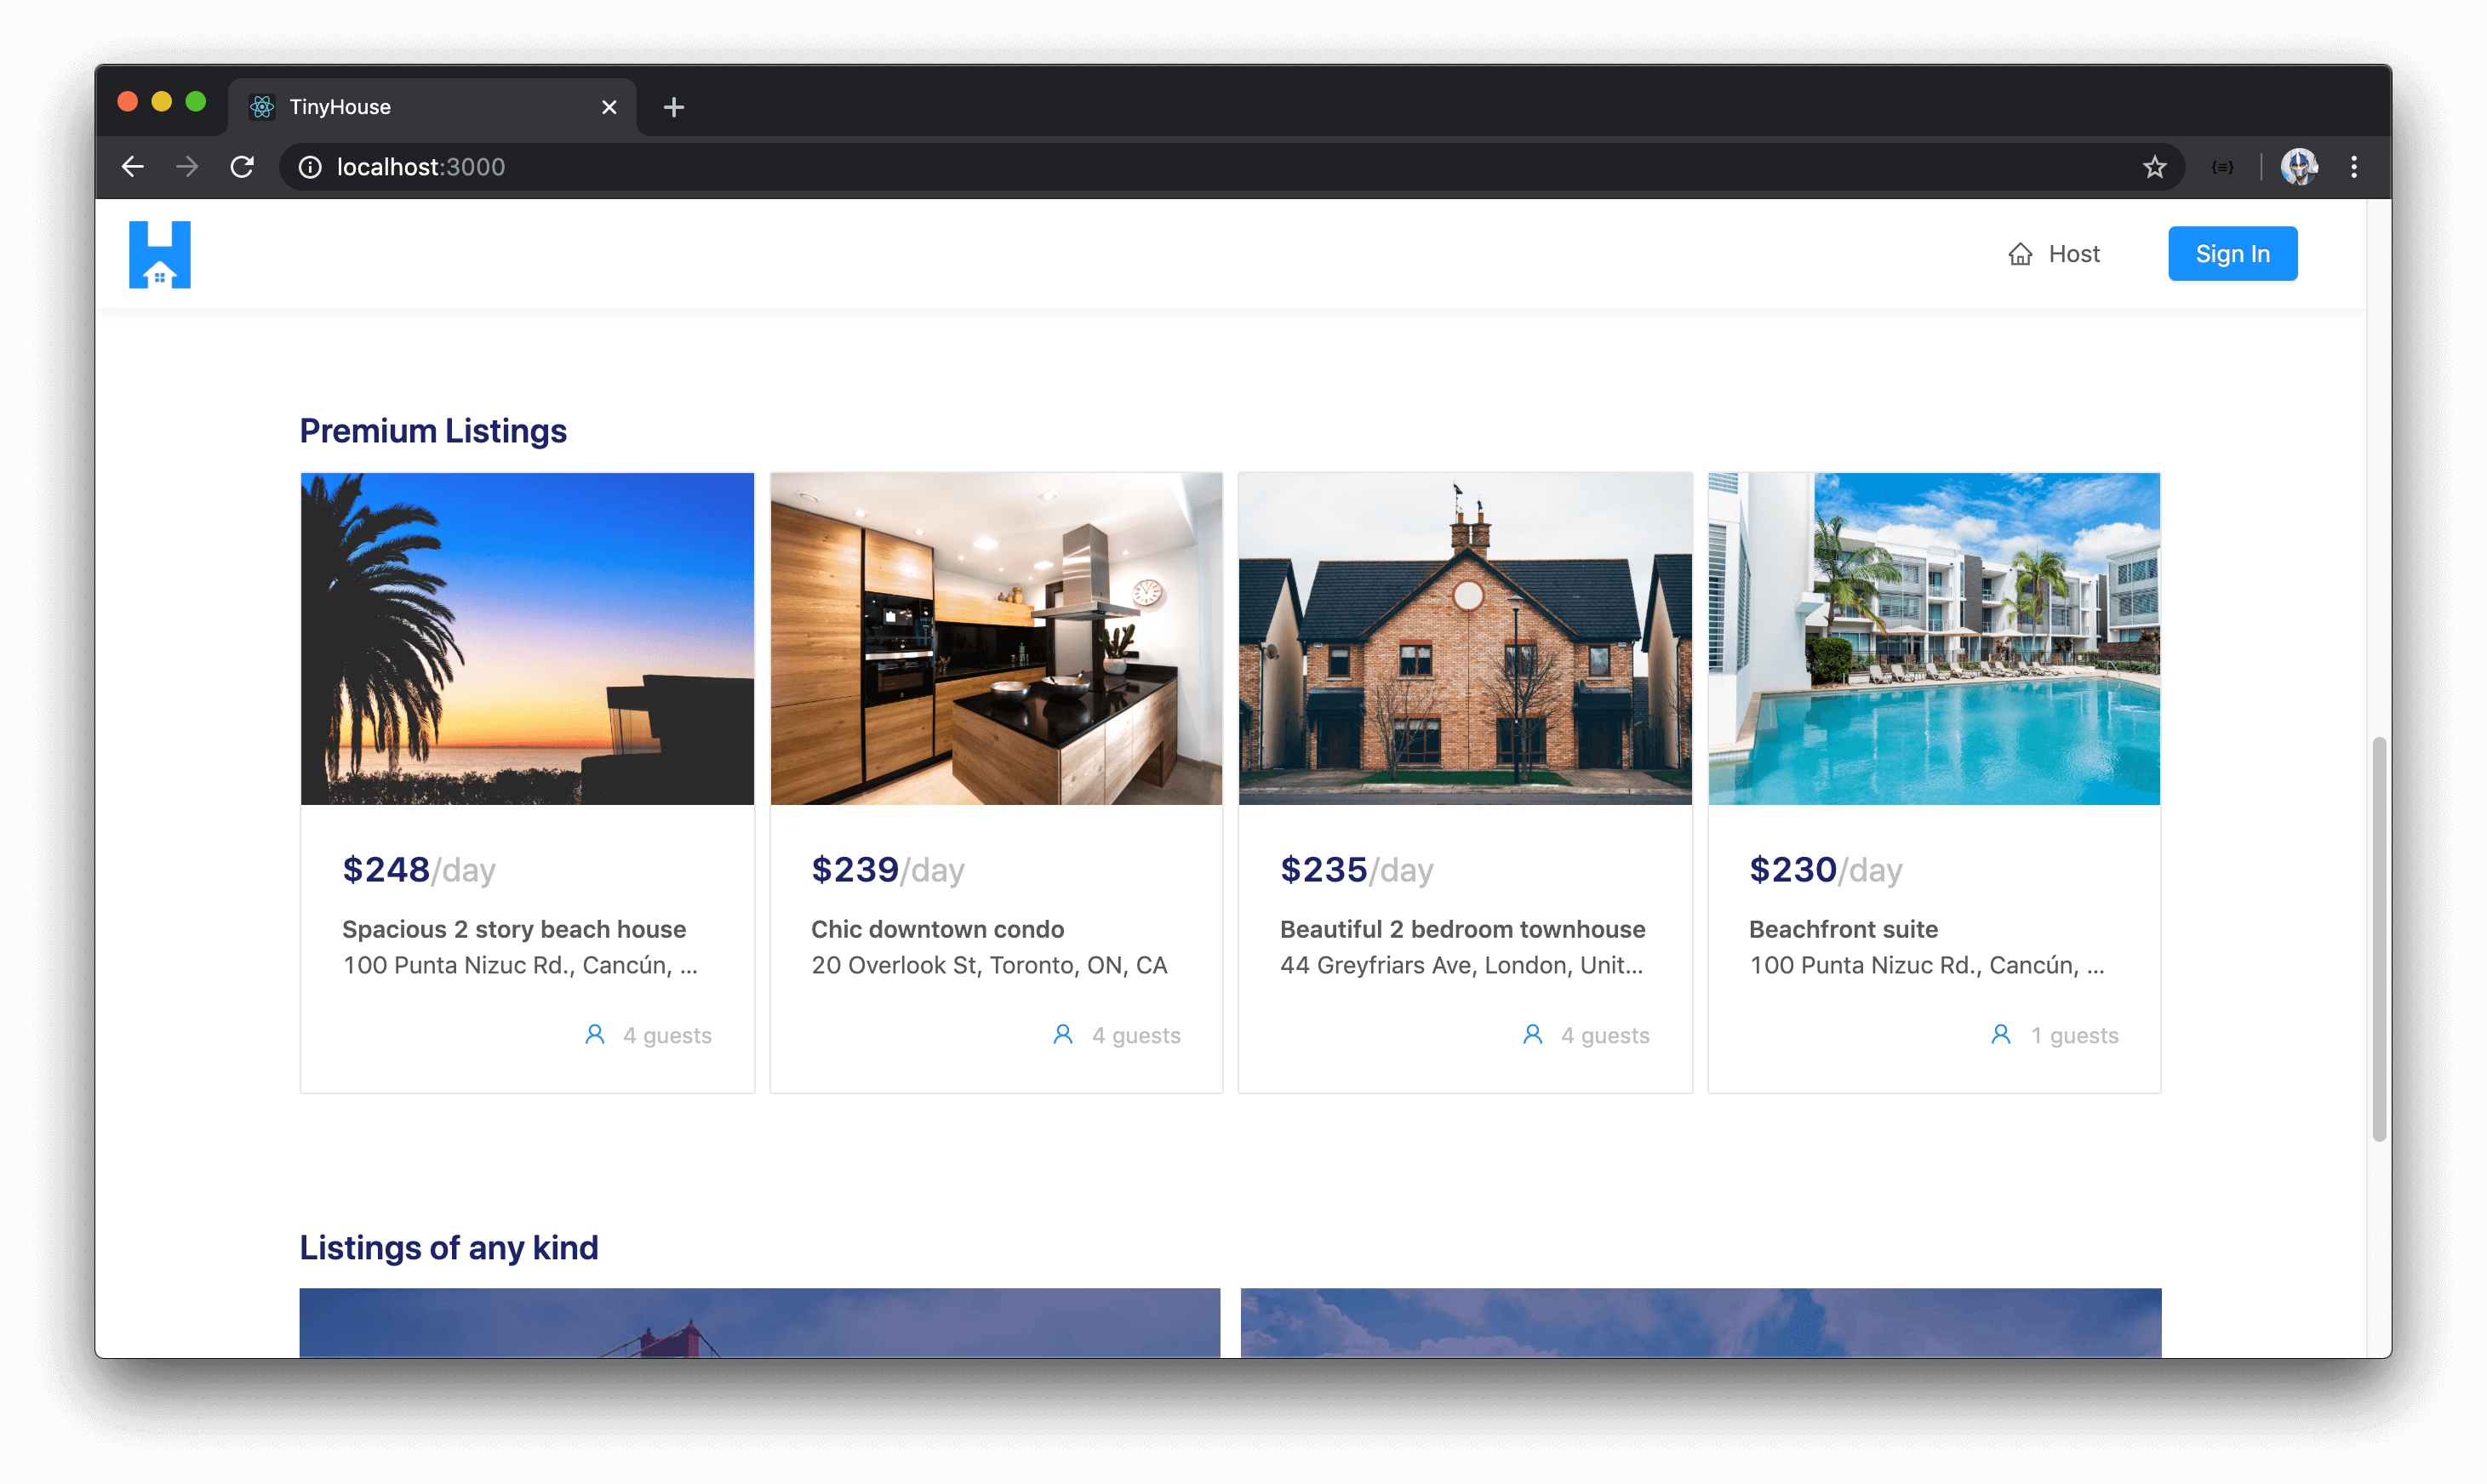
If we take a look at our homepage now, when our query is successful we’ll see the four highest priced listings shown to us.
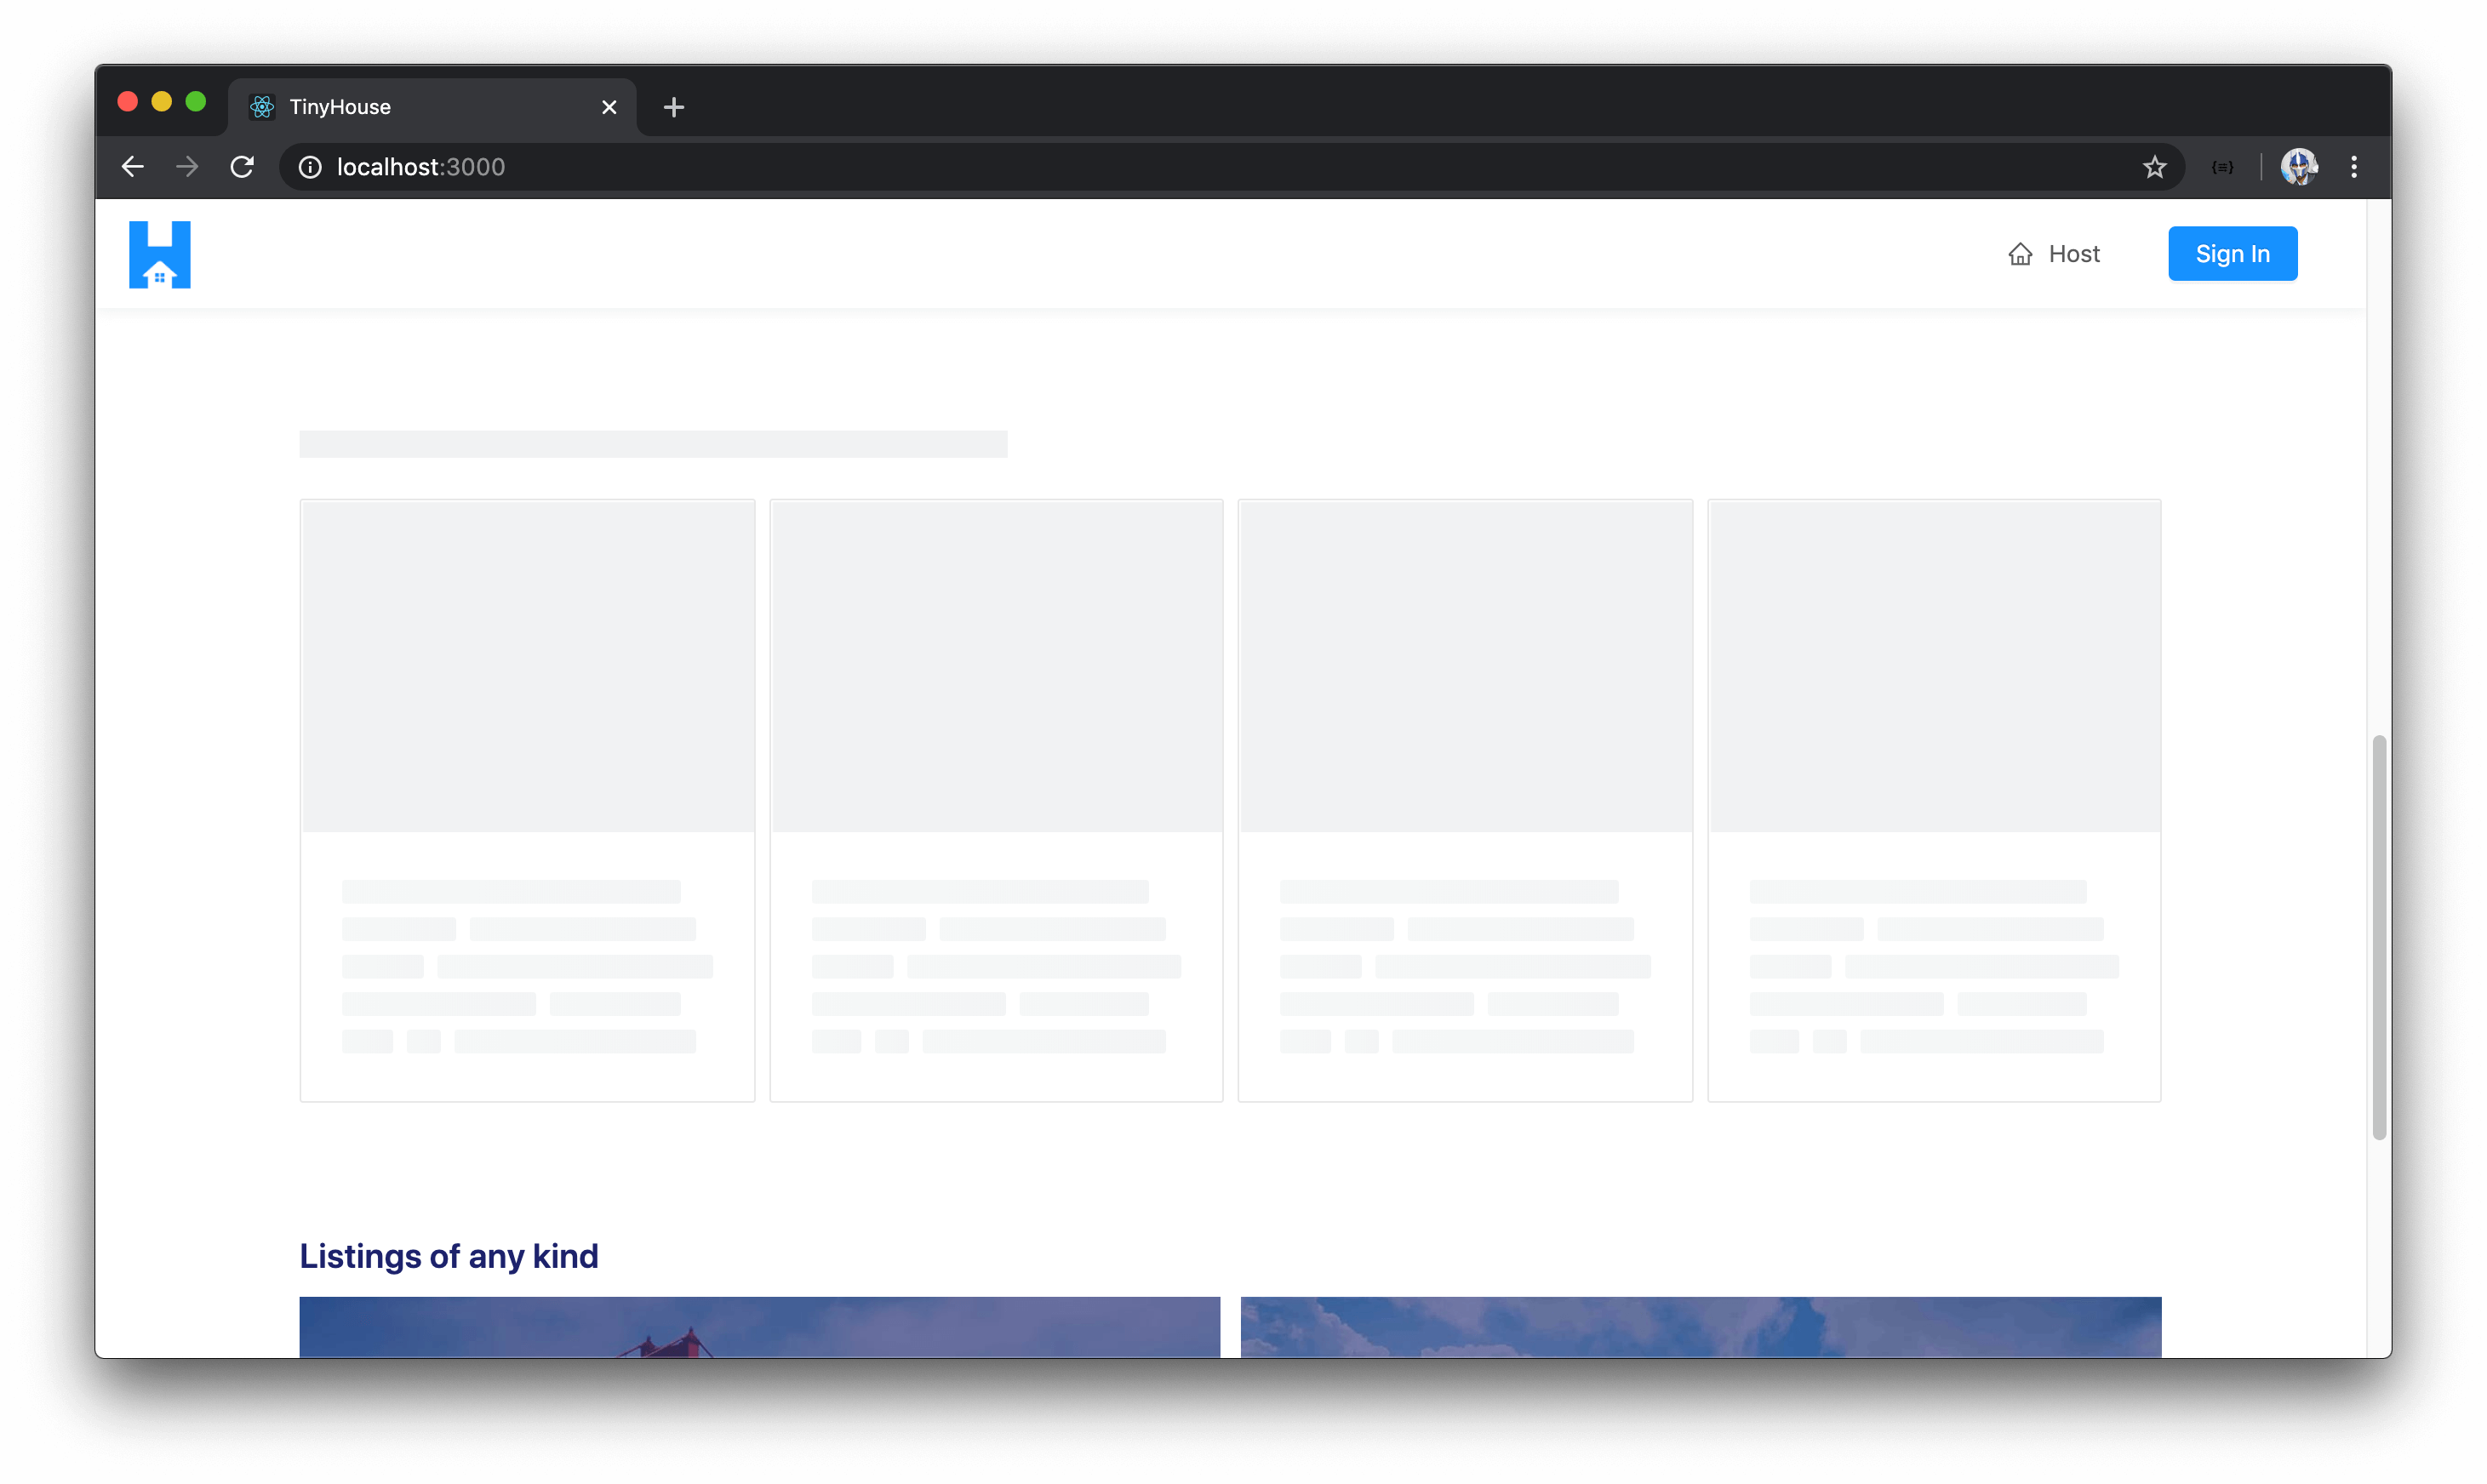
<HOMELISTINGSSKELETON />
Though we have the <HomeListings /> component rendered, our loading state for this section isn’t too presentable at this moment. We just have a text that says Loading.. .
With that said, let’s prepare a <HomeListingsSkeleton /> component responsible for rendering the skeleton UI of our listings section. We’ll create this component index in the same components/ folder within the Home/ sections directory.
client/
  src/
    // ...
    sections/
      // ...
      Home
        components/
          // ...
          HomeListingsSkeleton/
            index.tsx
        index.ts
      // ...
  // ...
In the src/sections/Home/components/index.ts file, we’ll re-export the soon to be created <HomeListingsSkeleton /> component.
client/src/sections/Home/components/index.ts
export * from "./HomeListingsSkeleton";
The <HomeListingsSkeleton /> component will be very similar to the <HomeListings /> component except we’re not going to render <ListingCard/> 's but instead render custom card elements we’ll create that appears as a card in the “loading” state.
In summary, the <HomeListingsSkeleton /> component will essentially render four custom card elements with Ant Design’s <List /> component where each custom card displays a background image to represent the card is in the “loading” state. This background image is to be imported from the assets/ folder within the src/sections/Home/ directory. With that said, the src/sections/Home/components/HomeListingsSkeleton/index.tsx will appear as follows.
client/src/sections/Home/components/HomeListingsSkeleton/index.tsx
import React from "react";
import { Card, List, Skeleton } from "antd";

import listingLoadingCardCover from "../../assets/listing-loading-card-cover.jpg";

export const HomeListingsSkeleton = () => {
  const emptyData = [{}, {}, {}, {}];

  return (
    <div className="home-listings-skeleton">
      <Skeleton paragraph={{ rows: 0 }} />
      <List
        grid={{
          gutter: 8,
          xs: 1,
          sm: 2,
          lg: 4
        }}
        dataSource={emptyData}
        renderItem={() => (
          <List.Item>
            <Card
              cover={
                <div
                  style={{ backgroundImage: `url(${listingLoadingCardCover})` }}
                  className="home-listings-skeleton__card-cover-img"
                ></div>
              }
              loading
            />
          </List.Item>
        )}
      />
    </div>
  );
};
In the <Home /> parent component file, we’ll import the newly created <HomeListingsSkeleton /> component from the adjacent components folder.
client/src/sections/Home/index.tsx
import { HomeHero, HomeListings, HomeListingsSkeleton } from "./components";
In the renderListingsSection() function of the <Home /> component, when our query is in the loading state, we’ll return the <HomeListingsSkeleton /> component we’ve just created instead of a "Loading.." message. With all the changes made to the <Home /> component, the src/sections/Home/index.tsx file will now appear as follows:
client/src/sections/Home/index.tsx
import React from "react";
import { Link, RouteComponentProps } from "react-router-dom";
import { useQuery } from "@apollo/react-hooks";
import { Col, Row, Layout, Typography } from "antd";
import { LISTINGS } from "../../lib/graphql/queries";
import {
  Listings as ListingsData,
  ListingsVariables
} from "../../lib/graphql/queries/Listings/__generated__/Listings";
import { ListingsFilter } from "../../lib/graphql/globalTypes";
import { displayErrorMessage } from "../../lib/utils";
import { HomeHero, HomeListings, HomeListingsSkeleton } from "./components";

import mapBackground from "./assets/map-background.jpg";
import sanFransiscoImage from "./assets/san-fransisco.jpg";
import cancunImage from "./assets/cancun.jpg";

const { Content } = Layout;
const { Paragraph, Title } = Typography;

const PAGE_LIMIT = 4;
const PAGE_NUMBER = 1;

export const Home = ({ history }: RouteComponentProps) => {
  const { loading, data } = useQuery<ListingsData, ListingsVariables>(LISTINGS, {
    variables: {
      filter: ListingsFilter.PRICE_HIGH_TO_LOW,
      limit: PAGE_LIMIT,
      page: PAGE_NUMBER
    }
  });

  const onSearch = (value: string) => {
    const trimmedValue = value.trim();

    if (trimmedValue) {
      history.push(`/listings/${trimmedValue}`);
    } else {
      displayErrorMessage("Please enter a valid search!");
    }
  };

  const renderListingsSection = () => {
    if (loading) {
      return <HomeListingsSkeleton />;
    }

    if (data) {
      return <HomeListings title="Premium Listings" listings={data.listings.result} />;
    }

    return null;
  };

  return (
    <Content className="home" style={{ backgroundImage: `url(${mapBackground})` }}>
      <HomeHero onSearch={onSearch} />

      <div className="home__cta-section">
        <Title level={2} className="home__cta-section-title">
          Your guide for all things rental
        </Title>
        <Paragraph>
          Helping you make the best decisions in renting your last minute locations.
        </Paragraph>
        <Link
          to="/listings/united%20states"
          className="ant-btn ant-btn-primary ant-btn-lg home__cta-section-button"
        >
          Popular listings in the United States
        </Link>
      </div>

      {renderListingsSection()}

      <div className="home__listings">
        <Title level={4} className="home__listings-title">
          Listings of any kind
        </Title>
        <Row gutter={12}>
          <Col xs={24} sm={12}>
            <Link to="/listings/san%20fransisco">
              <div className="home__listings-img-cover">
                <img
                  src={sanFransiscoImage}
                  alt="San Fransisco"
                  className="home__listings-img"
                />
              </div>
            </Link>
          </Col>
          <Col xs={24} sm={12}>
            <Link to="/listings/cancún">
              <div className="home__listings-img-cover">
                <img src={cancunImage} alt="Cancún" className="home__listings-img" />
              </div>
            </Link>
          </Col>
        </Row>
      </div>
    </Content>
  );
};
We’ll head back to the browser and refresh our homepage. When the homepage is shown and the listings query is in flight, we’ll see the custom <HomeListingsSkeleton /> component as the loading state of the listings section.
Great job!
MODULE 8 SUMMARY
In this module, we build the functionality to have the client be able to query for a list of listings.
SERVER PROJECT
SRC/GRAPHQL/TYPEDEFS.TS
We created a single root-level listings field that can be queried from the client to receive the information for a list of listings. The listing query field returns a collection of listings that satisfies three input arguments:
-
limit: The amount of listing objects to be returned for a single page. -
page: The page (i.e. subset) of listing objects to be returned from the"listings"collection. -
filter: The filter (i.e. sort) to be applied to the list of listings returned.
server/src/graphql/typeDefs.ts
  type Query {
    authUrl: String!
    user(id: ID!): User!
    listing(id: ID!): Listing!
    listings(filter: ListingsFilter!, limit: Int!, page: Int!): Listings!
  }
The ListingsFilter Enum determines the different filter values that can be applied to the listings query field. We’ve established two separate filter values:
-
PRICE_LOW_TO_HIGH: To sort the listings from the lowest price to the highest price. -
PRICE_HIGH_TO_LOW: To sort the listings from the highest price to the lowest price.
server/src/graphql/typeDefs.ts
  enum ListingsFilter {
    PRICE_LOW_TO_HIGH
    PRICE_HIGH_TO_LOW
  }
SRC/GRAPHQL/RESOLVERS/LISTING/INDEX.TS
In the listingResolvers map in the src/graphql/resolvers/Listing/index.ts file, we created the root-level query listings() resolver function to find a paginated list of listings from the "listings" collection based on the argument values provided.
server/src/graphql/resolvers/Listing/index.ts
    listings: async (
      _root: undefined,
      { filter, limit, page }: ListingsArgs,
      { db }: { db: Database }
    ): Promise<ListingsData> => {
      try {
        const data: ListingsData = {
          total: 0,
          result: []
        };

        let cursor = await db.listings.find({});

        if (filter && filter === ListingsFilter.PRICE_LOW_TO_HIGH) {
          cursor = cursor.sort({ price: 1 });
        }

        if (filter && filter === ListingsFilter.PRICE_HIGH_TO_LOW) {
          cursor = cursor.sort({ price: -1 });
        }

        cursor = cursor.skip(page > 0 ? (page - 1) * limit : 0);
        cursor = cursor.limit(limit);

        data.total = await cursor.count();
        data.result = await cursor.toArray();

        return data;
      } catch (error) {
        throw new Error(`Failed to query listings: ${error}`);
      }
    }
CLIENT PROJECT
SRC/LIB/GRAPHQL/QUERIES/LISTINGS/INDEX.TS
In the client, we constructed the Listings GraphQL document in the src/lib/graphql/queries/Listings/index.ts file.
client/src/lib/graphql/queries/Listings/index.ts
import { gql } from "apollo-boost";

export const LISTINGS = gql`
  query Listings($filter: ListingsFilter!, $limit: Int!, $page: Int!) {
    listings(filter: $filter, limit: $limit, page: $page) {
      result {
        id
        title
        image
        address
        price
        numOfGuests
      }
    }
  }
`;
SRC/SECTIONS/HOME/INDEX.TSX
In the <Home /> component rendered in the / route, we construct the homepage which involves but is not limited to:
- Making the
listingsquery when the component first mounts. - Presenting the list of highest priced listings in the
<HomeListings />child component. - Presenting the
<HomeHero />component which contains the search input that helps navigate the user to the/listingsroute of our application.
client/src/sections/Home/index.tsx
export const Home = ({ history }: RouteComponentProps) => {
  const { loading, data } = useQuery<ListingsData, ListingsVariables>(LISTINGS, {
    variables: {
      filter: ListingsFilter.PRICE_HIGH_TO_LOW,
      limit: PAGE_LIMIT,
      page: PAGE_NUMBER
    }
  });

  const onSearch = (value: string) => {
    const trimmedValue = value.trim();

    if (trimmedValue) {
      history.push(`/listings/${trimmedValue}`);
    } else {
      displayErrorMessage("Please enter a valid search!");
    }
  };

  const renderListingsSection = () => {
    if (loading) {
      return <HomeListingsSkeleton />;
    }

    if (data) {
      return <HomeListings title="Premium Listings" listings={data.listings.result} />;
    }

    return null;
  };

  return (
    <Content className="home" style={{ backgroundImage: `url(${mapBackground})` }}>
      <HomeHero onSearch={onSearch} />

      <div className="home__cta-section">
        <Title level={2} className="home__cta-section-title">
          Your guide for all things rental
        </Title>
        <Paragraph>
          Helping you make the best decisions in renting your last minute locations.
        </Paragraph>
        <Link
          to="/listings/united%20states"
          className="ant-btn ant-btn-primary ant-btn-lg home__cta-section-button"
        >
          Popular listings in the United States
        </Link>
      </div>

      {renderListingsSection()}

      <div className="home__listings">
        <Title level={4} className="home__listings-title">
          Listings of any kind
        </Title>
        <Row gutter={12}>
          <Col xs={24} sm={12}>
            <Link to="/listings/san%20fransisco">
              <div className="home__listings-img-cover">
                <img
                  src={sanFransiscoImage}
                  alt="San Fransisco"
                  className="home__listings-img"
                />
              </div>
            </Link>
          </Col>
          <Col xs={24} sm={12}>
            <Link to="/listings/cancún">
              <div className="home__listings-img-cover">
                <img src={cancunImage} alt="Cancún" className="home__listings-img" />
              </div>
            </Link>
          </Col>
        </Row>
      </div>
    </Content>
  );
};
MOVING FORWARD
In the next module, we build on what we’ve achieved in this module by building the capability to have a list of listings be queried for a certain location .