MODULE 9 INTRODUCTION
Geocoding is the process of converting address information, in the form of text, into specific geographic coordinates. We’re going to leverage the capability to geocode address information to help allow users to search for listings in certain locations. We’ll do this with the help of Google’s Geocoding API.
In this module, we’ll
- Discuss how Google’s Geocoding API works as well as retrieve the necessary API keys for application.
- Interact with the Geocoding API in our server to resolve the address/location inputs provided by a user.
- In the client, navigate a user to the Listings page when a location search is made.
- In the Listings page, query for listings in a specific location with the help of the Geocoding API.
- Finally, create an index for our
"listings"collection to support efficient location-based queries.
GOOGLE’S GEOCODING API
A sample of the
.envfile in our server project, after this lesson is complete, can be found - here.
We have a collection of listings stored persistently in our database. We’ve created the /listing/:id route in our client to allow users to view information about one certain listing at a time. We’ve also managed to create the capability for users to query for a list of listings that can be sorted based on listing price.
In this module, we’ll focus on the functionality that will allow our users to search for listings based on location .
There are probably many ways to accomplish this. A very simple approach could be that we allow users to fill out a form and let our users provide values for a city, state, and country. In our database, we can try and have our listing documents contain some of this data and we can filter and find the correct listings based on user searches. This is a more a self-developed approach and there’s a lot of questions to think about here - how do we handle spelling mistakes from users providing location information? How do we handle accepting information for many different regions in the world where certain regions may not have the concept of a state, province, etc?
We personally would want something a little more robust, like how Airbnb handles things. In the Airbnb website, there often exists an input field where the user can type a city, a state, a country or a combination of those, and the server will find listings that best matches the user’s input .
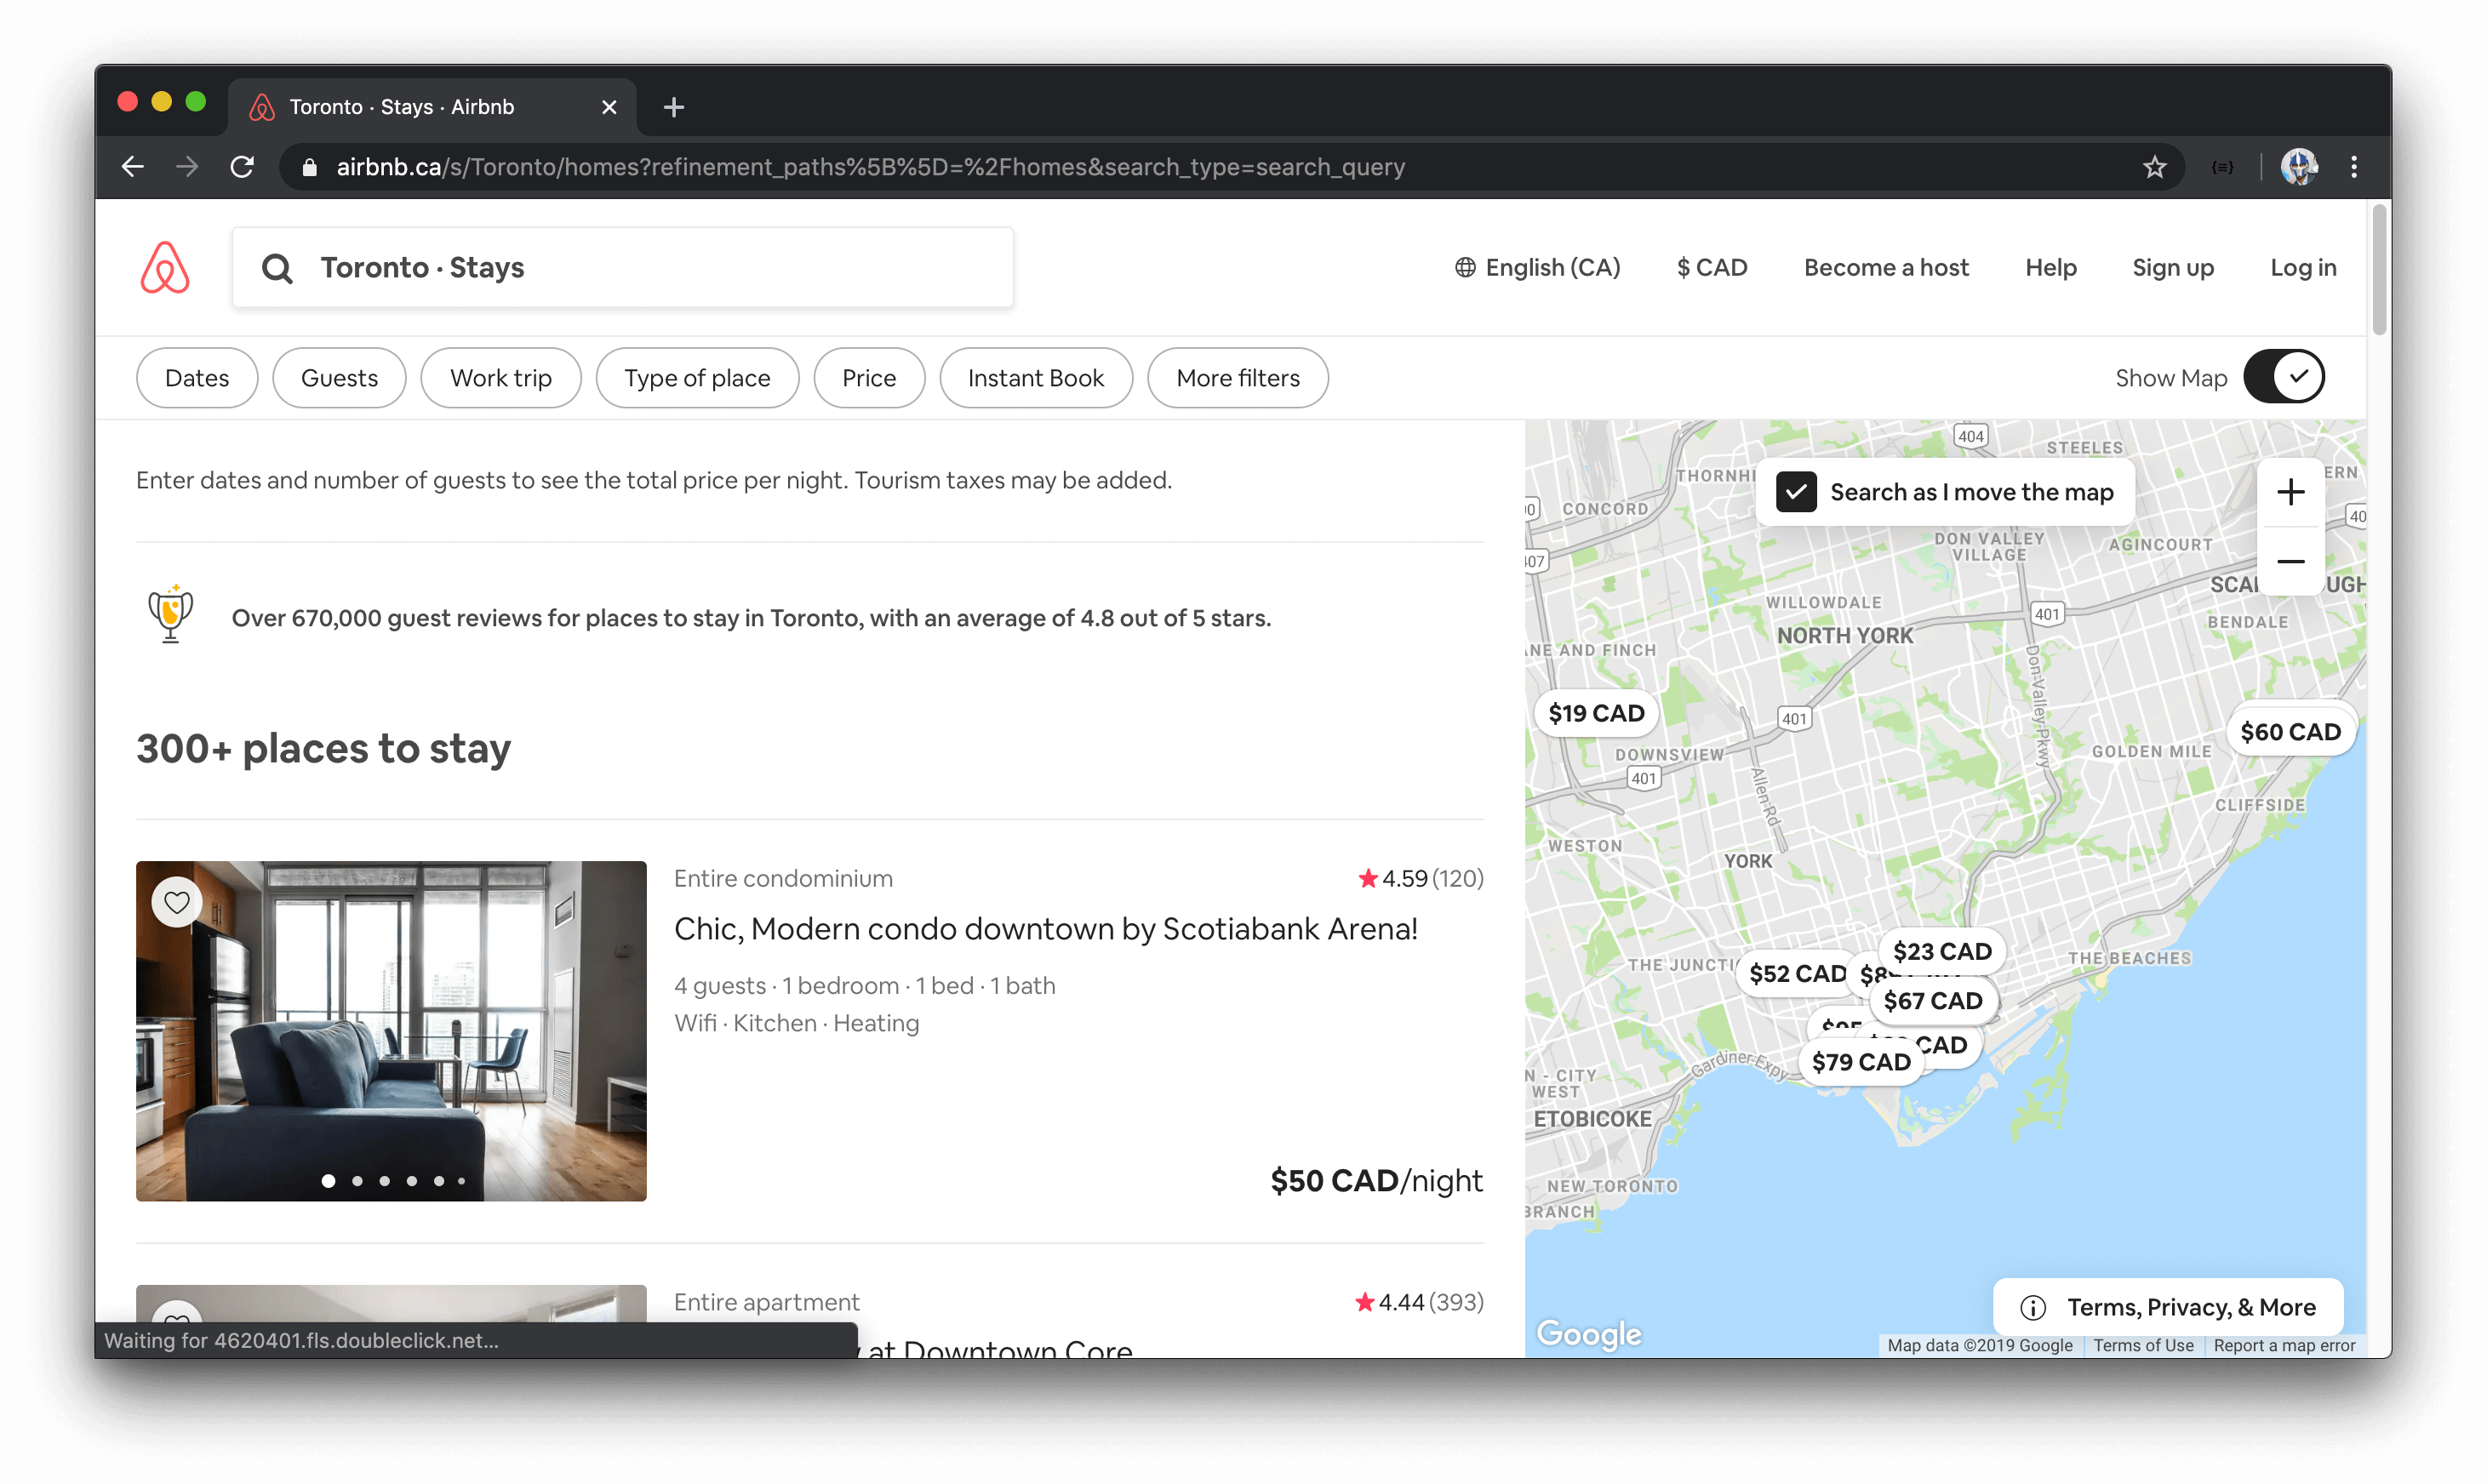
Note: Airbnb does provide searching capabilities in many different ways. We’ve just highlighted the more straightforward approach where a user can search for any location and results are shown based on that location.
Lucky for us, there is a perfect API that can help us achieve something like this. This where we’ll use Google’s Geocoding API .
GOOGLE GEOCODING API
Google’s Geocoding API is a service that provides geocoding and reverse geocoding of addresses. From the Google Geocoding API documentation:
- Geocoding is the process of converting addresses (like a street address) into geographic coordinates (like latitude and longitude), which you can use to place markers on a map or position the map.
- Reverse geocoding is the process of converting geographic coordinates into a human-readable address.
We’re going to spend more time in the next lesson talking about how we’ll want to use the API and what our proposed solution will be but we’ll be attempting to geocode location information. A user is to provide an address and Google’s servers will respond with more information about the address including its latitude and longitude.
Here’s an example geocoding response, for the address input of "1600 Amphitheatre Parkway, Mountain View, CA", that Google shows us in their documentation.
// Sample response for address input of "1600 Amphitheatre Parkway, Mountain View, CA"
{
  "results": [
    {
      "address_components": [
        {
          "long_name": "1600",
          "short_name": "1600",
          "types": ["street_number"]
        },
        {
          "long_name": "Amphitheatre Parkway",
          "short_name": "Amphitheatre Pkwy",
          "types": ["route"]
        },
        {
          "long_name": "Mountain View",
          "short_name": "Mountain View",
          "types": ["locality", "political"]
        },
        {
          "long_name": "Santa Clara County",
          "short_name": "Santa Clara County",
          "types": ["administrative_area_level_2", "political"]
        },
        {
          "long_name": "California",
          "short_name": "CA",
          "types": ["administrative_area_level_1", "political"]
        },
        {
          "long_name": "United States",
          "short_name": "US",
          "types": ["country", "political"]
        },
        {
          "long_name": "94043",
          "short_name": "94043",
          "types": ["postal_code"]
        }
      ],
      "formatted_address": "1600 Amphitheatre Pkwy, Mountain View, CA 94043, USA",
      "geometry": {
        "location": {
          "lat": 37.4267861,
          "lng": -122.0806032
        },
        "location_type": "ROOFTOP",
        "viewport": {
          "northeast": {
            "lat": 37.4281350802915,
            "lng": -122.0792542197085
          },
          "southwest": {
            "lat": 37.4254371197085,
            "lng": -122.0819521802915
          }
        }
      },
      "place_id": "ChIJtYuu0V25j4ARwu5e4wwRYgE",
      "plus_code": {
        "compound_code": "CWC8+R3 Mountain View, California, United States",
        "global_code": "849VCWC8+R3"
      },
      "types": ["street_address"]
    }
  ],
  "status": "OK"
}
In the geocoding response, there’s an address_components array within the result that contains specific information about the location’s street_number , route (Amphitheatre Parkway), locality (which refers to the city or political entity) among other information that can’t be derived from reading the original address input such as administrative_area_level_2 , postal_code , etc.).
Administrative area is the term used to convey the entities below the country level. Within the context of a country like the United States,
administrative_area_level_1often refers to the state andadministrative_area_level_2often refers to the county. The Address Types and Address Component Types section of the Google Geocoding API documentation explains this some more.
We can also see more information being returned from the sample geocoding response above such as a formatted_address field, latitude and longitude of the location, etc. For our use case and how we intend on geocoding locations for our app, we’ll primarily focus on the address_components section of the Geocoding API response. When a user searches for a location, we’ll be interested in three things in particular:
- The
city(which for the most part comes from thelocalityfield ofaddressComponents). - The
admin(i.e.administrative_area_level_1). - The
country.
Our listing documents in the "listings" collection of our database are to have the three fields - city , admin , and country . When a query is made for listings in a certain location, we’ll look to find the listing documents with which these three fields match that of what we’ve found from the API.
We’re going to spend more time talking about this in the next lesson. For now, let’s look to enable Google’s Geocoding API for us to use it in our application.
ENABLE GOOGLE GEOCODING API
To use Google’s Geocoding API we’ll have to activate it from our project’s Google Developer Console. The APIs section of the console can be accessed at console.developers.google.com/apis.
When logged in, click the " ENABLE APIS AND SERVICES " link to head over to the API Library section (or visit https://console.developers.google.com/apis/library directly in the browser).

Next, search for " Geocoding API " and when found, click ENABLE to enable the API.

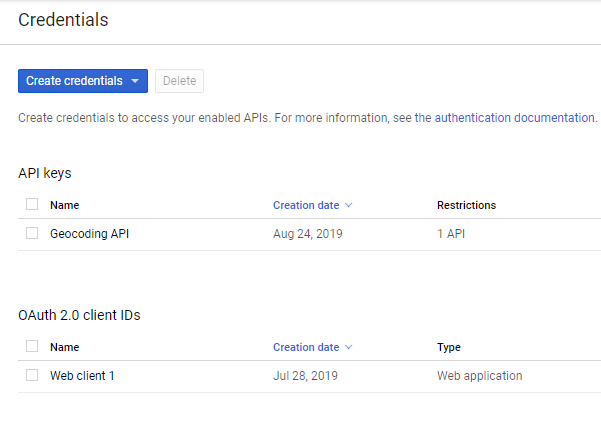
When the API is enabled, within the " Geocoding API " section, click on CREDENTIALS and then Credentials in APIs & Services to create a new credential for this API.
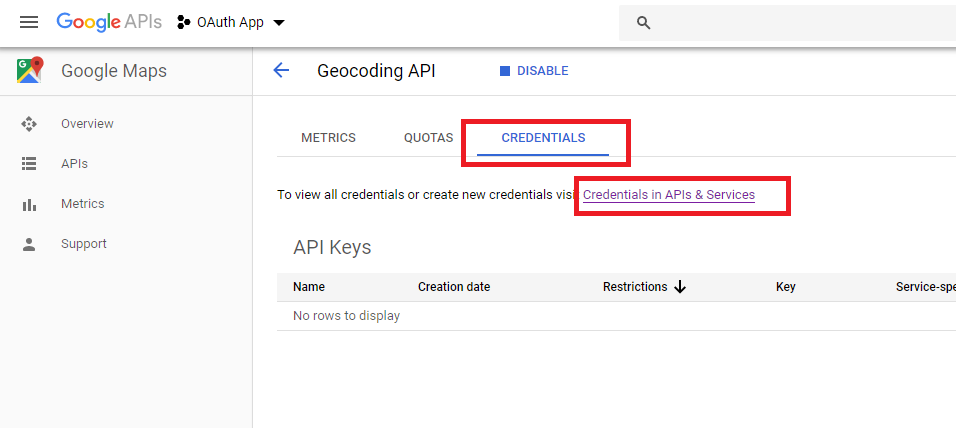
This will take us to the credentials section of the APIs in our console where we can create a new API Key.
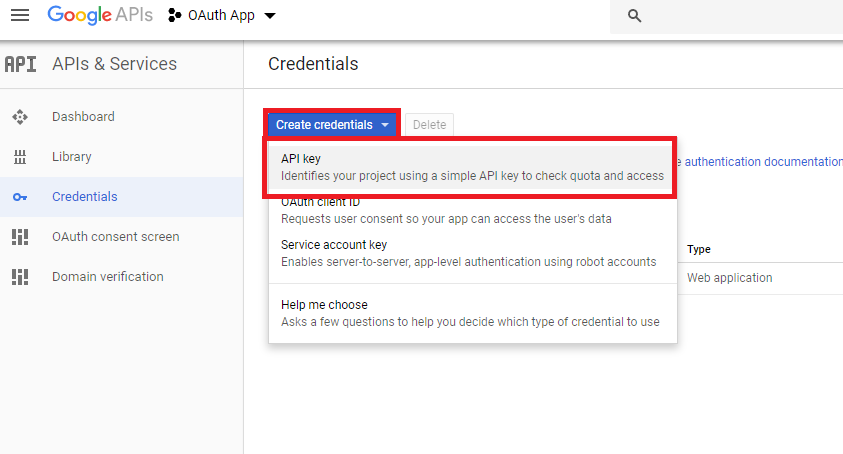
When the new API Key is created, we’ll restrict it so that it can only be used for the " Geocoding API ".
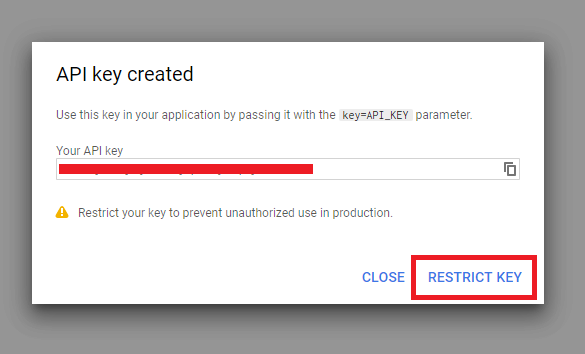
When we look to restrict the API Key, we can rename our API key to something more meaningful and we’ll name it " Geocoding API " so we know what it’s going to being used for. We can keep the application restriction as none. If in the future we wanted to expand our app to the iOS or Google Play store, the API key will still work. We do, however, want to restrict the key to be for the Geocoding API only.
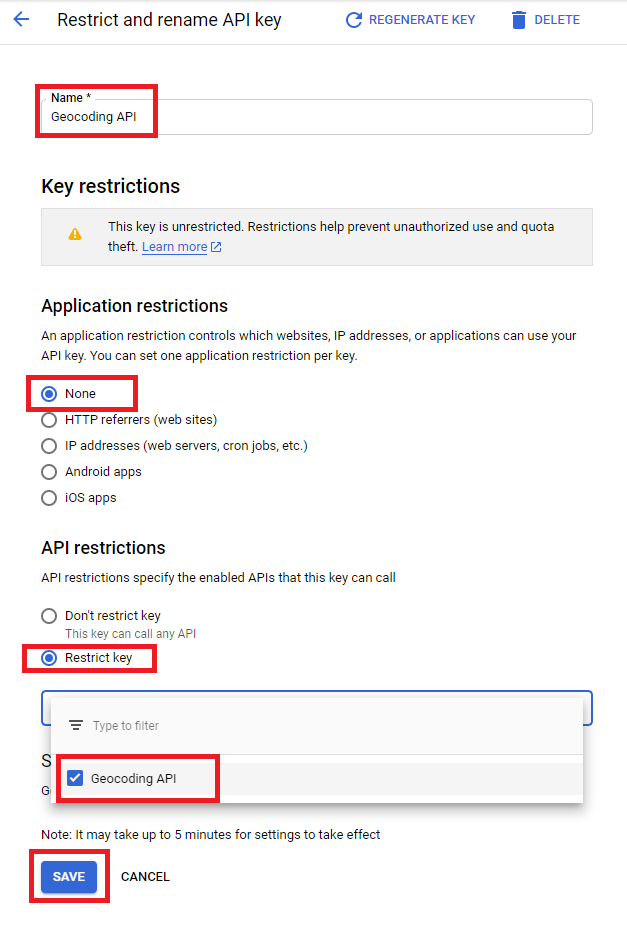
Perfect, we’ll now have our Geocoding API key available to us.
Since we’ll need this API Key in our application when we are to have requests be made in our app, we’ll save the newly generated Geocoding API Key as an environment variable in our server application. In the .env file of our server project, we’ll add a new environment variable we’ll label G_GEOCODE_KEY and we’ll provide the value we’ve obtained from our Google developer console.
G_GEOCODE_KEY=*****************************
Google Developer Console - Billing Information
As a quick note and before we close - we believe before you can start using the Google Maps Platform APIs and SDKs, you might have to create a billing account with your payment information in the Google Developer Console. This is documented and mentioned in the Get Started with Google Maps Platform documentation.
To add billing information, you’ll need to head over to the /billing/ route of your project in the developer console with which you can provide your billing information.
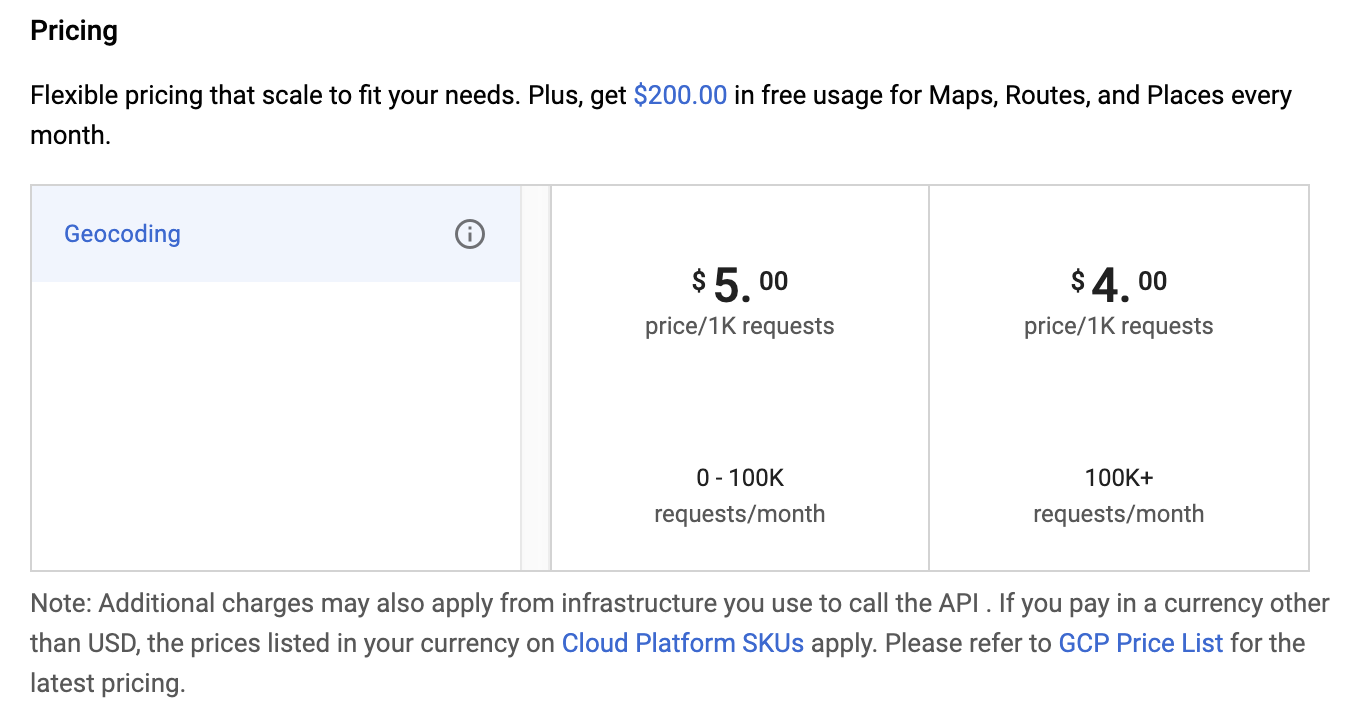
We encourage you to provide your billing information if possible. If you’re building the app locally and for development purposes, it’s highly unlikely your API keys are going to go to be used by a lot of people unless you share it with them . The Geocoding API uses a pay-as-you-go pricing model where it’s summarized that it costs around 5$ per 1000 requests (which is unlikely to be hit when experimenting and using the API Key locally).
With a Google Geocoding API Key now created and saved in our server environment configuration, in the next coming lessons, we’ll begin updating our GraphQL fields such that we can return listings to a user based on the location address they search for.
LOCATION-BASED SEARCHING FOR LISTINGS
In this lesson, we’ll address the gameplan we have in mind in how we want to conduct location-based searching in our app. If a user was to search for a country (like Canada), all the listings in our application that are in Canada should be surfaced and shown in the listings page we’ll create under the /listings/:location? route.

If a user was to search for a city like Toronto, all the listings in the city of Toronto should be surfaced and shown in the /listings/:location? route.

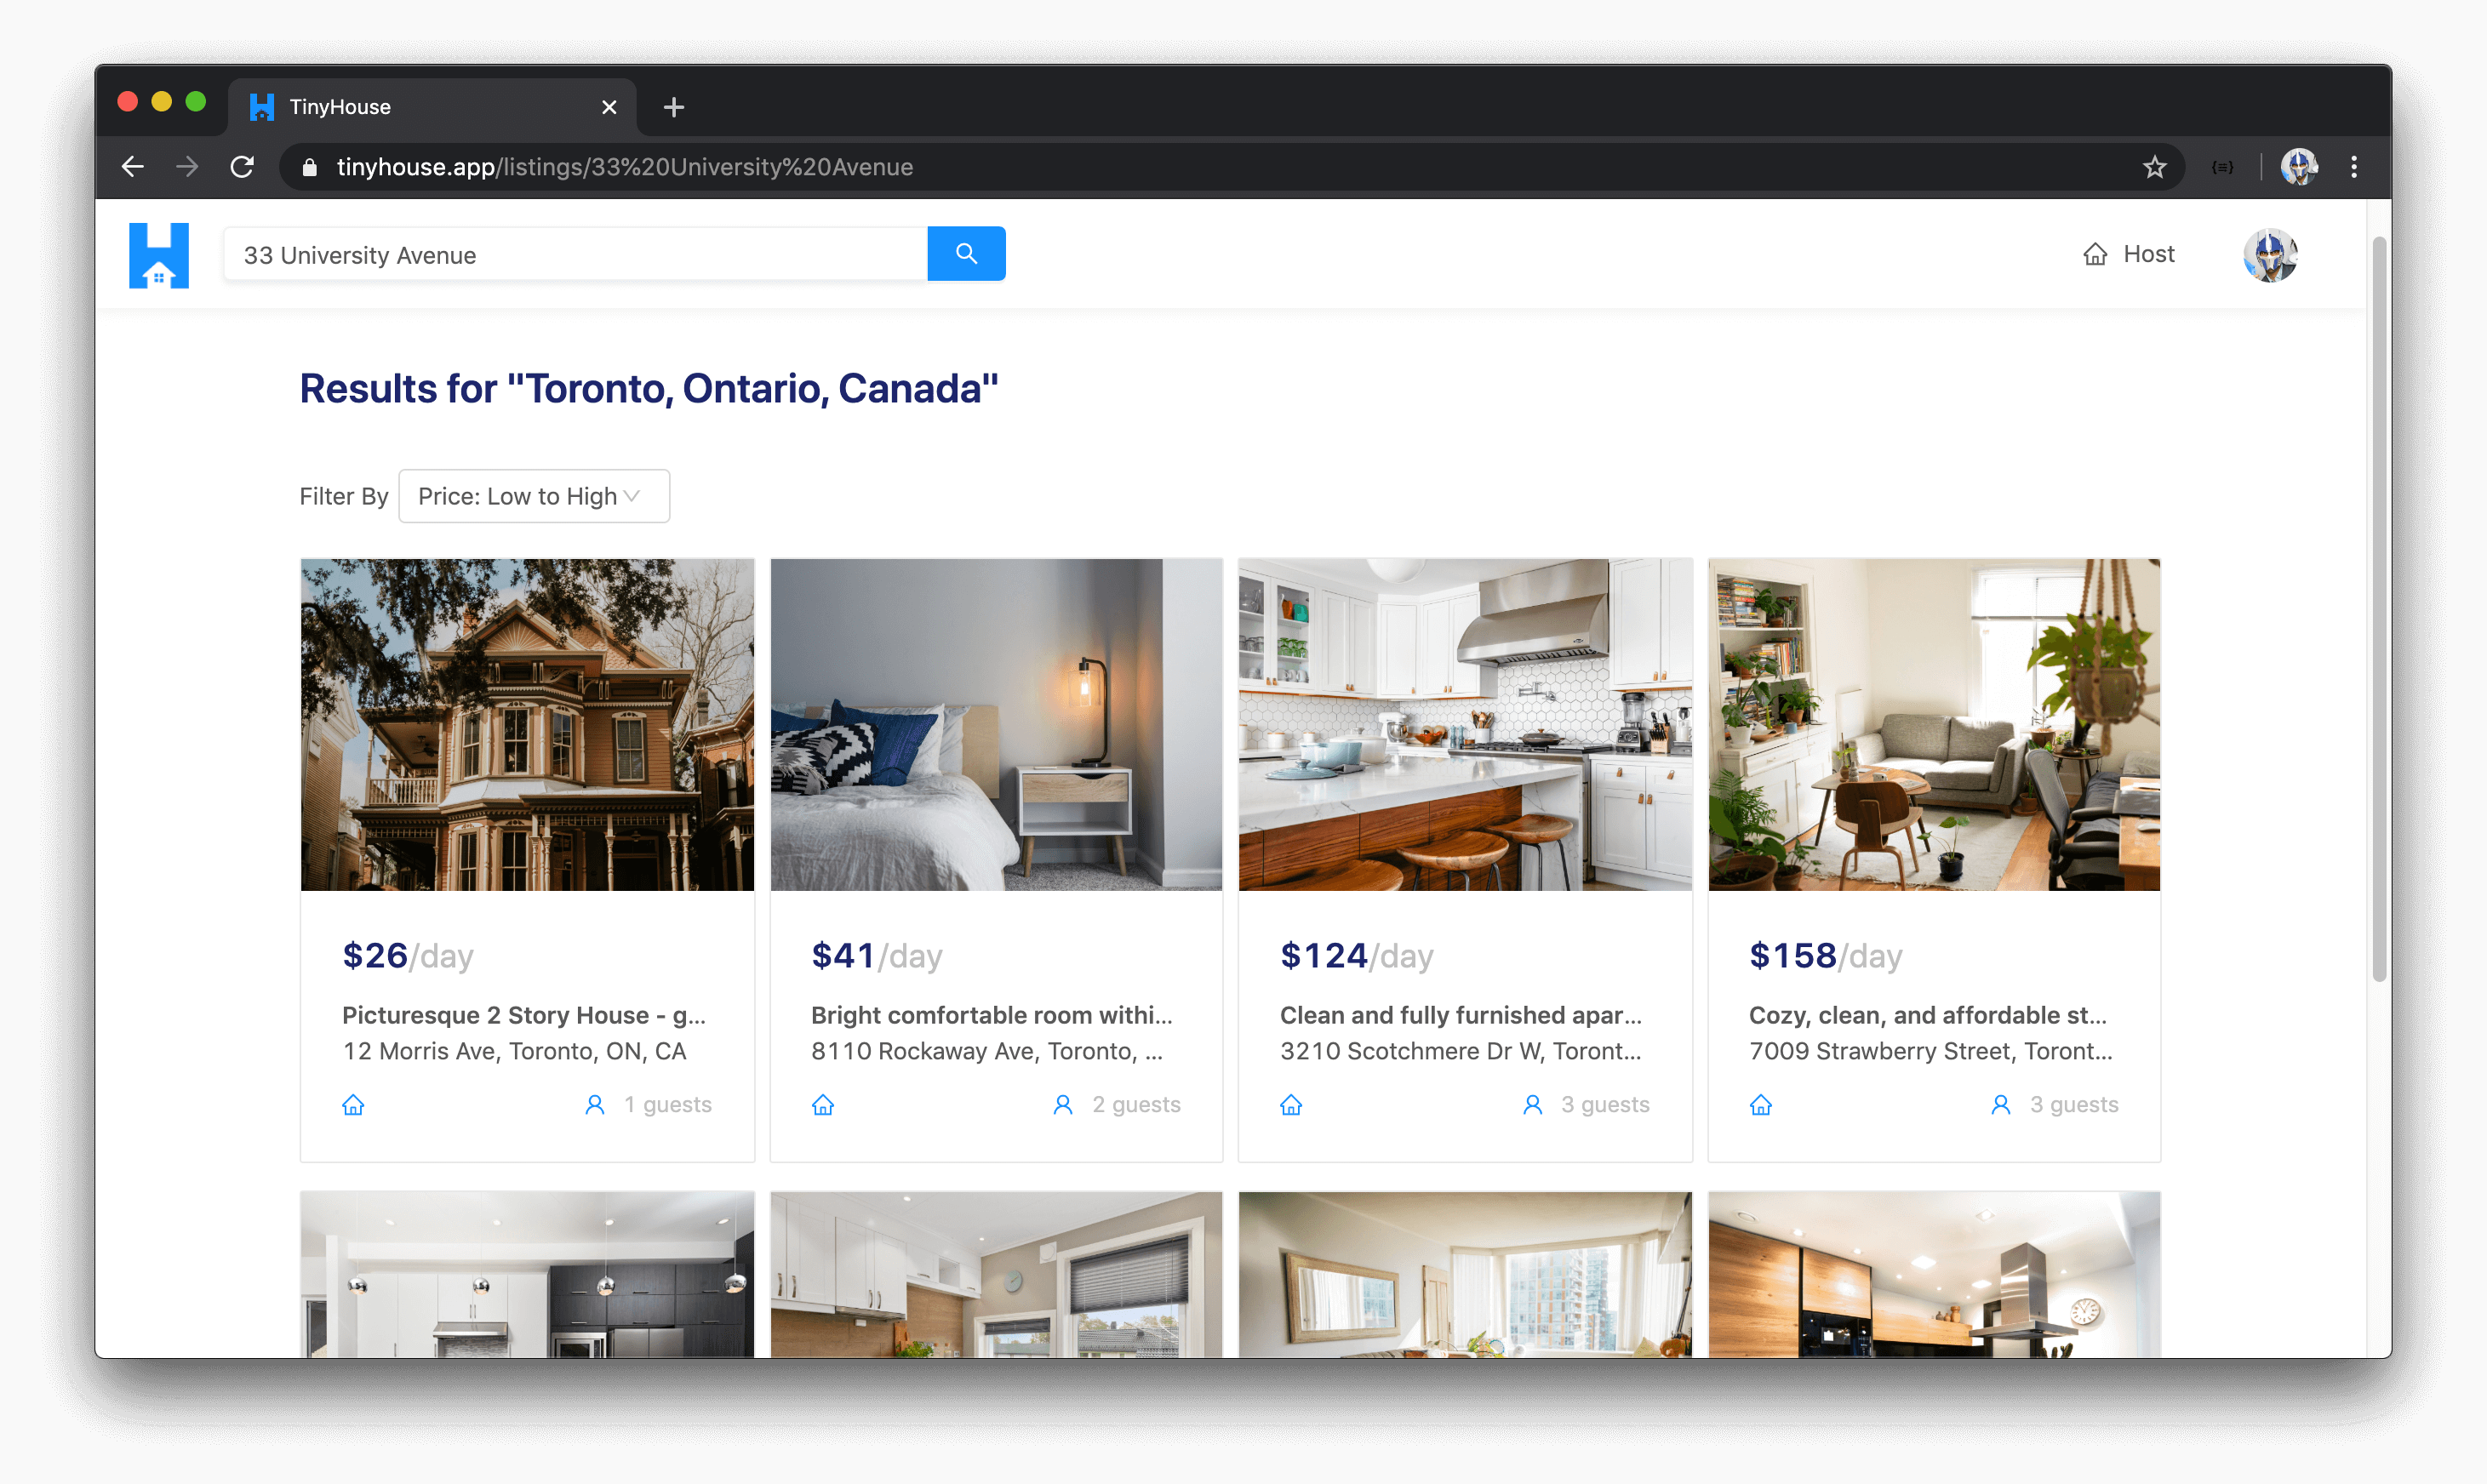
If a user was to search for a specific address, we won’t show listings only for that certain address but instead show listings for the city in which the address pertains to. For example, if a user was to search for "33 University Avenue" , which is an address located in downtown Toronto, the listings for the city of Toronto will surface. The city is the smallest searchable unit for where we surface listings information.
With that said, how do we facilitate this location-based searching?
FIND()
The listing documents in the "listings" collection of our database have three fields that will be used to help with our searching - country , admin , and city .
// A document in the listings collection
{
  _id: ObjectId("5d378db94e84753160e08b30"),
  // ...
  country: "Canada",
  admin: "Ontario",
  city: "Toronto"
  // ...
}
The listings() resolver function uses the Node Mongo driver’s find() method to get the collection of listings information that is to be returned. Since no filters or properties are defined within the query of this find() , MongoDB simply returns everything from the "listings" collection.
server/src/graphql/resolvers/Listing/index.ts
let cursor = await db.listings.find({});
If we were to specify certain selection filters within the find() query, perhaps something like country: "Canada" , MongoDB will find all the documents where the document country field is equal to "Canada" .
// Finding listings in a certain country
let cursor = await db.listings.find({
  country: "Canada"
});
If we were to add a filter for the admin field (e.g. admin: "Ontario" ), we’ll get all the listing documents where the admin is "Ontario" .
// Finding listings in a certain administration
let cursor = await db.listings.find({
  admin: "Ontario"
});
If we specified a filter for the city (e.g. city: "Toronto" ), we’ll get all the documents where the city is "Toronto" .
// Finding listings in a certain city
let cursor = await db.listings.find({
  city: "Toronto"
});
Lastly, if we wanted to filter documents in a more controlled manner, we can say we want to find listings where the listing country is equal to "Canada" , admin is "Ontario" , and city is "Toronto" . This will filter away any listing documents that are in Canada but don’t have an admin of Ontario. It will further filter away listings that are in Canada and Ontario but aren’t in the city of Toronto. In other words, MongoDB will return documents for where the country , admin , and city fields are "Canada" , "Ontario" , and "Toronto" respectively.
// Finding listings in a specific country, admin, and city
let cursor = await db.listings.find({
  country: "Canada",
  admin: "Ontario",
  city: "Toronto"
});
We now have the first half of our gameplan in mind. When it comes to finding the correct listings in our database, we can apply the appropriate filters in our MongoDB find() query.
GEOCODING LOCATION INPUT
When a user is to provide an input, whether it’s an address, city, or just an administration area - how can we get more focused geographic information for this particular search? This is where we’re going to use Google’s Geocoding API to help geocode the search input (i.e. convert the input provided to valid geographic information).
Let’s take a look at the example response we saw in the last lesson from the Google API Geocoding documentation for an address input of "1600 Amphitheatre Parkway, Mountain View, CA" .
// Sample response for address input of "1600 Amphitheatre Parkway, Mountain View, CA"
{
  "results": [
    {
      "address_components": [
        {
          "long_name": "1600",
          "short_name": "1600",
          "types": ["street_number"]
        },
        {
          "long_name": "Amphitheatre Parkway",
          "short_name": "Amphitheatre Pkwy",
          "types": ["route"]
        },
        {
          "long_name": "Mountain View",
          "short_name": "Mountain View",
          "types": ["locality", "political"]
        },
        {
          "long_name": "Santa Clara County",
          "short_name": "Santa Clara County",
          "types": ["administrative_area_level_2", "political"]
        },
        {
          "long_name": "California",
          "short_name": "CA",
          "types": ["administrative_area_level_1", "political"]
        },
        {
          "long_name": "United States",
          "short_name": "US",
          "types": ["country", "political"]
        },
        {
          "long_name": "94043",
          "short_name": "94043",
          "types": ["postal_code"]
        }
      ],
      "formatted_address": "1600 Amphitheatre Pkwy, Mountain View, CA 94043, USA",
      "geometry": {
        "location": {
          "lat": 37.4267861,
          "lng": -122.0806032
        },
        "location_type": "ROOFTOP",
        "viewport": {
          "northeast": {
            "lat": 37.4281350802915,
            "lng": -122.0792542197085
          },
          "southwest": {
            "lat": 37.4254371197085,
            "lng": -122.0819521802915
          }
        }
      },
      "place_id": "ChIJtYuu0V25j4ARwu5e4wwRYgE",
      "plus_code": {
        "compound_code": "CWC8+R3 Mountain View, California, United States",
        "global_code": "849VCWC8+R3"
      },
      "types": ["street_address"]
    }
  ],
  "status": "OK"
}
From the results returned, we get address_components which summarize the components of the address in question. The types field within each address component is the type of the returned geographic result. So here we see:
-
street_numberis"1600". -
routeis"Amphitheatre Parkway". -
localityandpoliticalinformation refers to"Mountain View"(in this example, this can be recognized as the city). -
administrative_area _1tells us the state is in"California"andadministrative_area_2tells us the county is"Santa Clara". - We get the
countryas"United States"and thepostal_codeof the address as"94043". - We also get other information such as the geometry (i.e.
latitude/longitude) and aformatted addressbut our solution is mostly concerned with theaddress_componentsresults.
With this information available to us, how would we map the appropriate address component type to the fields we have in our listing document? The geocoder often returns a large list of address components and we’ll only need to access or use a few.
country
The country address component is the most straightforward one and is the highest location order returned from the geocoder. The address_component type label is country and everything we search for has to have a country .
To get the country of a location input, we’ll simply map the country address component value from the result to the country field in our query.
admin
administrative_area_level_1 from the geocoder indicates the first level entity below country. In the US and Canada, this maps to the states and provinces of these countries respectively.
To get the admin of a location input, we’ll simply map the administrative_area_level_1 type value from the geocoder result to the admin field in our query.
city
To get the city of a location input is a little more tricky since the geocoder doesn’t return an address component for a type labeled city. What it returns is often locality which indicates an incorporated city or town political entity. However, we’ve found the locality address component isn’t provided for results for a few certain inputs but we’ve recognized in these cases, a postal_town field (which refers to a grouping of geographic areas such as locality) is often provided.
To get the city of a location input, we’ll check if the locality address component exists from the API and if so we’ll use that value for the city. If locality doesn’t exist, we’ll check for the postal_town value.
For more information on each of the different types within the
address_componentsarray of the geocoder result, be sure to check the Address Types and Address Component Types section of the Google Geocoding API documentation.
Conclusion
One important note to mention is that our query will depend on the fact that a country can be found from a location input. When a user searches for a certain location, we’ll have to add a filter for at least the country field. If a country can’t be found from the geocoder, it probably means the search was invalid and we’ll throw an error.
However, if for some reason or another, we’re unable to find the admin (i.e. administrative_area_level_1 ) or unable to find the city BUT the country value from the geocoder was returned → we’ll only add the filter for the country and make the query.
Lastly, it will be important for the user to know what was recognized from their search. As an example, if the user searches for Toronto, we’ll be explicit and tell the user the city, the admin, and the country that their search falls into. We’ll have this information sent from the server to the client.
In the next lesson, we’ll implement the solution we’ve talked about here in our server application!
UPDATING THE LISTINGS RESOLVER
In this lesson, we’ll begin to write the code in our server project to help allow a user to search for listings in a certain location . We’re going to modify the existing listings GraphQL query field to accept an optional location argument that when provided will return the listings that pertain only to that location.
To access Google’s Geocoding API, we’re going to use the Node.js client for Google Maps Services which provides access to a list of different Maps APIs such as the Directions API, Elevation API, and the one we’re interested in - the Geocoding API.
In our Node server project, we’ll first install the Google Maps client.
npm i @google/maps
Once installed, we’ll install the community prepared typings at @types/google__maps .
npm i -D @types/google__maps
With the Google Maps Node client available, we can begin to add geocoding functionality in our server project. We already have a src/lib/api/Google.ts file where we’ve instantiated our OAuth2 client and created the function necessary to log a user in and obtain the necessary OAuth token for a logged-in user. We’ll use this same file to construct a new Maps client constructor as well and a function labeled geocode() where our listings() resolver function will call to obtain geographic information of that location.
First, we’ll create our maps client under a constant we’ll call maps . To do so, we’ll need to run the createClient() function available to us from the @google/maps package. The argument we’ll provide to the createClient() function is an options object where at the minimum we’ll need to supply the API Key for our Geocoding API. We’ve already created the G_GEOCODE_KEY environment variable in our server project that references the Geocoding API Key we’ve created, so in our createClient() constructor options - we’ll specify a key with the value of the G_GEOCODE_KEY environment variable with which we’ll access with process.env .
// ...
import { createClient } from "@google/maps";

// ...

const maps = createClient({ key: `${process.env.G_GEOCODE_KEY}` });
The documentation tells us that to make this a Promise based solution, we can provide another key value in the options object denoted with Promise . In the Promise key option, we’ll provide the actual Promise object constructor as the value.
// ...
import { createClient } from "@google/maps";

// ...

const maps = createClient({ key: `${process.env.G_GEOCODE_KEY}`, Promise });
With our maps client constructed, we’ll create the geocode() function property of the Google object in this file.
// ...

export const Google = {
  // ...
  geocode: async () => {}
};
For us to run the geocoding functionality and provide additional geographic information, we’ll need access to the location provided from the client. With that said, we’ll assume that location is to be passed into this function as a string and we’ll call this location parameter address .
// ...

export const Google = {
  // ...
  geocode: async (address: string) => {}
};
With the address to be passed in and the constructed maps client available, we can run the geocode function available as part of the maps client constructor which accepts an options object that contains an address. To maintain a promise-based solution, the documentation tells us to chain a asPromise() function the .geocode() function as well.
// ...

export const Google = {
  // ...
  geocode: async (address: string) => {
    const res = await maps.geocode({ address }).asPromise();
  }
};
The response from the geocode().asPromise() function is the geocoding response from the API and it’s the response that is to have the address_components array that we’ll be interested in accessing. If this response was to ever fail, it could have a status code of either less than 200 or greater than 299 , so we can check for this and throw an error if ever to occur.
// ...

export const Google = {
  // ...
  geocode: async (address: string) => {
    const res = await maps.geocode({ address }).asPromise();

    if (res.status < 200 || res.status > 299) {
      throw new Error("failed to geocode address");
    }
  }
};
If the response is successful, we’ll look to parse the address_components of the response to obtain information on the country , admin , and city of the address input. In the geocode() function within the Google object, we’ll call another function we’ll create shortly called parseAddress() , that will help parse the response from the Geocoding API, and we’ll pass the address_components array from the response result.
server/src/lib/api/Google.ts
export const Google = {  geocode: async (address: string) => {
    const res = await maps.geocode({ address }).asPromise();

    if (res.status < 200 || res.status > 299) {
      throw new Error("failed to geocode address");
    }

    return parseAddress(res.json.results[0].address_components);
  }};
PARSEADDRESS()
We’ll now need to create the parseAddress() function and we’ll create it above our Google object. We’ll state that the parseAddress() function is to accept a parameter called addressComponents . We can define the shape of this parameter with an interface we can import from the typings of the @google/maps library called AddressComponent . The AddressComponent interface represents the shape of a single address component with which we’ll say the addressComponents parameter of the function is to be an array of these components.
// ...
import { createClient, AddressComponent } from "@google/maps";

const parseAddress = (addressComponents: AddressComponent[]) => {};

export const Google = {
  // ...
};
In the parseAddress() function, we’ll initialize three variables - country , admin , and city with null values. By the end of the function, we’ll return an object that contains these three properties.
// ...

const parseAddress = (addressComponents: AddressComponent[]) => {
  let country = null;
  let admin = null;
  let city = null;

  return { country, admin, city };
};

export const Google = {
  // ...
};
Before the return statement of the parseAddress() function, we’ll look through the addressComponents array and try and find values of the types that we can map to one of the properties we return. To loop through every item in the addressComponents array, we can use a for loop for every component in addressComponents .
// ...

const parseAddress = (addressComponents: AddressComponent[]) => {
  let country = null;
  let admin = null;
  let city = null;

  for (const component of addressComponents) {
  }

  return { country, admin, city };
};

export const Google = {
  // ...
};
In the for loop, we’ll check for country as a type in the addressComponents array. Since the types field of an iterated component from addressComponents is an array, we can check and see if the component types includes country . If it does, we’ll make the value of the country local variable to the value of the long_name property of the component.
// ...

const parseAddress = (addressComponents: AddressComponent[]) => {
  let country = null;
  let admin = null;
  let city = null;

  for (const component of addressComponents) {
    if (component.types.includes("country")) {
      country = component.long_name;
    }
  }

  return { country, admin, city };
};

export const Google = {
  // ...
};
Note: Each address component has a
long_nameandshort_nameproperty. We’ll be using the value of thelong_nameproperty for the fields we want to access.
We’ll then try and map the component where the types includes administration_area_level_1 to the value of the admin field in our function.
// ...

const parseAddress = (addressComponents: AddressComponent[]) => {
  let country = null;
  let admin = null;
  let city = null;

  for (const component of addressComponents) {
    if (component.types.includes("country")) {
      country = component.long_name;
    }

    if (component.types.includes("administrative_area_level_1")) {
      admin = component.long_name;
    }
  }

  return { country, admin, city };
};

export const Google = {
  // ...
};
For the city , we’ll look for a component where the types includes the locality type OR the postal_town type.
server/src/lib/api/Google.ts
const parseAddress = (addressComponents: AddressComponent[]) => {
  let country = null;
  let admin = null;
  let city = null;

  for (const component of addressComponents) {
    if (component.types.includes("country")) {
      country = component.long_name;
    }

    if (component.types.includes("administrative_area_level_1")) {
      admin = component.long_name;
    }

    if (component.types.includes("locality") || component.types.includes("postal_town")) {
      city = component.long_name;
    }
  }

  return { country, admin, city };
};
When our listings() resolver function now calls the geocode() function in our Google API object and passes a location parameter - it can expect country , admin , and city information for that location address to be returned.
LISTINGS()
Let’s now modify the GraphQL type definitions for the listings field to note that it can accept a location argument that is optional and is of the string type. We’ll state the location field as optional since this listings field is to be used elsewhere in our app like the homepage where a location value isn’t provided to get the highest-priced listings.
server/src/graphql/typeDefs.ts
  type Query {
    authUrl: String!
    user(id: ID!): User!
    listing(id: ID!): Listing!
    listings(
      location: String
      filter: ListingsFilter!
      limit: Int!
      page: Int!
    ): Listings!
  }
We’ll now modify the resolver function for the listings field in our listingsResolver map. First, we’ll update the ListingArgs TypeScript interface in the types.ts file in our src/resolvers/Listing/ folder to state that a location argument may exist which can be of type string or null .
server/src/graphql/resolvers/Listing/types.ts
export interface ListingsArgs {
  location: string | null;
  filter: ListingsFilter;
  limit: number;
  page: number;
}
In the listings() resolver function, we’ll say location is now one of the arguments that can be passed in.
export const listingResolvers: IResolvers = {
  Query: {
    // ...,
    listings: async (
      _root: undefined,
      { location, filter, limit, page }: ListingsArgs,
      { db }: { db: Database }
    ): Promise<ListingsData> => {
      // ...
    }
  },
  Listing: {
    // ...
  }
};
In our listings() resolver, we’ll construct an empty query object and pass that along to the MongoDB find() method we’ve established before to create the cursor.
export const listingResolvers: IResolvers = {
  Query: {
    // ...,
    listings: async (
      _root: undefined,
      { location, filter, limit, page }: ListingsArgs,
      { db }: { db: Database }
    ): Promise<ListingsData> => {
      const query = {};

      // ...

      let cursor = await db.listings.find(query);

      // ...
    }
  },
  Listing: {
    // ...
  }
};
In the function, we’ll to check to see if the location parameter has a value. If it does, we’ll run the geocode() function from our Google API object to get the city, admin, or country information for this location which we’ll then populate our query object with.
First, let’s use TypeScript to help define the shape of what this query constant can be. In the adjacent types.ts file, we’ll create and export a ListingsQuery interface that can potentially have country , admin , and city fields all of type string .
server/src/graphql/resolvers/Listing/types.ts
export interface ListingsQuery {
  country?: string;
  admin?: string;
  city?: string;
}
In the listingResolvers map file, we’ll import the ListingsQuery interface and define the shape of the query constant we’ve set up with it.
// ...
import {
  // ...,
  ListingsQuery
} from "./types";

export const listingResolvers: IResolvers = {
  Query: {
    // ...,
    listings: async (
      _root: undefined,
      { location, filter, limit, page }: ListingsArgs,
      { db }: { db: Database }
    ): Promise<ListingsData> => {
      const query: ListingsQuery = {};

      // ...

      let cursor = await db.listings.find(query);

      // ...
    }
  },
  Listing: {
    // ...
  }
};
In addition, we’ll import the Google object in our src/lib/api/ since we’ll need it to run the geocode() function we’ve prepared.
server/src/graphql/resolvers/Listing/index.ts
import { Google } from "../../../lib/api";
In our listings() resolver, we’ll check if the location argument exists and if it does we’ll run the Google geocode() method and pass in the location value. From the returned result of the geocode() function, we’ll look to destruct the country , admin , and city properties.
// ...

export const listingResolvers: IResolvers = {
  Query: {
    // ...,
    listings: async (
      _root: undefined,
      { location, filter, limit, page }: ListingsArgs,
      { db }: { db: Database }
    ): Promise<ListingsData> => {
      const query: ListingsQuery = {};

      // ...

      if (location) {
        const { country, admin, city } = await Google.geocode(location);
      }

      let cursor = await db.listings.find(query);

      // ...
    }
  },
  Listing: {
    // ...
  }
};
Here’s where we’ll check the values of what our geocode() function was able to return. If city exists, we’ll set it as the city property of our query. If admin exists, we’ll set it as the admin property of the query. If country exists, we’ll set it as the country property of our query.
However, if country doesn’t exist, it probably means the search didn’t go well since everything we search for should have a country associated with it so we’ll throw an error that says something like "no country found" .
// ...

export const listingResolvers: IResolvers = {
  Query: {
    // ...,
    listings: async (
      _root: undefined,
      { location, filter, limit, page }: ListingsArgs,
      { db }: { db: Database }
    ): Promise<ListingsData> => {
      const query: ListingsQuery = {};

      // ...

      if (location) {
        const { country, admin, city } = await Google.geocode(location);

        if (city) query.city = city;
        if (admin) query.admin = admin;
        if (country) {
          query.country = country;
        } else {
          throw new Error("no country found");
        }
      }

      let cursor = await db.listings.find(query);

      // ...
    }
  },
  Listing: {
    // ...
  }
};
Let’s now give what we’ve done a try. We’ll head over to GraphQL Playground and attempt to query the listings field. We’ll say we want our listings ordered from PRICE_HIGH_TO_LOW , be limited to 10 items, and be on the first page of results. In our returned result output, we’ll try and get id , title , city , admin , and country of each listing.
query {
  listings(filter: PRICE_HIGH_TO_LOW, limit: 10, page: 1) {
    result {
      id
      title
      country
      admin
      city
    }
  }
}
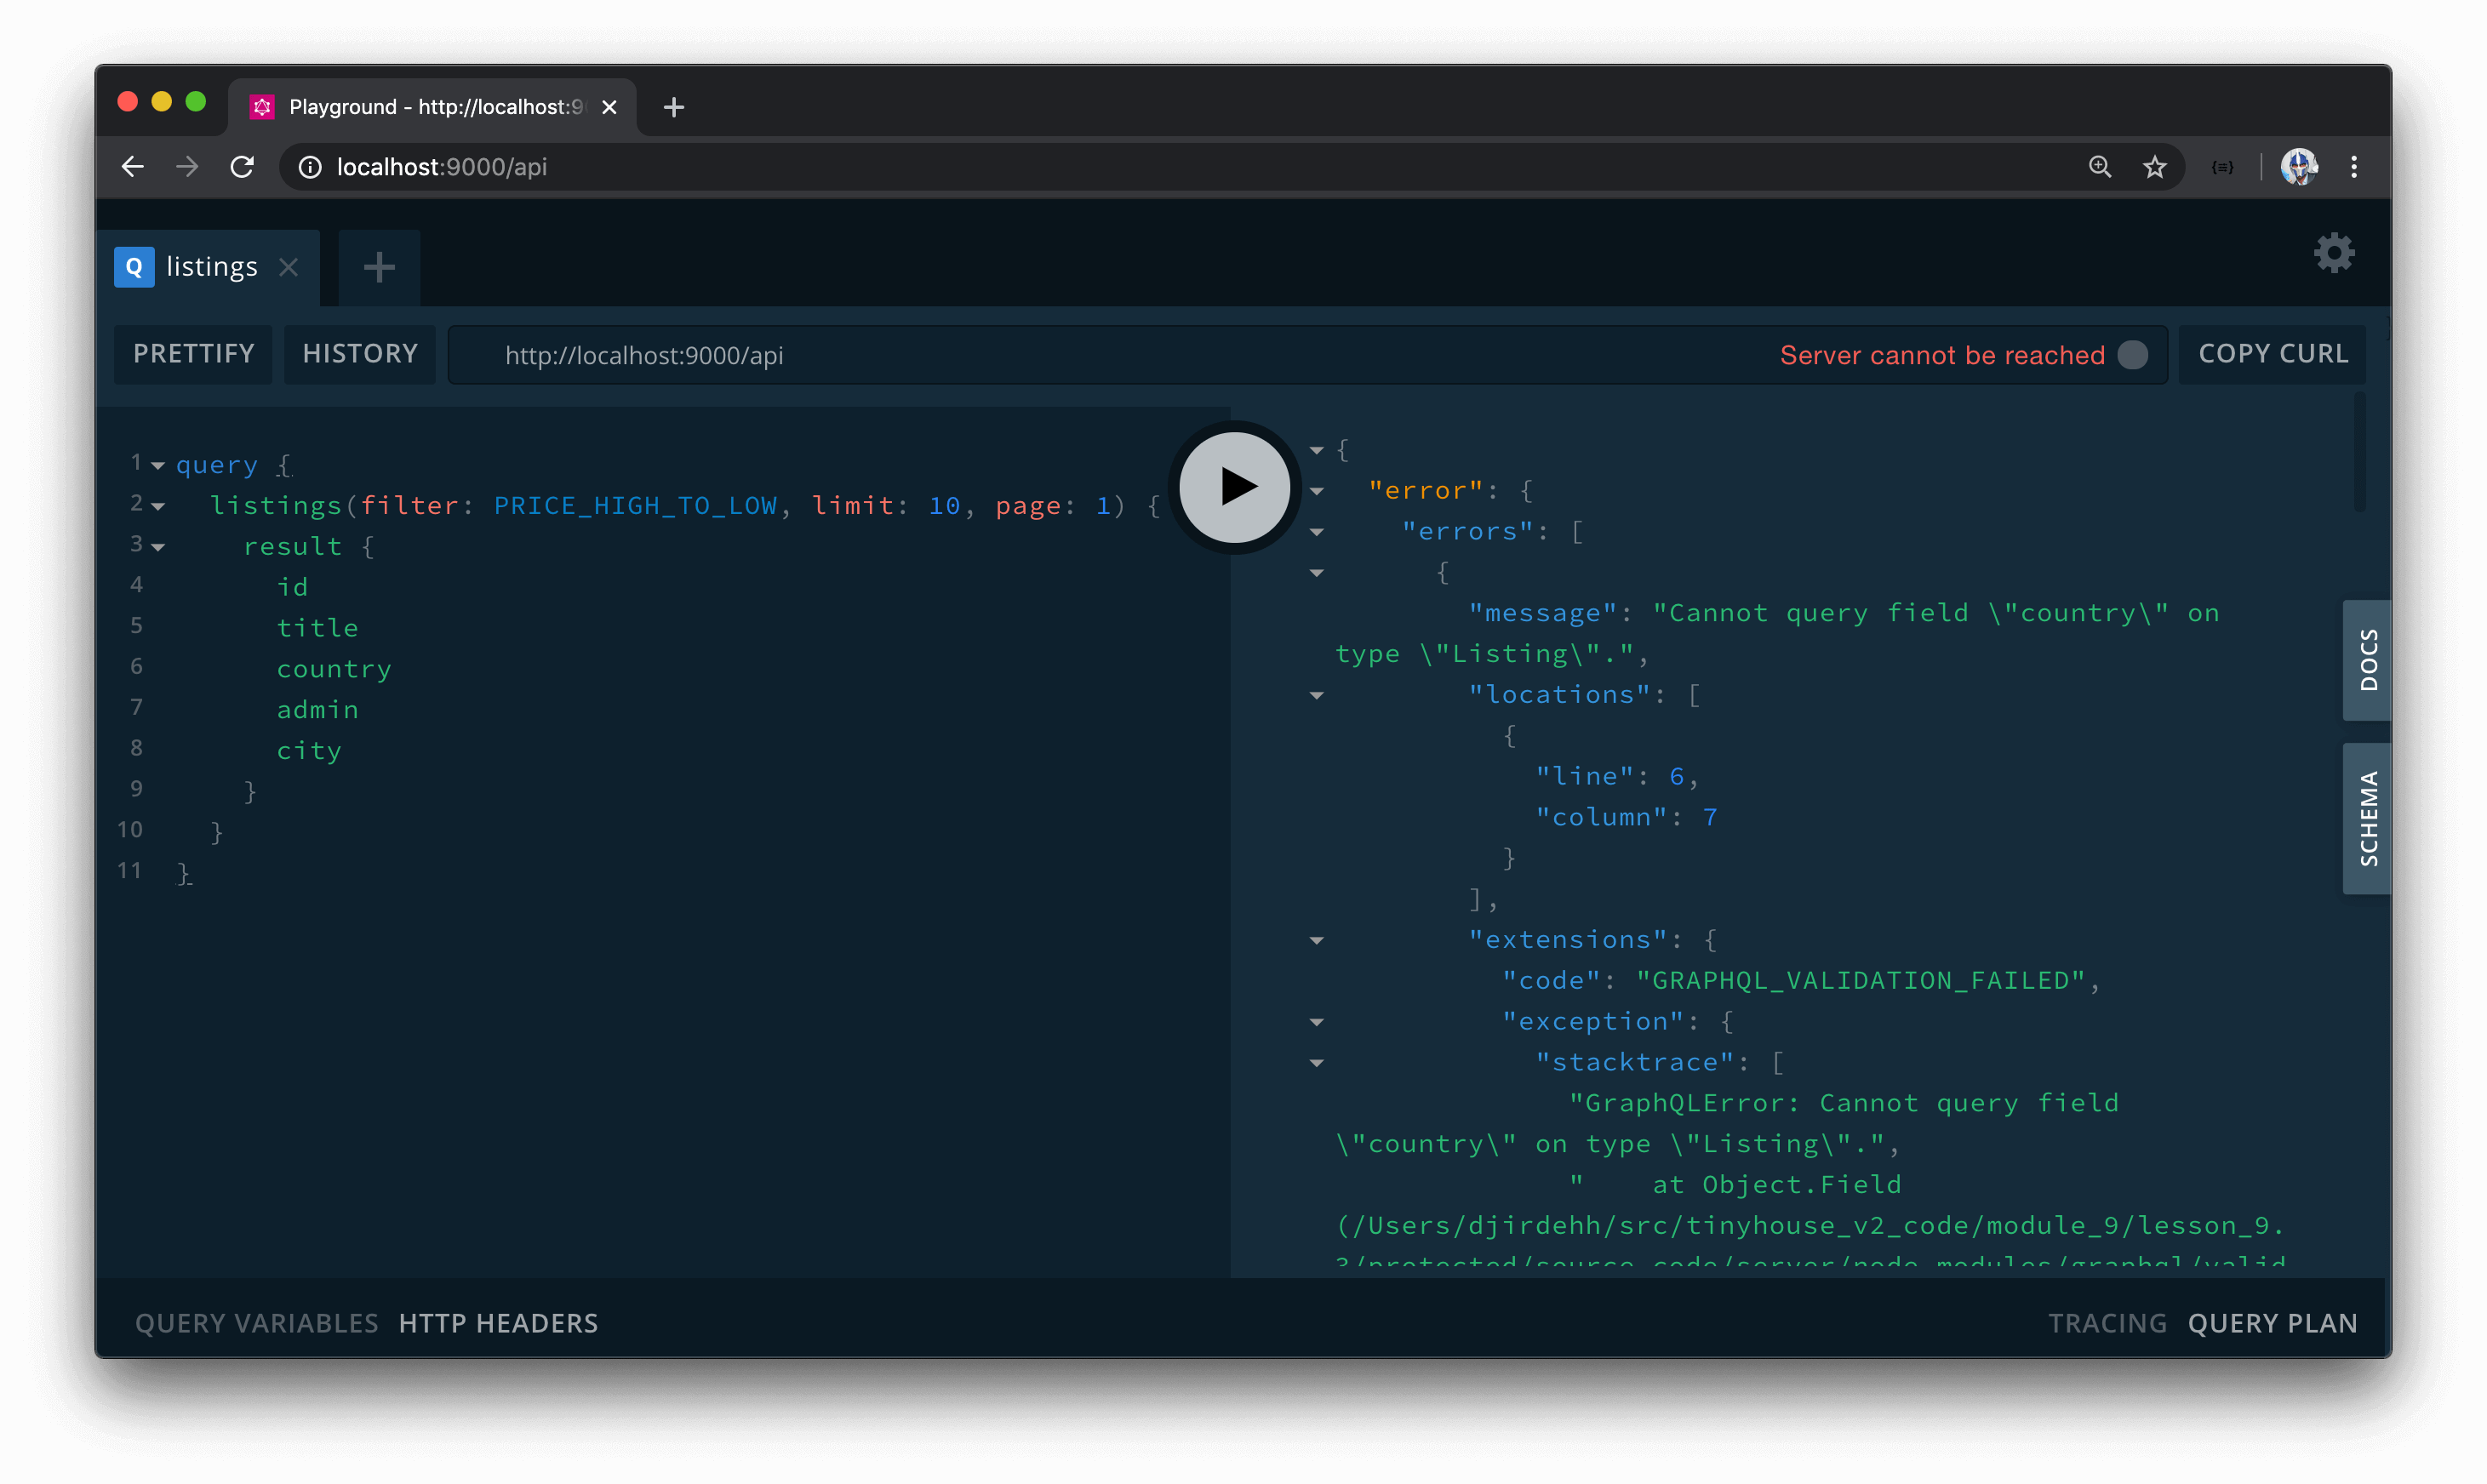
We’ll see an error in GraphQL Playground that tells us the country field isn’t part of the Listing GraphQL object. country , admin , city are part of our TypeScript definitions and mock data for listings in our "listings" collection. We’ll need to update the definition of our GraphQL Listing object to contain the country , admin , and city fields to all be of type string.
server/src/graphql/typeDefs.ts
  type Listing {
    id: ID!
    title: String!
    description: String!
    image: String!
    host: User!
    type: ListingType!
    address: String!
    country: String!
    admin: String!
    city: String!
    bookings(limit: Int!, page: Int!): Bookings
    bookingsIndex: String!
    price: Int!
    numOfGuests: Int!
  }
If we head back to GraphQL Playground and make our query now - we’ll get a bunch of different listings from different locations in the world.

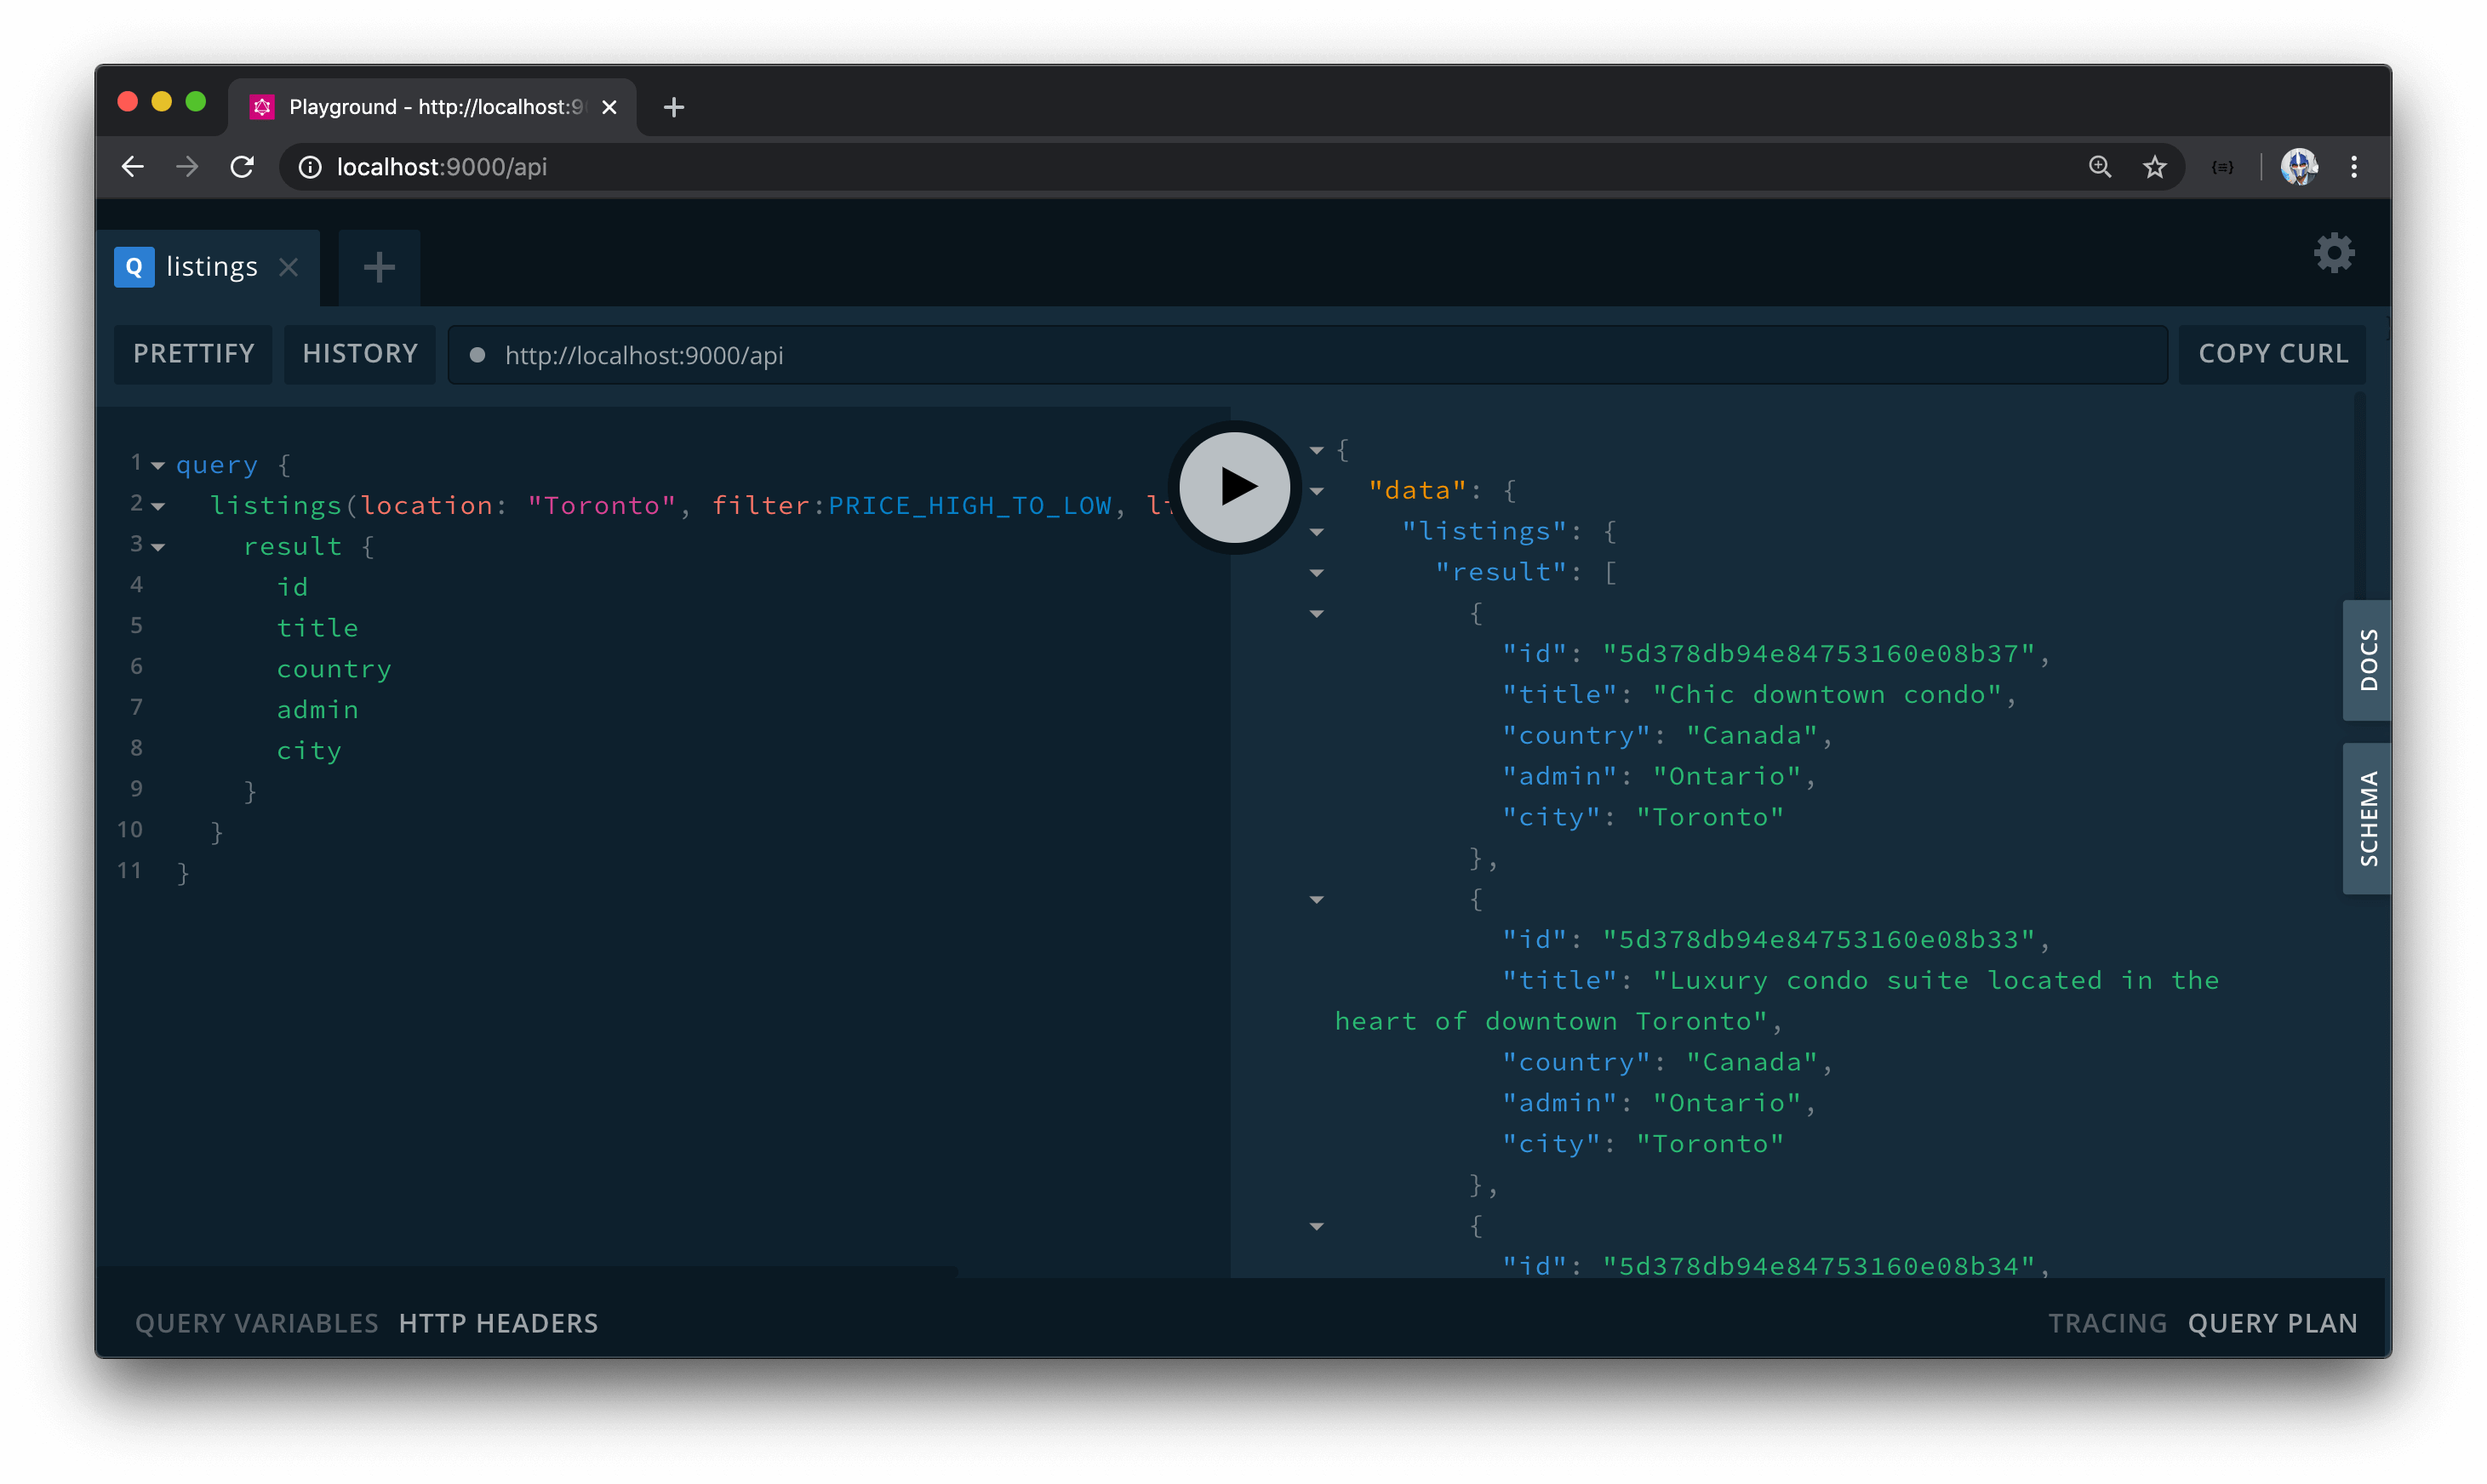
Let’s add a location argument to our query with a string value of "Toronto" .
query {
  listings(location: "Toronto", filter:PRICE_HIGH_TO_LOW, limit: 10, page: 1) {
    result {
      id
      title
      country
      admin
      city
    }
  }
}
When we now run our query, all listings data returned to us is in Toronto, Canada!
If we were to provide a location of "Los Angeles" , we’ll get listings from the region of Los Angeles.

If we provide a location argument value of a country, like "United States" , we’ll get listings for Los Angeles and San Fransisco!

If we provide a location to our query where we don’t have any listings for in our database, like "New York" , we’ll get an empty result array.

GEOCODER RESULT
So far so good! At this moment, however, when the client is to make the request to the server for listings in a certain location, it won’t know what the geocoder was able to note as the location. If a user searches for "United States" , we’ll want to convey that we’re looking for listings all over the United States. If a user searches for "Los Angeles" , we’ll want to convey we’re looking for listings in Los Angeles, California, United States.
To help us here, we can return an interpolated string message from the server that simply contains the city, admin, and country that was recognized from our geocoder. In our GraphQL type definitions, we’ll say the Listings GraphQL object is to contain a region field of type string and is to be optional. We’ll mark the region field as optional since we expect a value of region to exist only if a location argument value is provided.
server/src/graphql/typeDefs.ts
  type Listings {
    region: String
    total: Int!
    result: [Listing!]!
  }
In the TypeScript types.ts file for our listingResolvers map (in the src/graphql/resolvers/Listing/types.ts file), we’ll update the ListingsData interface to have a region property of type string or null .
server/src/graphql/resolvers/Listing/types.ts
export interface ListingsData {
  region: string | null;
  total: number;
  result: Listing[];
}
In the listings() resolver function, we’ll update the initial value of the data object with a region of null .
server/src/graphql/resolvers/Listing/index.ts
        const data: ListingsData = {
          region: null,
          total: 0,
          result: []
        };
If the location argument value exists in the listings() resolver, we’ll try and create an interpolated string that contains the city , admin , and country values from the geocoder. Since the city and admin fields from the geocoder may not always be found, we’ll construct text constants for city and admin and state that if they’re found they’ll be string values of what they are, followed by a ", " string. We’ll then state the region property of the data object that is to be returned is an interpolation of the found city , admin , and country . With this implemented, the listings() resolver function in its entirety will look as follows:
server/src/graphql/resolvers/Listing/index.ts
    listings: async (
      _root: undefined,
      { location, filter, limit, page }: ListingsArgs,
      { db }: { db: Database }
    ): Promise<ListingsData> => {
      try {
        const query: ListingsQuery = {};
        const data: ListingsData = {
          region: null,
          total: 0,
          result: []
        };

        if (location) {
          const { country, admin, city } = await Google.geocode(location);

          if (city) query.city = city;
          if (admin) query.admin = admin;
          if (country) {
            query.country = country;
          } else {
            throw new Error("no country found");
          }

          const cityText = city ? `${city}, ` : "";
          const adminText = admin ? `${admin}, ` : "";
          data.region = `${cityText}${adminText}${country}`;
        }

        let cursor = await db.listings.find(query);

        if (filter && filter === ListingsFilter.PRICE_LOW_TO_HIGH) {
          cursor = cursor.sort({ price: 1 });
        }

        if (filter && filter === ListingsFilter.PRICE_HIGH_TO_LOW) {
          cursor = cursor.sort({ price: -1 });
        }

        cursor = cursor.skip(page > 0 ? (page - 1) * limit : 0);
        cursor = cursor.limit(limit);

        data.total = await cursor.count();
        data.result = await cursor.toArray();

        return data;
      } catch (error) {
        throw new Error(`Failed to query listings: ${error}`);
      }
    }
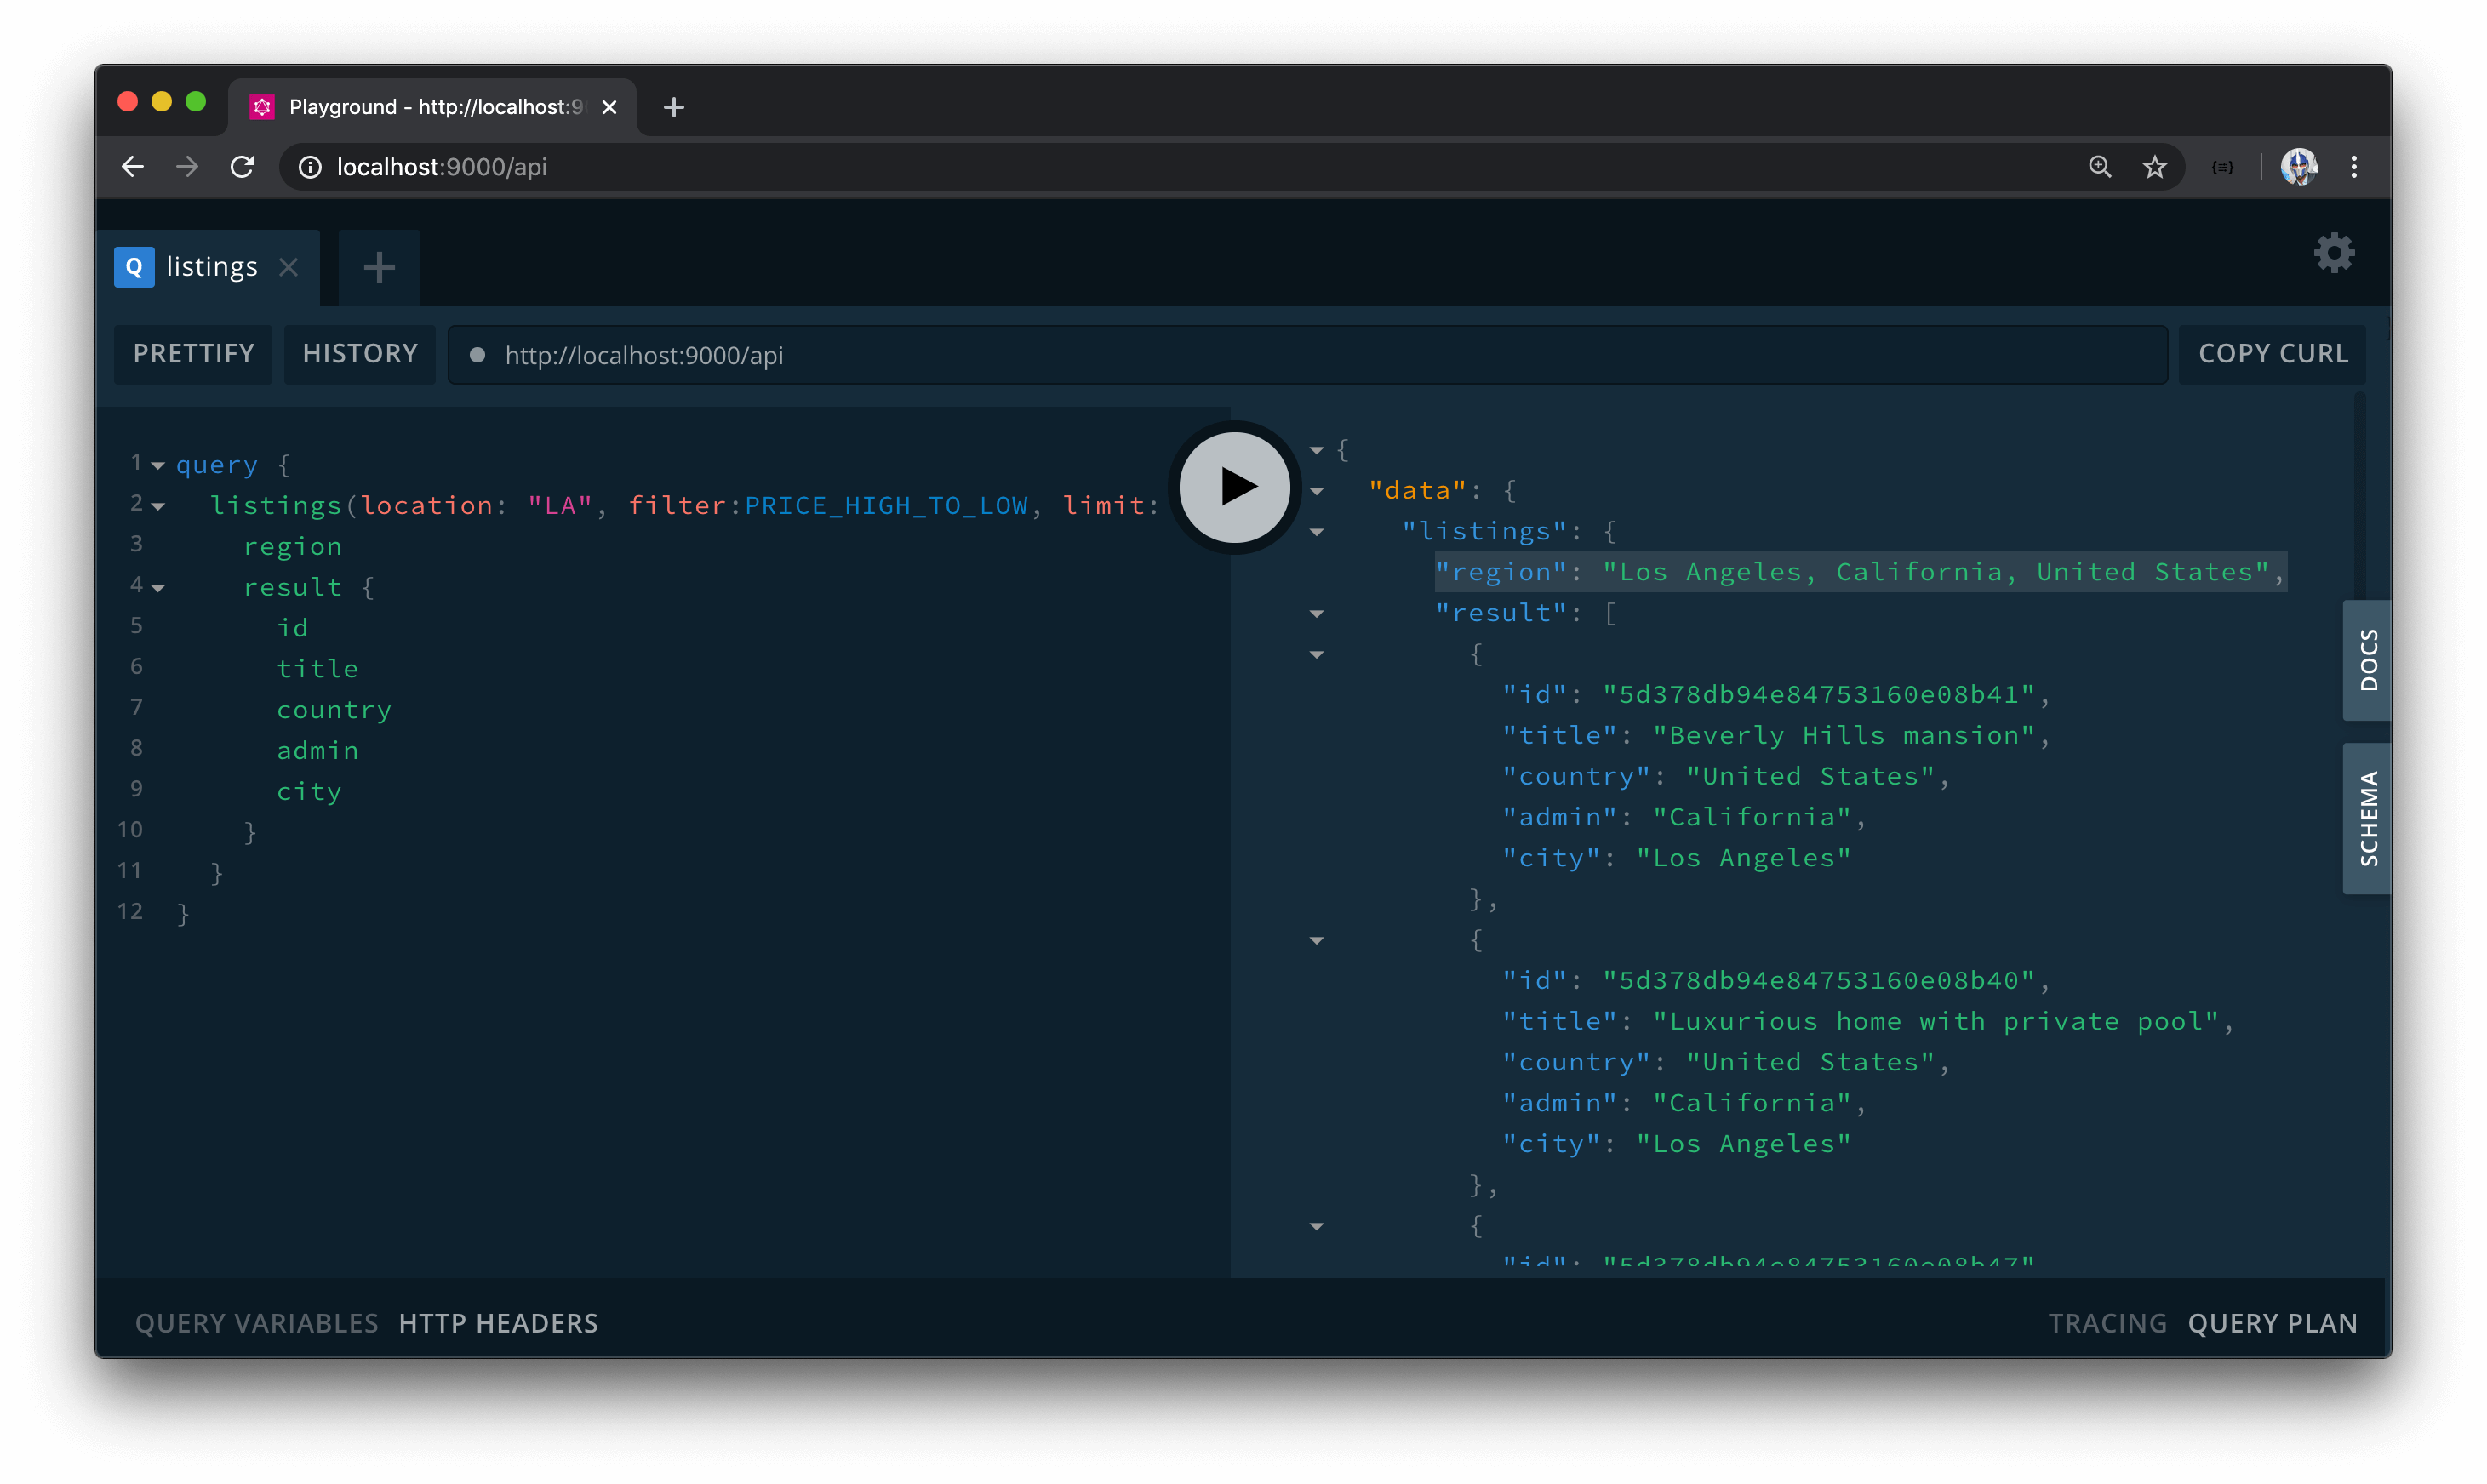
If we now make our queries again in the GraphQL Playground, we’ll see if the region of the returned data is returned as expected. We’ll specify region is another field we expect to be queried and we’ll first query for listings in "United States" .

If we searched for listings for the location of "LA" (shorthand for Los Angeles), the region returned from our API will have a value of "Los Angeles, California, United States" !
That’s it! In the next coming lesson, we’ll have our client now make the query and show the results for certain locations within the page shown in the /listings/:location? route.
BUILDING THE LISTINGS PAGE
With our listings field in our GraphQL API prepared to accept a location argument, we’ll begin to work on the client app to build the /listings/:location? page for where certain listings can be shown for specific locations.
The /listings/:location? page isn’t going to be very difficult to build but there will be a few things we’ll need to think about and handle. When data is available, we’ll look to show up to eight listing cards at a time for the listings that have been queried. We already have a component created labeled <ListingsCard/> that will be used to show the card previews for each listing.
The two children components we’ll create when data is available are the <ListingsFilters /> and <ListingsPagination /> components. Both of these child components will have very little markup but will contain functionality that affects the information that is to be shown on the parent listings page. When we pick a certain filter, we’ll be able to have our listings be sorted either from a high to low price or a low to high price. The pagination element will allow us to move from page to page where every page is to have at most eight listings.

We’ll build all of this step by step. The first thing we’ll attempt to do is make the listings query from the /listings/:location? page in our app and show the first page of listings with the <ListingCard /> components. Once we make the query and everything is shown, we’ll then see how the query can return different results when we provide a different location.
LISTINGS QUERY
In the <Listings /> section component in our src/sections/Listings/index.tsx file, we’ll import a few things we’ll need to get started with.
- We’ll import the
useQueryHook from React Apollo. - We’ll import the
<Layout />and<List />components from Ant Design. - We’ll import the
<ListingCard />component from thesrc/lib/components/folder that we’ll use to show each listing card. - We’ll import the
LISTINGSGraphQL query document and the autogenerated TypeScript definitions for the data and variables for theLISTINGSquery. - And we’ll import the autogenerated
ListingsFilterEnum from the globalTypes file kept in thesrc/lib/graphql/folder.
import React from "react";
import { useQuery } from "@apollo/react-hooks";
import { Layout, List } from "antd";
import { ListingCard } from "../../lib/components";
import { LISTINGS } from "../../lib/graphql/queries";
import {
  Listings as ListingsData,
  ListingsVariables
} from "../../lib/graphql/queries/Listings/generated/Listings";
import { ListingsFilter } from "../../lib/graphql/globalTypes";
We’ll destruct Ant Designs <Content /> component from <Layout /> and we’ll create a constant to reference the limit of the number of listings we want to show in a page. We’ll call this constant PAGE_LIMIT and provide a value of 8 .
import React from "react";
import { useQuery } from "@apollo/react-hooks";
import { Layout, List } from "antd";
import { ListingCard } from "../../lib/components";
import { LISTINGS } from "../../lib/graphql/queries";
import {
  Listings as ListingsData,
  ListingsVariables
} from "../../lib/graphql/queries/Listings/generated/Listings";
import { ListingsFilter } from "../../lib/graphql/globalTypes";

const { Content } = Layout;
const PAGE_LIMIT = 8;

export const Listings = () => {
  // ...
};
In our <Listings/> component function, we’ll use the useQuery Hook to query for the listings field. In our useQuery Hook declaration, we’ll pass the appropriate TypeScript interfaces for data and variables. For the values of the variables the query expects, we’ll specify the filter to have the "PRICE_LOW_TO_HIGH" value from the ListingsFilter Enum, we’ll use the PAGE_LIMIT constant for the limit variable, and for page number we’ll provide a value of 1 for now.
At this moment, we’ll only destruct the data object from the query result.
// ...

export const Listings = () => {
  const { data } = useQuery<ListingsData, ListingsVariables>(LISTINGS, {
    variables: {
      filter: ListingsFilter.PRICE_LOW_TO_HIGH,
      limit: PAGE_LIMIT,
      page: 1
    }
  });

  // ...
};
Note: We’re initializing the
filtervariable with the"PRICE_LOW_TO_HIGH"value and thepagevariable with a value of1since that is the default setting we’ll want the user to see when they first land on the page. When we build the filter and pagination capability, we’ll have values for thefilterandpagevariables as part of component state that changes based on user action.
When data is available from our query, we’ll look to obtain the listings field from data and assign it to a listings constant.
// ...

export const Listings = () => {
  const { data } = useQuery<ListingsData, ListingsVariables>(LISTINGS, {
    variables: {
      filter: ListingsFilter.PRICE_LOW_TO_HIGH,
      limit: PAGE_LIMIT,
      page: 1
    }
  });

  const listings = data ? data.listings : null;

  // ...
};
We’ll then look to construct a React element in a constant labeled listingsSectionElement that will be the list of listings we’ll build with the help of Ant Design’s <List /> component. This list will be very similar to the lists we’ve created in the Home and User pages. We’ll specify a gutter of around 8 units and we’ll want 4 cards to be shown for the entire width in large viewports, 2 in small viewports and 1 in extra-small viewports. The source of data for the list will be the result array within the listings field and in the renderItem() function of the <List /> component, we’ll render the <ListingCard /> component for each list item and pass the iterated listing object down.
// ...

export const Listings = () => {
  const { data } = useQuery<ListingsData, ListingsVariables>(LISTINGS, {
    variables: {
      filter: ListingsFilter.PRICE_LOW_TO_HIGH,
      limit: PAGE_LIMIT,
      page: 1
    }
  });

  const listings = data ? data.listings : null;

  const listingsSectionElement = listings ? (
    <List
      grid={{
        gutter: 8,
        xs: 1,
        sm: 2,
        lg: 4
      }}
      dataSource={listings.result}
      renderItem={listing => (
        <List.Item>
          <ListingCard listing={listing} />
        </List.Item>
      )}
    />
  ) : null;

  // ...
};
In our component return statement, we’ll return the <Content /> component and within we’ll place the listingsSectionElement .
// ...

export const Listings = () => {
  const { data } = useQuery<ListingsData, ListingsVariables>(LISTINGS, {
    variables: {
      filter: ListingsFilter.PRICE_LOW_TO_HIGH,
      limit: PAGE_LIMIT,
      page: 1
    }
  });

  const listings = data ? data.listings : null;

  const listingsSectionElement = listings ? (
    <List
      grid={{
        gutter: 8,
        xs: 1,
        sm: 2,
        lg: 4
      }}
      dataSource={listings.result}
      renderItem={listing => (
        <List.Item>
          <ListingCard listing={listing} />
        </List.Item>
      )}
    />
  ) : null;

  return <Content className="listings">{listingsSectionElement}</Content>;
};
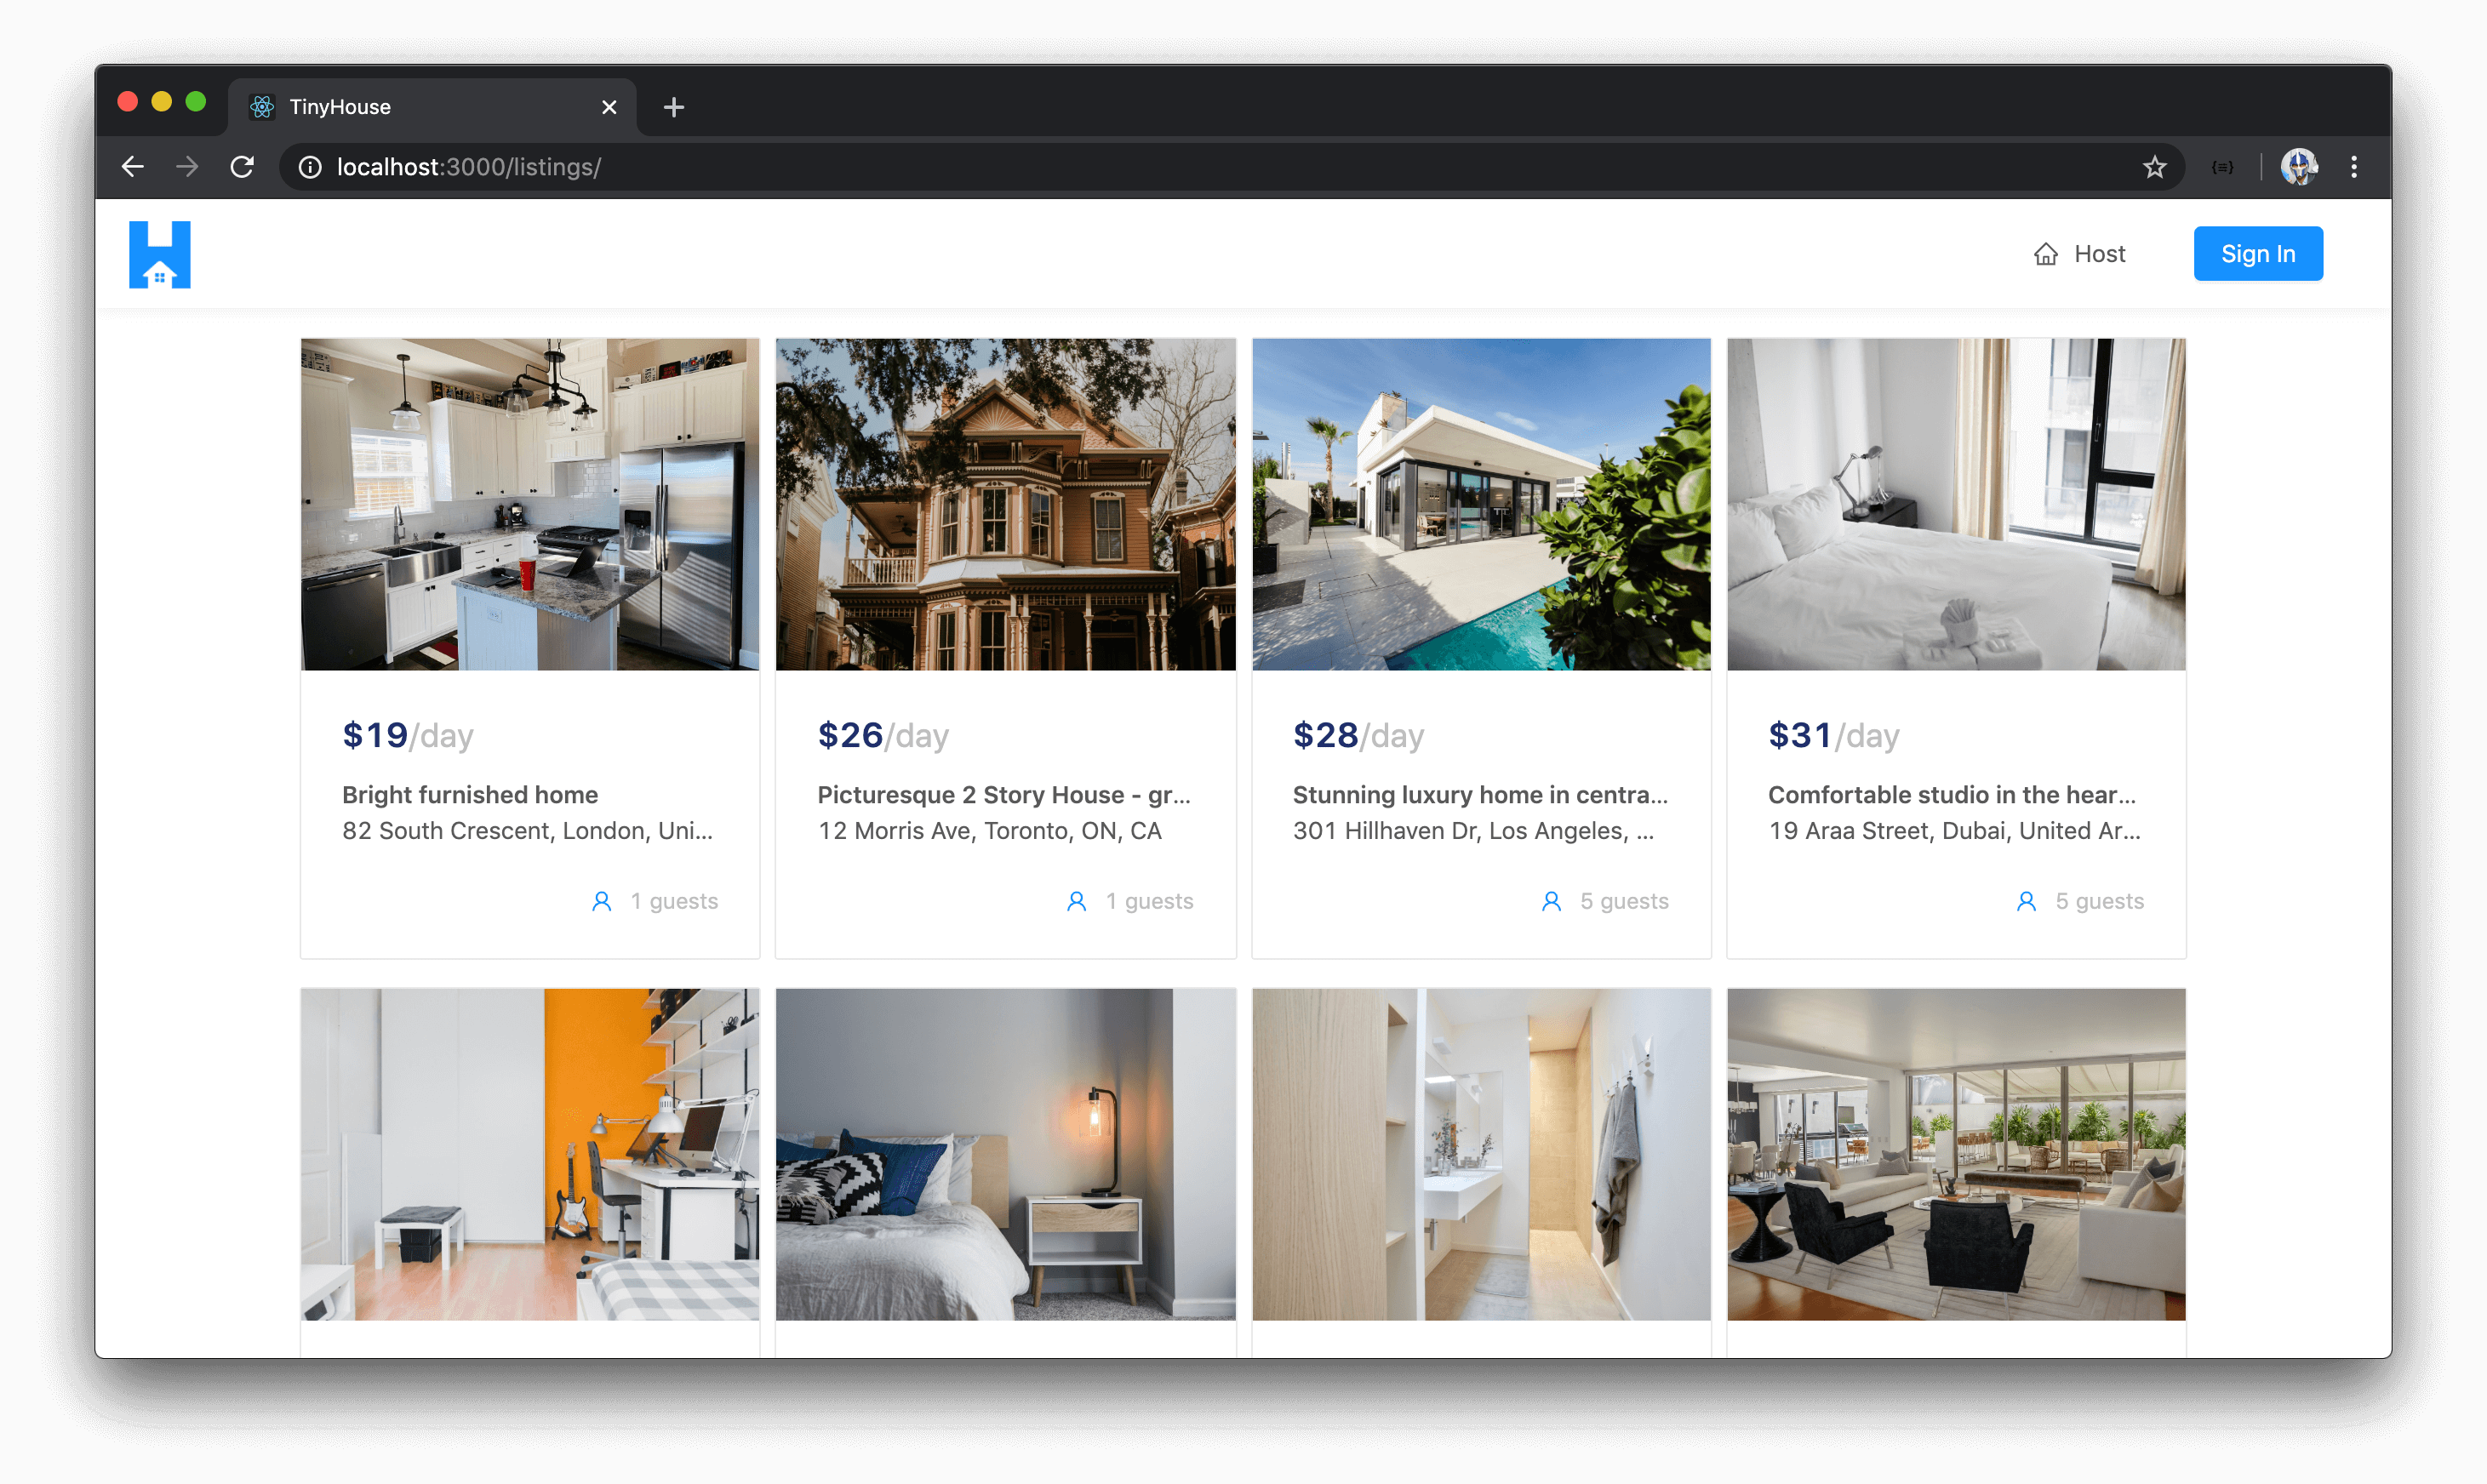
When we take a look at the listings page in the /listings route of our application, we’ll see eight different listing cards be shown to us!
LISTINGS QUERY WITH LOCATION
Though this works great, our intention for the listings page in our client is to help show listings for a certain location . To tackle this, the first thing we’ll do is specify that the listings query in the GraphQL document within src/lib/graphql/queries/Listings/index.ts can take an optional location argument of type String .
import { gql } from "apollo-boost";

export const LISTINGS = gql`
  query Listings($location: String, $filter: ListingsFilter!, $limit: Int!, $page: Int!) {
    listings(location: $location, filter: $filter, limit: $limit, page: $page) {
      result {
        id
        title
        image
        address
        price
        numOfGuests
      }
    }
  }
`;
We’ll want to autogenerate the TypeScript definitions regarding this query since we’re now saying a new argument can be passed in. Since we’ve also made some small changes to the GraphQL API schema in the last lesson we’ll first run the codegen:schema command, in our client project, to generate the schema json available in our client.
npm run codegen:schema
When that’s complete, we’ll run the codegen:generate command to regenerate our GraphQL related typings.
npm run codegen:generate
With our listings GraphQL query ready to accept a location argument when provided, we’ll need to pass it from our <Listings /> component. The location the user is interested in searching for will be derived from the URL parameter in the route. When a user enters a location in the search bar on the home page or in the search bar in the app header, we’re simply just going to take them straight to the /listings/:location? page. In the <Listings /> component where we make our query, we’ll simply need to derive the value of the location URL parameter.
We’ll first import RouteComponentProps from react-router-dom which we’ll use to describe the shape of the match props in our component.
// ...
import { RouteComponentProps } from "react-router-dom";
// ...
We’ll declare an interface called MatchParams to dictate the location param in our route which is of type string .
client/src/sections/Listings/index.tsx
interface MatchParams {
  location: string;
}
We’ll declare the match object as a prop of our component and we’ll use RouteComponentProps to describe the shape of our component. RouteComponentProps is a generic so we’ll pass the MatchParams interface within which helps tell our component that the match.params field will have a location of type string.
export const Listings = ({ match }: RouteComponentProps<MatchParams>) => {
  // ...
};
With the match object available in our component, let’s now provide a location variable to our query and say the value is match.params.location .
client/src/sections/Listings/index.tsx
  const { data } = useQuery<ListingsData, ListingsVariables>(LISTINGS, {
    variables: {
      location: match.params.location,
      filter: ListingsFilter.PRICE_LOW_TO_HIGH,
      limit: PAGE_LIMIT,
      page: 1
    }
  });
React Router has now introduced Hooks! Be sure to check out the React Router Hooks video in Module 15 of the course to highlight how the above can be done with Hooks.
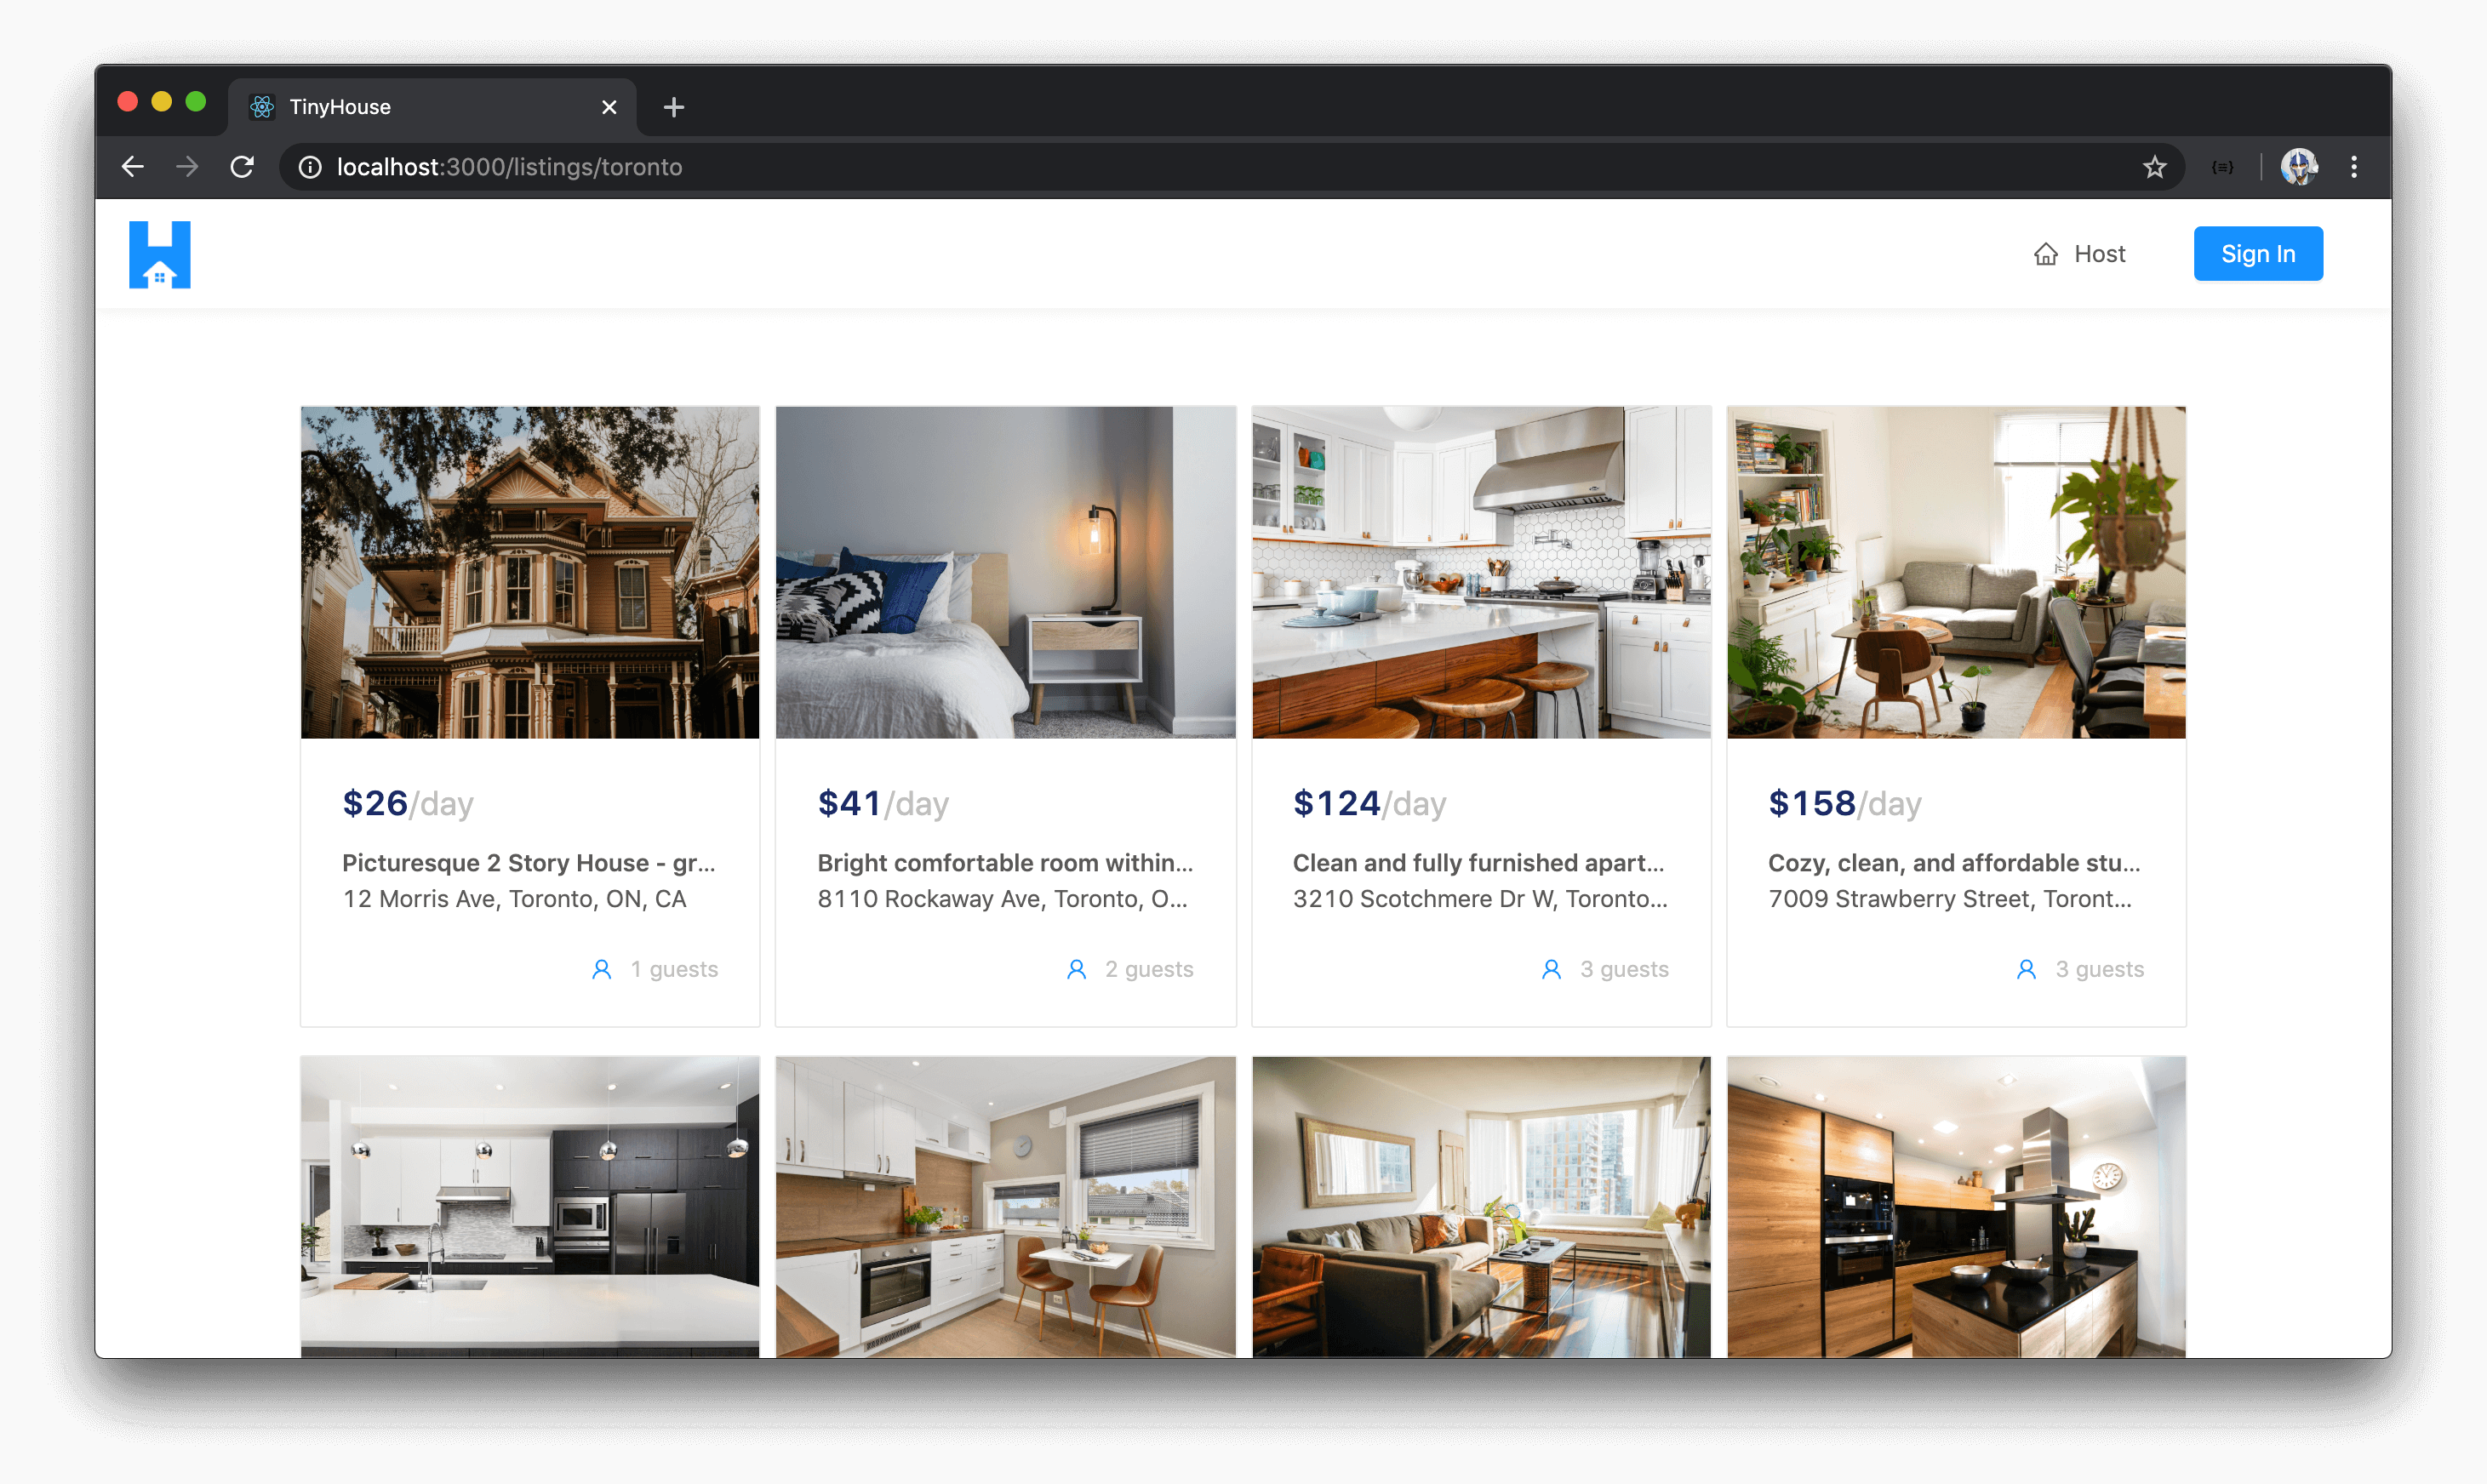
Let’s see how our /listings/:location? page now behaves. When we don’t provide a URL parameter, we’ll be presented with listings for a variety of different locations. However, if we now try to go to the /listings/toronto route, the listings returned to us will only be located in Toronto!
If we instead visit the /listings/los%20angeles route in our browser, we’ll only get listings in Los Angeles.

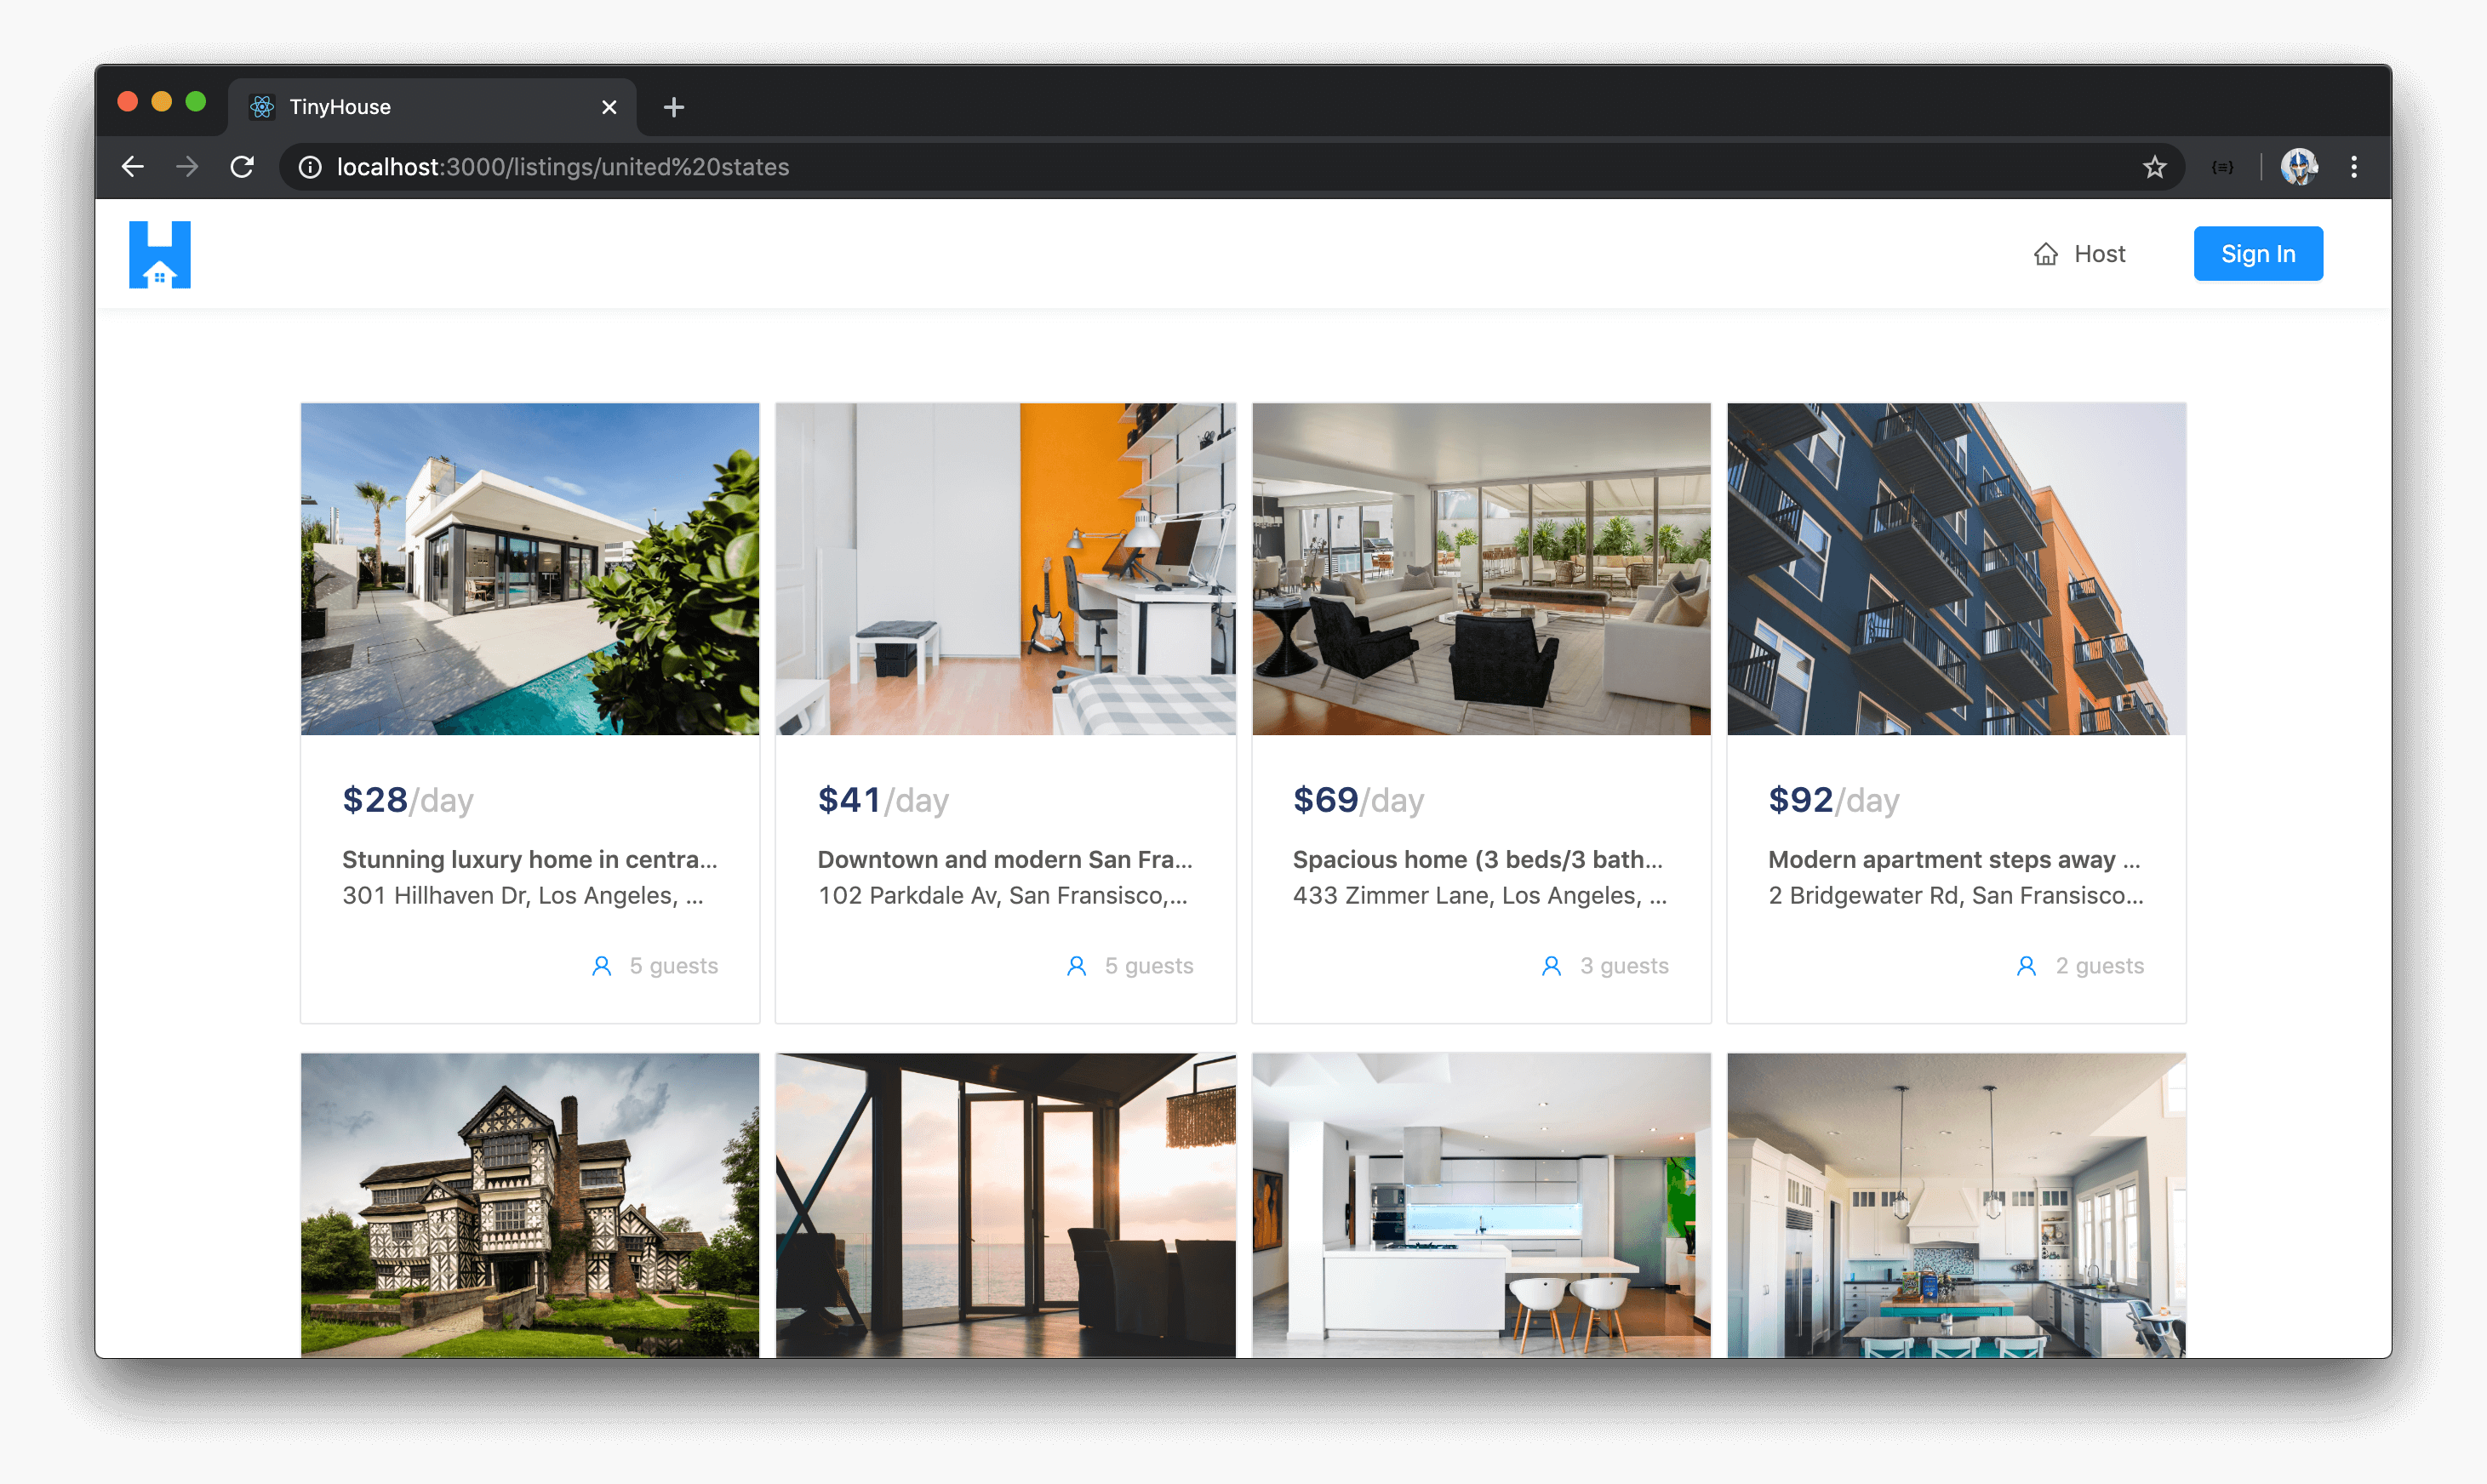
If we visit the /listings/united%20states route, we’ll get listings from both Los Angeles and San Fransisco!
There are a few more things we’ll take care of before we close this lesson.
LISTINGS QUERY AND REGION
The first small thing we’ll tackle is conveying to the user what location they’re searching for. We’ve added a region field in our Listings GraphQL Object that is populated with the region the geocoder determines based on the location/address input. With that said, in our Listings GraphQL document, we’ll add a region field in our query.
client/src/lib/graphql/queries/Listings/index.ts
export const LISTINGS = gql`
  query Listings($location: String, $filter: ListingsFilter!, $limit: Int!, $page: Int!) {
    listings(location: $location, filter: $filter, limit: $limit, page: $page) {
      region
      result {
        id
        title
        image
        address
        price
        numOfGuests
      }
    }
  }
`;
Since we’ve added a new field to query, we’ll regenerate our GraphQL related TypeScript definitions in our client project.
npm run codegen:generate
In our <Listings /> component, when data is available, we’ll try and grab the region from the listings field and have it as the value of a listingsRegion constant. When data isn’t there, listingsRegion will be null .
// ...

export const Listings = () => {
  const { data } = useQuery<ListingsData, ListingsVariables>(LISTINGS, {
    variables: {
      filter: ListingsFilter.PRICE_LOW_TO_HIGH,
      limit: PAGE_LIMIT,
      page: 1
    }
  });

  const listings = data ? data.listings : null;
  const listingsRegion = listings ? listings.region : null;

  // ...
};
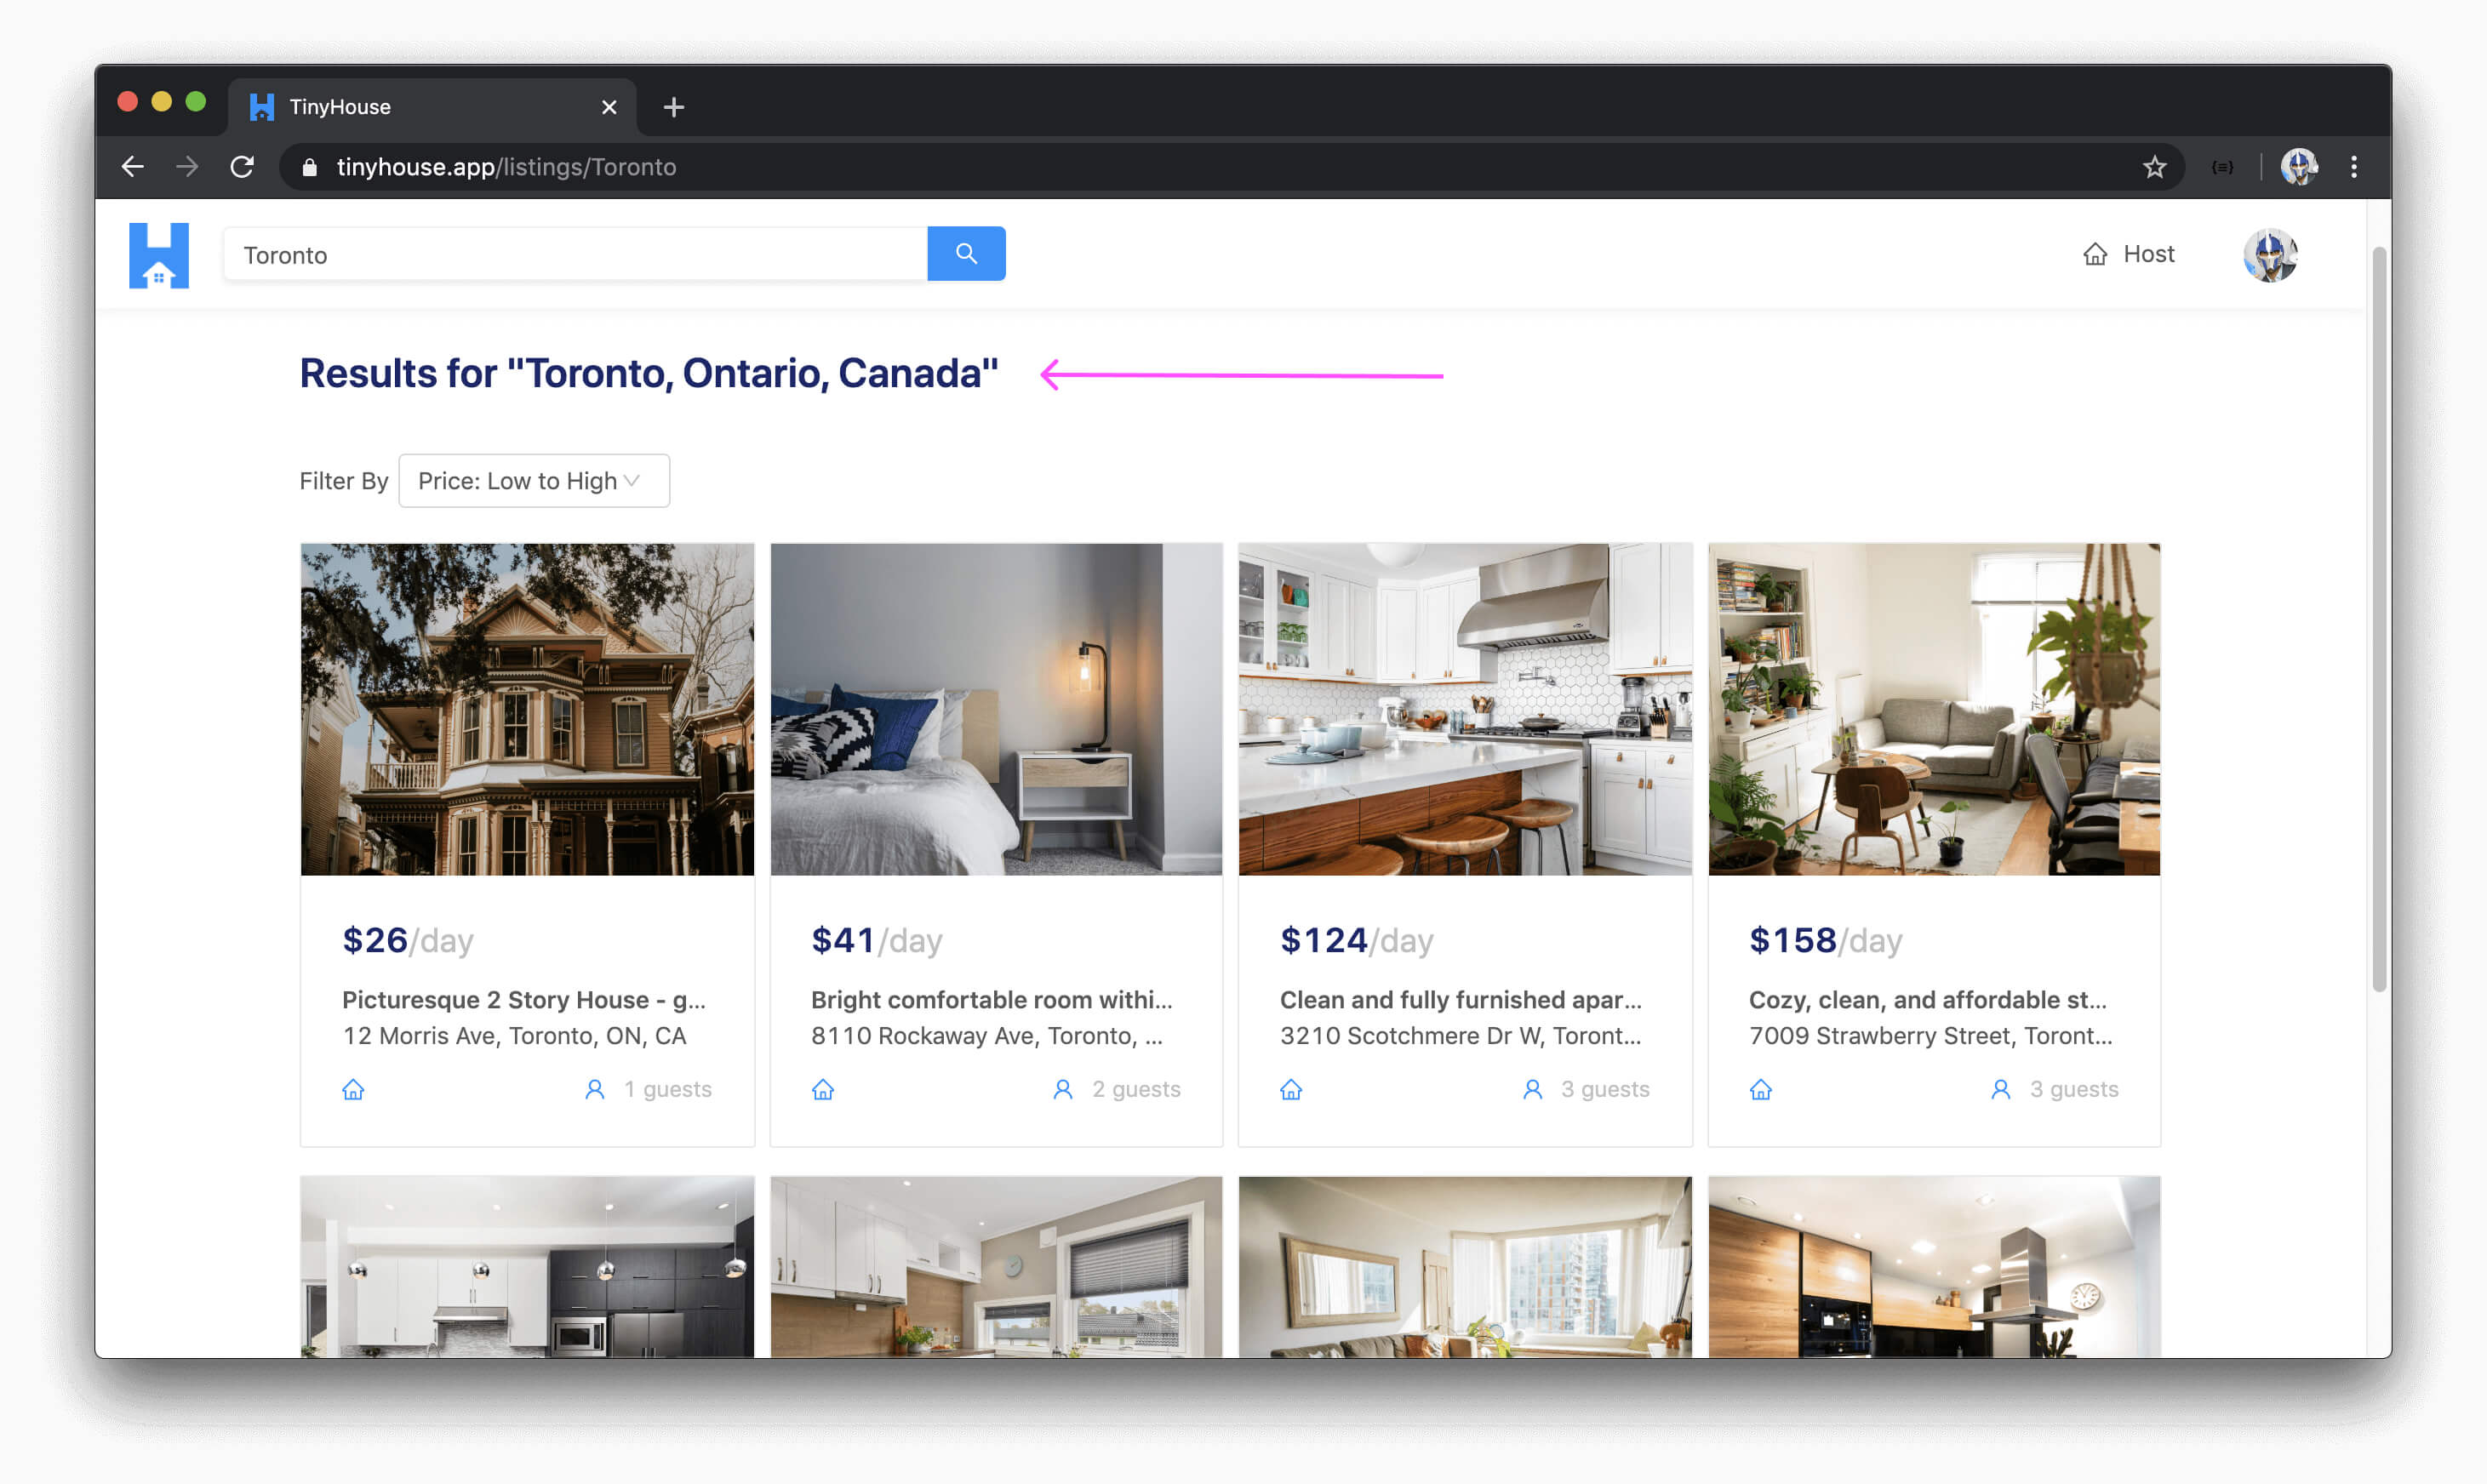
We’ll then create a constant element called listingsRegionElement that when the listingsRegion constant exists will be a <Title /> component from Ant Design that simply says "Results for "{listingRegion}" . We’ll have to import the <Typography /> component from Ant Design as well and destruct the <Title /> sub component from <Typography /> . Finally, we’ll place the listingsRegionElement right before the listingsSectionElement in our <Listings /> component return statement.
import { Layout, List, Typography } from "antd";

// ...

const { Title } = Typography;

// ...

export const Listings = () => {
  const { data } = useQuery<ListingsData, ListingsVariables>(LISTINGS, {
    variables: {
      filter: ListingsFilter.PRICE_LOW_TO_HIGH,
      limit: PAGE_LIMIT,
      page: 1
    }
  });

  const listings = data ? data.listings : null;
  const listingsRegion = listings ? listings.region : null;

  // ...

  const listingsRegionElement = listingsRegion ? (
    <Title level={3} className="listings__title">
      Results for "{listingsRegion}"
    </Title>
  ) : null;

  return (
    <Content className="listings">
      {listingsRegionElement}
      {listingsSectionElement}
    </Content>
  );
};
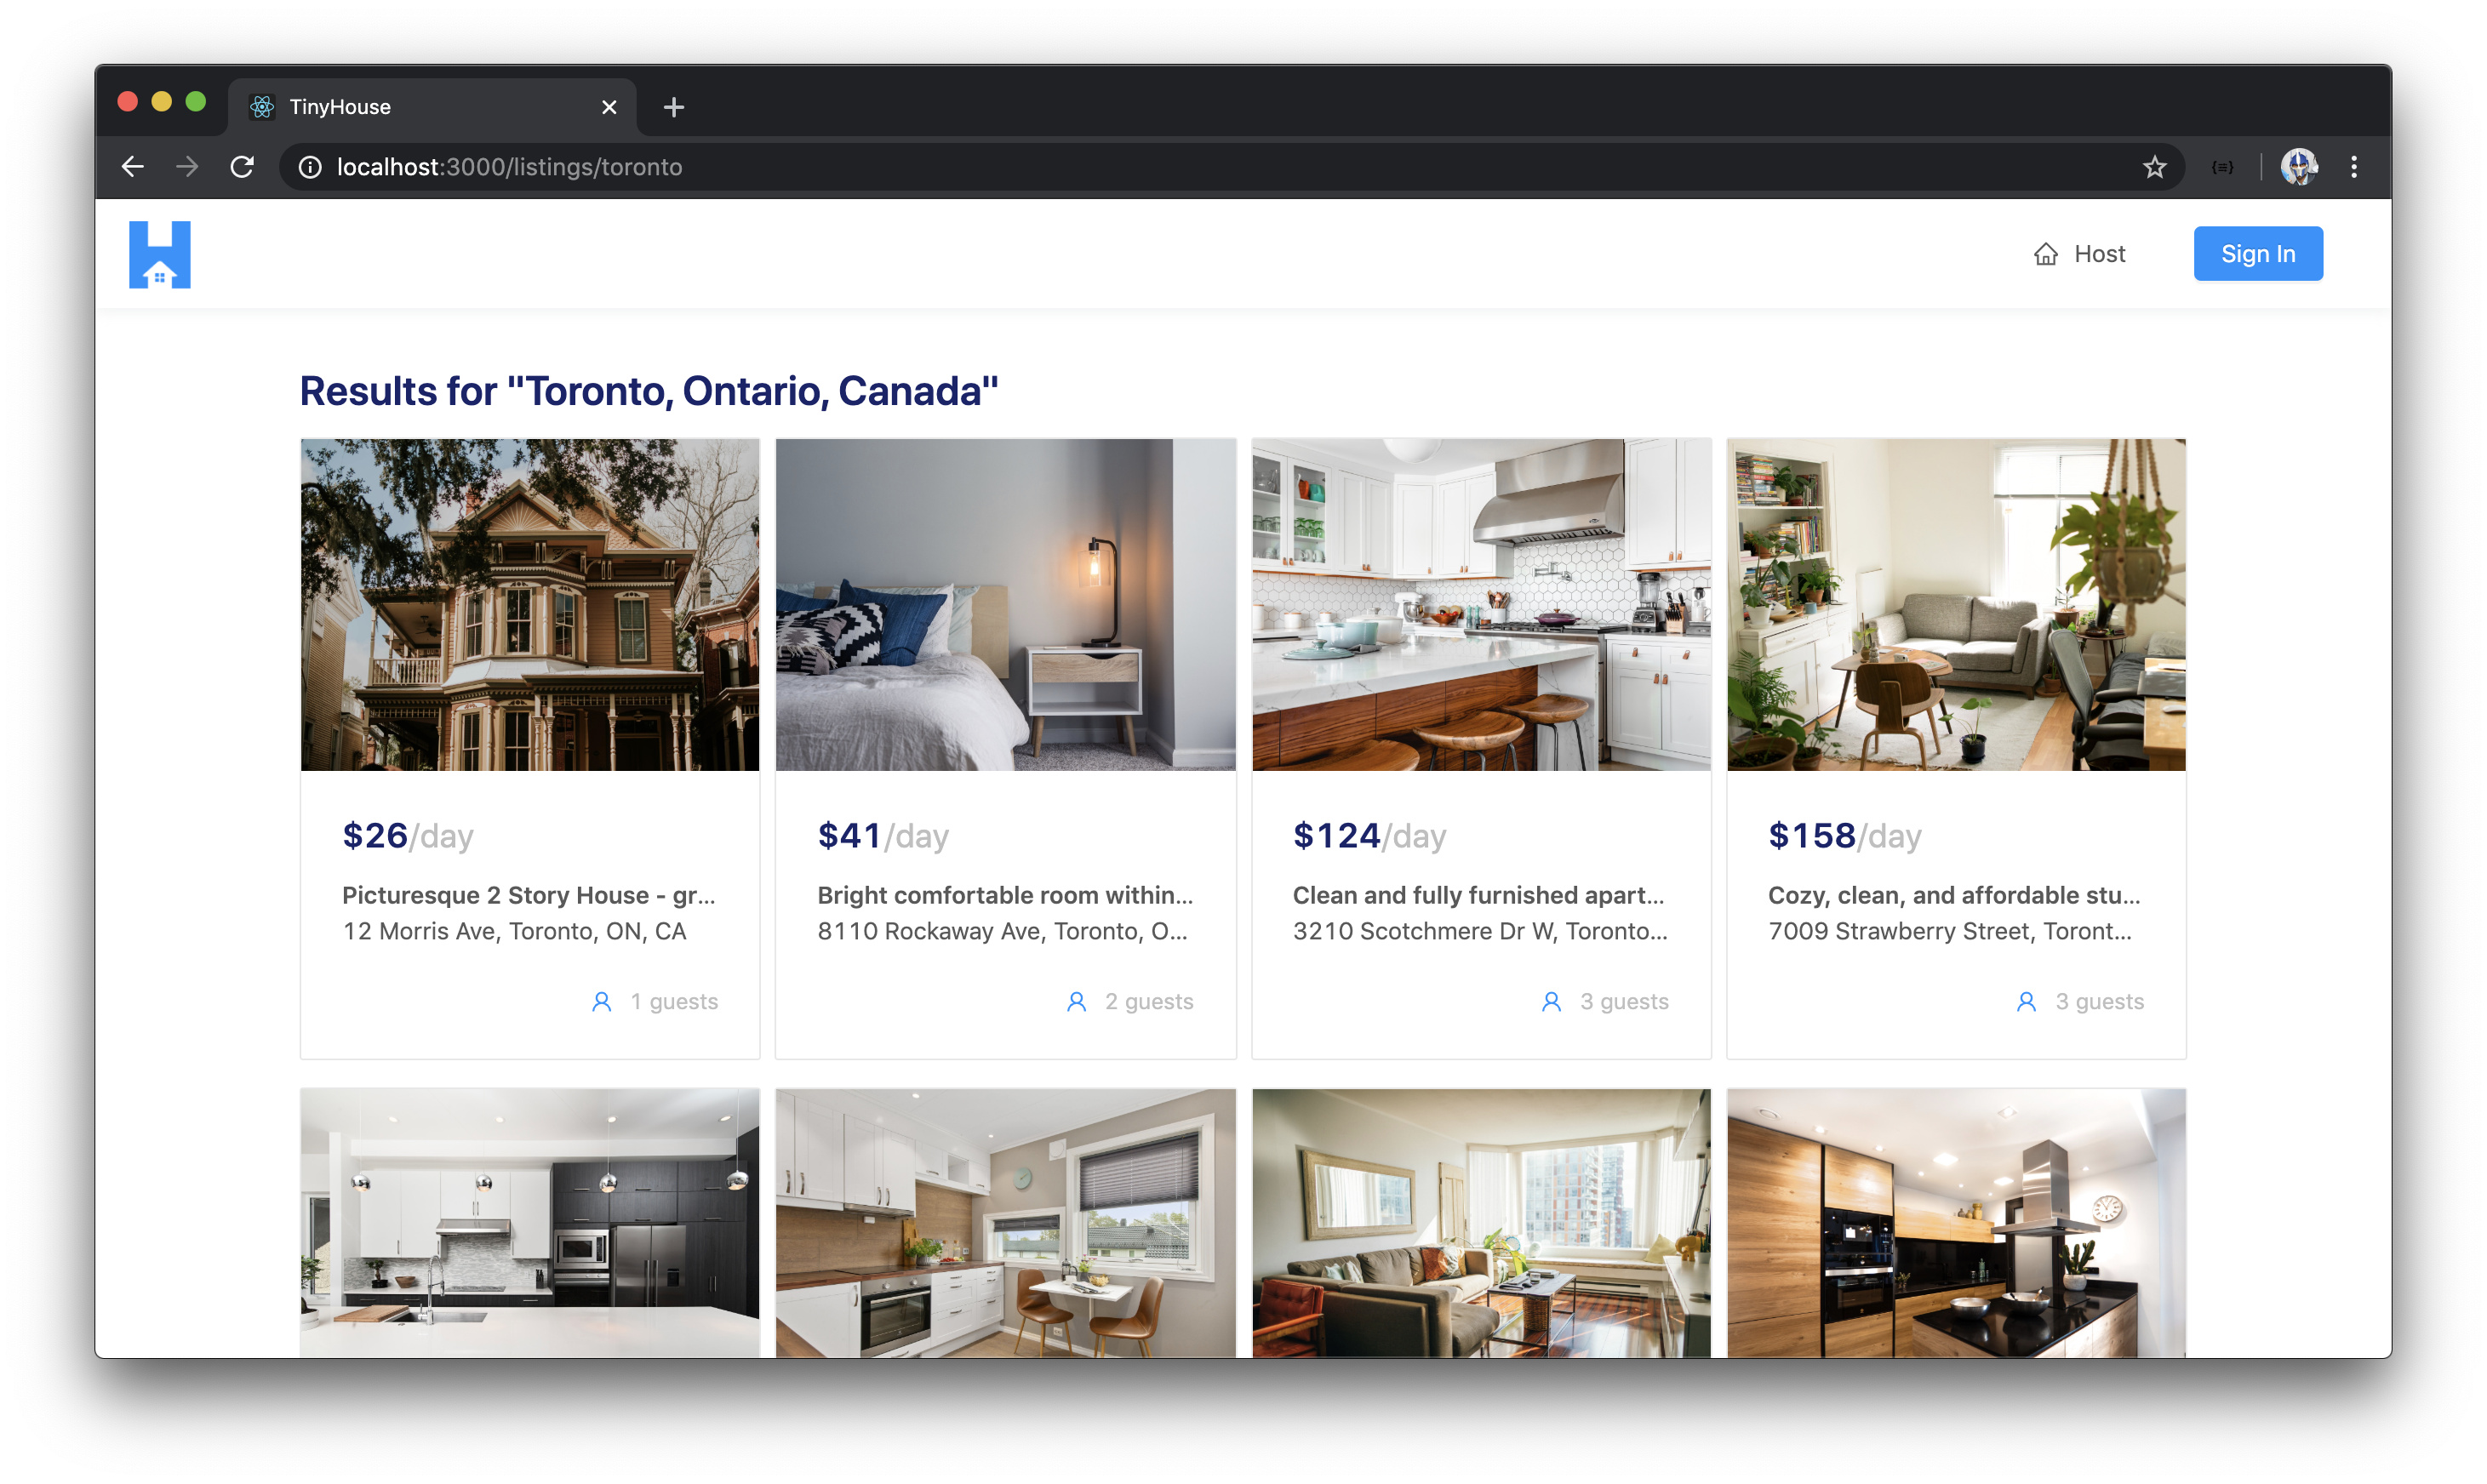
When we visit a valid /listings/location? route in our app, we’ll now see the region that was returned from our geocoder be presented to us!
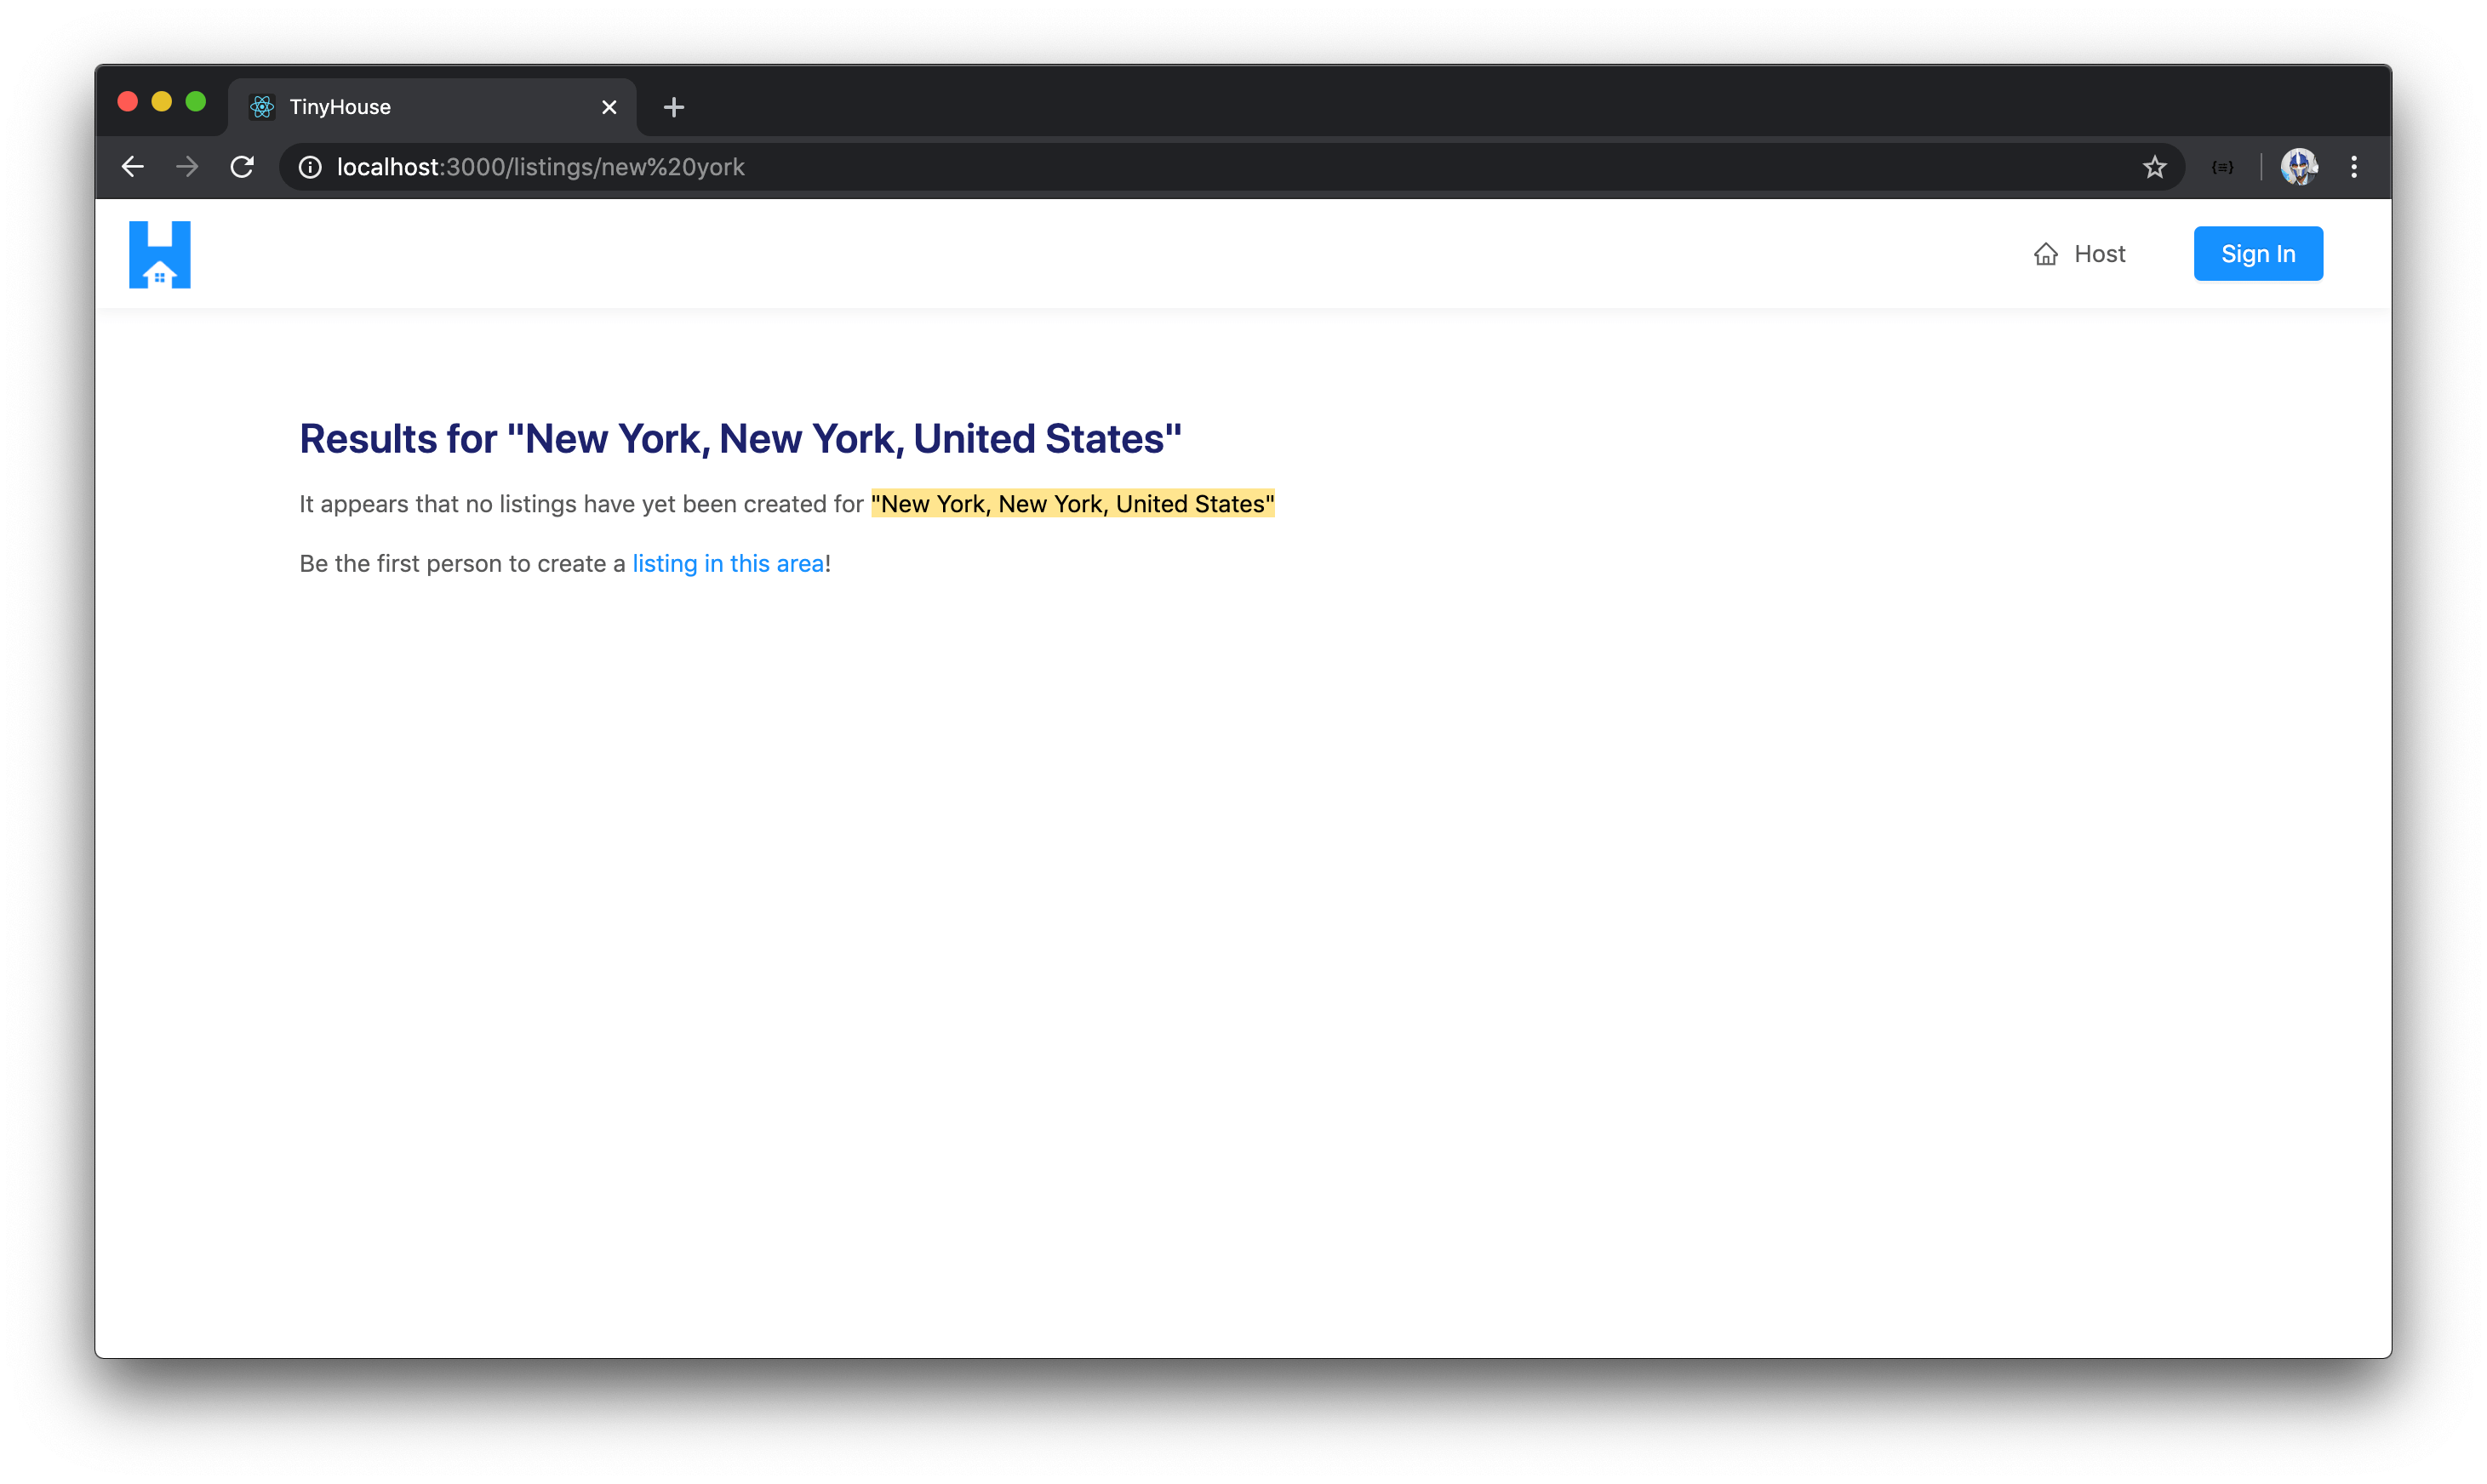
LISTINGS QUERY WITH NO DATA
The last thing we’ll look to tackle is to provide some text information to the user when no data exists from a query made for listings. In the information we tell the user, we can convey to the user that they can go to the /host route of our app to create a new listing.
In the listingsSectionElement constant within the <Listings /> component, we won’t only check if listings data is available but we’ll also check for the length of the results array from our listings object. If the results array is empty, it means there are no listings so we won’t show the entire <List /> component. Instead, we’ll show a <div /> element that has a paragraph that says "It appears that no listings have yet been created for this region" . We’ll have another paragraph and say something along the lines of "Be the first person to create a listing in this area" where we’ll make a portion of that a link that will take the user to the /host route when clicked.
With the above change implemented and all the changes we’ve made, the src/sections/Listings/index.tsx file will look like the following:
client/src/sections/Listings/index.tsx
import React from "react";
import { Link, RouteComponentProps } from "react-router-dom";
import { useQuery } from "@apollo/react-hooks";
import { Layout, List, Typography } from "antd";
import { ListingCard } from "../../lib/components";
import { LISTINGS } from "../../lib/graphql/queries";
import {
  Listings as ListingsData,
  ListingsVariables
} from "../../lib/graphql/queries/Listings/__generated__/Listings";
import { ListingsFilter } from "../../lib/graphql/globalTypes";

interface MatchParams {
  location: string;
}

const { Content } = Layout;
const { Paragraph, Text, Title } = Typography;

const PAGE_LIMIT = 8;

export const Listings = ({ match }: RouteComponentProps<MatchParams>) => {
  const { data } = useQuery<ListingsData, ListingsVariables>(LISTINGS, {
    variables: {
      location: match.params.location,
      filter: ListingsFilter.PRICE_LOW_TO_HIGH,
      limit: PAGE_LIMIT,
      page: 1
    }
  });

  const listings = data ? data.listings : null;
  const listingsRegion = listings ? listings.region : null;

  const listingsSectionElement =
    listings && listings.result.length ? (
      <List
        grid={{
          gutter: 8,
          xs: 1,
          sm: 2,
          lg: 4
        }}
        dataSource={listings.result}
        renderItem={listing => (
          <List.Item>
            <ListingCard listing={listing} />
          </List.Item>
        )}
      />
    ) : (
      <div>
        <Paragraph>
          It appears that no listings have yet been created for{" "}
          <Text mark>"{listingsRegion}"</Text>
        </Paragraph>
        <Paragraph>
          Be the first person to create a <Link to="/host">listing in this area</Link>!
        </Paragraph>
      </div>
    );

  const listingsRegionElement = listingsRegion ? (
    <Title level={3} className="listings__title">
      Results for "{listingsRegion}"
    </Title>
  ) : null;

  return (
    <Content className="listings">
      {listingsRegionElement}
      {listingsSectionElement}
    </Content>
  );
};
If we were to now attempt to query for listings where listing data doesn’t exist in our database, we’ll see a message being shown to us that says "It appears no listings have yet been created..." .
Awesome! We don’t currently handle for when the listings query is loading or has errored. We’ll look to handle this and the capability to change filters and paginate within the /listings/:location? page in the next coming lessons.