PAGINATION & FILTERING IN THE LISTINGS PAGE
The
listing-loading-card-cover.jpgimage asset used in this lesson can be found - here.
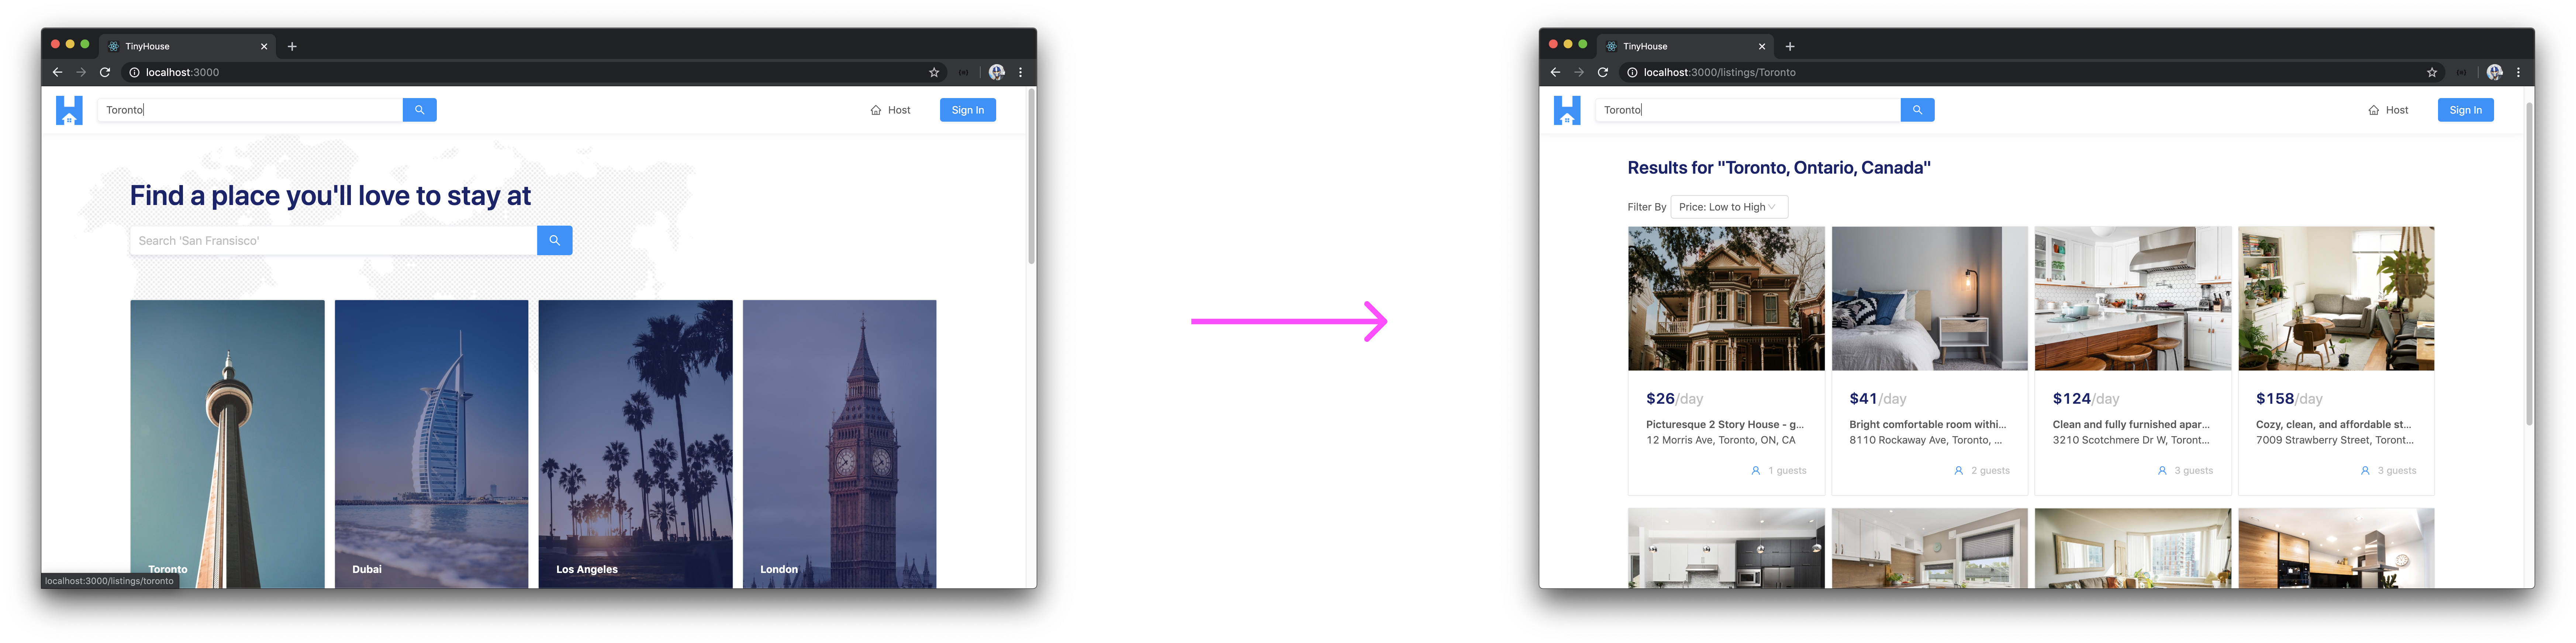
In the last lesson, we were able to build the page displayed in the /listings/location? route and show up to eight different listing cards for listings that exist in certain locations.
There are still a few things left for us to do on this page. We mentioned earlier that we’re interested in allowing a user to filter listings from one of two ways - whether it’s to see listings sorted from the lowest price to the highest price OR to see listings sorted from the highest price to the lowest price.
We also want to give the user the capability to move from page to page. We only show a maximum of eight listings per page and if more is to exist for a certain location, we’ll like the user to be able to move to the next page. If there is to be only a single page of listings, we’ll avoid showing the pagination section.
Both the filter section and the pagination section within the /listing/:location? page are to be components of their own. The markup for these components will be small but depending on the user action conducted on these components, a re-query for new data will be made to show a new set of listings.

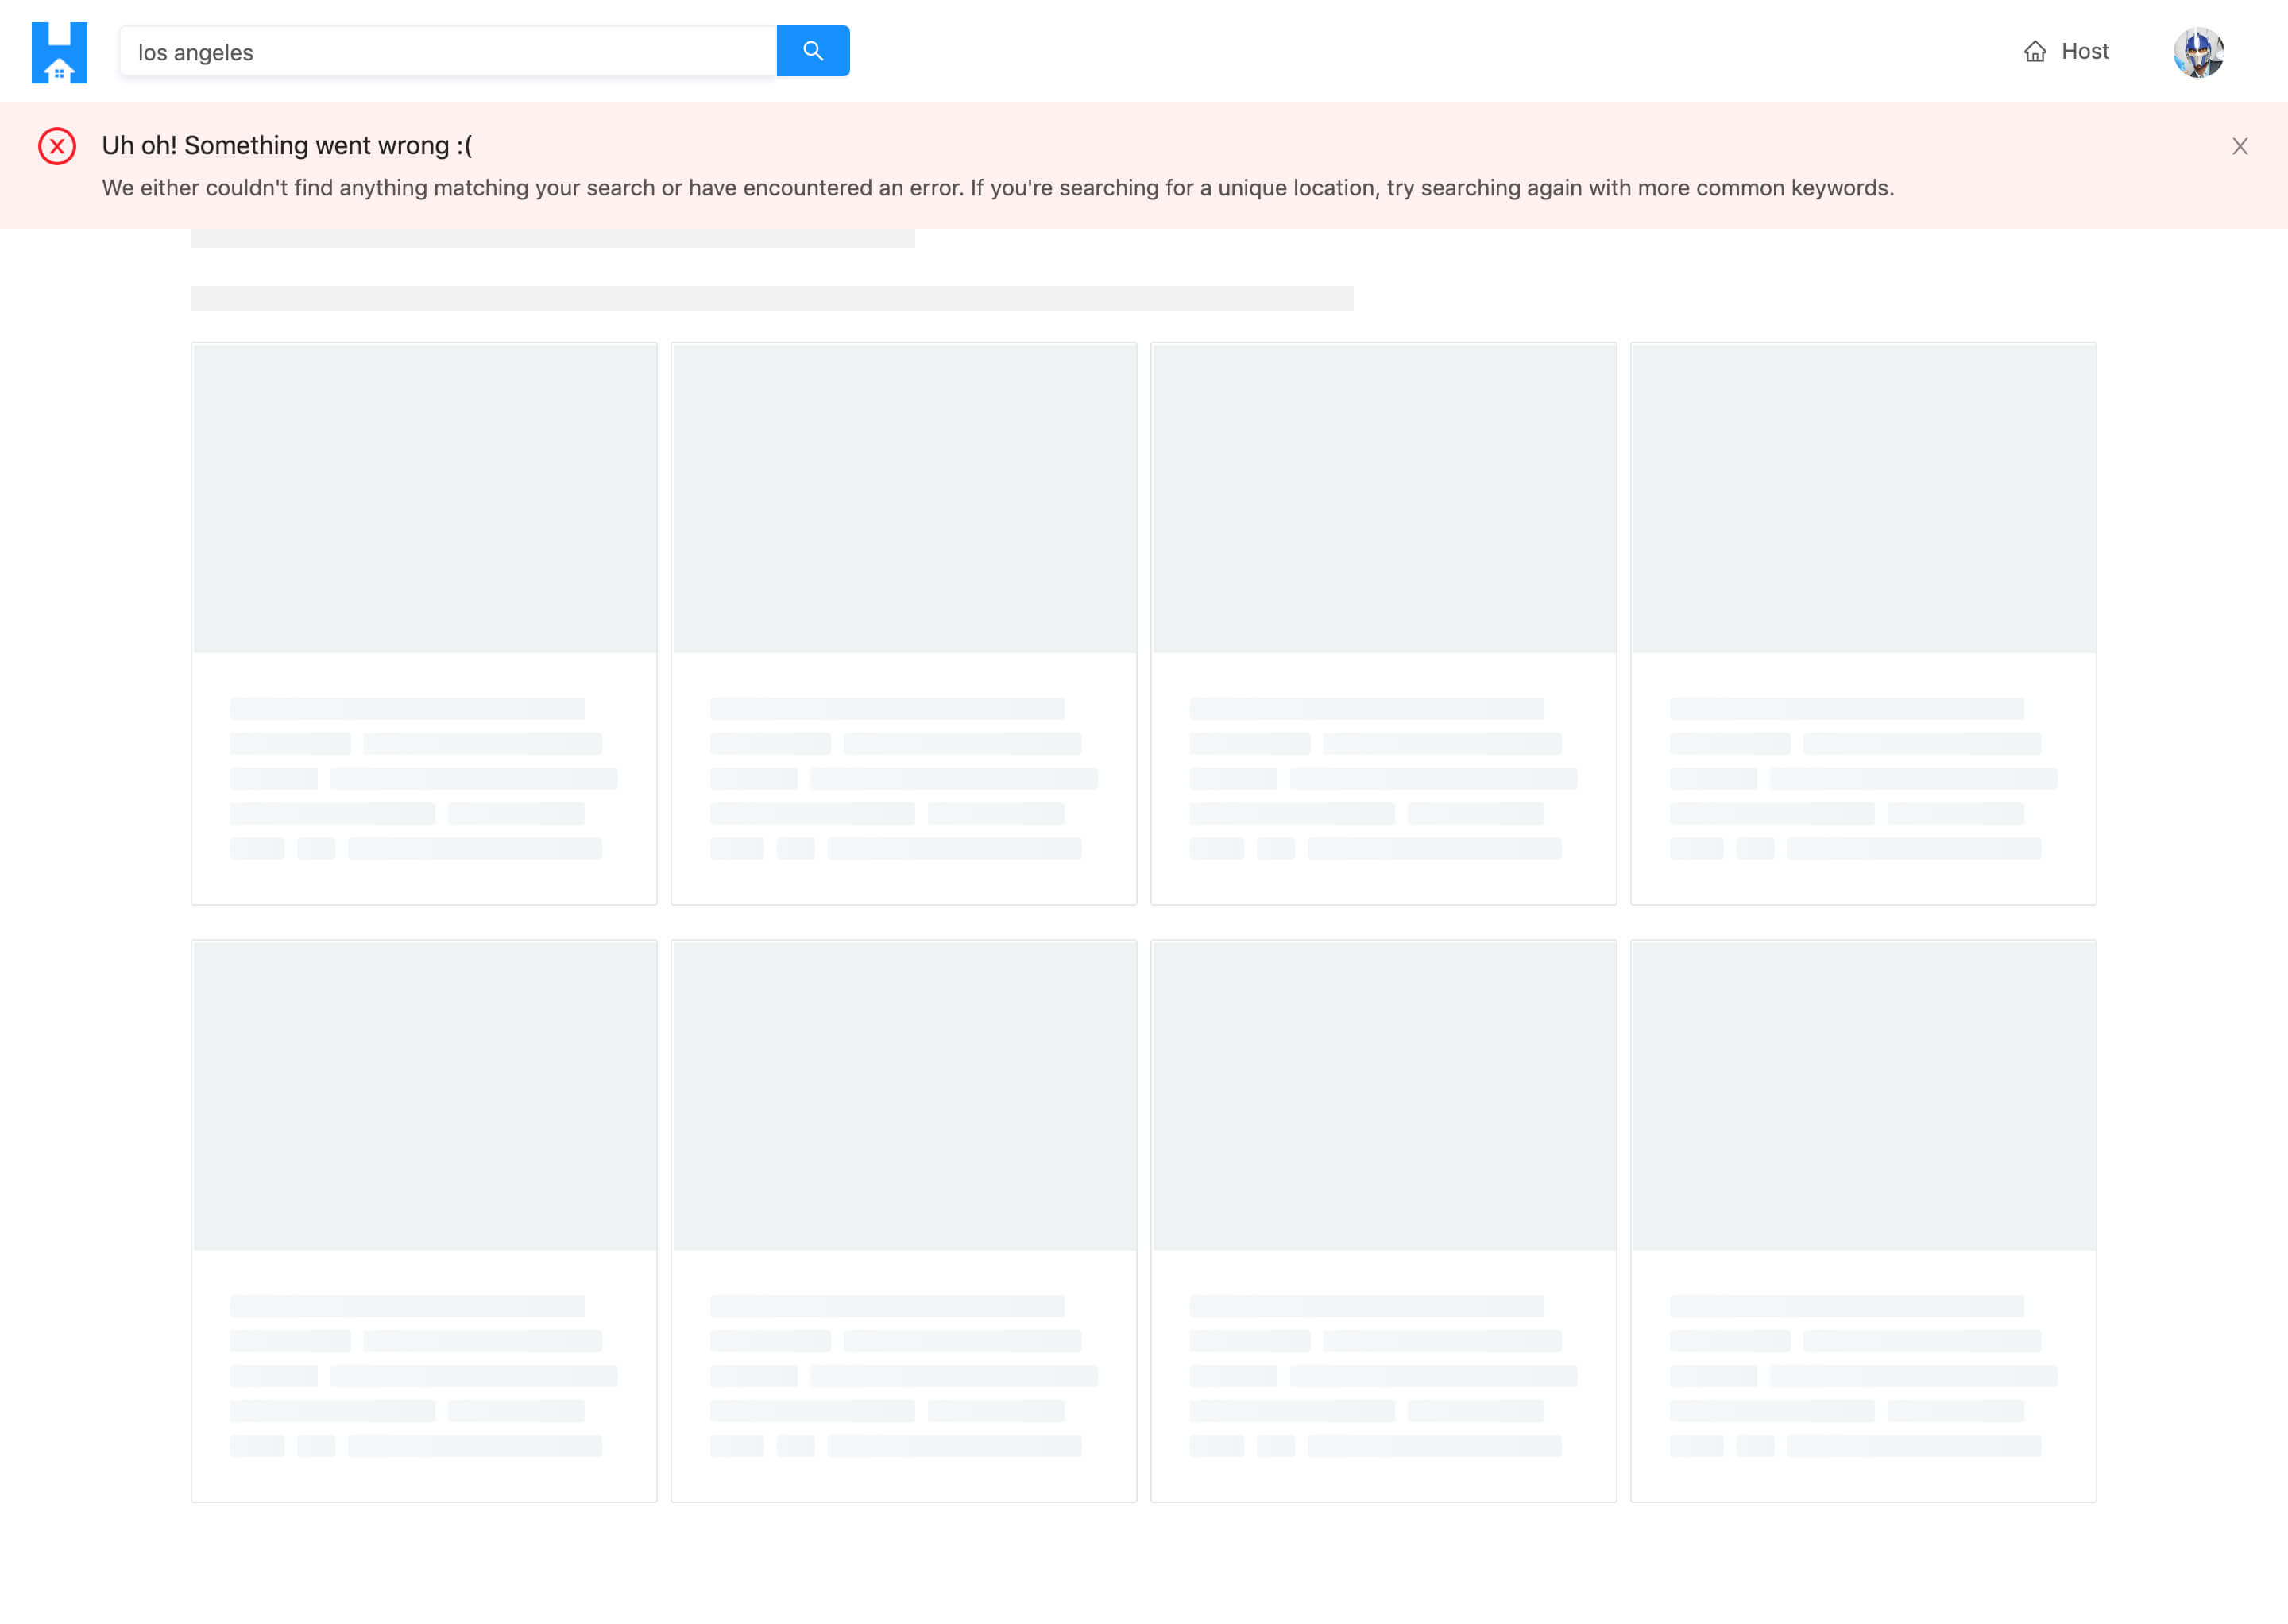
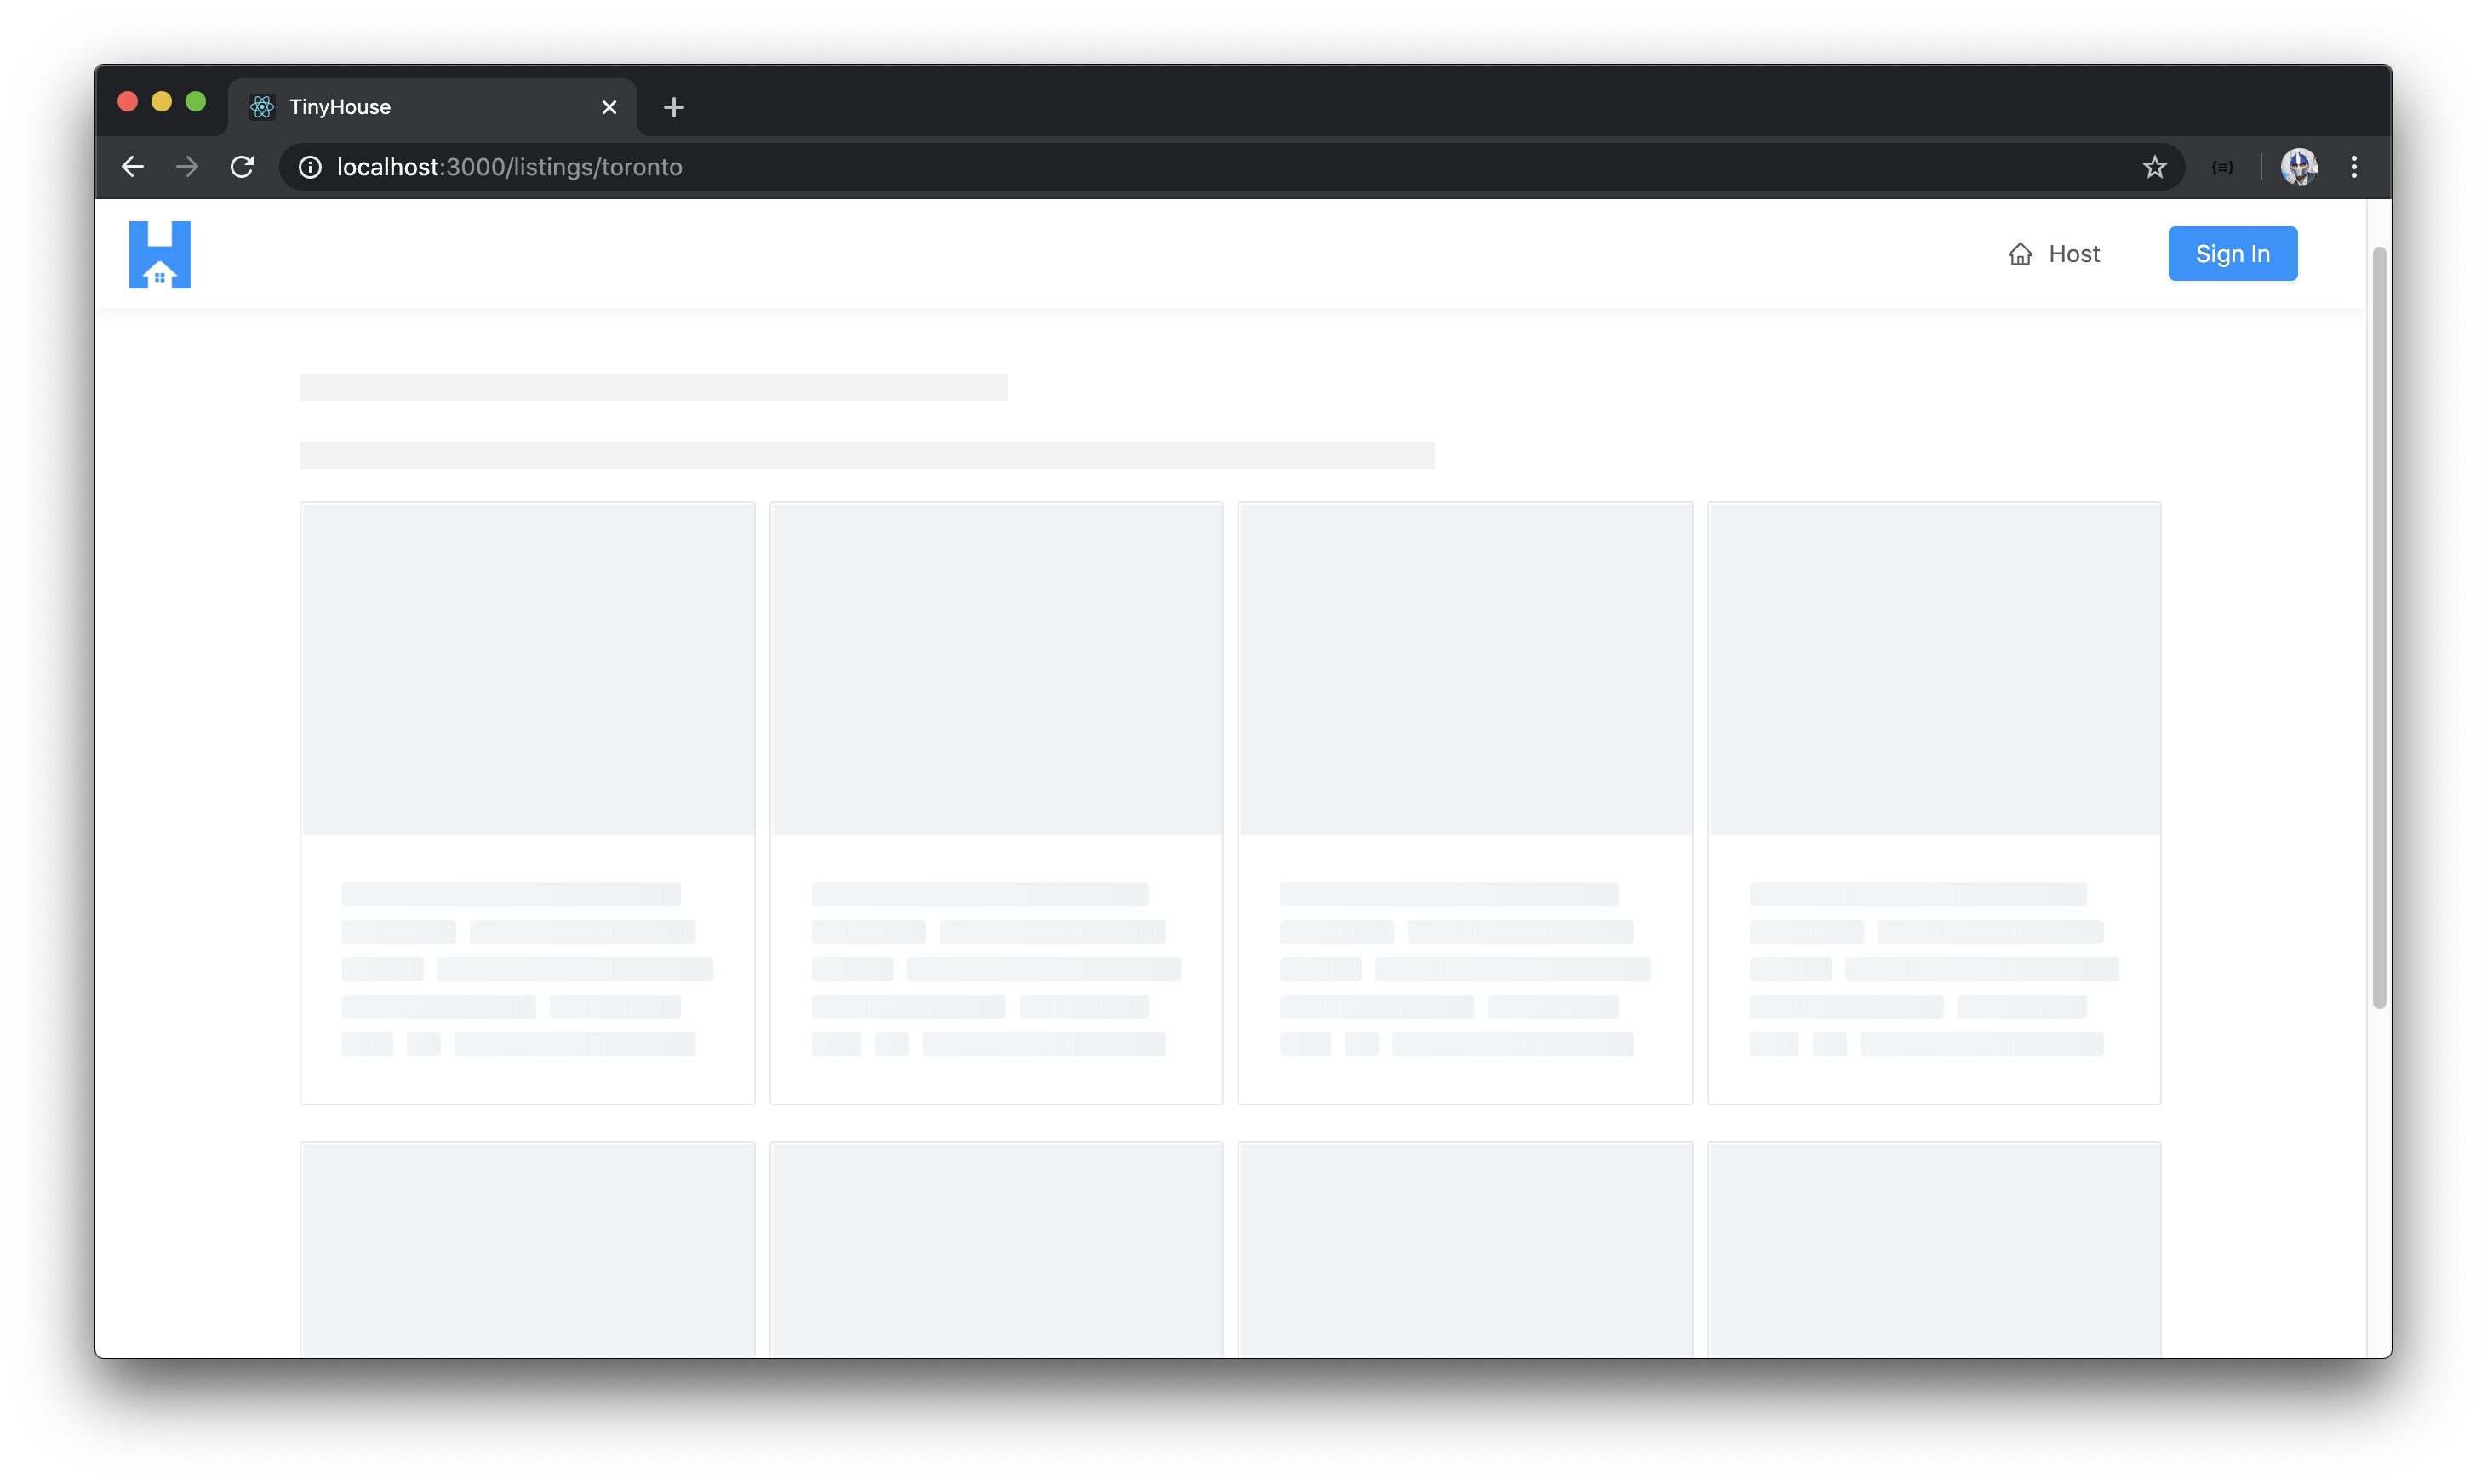
Some other things we’ll want to take care of is appropriate UI for when the query is loading or when the query might have completely errored. When the query is loading, we could use the shared <PageSkeleton /> component we’ve built for some of the other pages in our app. However, for this particular page, we’ll go the extra step and look to create a custom loading page that tells the user what the perceived UI would be. The loading state will essentially be a grid of eight cards that resemble that they’re all in the “loading” state. Very similar to how we’ve done it on the homepage except we’ll be showing eight cards. instead of four. This will be a <ListingsSkeleton /> component that we’ll create.

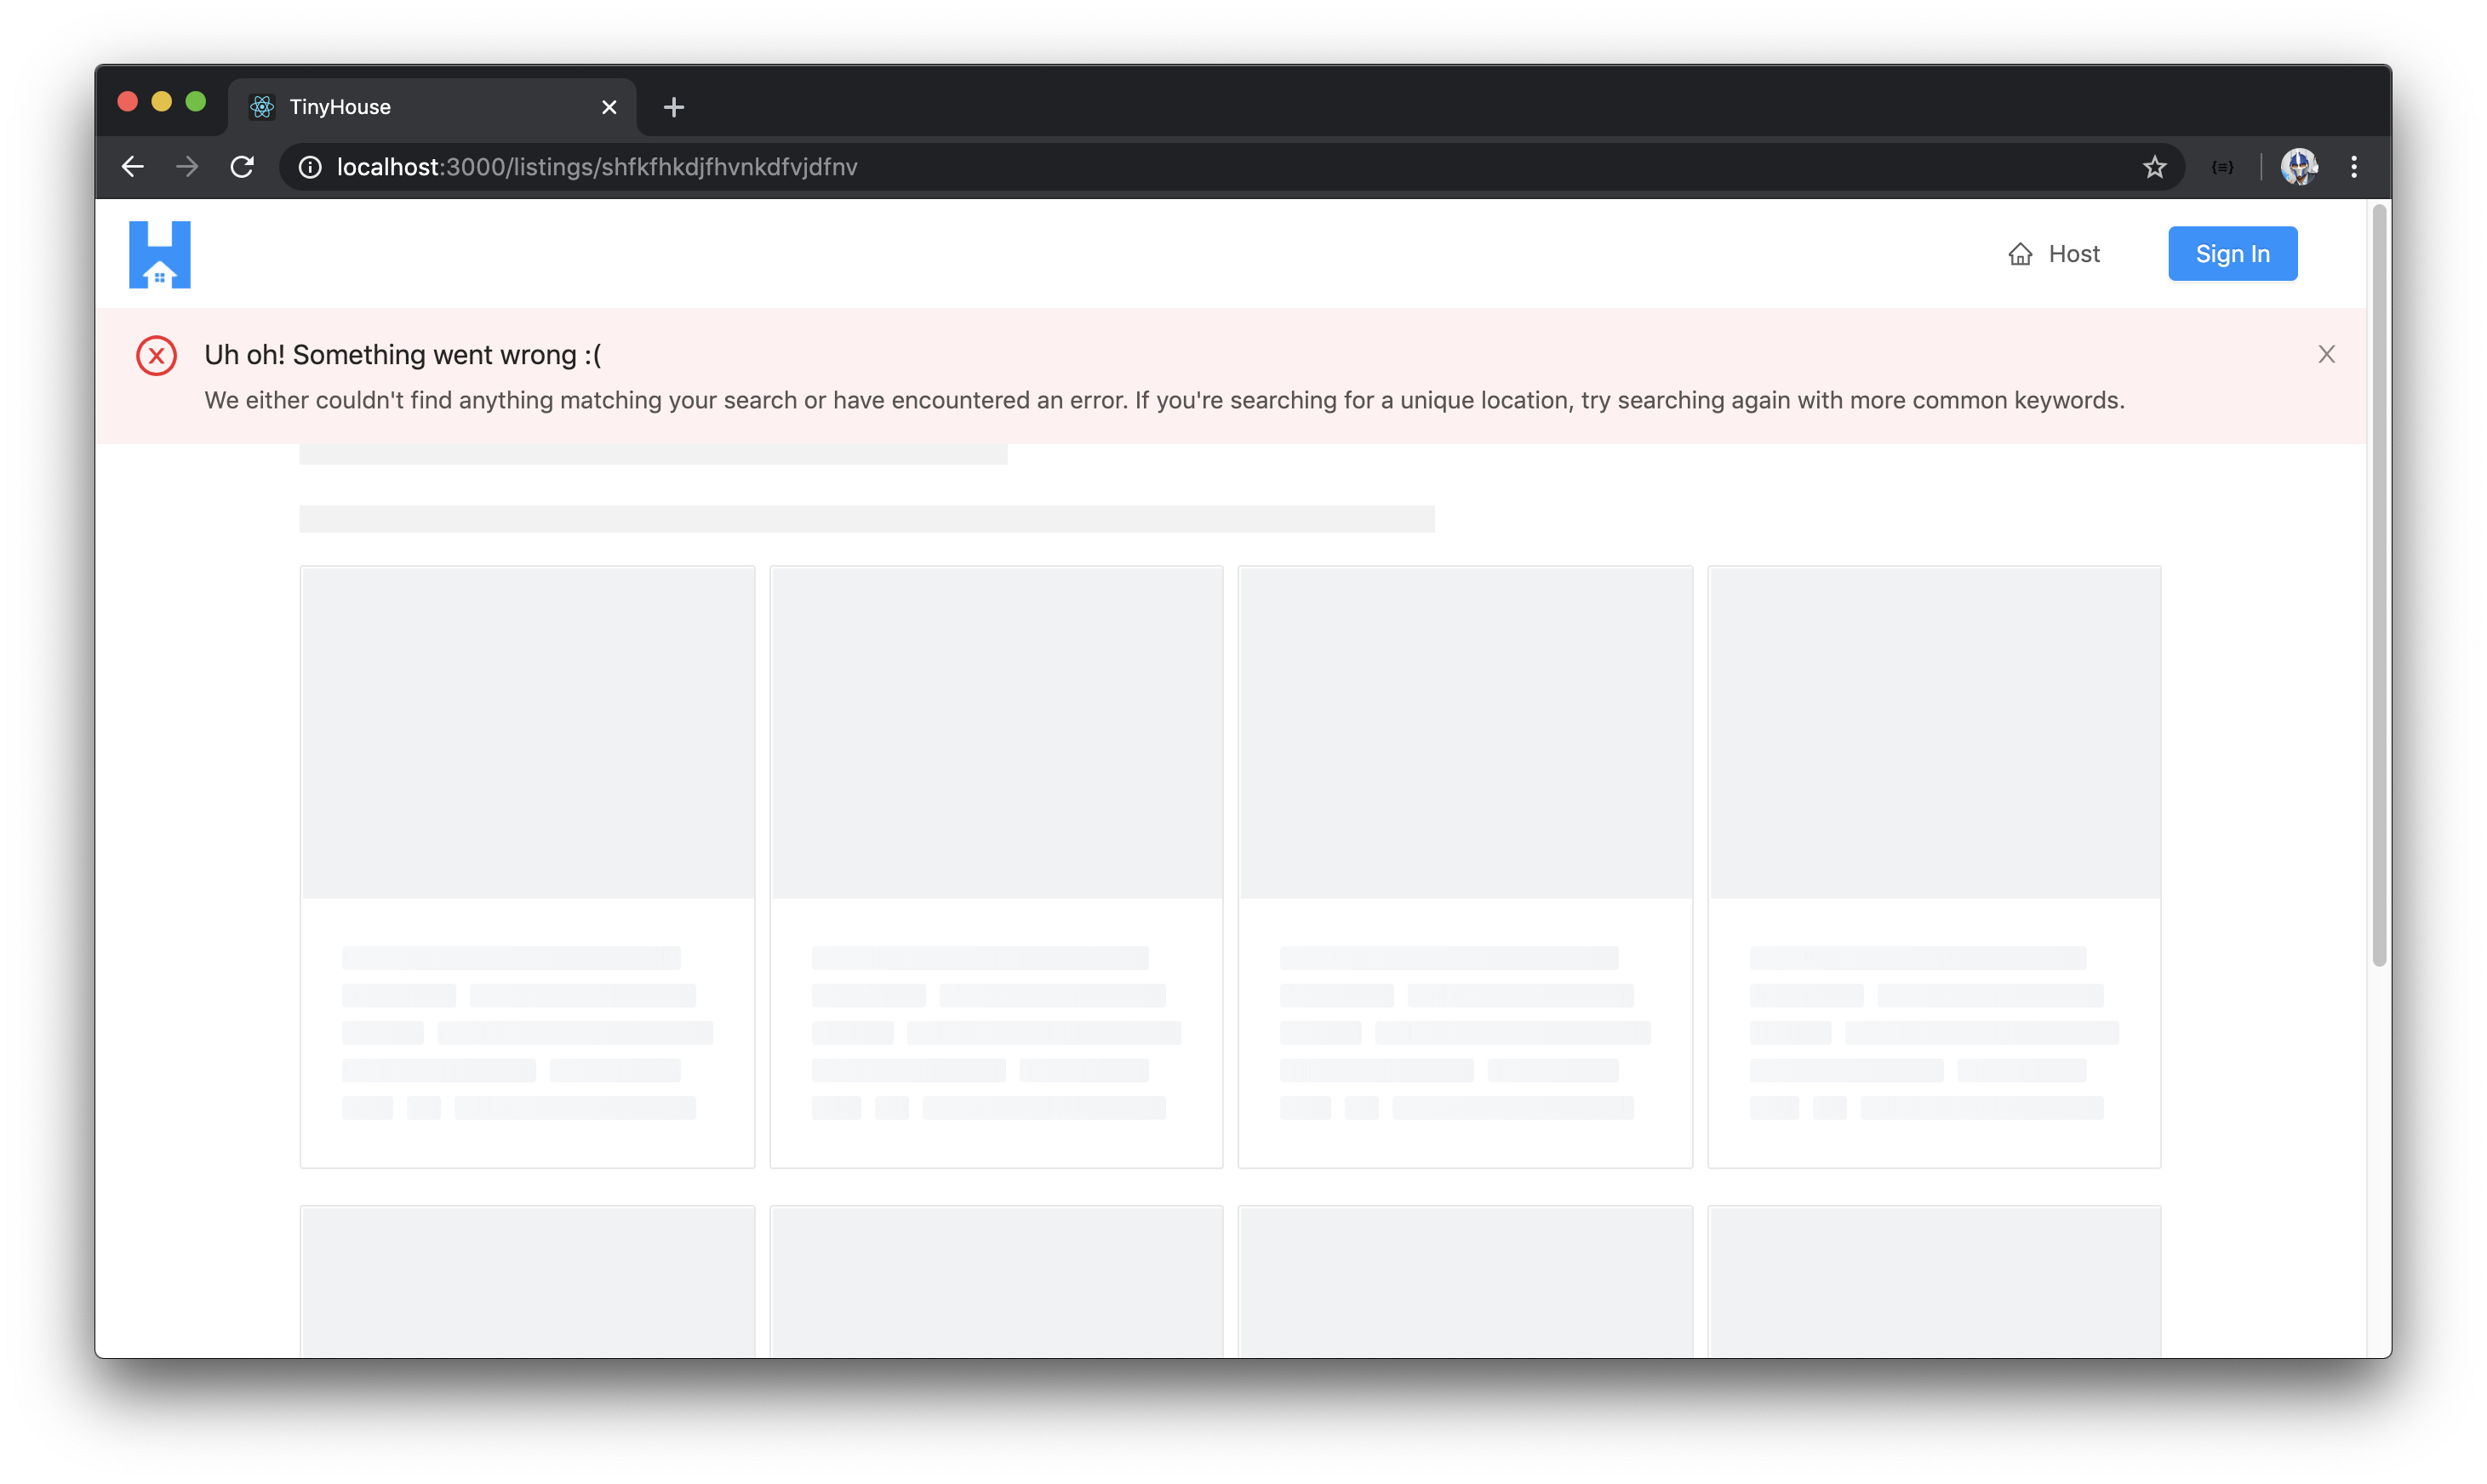
Lastly, if an error was to ever occur when the query in the /listings/:location? page is made, we’ll show the <ListingsSkeleton /> component and we’ll display an <ErrorBanner/ > at the top to say "We either couldn't find anything matching your search or have encountered an error. If you're searching for a unique location, try searching again with more common keywords" . In this case, we tell the user to conduct the action of trying to search for a more unique location just in case they’ve tried to search for a location and the geocoder isn’t able to derive location information when it should have been found.
We’ll take this step by step. The first few things we’ll tackle are the filtering and pagination capabilities.
<LISTINGSFILTER />
The listings query in our GraphQL API accepts a filter variable that dictates how the listings are going to be sorted. At this moment in time, we’ve simply provided a value of "PRICE_LOW_TO_HIGH" from the ListingsFilter Enum when we make the query in the <Listings /> component. If we want to give the user the option to control how the listings are going to be shown and sorted, we’ll need to have them be able to control the value we pass in this filter variable in our query. Because of this, we’ll keep the value as part of component state.
In the src/sections/Listings/index.tsx file, we’ll import the useState Hook from React.
client/src/sections/Listings/index.tsx
import React, { useState } from "react";
In the <Listings /> component, we’ll use the useState Hook to initialize a state variable we’ll call filter . We’ll also destruct a function that can be used to update the filter state variable which we’ll call setFilter() . We’ll state that the initial value of the filter state variable will be the "PRICE_LOW_TO_HIGH" value in our ListingsFilter Enum. We’ll then update the filter variable in our query to take the filter state variable as its value.
// ...

export const Listings = ({ match }: RouteComponentProps<MatchParams>) => {
  const [filter, setFilter] = useState(ListingsFilter.PRICE_LOW_TO_HIGH);
  const { data } = useQuery<ListingsData, ListingsVariables>(LISTINGS, {
    variables: {
      location: match.params.location,
      filter,
      limit: PAGE_LIMIT,
      page: 1
    }
  });

  // ...
};
We’ll now look to create a component called <ListingsFilters /> that will accept the filter state variable and the setFilter() function and will have the markup for the select dropdown that the user can use to change how the listings in the /listings/:location? page is sorted. We’ll create this <ListingsFilter /> component before we import it and use it in the <Listings /> component. We’ll create a ListingsFilters/ folder in the components/ folder within the src/sections/Listings/ directory that is to have an index.tsx file. We’ll also create an index.ts file in the src/sections/Listings/components/ folder.
client/
  // ...
  src/
    // ...
    sections/
      // ...
      Listings/
        components/
          ListingsFilters/
            index.tsx
        index.ts
      // ...
  // ...
In the src/sections/Listings/components/index.ts file, we’ll re-export the soon to be created <ListingsFilters /> component.
client/src/sections/Listings/components/index.ts
export * from "./ListingsFilters";
The markup for the <ListingsFilters /> component will be very small and will mostly consist of the <Select /> dropdown that we’ll use from Ant Design. With Ant Design’s <Select /> component, we’ll be able to show a select dropdown which accepts a value prop that determines what the selected value is. Within the select dropdown, we can declare the <Select.Option /> sub-components that convey each potential option and will have a value attached to them. Finally, there’ll be an onChange() prop function in the select dropdown that will trigger a callback function that we’ll use to update the state value.
In the <ListingsFilter /> component file, we’ll import the React library and the <Select /> dropdown from Ant Design. We’ll also import the ListingsFilter Enum from the src/lib/graphql/globalTypes.ts file with which we’ll use to dictate the value of each option in the select dropdown.
client/src/sections/Listings/components/ListingsFilters/index.tsx
import React from "react";
import { Select } from "antd";
import { ListingsFilter } from "../../../../lib/graphql/globalTypes";
We’ll declare the shape of Props that this component can expect. We’ll want this component to accept the actual filter state variable from the parent which is of type ListingsFilter and a setFilter() function which can be used to update the filter variable and will take a new filter value argument of type ListingsFilter and will return void.
We’ll also destruct the <Option /> sub-component from <Select /> .
client/src/sections/Listings/components/ListingsFilters/index.tsx
import React from "react";
import { Select } from "antd";
import { ListingsFilter } from "../../../../lib/graphql/globalTypes";

interface Props {
  filter: ListingsFilter;
  setFilter: (filter: ListingsFilter) => void;
}

const { Option } = Select;
We’ll then create the <ListingsFilters /> component function, specify the props it is to accept and for its markup, we’ll return a <div /> element that has some text that says “Filter By” which will convey to the user that they can filter the listings by whatever the options are in the select dropdown. We’ll then render the <Select /> dropdown with which the value will be what the filter state value is in the parent. When a change is made, it’ll trigger the setFilter() function and pass along the new value. We’ll have two options in the dropdown - one to say “Price: Low to High” and the other to say “Price: High to Low”. We’ll provide the appropriate Enum values for each select option.
client/src/sections/Listings/components/ListingsFilters/index.tsx
import React from "react";
import { Select } from "antd";
import { ListingsFilter } from "../../../../lib/graphql/globalTypes";

interface Props {
  filter: ListingsFilter;
  setFilter: (filter: ListingsFilter) => void;
}

const { Option } = Select;

export const ListingsFilters = ({ filter, setFilter }: Props) => {
  return (
    <div className="listings-filters">
      <span>Filter By</span>
      <Select value={filter} onChange={(filter: ListingsFilter) => setFilter(filter)}>
        <Option value={ListingsFilter.PRICE_LOW_TO_HIGH}>Price: Low to High</Option>
        <Option value={ListingsFilter.PRICE_HIGH_TO_LOW}>Price: High to Low</Option>
      </Select>
    </div>
  );
};
In the <Listings /> page component file, we’ll import the <ListingsFilters /> component from the adjacent components/ folder.
// ...
import { ListingsFilters } from "./components";
We’ll now look to render the <ListingsFilters /> component in the <Listings /> component. We’ll render the child filter component only when listings data is available and listings are present. There’s no point in rendering the filter options when there’s no listing data at all. With that said, in the listingsSectionElement within the <Listings /> component, instead of rendering just a list, we’ll render a <div /> element that is to contain the list of listings and the <ListingsFilters /> component. We’ll be sure to pass along the values for the filter and setFilter() props that it accepts.
// ...

export const Listings = ({ match }: RouteComponentProps<MatchParams>) => {
  const [filter, setFilter] = useState(ListingsFilter.PRICE_LOW_TO_HIGH);
  const { data } = useQuery<ListingsData, ListingsVariables>(LISTINGS, {
    variables: {
      location: match.params.location,
      filter,
      limit: PAGE_LIMIT,
      page: 1
    }
  });

  // ...

  const listingsSectionElement =
    listings && listings.result.length ? (
      <div>
        <ListingsFilters filter={filter} setFilter={setFilter} />
        <List
          grid={{
            gutter: 8,
            xs: 1,
            sm: 2,
            lg: 4
          }}
          dataSource={listings.result}
          renderItem={listing => (
            <List.Item>
              <ListingCard listing={listing} />
            </List.Item>
          )}
        />
      </div>
    ) : (
      <div>
        <Paragraph>
          It appears that no listings have yet been created for{" "}
          <Text mark>"{listingsRegion}"</Text>
        </Paragraph>
        <Paragraph>
          Be the first person to create a <Link to="/host">listing in this area</Link>!
        </Paragraph>
      </div>
    );
  // ...
};
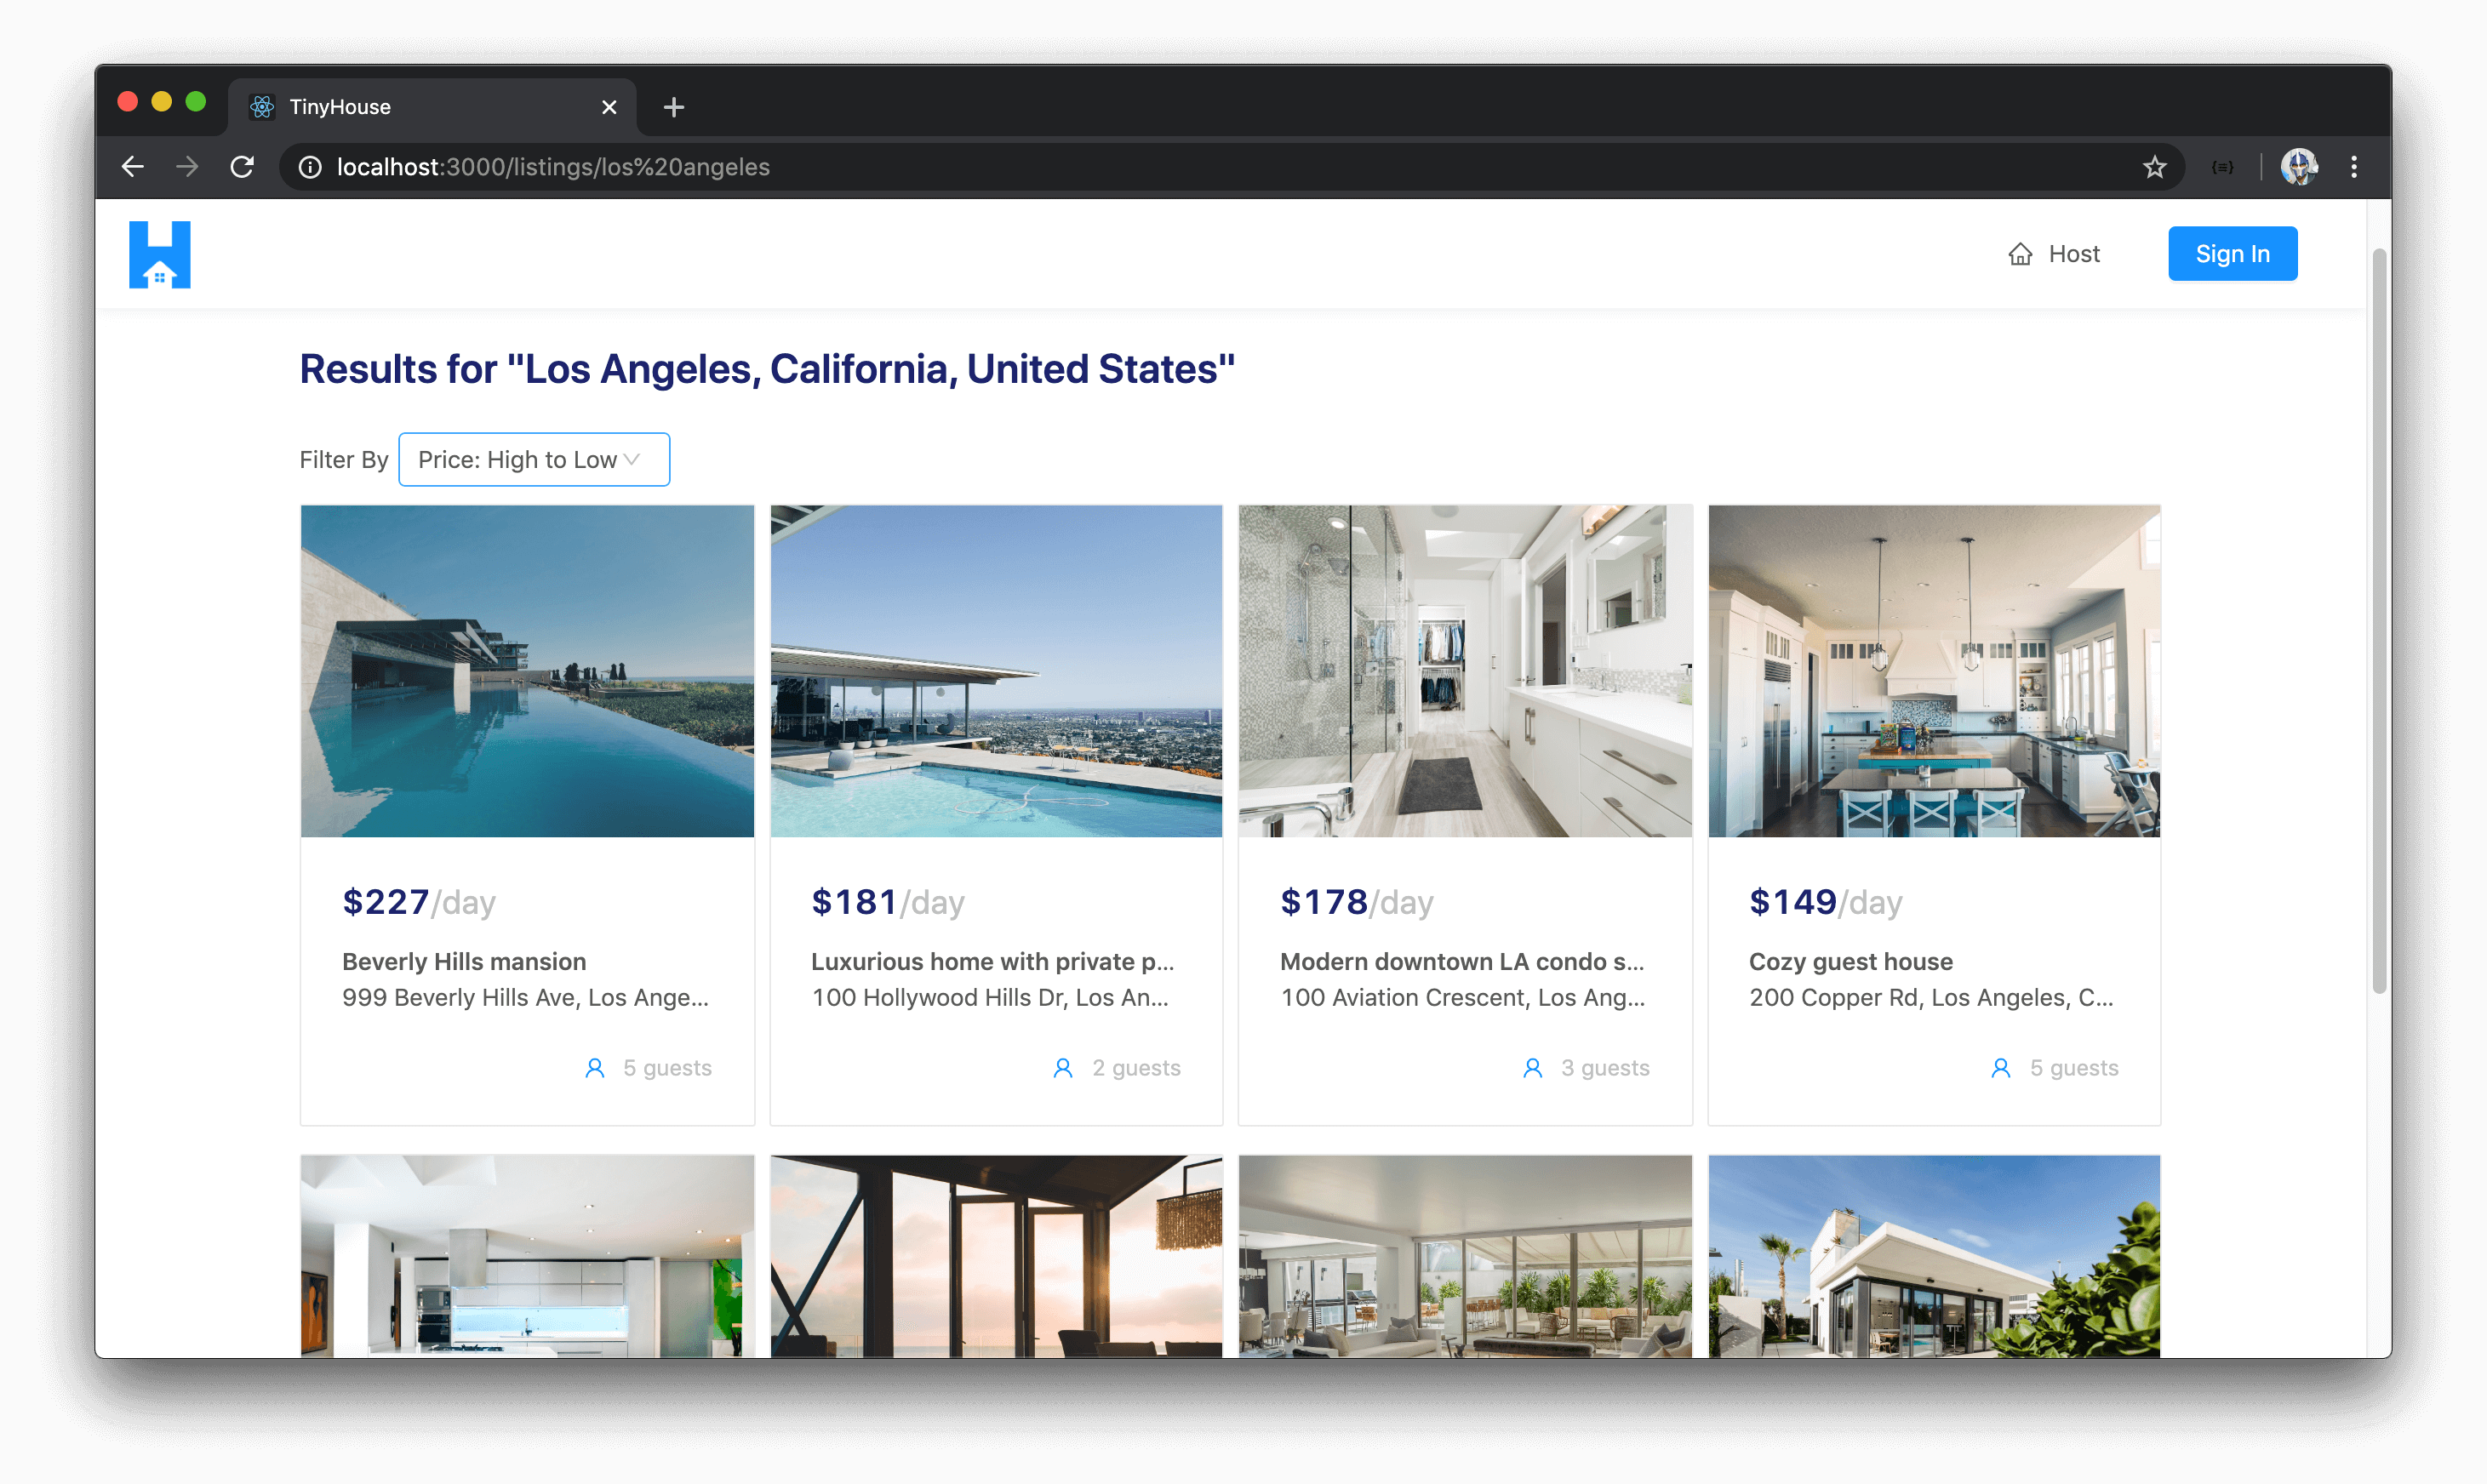
Let’s now see how our /listings/:location? page behaves. If we look at our listings page, we’ll see a select dropdown be shown to us with two options, one that says “Price Low To High” and the other that says “Price High To Low”. By default, we can see the filter value is “Price Low To High” with the presented listings being sorted from the lowest to highest price.

When we pick the other option in our dropdown of “Price High To Low” and wait a brief second, a new set of listings will be shown to us which are now sorted from the highest price to the lowest!
What’s happening here? We’ve seen this behavior when building some paginated sections in the /user/:id page of our app. Understanding what’s happened here is pretty important so let’s break it down step by step.
- When we first load the page, the
filtervalue in our query is set from"Price Low To High"which is why we see listings sorted from price low to high. This is what the server returns from the query we’ve made. - When the page is first rendered, a select dropdown is shown to the user and the initial state value of
filterdictates the dropdown is to have a value of"Price Low To High". - When a user selects the other option in the dropdown, the
setFilter()function in the<Listings />component is run and the newfilterstate value is passed. - The
setFilter()function changes the value of thefilterstate variable. In React, when state changes, components re-render to show the change . - We understand that the
useQueryHook makes a query when a component first mounts/renders. However, when the values of the variables in theuseQueryHook changes, it recognizes that it should make another query to get fresh new data from the server . - Lastly, if we were to toggle back and forth between the two filter options, we’ll notice the query won’t be made again despite our UI showing the new changes. This is because of React Apollo’s state management solution . When a query is first made, it caches the data from that query. By default, if we attempt to re-query what we’ve already done queried before - Apollo will check to see if we already have this data in the cache. If this data already exists in the cache, Apollo won’t need to hit the network again and will provide the data from the cache directly.
This behavior of querying data, keeping it in component state, updating state from user action, and if needed re-querying information is, in our opinion, a large part of the work one does when building React applications. We’ll see another very similar example of this pattern when we build the pagination capability in the /listings/:location? page.
<LISTINGSPAGINATION />
To show the pagination section in our /listings/:location? page, we could use the pagination prop object that the Ant Design <List /> component expects. Though very similar, what we’ll do in this case is construct our own component called <ListingsPagination /> that uses the Ant Design <Pagination /> component. The pagination we’ve seen before within the <List /> component essentially renders this same pagination section.
We’ll be interested in telling the <Pagination /> component what the total amount of results from the query is. This is because Ant Design’s <Pagination /> component uses that data to determine the number of page elements to show. Our API allows us to retrieve this information, so we’ll head to the listings GraphQL document we’ve set up and specify a total field is to be returned alongside the region and result .
client/src/lib/graphql/queries/Listingsindex.ts
import { gql } from "apollo-boost";

export const LISTINGS = gql`
  query Listings($location: String, $filter: ListingsFilter!, $limit: Int!, $page: Int!) {
    listings(location: $location, filter: $filter, limit: $limit, page: $page) {
      region
      total
      result {
        id
        title
        image
        address
        price
        numOfGuests
      }
    }
  }
`;
To have our generated TypeScript definitions recognize that the data returned from the listings query is to have a total number field, we’ll head to the terminal and run the npm run codegen:generate command to regenerate our GraphQL typings.
npm run codegen:generate
In the <Listings /> component, we’ll now create a state property that’s responsible for tracking the page the user is viewing. We’ll call this state property page and the function responsible for updating the state property as setPage() . Initially, we’ll always want the user to see the first page of results so we’ll provide an initial value of 1 . We’ll also have the page variable in our query now accept the value of the page state value.
// ...

export const Listings = ({ match }: RouteComponentProps<MatchParams>) => {
  const [filter, setFilter] = useState(ListingsFilter.PRICE_LOW_TO_HIGH);
  const [page, setPage] = useState(1);

  const { data } = useQuery<ListingsData, ListingsVariables>(LISTINGS, {
    variables: {
      location: match.params.location,
      filter,
      limit: PAGE_LIMIT,
      page
    }
  });

  // ...
};
We’ll create the <ListingsPagination /> component that will have the markup for the pagination section. We’ll create the appropriate folder and index file in the adjacent components/ folder of the <Listings /> component file.
client/
  // ...
  src/
    // ...
    sections/
      // ...
      Listings/
        components/
          // ...
          ListingsPagination/
            index.tsx
        index.ts
      // ...
  // ...
In the src/sections/Listings/components/index.ts file, we’ll re-export the soon to be created <ListingsPagination /> component.
client/src/sections/Listings/components/index.ts
export * from "./ListingsPagination";
In the <ListingsPagination /> component file, we’ll only need to import two things - the React library and the <Pagination /> component from Ant Design.
client/src/sections/Listings/components/ListingsPagination/index.tsx
import React from "react";
import { Pagination } from "antd";
The <ListingsPagination /> component is to accept a couple of props from the parent that will be used in the rendered pagination element. It will accept:
- The
totalnumber of listings that are retrieved from the query. - The
pagecurrently being viewed. - The
limit, or in other words, the total amount of items that should be shown on a page. - A function we’ll label as
setPage()that will essentially be used in the parent to update thepagestate variable. ThesetPage()function prop will accept apageargument of typenumberand will return void.
client/src/sections/Listings/components/ListingsPagination/index.tsx
import React from "react";
import { Pagination } from "antd";

interface Props {
  total: number;
  page: number;
  limit: number;
  setPage: (page: number) => void;
}
We’ll export the <ListingsPagination /> component function, declare the props it is to accept, and return the <Pagination /> component from Ant Design. There are a few props we’ll declare to have the <Pagination /> component behave the way we’ll want it to.
- The
currentprop conveys what the current page is with which we’ll provide a value of thepageprop we’ll pass into the component. - The
totalprop refers to the total amount of items and helps control the number of pages to be shown in the pagination element. We’ll pass thetotalprop to be available in the component as a value for this. -
defaultPageSizerefers to the number of items to be shown in the page which is used by the<Pagination />component to determine the number of pages to be shown in the list. We’ll supply thelimitprop, that we’ll pass into this component, as the value fordefaultPageSize. -
hideOnSinglePageis a useful prop that tells the component to be hidden when there is only one page which is what we’ll want. -
showLessItemshelps show fewer page numbers and compresses the pagination section to focus more on the initial page numbers and the last page numbers. This is mostly preference and we’ll apply it as well. - There’s the
onChange()callback prop that will trigger when a page number is selected. We’ll take that page number and pass it along to thesetPage()function prop that will be available and passed in. - And lastly, we’ll just add a class we’ve created to help with some minor styling.
client/src/sections/Listings/components/ListingsPagination/index.tsx
import React from "react";
import { Pagination } from "antd";

interface Props {
  total: number;
  page: number;
  limit: number;
  setPage: (page: number) => void;
}

export const ListingsPagination = ({ total, page, limit, setPage }: Props) => {
  return (
    <Pagination
      current={page}
      total={total}
      defaultPageSize={limit}
      hideOnSinglePage
      showLessItems
      onChange={(page: number) => setPage(page)}
      className="listings-pagination"
    />
  );
};
In the parent <Listings /> component, we’ll import the <ListingsPagination/> component from the components/ folder.
// ...
import { ListingsFilters, ListingsPagination } from "./components";
We’ll now look to render the <ListingsPagination /> component in the <Listings /> component. Similar to the filter section shown on the page - we wouldn’t want to show the pagination section only until listings data is available and listings are present. With that said, we’ll look to place it among where the <ListingsFilter /> component is and we’ll pass the necessary props that it is to accept.
One other minor thing we’ll do is use Ant Designs <Affix /> component to affix the filter and pagination section to close to the top of the screen if the user was to scroll a little below past the entire section. We’ll import the <Affix /> component from Ant Design and wrap the <ListingsFilters /> and <ListingsPagination /> components that will be part of the listingsSectionElement . We’ll specify an offsetTop prop to the <Affix /> component which helps offset the section from the top of the page if the user was to scroll below it. We’ll apply a value of 64 to help position the filters and pagination below the app header by around 64px.
// ...
import { Affix, Layout, List, Typography } from "antd";
// ...

export const Listings = ({ match }: RouteComponentProps<MatchParams>) => {
  // ...

  // ...

  const listingsSectionElement =
    listings && listings.result.length ? (
      <div>
        <Affix offsetTop={64}>
          <ListingsPagination
            total={listings.total}
            page={page}
            limit={PAGE_LIMIT}
            setPage={setPage}
          />
          <ListingsFilters filter={filter} setFilter={setFilter} />
        </Affix>
        <List
          grid={{
            gutter: 8,
            xs: 1,
            sm: 2,
            lg: 4
          }}
          dataSource={listings.result}
          renderItem={listing => (
            <List.Item>
              <ListingCard listing={listing} />
            </List.Item>
          )}
        />
      </div>
    ) : (
      <div>
        <Paragraph>
          It appears that no listings have yet been created for{" "}
          <Text mark>"{listingsRegion}"</Text>
        </Paragraph>
        <Paragraph>
          Be the first person to create a <Link to="/host">listing in this area</Link>!
        </Paragraph>
      </div>
    );
  // ...
};
If we take a look at our /listings/:location? page now for a location that has more than eight listings, we should see a pagination section shown to us with the first page being selected by default. Keep in mind, we’ve stated the pagination component is to only be shown if there is more than one page of results. If we’re unable to see the pagination section since none of our current locations have more than eight listings, we can test out the pagination section by simply changing the PAGE_LIMIT value, we have in the src/sections/Listings/index.tsx and is being used in the query and is being passed to the <ListingsPagination /> component, to a smaller value (e.g. 4 ).
const PAGE_LIMIT = 4; // set page limit to a smaller value temporarily
We’ll now see a smaller list of listings be presented to us and the pagination section be displayed with the first page being selected by default.
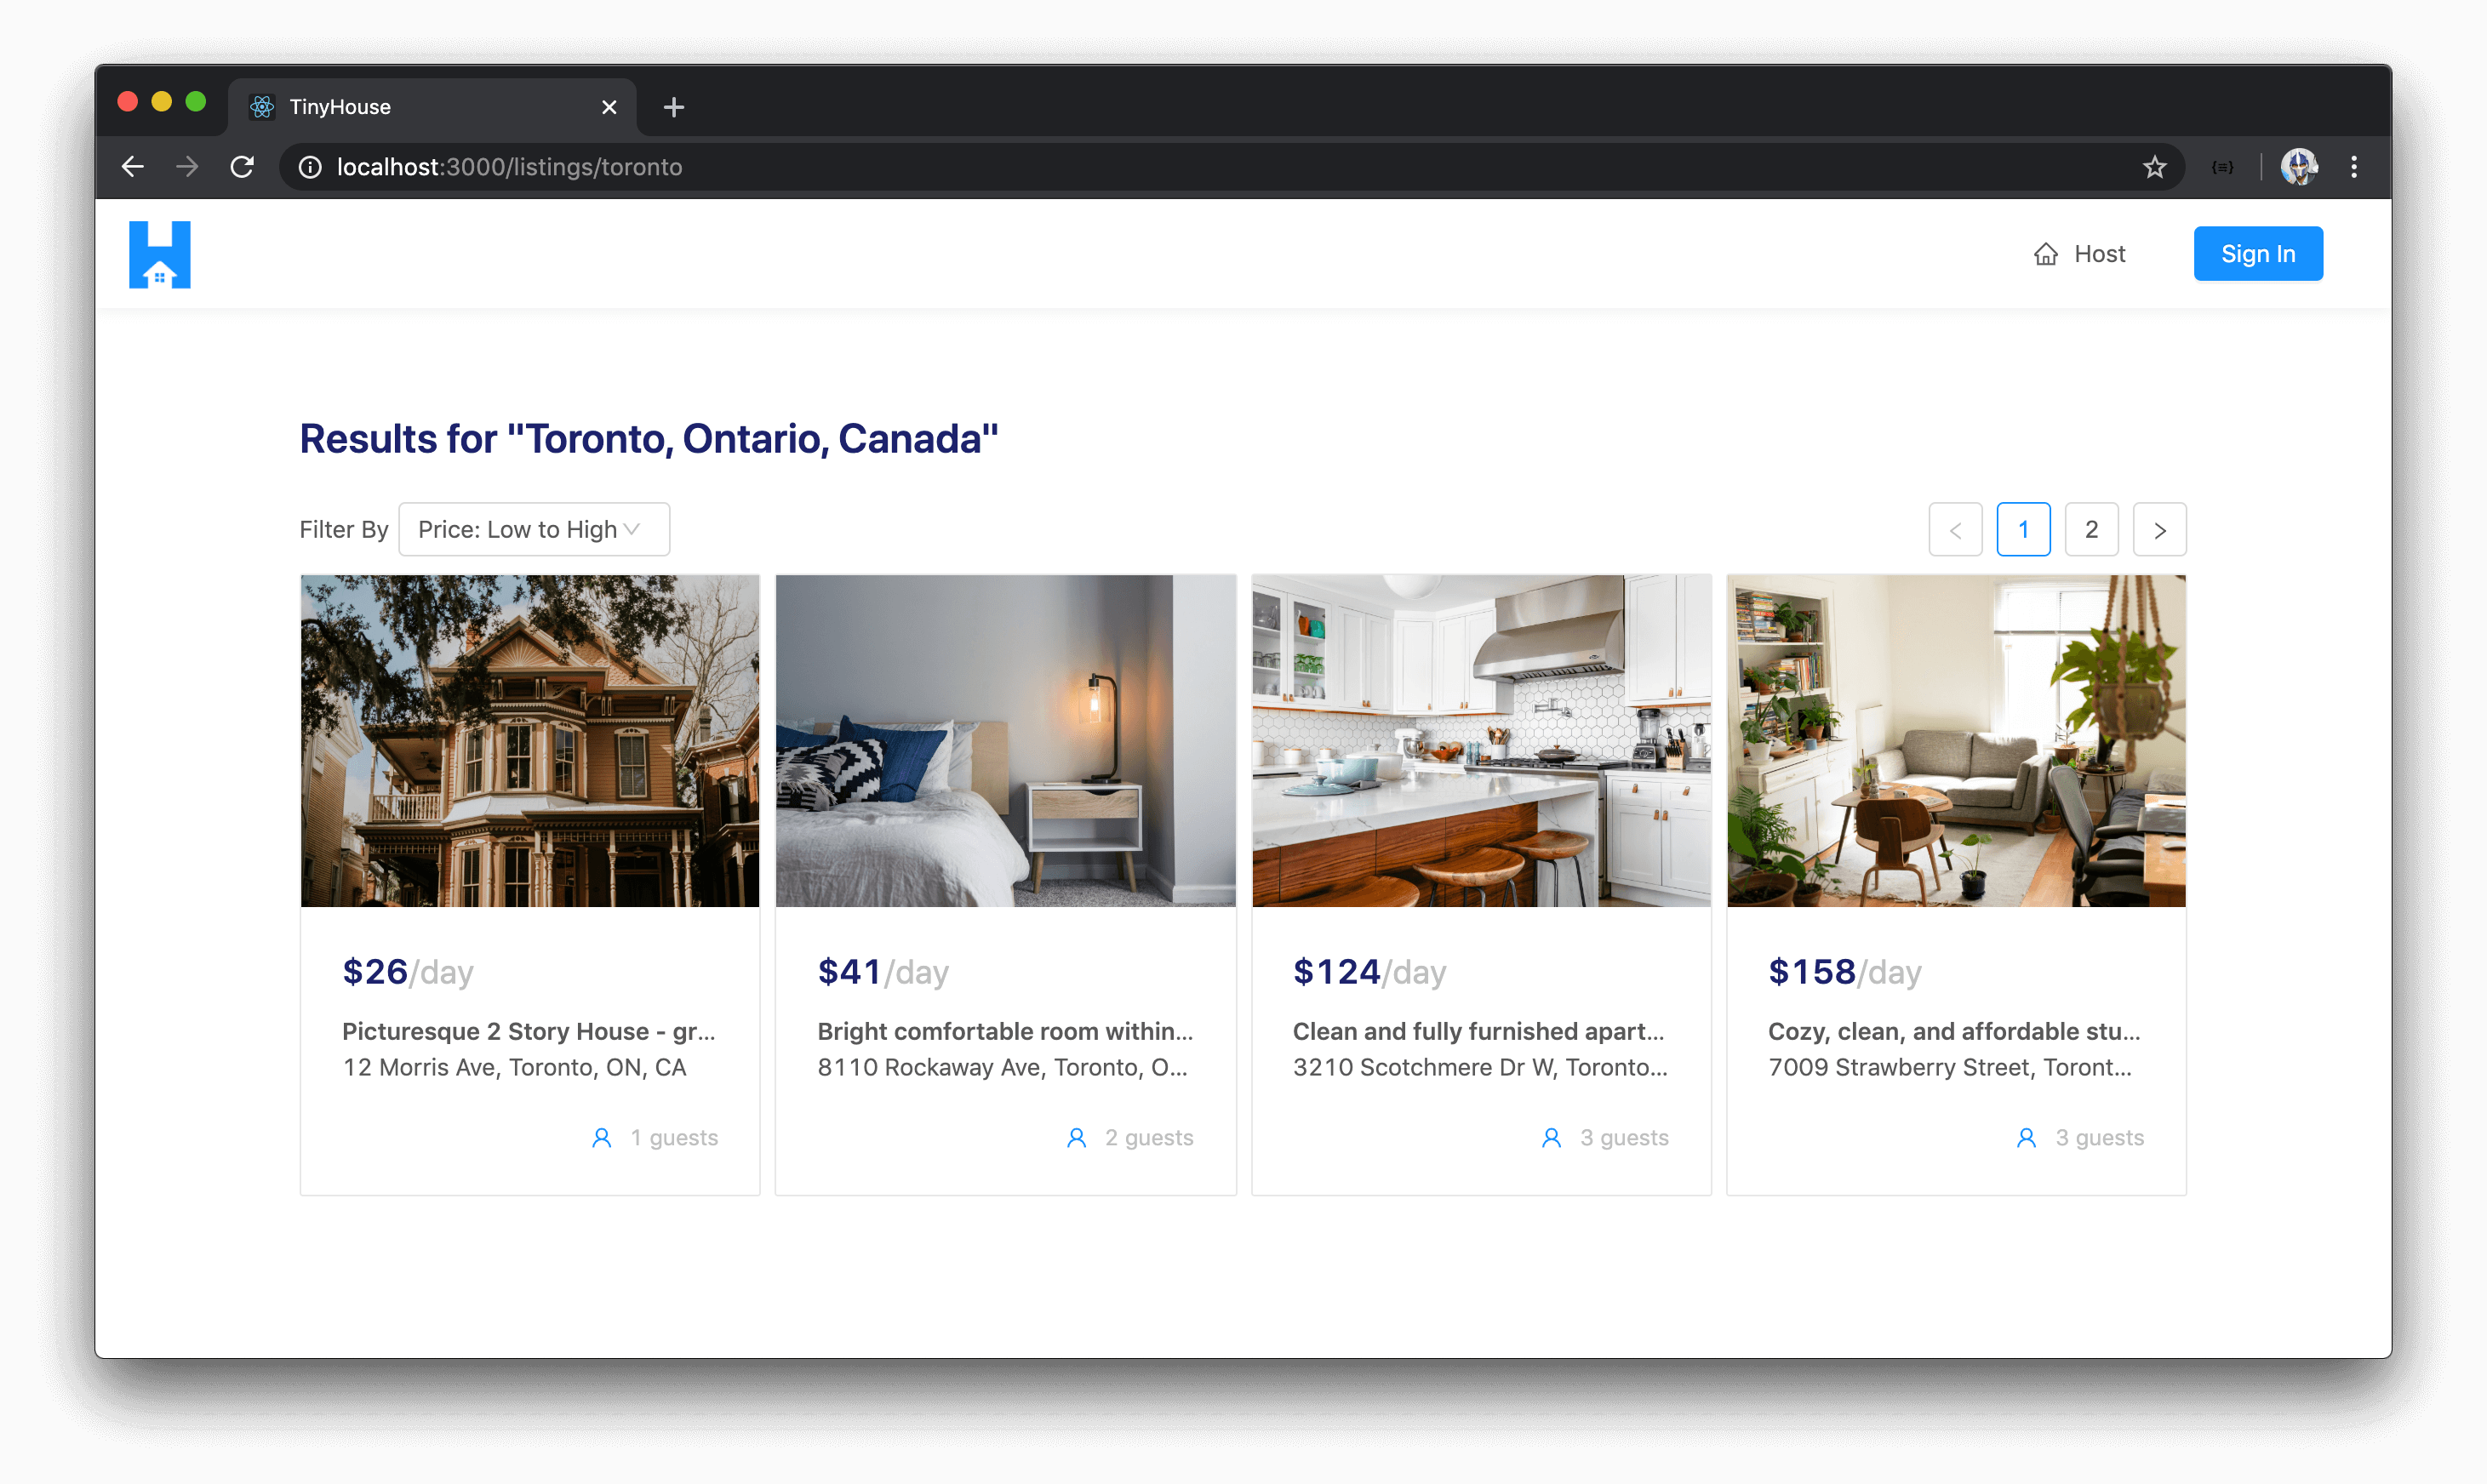
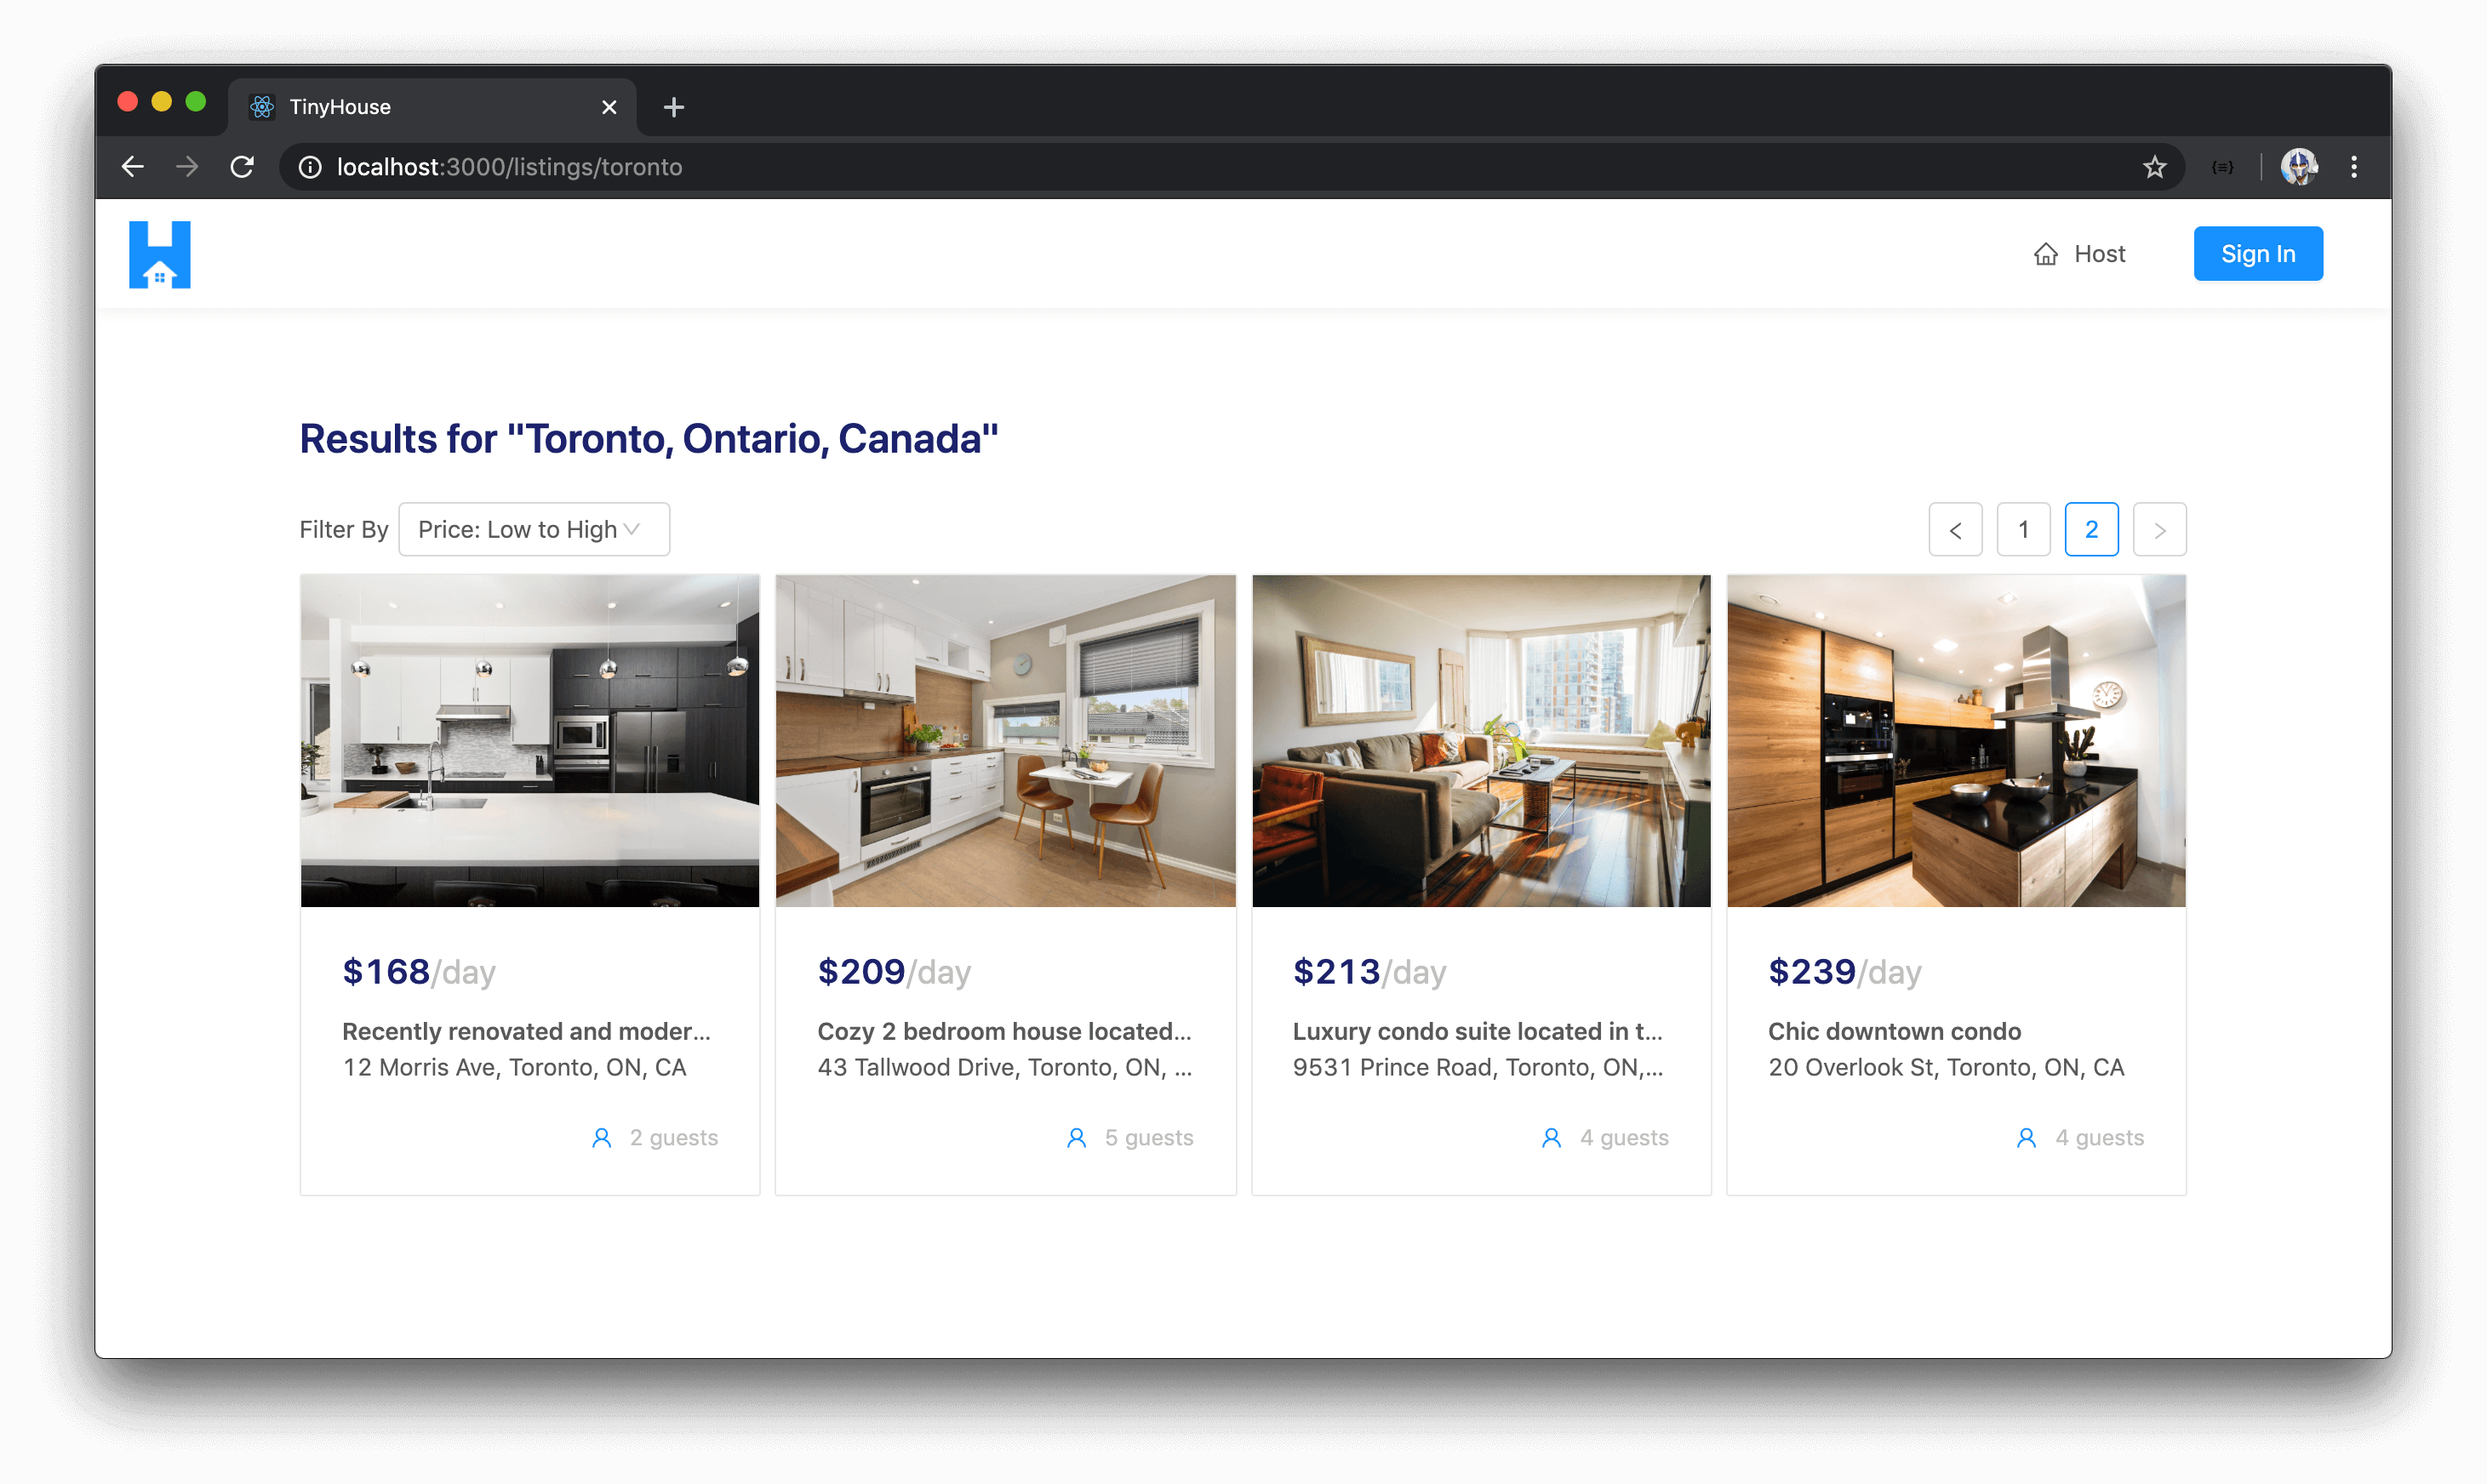
If we were to click the second page in the pagination section, we’ll get a new result of listings shown to us after a brief period!
The behavior that occurs when a different page is selected is very similar to the behaviour made in the filters dropdown. We have a state value for the page variable being used in the query. When a user changes a page in the pagination section, the page state value is updated. When a change in state happens, the <Listing /> component re-renders. Since the value of the state variable is being used in the useQuery Hook - when it changes, it makes the query happen again. Lastly, once the data is available in Apollo’s cache - the next time we try to visit a page we’ve already visited, Apollo gets the data from the cache as opposed to making the network request.
Before we continue, we’ll go back and make sure our PAGE_LIMIT is set back to 8.
LISTINGS QUERY - LOADING & ERROR HANDLING
The last couple of things we’ll tackle in the /listings/:location? page involve the UI we’ll want to show when the listings query is in the loading state or has errored out completely. We’ll first attempt to handle the UI for when the query is loading , with which we’ll create a component called <ListingsSkeleton /> that is to be shown in this case.
We’ll create the ListingsSkeleton/ component folder and the associated index.ts file in the src/sections/Listings/components/ directory.
client/
  // ...
  src/
    // ...
    sections/
      // ...
      Listings/
        components/
          // ...
          ListingsSkeleton/
            index.tsx
        index.ts
      // ...
  // ...
We’ll then have the <ListingsSkeleton /> component we’ll create shorly be re-exported from the src/sections/Listings/components/ file.
client/src/sections/Listings/components/index.ts
export * from "./ListingsSkeleton";
We mentioned we want the loading state of the /listings/:location? page to show eight “loading” cards. The <ListingsSkeleton /> component is to be very similar to the skeleton component we show when the highest priced listings are being queried for in the homepage - so we’ll copy the skeleton UI we’ve prepared in the src/sections/Home/HomeListingsSkeleton/index.tsx component over to src/sections/Listings/ListingsSkeleton/index.tsx and make some necessary changes.
Note: We use an image asset labeled
listing-loading-card-cover.jpgin thesrc/sections/Listings/assets/folder for help displaying the loading cards in the<ListingsSkeleton />component. Find a source for this image asset - here.
Mostly everything will remain the same except we’ll rename the component function accordingly, make a few changes to the classNames applied, and in the upper skeleton paragraph - we’ll say we’ll only want a single row. We’ll also look to specify that we expect to have eight cards be shown. The way we can achieve this is to update the emptyData array we have in the component to contain eight objects so it’ll render the list items eight times.
client/src/sections/Listings/components/ListingsSkeleton/index.tsx
import React from "react";
import { Card, List, Skeleton } from "antd";

import listingLoadingCardCover from "../../assets/listing-loading-card-cover.jpg";

export const ListingsSkeleton = () => {
  const emptyData = [{}, {}, {}, {}, {}, {}, {}, {}];

  return (
    <div>
      <Skeleton paragraph={{ rows: 1 }} />
      <List
        grid={{
          gutter: 8,
          xs: 1,
          sm: 2,
          lg: 4
        }}
        dataSource={emptyData}
        renderItem={() => (
          <List.Item>
            <Card
              cover={
                <div
                  style={{ backgroundImage: `url(${listingLoadingCardCover})` }}
                  className="listings-skeleton__card-cover-img"
                ></div>
              }
              loading
              className="listings-skeleton__card"
            />
          </List.Item>
        )}
      />
    </div>
  );
};
In the <Listings /> component file, we’ll import the <ListingsSkeleton /> component from the adjacent components/ folder.
client/src/sections/Listings/index.tsx
import { ListingsFilters, ListingsPagination, ListingsSkeleton } from "./components";
In the <Listings /> component, we’ll destruct the loading state from the query and when it’s ever true, we’ll render the <ListingsSkeleton /> component and have it within Ant Design’s <Content /> component.
export const Listings = ({ match }: RouteComponentProps<MatchParams>) => {
  const [filter, setFilter] = useState(ListingsFilter.PRICE_LOW_TO_HIGH);
  const { loading, data } = useQuery<ListingsData, ListingsVariables>(LISTINGS, {
    variables: {
      location: match.params.location,
      filter,
      limit: PAGE_LIMIT,
      page: 1
    }
  });

  // ...

  if (loading) {
    return (
      <Content className="listings">
        <ListingsSkeleton />
      </Content>
    );
  }
};
Now, when our query is in flight (i.e. loading), we’ll see the loading state be presented to us that mimics the perceived outcome of the page we intend to show!
The last thing we’ll look to handle is if our listings query was to ever fail. If it was, we’ll show the <ListingsSkeleton /> component with an error banner as well.
First, we’ll import the shared <ErrorBanner /> component we’ve created in the lib/components folder.
client/src/sections/Listings/index.tsx
import { ListingsFilters, ListingsPagination, ListingsSkeleton } from "./components";
We’ll destruct the error property from our query result and when true , we’ll look render the <ListingsSkeleton /> component with an <ErrorBanner /> that has an appropriate description. With this change and all the changes we’ve made for the <Listings /> component, the src/sections/Listings/index.tsx file will look like the following:
client/src/sections/Listings/index.tsx
import React, { useState } from "react";
import { Link, RouteComponentProps } from "react-router-dom";
import { useQuery } from "@apollo/react-hooks";
import { Affix, Layout, List, Typography } from "antd";
import { ErrorBanner, ListingCard } from "../../lib/components";
import { LISTINGS } from "../../lib/graphql/queries";
import {
  Listings as ListingsData,
  ListingsVariables
} from "../../lib/graphql/queries/Listings/__generated__/Listings";
import { ListingsFilter } from "../../lib/graphql/globalTypes";
import { ListingsFilters, ListingsPagination, ListingsSkeleton } from "./components";

interface MatchParams {
  location: string;
}

const { Content } = Layout;
const { Paragraph, Text, Title } = Typography;

const PAGE_LIMIT = 8;

export const Listings = ({ match }: RouteComponentProps<MatchParams>) => {
  const [filter, setFilter] = useState(ListingsFilter.PRICE_LOW_TO_HIGH);
  const [page, setPage] = useState(1);

  const { loading, data, error } = useQuery<ListingsData, ListingsVariables>(LISTINGS, {
    variables: {
      location: match.params.location,
      filter,
      limit: PAGE_LIMIT,
      page
    }
  });

  if (loading) {
    return (
      <Content className="listings">
        <ListingsSkeleton />
      </Content>
    );
  }

  if (error) {
    return (
      <Content className="listings">
        <ErrorBanner
          description={`
            We either couldn't find anything matching your search or have encountered an error.
            If you're searching for a unique location, try searching again with more common keywords.
          `}
        />
        <ListingsSkeleton />
      </Content>
    );
  }

  const listings = data ? data.listings : null;
  const listingsRegion = listings ? listings.region : null;

  const listingsSectionElement =
    listings && listings.result.length ? (
      <div>
        <Affix offsetTop={64}>
          <ListingsPagination
            total={listings.total}
            page={page}
            limit={PAGE_LIMIT}
            setPage={setPage}
          />
          <ListingsFilters filter={filter} setFilter={setFilter} />
        </Affix>
        <List
          grid={{
            gutter: 8,
            xs: 1,
            sm: 2,
            lg: 4
          }}
          dataSource={listings.result}
          renderItem={listing => (
            <List.Item>
              <ListingCard listing={listing} />
            </List.Item>
          )}
        />
      </div>
    ) : (
      <div>
        <Paragraph>
          It appears that no listings have yet been created for{" "}
          <Text mark>"{listingsRegion}"</Text>
        </Paragraph>
        <Paragraph>
          Be the first person to create a <Link to="/host">listing in this area</Link>!
        </Paragraph>
      </div>
    );

  const listingsRegionElement = listingsRegion ? (
    <Title level={3} className="listings__title">
      Results for "{listingsRegion}"
    </Title>
  ) : null;

  return (
    <Content className="listings">
      {listingsRegionElement}
      {listingsSectionElement}
    </Content>
  );
};
An error could occur if the server was to error out unexpectedly. However, an error could also arise if a user was to search for a location where the geocoder would not be able to find geographic information. To see this, we can try and navigate to the /listings/:location? route where the location URL parameter is just a random set of characters.
When the listings query now errors, we’ll be presented with the <ListingsSkeleton /> component and an error banner that tells the user that something might have gone wrong.
Our /listings/:location? page is now complete! We can query listings for certain locations and when a query is made and successful, we’re able to filter the listings shown to us from a low price to a high price or vice versa. If there are a large number of listings that exist within a certain location, the user can use the pagination elements available to them to navigate from page to page.
Great!
SEARCHING FOR LISTINGS FROM THE APP HEADER
At this moment in time, our /listings/:location? page behaves the way we want it to. In this lesson, we’ll work on something slightly related to the /listings/:location? page and is a big factor of our app. We’ll be working on the search input we’re going to place in the app header. Having the search input in the app header itself is useful since it will allow users to search for listings in a location while within any part of our app.
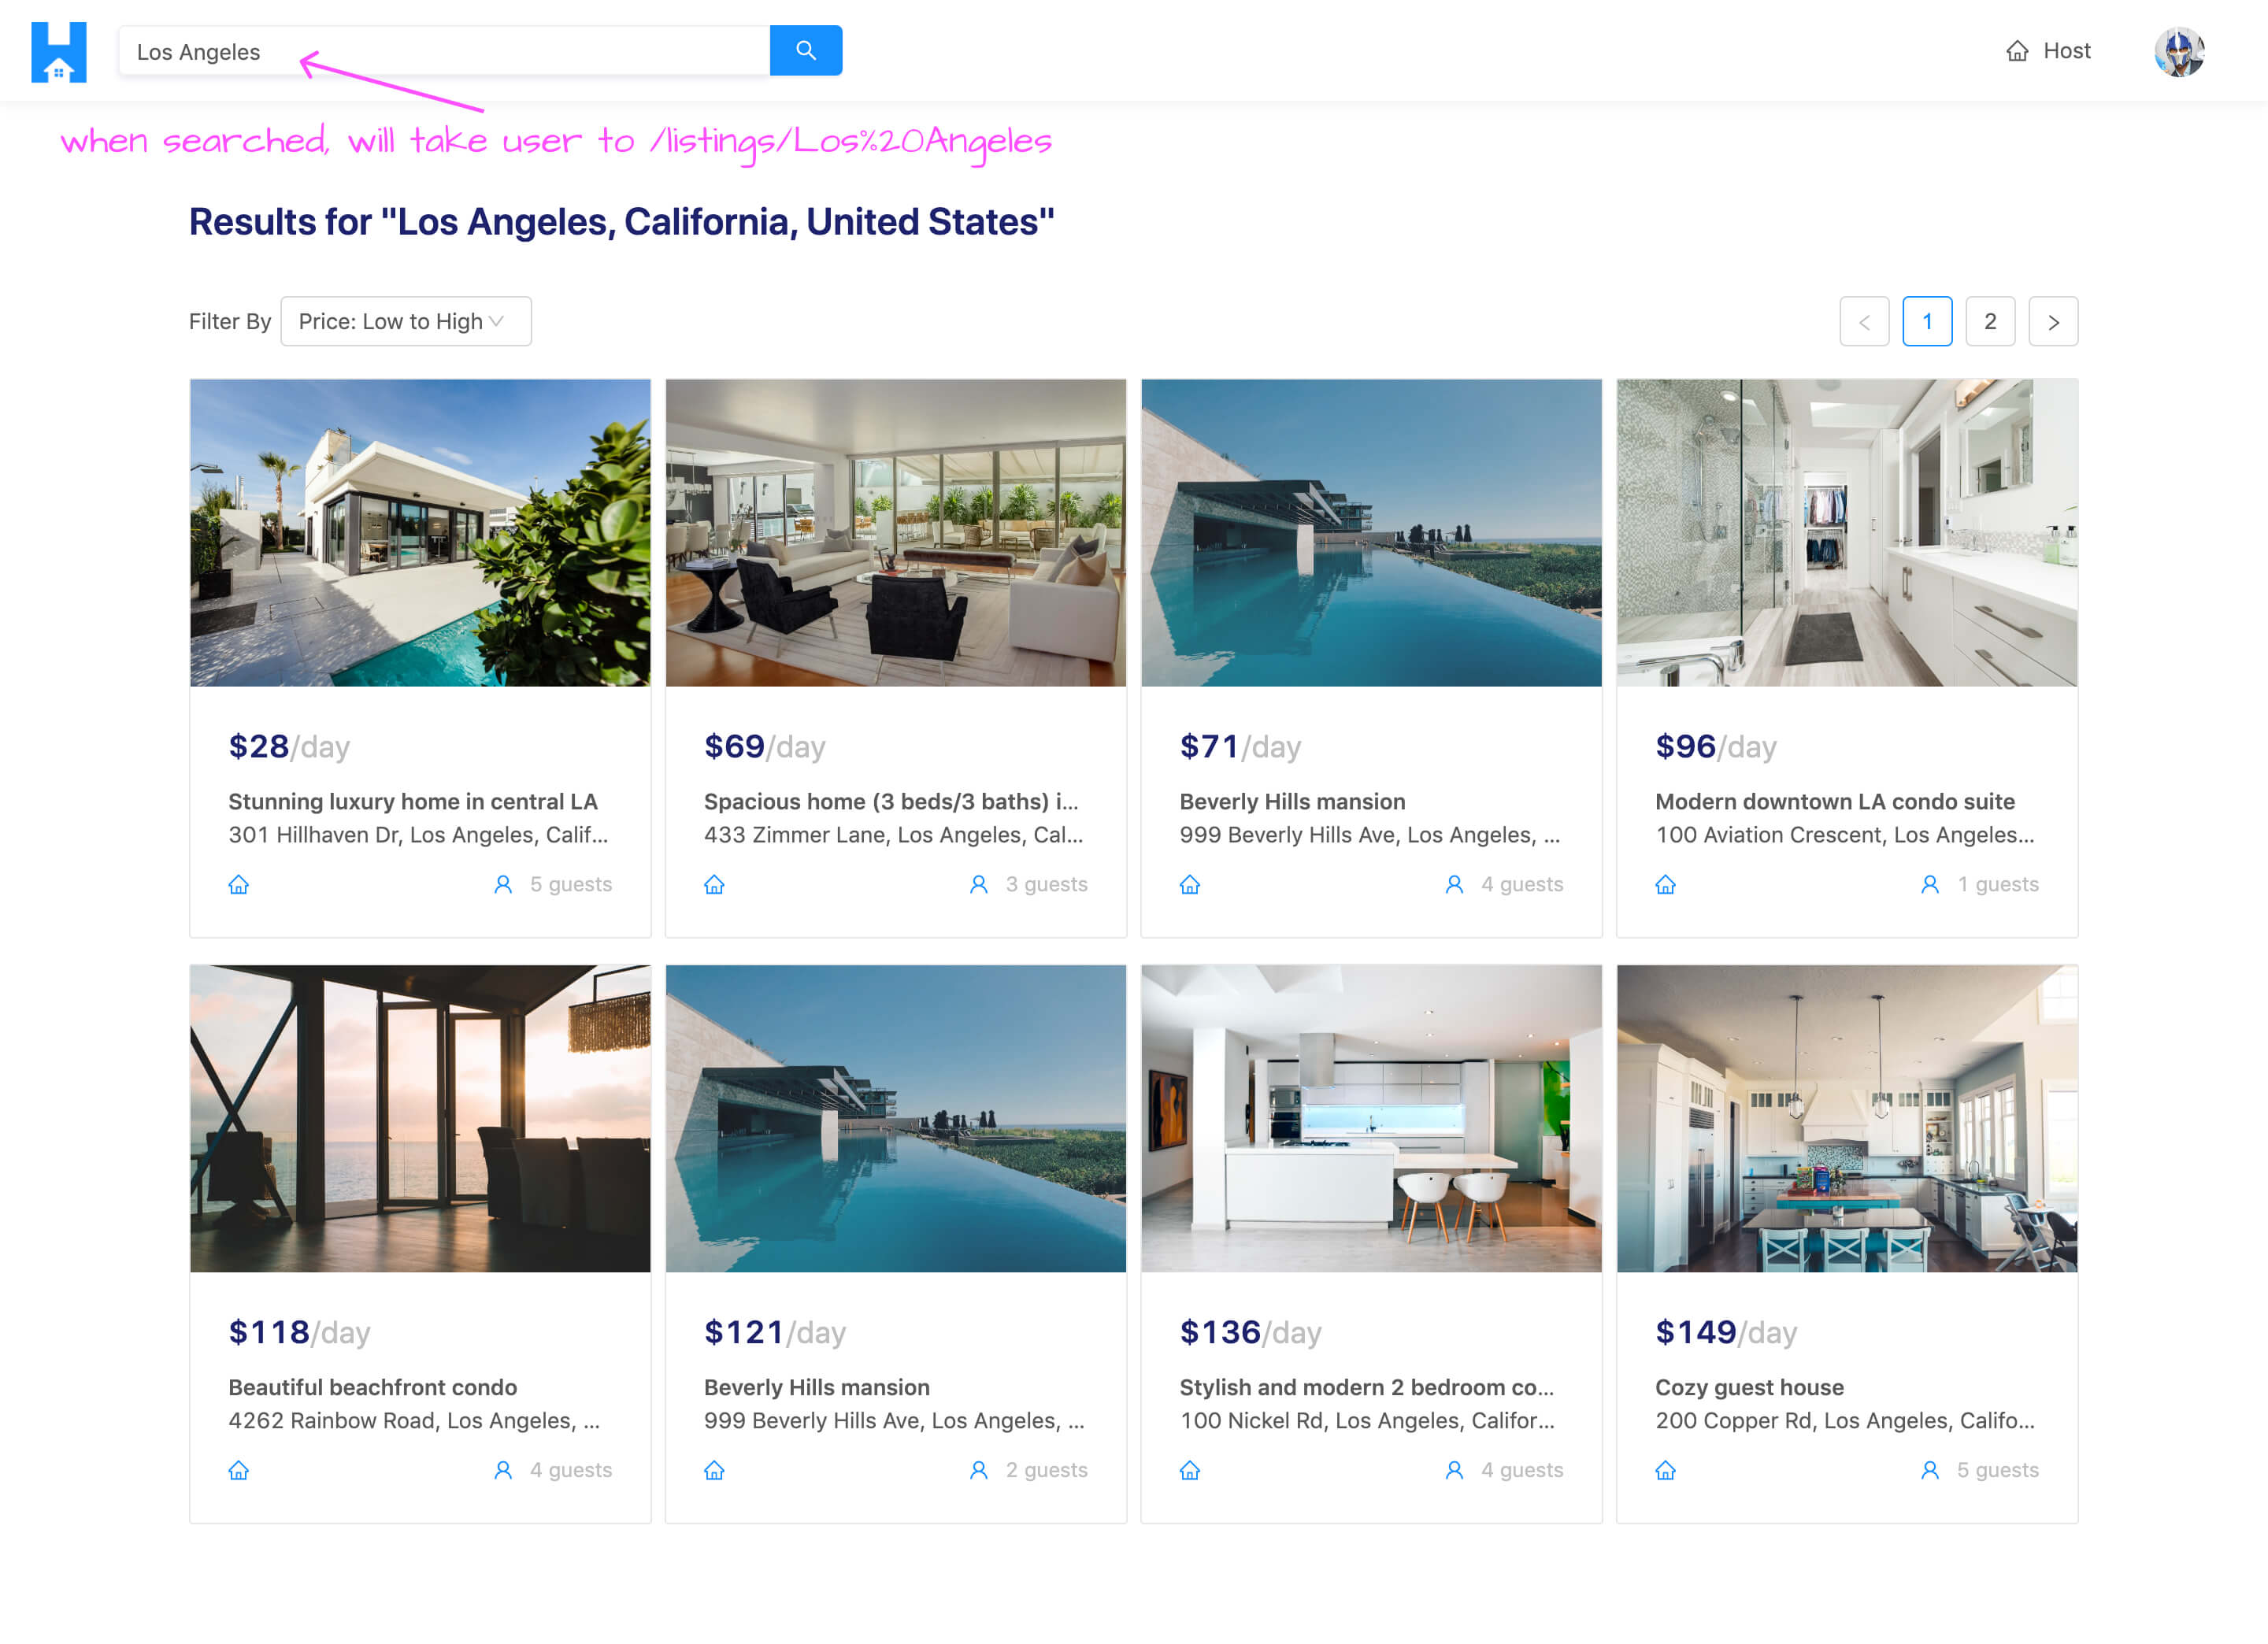
The search input in the app header is going to behave similarly to the search input we have on the homepage. It’ll simply be the <Input /> component from Ant Design where when a user searches for something, it’ll take the user directly to the /listings/:location? page and append whatever’s been searched in the location URL parameter. The /listings/:location? page will retrieve the value for the location parameter and make the appropriate query.
Let’s look to provide the search input functionality that’s very similar to what we have on the homepage. First, we’ll head over to the <AppHeader /> component we created before in the src/sections/AppHeader/index.tsx file. In this file, we’ll import the <Input /> component from Ant Design.
client/src/sections/AppHeader/index.tsx
import { Input, Layout } from "antd";
We’ll also destruct the <Search /> sub-component from the <Input /> component.
client/src/sections/AppHeader/index.tsx
const { Search } = Input;
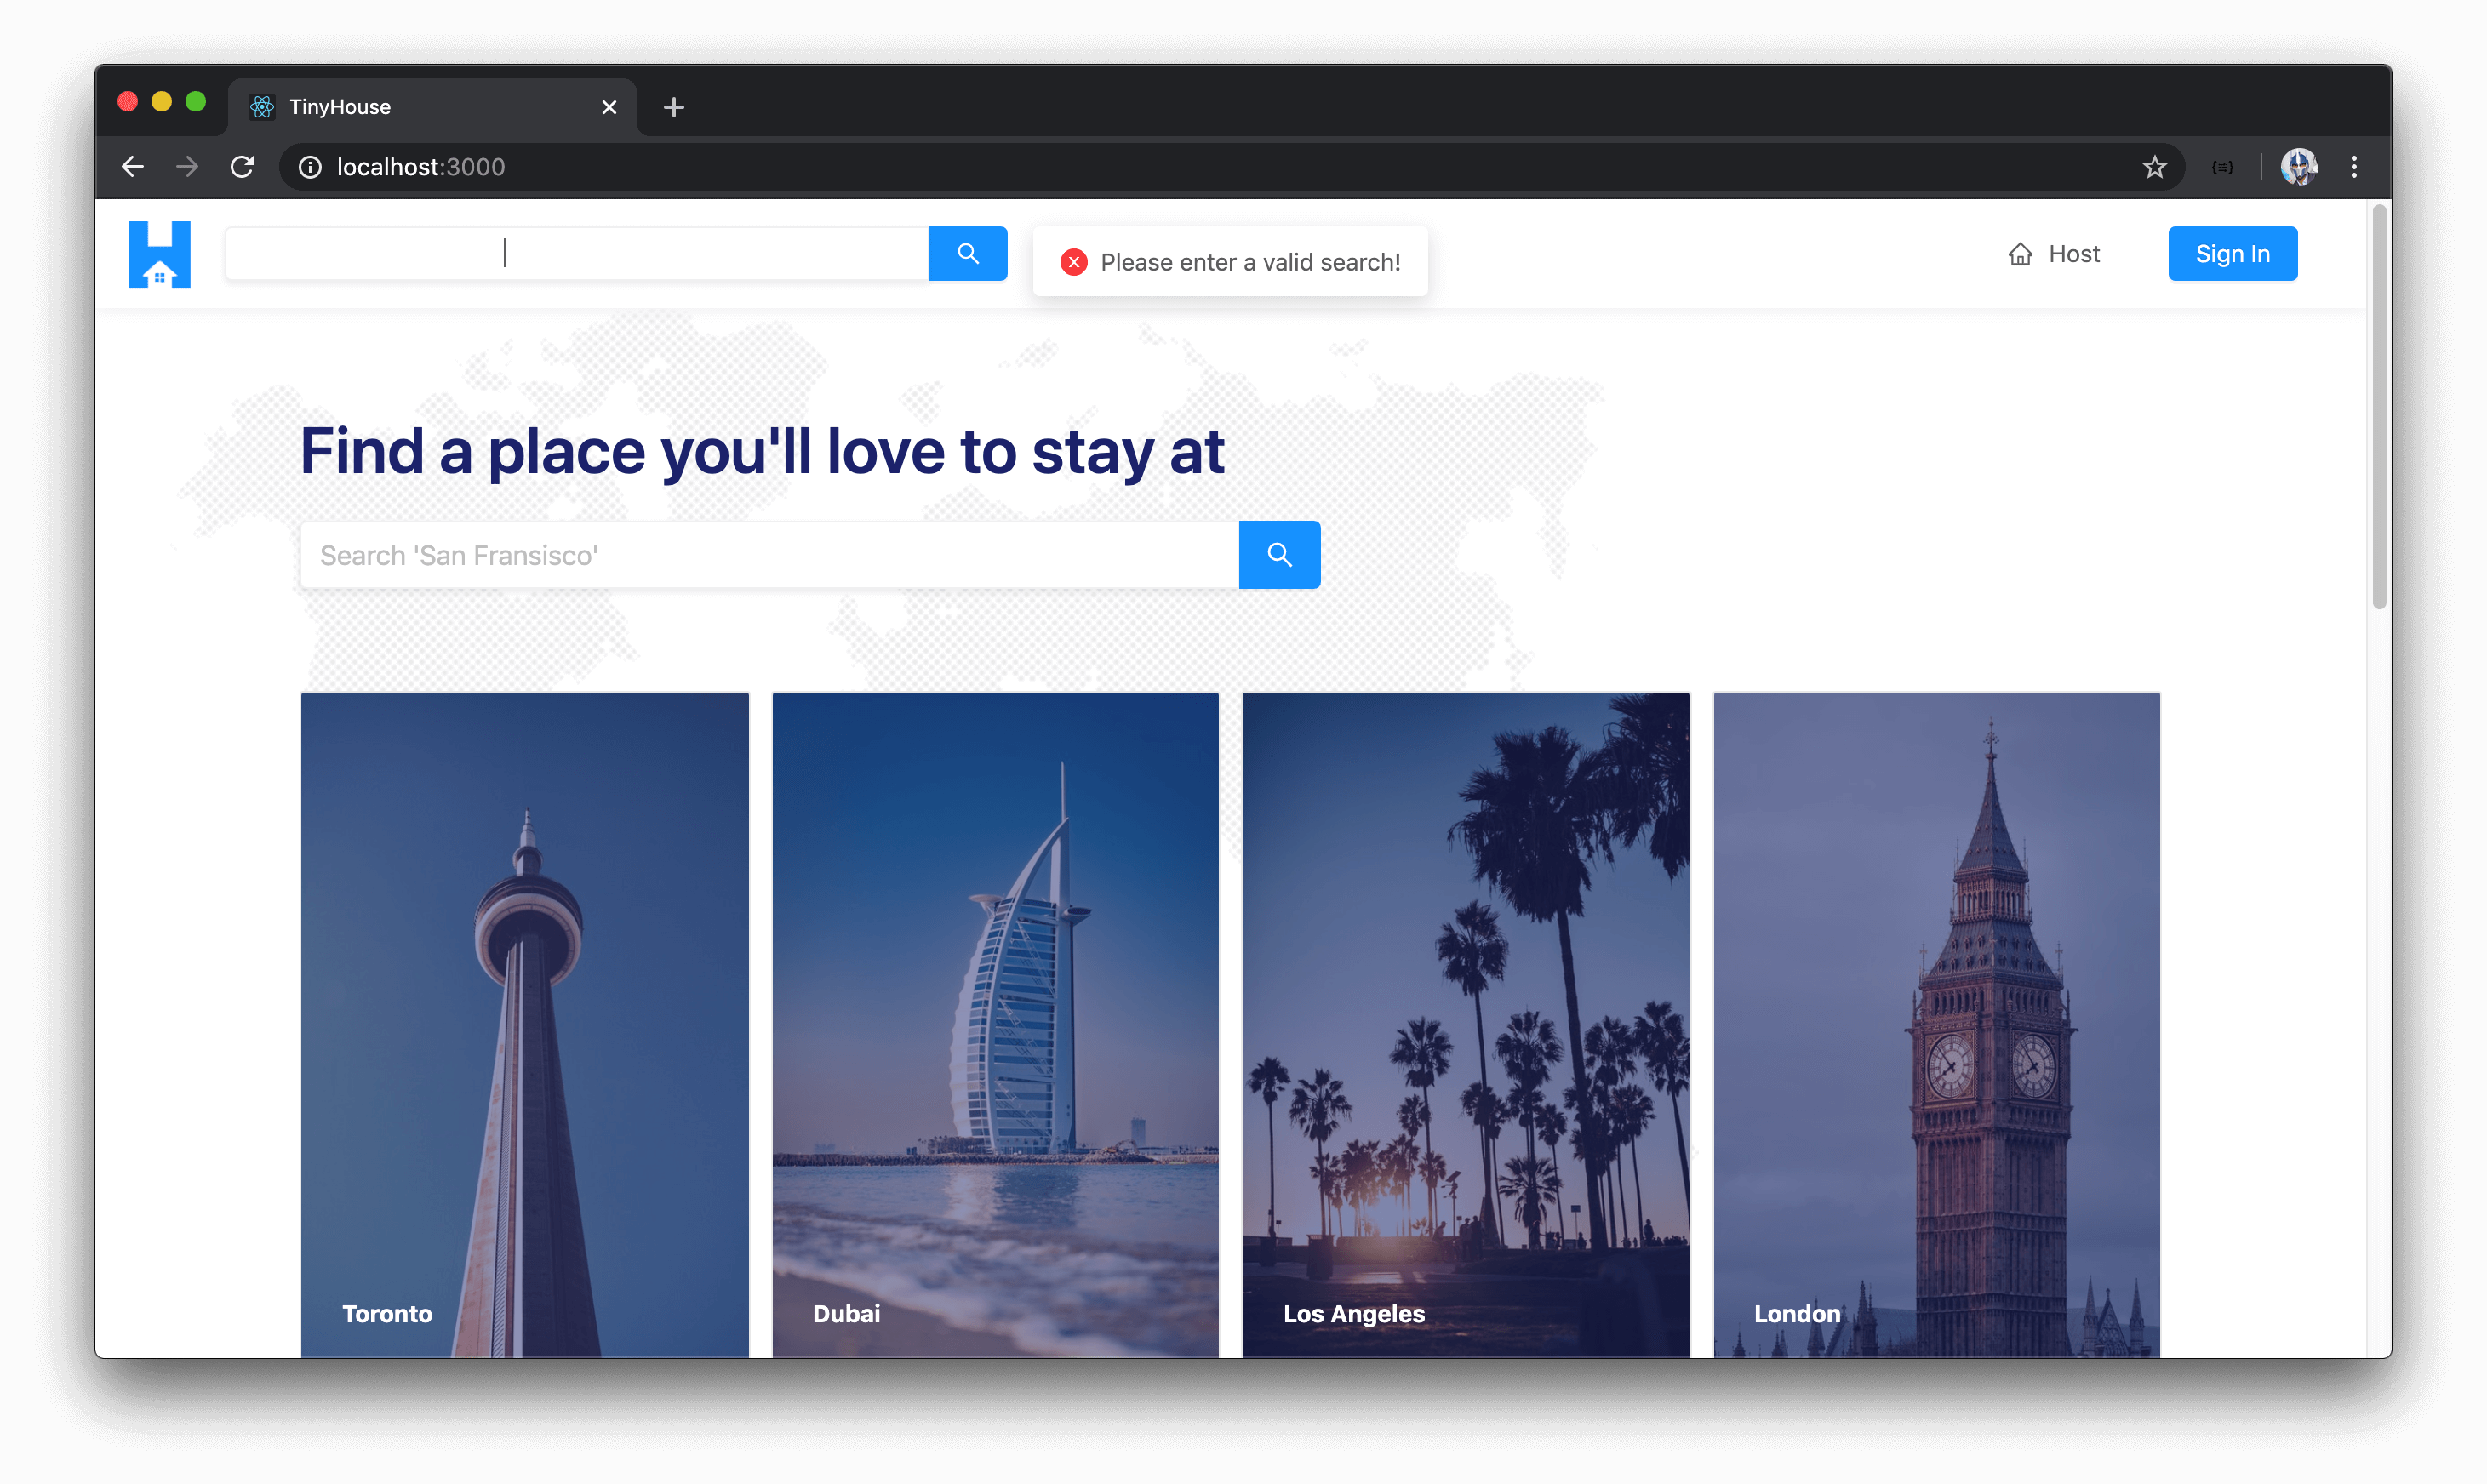
Let’s prepare the <Search /> input we want in the app header. We’ll place the <Search /> input right after the <div /> element that encompasses the logo section of our app header. We’ll apply a placeholder value of the <Search /> input of "Search San Fransisco" and we’ll provide the enterButton prop that helps display the call to action search button. For the onSearch() callback prop that gets called when a search is inputted - we’ll call a function in the component called onSearch() .
// ...

export const AppHeader = ({ viewer, setViewer, history }: Props) => {
  const onSearch = (value: string) => {};

  return (
    <Header className="app-header">
      <div className="app-header__logo-search-section">
        <div className="app-header__logo">
          <Link to="/">
            <img src={logo} alt="App logo" />
          </Link>
        </div>
        <div className="app-header__search-input">
          <Search placeholder="Search 'San Fransisco'" enterButton onSearch={onSearch} />
        </div>
      </div>
      <div className="app-header__menu-section">
        <MenuItems viewer={viewer} setViewer={setViewer} />
      </div>
    </Header>
  );
};
When a search is to be made, we’ll do as we’ve done before and trim() the value that’s been searched to remove any whitespace in the beginning or end of the submitted string. If the user simply tries to search for empty whitespaces, the trimmed value will be an empty string with which we’ll use the displayErrorMessage utility function we have in the src/lib/utils/ folder to display an error message.
// ...
import { displayErrorMessage } from "../../lib/utils";
// ...

export const AppHeader = ({ viewer, setViewer, history }: Props) => {
  const onSearch = (value: string) => {
    const trimmedValue = value.trim();

    if (trimmedValue) {
    } else {
      displayErrorMessage("Please enter a valid search!");
    }
  };

  return (
    <Header className="app-header">
      <div className="app-header__logo-search-section">
        <div className="app-header__logo">
          <Link to="/">
            <img src={logo} alt="App logo" />
          </Link>
        </div>
        <div className="app-header__search-input">
          <Search placeholder="Search 'San Fransisco'" enterButton onSearch={onSearch} />
        </div>
      </div>
      <div className="app-header__menu-section">
        <MenuItems viewer={viewer} setViewer={setViewer} />
      </div>
    </Header>
  );
};
If we were to take a look at our app now, we’ll see the search input in our header! If we tried to simply search for a value of just empty whitespace characters, we’ll get the error message shown to us prompting us to search for a location.
We’ll now look to take the user to the /listings/:location? route when a search is successfully made in the app header. In the <Home /> component, we used the history object available in the component to help add a new entry to the browser session stack (i.e. help direct the user to the appropriate route). This history object is available as a prop to components rendered as part of the <Route /> component from React Router.
The <AppHeader /> component isn’t rendered as part of a <Route /> component and we’re interested in using this history object. To have history available in the <AppHeader /> component, we’ll use a Higher Order Component function that React Router provides called withRouter() that provides additional props related to the route for components that aren’t rendered as part of the main routes.
In the <AppHeader /> component file, we’ll import the withRouter() function and the RouteComponentProps interface from React Router.
client/src/sections/AppHeader/index.tsx
import { Link, withRouter, RouteComponentProps } from "react-router-dom";
We’ll then wrap our <AppHeader /> component with the withRouter function to then be able to access the history object as a prop. We’ll be able to specify the shape of the history prop object by using the RouteComponentProps interface.
// ...

export const AppHeader = withRouter(
  ({ viewer, setViewer, history }: Props & RouteComponentProps) => {
    // ...
  }
);
In our component onSearch() function, we’ll use the push() method from the history object to direct the user to the new location of /listings/ and append whatever the trimmed search value is as the location parameter of the route.
// ...

export const AppHeader = withRouter(
  ({ viewer, setViewer, history }: Props & RouteComponentProps) => {
    const onSearch = (value: string) => {
      const trimmedValue = value.trim();

      if (trimmedValue) {
        history.push(`/listings/${trimmedValue}`);
      } else {
        displayErrorMessage("Please enter a valid search!");
      }
    };

    return (
      <Header className="app-header">
        <div className="app-header__logo-search-section">
          <div className="app-header__logo">
            <Link to="/">
              <img src={logo} alt="App logo" />
            </Link>
          </div>
          <div className="app-header__search-input">
            <Search
              placeholder="Search 'San Fransisco'"
              enterButton
              onSearch={onSearch}
            />
          </div>
        </div>
        <div className="app-header__menu-section">
          <MenuItems viewer={viewer} setViewer={setViewer} />
        </div>
      </Header>
    );
  }
);
If we were to use the search input in the app header, we’ll find ourselves being navigated to the /listings/:location? page with the appropriate URL parameter!
<APPHEADER /> - USEEFFECT()
We’re in a good spot now, however, there are a few improvements we can make with regards to this search input. When we search for something in the app header, we’re taken to the new /listings/:location? route and the search input is populated with the recently searched location which helps tell the user what they’ve recently searched for.
However, as a preference, we’ll also want the search input to be two-way bound to the URL parameter in our route. As an example, if we were to simply visit the /listings/:location? page with a certain parameter, we want to be taken to the appropriate listings page but we’ll also want the search input to be populated with the location parameter.
What we want to do is check for when the <AppHeader /> component first renders and see if the /listings/:location? route has an appropriate URL parameter. If the location URL parameter exists, it’ll be used to update the value in the search input of the app header.
We’ll need to keep track of the value in the search input so we’ll import and use the useState Hook.
import React, { useState } from "react";
// ...
At the beginning of our <AppHeader /> component function, we’ll declare a new state property called search and a function called setSearch() which will be used to update the search state property. We’ll initialize the value of this search state property with a blank string and we’ll place the search state property as the value of the value prop in our <Search /> component.
// ...

export const AppHeader = withRouter(
  ({ viewer, setViewer, history }: Props & RouteComponentProps) => {
    const [search, setSearch] = useState("");

    // ...

    return (
      <Header className="app-header">
        <div className="app-header__logo-search-section">
          {/* ... */}
          <div className="app-header__search-input">
            <Search
              placeholder="Search 'San Fransisco'"
              enterButton
              value={search}
              onSearch={onSearch}
            />
          </div>
        </div>
        {/* ... */}
      </Header>
    );
  }
);
If we checked the search input at this time, we’ll see it’s initialized with a blank string. However, we’ll be unable to type anything in the input. This is because by providing a state property as the value of the input, we haven’t provided the means to update the state value. We’ll use another prop labeled onChange() in the <Search /> input that receives an evt object. From this evt object, we can access the value property from evt.target.value with which we can then use to update the search state property with the setState() function.
// ...

export const AppHeader = withRouter(
  ({ viewer, setViewer, history }: Props & RouteComponentProps) => {
    const [search, setSearch] = useState("");

    // ...

    return (
      <Header className="app-header">
        <div className="app-header__logo-search-section">
          {/* ... */}
          <div className="app-header__search-input">
            <Search
              placeholder="Search 'San Fransisco'"
              enterButton
              value={search}
              onChange={evt => setSearch(evt.target.value)}
              onSearch={onSearch}
            />
          </div>
        </div>
        {/* ... */}
      </Header>
    );
  }
);
At this moment, we have a state property that populates the value of the search input. We can now check for when the component first renders and see if the user is in the /listings/:location? route. If so, we’ll take the URL pathname of the route and look to update the state property with its value. Since we want to do something when the component first renders, we’ll import and use the useEffect Hook from React.
client/src/sections/AppHeader/index.tsx
import React, { useState, useEffect } from "react";
We’ll construct an effect callback with the useEffect Hook. We’ll want the effect run only on first render so we’ll provide an empty dependencies array.
// ...

export const AppHeader = withRouter(
  ({ viewer, setViewer, history }: Props & RouteComponentProps) => {
    const [search, setSearch] = useState("");

    useEffect(() => {}, []);

    // ...

    return (
      // ...
    );
  }
);
Our approach in the effect callback would be to check what URL route the user is in. If the user is in the listings/:location? route, we’ll want to update the state value with the URL parameter in the route. React Router provides access to another object called location which is useful if we need to know what the current URL is at any time.
Since we’ve used the withRouter higher-order function for our <AppHeader /> component, we’ll able to destruct a location object from the props available in the component. In our effect callback, we’ll attempt to access the pathname of the URL with the help of the location object.
// ...

export const AppHeader = withRouter(
  ({ viewer, setViewer, history, location }: Props & RouteComponentProps) => {
    const [search, setSearch] = useState("");

    useEffect(() => {
      const { pathname } = location;
    }, [location]);

    // ...

    return (
      // ...
    );
  }
);
React Router has now introduced Hooks! Be sure to check out the React Router Hooks video in Module 15 of the course to highlight how retrieving the
historyandlocationobjects can be done with Hooks.
The first thing we’ll do in the effect callback will be the opposite of what we just talked about. If a user while, in the /listings/:location? page, navigates away from the page to another location in our app, we’ll want the search input to be cleared out. If the user visits another page in our app after viewing listings for a location, there’s no reason to have the search input still contain the most recent search.
To achieve this, we can check if the URL pathname does not contain the string /listings . If it doesn’t, it probably means the user isn’t visiting the listings page and is trying to visit some other page in our app. If that’s the case, we’ll use the setSearch() state function we have to set the state property to an empty string.
// ...

export const AppHeader = withRouter(
  ({ viewer, setViewer, history, location }: Props & RouteComponentProps) => {
    const [search, setSearch] = useState("");

    useEffect(() => {
      const { pathname } = location;

      if (!pathname.includes("/listings")) {
        setSearch("");
        return;
      }
    }, [location]);

    // ...

    return (
      // ...
    );
  }
);
While in the /listings/:location? page, if we were to navigate elsewhere in our app - the search input will be cleared out!
If the user is visits the /listings/:location? route directly in the URL bar, we’ll want to update the search input in the app header with the location parameter value. We can do this by checking if the pathname of the location includes /listings . If so, we’ll try and retrieve the portion of the URL at the end of the pathname. The first thing we’ll do is get all the sub-strings in our URL by separating every portion with "/" , and we’ll keep this within a constant labeled pathnameSubStrings .
// ...

export const AppHeader = withRouter(
  ({ viewer, setViewer, history, location }: Props & RouteComponentProps) => {
    const [search, setSearch] = useState("");

    useEffect(() => {
      const { pathname } = location;
      const pathnameSubStrings = pathname.split("/");

      if (!pathname.includes("/listings")) {
        setSearch("");
        return;
      }
    }, [location]);

    // ...

    return (
      // ...
    );
  }
);
The pathnameSubStrings constant will be an array of three strings - the domain name, listings , and the location pathname. In another if statement in the effect callback, we can add a further check to make sure the user is attempting to visit a certain location in the /listings/:location? page by seeing if pathnameSubStrings has a length of 3 . If it has a length of 2 , it would mean perhaps the user is attempting to only visit the /listings route without a location URL pathname.
If pathnameSubStrings is to have a length of 3 , we can take the last item in the array and use it to update the search state property with it. With this change and all the changes we’ve made to the <AppHeader /> component, the src/sections/AppHeader/index.tsx file will look like the following:
client/src/sections/AppHeader/index.tsx
import React, { useState, useEffect } from "react";
import { Link, withRouter, RouteComponentProps } from "react-router-dom";
import { Input, Layout } from "antd";
import { displayErrorMessage } from "../../lib/utils";
import { Viewer } from "../../lib/types";
import { MenuItems } from "./components";

import logo from "./assets/tinyhouse-logo.png";

interface Props {
  viewer: Viewer;
  setViewer: (viewer: Viewer) => void;
}

const { Header } = Layout;
const { Search } = Input;

export const AppHeader = withRouter(
  ({ viewer, setViewer, location, history }: Props & RouteComponentProps) => {
    const [search, setSearch] = useState("");

    useEffect(() => {
      const { pathname } = location;
      const pathnameSubStrings = pathname.split("/");

      if (!pathname.includes("/listings")) {
        setSearch("");
        return;
      }

      if (pathname.includes("/listings") && pathnameSubStrings.length === 3) {
        setSearch(pathnameSubStrings[2]);
        return;
      }
    }, [location]);

    const onSearch = (value: string) => {
      const trimmedValue = value.trim();

      if (trimmedValue) {
        history.push(`/listings/${trimmedValue}`);
      } else {
        displayErrorMessage("Please enter a valid search!");
      }
    };

    return (
      <Header className="app-header">
        <div className="app-header__logo-search-section">
          <div className="app-header__logo">
            <Link to="/">
              <img src={logo} alt="App logo" />
            </Link>
          </div>
          <div className="app-header__search-input">
            <Search
              placeholder="Search 'San Fransisco'"
              enterButton
              value={search}
              onChange={evt => setSearch(evt.target.value)}
              onSearch={onSearch}
            />
          </div>
        </div>
        <div className="app-header__menu-section">
          <MenuItems viewer={viewer} setViewer={setViewer} />
        </div>
      </Header>
    );
  }
);
Note We aren’t using the
matchobject React Router provides like we’ve done elsewhere since thematchparam is route relative and is only inherited from the nearest route . If we attempted to use thematchparam object in<AppHeader />, it’ll have no context as to what URL parameter exists and just be an empty object. As a result, we’ve resorted to retrieving thelocationparameter manually from the URL.
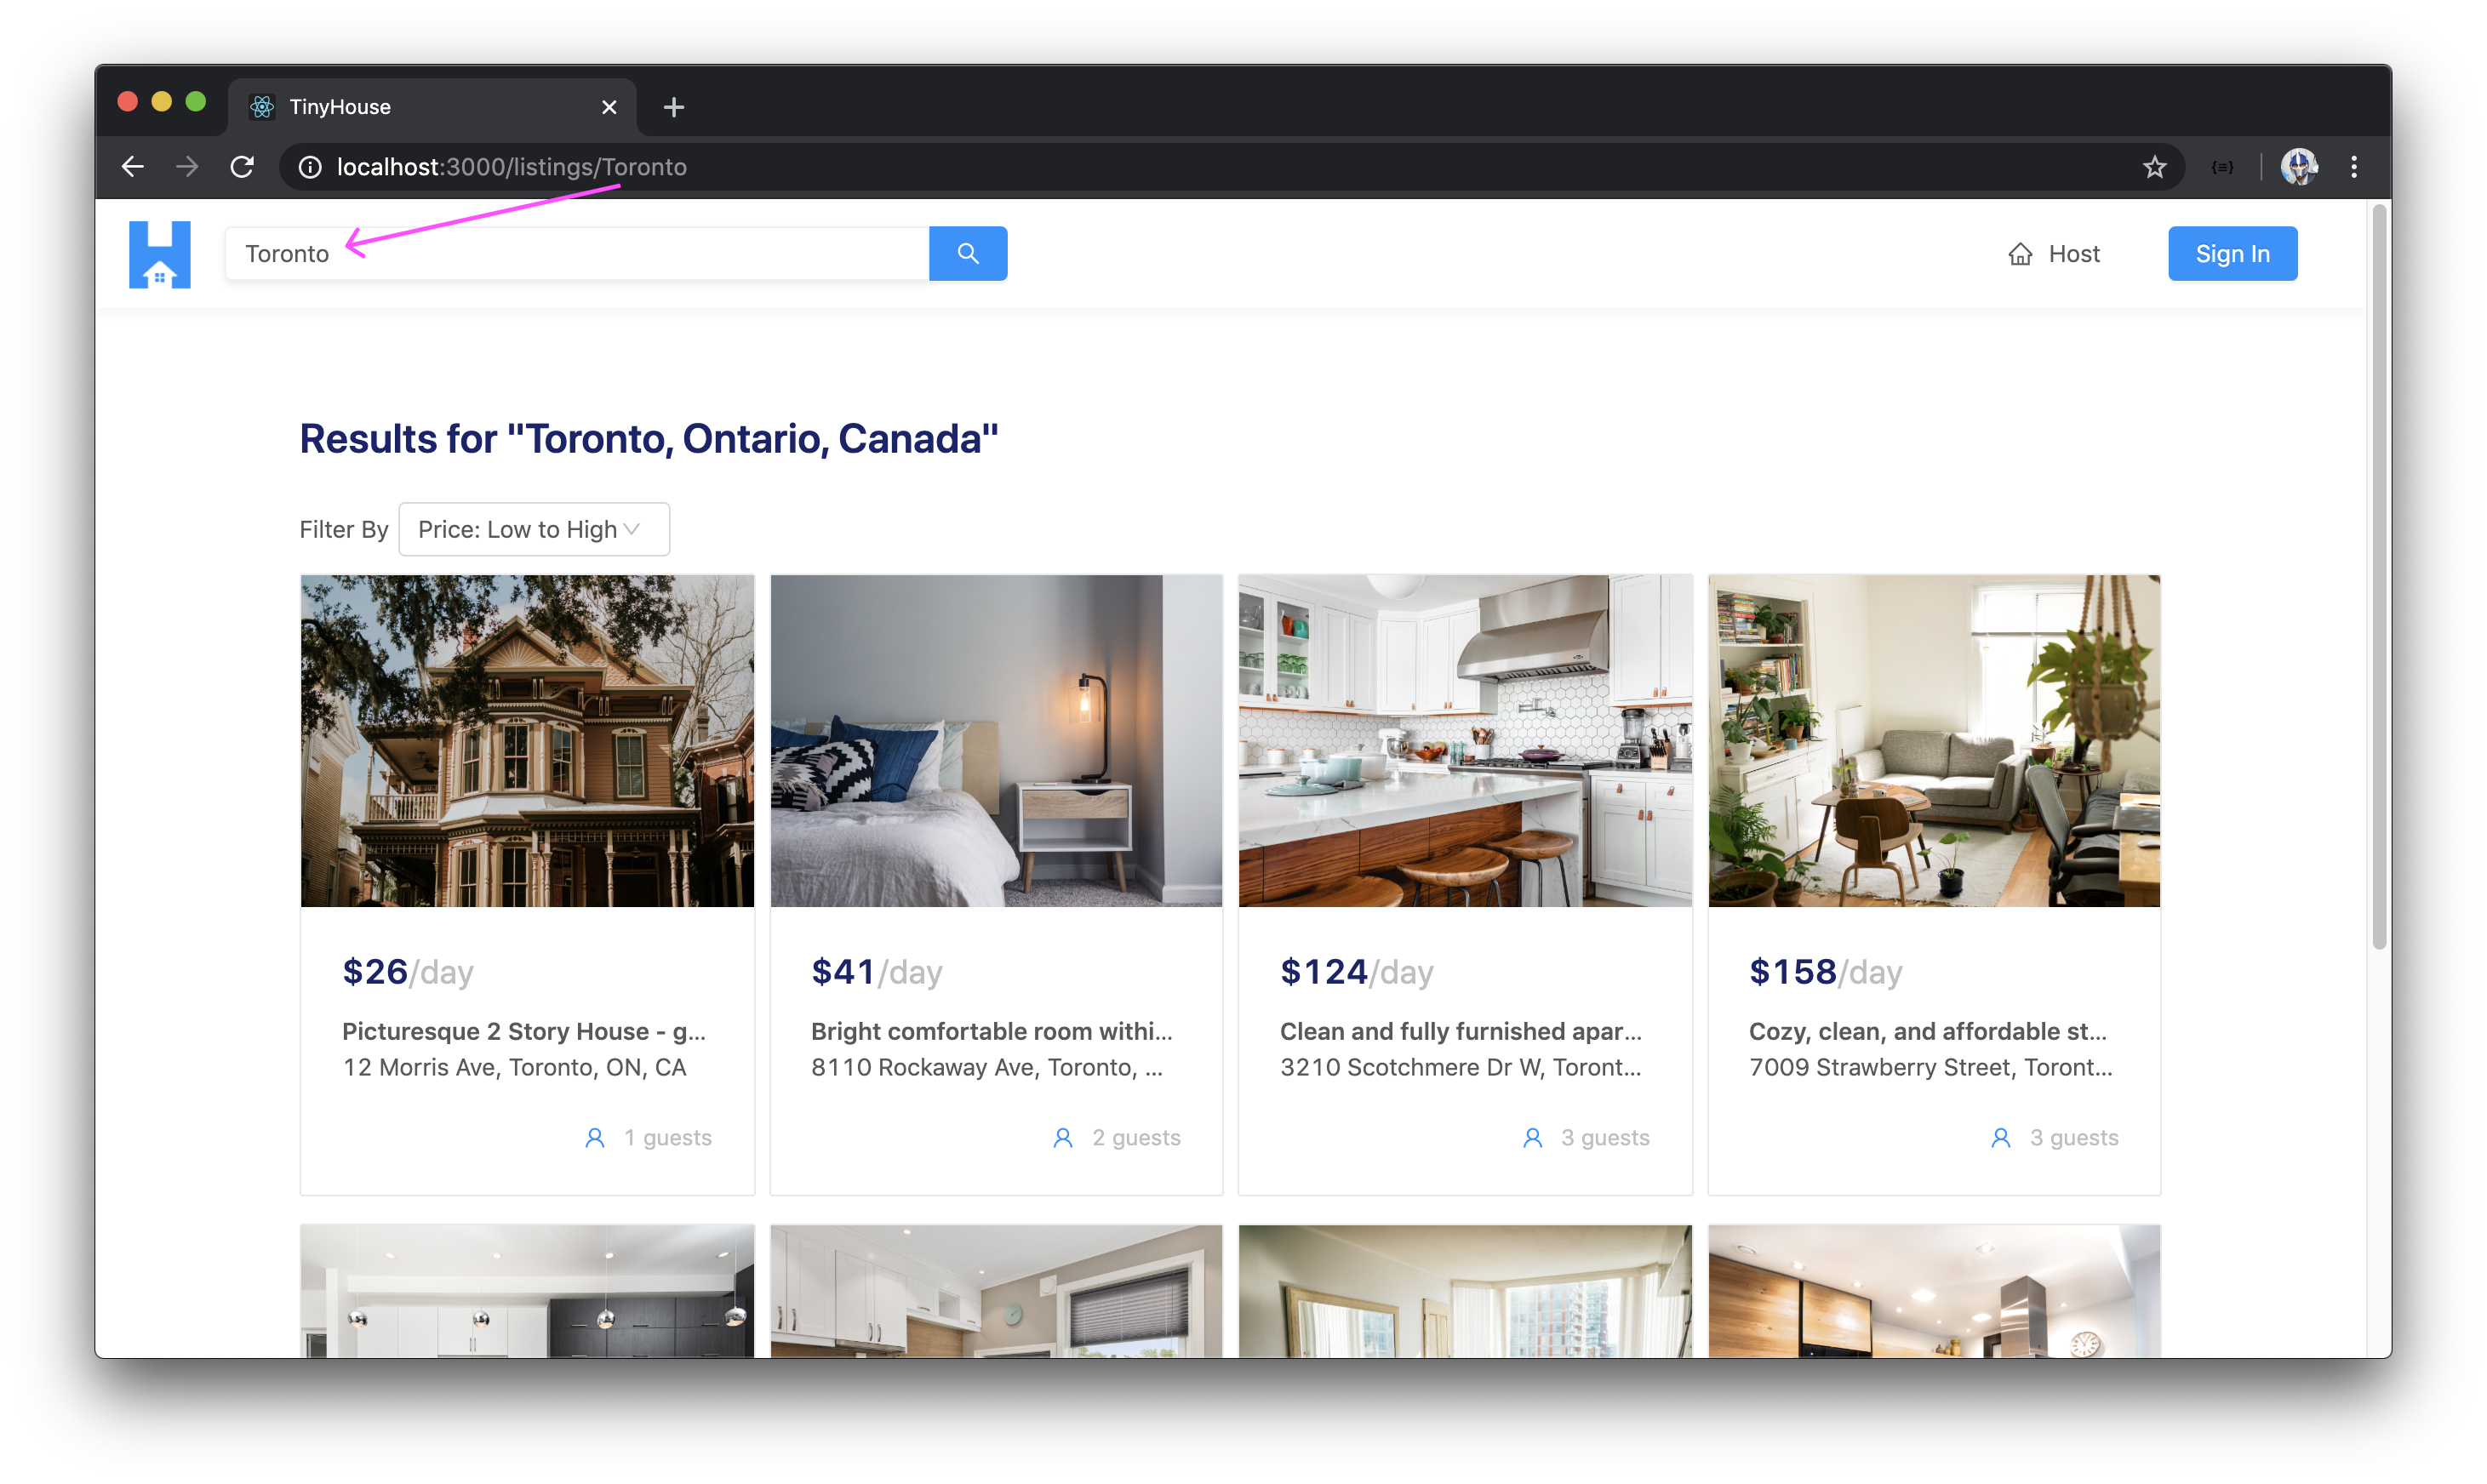
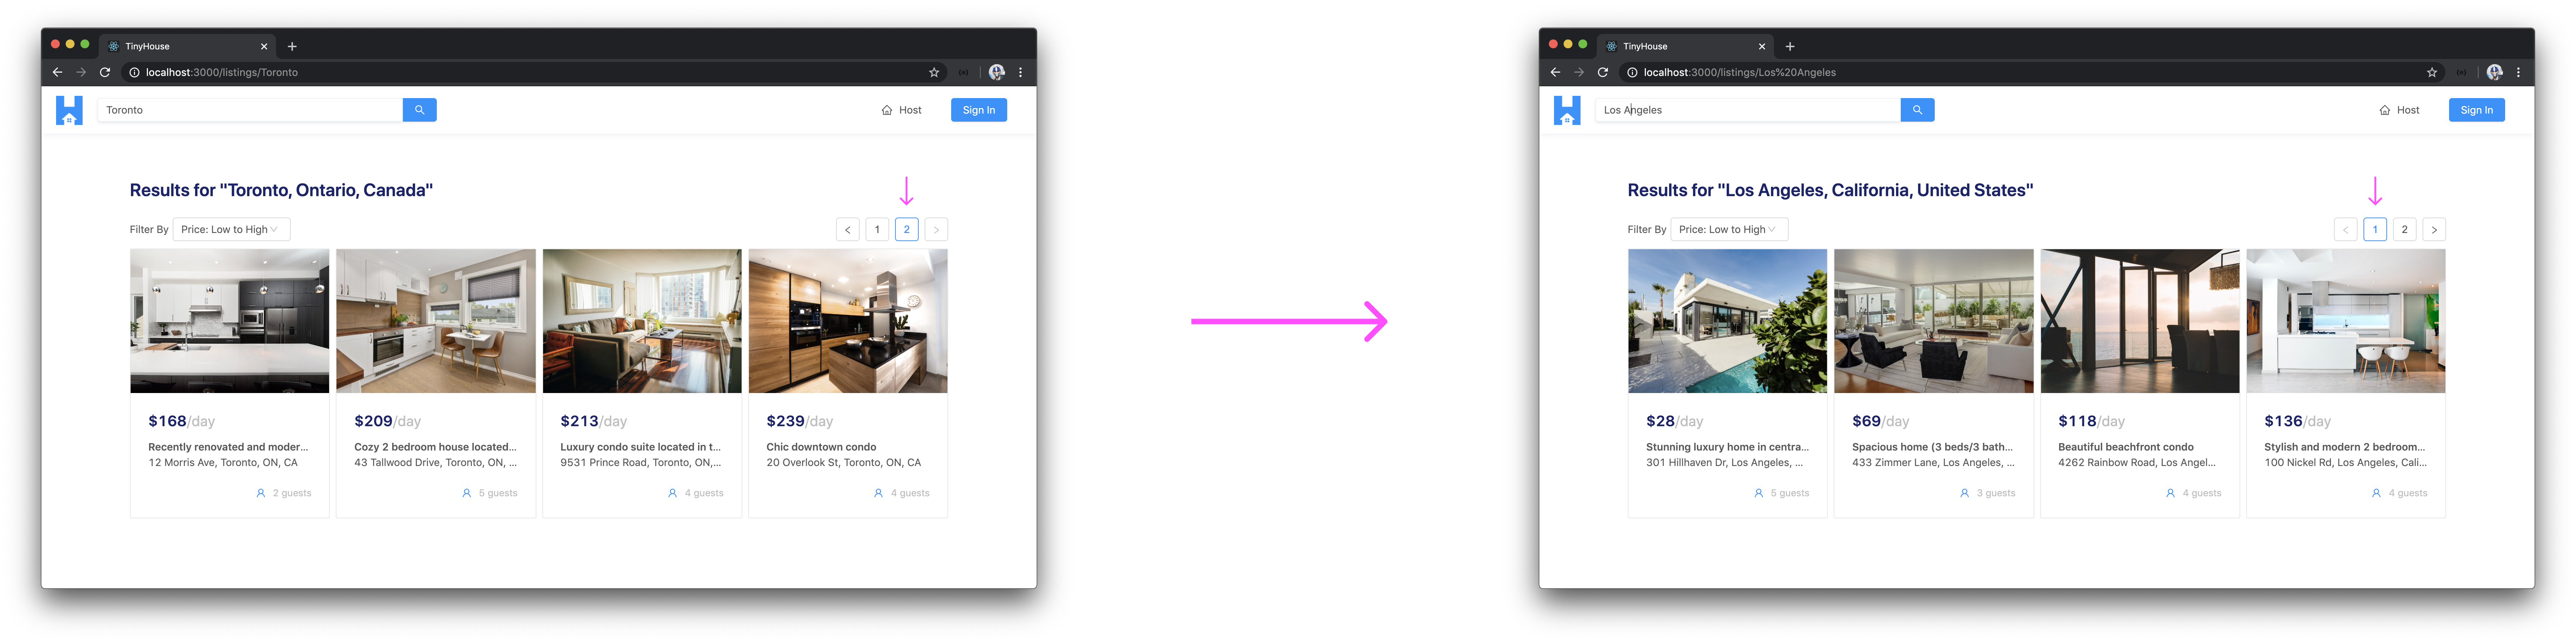
If we attempted to access the /listings/:location? path in the URL bar of our browser, with something like /listings/Toronto , we’ll see the `“Toronto” pathname populating our search input!
<LISTINGS /> - PAGINATION
We’ve covered most of what we wanted to with having the search input be available in the app header. There’s one other small quirk we’ll look to handle and this can be observed when attempting to navigate between pages in the /listings/:location? route.
Note: To see the pagination element in our
/listings/:location?page, we can change thePAGE_LIMITconstant used in the<Listings />component temporarily to a smaller value (e.g.4).
If we were to navigate to another page in the /listings/:location? route (e.g. go to page 2 ) and then search for another location in the search bar in the app header, we’ll notice that the new search is made but we’ll still be in the second page.
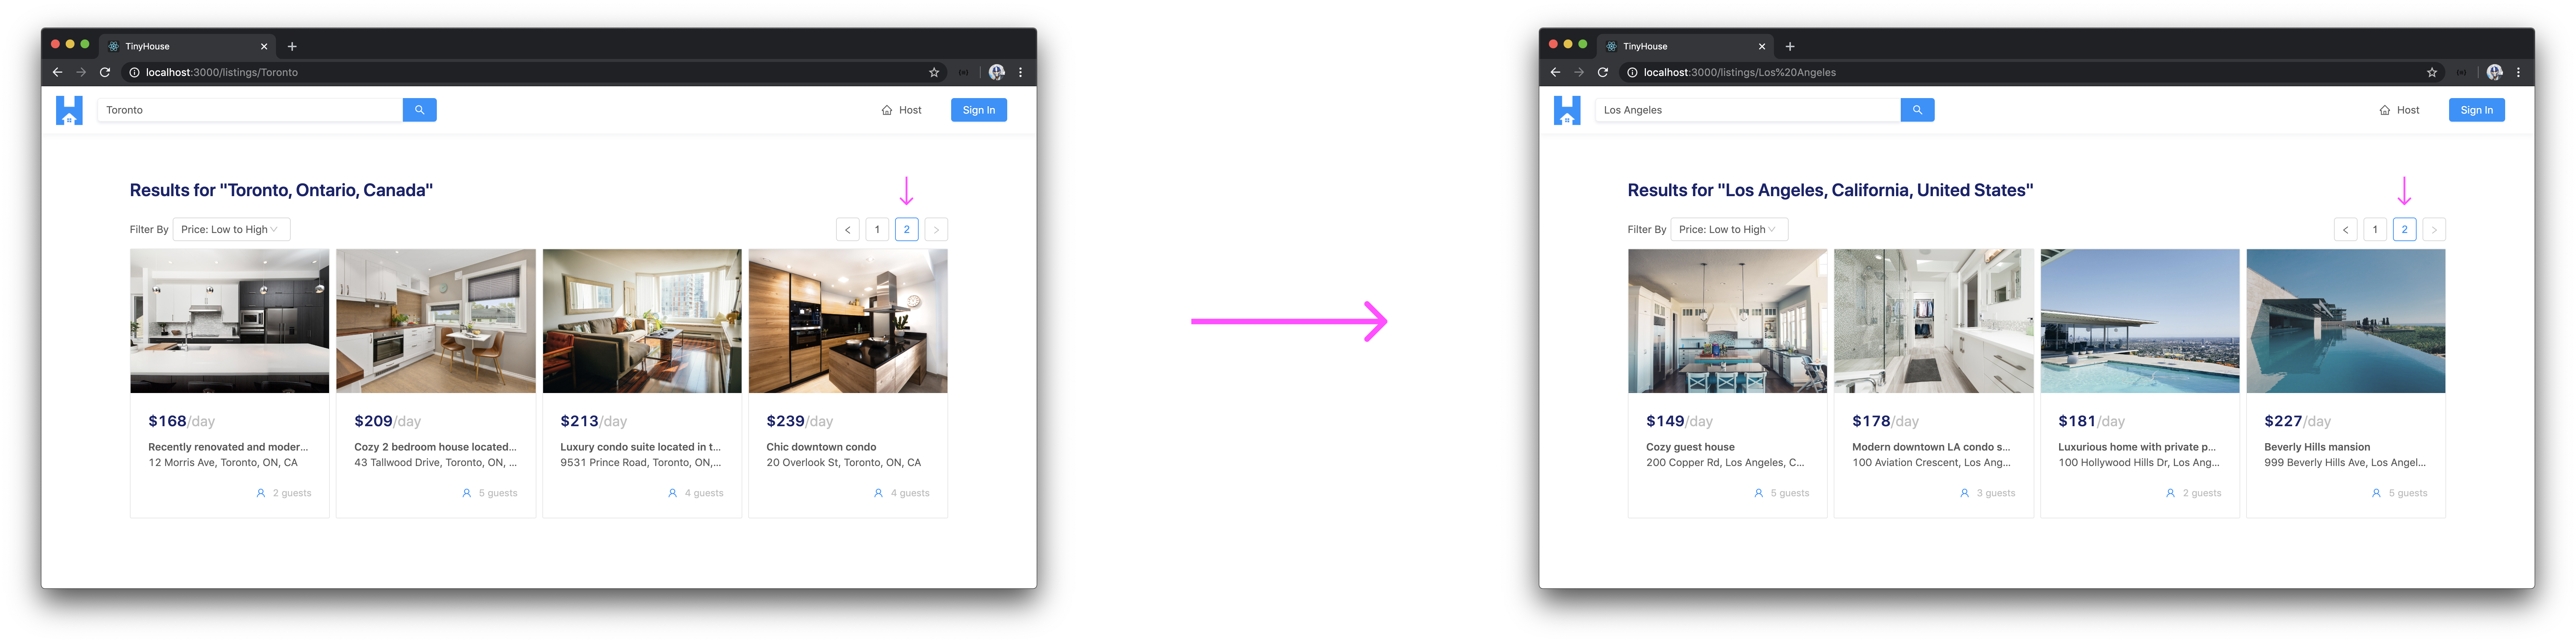
As a preference, we wouldn’t want this. We’ll prefer whenever a search is made for a certain location, we bring the page level back to 1 . This will be more important if we had dozens of pages for a location and if we were on the 30th page and searched for a different location, we wouldn’t want to stay on the 30th page of that new location.
When our <Listings /> component is first rendered, the page is initialized with 1 . When we change the page state value then attempt to search for a different location, we’re still in the same <Listings /> component so the page state value remains the same but the location value in our query changes. This is why we get a new set of listings but stay on the same page.
To resolve this, in the <Listings /> component, we can check if the value of the URL location ever changes while still in the listings/:location? page (i.e. still in the <Listings /> component). If this is to happen, we’ll set the page state value back to 1 . This is a perfect use case for the useEffect Hook so we’ll import it and attempt to use it in our <Listings/> component file.
import React, { useState, useEffect } from "react";
// ...

// ...

export const Listings = ({ match }: RouteComponentProps<MatchParams>) => {
  // ...

  useEffect(() => {}, []);

  // ...
};
We want to have an effect that brings our page state value back to 1 with which we can achieve by using the setPage() function available in our <Listings /> component and providing a value of 1 .
import React, { useState, useEffect } from "react";
// ...

// ...

export const Listings = ({ match }: RouteComponentProps<MatchParams>) => {
  // ...

  useEffect(() => {
    setPage(1);
  }, []);

  // ...
};
When would we want the above effect to run? We’ll want it to run at any moment the URL location parameter ever changes while still in this /listings/:location? route. If the location URL parameter changes and the <Listings/> component is still rendered, this probably means that the user has used the search bar to find listings for another location. With that said, we can add the location URL parameter available in our match.params object as the dependency of our effect.
import React, { useState, useEffect } from "react";
// ...

// ...

export const Listings = ({ match }: RouteComponentProps<MatchParams>) => {
  // ...

  useEffect(() => {
    setPage(1);
  }, [match.params.location]);

  // ...
};
When we’re now in the /listings/:location? route, visit another page, and attempt to search for listings in a different location with the app header - we’ll be brought back to page 1!
<LISTINGS /> - SKIP QUERY
Great! Things are working the way we expect to. However, if we were to repeat the above process and took a look at our network logs, we’ll notice something peculiar happening. When we go to a new page and then search for a different location, we’ll see two network requests being made to query for new set of listings.
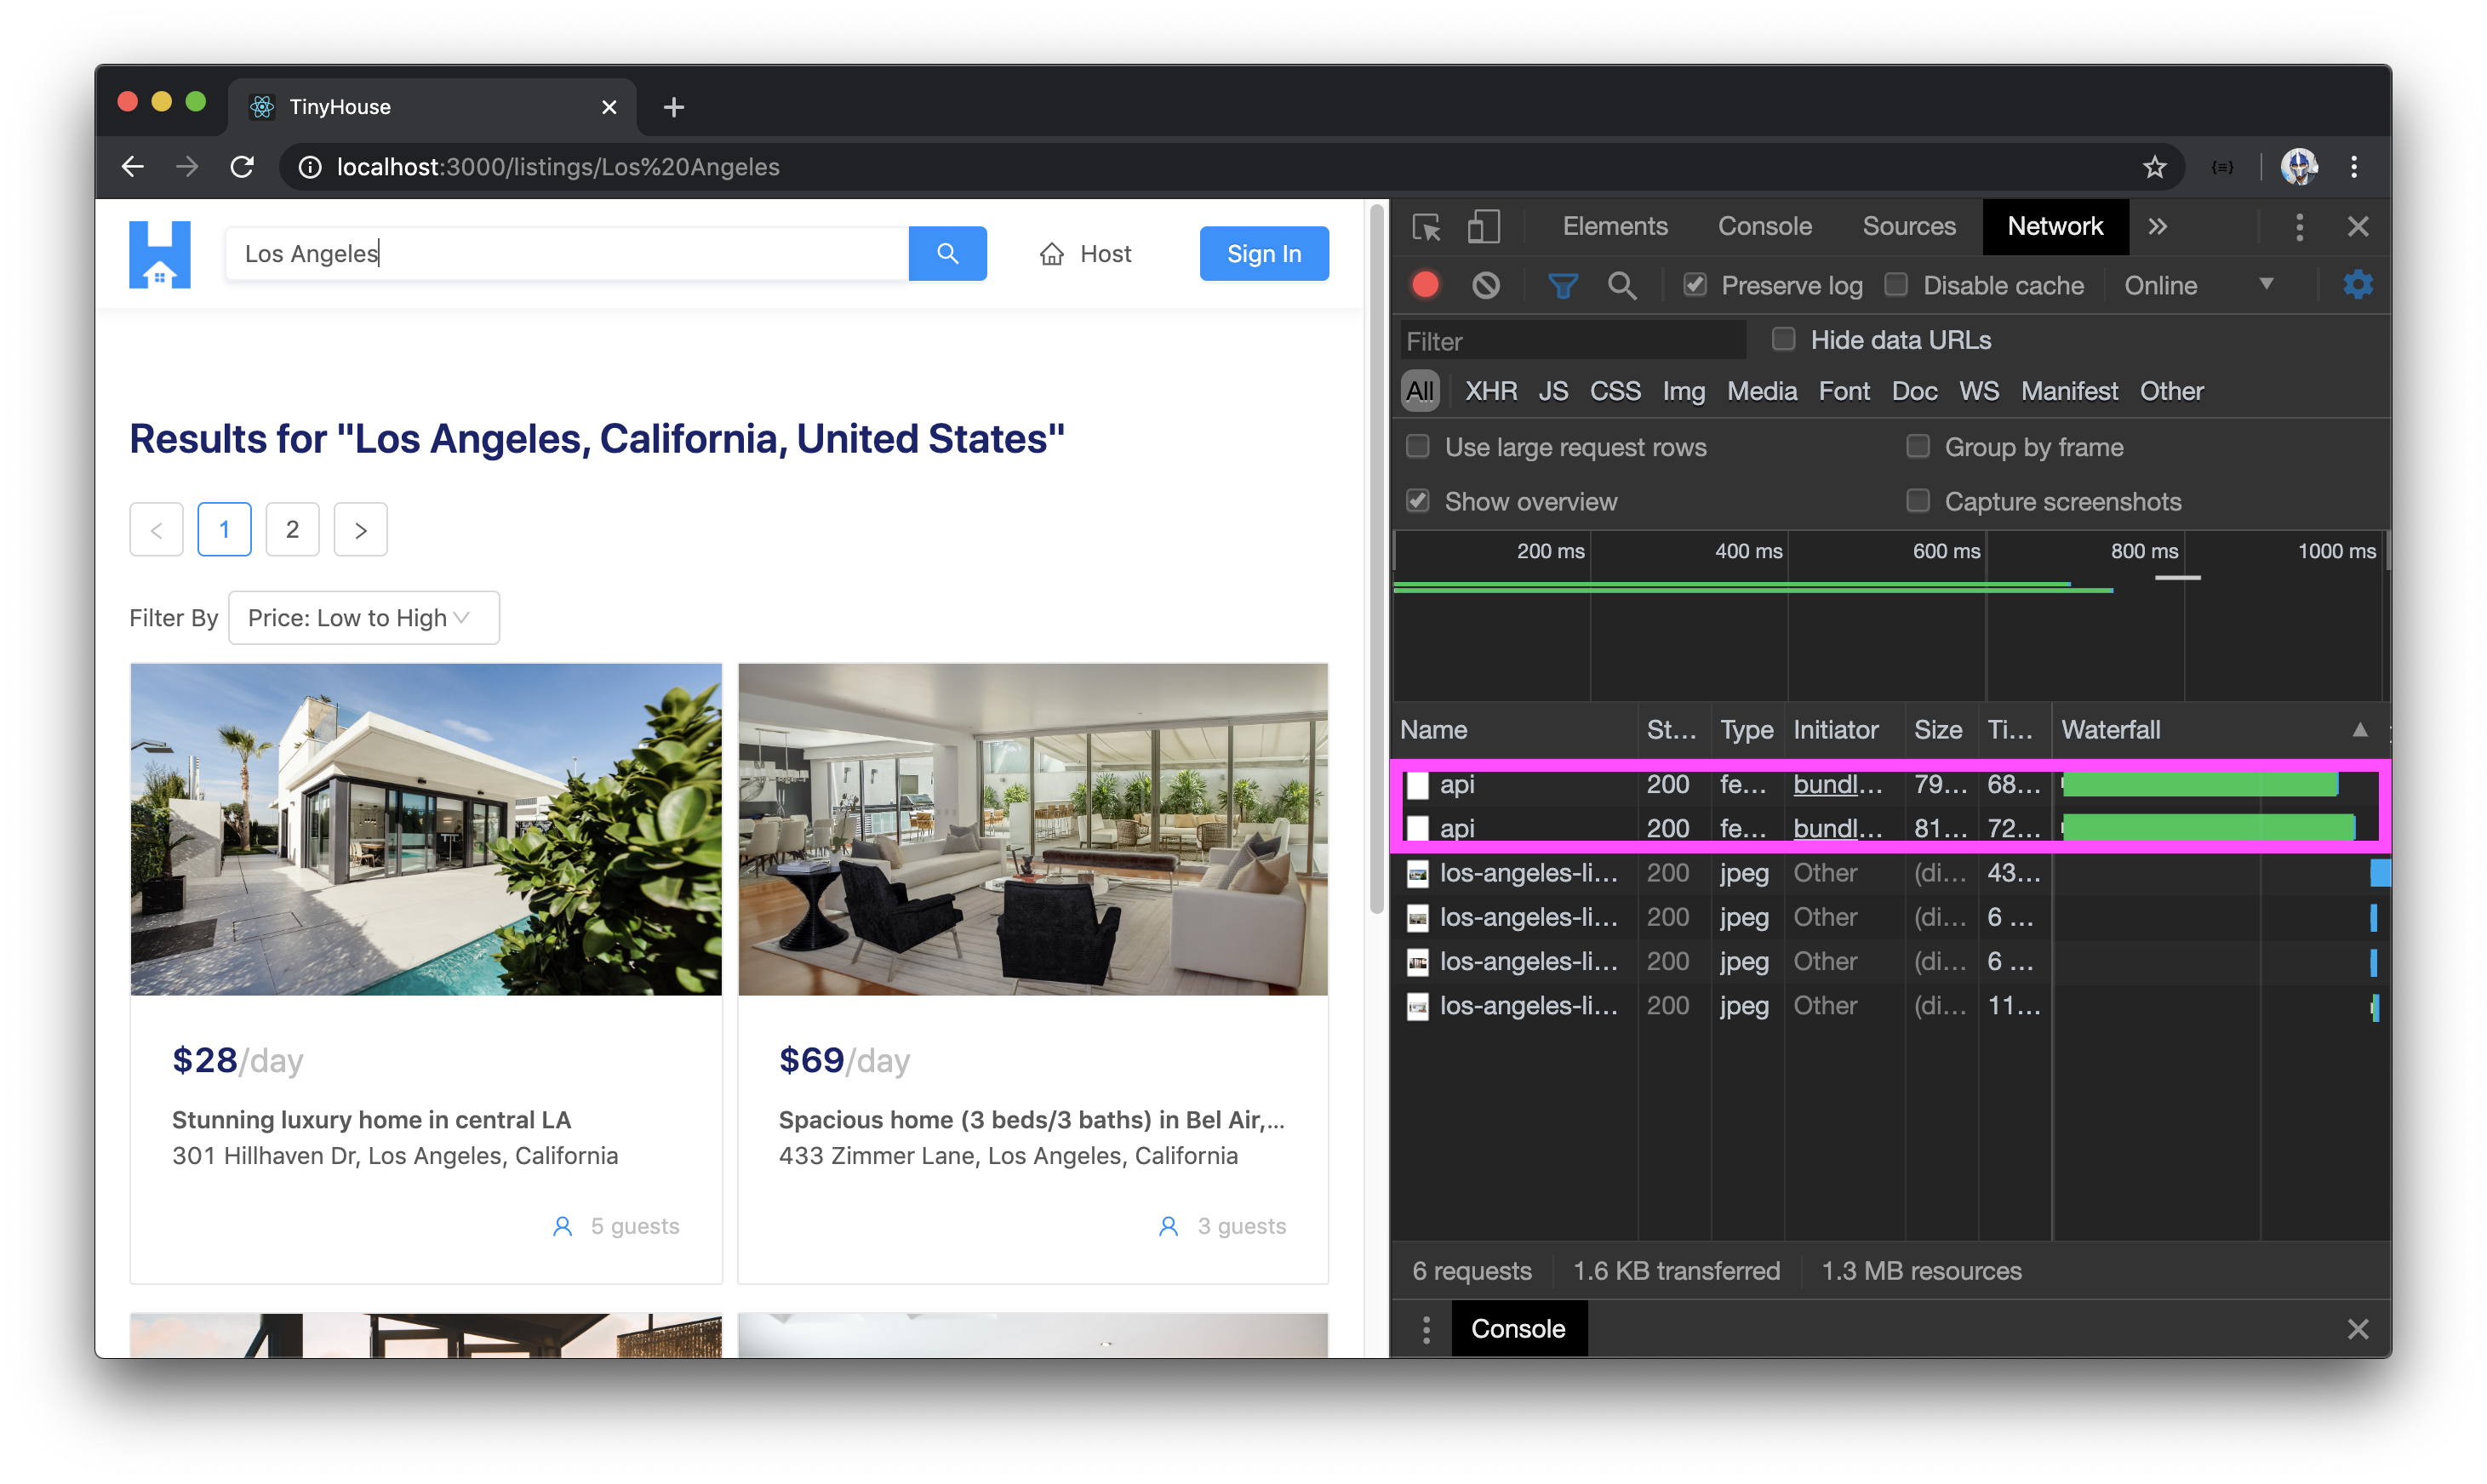
Why is this happening? This is because the variables in the query are changing twice. First, the value of the location variable in the query changes and a query is made. An effect is then being run to set the value of the page state variable back to 1 and a second query is made. Since this happens instantly from a UI perspective, we just see the final outcome. However, it’s unnecessary to make that first request.
What we can do here is try and skip that first request if under the condition we know the page is going to be updated back to 1 . We can achieve this by using the skip property React Apollo provides to help skip making the query under a certain condition. We can say that if the value of the location URL parameter is being updated and the page isn’t equal to 1 , this means that when the location is updated; the page will be set back to 1 so let’s skip making that first query.
How do we keep context of when the location is being changed? We can use the useRef Hook. The useRef Hook in React helps return a mutable ref object that persists for the lifetime of the component. We’ll import the useRef Hook in the <Listings /> component file.
client/src/sections/Listings/index.tsx
import React, { useState, useRef, useEffect } from "react";
At the beginning of our <Listings /> component function, we’ll create a new ref object that we’ll call locationRef and we’ll pass in the location parameter from the match.params object.
// ...

export const Listings = ({ match }: RouteComponentProps<MatchParams>) => {
  const locationRef = useRef(match.params.location);
  // ...

  // ...
};
We’ll apply a skip property in the options of our useQuery Hook, and for skip clause we can check to see if the locationRef.current value (which is the referenced value we passed in) isn’t equal to the new match.params.location value and the page state value is not equal to 1 .
In our effect callback within the useEffect Hook, we’ll be sure to update the locationRef.current value with the new location after the page has already been set back to 1 .
// ...

export const Listings = ({ match }: RouteComponentProps<MatchParams>) => {
  const locationRef = useRef(match.params.location);
  // ...

  const { loading, data, error } = useQuery<ListingsData, ListingsVariables>(LISTINGS, {
    skip: locationRef.current !== match.params.location && page !== 1,
    variables: {
      location: match.params.location,
      filter,
      limit: PAGE_LIMIT,
      page
    }
  });

  useEffect(() => {
    setPage(1);
    locationRef.current = match.params.location;
  }, [match.params.location]);

  // ...
};
How would this work?
Let’s assume we first visit the /listings/toronto route. The locationRef value will be toronto in this instance. Let’s then say we switched to page 2 and made a search for a different location (e.g. los angeles ) in the search bar of our app header. The reference value at this point ( locationRef which will be toronto ) won’t be equal to the new location value ( match.params.location which will be los angeles ) and since we’re not in page 1 - we’ll skip making the query for the fact that the match.params.location value has changed.
Our effect callback will pick up the fact that our location has changed and will attempt to set our page state value back to 1 . Since the value of the page variable in the query is being updated, the query will now be made with the new page and match.params.location values.
If we take a look at our UI and attempt to replicate the situation to have two queries be made (i.e. change page + search for a new location in the app header), we’ll only be able to make a single query request with the latest values of the page and location variables!

That is pretty much it! We have our app header search functionality now working the way we want it to.
INDEX LOCATION-BASED DATA
MongoDB documentation on indexes can be found - here.
At this moment in time, we’ve introduced the capability to have our client application query for listing documents for different locations. Our database, at this moment in time, only contains a handful of listings that we’ve prepared as mock data. As a result, when we query our database based on location data, it returns results fairly quickly. However, imagine if we had tens of millions of listings in our database. If we tried to search all the listings in New York (for example) our server will take several minutes to scan through our entire collection and pick out the correct data.
Here is a suitable analogy, imagine you had a book with one million random pictures in it and someone told you to find all the pictures with a cat in it. It would take you a long time to check each and every picture . However, if there was an index at the beginning of the book that categorized all the pictures based on the object in them along with their page number, you will have a much easier time.
What we need is an index for our "listings" collection in the database!
MONGODB INDEXES
MongoDB Indexes support the efficient execution of queries in a collection. Without indexes, MongoDB must perform a collection scan (i.e. scan for every document in a collection) to select the documents that match the query statement. If an appropriate index exists for a query, MongoDB can use the index to limit the number of documents it must inspect .
Indexes are important when it comes to databases and are data structures that essentially allow for faster access of data. Without an index, MongoDB will perform a scan for every document in a collection to satisfy a query. If there are millions of documents - so be it, it will go through every document.
When we define an index for a certain field, we tell the database (in this case MongoDB) to create a different data structure for the values of that field for every document in the collection. When we provide a query to find the documents based on certain values of the field, MongoDB doesn’t do a collection scan and go through every document but instead gets the documents we’re looking for in a more time-effective manner. How? This is because the data structure MongoDB prepares for the values of the field in the index is now easier to traverse .
What is the algorithm or data structure that’s made with the help of an index? The documentation in MongoDB doesn’t spend much time talking about this but it does note that B-tree data structures are used for indexes. B-trees are self-balancing data structures that maintain sorted data and allow for fairly quick searches, removals, and insertions of data.
Traversing through a B-Tree data structure is often recognized to be done in logarithmic time, O(log N), which is more time-effective as the data set grows when compared with linear time, O(N), which is what a collection scan would do.
The key takeaway here is that specifying indexes helps speed up the amount of time needed to query for documents in large collections. Here’s a diagram from the MongoDB documentation that illustrates a query that selects and orders the matching documents using an index.
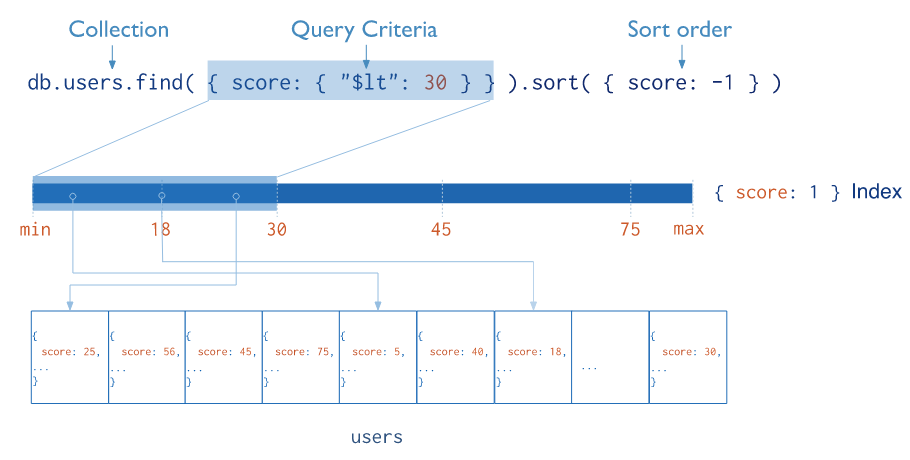
The diagram above conveys that an attempt is being made to find all the documents in a "users" collection where the score of the user is less than 30 and the results are to be sorted in ascending order of score . In this case, an index has been specified for the score field and by doing so, MongoDB creates a data structure for all the values of the score field for all the documents in the collection. It then performs a search faster than linear time to get all the documents that match the query.
Fundamentally, indexes in MongoDB are similar to indexes in other database systems. MongoDB defines indexes at the collection level and supports indexes on any field or sub-field of the documents in a MongoDB collection .
DEFAULT _ID INDEX
MongoDB automatically creates a unique index on the _id field during the creation of a collection. Since the _id field index is given a unique property, MongoDB rejects duplicate values for the indexed field which prevents clients from inserting two documents with the same value for the _id field.
MongoDB also offers many other different index types such as Geospatial, Text, etc. For more information on this topic, we strongly encourage you to check out the MongoDB documentation on indexes and index types.
COMPOUND INDEXES
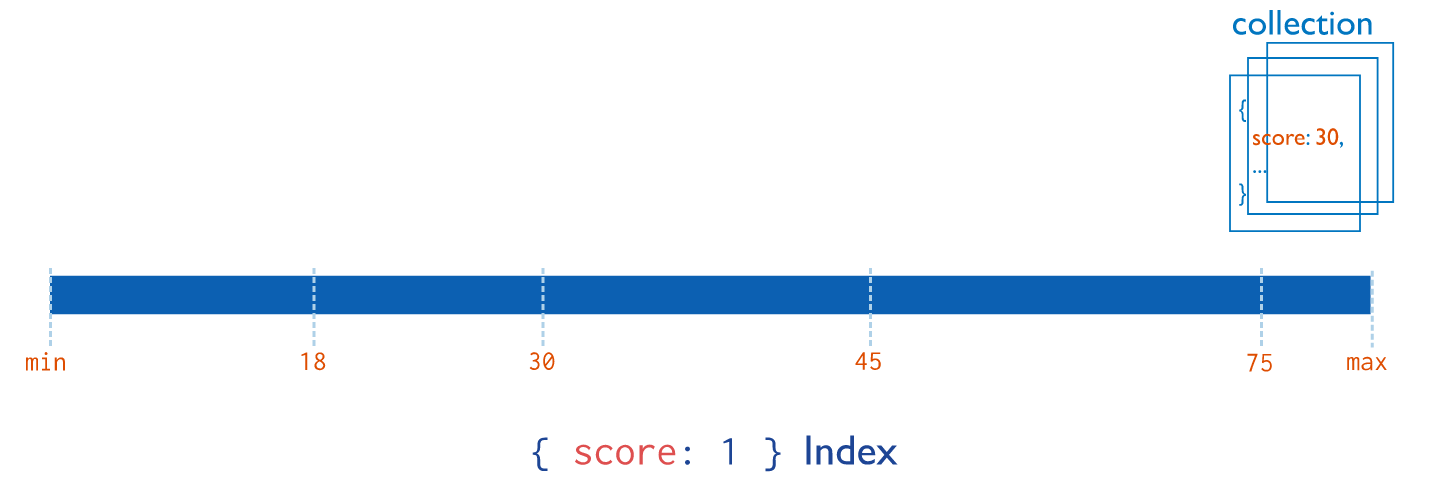
We’ve now come to understand that MongoDB supports the creation of indexes on a single field of a document. Here’s a diagram from MongoDB documentation that conveys an index is created for a single score field in a document.
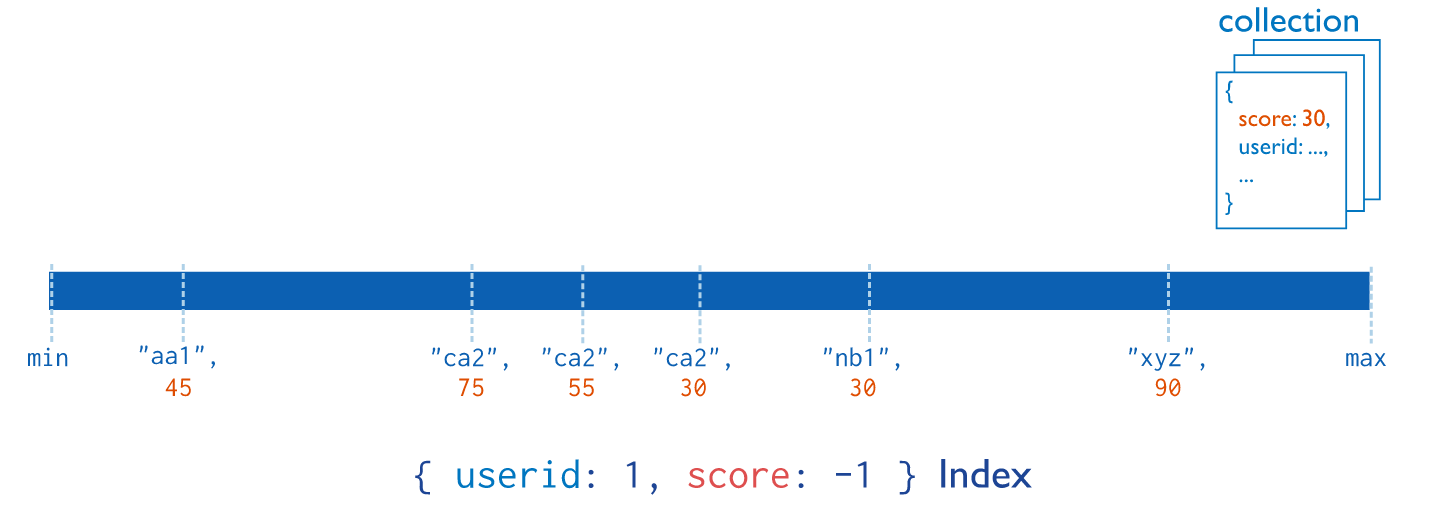
MongoDB also supports the creation of indexes on multiple fields otherwise known as compound indexes . The order of fields listed in a compound index has significance. For instance, if a compound index consists of {userid: 1, score: -1 } , the index sorts first by userid and within each userid value then sorts by score . Here’s a diagram from MongoDB documentation that conveys a compound index being created for a userId and score fields.
With that all said, let’s now go back to our use case. We’ve mentioned that if a certain location is searched in our app, at this moment in time, MongoDB will conduct a collection scan and go through all the documents in the listings collection that satisfy the query. This isn’t a huge issue now since we don’t have a lot of listings but it can be an issue if we start to have thousands or even millions of listings in our app.
When it comes to searching for listings in a location, what are the fields we’re querying for? If we recall, we make a query for listings that matches at most three fields - country , admin , and city .
let cursor = await db.listings.find({
  country: "Canada",
  admin: "Ontario",
  city: "Toronto"
});
At the minimum, we provide a query that contains the country when a location is specified. If our geocoder picks up the administrative area and city, we include those fields in our query as well. When all three fields exist and when MongoDB makes a search, it isn’t looking for documents that satisfy a single field - but three!
With that said, let’s visit the Atlas dashboard of our MongoDB cluster and prepare indexes for the three fields we query for when it comes to retrieving listings information. We’ll visit the listings collection and click on the indexes tab to provide a new index.

We’ll already see the default _id unique index automatically created by MongoDB. We will now create our own index by clicking on the CREATE INDEX button.
Since we’re going to create an index for multiple fields, we’ll create a compound index . country holds the most importance in our location searches followed by the admin and followed by the city . With that said, we’ll define a compound index that sorts our listings documents by country first, then admin , and lastly by city . We’ll provide all of them with a value of 1 which helps prepare the sorted indexes in ascending alphabetical order.
{
  country: 1,
  admin: 1,
  city: 1
}
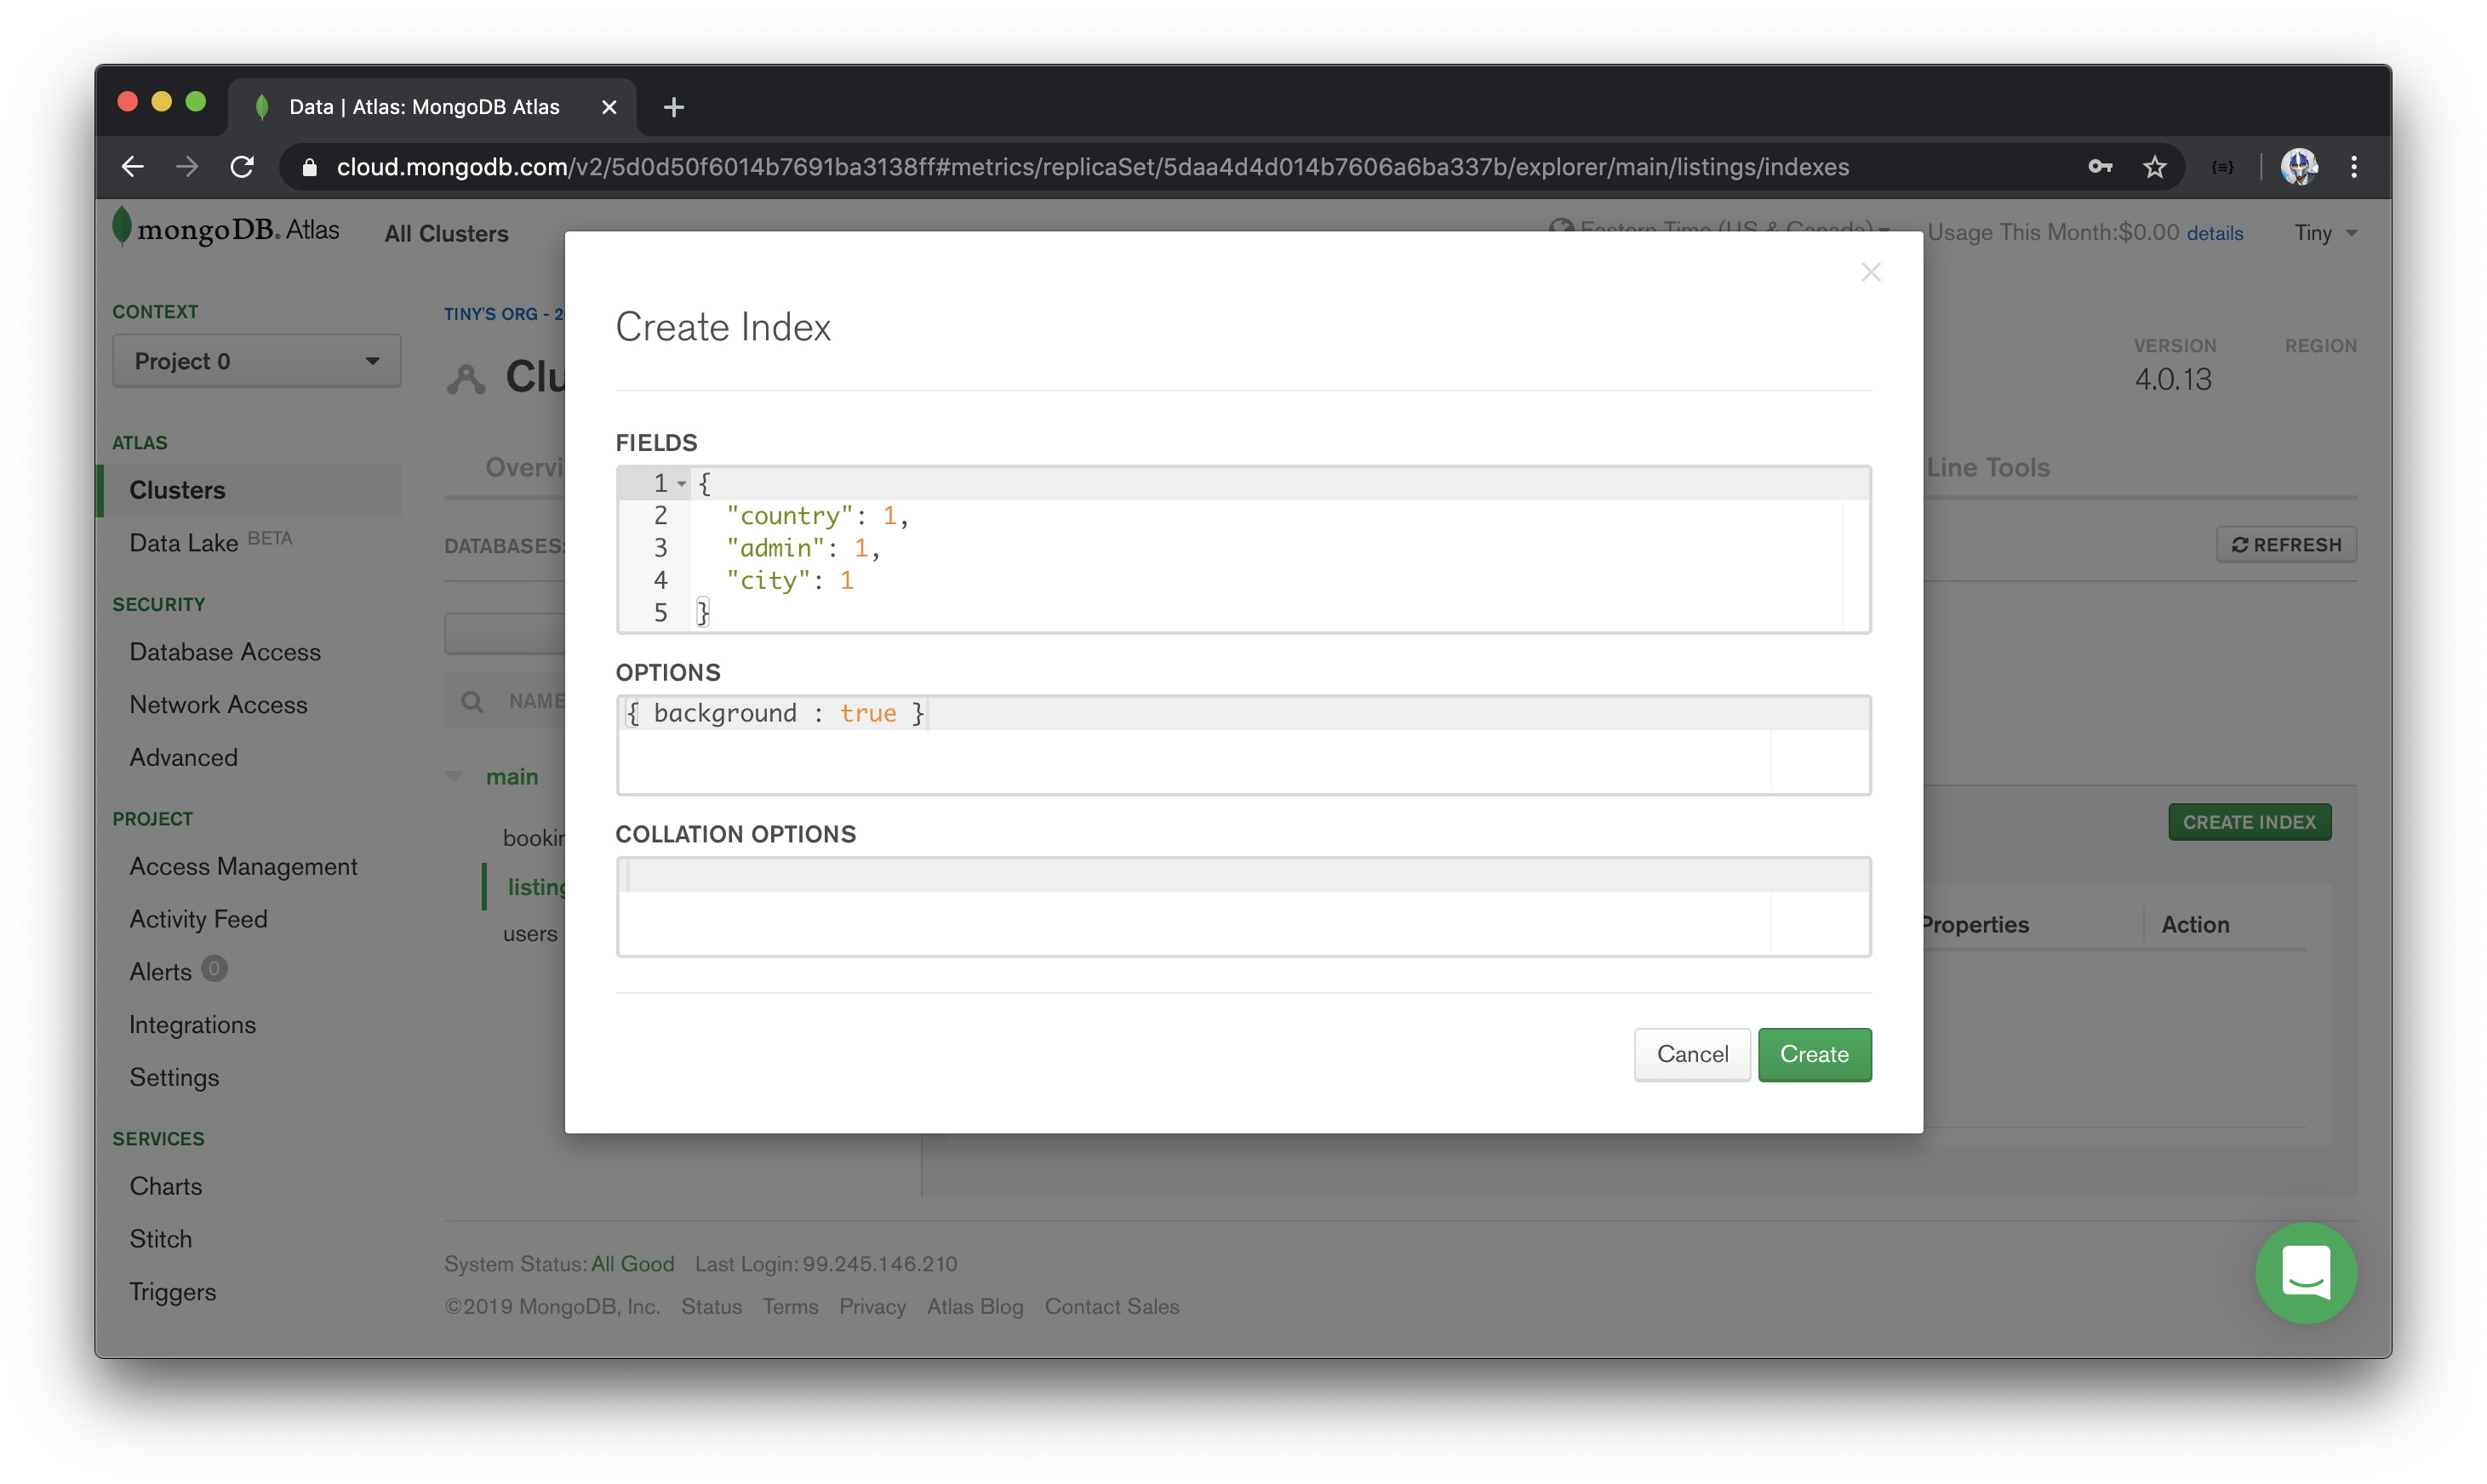
We’ll finally click Create to create our new index.
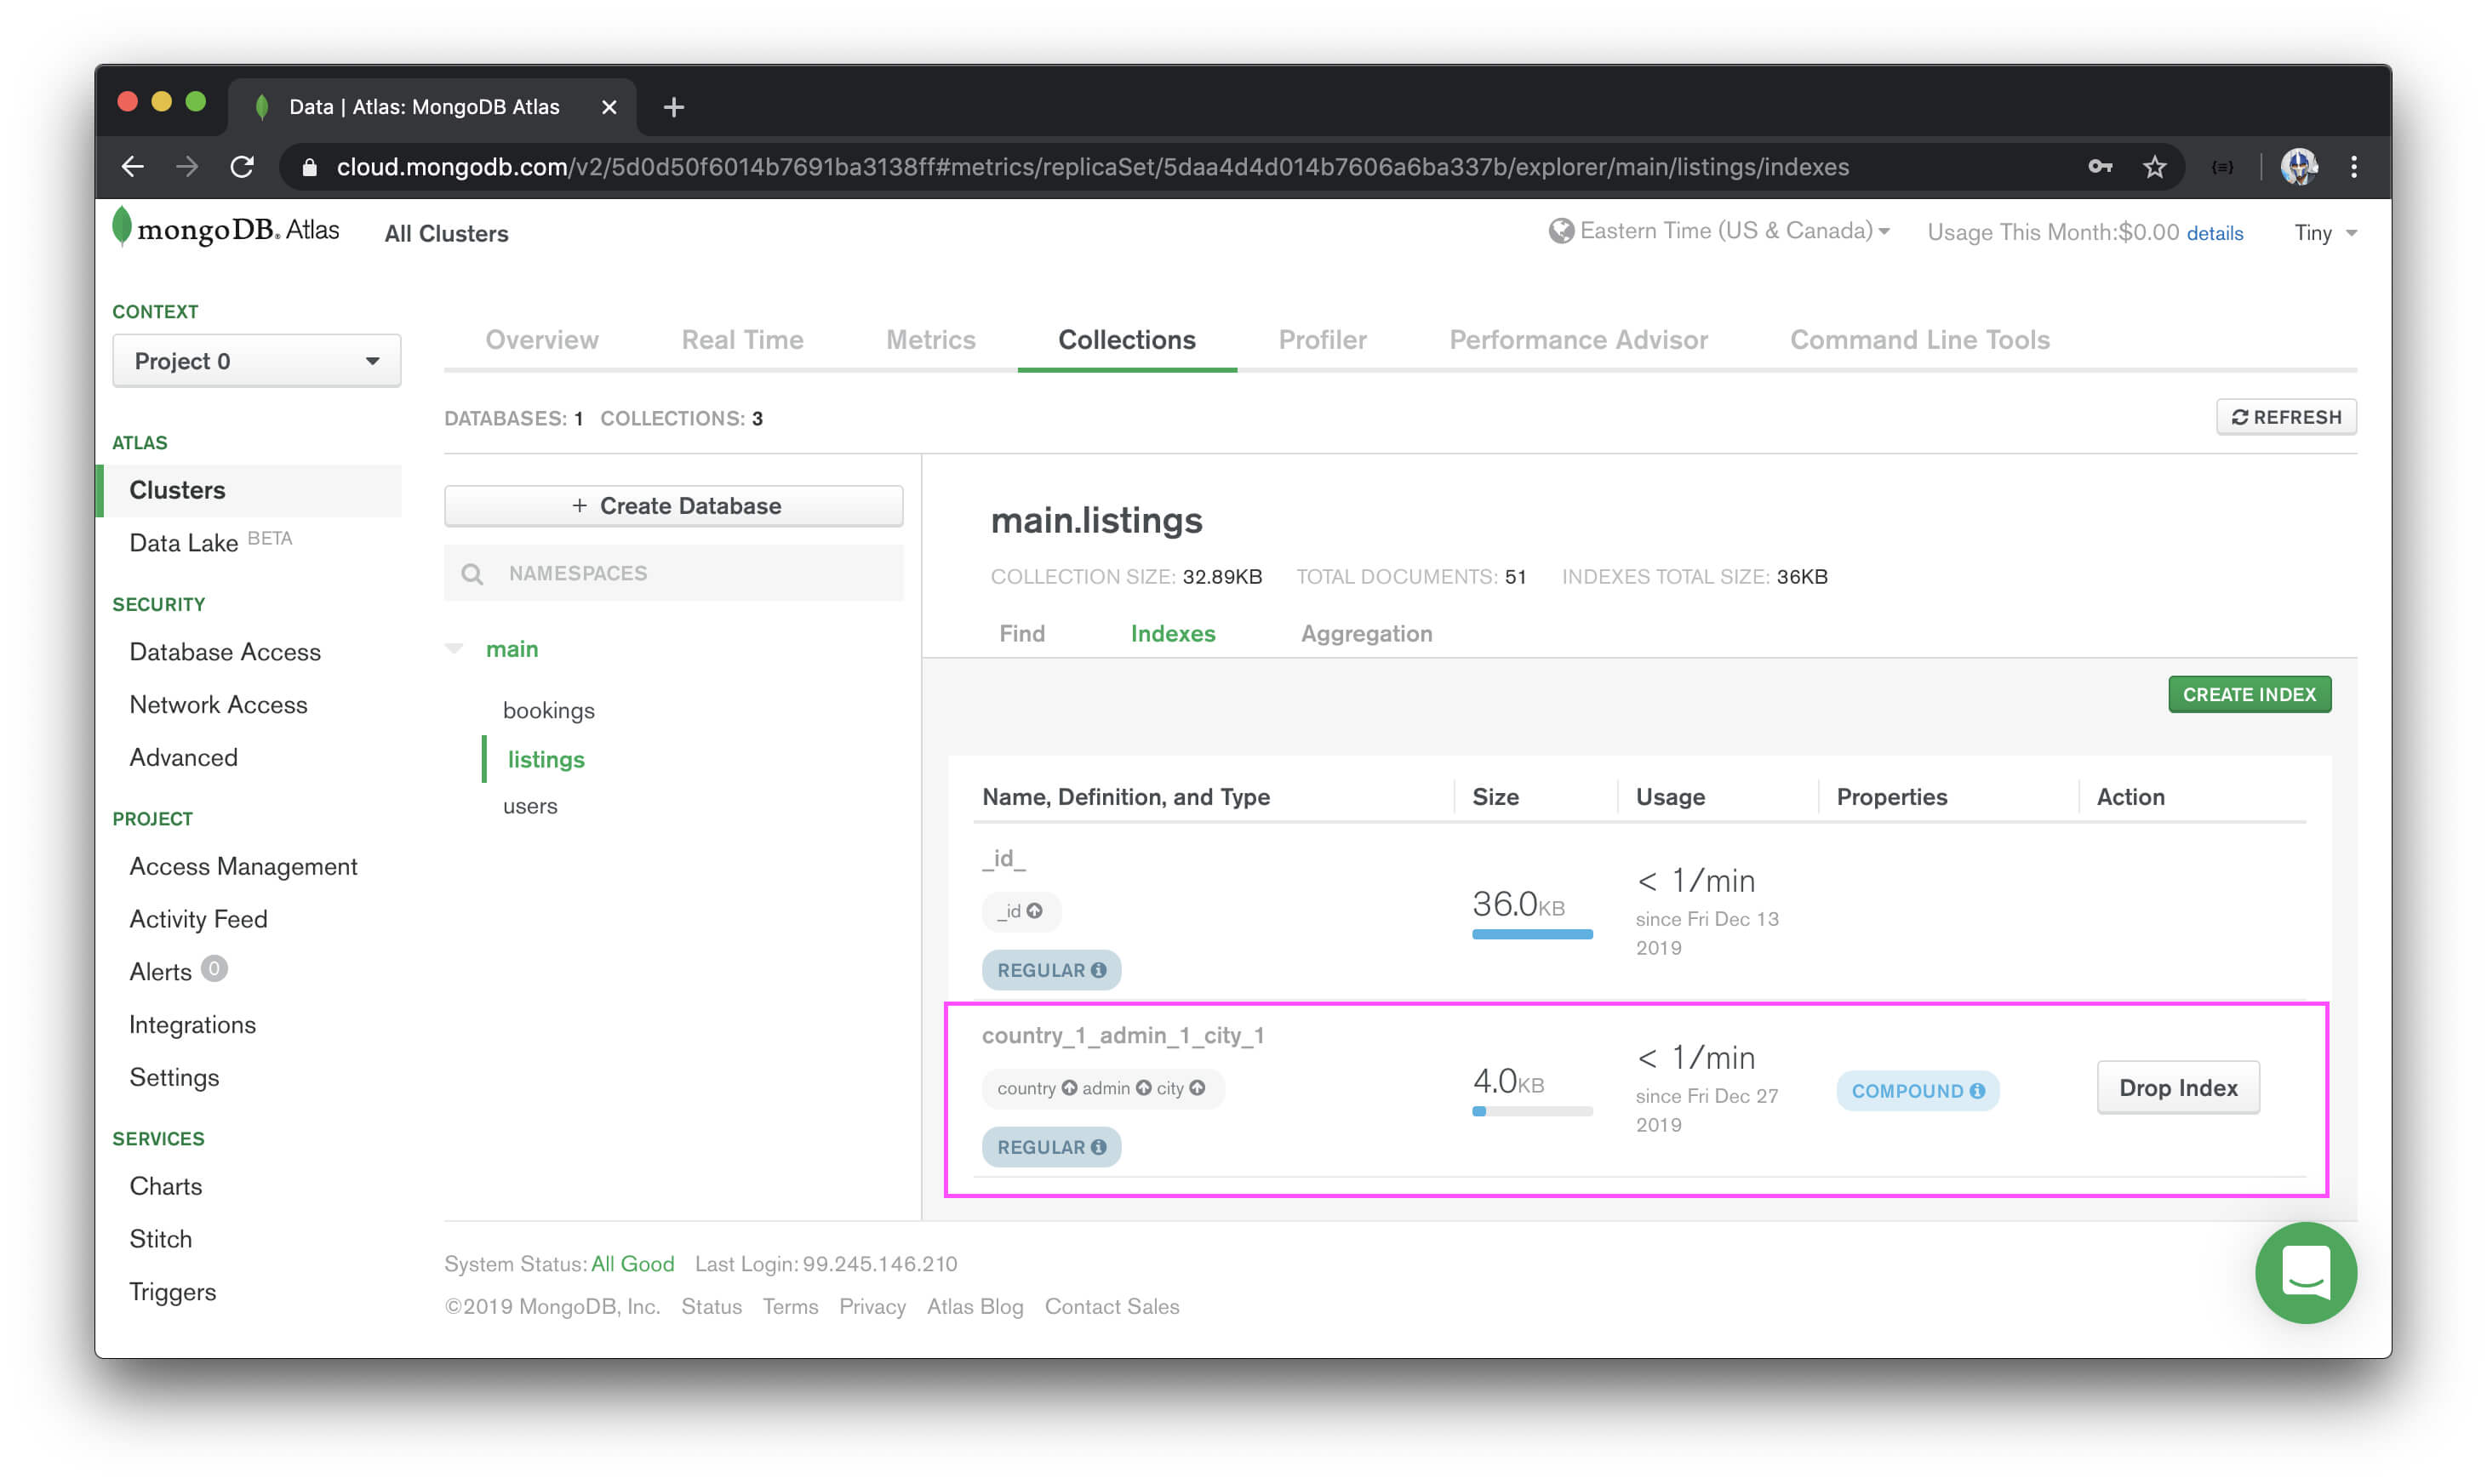
A compound index has now been created for the country , admin , and city fields for the documents in our "listings" collection. If we had millions of listings in our database, a query that utilizes our new index for location-based searching could potentially take seconds as opposed to minutes to complete.
MODULE 9 SUMMARY
In this module, we’ll set up the functionality that will allow users to search for a collection of listings based on location .
SERVER PROJECT
SRC/GRAPHQL/TYPEDEFS.TS
We’ve updated the root-level listings query field to accept an optional location argument. When the location argument is provided, the listings field is to return the collection of listings that pertain to the specific location that is being searched for.
server/src/graphql/typeDefs.ts
  type Query {
    authUrl: String!
    user(id: ID!): User!
    listing(id: ID!): Listing!
    listings(
      location: String
      filter: ListingsFilter!
      limit: Int!
      page: Int!
    ): Listings!
  }
SRC/GRAPHQL/RESOLVERS/LISTING/INDEX.TS
In the listings() resolver function within the listingResolvers map, we check to see if the location argument has been provided. If location exists, we determine the country , admin , and city of the location being searched for by using Google’s Geocoding API. When the geocoded information of the location is determined, we query for the listings in the "listings" collection that have the country , admin , and/or city of the location being searched for.
server/src/graphql/resolvers/Listing/index.ts
    listings: async (
      _root: undefined,
      { location, filter, limit, page }: ListingsArgs,
      { db }: { db: Database }
    ): Promise<ListingsData> => {
      try {
        const query: ListingsQuery = {};
        const data: ListingsData = {
          region: null,
          total: 0,
          result: []
        };

        if (location) {
          const { country, admin, city } = await Google.geocode(location);

          if (city) query.city = city;
          if (admin) query.admin = admin;
          if (country) {
            query.country = country;
          } else {
            throw new Error("no country found");
          }

          const cityText = city ? `${city}, ` : "";
          const adminText = admin ? `${admin}, ` : "";
          data.region = `${cityText}${adminText}${country}`;
        }

        let cursor = await db.listings.find(query);

        if (filter && filter === ListingsFilter.PRICE_LOW_TO_HIGH) {
          cursor = cursor.sort({ price: 1 });
        }

        if (filter && filter === ListingsFilter.PRICE_HIGH_TO_LOW) {
          cursor = cursor.sort({ price: -1 });
        }

        cursor = cursor.skip(page > 0 ? (page - 1) * limit : 0);
        cursor = cursor.limit(limit);

        data.total = await cursor.count();
        data.result = await cursor.toArray();

        return data;
      } catch (error) {
        throw new Error(`Failed to query listings: ${error}`);
      }
    }
  },
SRC/LIB/API/GOOGLE.TS
In the Google object instance within the src/lib/api/Google.ts file, we’ve introduced a geocode() function that runs the Geocoding API from Google Maps services.
server/src/lib/api/Google.ts
export const Google = {  geocode: async (address: string) => {
    const res = await maps.geocode({ address }).asPromise();

    if (res.status < 200 || res.status > 299) {
      throw new Error("failed to geocode address");
    }

    return parseAddress(res.json.results[0].address_components);
  }};
Before the geocoded results are returned, we parse the information returned from the geocoder to get the country , admin , and city information of the location.
server/src/lib/api/Google.ts
const parseAddress = (addressComponents: AddressComponent[]) => {
  let country = null;
  let admin = null;
  let city = null;

  for (const component of addressComponents) {
    if (component.types.includes("country")) {
      country = component.long_name;
    }

    if (component.types.includes("administrative_area_level_1")) {
      admin = component.long_name;
    }

    if (component.types.includes("locality") || component.types.includes("postal_town")) {
      city = component.long_name;
    }
  }

  return { country, admin, city };
};
CLIENT PROJECT
SRC/LIB/GRAPHQL/QUERIES/LISTINGS/INDEX.TS
In the client, we update the Listings GraphQL document to accept an optional location argument.
client/src/lib/graphql/queries/Listings/index.ts
import { gql } from "apollo-boost";

export const LISTINGS = gql`
  query Listings($location: String, $filter: ListingsFilter!, $limit: Int!, $page: Int!) {
    listings(location: $location, filter: $filter, limit: $limit, page: $page) {
      region
      total
      result {
        id
        title
        image
        address
        price
        numOfGuests
      }
    }
  }
`;
SRC/SECTIONS/LISTINGS/INDEX.TSX
In the <Listings /> component rendered in the /listings/:location? route, we construct the listings page which involves but is not limited to:
- Making the
listingsquery when the component first mounts and providing alocationargument when thelocationURL parameter exists. - Displaying a paginated list of listings with each listing presented through a
<ListingCard />component. - Providing the user the capability to change the filter value in the query within a child
<ListingsFilters />component. - Providing the user the capability to change the page value in the query within a child
<ListingsPagination />component.
Appropriate loading and error state UI is also presented when the listings query is in the loading or error state. When data is available from the query, the relevant information is shown to the user.
client/src/sections/Listings/index.tsx
export const Listings = ({ match }: RouteComponentProps<MatchParams>) => {
  const locationRef = useRef(match.params.location);
  const [filter, setFilter] = useState(ListingsFilter.PRICE_LOW_TO_HIGH);
  const [page, setPage] = useState(1);

  const { loading, data, error } = useQuery<ListingsData, ListingsVariables>(LISTINGS, {
    skip: locationRef.current !== match.params.location && page !== 1,
    variables: {
      location: match.params.location,
      filter,
      limit: PAGE_LIMIT,
      page
    }
  });

  useEffect(() => {
    setPage(1);
    locationRef.current = match.params.location;
  }, [match.params.location]);

  if (loading) {
    return (
      <Content className="listings">
        <ListingsSkeleton />
      </Content>
    );
  }

  if (error) {
    return (
      <Content className="listings">
        <ErrorBanner
          description={`
            We either couldn't find anything matching your search or have encountered an error.
            If you're searching for a unique location, try searching again with more common keywords.
          `}
        />
        <ListingsSkeleton />
      </Content>
    );
  }

  const listings = data ? data.listings : null;
  const listingsRegion = listings ? listings.region : null;

  const listingsSectionElement =
    listings && listings.result.length ? (
      <div>
        <Affix offsetTop={64}>
          <ListingsPagination
            total={listings.total}
            page={page}
            limit={PAGE_LIMIT}
            setPage={setPage}
          />
          <ListingsFilters filter={filter} setFilter={setFilter} />
        </Affix>
        <List
          grid={{
            gutter: 8,
            xs: 1,
            sm: 2,
            lg: 4
          }}
          dataSource={listings.result}
          renderItem={listing => (
            <List.Item>
              <ListingCard listing={listing} />
            </List.Item>
          )}
        />
      </div>
    ) : (
      <div>
        <Paragraph>
          It appears that no listings have yet been created for{" "}
          <Text mark>"{listingsRegion}"</Text>
        </Paragraph>
        <Paragraph>
          Be the first person to create a <Link to="/host">listing in this area</Link>!
        </Paragraph>
      </div>
    );

  const listingsRegionElement = listingsRegion ? (
    <Title level={3} className="listings__title">
      Results for "{listingsRegion}"
    </Title>
  ) : null;

  return (
    <Content className="listings">
COMPOUND INDEX
In the MongoDB Atlas dashboard, we’ve created a compound index for the country , admin , and city fields for the documents in our "listings" collection. This is to help support the more efficient execution of queries in the "listings" collection when listing documents are to be found for a certain country , admin , and city .
MOVING FORWARD
In the next module, we move towards explaining how we are to accept payments in our application with Stripe and we’ll build out the mutations necessary for a user to connect with Stripe .