Video
Links
- Lesson 1
- Lesson 2
- Lesson 3
- Lesson 4
- Lesson 5
- Lesson 6
- Lesson 7
- Lesson 8
- Lesson 9
- Lesson 10
- Lesson 11
- Lesson 12
Build a Reactivity System
In this lesson we will build a simple reactivity system using the very same techniques you’ll find in the Vue source code. This will give you a better understanding of Vue.js and it’s design patterns, as well as get you familiar with watchers and the Dep class.
The Reactivity System
Vue’s reactivity system can look like magic when you see it working for the first time.
Take this simple app:
    <div id="app">
      <div>Price: ${{ price }}</div>
      <div>Total: ${{ price * quantity }}</div>
      <div>Taxes: ${{ totalPriceWithTax }}</div>
    </div>
    <script src="https://cdn.jsdelivr.net/npm/vue"></script>
    <script>
      var vm = new Vue({
        el: '#app',
        data: {
          price: 5.00,
          quantity: 2
        },
        computed: {
          totalPriceWithTax() {
            return this.price * this.quantity * 1.03
          }
        }
      })
    </script>
And somehow Vue just knows that if price changes, it should do three things:
- Update the
pricevalue on our webpage. - Recalculate the expression that multiplies
price*quantity, and update the page. - Call the
totalPriceWithTaxfunction again and update the page.
But wait, I hear you wonder, how does Vue know what to update when the price changes, and how does it keep track of everything?
This is not how JavaScript programming usually works
If it’s not obvious to you, the big problem we have to address is that programming usually doesn’t work this way. For example, if I run this code:
    let price = 5
    let quantity = 2
    let total = price * quantity  // 10 right?
    price = 20
    console.log(`total is ${total}`)
What do you think it’s going to print? Since we’re not using Vue, it’s going to print 10 .
>> total is 10
In Vue we want total to get updated whenever price or quantity get updated. We want:
>> total is 40
Unfortunately, JavaScript is procedural, not reactive, so this doesn’t work in real life. In order to make total reactive, we have to use JavaScript to make things behave differently.
Problem
We need to save how we’re calculating the total , so we can re-run it when price or quantity changes.
Solution
First off, we need some way to tell our application, “The code I’m about to run, store this , I may need you to run it at another time.” Then we’ll want to run the code, and if price or quantity variables get updated, run the stored code again.
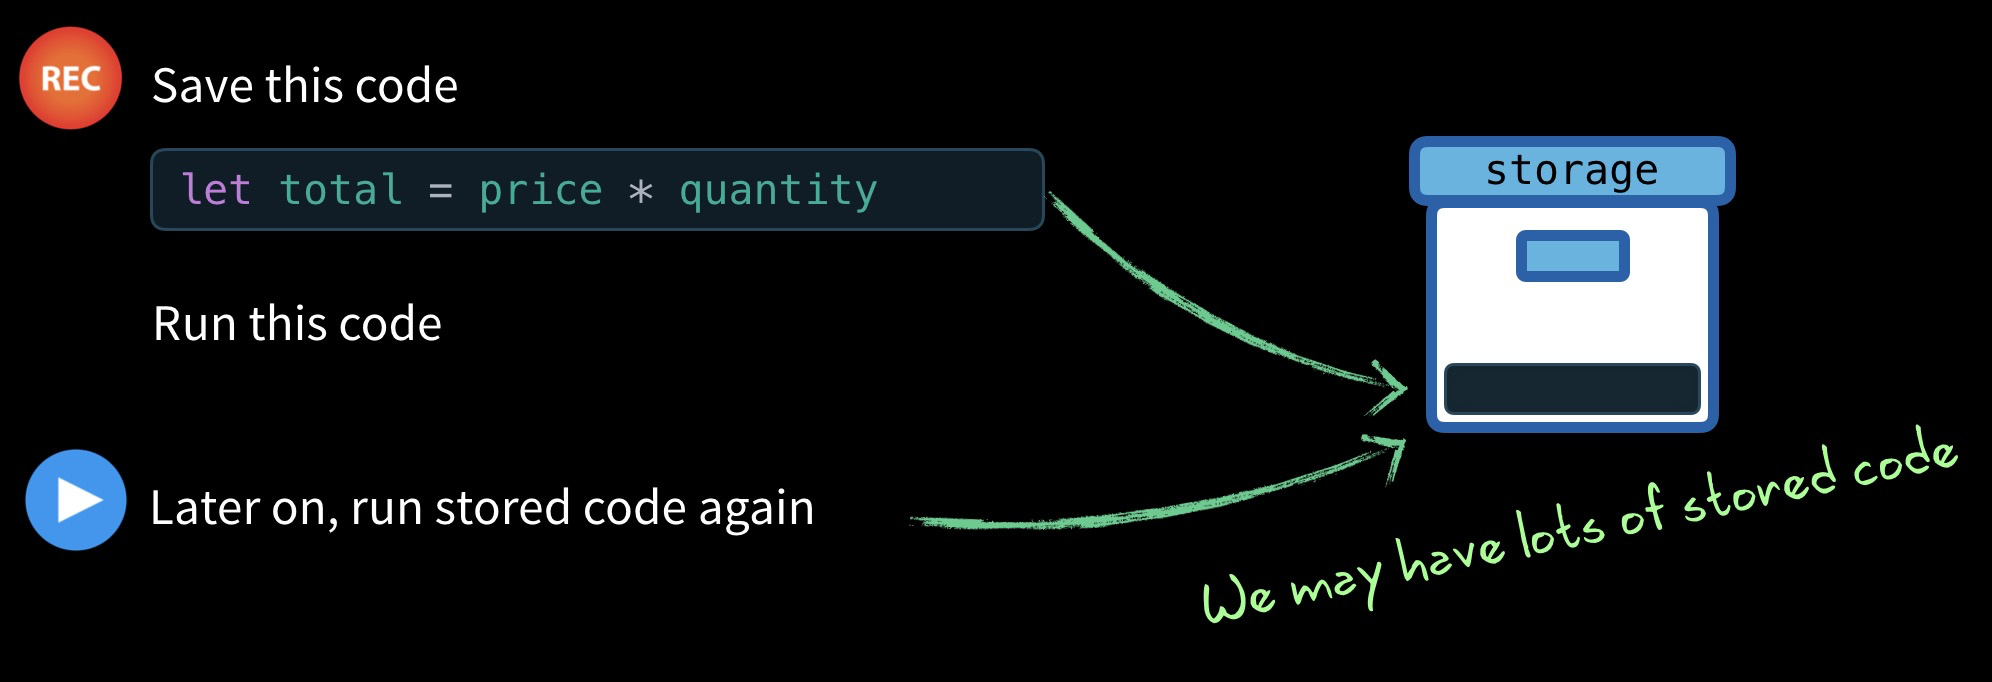
We might do this by recording the function so we can run it again.
    let price = 5
    let quantity = 2
    let total = 0
    let target = null

    target = function () {
      total = price * quantity
    })

    record() // Remember this in case we want to run it later
    target() // Also go ahead and run it
Notice that we store an anonymous function inside the target variable, and then call a record function. Using the ES6 arrow syntax I could also write this as:
target = () => { total = price * quantity }
The definition of the record is simply:
    let storage = [] // We'll store our target functions in here

    function record () { // target = () => { total = price * quantity }
      storage.push(target)
    }
We’re storing the target (in our case the { total = price * quantity } ) so we can run it later, perhaps with a replay function that runs all the things we’ve recorded.
    function replay (){
      storage.forEach(run => run())
    }
This goes through all the anonymous functions we have stored inside the storage array and executes each of them.
Then in our code, we can just:
    price = 20
    console.log(total) // => 10
    replay()
    console.log(total) // => 40
Simple enough, right? Here’s the code in it’s entirety if you need to read through and try to grasp it one more time. FYI, I am coding this in a particular way, in case you’re wondering why.
    let price = 5
    let quantity = 2
    let total = 0
    let target = null
    let storage = []

    function record () {
      storage.push(target)
    }

    function replay () {
      storage.forEach(run => run())
    }

    target = () => { total = price * quantity }

    record()
    target()

    price = 20
    console.log(total) // => 10
    replay()
    console.log(total) // => 40

Problem
We could go on recording targets as needed, but it’d be nice to have a more robust solution that will scale with our app. Perhaps a class that takes care of maintaining a list of targets that get notified when we need them to get re-run.
Solution: A Dependency Class
One way we can begin to solve this problem is by encapsulating this behavior into its own class, a Dependency Class which implements the standard programming observer pattern.
So, if we create a JavaScript class to manage our dependencies (which is closer to how Vue handles things), it might look like this:
    class Dep { // Stands for dependency
      constructor () {
        this.subscribers = [] // The targets that are dependent, and should be
                              // run when notify() is called.
      }
      depend() {  // This replaces our record function
        if (target && !this.subscribers.includes(target)) {
          // Only if there is a target & it's not already subscribed
          this.subscribers.push(target)
        }
      }
      notify() {  // Replaces our replay function
        this.subscribers.forEach(sub => sub()) // Run our targets, or observers.
      }
    }
Notice instead of storage we’re now storing our anonymous functions in subscribers . ****Instead of our record function we now call depend ****and we now use notify instead of replay . To get this running:
    const dep = new Dep()

    let price = 5
    let quantity = 2
    let total = 0
    let target = () => { total = price * quantity }
    dep.depend() // Add this target to our subscribers
    target()  // Run it to get the total

    console.log(total) // => 10 .. The right number
    price = 20
    console.log(total) // => 10 .. No longer the right number
    dep.notify()       // Run the subscribers
    console.log(total) // => 40  .. Now the right number
It still works, and now our code feels more reusable. Only thing that still feels a little weird is the setting and running of the target .
Problem
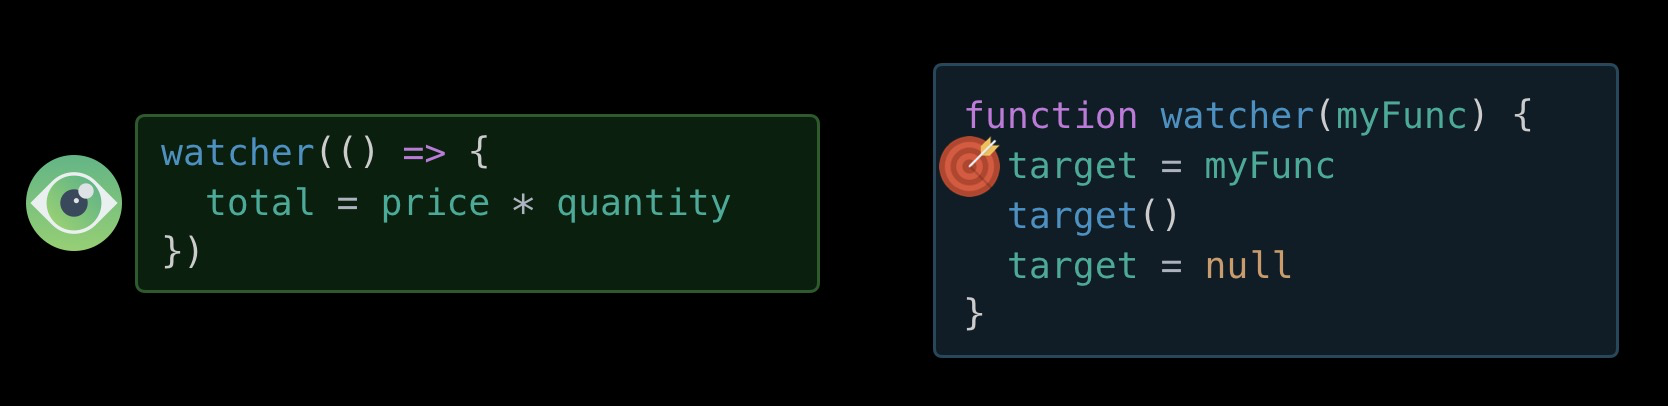
In the future we’re going to have a Dep class for each variable, and it’ll be nice to encapsulate the behavior of creating anonymous functions that need to be watched for updates. Perhaps a watcher function might be in order to take care of this behavior.
So instead of calling:
    target = () => { total = price * quantity }
    dep.depend()
    target()
(this is just the code from above)
We can instead just call:
    watcher(() => {
      total = price * quantity
    })
Solution: A Watcher Function
Inside our Watcher fucntion we can do a few simple things:
    function watcher(myFunc) {
      target = myFunc // Set as the active target
      dep.depend()       // Add the active target as a dependency
      target()           // Call the target
      target = null      // Reset the target
    }
As you can see, the watcher function takes a myFunc argument, sets that as a our global target property, calls dep.depend() to add our target as a subscriber, calls the target function, and resets the target .
Now when we run the following:
    price = 20
    console.log(total)
    dep.notify()
    console.log(total)

You might be wondering why we implemented target as a global variable, rather than passing it into our functions where needed. There is a good reason for this, which will become obvious by the end of our article.
Problem
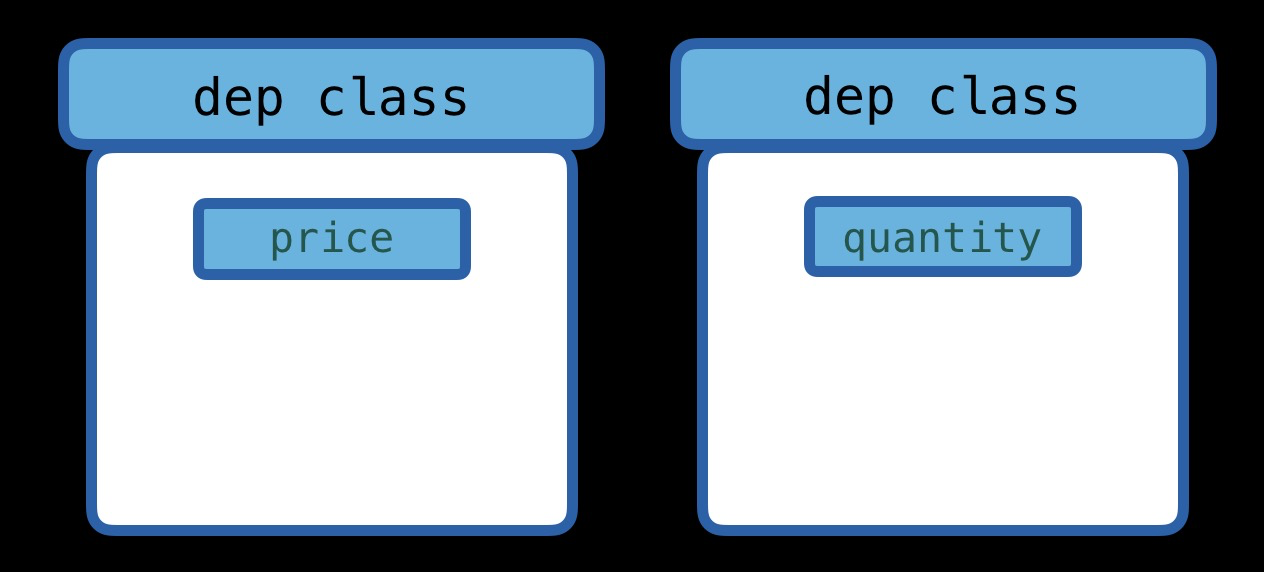
We have a single Dep class , but what we really want is each of our variables to have its own Dep. Let me move things into properties before we go any further.
let data = { price: 5, quantity: 2 }
Let’s assume for a minute that each of our properties ( price and quantity ) have their own internal Dep class.
Now when we run:
    watcher(() => {
      total = data.price * data.quantity
    })
Since the data.price value is accessed (which it is), I want the price property’s Dep class to push our anonymous function (stored in target ) onto its subscriber array (by calling dep.depend() ). Since data.quantity is accessed I also want the quantity property Dep class to push this anonymous function (stored in target ) into its subscriber array.
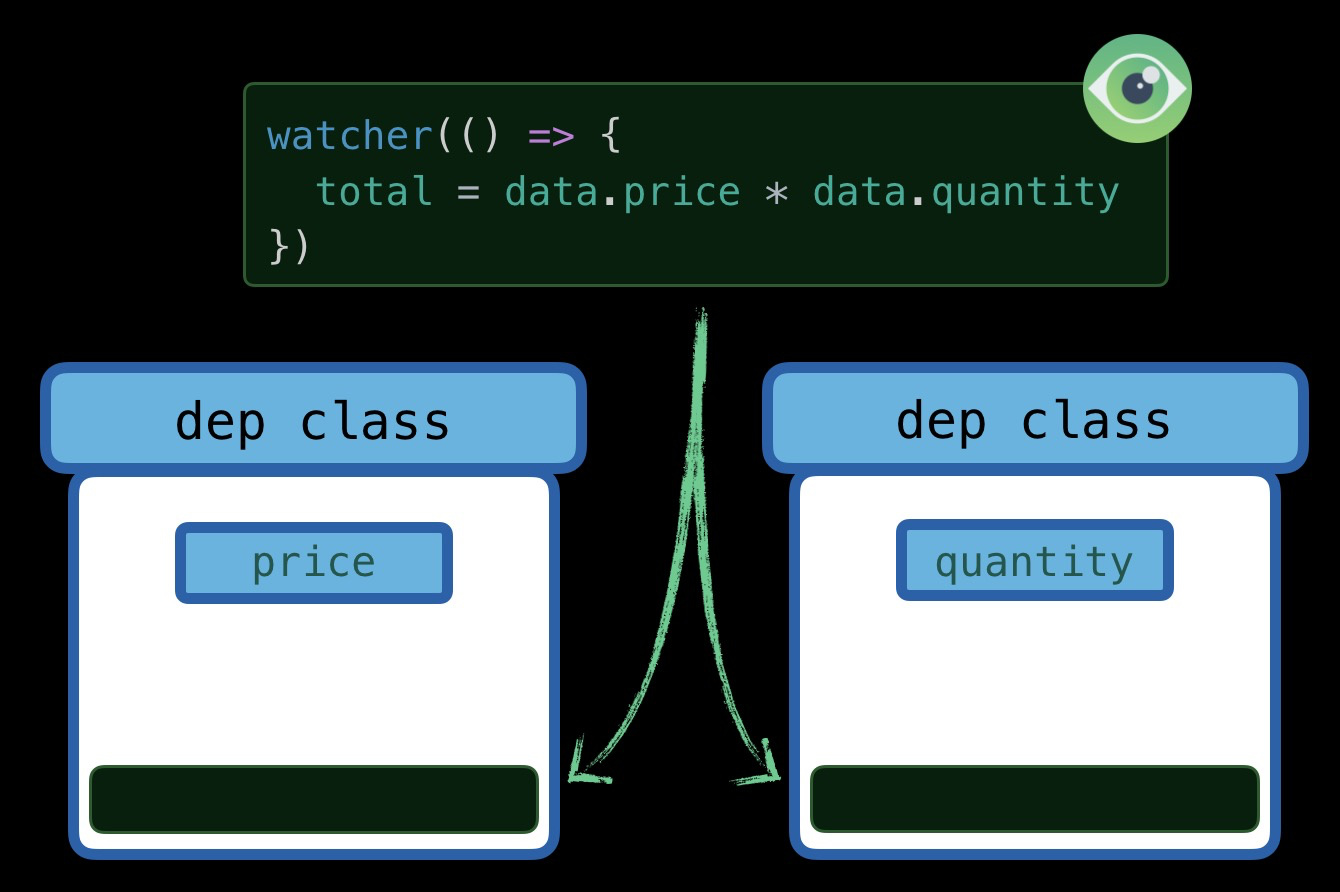
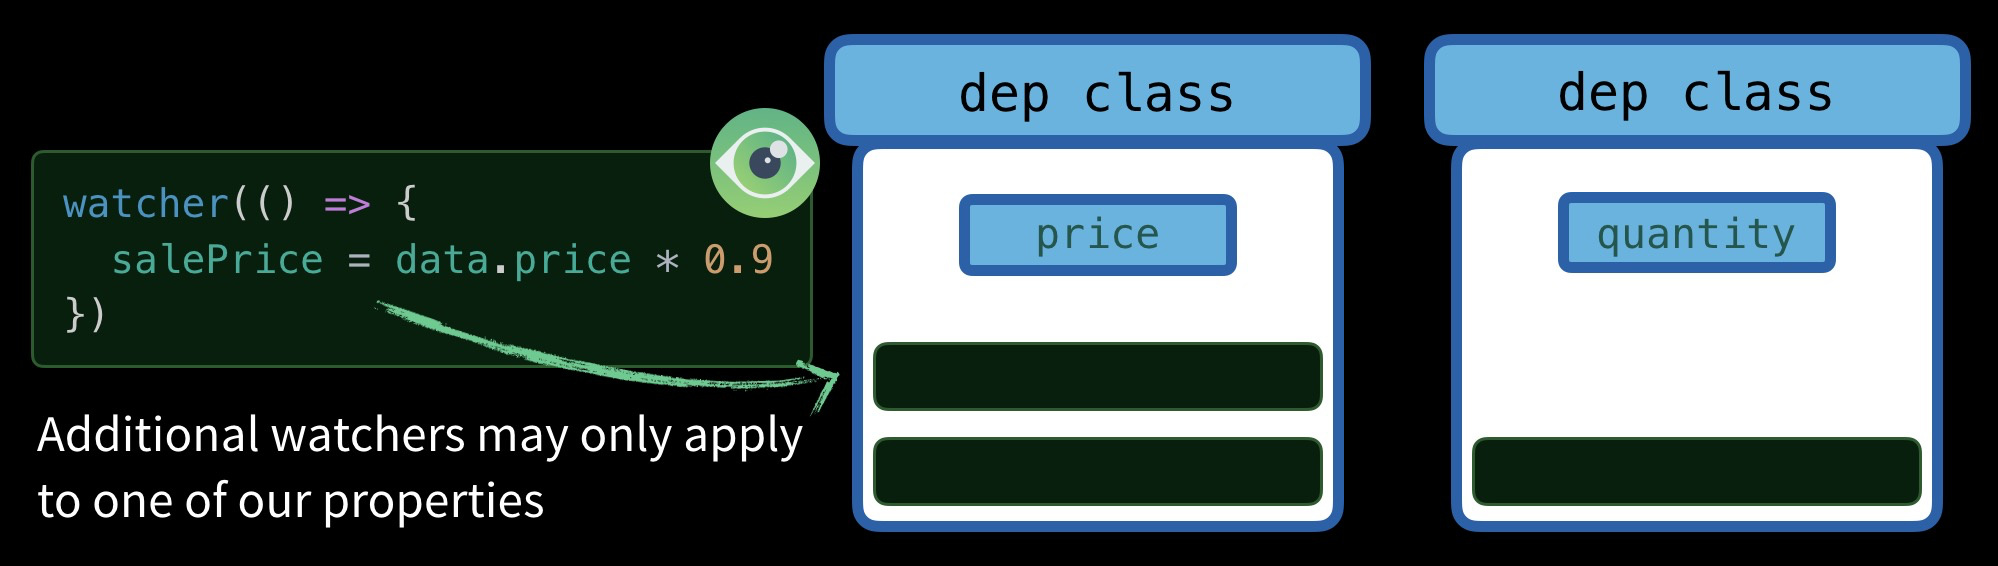
If I have another anonymous function where just data.price is accessed, I want that pushed just to the price property Dep class.
When do I want dep.notify() to be called on price ’s subscribers? I want them to be called when price is set. By the end of the article I want to be able to go into the console and do:
>> total
10
>> price = 20  // When this gets run it will need to call notify() on the price
>> total
40
We need some way to hook into a data property (like price or quantity ) so when it’s accessed we can save the target into our subscriber array, and when it’s changed run the functions stored our subscriber array.
Solution: Object.defineProperty()
We need to learn about the Object.defineProperty() function which is plain ES5 JavaScript. It allows us to define getter and setter functions for a property. Lemme show you the very basic usage, before I show you how we’re going to use it with our Dep class.
    let data = { price: 5, quantity: 2 }

    Object.defineProperty(data, 'price', {  // For just the price property

        get() {  // Create a get method
          console.log(`I was accessed`)
        },

        set(newVal) {  // Create a set method
          console.log(`I was changed`)
        }
    })
    data.price // This calls get()
    data.price = 20  // This calls set()

As you can see, it just logs two lines. However, it doesn’t actually get or set any values, since we over-rode the functionality. Let’s add it back now. get() expects to return a value, and set() still needs to update a value, so let’s add an internalValue variable to store our current price value.
    let data = { price: 5, quantity: 2 }

    let internalValue = data.price // Our initial value.

    Object.defineProperty(data, 'price', {  // For just the price property

        get() {  // Create a get method
          console.log(`Getting price: ${internalValue}`)
          return internalValue
        },

        set(newVal) {  // Create a set method
          console.log(`Setting price to: ${newVal}` )
          internalValue = newVal
        }
    })
    total = data.price * data.quantity  // This calls get()
    data.price = 20  // This calls set()
Now that our get and set are working properly, what do you think will print to the console?

So we have a way to get notified when we get and set values. And with some recursion we can run this for all items in our data array, right?
FYI, Object.keys(data) returns an array of the keys of the object.
    let data = { price: 5, quantity: 2 }

    Object.keys(data).forEach(key => { // We're running this for each item in data now
      let internalValue = data[key]
      Object.defineProperty(data, key, {
        get() {
          console.log(`Getting ${key}: ${internalValue}`)
          return internalValue
        },
        set(newVal) {
          console.log(`Setting ${key} to: ${newVal}` )
          internalValue = newVal
        }
      })
    })
    total = data.price * data.quantity
    data.price = 20
Now everything has getters and setters, and we see this on the console.

Putting both ideas together
total = data.price * data.quantity
When a piece of code like this gets run and gets the value of price , we want price to remember this anonymous function ( target ). That way if price gets changed, or is set to a new value, it’ll trigger this function to get rerun, since it knows this line is dependent upon it. So you can think of it like this.
Get => Remember this anonymous function, we’ll run it again when our value changes.
Set => Run the saved anonymous function, our value just changed.
Or in the case of our Dep Class
Price accessed (get) => call dep.depend() to save the current target
Price set => call dep.notify() on price, re-running all the targets
Let’s combine these two ideas, and walk through our final code.
    let data = { price: 5, quantity: 2 }
    let target = null

    // This is exactly the same Dep class
    class Dep {
      constructor () {
        this.subscribers = []
      }
      depend() {
        if (target && !this.subscribers.includes(target)) {
          // Only if there is a target & it's not already subscribed
          this.subscribers.push(target)
        }
      }
      notify() {
        this.subscribers.forEach(sub => sub())
      }
    }

    // Go through each of our data properties
    Object.keys(data).forEach(key => {
      let internalValue = data[key]

      // Each property gets a dependency instance
      const dep = new Dep()

      Object.defineProperty(data, key, {
        get() {
          dep.depend() // <-- Remember the target we're running
          return internalValue
        },
        set(newVal) {
          internalValue = newVal
          dep.notify() // <-- Re-run stored functions
        }
      })
    })

    // My watcher no longer calls dep.depend,
    // since that gets called from inside our get method.
    function watcher(myFunc) {
      target = myFunc
      target()
      target = null
    }

    watcher(() => {
      data.total = data.price * data.quantity
    })
And now look at what happens in our console when we play around.

Exactly what we were hoping for! Both price and quantity are indeed reactive! Our total code gets re-run whenever the value of price or quantity gets updated.
Jumping to Vue
This illustration from the Vue docs should start to make sense now.
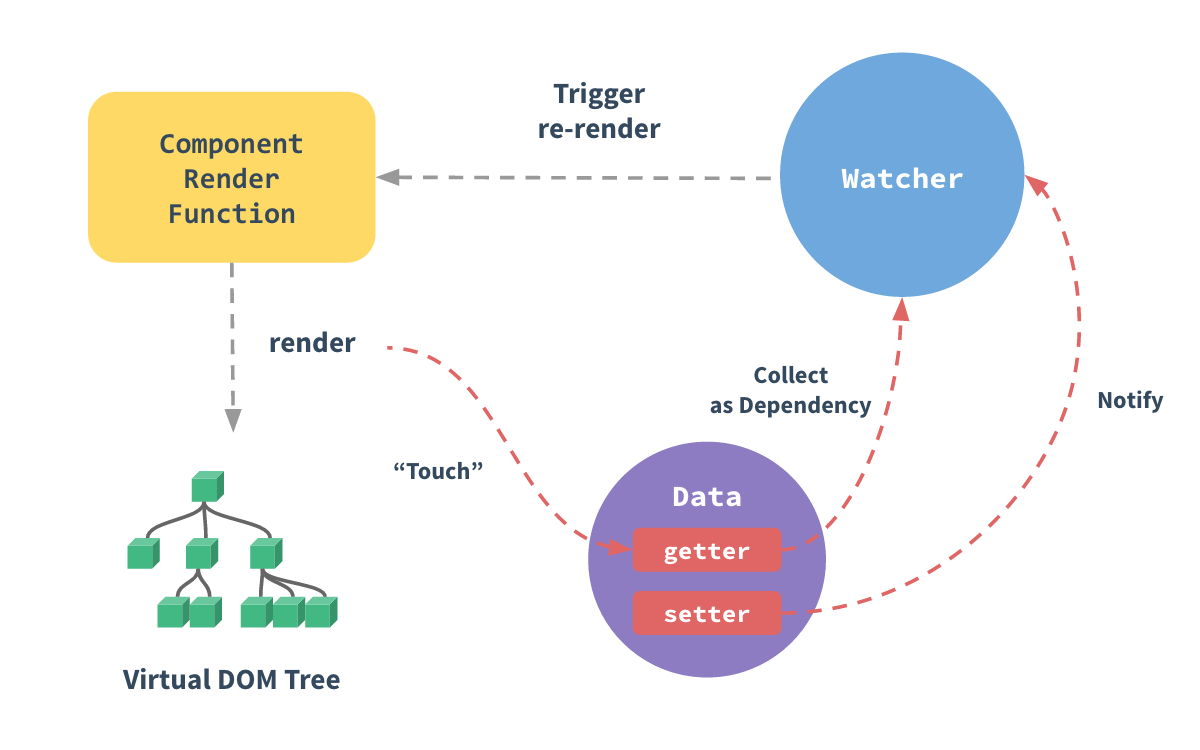
Do you see that beautiful purple Data circle with the getters and setters? It should look familiar! Every component instance has a watcher instance (in blue) which collects dependencies from the getters (red line). When a setter is called later, it notifies the watcher which causes the component to re-render. Here’s the image again with some of my own annotations.
Yeah, doesn’t this make a whole lot more sense now?
Obviously how Vue does this under the covers is more complex, but you now know the basics. In the next lesson we’ll dive under the hood with Vue, and see if we can find this pattern inside the source code.
So what have we learned?
- How to create a Dep class which collects a dependencies (depend) and re-runs all dependencies (notify).
- How to create a watcher to manage the code we’re running, that may need to be added (target) as a dependency.
- How to use Object.defineProperty() to create getters and setters.
Evan You on Proxies
In the previous video we built out a reactivity system that mimics the Vue.js implementation of reactivity. The use of Object.defineProperty() to convert the properties into getters/setters allowed us to track them as dependencies when accessed and then rerun code (notify) when modified.
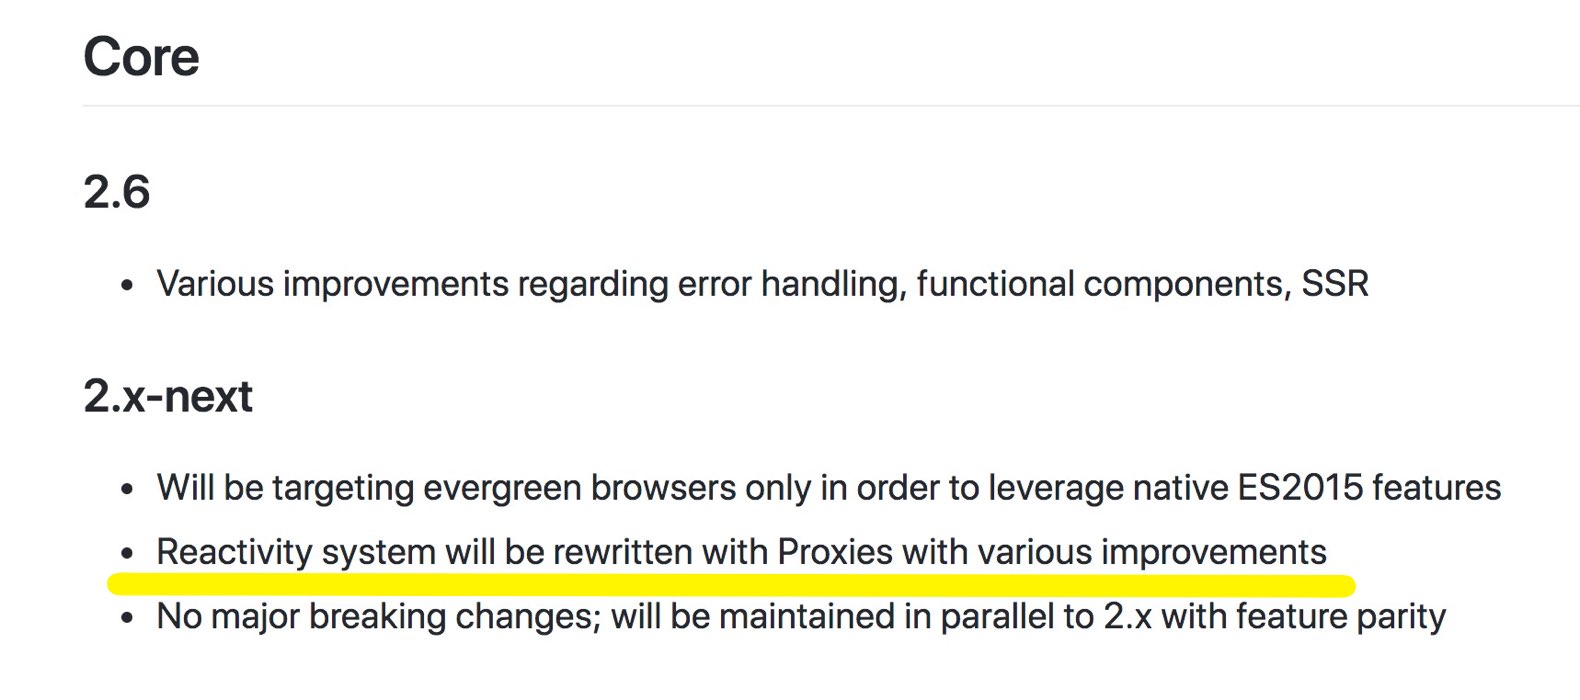
If you have been following the Vue roadmap, the 2.x-next version’s reactivity system will be rewritten with Proxies, which is different than what I showed.
I wanted to ask Evan what exactly this might look like and the advantages we get from it.
What are the Advantages?
The proxy API allows us to create a virtual representation of an object and provides us with handlers like set() , get() and deleteProperty() etc that we can use to intercept when properties are accessed or modified on the original object. This relieves us from the following limitations:
- Usage of
Vue.$set()to add new reactive properties andVue.$delete()to delete existing properties. - Array change detection.
Our Previous Code
Previously we used Object.defineProperty() to listen for when our properties are get and set. Here is a codepen which shows where we ended up on the last lesson:
    let data = { price: 5, quantity: 2 };
    let target = null;

    // Our simple Dep class
    class Dep {
      constructor() {
        this.subscribers = [];
      }
      depend() {
        if (target && !this.subscribers.includes(target)) {
          // Only if there is a target & it's not already subscribed
          this.subscribers.push(target);
        }
      }
      notify() {
        this.subscribers.forEach(sub => sub());
      }
    }

    // Go through each of our data properties
    Object.keys(data).forEach(key => {
      let internalValue = data[key];

      // Each property gets a dependency instance
      const dep = new Dep();

      Object.defineProperty(data, key, {
        get() {
          dep.depend(); // <-- Remember the target we're running
          return internalValue;
        },
        set(newVal) {
          internalValue = newVal;
          dep.notify(); // <-- Re-run stored functions
        }
      });
    });

    // The code to watch to listen for reactive properties
    function watcher(myFunc) {
      target = myFunc;
      target();
      target = null;
    }

    watcher(() => {
      data.total = data.price * data.quantity;
    });

    console.log("total = " + data.total)
    data.price = 20
    console.log("total = " + data.total)
    data.quantity = 10
    console.log("total = " + data.total)
Solution: Using Proxy to overcome the limitations
Instead of looping through each property to add getters/setters we can set up a proxy on our data object using:
    //data is our source object being observed
    const observedData = new Proxy(data, {
      get() {
        //invoked when property from source data object is accessed
      },
      set() {
        //invoked when property from source data object is modified
      },
      deleteProperty() {
        //invoked when property from source data object is deleted
      }
    });
The second argument passed to Proxy constructor function is called the handler. Handler is nothing but an object that contains functions known as traps. These traps allow us to intercept operations happening on the source data object.
The get() and set() are two traps that can be used to invoke dep.depend() and dep.notify() respectively. The set() trap will be invoked even for the newly added properties, so it can be it can be used to make new properties reactive. Hence, we no longer need to declare new reactive properties using Vue.$set() . The same applies for deletion of reactive properties which can be handled in deleteProperty() trap.
Implementing the Reactivity System Using Proxies
Even though the Proxy API is not yet incorporated into Vue’s reactivity system, let’s try to implement the reactivity system from the previous lesson using Proxy ourselves. The first thing we’ll change is our Object.keys(data).forEach loop, which we’ll now use to create a new Dep for each reactive property.
    let deps = new Map(); // Let's store all of our data's deps in a map
    Object.keys(data).forEach(key => {
      // Each property gets a dependency instance
      deps.set(key, new Dep());
    });
Side Note: The Dep class remains the same. Now we’ll replace the use of Object.defineProperty with the use of a proxy:
    let data_without_proxy = data; // Save old data object
    data = new Proxy(data_without_proxy, {
      // Override data to have a proxy in the middle
      get(obj, key) {
        deps.get(key).depend(); // <-- Remember the target we're running
        return obj[key]; // call original data
      },
      set(obj, key, newVal) {
        obj[key] = newVal; // Set original data to new value
        deps.get(key).notify(); // <-- Re-run stored functions
        return true;
      }
    });
As you can see, we create a variable data_without_proxy that holds the copy of our source data object which will be used when overwriting the data object to have a Proxy object. The get() and set() traps are passed in as the properties to handler object which is the 2nd argument.
get(obj, key) This is the function that gets invoked when a property is accessed. It receives the original object i.e data_without_proxy as obj and the key of the property that is accessed. We call the depend() method of the specific Dep class associated to that particular property. At last the value related to that key is returned using return obj[key] .
set(obj, key, newVal) The first two arguments are the same as the above-mentioned get() trap. The 3rd argument is the new modified value. Then we set the new value to the property that is modified using obj[key] = newVal and call the notify() method.
Moving Total & Testing
We need to make one more small change to our code. We need to extract total into its own variable as it does not need to be reactive.
    let total = 0;
    watcher(() => {
      total = data.price * data.quantity;
    });
    console.log("total = " + total);
    data.price = 20;
    console.log("total = " + total);
    data.quantity = 10;
    console.log("total = " + total);
Now when we re-run the program, we see the following output in the console:
    total = 10
    total = 40
    total = 200
That’s a good sign. The total updates when we update the price and quantity .
Adding Reactive Properties
Now we should be able to add properties into data without declaring them upfront. That was one of the reasons for considering proxies over getters/setters right? Let’s try it out.
We can add the following code:
    deps.set("discount", new Dep());  // Need a new dep for our property
    data["discount"] = 5; // Add our new property

    let salePrice = 0;

    watcher(() => {  // New code to watch which includes our reactive property
      salePrice = data.price - data.discount;
    });

    console.log("salePrice = " + salePrice);
    data.discount = 7.5;  // This should be reactive, and rerun the watcher.
    console.log("salePrice = " + salePrice);
When the program is run we can see the following output:
    ....
    salePrice = 15
    salePrice = 12.5
You can see that when the data.discount is modified the salePrice also gets updated. Hurray! The finished code can be seen here.
ReVue
In this lesson Evan You spoke to us about how future versions of Vue (v2.6-next) could implement reactivity using Proxies. We learned more about:
- The limitations of current reactivity system
- How proxies work
- How to build a reactivity system using proxies
In the next video, we’ll dive into the Vue source code and discover where reactivity lies.
Reactivity in Vue.js
Using the knowledge we learned building a reactivity system in our first lesson, we’ll dive into the Vue.js source code to find where the reactivity lives. Doing so will help us:
- Get comfortable parsing though the Vue.js source
- Learn Vue.js design patterns & architecture
- Improve your debugging skills
- Learn caveats to the reactivity system
It all will start with a simple Vue application.
    <div id="app">
      <h1>{{ product }}</h1>
    </div>

    <script src="vue.js"></script>

    <script>
    var app = new Vue({
      el: '#app',
      data: {
        product: "Socks"
      }
    })
    </script>
Question: Where is Reactivity?
At some point the product property inside the data object gets reactive super powers. It’d be nice to know where and how this happens.
If we look in the documentation for this data object we find:

See how it talks about getters/setters to make it reactive? It also mentions that the object must be plain, just data. So somewhere in the source it’s making the properties in data reactive, and adding the ability to remember what needs to get updated when the property values changes. Remember, when data is GET we add a dependency, and when it’s SET we notify all the dependencies.
Answer: Tracing the Code Execution
I started by downloading the Vue.js source code so I could generate a local version of Vue. I wrote up an index.html file with the contents that you see above, and used the Chrome DevTools Debugger to watch the code execute one line at a time. It’s easier than you might think.
When our Vue application starts up, we’ll begin here:
/src/core/instance/index.js
    import { initMixin } from './init'
    import { stateMixin } from './state'
    import { renderMixin } from './render'
    import { eventsMixin } from './events'
    import { lifecycleMixin } from './lifecycle'
    import { warn } from '../util/index'

    function Vue (options) {
      ... // ommitted code
      this._init(options)
    }
    initMixin(Vue)  // goes here next
    stateMixin(Vue)
    eventsMixin(Vue)
    lifecycleMixin(Vue)
    renderMixin(Vue)
    export default Vue
There’s our root Vue function that creates our instance when we call var app = new Vue({ .. }) . Notice it calls _init, which is a prototype function that gets added to our Vue object.
Side Note: In the code above and the code that follows I’ve omitted code to simplify what you have to read.
/src/core/instance/init.js
    export function initMixin (Vue: Class<Component>) {
      Vue.prototype._init = function (options?: Object) {
        const vm: Component = this

        ... Normalizing options ...
        vm._self = vm
        initLifecycle(vm)
        initEvents(vm)
        initRender(vm) // defineReactive attrs and listeners
        callHook(vm, 'beforeCreate') // Notice this lifecycle call hook
        initInjections(vm) // resolve injections before data/props
        initState(vm)  // <---
        initProvide(vm) // resolve provide after data/props
        callHook(vm, 'created') // Notice this lifecycle call hook
        ...
        vm.$mount(vm.$options.el)
      }
    }
Inside init we do many things, but we’re interested in InitState.
/src/core/instance/state.js
    export function initState (vm: Component) {
      vm._watchers = []
      const opts = vm.$options
      if (opts.props) initProps(vm, opts.props)
      if (opts.methods) initMethods(vm, opts.methods)
      if (opts.data) {
        initData(vm)  // <---  We do have data
      } else {
        observe(vm._data = {}, true /* asRootData */)
      }
      if (opts.computed) initComputed(vm, opts.computed)
      if (opts.watch && opts.watch !== nativeWatch) {
        initWatch(vm, opts.watch)
      }
    }
    ...
As you can see, we initialize Props, Methods, and then initData, which continues in the same file below.
    ...
    function initData (vm: Component) {
      let data = vm.$options.data // The value here is { product: "Socks" }
      ...

      observe(data, true /* asRootData */)  // <--- Here we go
    }
See how we call “observe” on our data? We’re getting closer.
/src/core/observer/index.js
    export function observe (value: any, asRootData: ?boolean): Observer | void {
      ... // Our value is still { product: "Socks" }
      ob = new Observer(value)
      return ob
    }
Okay, so our observer does something with our data. Let’s dive deeper.
/src/core/observer/index.js
    export class Observer {
      value: any;

      constructor (value: any) {
        this.value = value  // { product: "Socks" }
        ...
        if (Array.isArray(value)) {  // We don't have an array but if we did
          ...
          this.observeArray(value) // We would call observeArray (shown below)
        } else {
          this.walk(value)  // Walk through each property
        }
      }
      /**
       * Walk through each property and convert them into
       * getter/setters. This method should only be called when
       * value type is Object.
       */
      walk (obj: Object) {
        const keys = Object.keys(obj)  // keys = ["product"]
        for (let i = 0; i < keys.length; i++) {  // Go through each key
          defineReactive(obj, keys[i], obj[keys[i]])  // <--- Going here next
                      // Calling defineReactive(obj, 'product', 'Socks')
        }
      }
      /**
       * Observe a list of Array items.
       */
      observeArray (items: Array<any>) {
        for (let i = 0, l = items.length; i < l; i++) {
          observe(items[i])  // Just call observe on each item
        }
      }
    }
See how if our data is an array we call observe on each of the items? If it’s not an array we go to the walk function, get all our keys, and then we call defineReactive ?
That’s where we go next.
/src/core/observer/index.js
    /**
     * Define a reactive property on an Object.
     */
    export function defineReactive (
      obj: Object,
      key: string,  // <--- "product"
      val: any, // <--- "Socks" this will be our internalValue
      customSetter?: ?Function,
      shallow?: boolean
    ) {
      const dep = new Dep() // <--- There's our dependency class like from the last lesson.
      const property = Object.getOwnPropertyDescriptor(obj, key)
      if (property && property.configurable === false) {
        return // if property is not set as configurable, then return
      }
      // cater for pre-defined getter/setters
      const getter = property && property.get
      const setter = property && property.set

      Object.defineProperty(obj, key, {  // <--- There's our defineProperty
        enumerable: true,
        configurable: true,
        get: function reactiveGetter () { // <--- There's our Get
          const value = getter ? getter.call(obj) : val // <--- If we have a defined getter, then use that; otherwise return value, like we did with our internalVal.

          if (Dep.target) {
            dep.depend() // <-- There's our depend function
            ...
          }
          return value // A Getter returns a value.
        },
        set: function reactiveSetter (newVal) {
          const value = getter ? getter.call(obj) : val // <-- if custom getter

          // If the value is the same don't do anything.
          if (newVal === value || (newVal !== newVal && value !== value)) {
            return
          }

          if (setter) {
            setter.call(obj, newVal)
          } else {
            val = newVal // <--- Set the new value.
          }
          dep.notify() // <-- There's our notify
        }
      })
    }
Aha, there’s our reactivity! Pretty similar to what we wrote, isn’t it? If we trace from the top down, here’s what our path down to Reactivity looks like!
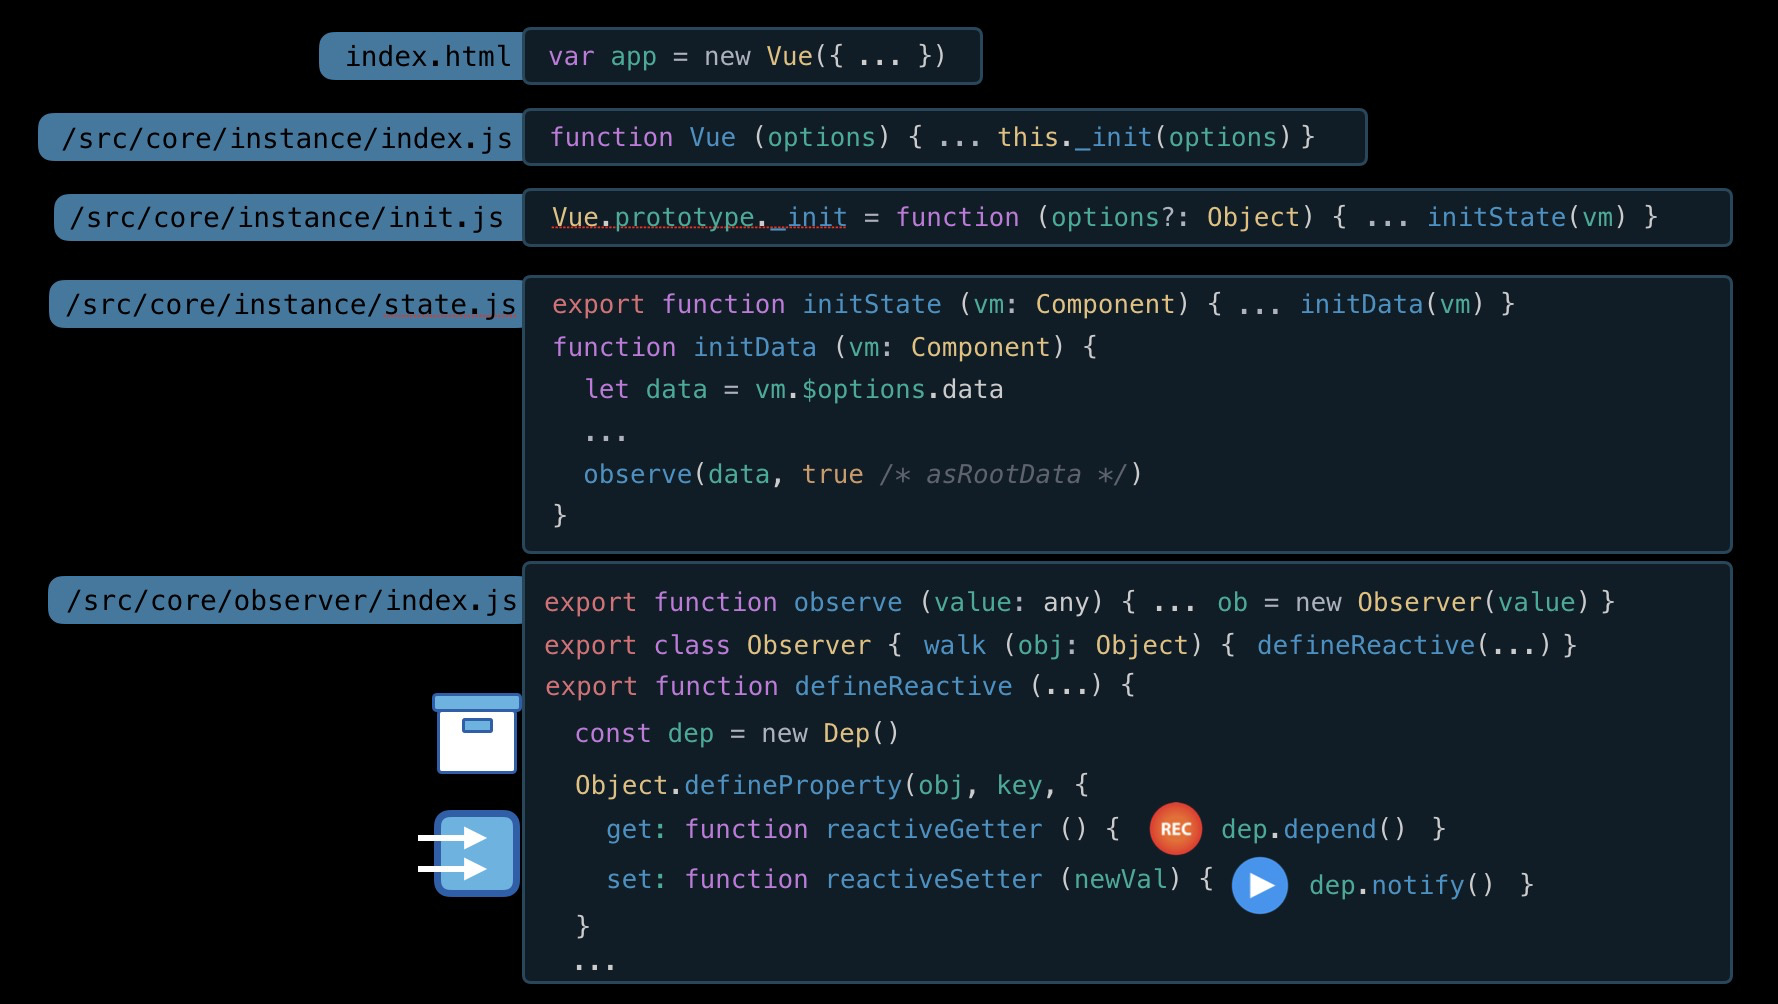
Question: But what’s inside that Dep class?
I know I was really curious at this point to see what was inside my Dep class, but before we get there we need to understand more about Vue’s Watcher class . Remember our Watch Function from the last lesson?
Well, Vue has a Watcher class which:
- Receives as a parameter the code to watch (like above)
- Stores the code inside a
getterproperty - Has a
getfunction (called directly in instantiation, or by the scheduler) which:- Runs
pushTarget(this)to setDep.targetto this watcher object - Calls
this.getter.callto run this code - Runs
popTarget() to remove currentDep.target
- Runs
- Has an
updatefunction to queue thiswatcherto run (using a scheduler)
/src/core/observer/watcher.js
    export default class Watcher {
      ...
      get() {
        pushTarget(this) // Set Dep.target to this watcher object
        ...
        value = this.getter.call(vm, vm) // run the code
        ...
        popTarget() // remove current Dep.target
        return value
      }
      update() {
        if (this.lazy) {
          this.dirty = true
        } else if (this.sync) {
          this.run() // shown below
        } else {
          queueWatcher(this) // queue this to run later
        }
      }
      run() {
        if (this.active) {
          const value = this.get()
        }
      }
      addDep(dep: Dep) { // This is called to start tracking a dep
        ...
        this.newDeps.push(dep) // The watcher also track's deps
        dep.addSub(this) // Calls back to the dep (below)
      }
    }
Now that you know what a Watcher looks like, the dep class should make a little more sense:
/src/core/observer/dep.js
    export default class Dep {
      ...
      subs: Array<Watcher>;  // Notice our susbcribers are of class Watcher.
      constructor () {
        this.subs = []  // Our subscribers we need to keep track of
      }
      addSub(sub: Watcher) {  // You can think of this sub Watcher as our target
        this.subs.push(sub)
      }
      ...
      depend() { // <-- There's our depend function
        if (Dep.target) {  // If target exists
          Dep.target.addDep(this)  // Add this as a dependency, which ends up calling addSub function above.  Pushing this watcher.
        }
      }
      notify() { // <--- There's our notify function
        const subs = this.subs.slice()
        for (let i = 0, l = subs.length; i < l; i++) {
          subs[i].update()  // <-- Queue and run each subscriber
        }
      }
    }
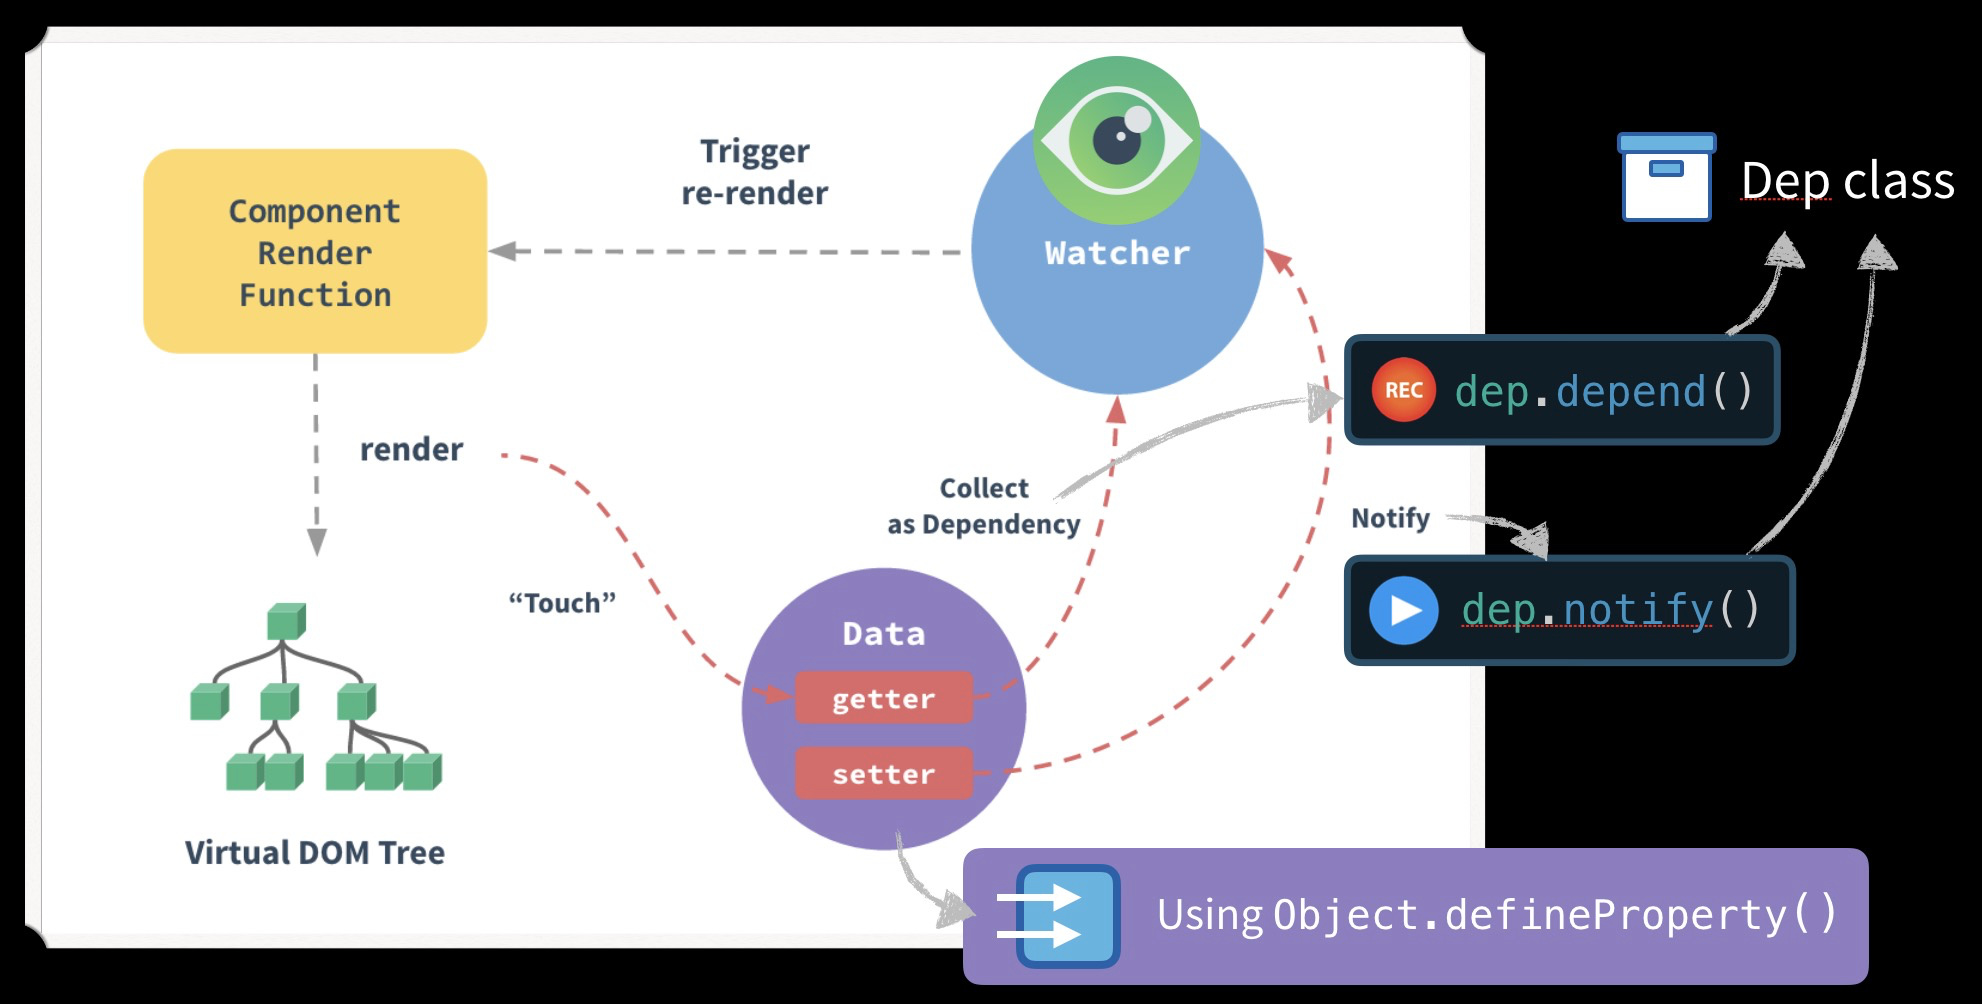
Be sure to read through my code comments above. You can see how this is very similar to the reactivity engine we build in the previous level. If we look at our diagram again, it should make a little more sense:

Some day you might need to dive into the source, and now perhaps it’ll be a little less scary.
Problem: Caveats to the Reactivity System
There are limitations to the reactivity system that you should get a little familiar with, and the Vue documentation is extremely well written on it. Some of these could cause some of those hair-pulling bugs someday, so trust me on taking a quick look.
The first caveat involves addition or deletion of reactive properties, like inside the data object. The second involves the way you might make changes to an array that is reactive.
Stay Tuned
Now that we have a good sense of how our Reactivity system works, in our next lesson we’ll jump into our component rendering system. When you see how these two systems work together you’ll have a deeper appreciation for the Component engine, and we’ll begin to look at techniques to make our components more scalable.
Evan You on Vue Core
In our last lesson we walked through the code base to find reactivity. I showed Evan the following diagram and asked him about any design choices he made along the way.
Constructor: the place where it all begins
When we create a new Vue instance using new Vue({…}) it calls the Vue constructor function. This function is pretty basic. It just calls the _init prototype method of Vue passing the options as the argument.
 //src/core/instance/index.js
 function Vue(options){ this._init(options) }
Little tweaks for performance
As Evan mentions refactors that were made to rule out some edge cases and improve performance. One such place is where a different strategy is used to merge all the options into vm.$options of an instance that is instantiating many components.
        //src/core/instance/init.js

        if (options && options._isComponent) {
          // optimize internal component instantiation
          // since dynamic options merging is pretty slow, and none of the
          // internal component options needs special treatment.
          initInternalComponent(vm, options)
        } else {
          vm.$options = mergeOptions(
            resolveConstructorOptions(vm.constructor),
            options || {},
            vm
          )
        }
This is a common pattern we can observe in the code base where such optimization tweaks were made over time.
Question: Are proxies already used?
This isn’t a simple answer, Yes and No.
- No: proxies are not used in the reactivity system yet.
- Yes: proxies are used to improve developer experience for browsers that support them.
        //src/core/instance/init.js
        if (process.env.NODE_ENV !== 'production') {
        //used during development
          initProxy(vm)
        } else {
          vm._renderProxy = vm
        }
If a developer calls a method that doesn’t exist in our component options, a proxy’s [has()](https://developer.mozilla.org/en-US/docs/Web/JavaScript/Reference/Global_Objects/Proxy/handler/has) trap is used to catch the mistake and throw a warning. This looks like:

The sequence of code execution
Evan shows us the sequence in which the Vue instance is set up and how each lifecycle hook is executed. He points out that understanding this code makes debugging easy.
        //src/core/instance/init.js
        initLifecycle(vm)
        initEvents(vm)
        initRender(vm)
        callHook(vm, 'beforeCreate')
        initInjections(vm) // resolve injections before data/props
        initState(vm)
        initProvide(vm) // resolve provide after data/props
        callHook(vm, 'created')
-
initLifecycle(vm): this sets up some initial properties like$parent,$refsetc on the vue instance. -
initEvents(vm): sets up methods related to custom events likevm.$emit,vm.$on,vm.$onceetc. -
initRender(vm): sets up therender()andupdate()methods on the instance. -
callHook(vm, 'beforeCreate'): thebeforeCreate()lifecycle hook is called. Also, plugins like vuex add their properties to the instance in this hook. -
initInjections(vm): this is where all the dependency-injections are set that are provided using theprovideoption by the parent. -
initState(vm): this is where all the props, methods, data, computed and watchers are initialized. You can see the sequence they are initialized below:
    //src/core/instance/state.js
      if (opts.props) initProps(vm, opts.props)
      if (opts.methods) initMethods(vm, opts.methods)
      if (opts.data) {
        initData(vm)
      } else {
        observe(vm._data = {}, true /* asRootData */)
      }
      if (opts.computed) initComputed(vm, opts.computed)
      if (opts.watch && opts.watch !== nativeWatch) {
        initWatch(vm, opts.watch)
      }
The sequence of initialization explains why data properties can be accessed in computed properties and not vice-versa.
-
initProvide(vm): the[provide](https://vuejs.org/v2/api/#provide-inject)option is resolved -
callHook(vm, 'created'): this is where thecreated()lifecycle hook is called. As you see from the sequenceinitState()is called before calling this hook. So all thedata,props,methodsandcomputedare already initialized. That’s the reason we are able to use them increated().
Where our data option is initialized and made reactive
    //src/core/instance/state.js
    export function initState (vm: Component) {
    ...
      if (opts.data) {
        initData(vm)
      } else {
        observe(vm._data = {}, true /* asRootData */)
      }
      ...
    }
initData(vm) is where the data option is checked. If it is a function then the data option should return an object otherwise a warning will be displayed in the console.
We now loop through the data properties and proxy them onto the instance. This means that we can access our data property named foo using this.foo instead of this.$data.foo . It also performs a check to not have conflicting names in our data , props and methods .
    function initData (vm: Component) {
      let data = vm.$options.data
      // checks if data is function or object
      ...
      //proxies the data properties onto the instance
      ...

      // observe data
      observe(data, true /* asRootData */)
    }
Finally the observe(data,true) is called. This is where our normal data properties become reactive as we have discussed in the previous lessons.
The Observer class
The observe(data) function uses the Observer class. This Observer class is used to make code easier to organize and its main purpose is to convert the data properties into getters/setters . This is where dep.depend() and dep.notify() are called as we have seen in the previous lessons.
Evan elaborates on how the relationship between a particular dependency and its computation works. A computation is collected as a subscriber to that particular dependency of which it is a part of.
Why a separate Observer class?
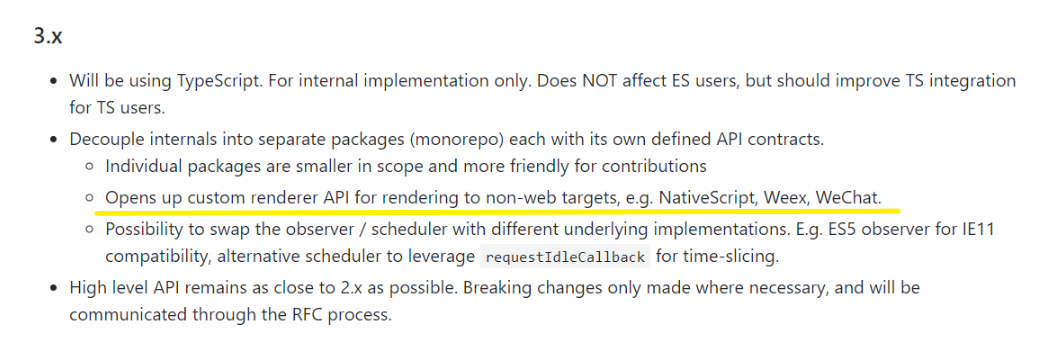
Evan clarifies that in the future this Observer class could be its own stand-alone package. This allows for the flexibility of creating a separate Observer class that uses proxies API. The two observers can be used in an interchangeable fashion so Vue can support both IE11 and evergreen browsers. This is projected for the Vue version 3.x as shown below:

Up Next
Now that we have a greater understanding of the Vue source & reactivity, we can begin our understanding of the Template Rendering process in the next lesson.
Template Compilation
In this lesson we will be learning about template compilation & render function.
Why is it useful to know about this?
- So you can get better at debugging, by knowing what’s going on under the hood.
- When your run up against a limitation in the Vue template engine. The template engine will work for you 95% of the time, but sometimes a render function may give you the functionality you need.
- In order to create functional components, which are cheaper to render than normal components (covered in lesson 5).
- To send in a Render function as a component property (covered in lesson 6).
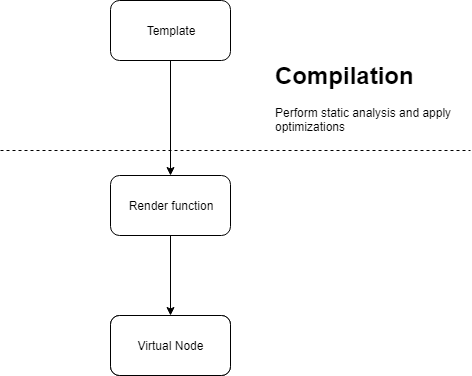
Rendering our component’s template happens after the reactivity system initializes (which we learned about in the last lesson), and there are two steps:
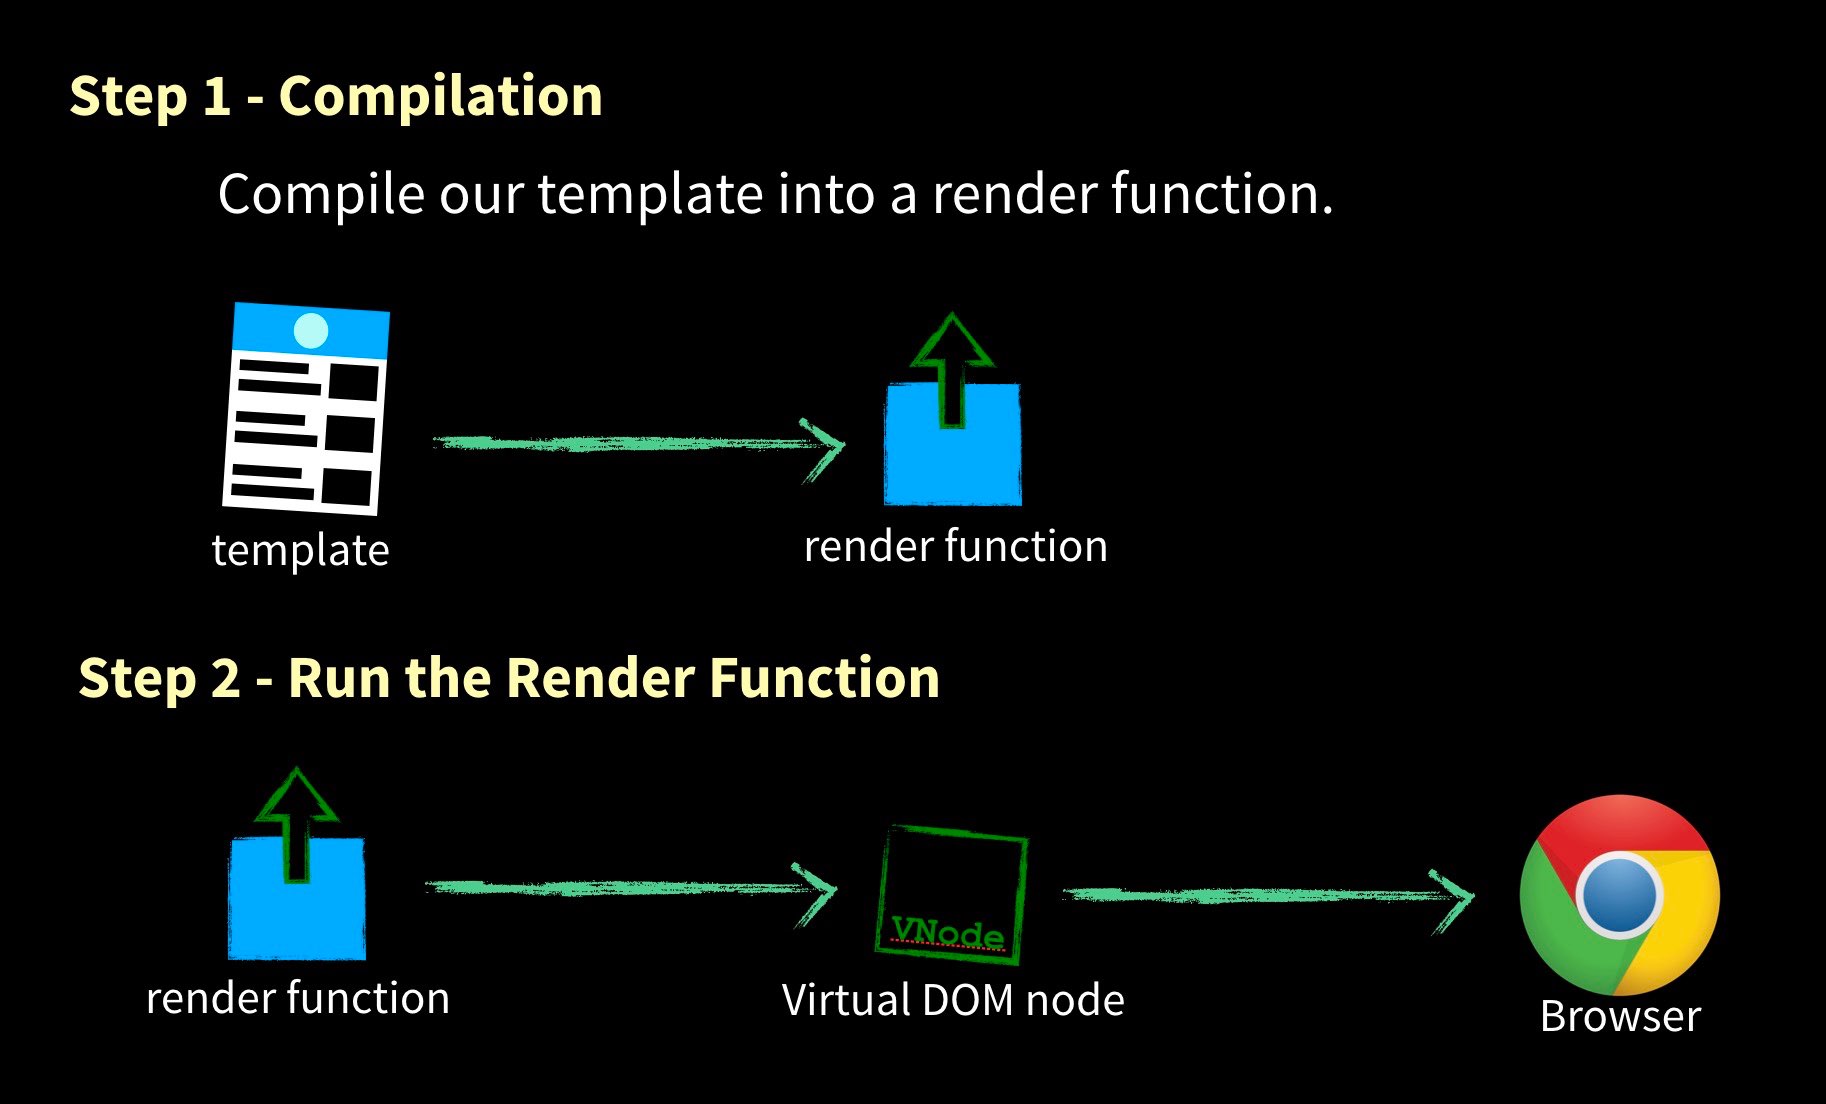
Step 1 - Compilation
As you see above, if we have a template it will need to get compiled into a Render function.
Step 2 - Running the Render Function
Whenever we need to render or re-render this component (like when dependencies change) we run the the Render Function.
Each time it returns a Virtual DOM node (Also known as a VNode ). This VNode can be used later to create or update parts of the actual DOM.
Using Vue CLI v2.x
If you’ve used the Vue CLI v2.x you’ve probably see this prompt before:

What this is really asking is:
For what gets sent to the browser, do you want to include the code that is able to compile templates?
If I select Runtime + Compiler the Vue.js source file that my application will ship with will be ~32kb mininfied and compressed, and if I select Runtime-only the Vue.js file my application will ship with will be ~22kb mininfied and compressed. The compiler code which knows how to take templates and turn them into render functions is about ~10kb.

So, if I pick Runtime-only I must put all my templates in .vue files, which will get compiled into render functions at build time.
CLI v3.x defaults to Runtime-only, and doesn’t ask if you want to ship the compiler or not. This makes sense as most production Vue.js applications will compile templates on the server-side for the speed improvement.
This leads to our next question:
What does a render function look like, what is a VNode, and what is this Virtual DOM thing?
You might already know this, and feel free to skip this section if you do. The DOM or Document Object Model refers to our browser’s interface (API) to change what gets displayed on the screen. Each HTML document is a series of nodes (like below) that we can manipulate using code which then updates what the user sees.
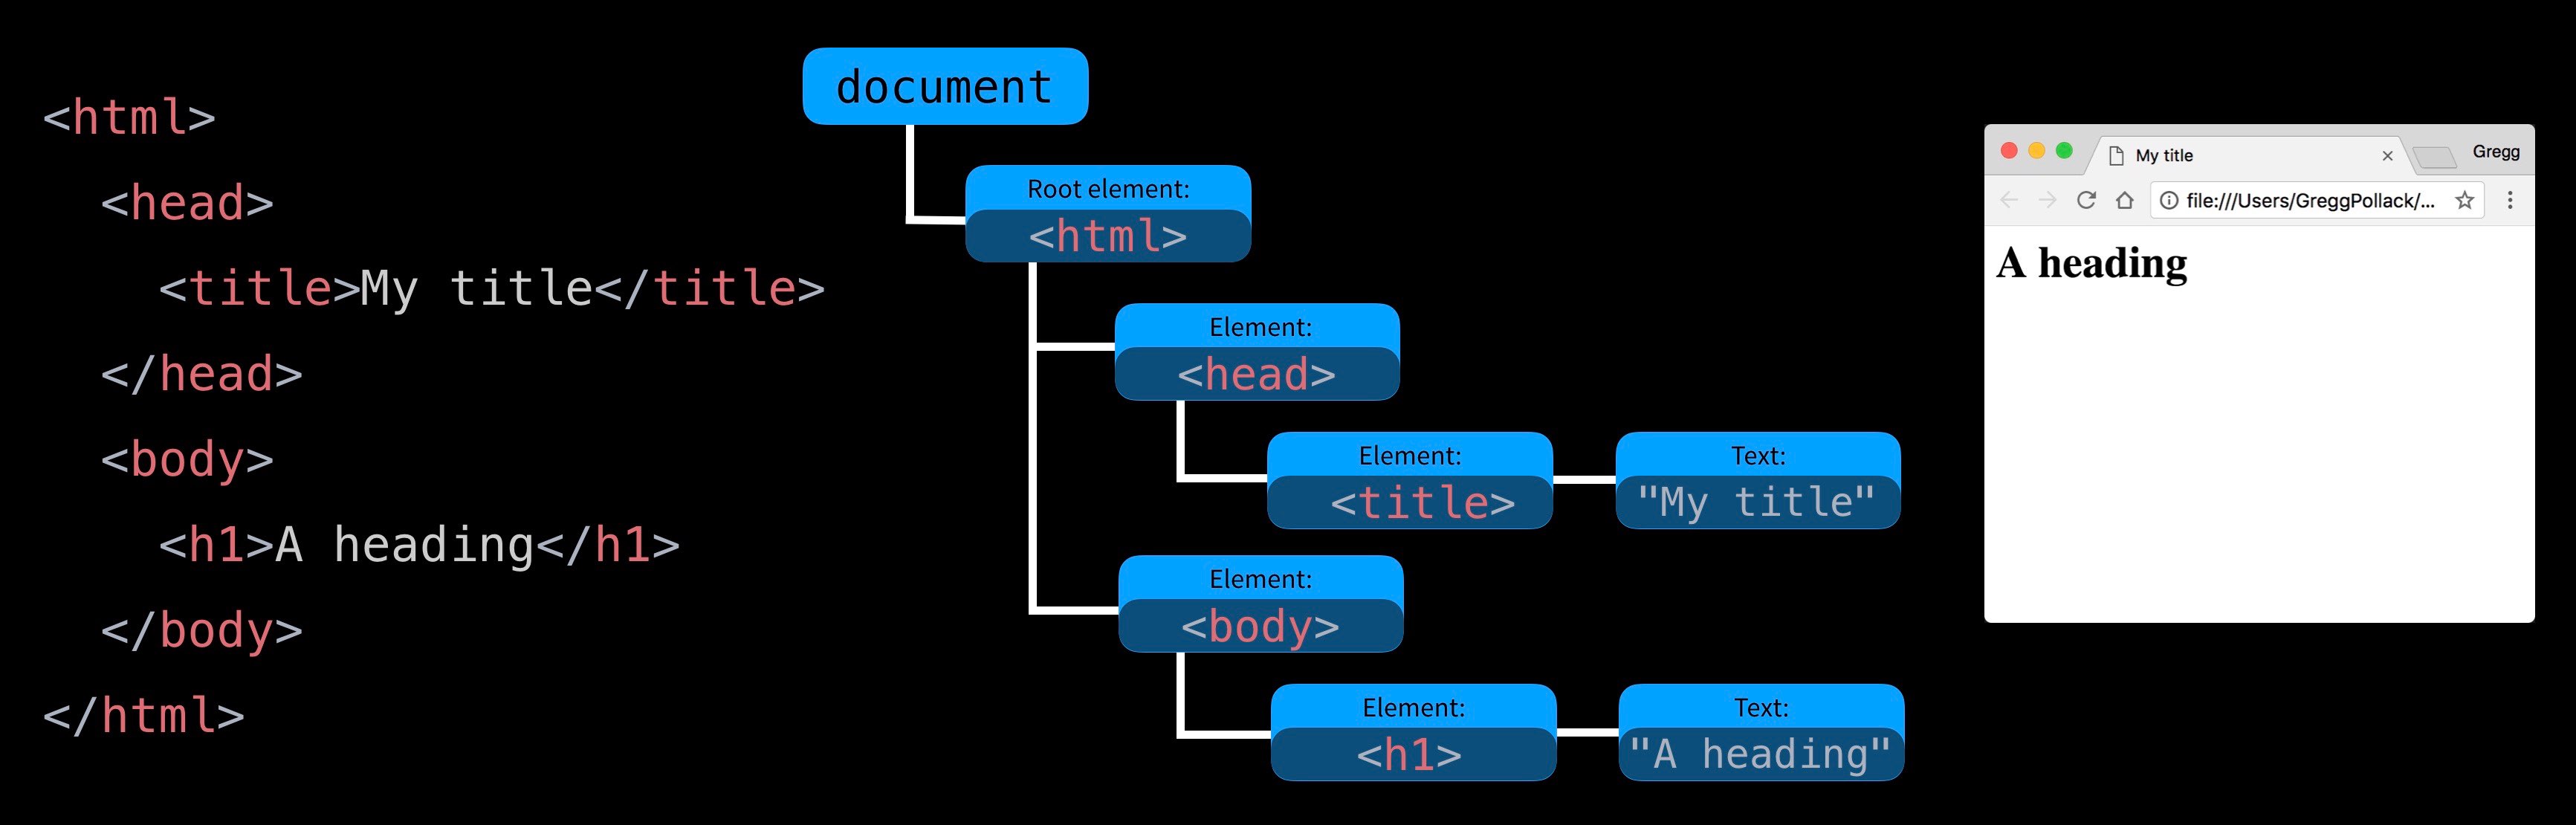
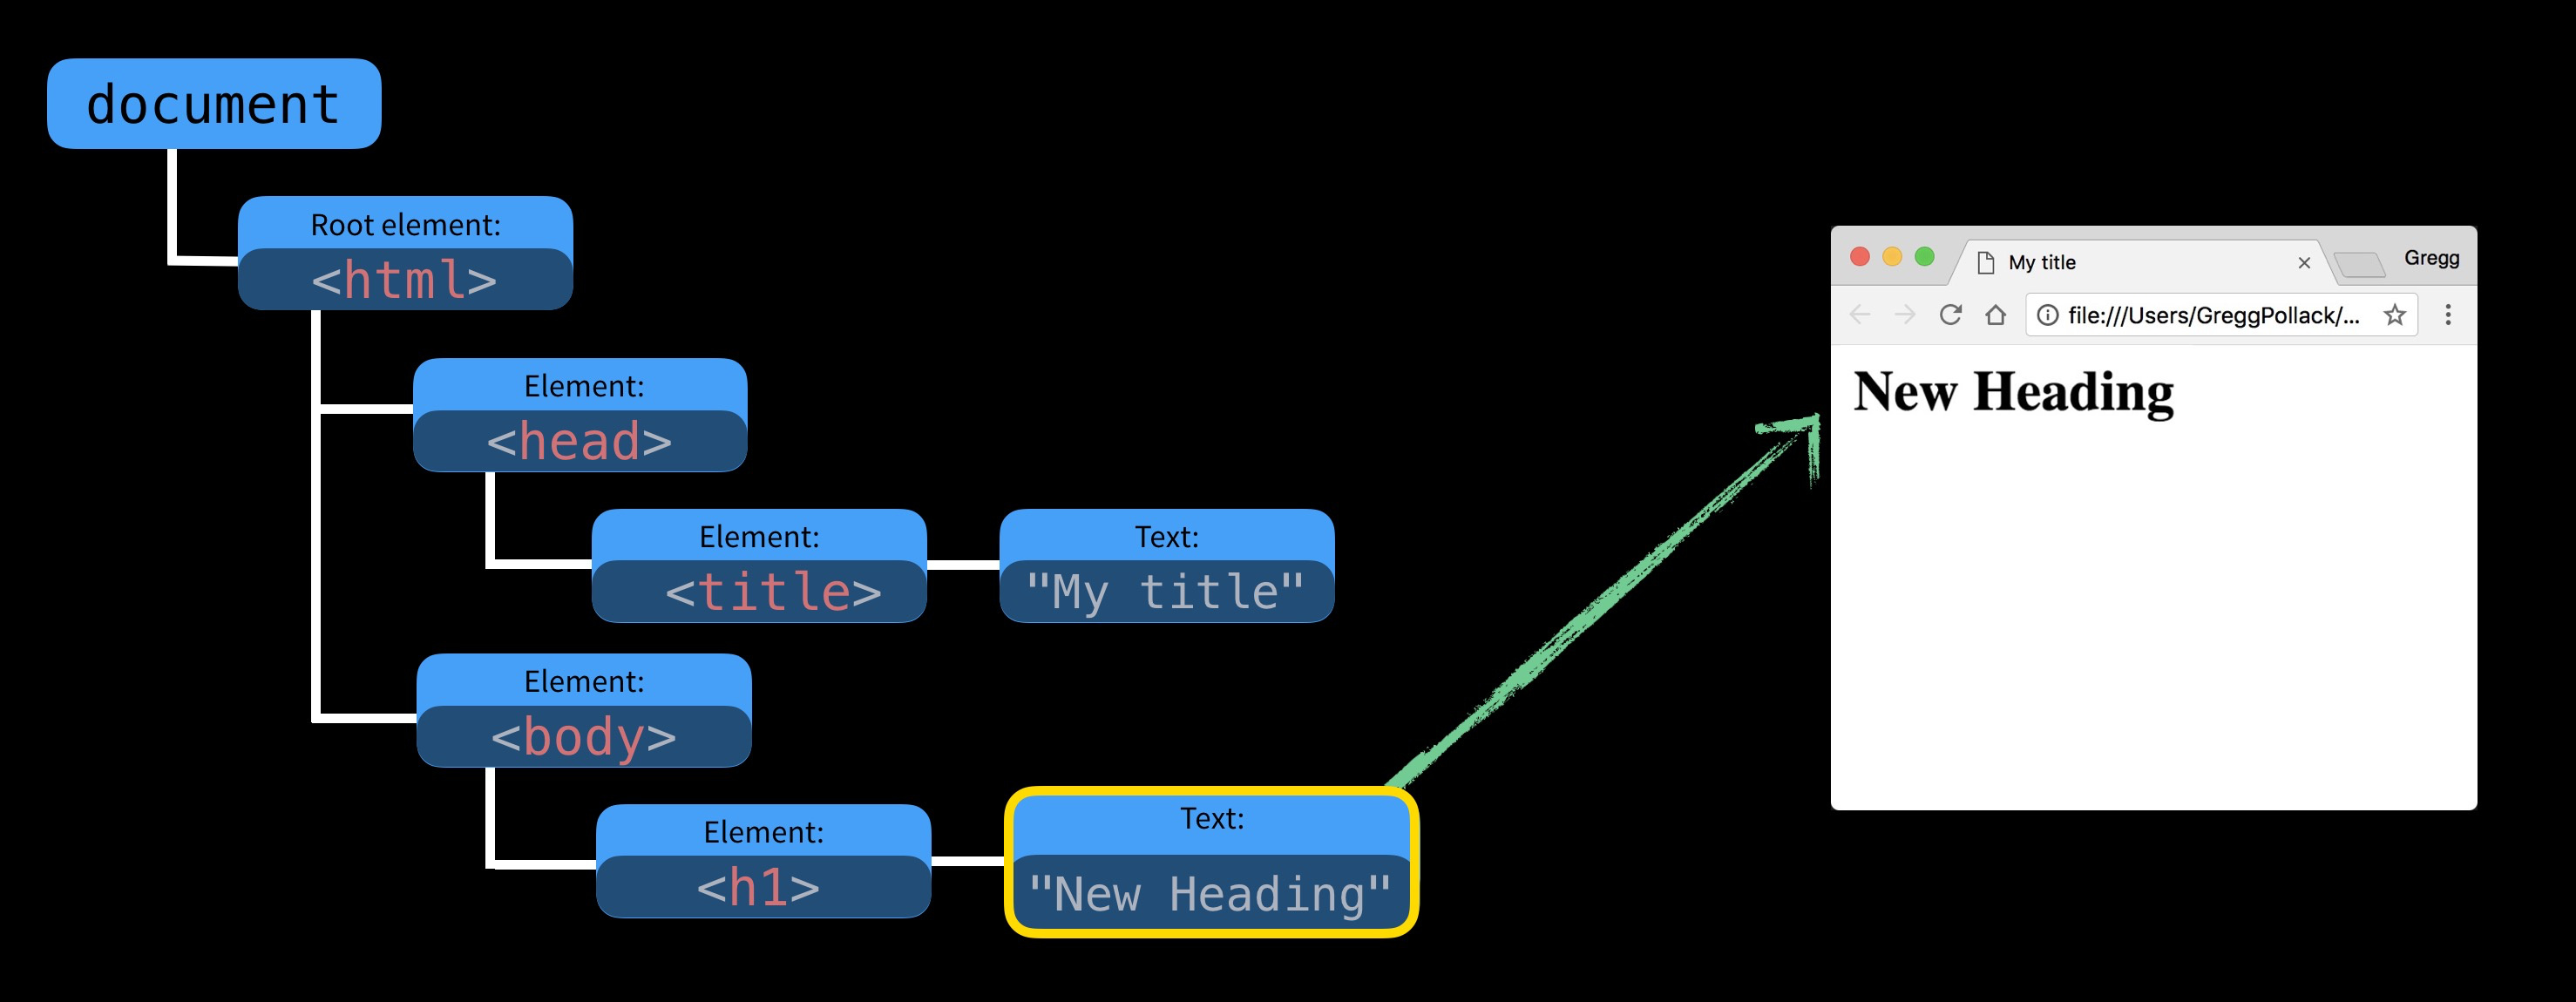
When we run the following code against the webpage, what happens?
    var item = document.getElementsByTagName("h1")[0];
    item.textContent = "New Heading";
When we run this JavaScript we use the DOM API to get all the elements with the h1 tag, get the first one [0] , and set the textContext value of that node to New Heading . This updates the DOM and what gets shown in our browser changes.
DOM trees can be huge and have thousands of nodes. Luckily we don’t have to run low level commands on the DOM anymore. We have frameworks (like Vue.js) that call this DOM API under the hood.
However, even with frameworks doing the heavy lifting searching and updating our DOM with thousands of nodes can be slow. This is one of the reasons the Virtual DOM was created. This is not unique to Vue.js, many frameworks have the concept of the Virtual DOM.
What is the Virtual Dom and what does it look like?
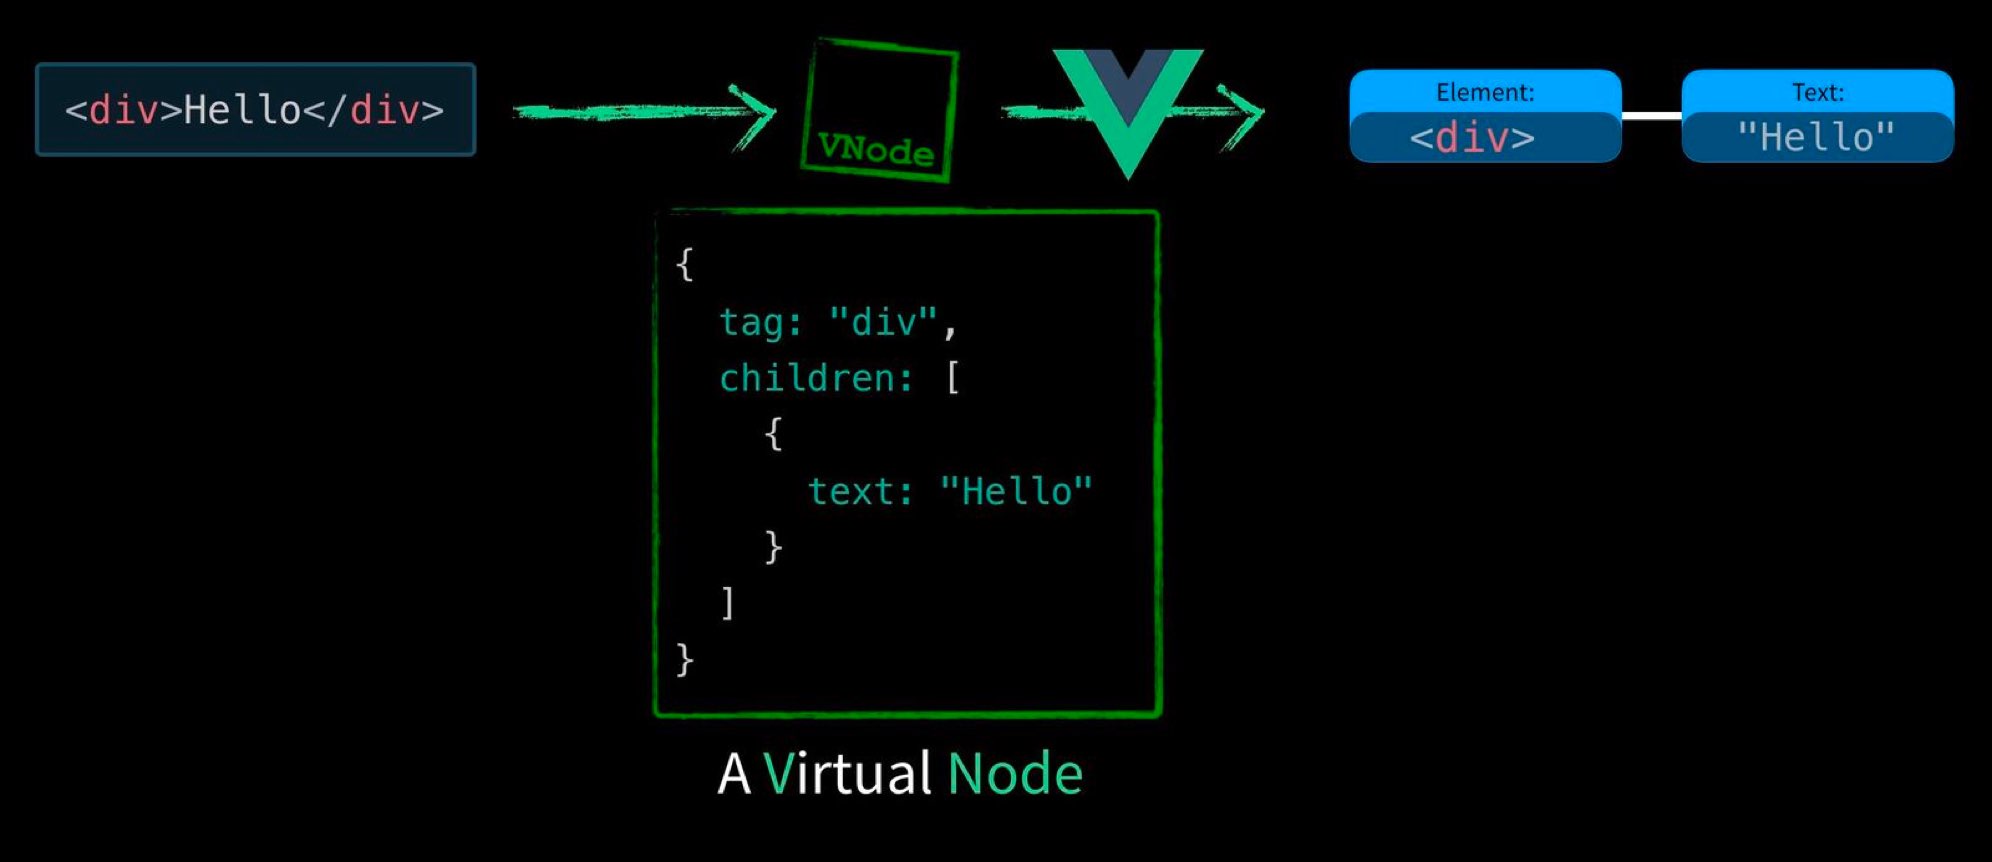
The Virtual DOM is a way of representing the Actual DOM, but with JavaScript objects. It’s a simpler abstraction of what we want to build onto our webpage. As you can see below, our html can be represented by a JavaScript object, also know as a virtual DOM node (or VNode ): When we’re ready to insert this into the actual DOM for the first time, our framework (Vue) knows how to take VNodes (like the one above) and very efficiently build actual DOM elements.
Later if a piece of data changes (like our text) it could trigger our render function to run again, creating another VNode. Vue then knows how to diff the new VNode from the old VNode and make updates to the actual DOM in the most efficient way possible.

The Blueprints to our Building
You can think of the Virtual Dom as the blueprints to our building (the actual DOM).

When we change some data on the 29th floor of our building, like moving the furniture around and adding a new kitchen island, we have two options:
- Demolish everything on the 29th and start from scratch.
- Create new blueprints, compare the old and new blueprints, and make updates.
Obviously, I want to do the minimal amount of work, the latter.
Walking through an App
If we have the following code:
    <div id="app"></div>

    <script src="vue.js"></script>
    <script>
    var app = new Vue({
      el: '#app',
      template: '<div>hello</div>' // <-- There's our template
    })
    </script>
The render function that gets generated from the above looks something like this (simplified)
    app.$options.render = (createElement) => {
      return createElement('div', 'hello')
    }
When this render function is called, it returns the following JavaScript object (or VNode)
    {
      tag: "div"
      children: [
        {
          text: "Hello"
        }
      ]
    }
How can we create our own Render Function
One of the ways Vue.js is flexible is by letting us create own render functions (instead of using a template which gets compiled). We might have a component that looks like this:
    <div id="app"></div>

    <script src="vue.js"></script>
    <script>
    var app = new Vue({
      el: '#app',
      render(createElement) {  // Here's the render function
        return createElement('div', 'hello')
      }
    })
    </script>

Notice we defined our render function. It called createElement(‘div’, ‘hello’) which returned a VNode that looks like this (when you remove all the extra null properties):
    {
      tag: "div"
      children: [
        {
          text: "Hello"
        }
      ]
    }
Looks familiar right?
The h() method
Another way you might see this render function written is:
      render(h) {  // Here's the render function
        return h('div', 'hello')
      }
When you’re working with a virtual DOM, it’s a common convention to alias createElement to “h”, which really just stands for Hyperscript. You may already know that HTML stands for"hyper-text markup language," and in this case “Hyperscript” stands for “script that generates HTML structures.”
When does the VNode get inserted into the DOM?
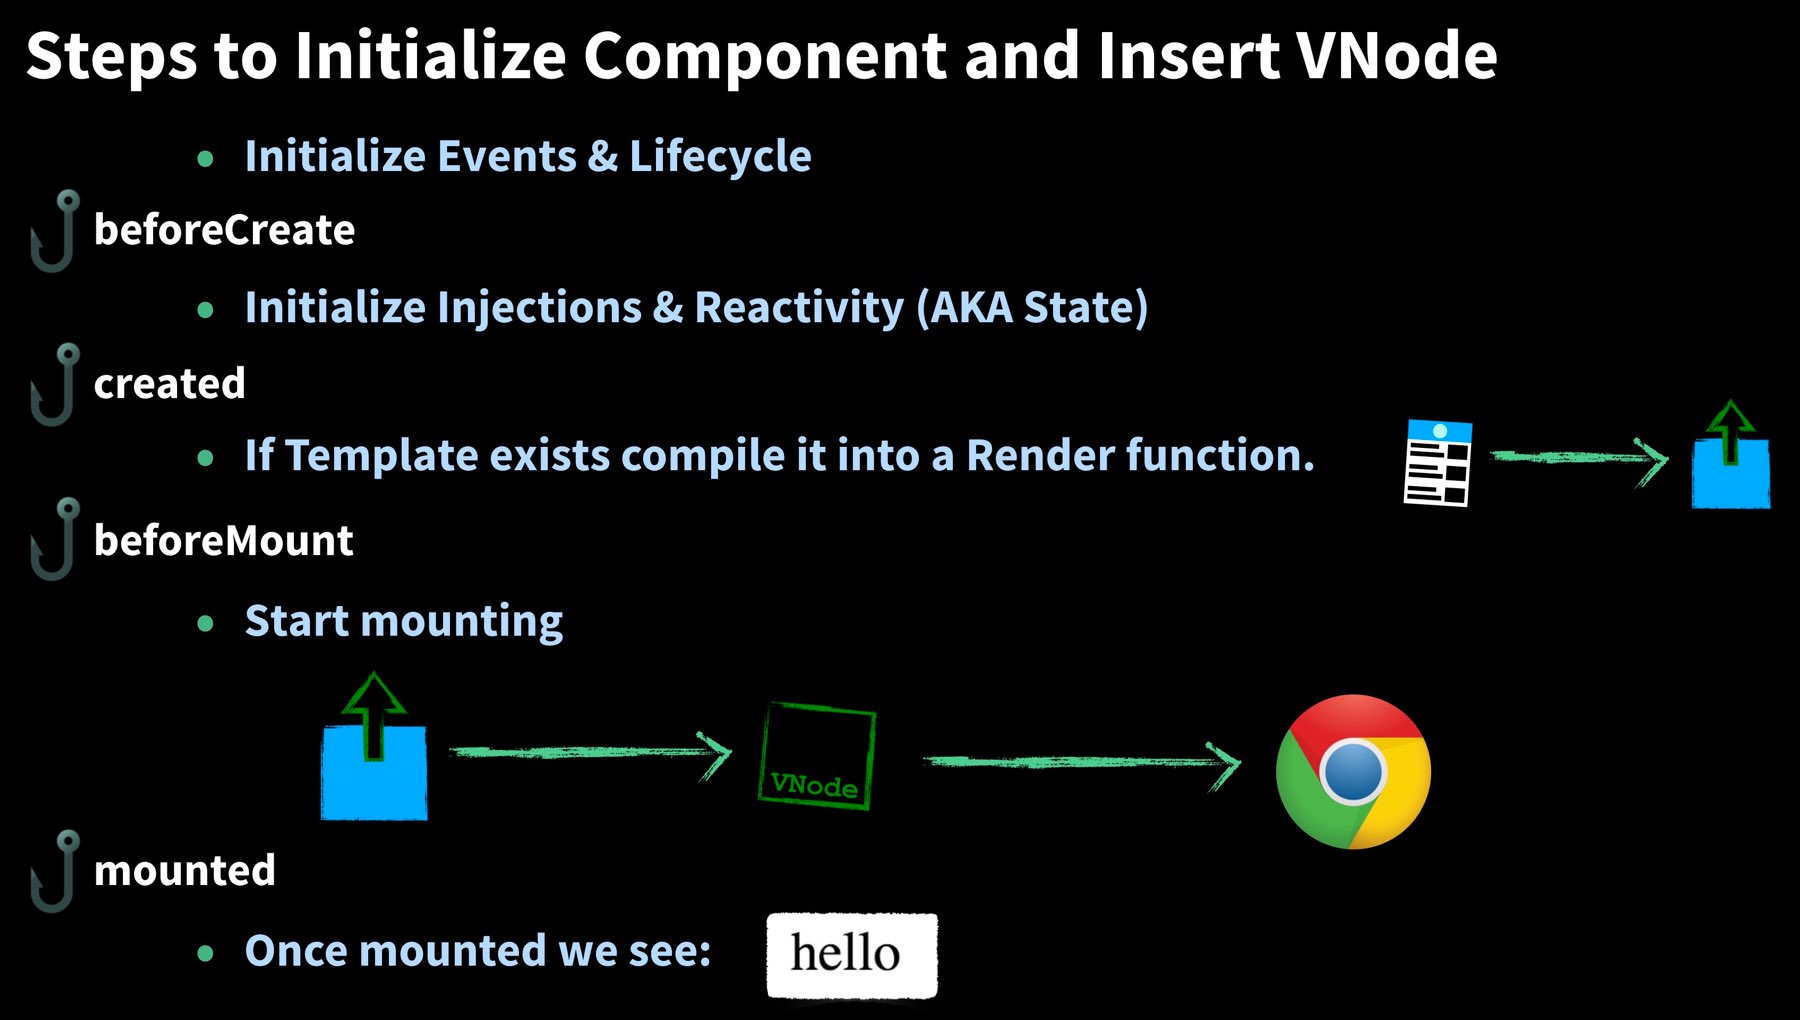
Well, we first initialize our Component it goes through these steps:
- Initialize Events & Lifecycle
- Initialize Injections & Reactivity (AKA State)
- If template exists compile it into a Render function.
- Start mounting - This refers to the process of calling the render function which returns the VNode, fetching the EL (in our case div#app), and mounting our VNode to the Actual DOM.
- Once mounted, we’ll see “hello” in our browser.
Now with the proper lifecycle hooks, this looks like:
Mounting with Reactivity and Rendering
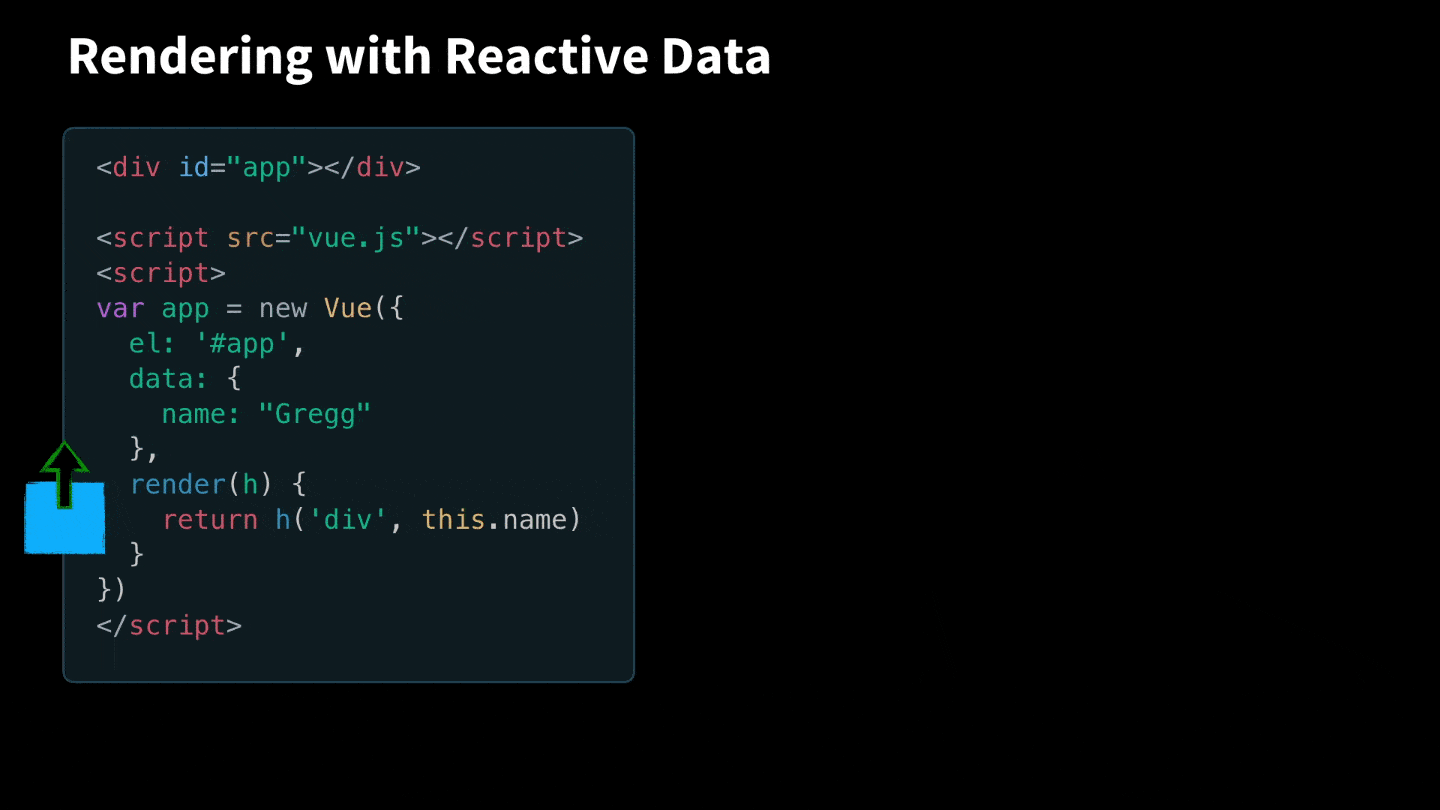
Remember in lesson 1 when we watched this code for reactive properties?
    watcher(() => {
      data.total = data.price * data.quantity
    })
In the Vue lifecycle.js codebase we find:
    export function mountComponent (...) {
      ...
      callHook(vm, 'beforeMount')
      let updateComponent = () => {
        vm._update(vm._render(), hydrating) // Notice our render function is called
      }
      new Watcher(vm, updateComponent, noop, null, true)
      // Here's our watcher which will call render, and while it's calling render it will be listening for reactive properties.
So if we are rendering with reactive data, here’s how it all starts to work together:
If we already have the component loaded onto the page, and we change the reactive data, like on the console, here’s what we see:
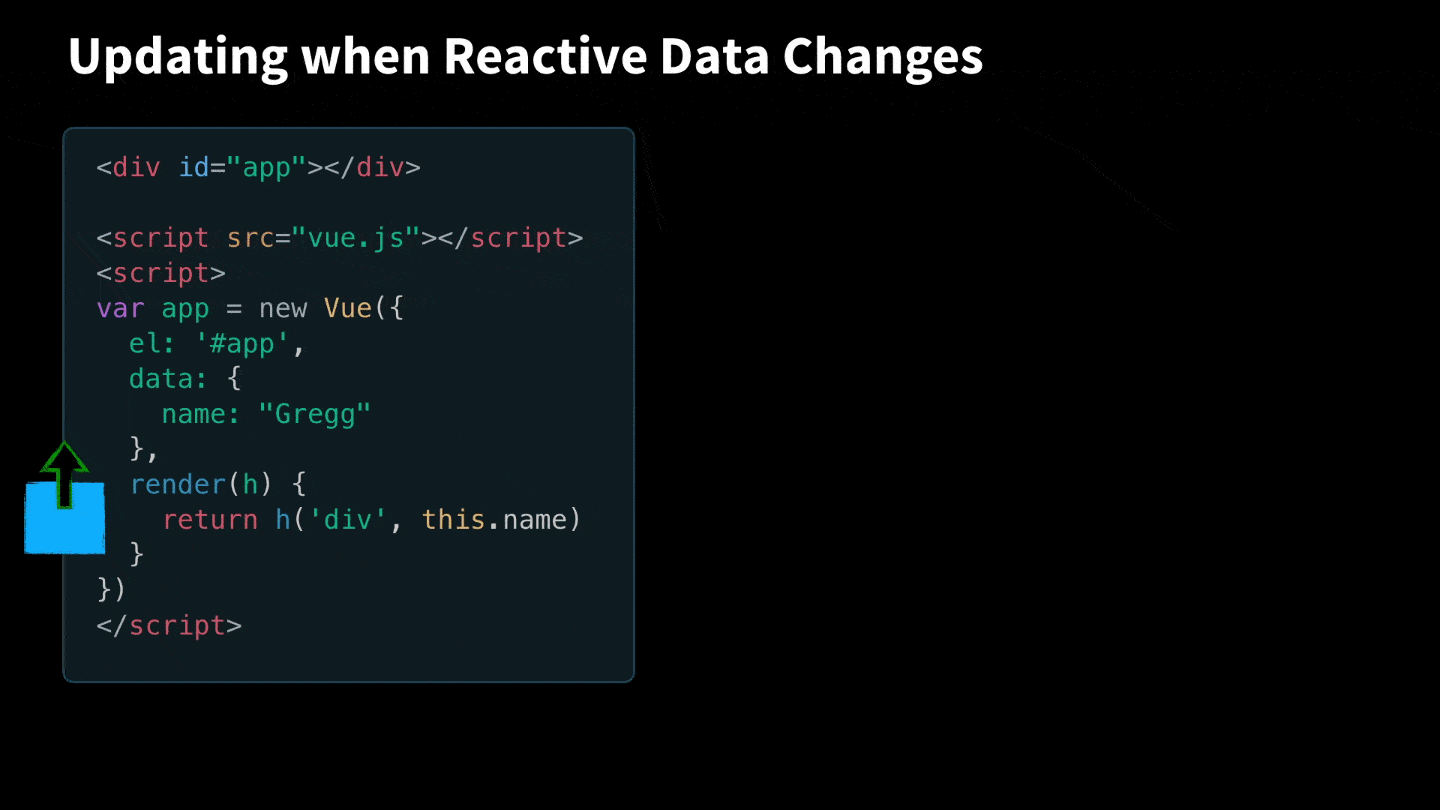
This image should make a little more sense now, this time with annotations.
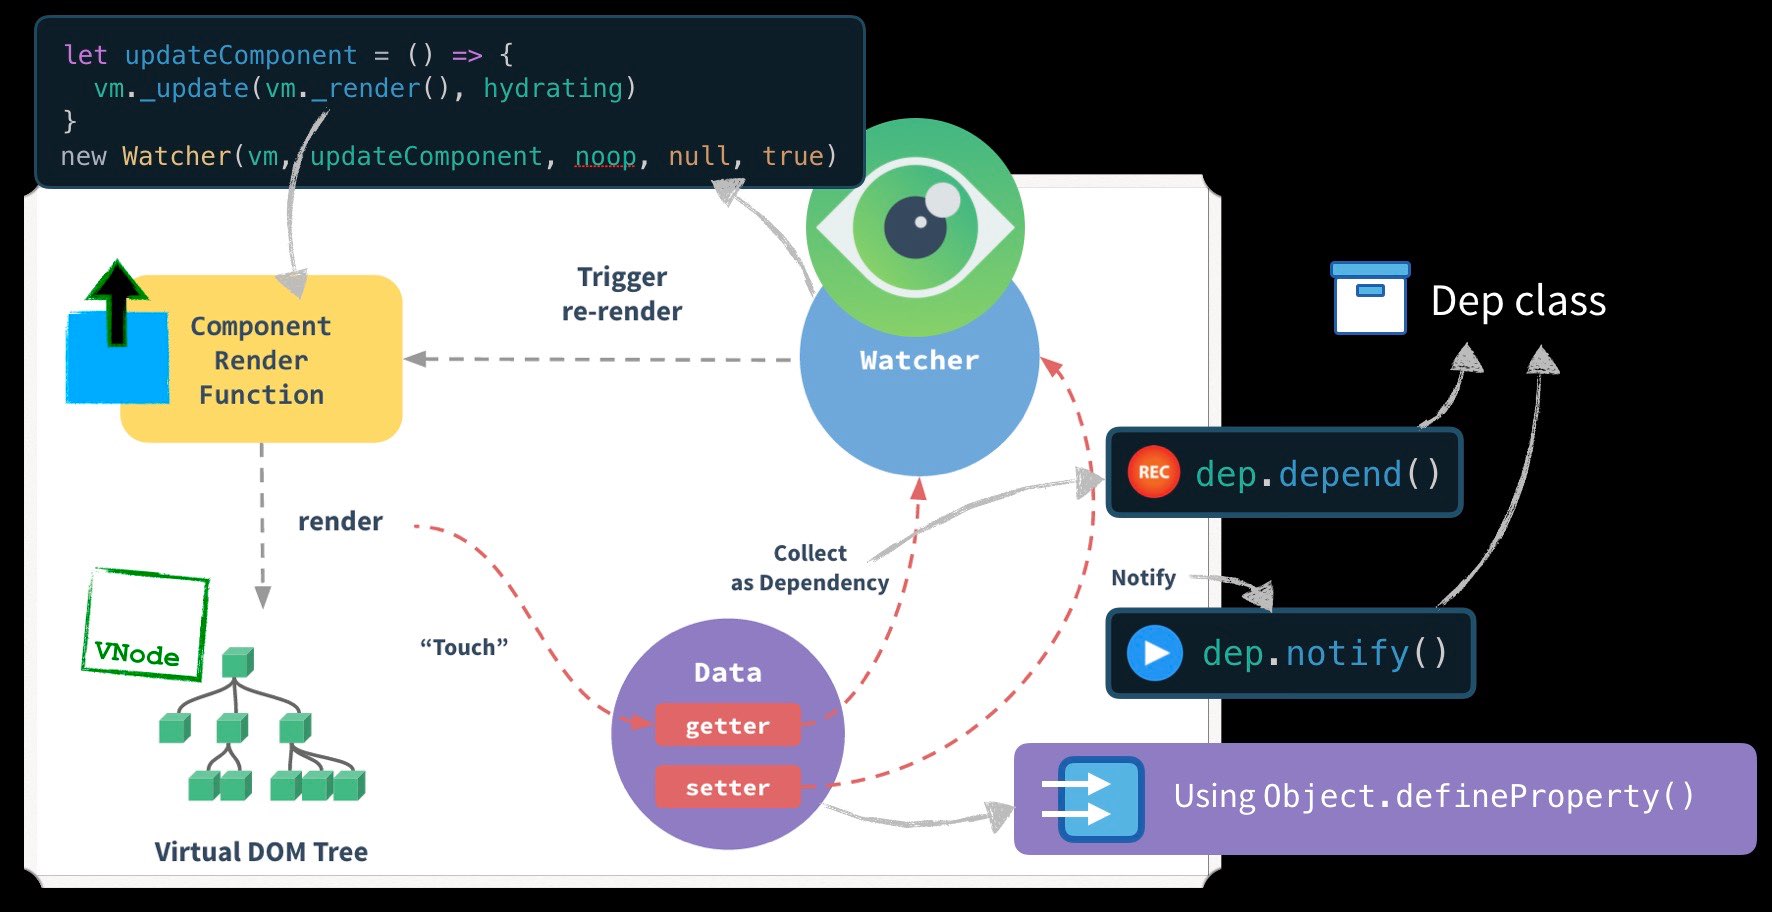
Notice how it’s the render function that is triggered by the Watcher when one of the reactive properties gets changed. Do you see how the Component render function returns the Virtual Dom Node? Yes it says “Virtual DOM Tree”, our VNode could have a tree of nodes as children, so it’s not wrong.
More createElement syntax options
There’s lots of creative ways to leverage the power of the render function, and our trusty h method. Here are a few simpler examples:
      render(h) {
        return h('ul', [
                      h('li', 'Gregg'),
                      h('li', 'Adam'),
                      h('li', 'Melissa')
                    ])

As you can see, if the second parameter is an array, it’s children nodes.
What do you think this would render?
      render(h) {
        return h('div',
                    {
                      attrs:
                        {
                          id: 'people'
                        },
                      class: 'sideBar'
                    },
                    "Gregg and Chase")
      }
It renders:
<div id="people" class="sideBar">Gregg and Chase</div>
The second argument has now become a data object where we can send in attributes that we would use in a template. The third argument just creates text. The Vue docs detail all the options you have in this data object.
Adding JSX
If you’re coming from the React world you might already be familiar with JSX. It’s a preprocessor that adds XML syntax to JavaScript. With the help of this Babel plugin you could use JSX to write a render function like:
      render(h) {
        return (
          <div id="people" class="sideBar">Gregg and Chase</div>
        )
      }
If you prefer this type of syntax for writing templates, now you know how!
A Template Limitation Example
As I mentioned at the start of this lesson, one use-case for using the render function is when you run into a limitation with the template engine. In the Vue documentation they walk through the following problem:
Problem: I want to have an <h#> tag, with the # being supplied out of the database.
So maybe I want to do this:
    <div id="app">
      <custom-header :level="mylevel">Hey there</custom-header>
    </div>
    <script src="vue.js"></script>
    <script>
    Vue.component('custom-header', {
      props: ['level'],
      render: function (h) {
        return h(
          // In here we want to write the code that will result in:
          // <h1>Hey there</h1>
        )
      },
    })
    new Vue({
     el: '#app',
     data: {
         mylevel: 1, // This could be dynamic
     }
    })
Using what we know so far we can easily use a render function to dynamically output the tag.
      render: function (h) {
        return h(
          'h' + this.level,   // tag name
          this.$slots.default // array of children
        )
      },

And we get exactly what we’re looking for, now with a dynamic tag name. Definitely check out the documentation to see the full use-case.
Sending in a Component to Render
Sometimes we may want to render a component inside our render function. If we send an object into the first argument of our “h” function it will automatically treat that object as options for a component. Like so:
    <div id="app"></div>
    <script src="vue.js"></script>
    <script>
    const GreetComponent = {
      template: '<h2>Hello There</h2>'
    }
    var app = new Vue({
      el: '#app',
      render(h) {
        return h(GreetComponent)
      }
    })
    </script>

We can create some powerful design patterns by having access to this render function, which we’ll see in the next few lessons. It’s also something you’ll encounter when using component libraries with Vue, so it’s good that you know the basics now.
Evan You on the Virtual DOM
If you watched the previous lesson then you’re familiar with the workings of template compilation and Virtual DOM (VDom) in Vue. In this video Evan You, the creator of Vue, talks about the creation of the VDom, the present state, and the future.
Initial implementation
Evan credits snabbdom, a VDom library which he forked to create Vue’s VDom. Snabbdom is simple, performant, extensible, and has a modular architecture.
The modular design helps separate concerns into modules such as style, classes, and attributes. This makes it easy for Vue to have its own modules to handle directives and ref. It also allows for the construction of a different patch functions with modules that target different platforms. This enables Vue to be platform agnostic and is what enables alternate platform implementations like Weex and Nativescript.
Improving the current Virtual DOM implementation
The Vue team wishes to further trim down the current implementation of the VDom to enable performance improvements.
The image above shows how the compilation phase can be further optimized for additional performance by doing static analysis amongst other improvements. Evan compares this to GNU Compiler Collection providing optimization levels to create a better assembly.
This way the template syntax can remain the same while the underlying implementation can be iteratively optimized over time.
Question: Do we really need a virtual DOM?
The VDom certainly comes with its own trade-offs. Abstracting the browser DOM into a virtual representation does make things slower when you compare it to directly updating the DOM.
Solution: The power of render functions
Evan clarifies that we need the VDom because of the power of render functions, where you get access to the power of JavaScript. Render functions can be used to create:
- Functional wrapper components
- Higher order components containing complex arbritrary logic
The view.js of the Vue Router is a perfect example of the power of render functions.
Up next
In the next lesson we’ll have a closer look at functional components and their usage.
Functional Components
In the previous lesson we learned how to create render functions. With this new super power there are two patterns you can use. The first, which we’ll dive into this lesson, is a functional component which allows you to:
- Create fast-loading presentational components
- Create wrapper components
You could think of it like a Component on a diet. Perhaps we want a custom header just for presentational logic and we decide to write it using a render function:
    <div id="app">
      <big-topic>
        Hiking Boots
      </big-topic>
    </div>

    <script src="vue.js"></script>
    <script>
      Vue.component('big-topic', {
        render(h) {
          return h('h1', 'Topic: ' + this.$slots.default)
        }
      })

      new Vue({
       el: '#app'
      })
    </script>
Notice how we’re accessing the default slot, using this.$slots.default .

Using a normal Component for this presentational Component is a little overkill. This is where functional components start to shine:
A Functional Component:
- Can’t have its own data, computed properties, watchers, lifecycle events, or methods.
- Can’t have a template, unless that template is precompiled from a single-file component. That’s why we used a render function above.
- Can be passed things, like props, attributes, events, and slots.
- Returns a VNode or an array of VNodes from a render function. Unlike a normal component that has to have a single root VNode, it can return an array of VNodes.
As you might imagine (without less functionality) a functional component is a little faster. We can make a functional component by simply adding the option:
    Vue.component('big-topic', {
      functional: true,  // <-----
      render(h, context) { // Notice the new context parameter
        return h('h1', context.slots().default)
      }
    })
Notice how we now use the context parameter to access slots? This context argument is how we get access to to things like props, children, data, parent, listeners, and slots inside a functional component since we no longer can use this . The official Vue documentation goes into more detail.
If we’re using Vue’s single file components we can declare a functional components at the template level. Here is the above example as a single file component:
    <template functional>
      <h1>
        <slot></slot>
      </h1>
    </template>
Yes, that could be the ONLY content in your .vue file. No export default, no props, no data, no methods, and it will just render out the template. This is great for presentational templates .
Functional Wrapper Components
Functional components are great to use when you need a way of programmatically delegating to a specific component. The Vue.js documentation has a great example I’d like to walk you through, simplified first.
Let’s say you want to create a SmartTable component. If the list passed in is Empty render using one component, but if it’s not Empty use another component.
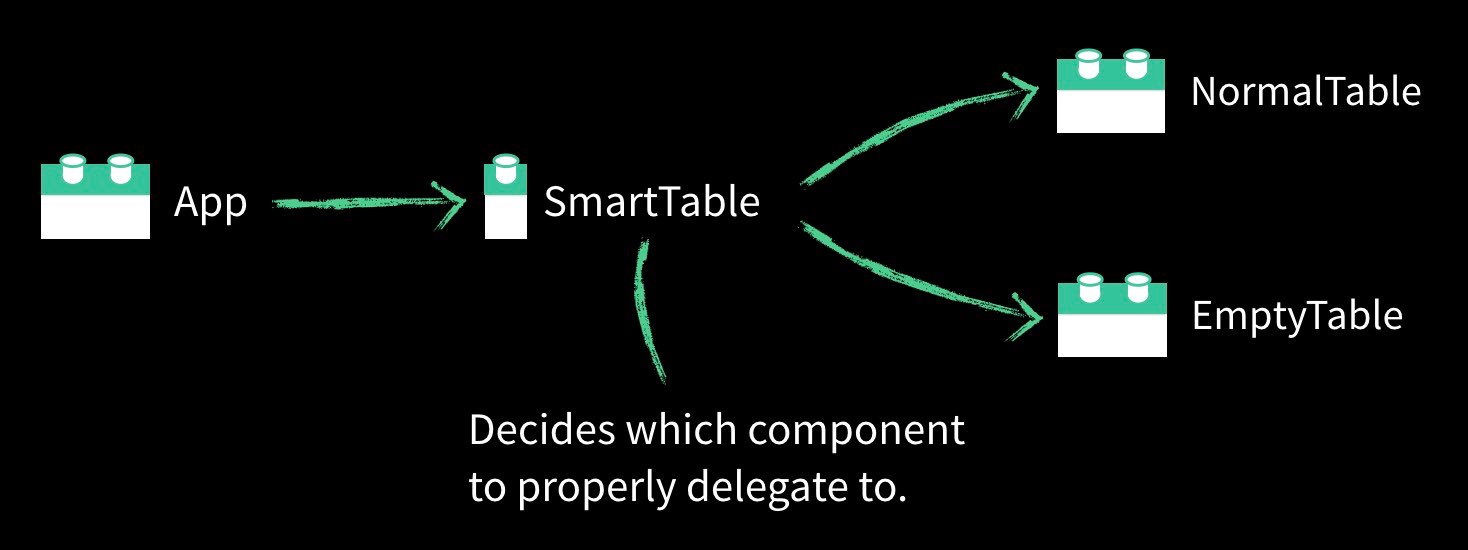
The SmartTable component only needs to know how to delegate, it doesn’t have to be very smart, so it’s going to be a functional component.
    <div id="app">
      <smart-table :items='vehicles'>
    </div>

    <script src="vue.js"></script>
    <script>
    const EmptyTable = {
      template: `<h1>Nothing Here</h1>`
    }
    const NormalTable = { // Normally this would be more complex
      template: `<h1>Normal Table</h1>`
    }

    Vue.component('smart-table', {
     functional: true,
     props: { items: { type: Array } },
     render(h, context) {
       if (context.props.items.length > 0 ) {  // Delegate
         return h(NormalTable, context.data, context.children)
       } else {
         return h(EmptyTable, context.data, context.children)
       }
     }
    })
    new Vue({
     el: '#app',
     data: {
      vehicles: [ 'Fiat', 'Toyota', 'BMW' ]
     }
    })
    </script>
As you might expect, when the vehicles Array is empty we see the EmptyTable, and when it has one or more item it displays the Normal Table:

With the h(NormalTable, context.data, context.children) line we’re rendering the component and passing through all our data which includes attributes, event listeners, and props so Normal table will have access to them.
Aside: Destructuring Context
When you have a function which receives a JavaScript object as a parameter you can use ES6 destructuring to split it out into variables. It’s not uncommon to see people do this with the context object like so:
     render(h, { props, data, children }) {
       if (props.items.length > 0 ) {
         return h(NormalTable, data, children)
       } else {
         return h(EmptyTable, data, children)
       }
     }
As you can see, the code gets a little simpler.
The More Complex Example
The example in the Vue documentation is a more complex version of what we have above. Instead of having just two different components to render our list, we have four in our smart-table. Take a read:
    // Here are the four components we're delegating to

    var EmptyList = { /* ... */ }
    var TableList = { /* ... */ }
    var OrderedList = { /* ... */ }
    var UnorderedList = { /* ... */ }

    Vue.component('smart-list', {
      functional: true,
      props: {
        items: {
          type: Array,
          required: true
        },
        isOrdered: Boolean
      },
      render: function (createElement, context) {

        // This function returns which component to use to render
        function appropriateListComponent () {
          var items = context.props.items

          if (items.length === 0)           return EmptyList
          if (typeof items[0] === 'object') return TableList
          if (context.props.isOrdered)      return OrderedList

          return UnorderedList
        }

        // Now call the appropriate component.
        // Remember that h is short-hand for createElement
        return createElement(
          appropriateListComponent(),
          context.data,
          context.children
        )
      },

    })
As you can see, our functional component just wraps around our other four components.
When you need some sort of wrapper or delegating component, and you care about speed, a functional component might be the best way to go. In our next lesson, we’ll dive back into the Vue.js source to figure out more internals of the rendering and mounting process.
Evan You on Functional Components
In the previous lesson we learned about functional components. In this bonus lesson with Evan You, the creator of Vue, he explains the power of functional components and its use-cases.
Why Functional Components are Powerful
Evan explains how functional components are cheaper to render because they don’t have a Vue instance associated with them. Rather than creating a new Vue instance, they create an extra Virtual Node.
Let’s say we have 100 items on a list on our webpage, each consisting of 3 base button components (Ex. could be show/edit/delete). This could add up to 300 Vue instances. If we refactor the base button components to be functional components, we save 300 instances from being instantiated, which in turn means less javascript to execute and less memory to allocate (everything runs faster).
Major Use Cases
Evan specifies two major use-cases for functional components:
- Cheap leaf components that can be reused without the cost of instantiation stateful component (like above).
- Functional wrapper components.
As we saw in the previous lesson, a functional wrapper component helps us delegate to other components programmatically. Evan points out a great example of a functional wrapper component in the Vue-Router library, the router-view. This functional component looks at the current route and decides which component to render.
The Mounting Process
In previous lessons we looked at the Vue internals for reactivity and rendering, but we didn’t talk about the mounting process. Learning more about how this works will help improve our understanding of the Vue internals and improve our debugging skills.
Remember the mountComponent function?
  export function mountComponent (...) {
    ...
    callHook(vm, 'beforeMount') // <-- Lifecycle hook

    let updateComponent = () => {
      vm._update(vm._render(), hydrating)  // <-- This is our target method
    }
    new Watcher(vm, updateComponent, noop, null, true) // <-- Our watcher, which runs our target method, and reruns it when needed
    ...
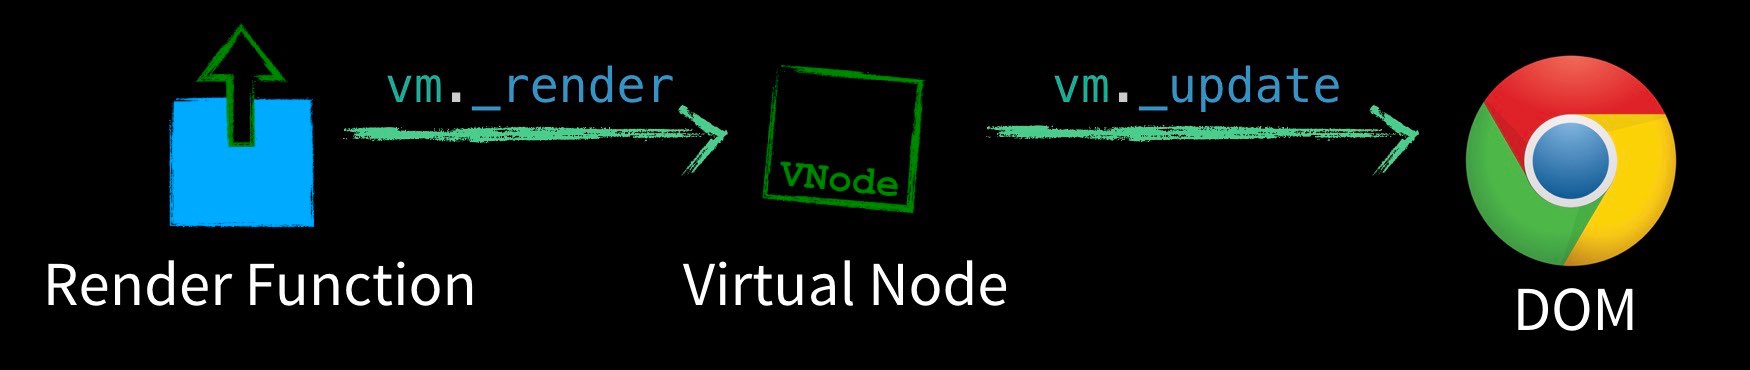
_render calls our component render function which returns a Virtual Node (VNode), and _update knows how to take that VNode and make updates to the actual DOM.
But that doesn’t answer the following questions:
- Where is
mountComponentactually called? - Where does a template get compiled into a render function?
- What does
_renderdo? - What does
_updatedo?
In this lesson we will do our best to answer these questions starting with the first, by looking for mountComponent . Our search starts back in our _init method that should look familiar by now:
/src/core/instance/index.js
export function initMixin (Vue: Class<Component>) {
  Vue.prototype._init = function (options?: Object) {
    const vm: Component = this
    ...
    // expose real self
    vm._self = vm
    initLifecycle(vm)
    initEvents(vm)
    initRender(vm)
    callHook(vm, 'beforeCreate')
    initInjections(vm) // resolve injections before data/props
    initState(vm)
    initProvide(vm) // resolve provide after data/props
    callHook(vm, 'created')

    if (vm.$options.el) {
      vm.$mount(vm.$options.el)  // <-- Where the template is compiled (if needed), and mountComponent must be eventually.
    }
  }
}
The definition of $mount is determined by the kind of Vue build we’re running, and if we look inside /scripts/config.js inside the Vue source we’ll see a bunch of builds, including the following two:
/scripts/config.js
const builds = {
  // runtime-only build (Browser)
  "web-runtime-dev": {
    entry: resolve("web/entry-runtime.js"), // This mount only includes the code to run render functions.
    dest: resolve("dist/vue.runtime.js"),
    ...
  },
  // Runtime+compiler development build (Browser)
  "web-full-dev": {
    entry: resolve("web/entry-runtime-with-compiler.js"), // includes code to compile templates into render functions and run them
    dest: resolve("dist/vue.js"),
    ...
  }
};
The definition of $mount we’re calling in this walkthrough can be found inside entry-runtime-with-compiler.js and is listed below. We want both the runtime and the compiler, because in our example we’ll be both compiling our templates into render functions and rendering them. Remember, if we’re pre-compiling our templates then our user’s browser doesn’t need to know how to compile, and our $mount would be different.
/src/platforms/web/entry-runtime-with-compiler.js
    const mount = Vue.prototype.$mount // This version of mount is defined inside runtime/index.js
    Vue.prototype.$mount = function (el?: string | Element, hydrating?: boolean): Component {
      el = el && query(el)
      const options = this.$options

      // Only compile a template if we don't already have a render function
      if (!options.render) {
        let template = options.template
        if (template) {  // do compilation in here!
          const { render, staticRenderFns } = compileToFunctions(template, { ...  }, this)
          options.render = render  // Now we have compiled .. see below
        }
      }
      // Call previously defined mount before returning
      return mount.call(this, el, hydrating)
    }
It’s our compileToFunctions call that converts our component template that looks like this:
template: `<h1>{{ this.name }}</h1>`
Into something that looks more like:
    {
    with(this){return _c('h1',[_v(_s(this.name))])}
    }
As you see above, this becomes the value of options.render, or more specifically this.$options.render . If our component has a render function, this step just gets skipped.
You might be wondering what the underscore methods are (_c, _v, and _s). Inside initRender we find this for _c:
vm._c = (a, b, c, d) => createElement(vm, a, b, c, d, false)
It calls our createElement function with the proper context. For the others if we look inside:
/src/core/instance/render-helpers.js
      target._o = markOnce
      target._n = toNumber
      target._s = toString // <-------
      target._l = renderList
      target._t = renderSlot
      target._q = looseEqual
      target._i = looseIndexOf
      target._m = renderStatic
      target._f = resolveFilter
      target._k = checkKeyCodes
      target._b = bindObjectProps
      target._v = createTextVNode // <------
      target._e = createEmptyVNode
      target._u = resolveScopedSlots
      target._g = bindObjectListeners
If we were to extrapolate our render function we’d have:
    {
    with(this){return createElement('h1',[ createTextVNode ( toString(this.name))])}
    }
Once we compile our render function and get to the bottom of our $mount call we find mount.call(this, el, hydrating) . This calls our previously defined $mount :
/src/platforms/web/runtime.js
    // public mount method
    Vue.prototype.$mount = function (
      el?: string | Element,
      hydrating?: boolean
    ): Component {
      el = el && inBrowser ? query(el) : undefined // Get or create the DOM element if we haven't yet
      return mountComponent(this, el, hydrating) // <-- Here's our mountComponent call!
    }
We found it, we found the mountComponent call which leads us back to lifecycle.js:
/src/core/instance/lifecycle.js
    export function mountComponent (
      vm: Component,
      el: ?Element,
      hydrating?: boolean
    ): Component {
      vm.$el = el
      ...
      callHook(vm, 'beforeMount')

      let updateComponent
      updateComponent = () => {
        vm._update(vm._render(), hydrating)
      }

      new Watcher(vm, updateComponent, noop, null, true /* isRenderWatcher */)

      hydrating = false
      return vm
    }
Remember the watcher from this diagram?
We send our updateComponent function into the watcher, and it takes care of invoking it for the first time. When it gets invoked you can see it first calls _render which returns the VNode (like in the diagram) and then calls _update which updates the actual DOM. This leads to our final two questions:
What are this _render() & _update() functions doing?
The _render function can be found inside instance/render.js:
/src/core/instance/render.js
    Vue.prototype._render = function (): VNode {
        const vm: Component = this
        const { render, _parentVnode } = vm.$options

        // set parent vnode. this allows render functions to have access
          // to the data on the placeholder node.
        vm.$vnode = _parentVnode
        // render self
        let vnode
        try {
          vnode = render.call(vm._renderProxy, vm.$createElement) // <--- Executes our render function, returning a VNode
        } catch (e) { ... }

        // set parent
        vnode.parent = _parentVnode
        return vnode
      }
See where our render function is called? This runs this render function which we compiled earlier:
    (function() {
      with(this){return _c('h1',[_v(_s(this.name))])}
    })
Since this.name is reactive, this is where our getter method gets invoked for the first time (from lesson 2 & 3), and we call dep.depend() .
If we had written our render function from scratch inside our component (like we did on lesson 4) this is where that function would get invoked.
Our render function returns a VNode and then our _update function gets called, found here:
/src/core/instance/lifecycle.js
      Vue.prototype._update = function (vnode: VNode, hydrating?: boolean) {
        const vm: Component = this
        if (vm._isMounted) {  // If we've already mounted this node on the DOM
          callHook(vm, 'beforeUpdate')
        }

        const prevVnode = vm._vnode // Store the previous VNode

        vm._vnode = vnode // set current vnode to the one we just generated and
                          // passed into the _update method

        if (!prevVnode) {
          // If no previous VNode then DOM node created and inserted
          vm.$el = vm.__patch__(vm.$el, vnode, hydrating, false, vm.$options._parentElm, vm.$options._refElm)
        } else {
          // Updates happen here.  Notice we're sending in the prevVnode and the new
          // one, so that the least amount of DOM updates occur.
          vm.$el = vm.__patch__(prevVnode, vnode)
        }
      }
As you can see with the comments I left above, _update eventually calls the __patch__ function, sending in the information it needs to change the actual DOM. The __patch__ function itself gets set based on what environment we’re in. Since we’re on the web, the following code get’s called:
/src/platforms/web/runtime/index.js
Vue.prototype.__patch__ = inBrowser ? patch : noop
We are inBrowser so this leads us to the path function:
/src/platforms/web/runtime/patch.js
import * as nodeOps from 'web/runtime/node-ops'
...
export const patch: Function = createPatchFunction({ nodeOps, modules })
And createPatchFunction leads us to the Virtual DOM or vdom library:
/src/core/vdom/patch.js
export function createPatchFunction (backend) { ... }
We’re not actually going to look inside the createPatchFunction , as that would be diving into the internals of how the Virtual DOM does it’s thing (we’d need another lesson for that). However, what’s interesting here is nodeOps which gets passed into it. nodeOps basically contains all of the functions needed to interact with the DOM, like these two:
/src/platforms/web/runtime/node-ops.js
export function createElement(tagName: string, vnode: VNode): Element {
  const elm = document.createElement(tagName);
}

export function createTextNode(text: string): Text {
  return document.createTextNode(text);
}
... // A bunch more
What’s interesting about the separation of the Virtual DOM and the operations needed to manipulate the actual DOM, is that you can begin to understand how you might add another entire platform… Like maybe Android? Pay attention to the folder paths:

I’ve been told that Vue isn’t quite this modular yet, and there are parts of core that still reference inBrowser . However, as Vue evolves I it will make it easier for this to be possible.
I hope this gives you a greater understanding of the Vue internals. If you haven’t yet, I highly encourage you to download the core source and take a read.
Evan You on the Mounting Process
In the previous lesson, we looked into the Vue mounting process. In this bonus lesson Evan You, the creator of Vue, gives us a tour of the source code relating to the mounting process and gives us a look forward into Vue 3.
Platform-Based Builds
Evan starts by acknowledging that Vue is designed to allow for multiple platforms. He shows us the source code for the web and weex platforms. He also discusses the relationship between the different builds in the platforms/web folder and how they correspond to the files generated in the dist folder.
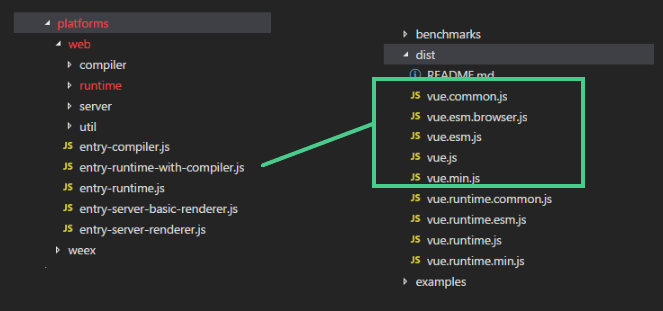
The entry-runtime-with-compiler.js is the full vue.js that is shipped onto the CDNs.
A Look into the Vue Runtime
Obviously, display operations from one platform to the next are different, and that’s why we have them in different directories. The code present in platforms/web/runtime is expected to be executed in the browser only. The modules like class, attrs, dom-props etc anticipate the presence of the window object and DOM APIs.
The vue directives like v-show and v-model have their own implementation to deal with CSS and all the browser inputs respectively.
The weex implementation in platforms/weex also follows the same folder structure, but calls to native rendering engines (Android or iOS) to perform the operations.
The Patching Algorithm
Evan points out to an important line of code in platforms/web/runtime/index.js
    // install platform patch function
    Vue.prototype.__patch__ = inBrowser ? patch : noop
This is the virtual DOM patch algorithm. The patch function is imported from platforms/web/runtime/patch.js. This is created by calling createPatchFunction() .
    // platforms/web/runtime/patch.js
    import * as nodeOps from "web/runtime/node-ops"; // <-- the operations needed to be performed on virtual DOM

    import { createPatchFunction } from "core/vdom/patch"; // <-- the platform agnostic factory function for creating patch algorithm

    import baseModules from "core/vdom/modules/index";
    import platformModules from "web/runtime/modules/index"; // <-- browser only modules needed by patch algorithm

    const modules = platformModules.concat(baseModules);
    export const patch: Function = createPatchFunction({ nodeOps, modules });
The createPatchFunction() is a factory function that takes two arguments:
-
nodeOps: the operations needed map the Virtual Dom onto the platform display (i.e. Actual DOM or Android). For example in the web nodOps, the DOM APIs are used inside these operations (think
document.createElement). - modules: the list of modules needed to be injected for the diffing and patching of VNodes.
We can inject custom nodeOps and custom modules into the createPatchFunction to create our own patching algorithm. This is how you’d use Vue for platforms other than the web. In the Vue source you can see how Weex is injecting their own nodeOps and modules .
Scope for improvement
At the moment there is platform-specific code inside Vue Core (Web & Weex). As you might imagine, this is not separating concerns optimally. In Vue 3, Evan states that he would like to provide a first class renderer API and separate this code from Vue core. This would make it easier for other platform developers to integrate with Vue.
In the next lesson, we jump into a killer feature of Vue: Scoped Slots