Video
Материалы
- Lesson 1
- Lesson 2
- Lesson 3
- Lesson 4
- Lesson 5
- Lesson 6
- Lesson 7
- Lesson 8
- Lesson 9
- Lesson 10
- Lesson 11
The Vue Instance
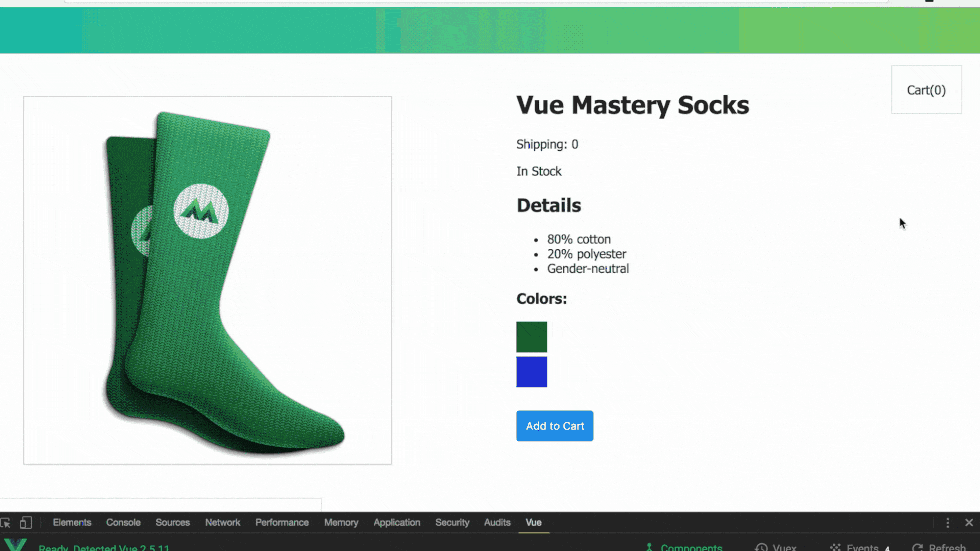
Throughout this course you will learn the fundamentals of Vue while we build this product page together.
Prerequisites:
This course assumes a foundational knowledge in HTML, CSS and JavaScript.
Our Goal
In this lesson, we’ll show you how to use Vue to display data onto a webpage.
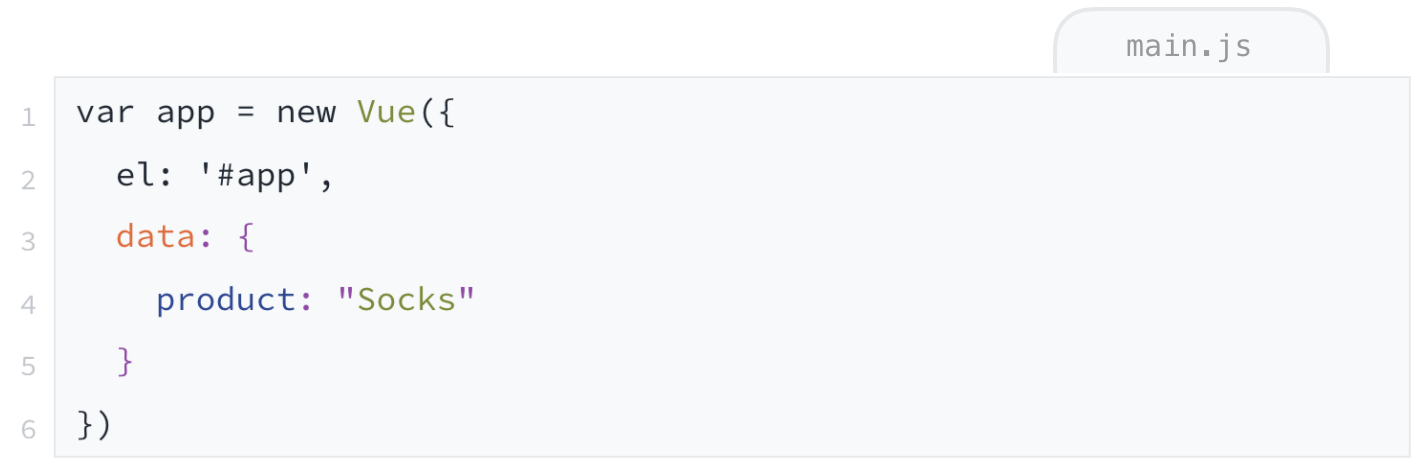
Our Starting Code
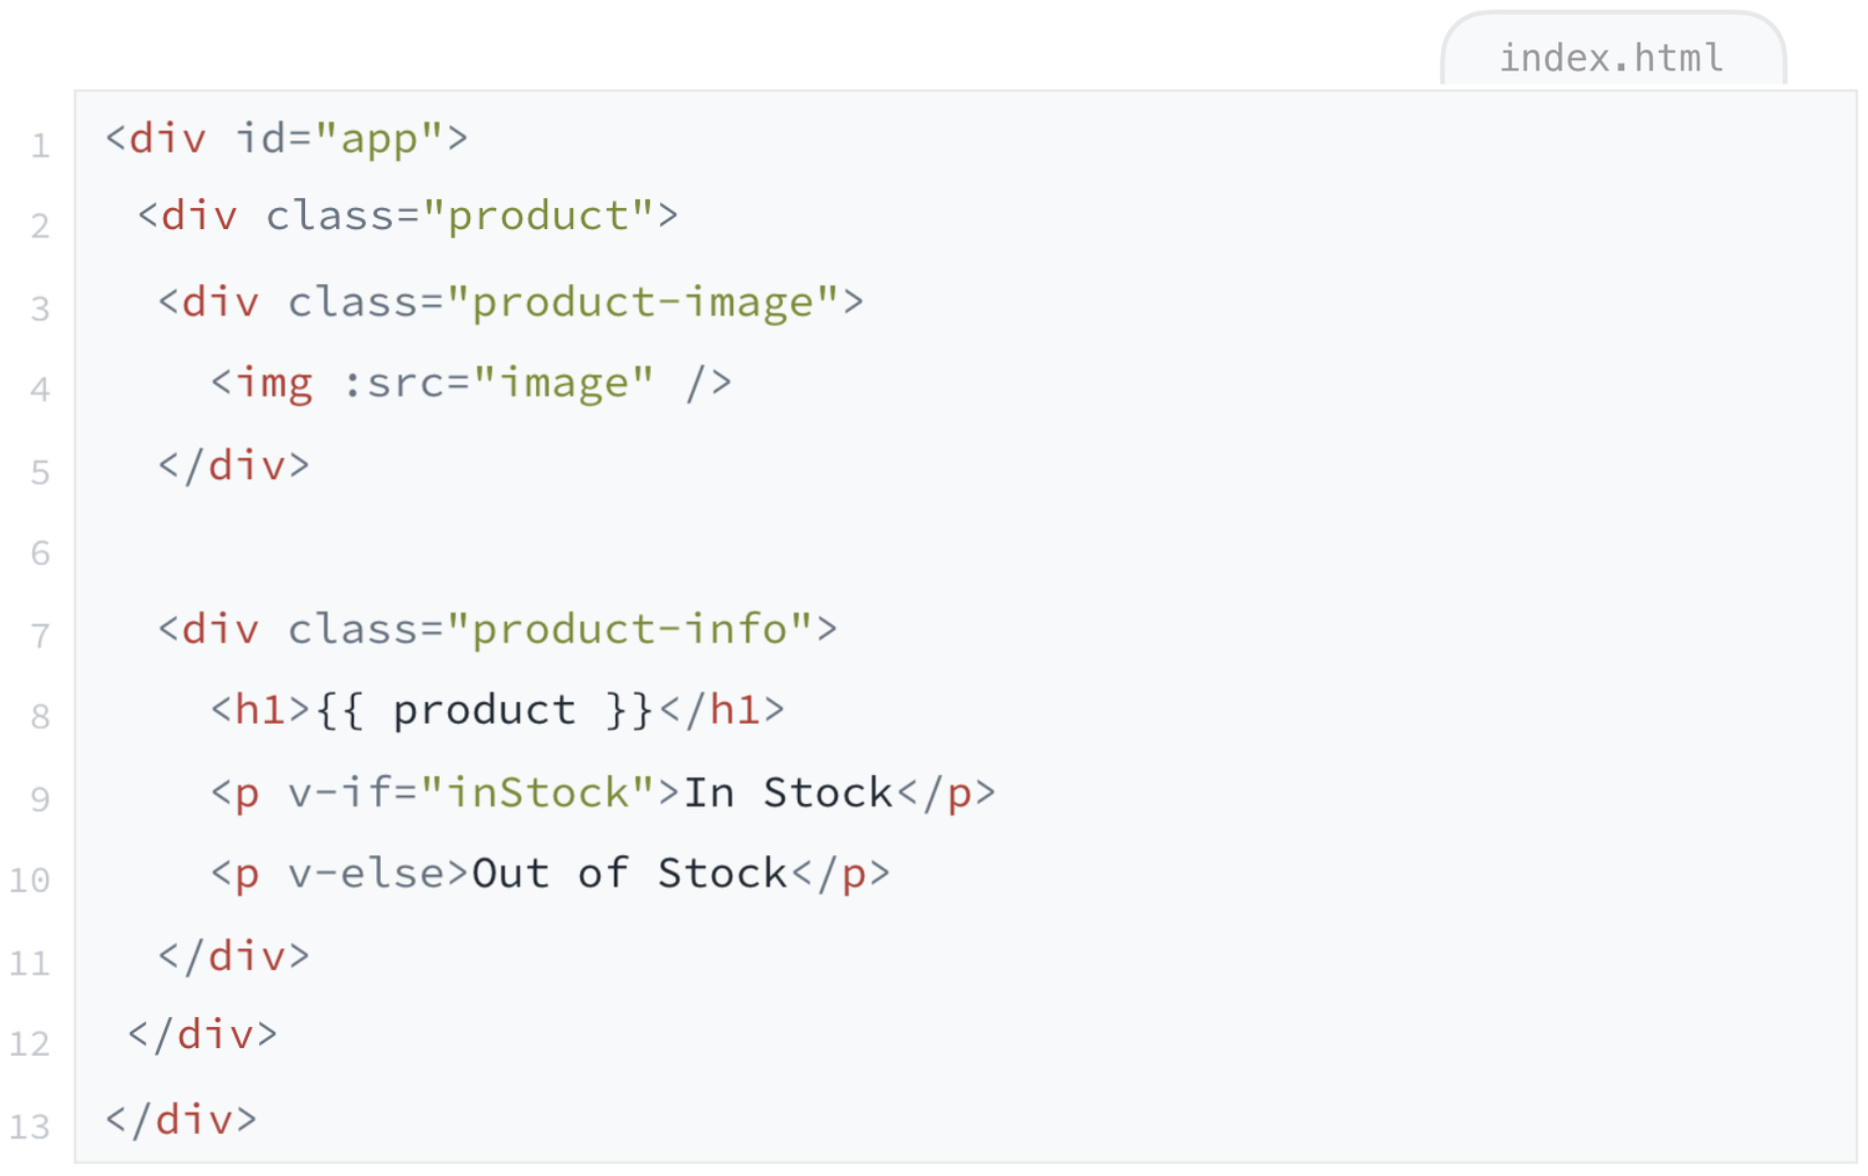
We’re going to start with some very simple HTML and JS code, which looks like this:


Problem
We need a way to take the variable product from our JavaScript and have it show up in the h1 of our HTML.
Our first step is to include Vue in our project, which we’ll do by adding this line at the bottom of our index.html file.

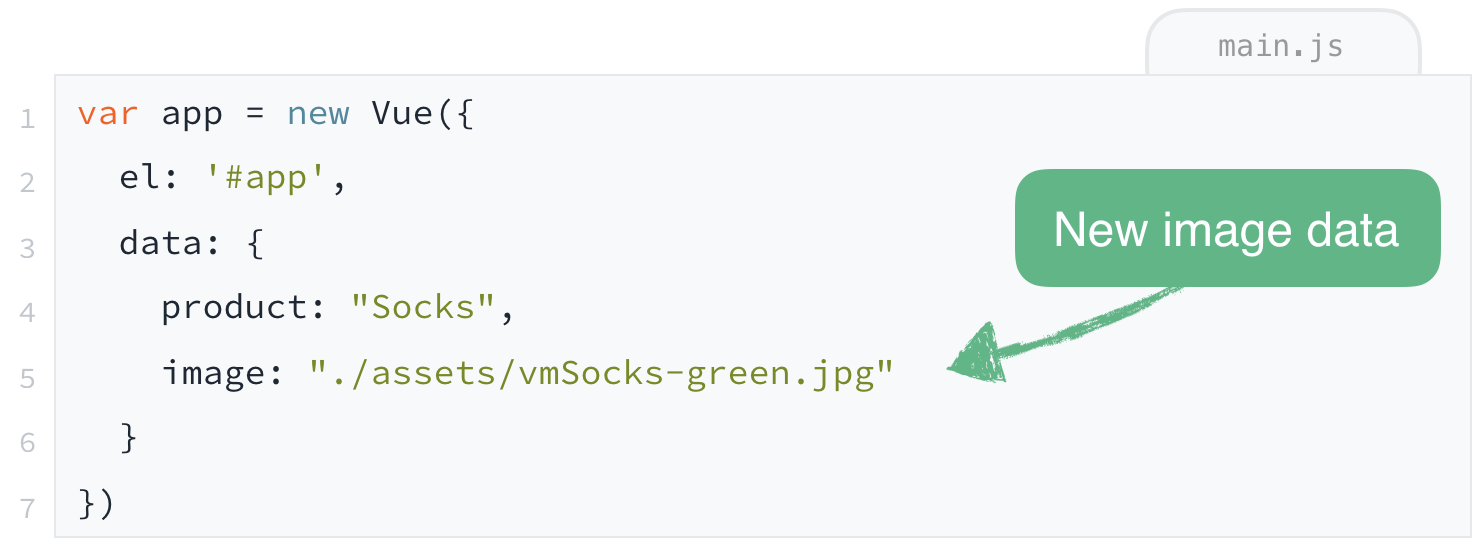
Next in our main.js we’ll write the following:
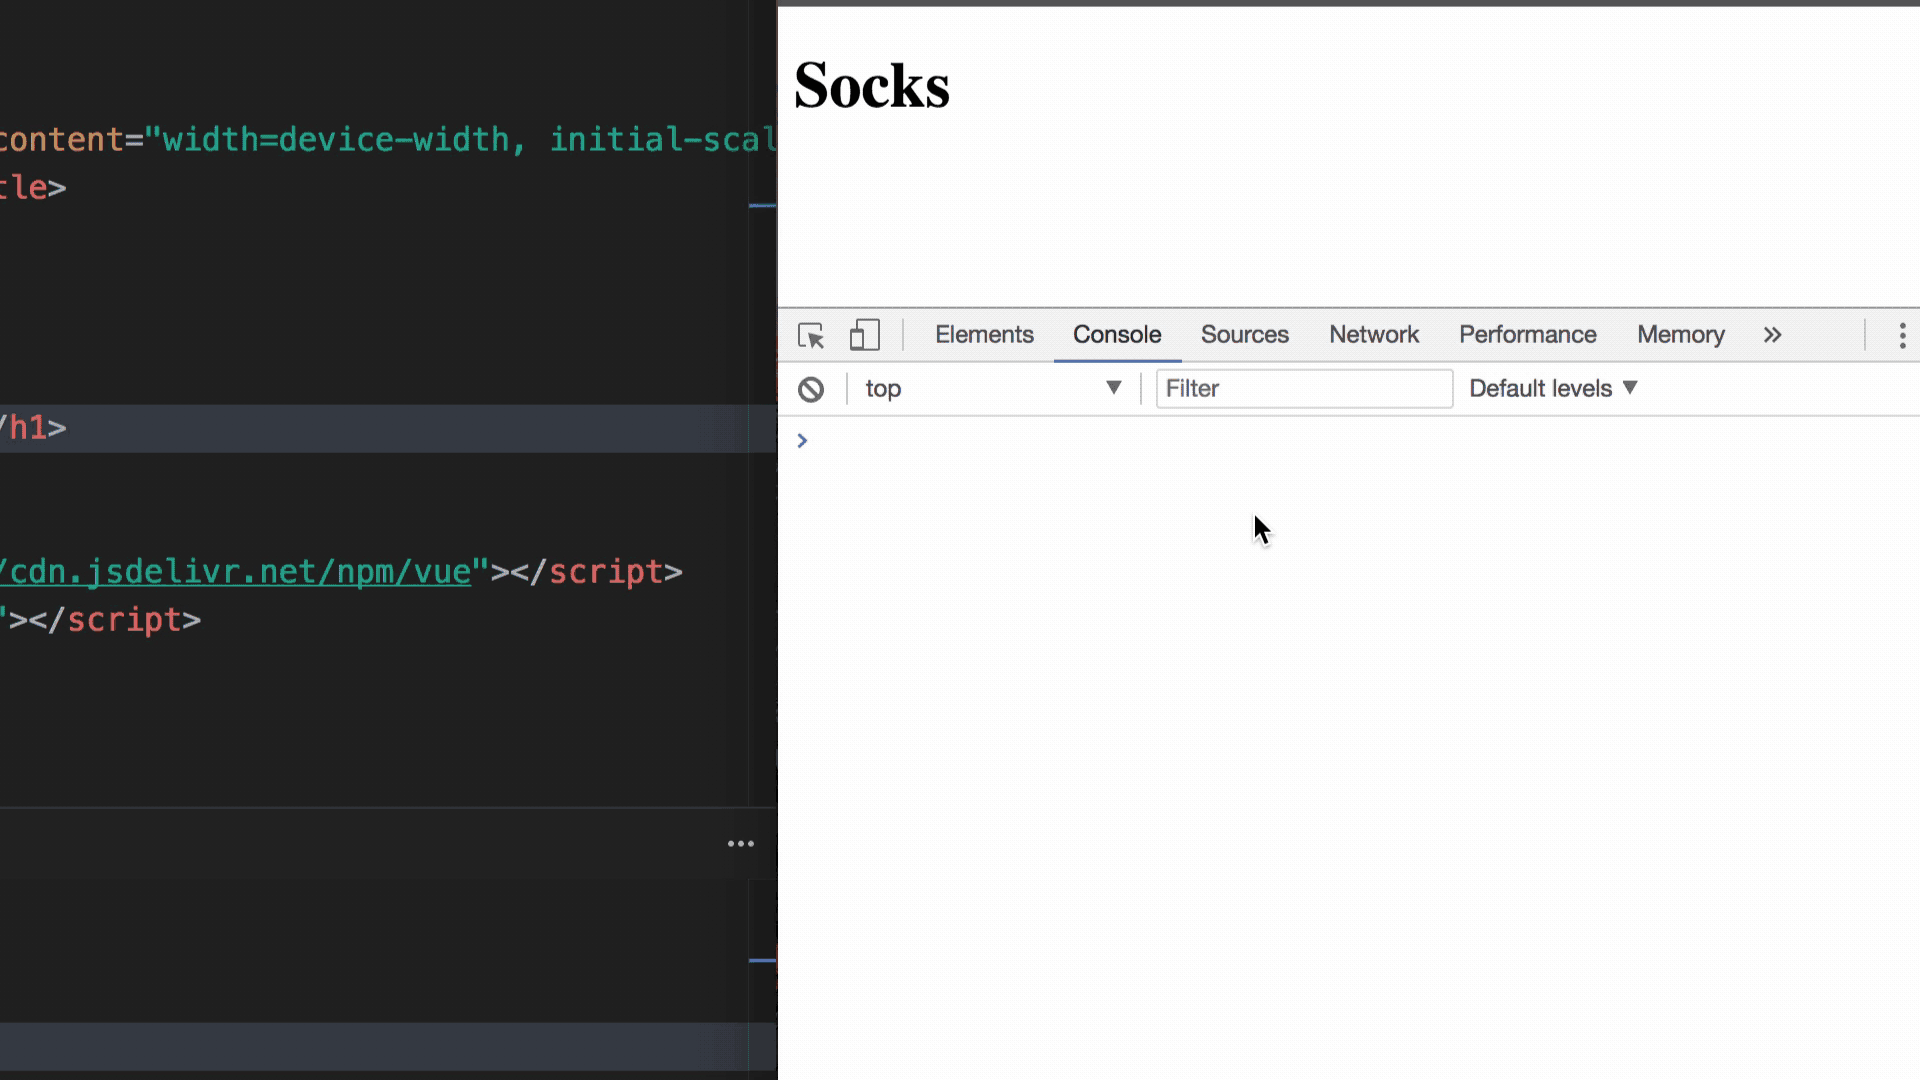
And then in our index.html we’ll use our first JavaScript expression:

When we save this, we’ll see “Socks” appear on our webpage.

It worked. Data from our JavaScript is showing up in our HTML. But what did we just do? Let’s break it down:
The Vue Instance

A Vue instance is the root of our application. It is created by passing an options object into it. Just like it sounds, this object has a variety of optional properties that give the instance the ability to store data and perform actions.
Plugging in to an Element

The Vue instance is then plugged into an element of your choosing, forming a relationship between the instance and that portion of the DOM. In other words, we’re activating Vue on the div with the id of app by setting '``#app``' as the element ( el ) that our instance is plugged into.
Putting our data in its place
A Vue instance has a place for data, in its data property.

The instance’s data can be accessed from inside the element that the instance is plugged into.
Using an Expression
If we want our product to appear in our h1 , we can put product inside these double curly braces.

See? It works. Simple huh?
How does it work? Inside the double curly braces, we’re using a JavaScript expression.
Important Term: Expression
Expressions allow us to utilize existing data values, together with logic, to produce new data values.
When Vue sees the expression {{ product }} , it recognizes that we are referencing the associated Vue instance’s data, and it replaces that expression with the value of product instead, in this case: “Socks”.
Some other ways expressions can be used:

Introducing Reactivity
The reason Vue is able to display product ‘s value immediately is because Vue is reactive . In other words, the instance’s data is linked to every place that data is being referenced. So not only can Vue make its data appear within the HTML that references it, but that HTML will be updated to display new values any time that referenced data changes.
To prove that, let’s open the console and change the value of our product string. Look what happens.
See how easy that was?
What have we learned?
- How to begin writing a Vue application with a Vue instance, and how to load basic data onto the webpage.
- The Vue instance is the root of every Vue application
- The Vue instance plugs into an element in the DOM
- The Vue instance’s data can be displayed using the mustache-like syntax
{{ }}called an expression. - Vue is reactive
Learn by doing
Challenge
Add a description key to our existing data object with the value “A pair of warm, fuzzy socks”. Then display description using an expression in an p element, underneath the h1 .
Attribute Binding
In this lesson, we’ll explore ways you can connect data to the attributes of your HTML elements.
Our Goal
We’ll use attribute-binding in order to display an image and attach alt text to it based on values from our instance’s data.
Starting Code
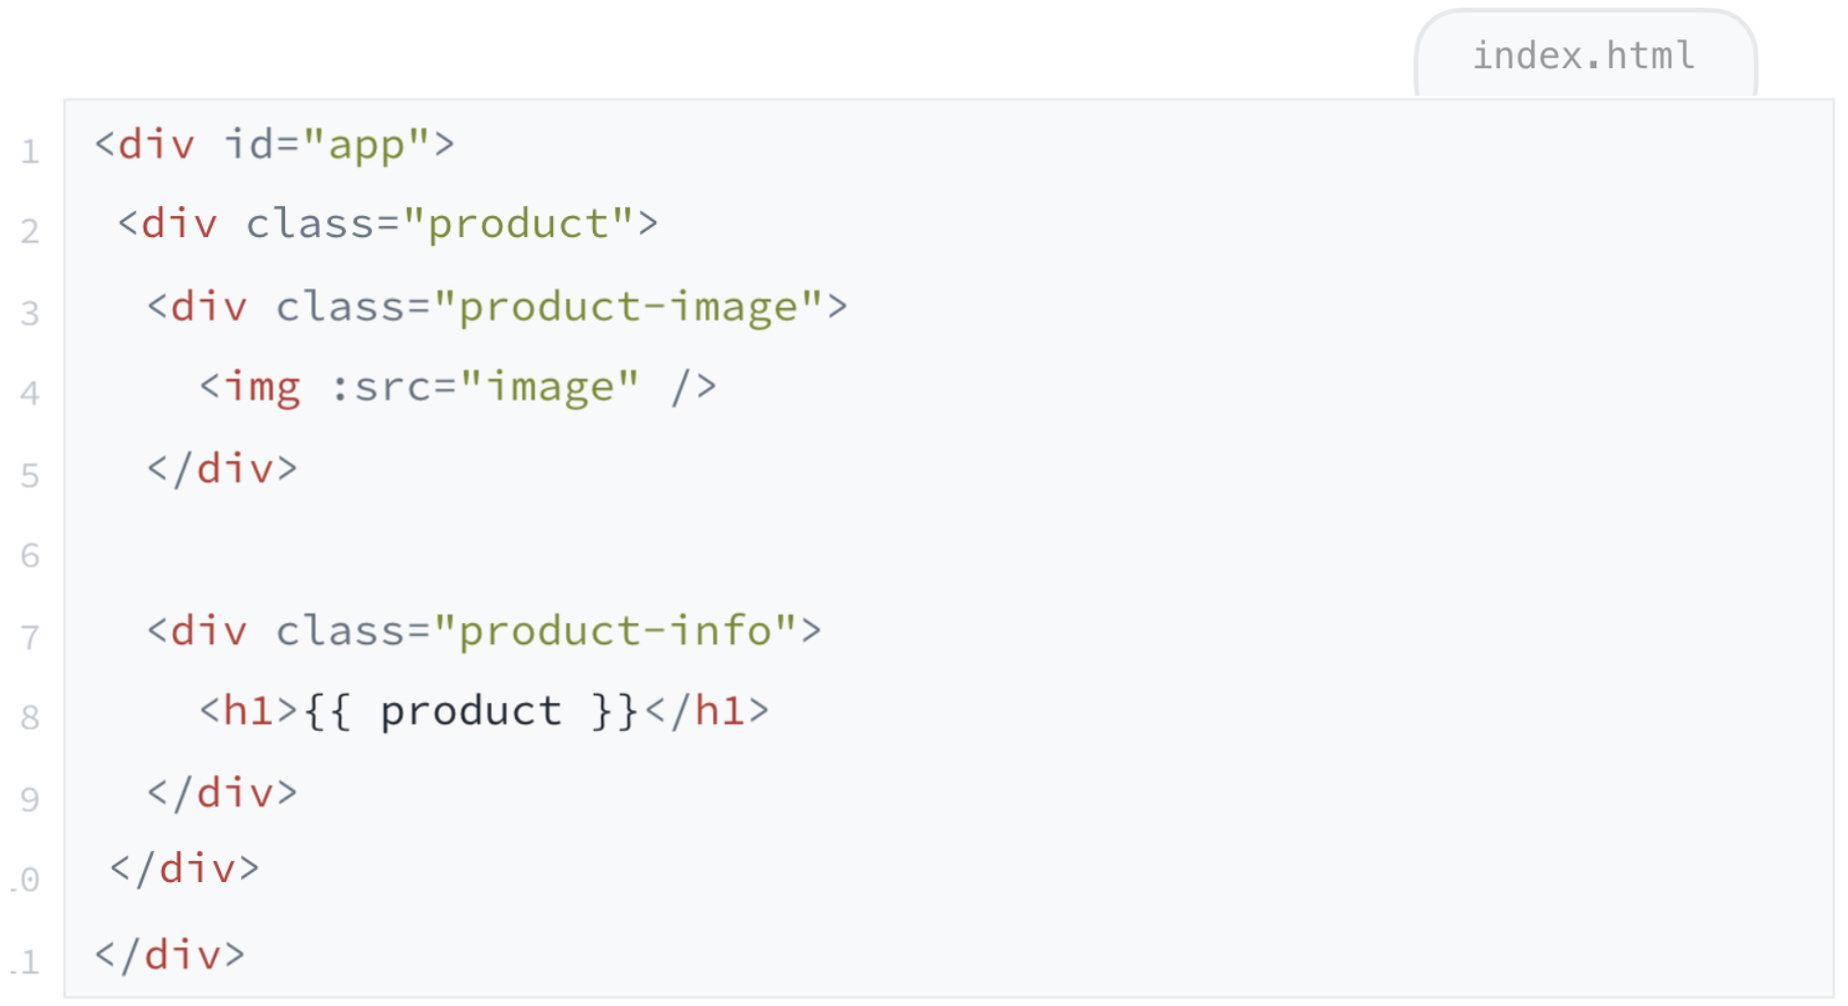
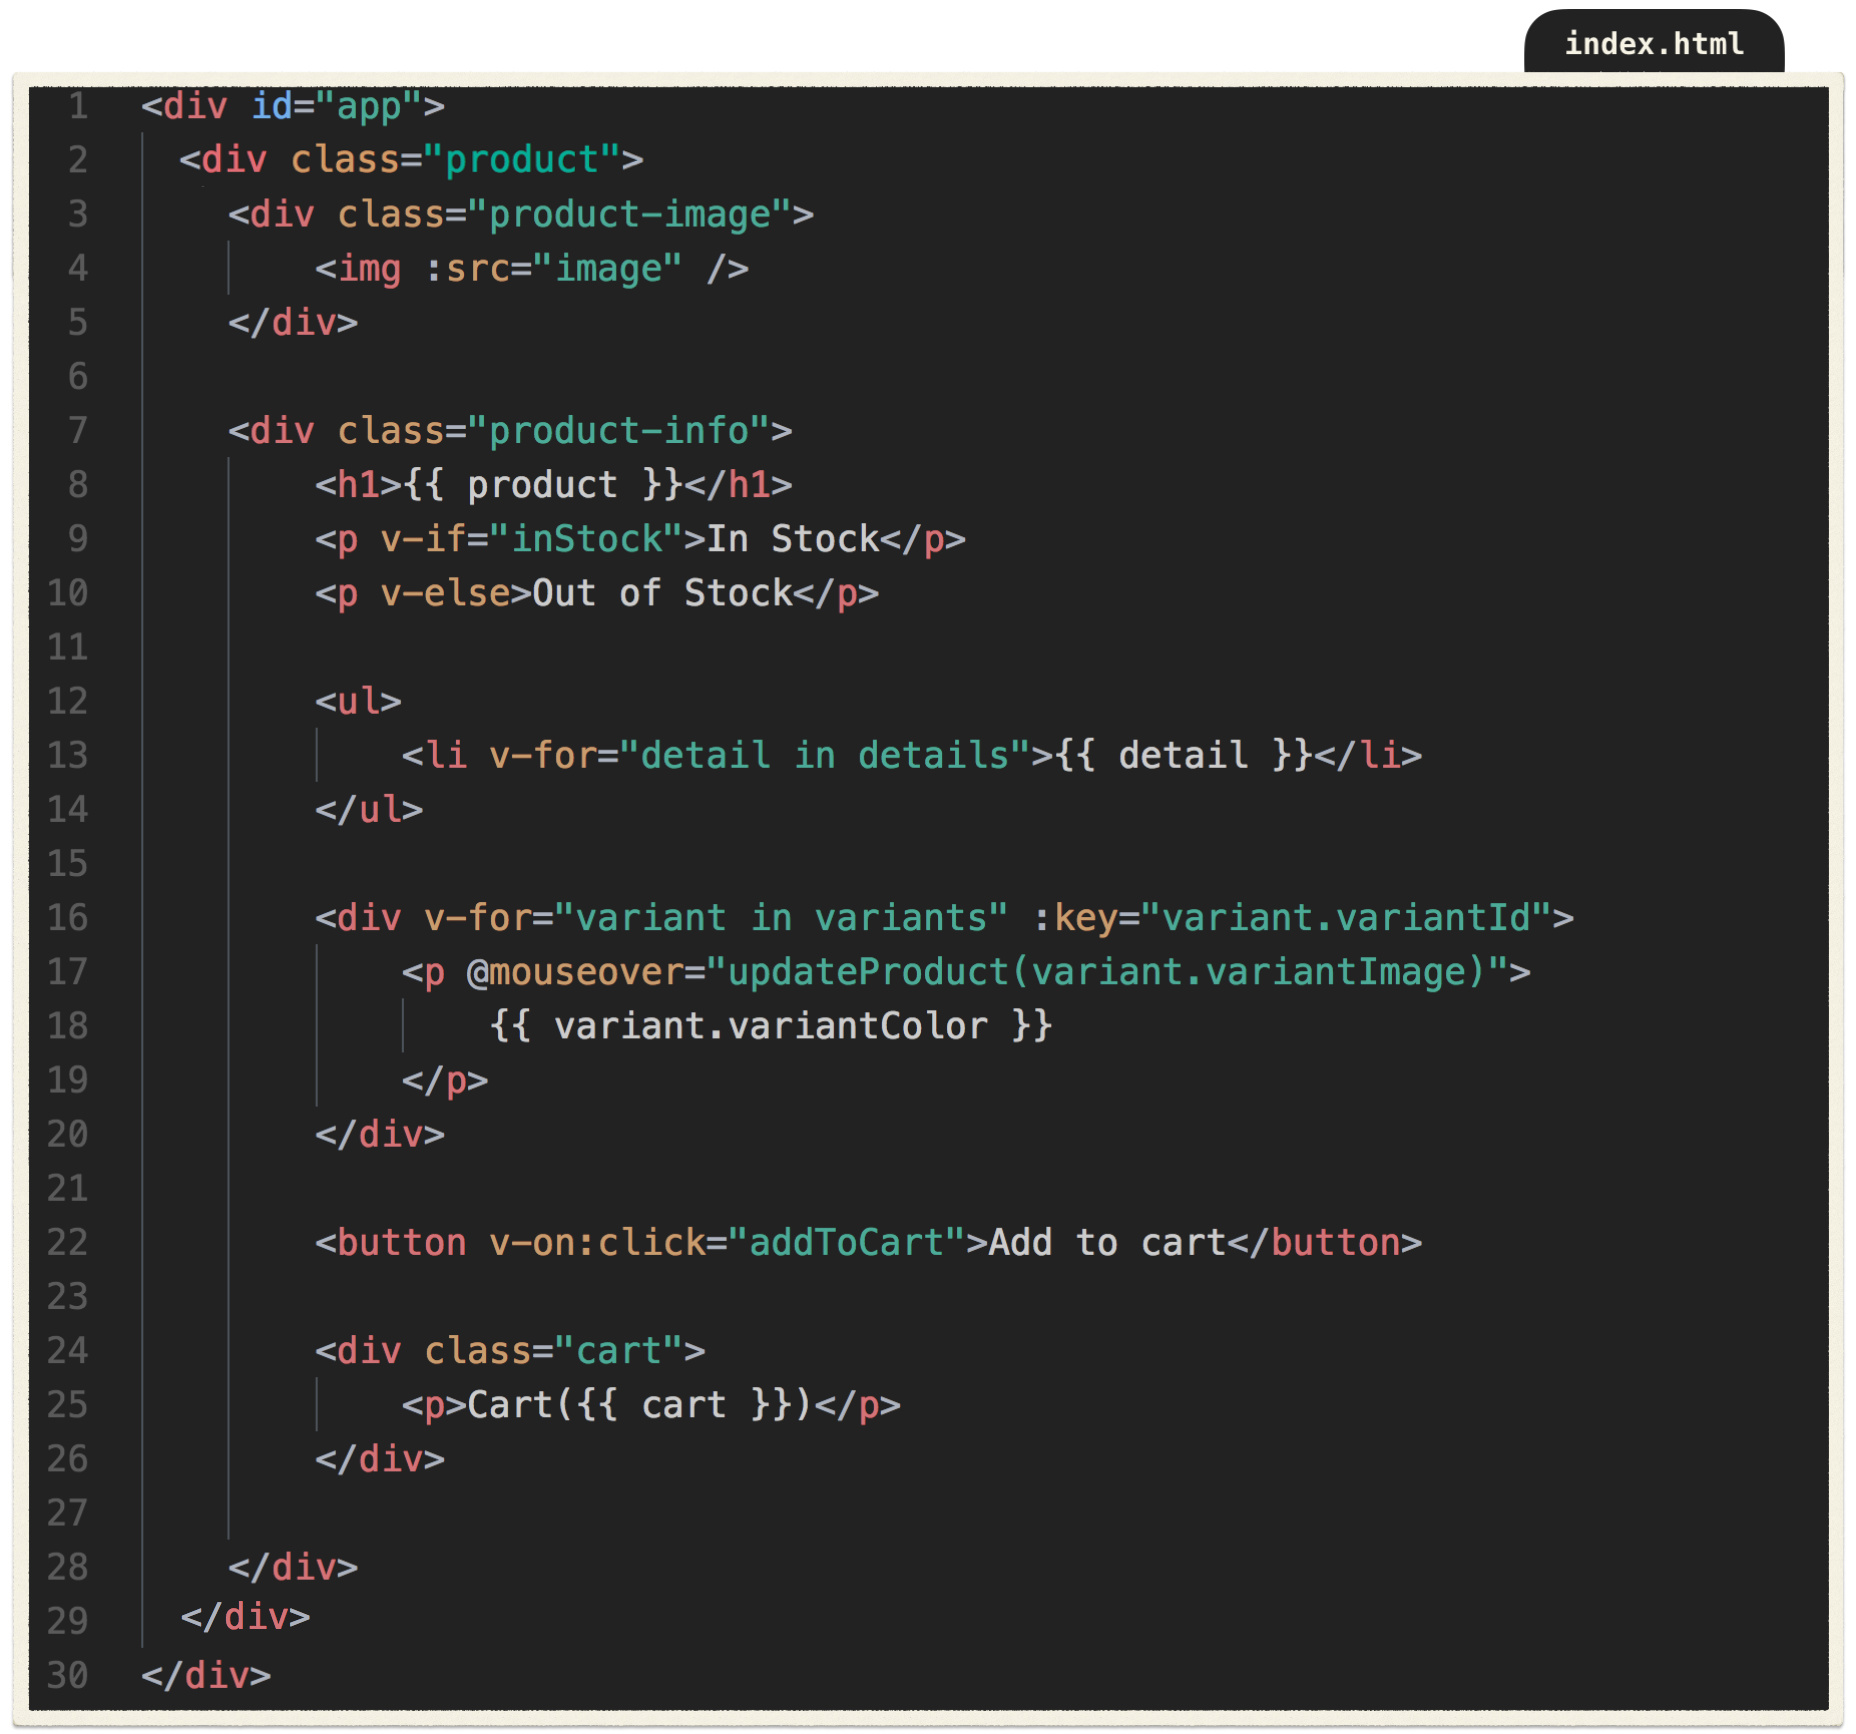
Currently our HTML looks like this:
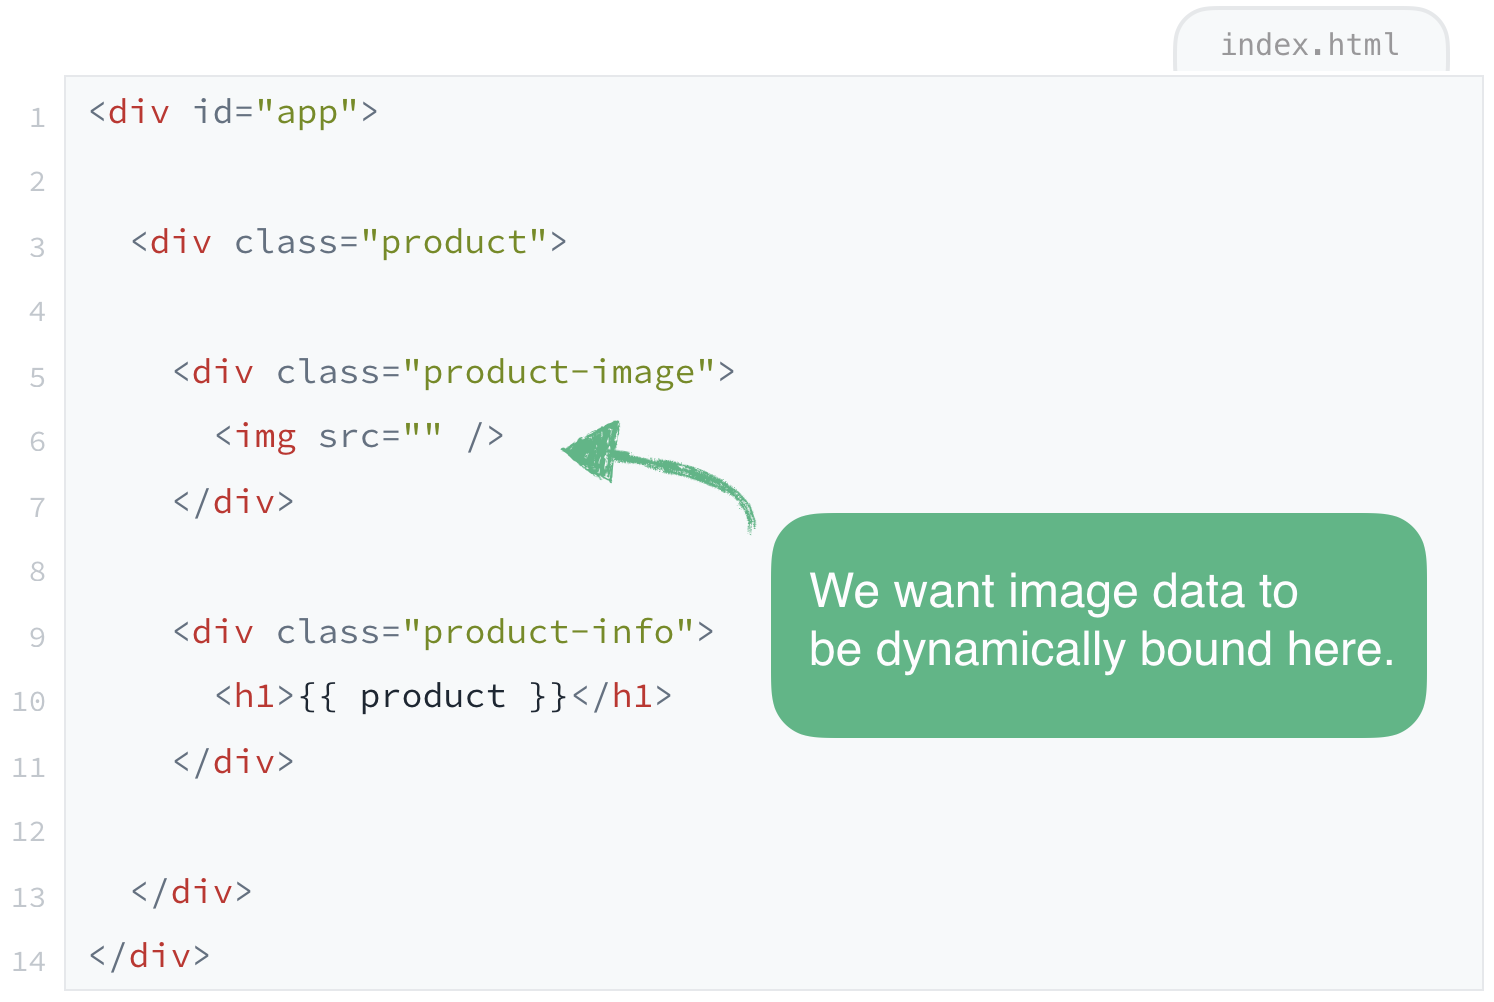
We’ve created a div for the product image and the product info, in order to style them with Flexbox.
And our JavaScript looks like this:
Notice we’ve added an image source to our data.
Problem
We want an image to show up on our page, but we need it to be dynamic. We want to be able to update that image in our data and have the image automatically update on the page. Since our src attribute is what pulls the image into this element, we’ll need data to be bound to src so that we can dynamically display an image based on the data at that time.
Important Term: Data Binding
When we talk about data binding in Vue, we mean that the place where it is used or displayed in the template is directly linked, or bound to the source of the data, which is the data object inside the Vue instance.
In other words, the host of the data is linked to the target of the data. In this case, our data is hosted by the data property of our Vue instance. And we want to target that data from our src .
Solution
To bind the value of image in our data object to the src in our img tag, we’ll use Vue’s v-bind directive.

This evaluates to:

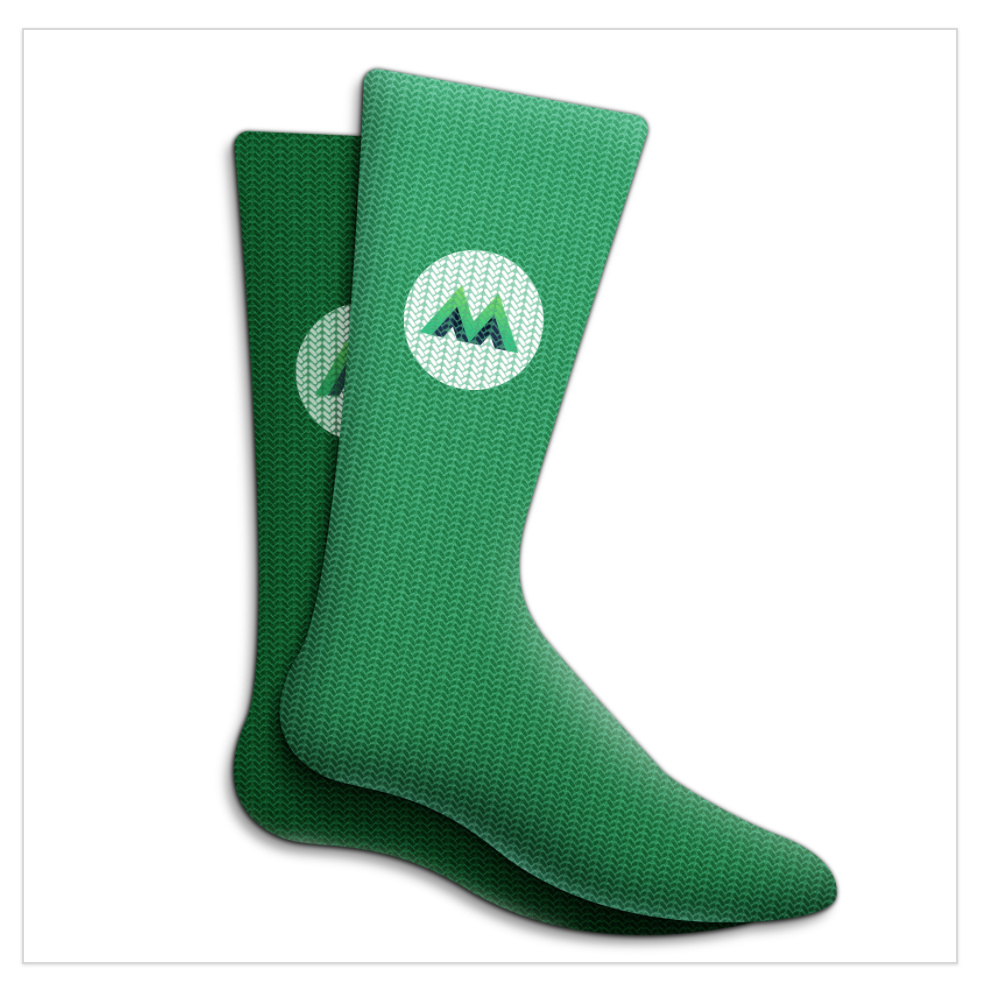
Voila! Our image appears. If the value of image were to change, the src will update to match, and the new image will appear.


Again, this happens because the data that lives in image is bound to our src attribute.
Additional Usages
We can use v-bind again here if we want to bind alt text data to this same img element.
If we add this in our data:

We can bind that to the alt attribute like so:

In both of these cases, we’ve used the syntax v-bind and after the colon : , we’ve stated which attribute we’re binding the data to, src and alt in this case.
Now whenever the image and altText data changes, that updated data will remain linked to the src and alt attributes.
This is a very commonly used feature in Vue. Because it’s so common, there’s a shorthand for v-bind , and it’s just a colon :

Simple, clean, and handy.
So what have we learned?
- Data can be bound to HTML attributes.
- Syntax is
v-bind:or:for short. - The attribute name that comes after the
:specifies the attribute we’re binding data to. - Inside the attribute’s quotes, we reference the data we’re binding to.
Learn by doing
Challenge:
Add a link to your data object, and use v-bind to sync it up with an anchor tag in your HTML. Hint: you’ll be binding to the href attribute.
Conditional Rendering
In this lesson we’ll be uncovering how to conditionally display elements with Vue.
Our Goal
We want to display text that says if our product is in stock or not, based on our data.

Starting Code
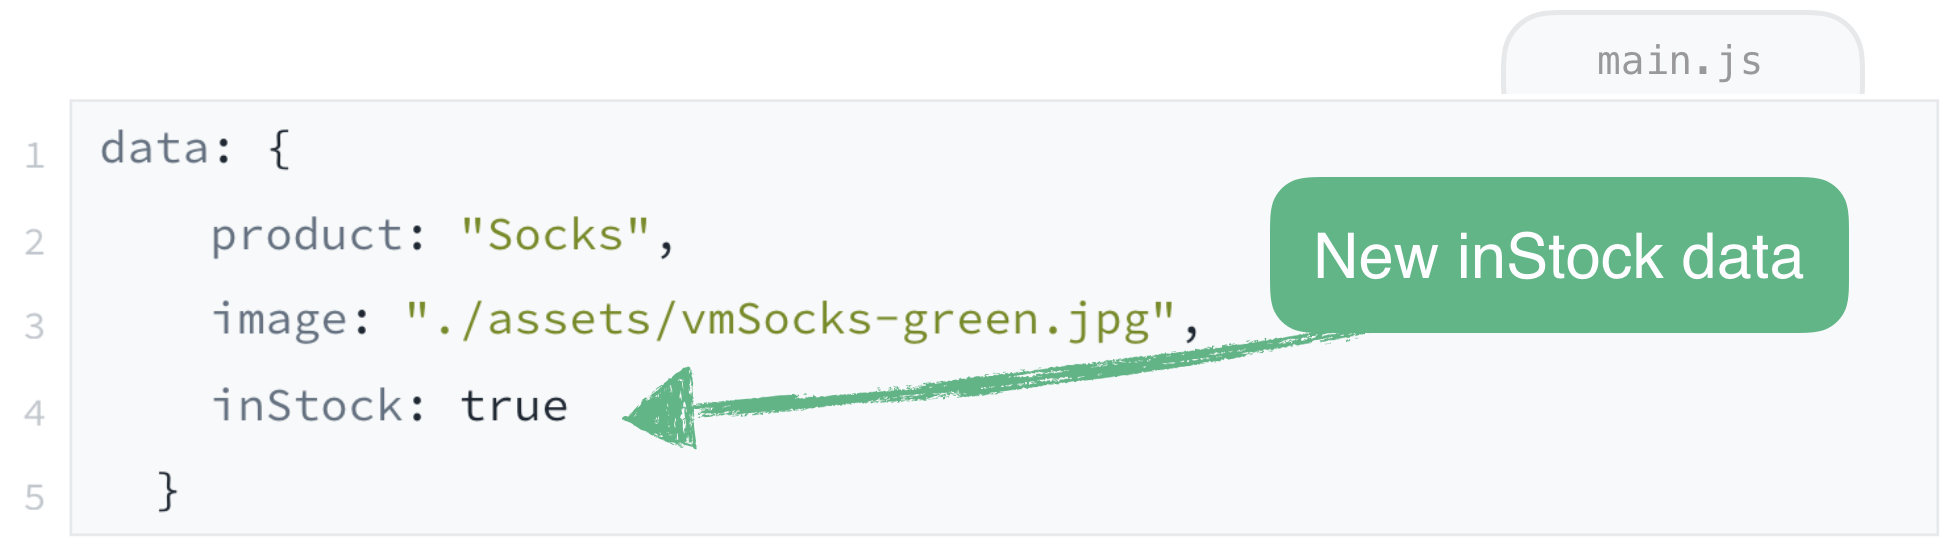
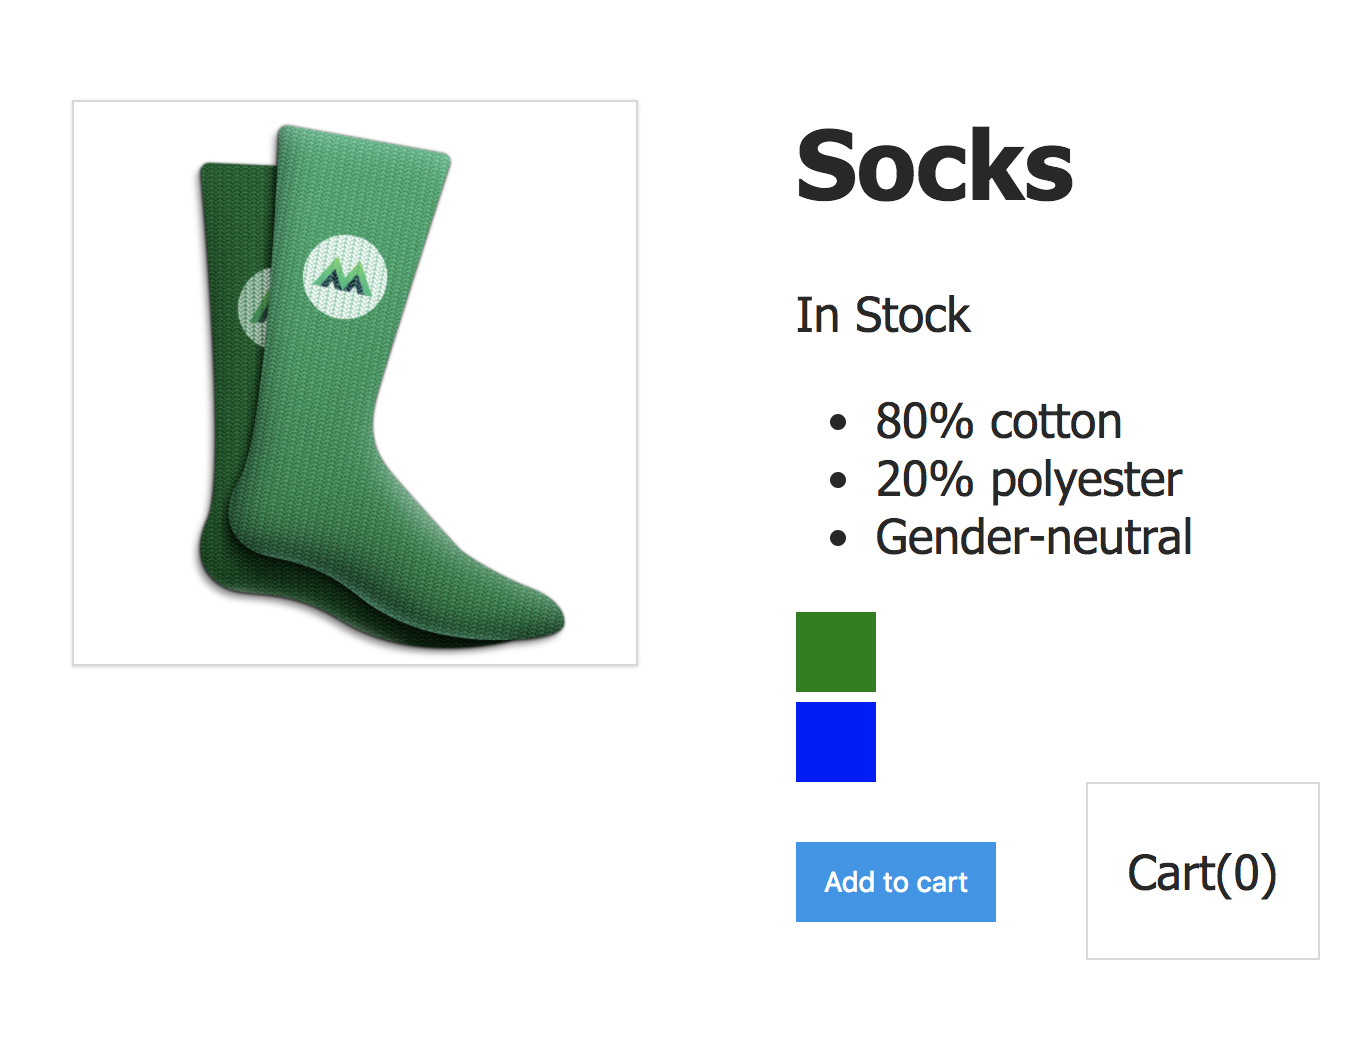
Notice we’ve added a new data property there at the bottom: inStock .
Problem
Often in a web application, we want elements to appear on the page depending on if a condition is met or not. For instance, if our product is not in stock, our page should display the fact that it’s out of stock.
So how could we conditionally render these elements, depending on whether our product is in stock or not?

Solution
Vue’s solution is simple and straightforward.
Given that our data contains this new property:

We can use the v-if and v-else directives to determine which element to render.

If inStock is truthy, the first paragraph will render. Otherwise, the second paragraph will. In this case, since the value of inStock is true, the first paragraph will render.
Great. We’ve used conditional rendering to display whether our product is in stock or not. Our feature is done. But let’s explore conditional rendering some more before we move onto our next topic.
Additional Conditional Syntax: v-else-if
We can add a third degree of logic with v-else-if . To demonstrate, let’s use an example that is a bit more complex.
If our data looked something like this:

We could use expressions, inside the quotes, to make our conditions more specific.

The element that will render is the first element whose expression evaluates to true.
Additional Conditional Syntax: v-show
If your app needs an element to frequently toggle on and off the page, you’ll want to use the v-show directive. An element with this directive on it will always be present in our DOM, but it will only be visible on the page if its condition is met. It will conditionally add or remove the CSS property display: none to the element.
This method is more performant than inserting and removing an element over and over with v-if / v-else .

However, in the product app we’re building, using a v-if and v-else works just fine, so we’ll keep that as our solution.
What’d we learn
- There are Vue directives to conditionally render elements:
- v-if
- v-else-if
- v-else
- v-show
- If whatever is inside the directive’s quotes is truthy, the element will display.
- You can use expressions inside the directive’s quotes.
- V-show only toggles visibility, it does not insert or remove the element from the DOM.
Learn by doing
Challenge:
Add an onSale property to the product’s data that is used to conditionally render a span that says “On Sale!”
List Rendering
In this lesson, we’ll learn how to display lists onto our webpages with Vue.
Our Goal
We want to be able to display a list of our product’s details.
Starting Code
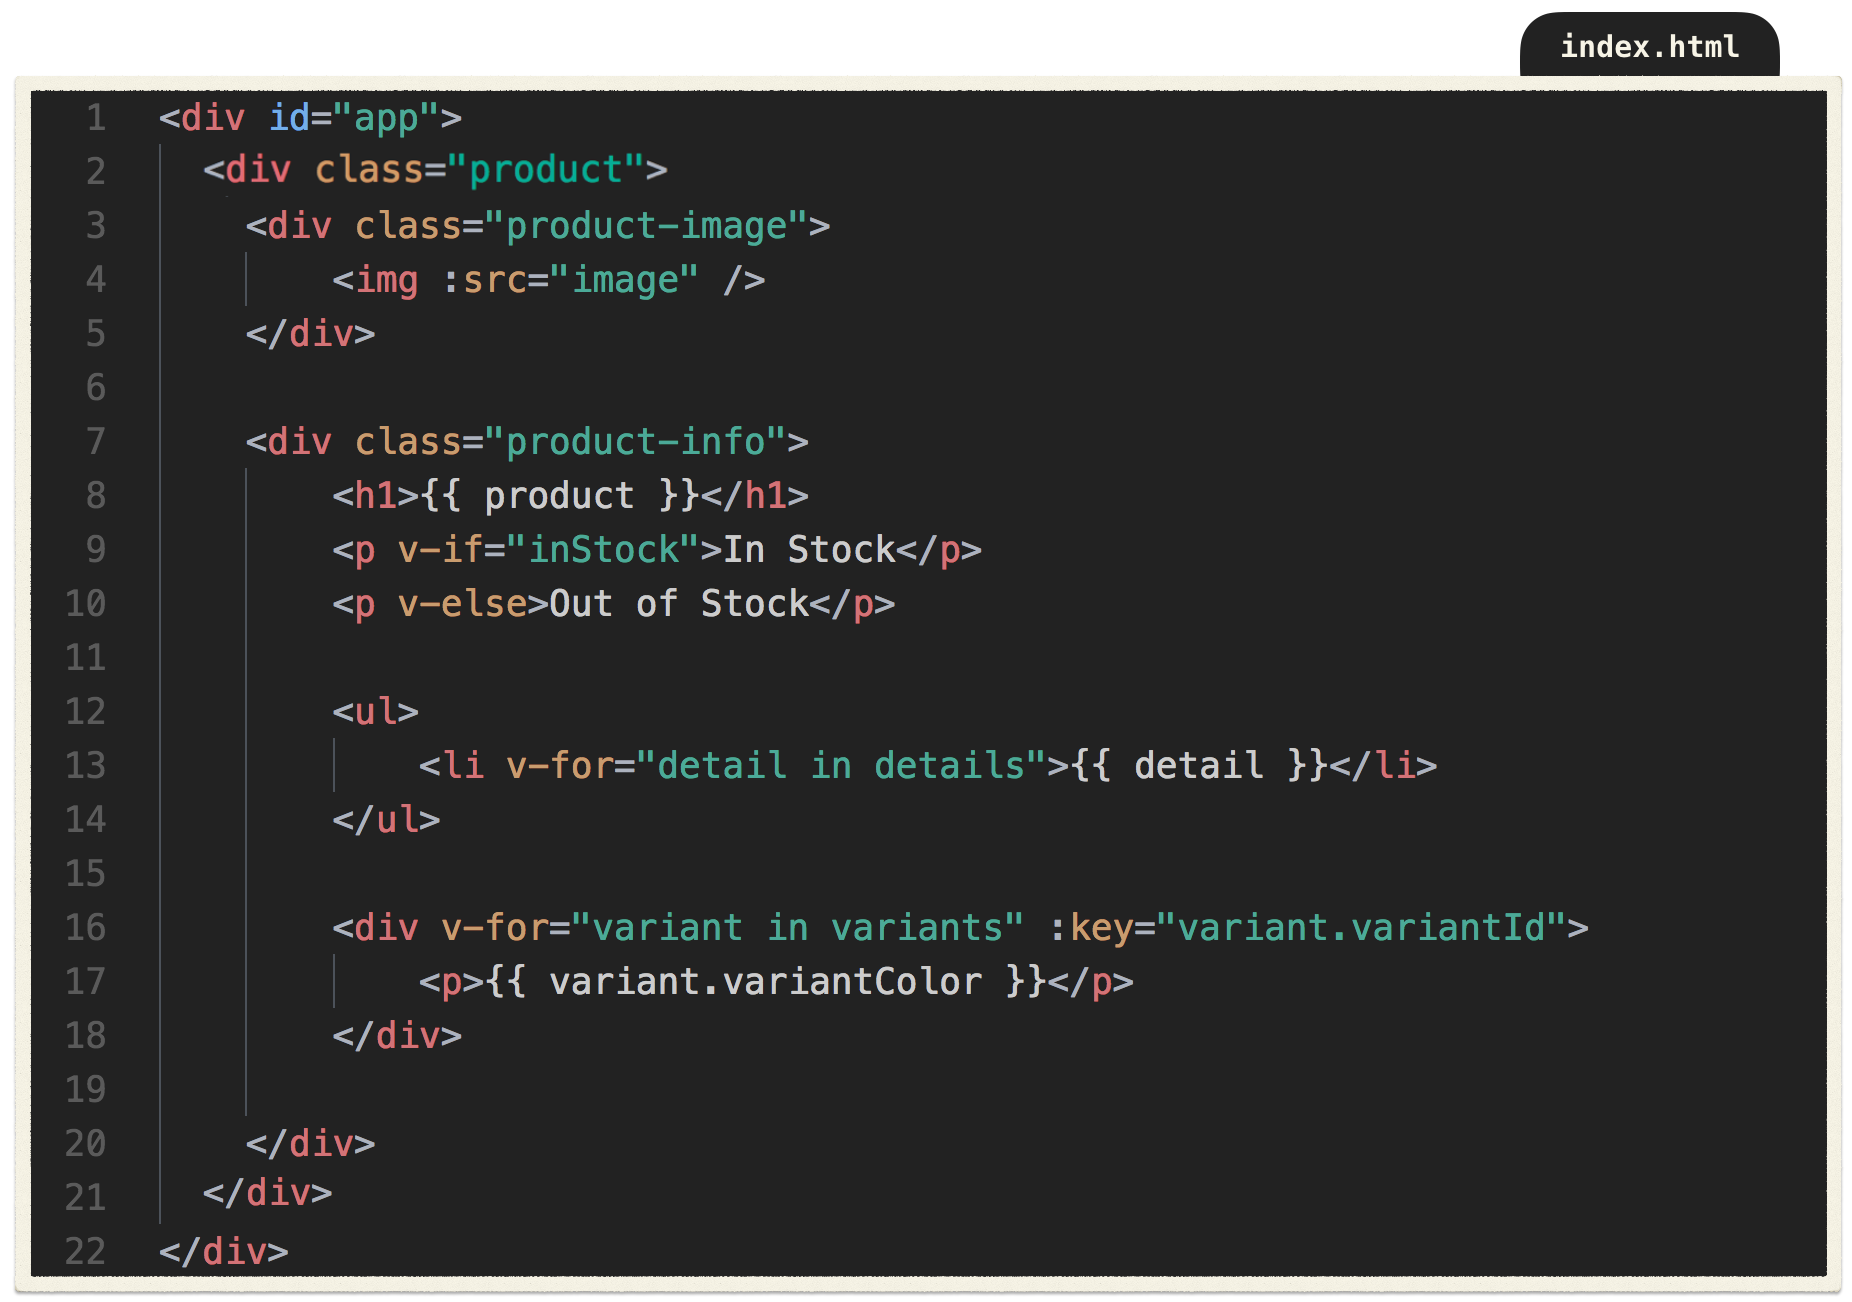
Our project’s code currently looks like this:

What’s new here is our array of details at the bottom.
Problem
We want our page to display our product’s details . How can we iterate through this array to display its data?

Solution
Another Vue directive to the rescue. The v-for directive allows us to loop over an array and render data from within it.

Now we have our details showing up in a list. But how is this working?
The syntax within the quotes of the v-for directive may look familiar if you have used JavaScript’s for of or for in before. The v-for works like this:
We use a singular noun ( detail ) as an alias for the string in the array we are iterating over. We then say in and name the collection ( details ) that we are looping through. Inside the double curly braces, we specify what data to be displayed there( {{ detail }} ).
Since our v-for is inside an <li> , Vue will print out a new <li> for each detail in our details array. If our v-for was inside a <div> , then a <div> would have been printed out for each array item along with its content.
You can envision v-for like an assembly line, where a mechanical arm that takes an element from the collection one at a time in order to construct your list.

Let’s take a look at a more complex example, displaying an object’s data in a div.
Iterating Over Objects
Problem
The product page we’re building needs to be able to show different versions of the same product, based on an array in our data of variants . How would we iterate through this array of objects to display its data?

Let’s display the color of each variant. We’ll write:

In this case, we just want to display the color from the variant object, so we’re using dot notation to do so. If we wrote {{ variant }} we’d display the entire object.
Note that it is recommended to use a special key attribute when rendering elements like this so that Vue can keep track of each node’s identity. We’ll add that in now, using our variant’s unique variantId property.

What’d we learn
- The
v-fordirective allows us to iterate over an array to display data. - We use an alias for the element in the array being iterated on, and specify the name of the array we are looping through. Ex:
v-for="item in items" - We can loop over an array of objects and use dot notation to display values from the objects.
- When using
v-forit is recommended to give each rendered element its own unique key.
Learn by doing
Challenge:
Add an array of sizes to the data and use v-for to display them in a list.
Event Handling
In this lesson we’ll be learning how to listen for DOM events that we can use to trigger methods.
Goal
We want to have a button that increments the number of items in our cart.
Starting Code

Problem
We need a button to listen for click events on it, then trigger a method when that click happens, in order to increment our cart total.
First, we’ll add a new data property for our cart .

In our HTML, we’ll create a div for our cart. We’ll add a p inside it to display our cart data’s value.

We’ll also make a button to add items to our cart .

As you can see, we’re using Vue’s v-on directive to increment the value of cart
This works. But how is it working?
Let’s dissect this syntax. We say v-on , which let’s Vue know we’re listening for events on this button, and after the : we specify the kind of event we are listening for, in this case: a click. Inside the quotes, we’re using an expression that adds 1 to the value of cart every time the button is clicked.
This is simple, but not entirely realistic. Rather than using the expression cart += 1 , let’s make the click trigger a method that increments the value of cart instead, like this:

As you can see, addToCart is the name of a method that will fire when that click event happens. We haven’t yet defined that method, so let’s do that now, right on our instance.
Just like it does for its data, the Vue instance has an optional property for methods. So we’ll write out our addToCart method within that option.
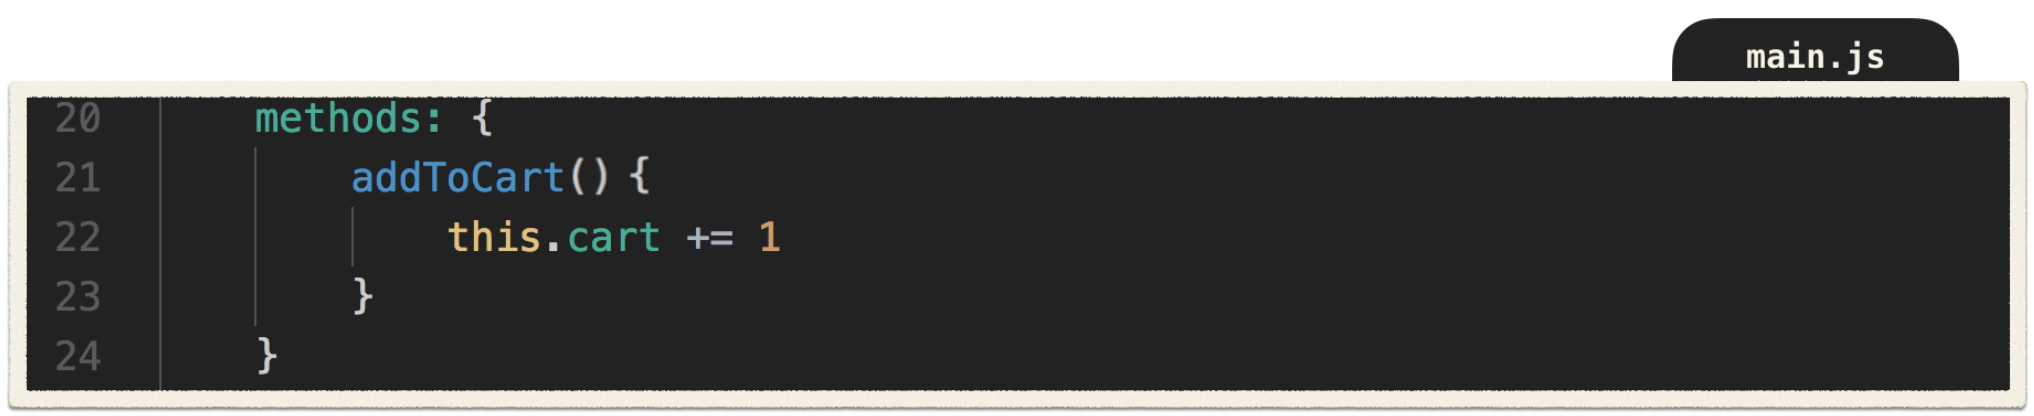
Now, when we click our button , our addToCart method is triggered, which increments the value of cart , which is being displayed in our p tag.
Let’s break this down further.
Our button is listening for click events with the v-on directive, which triggers the addToCart method. That method lives within the methods property of the Vue instance as an anonymous function. The body of that function adds 1 to the value of this.cart . Because this refers to the data of the instance we’re currently in, our function is adding 1 to the value of cart , because this.cart is the cart inside our data property.
If we just said cart += 1 here, we’d get an error letting us know that “cart is not defined”, so we use this.cart to refer to the cart from this instance’s data.
You might be thinking, “But wait. We’re only incrementing the number of items in the cart, we’re not actually adding a product to the cart.” And you’re right. We’ll build that out in a future lesson.
Now that we’ve learned the basics of event handling in Vue, let’s look at a more complex example.
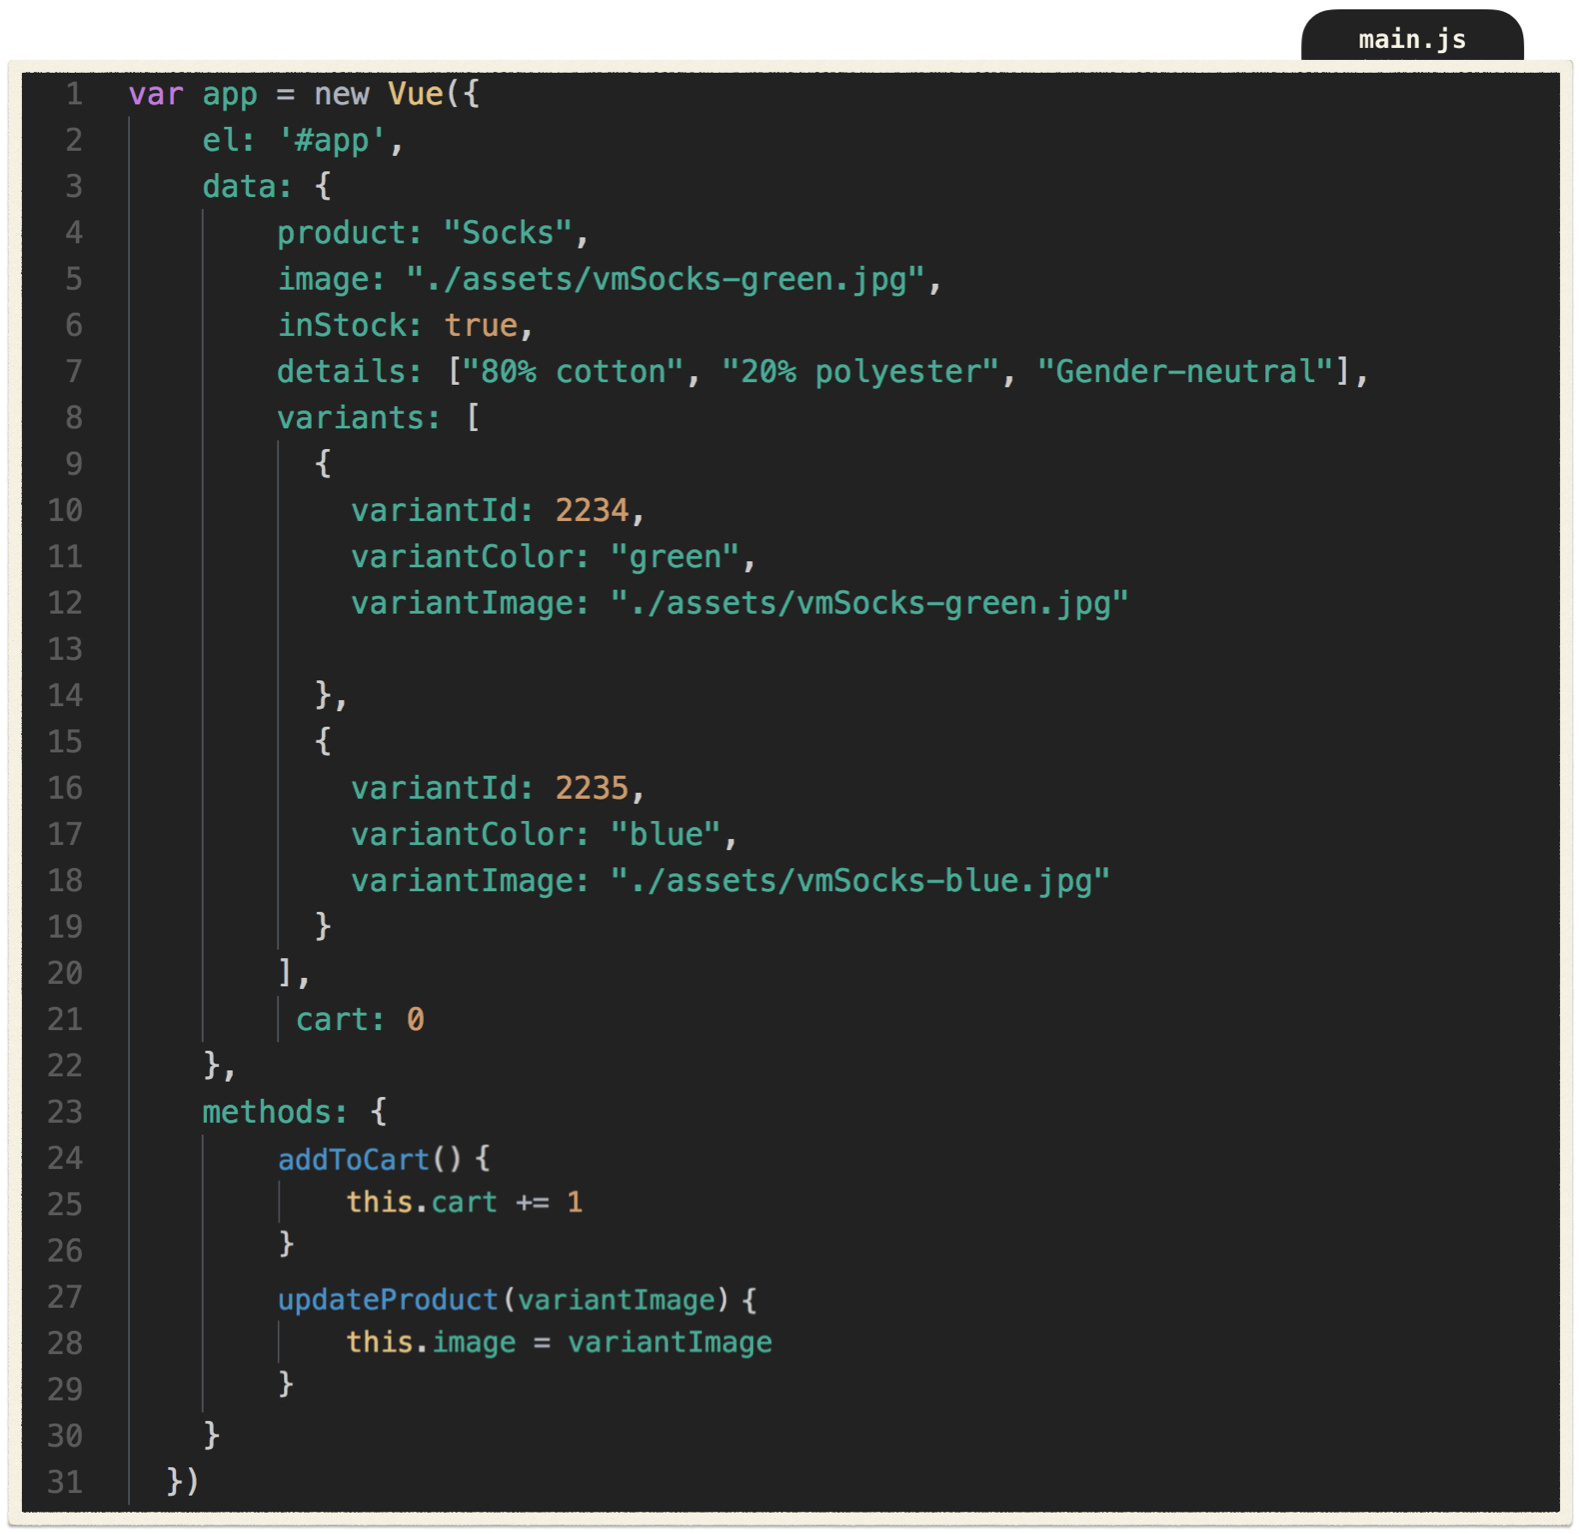
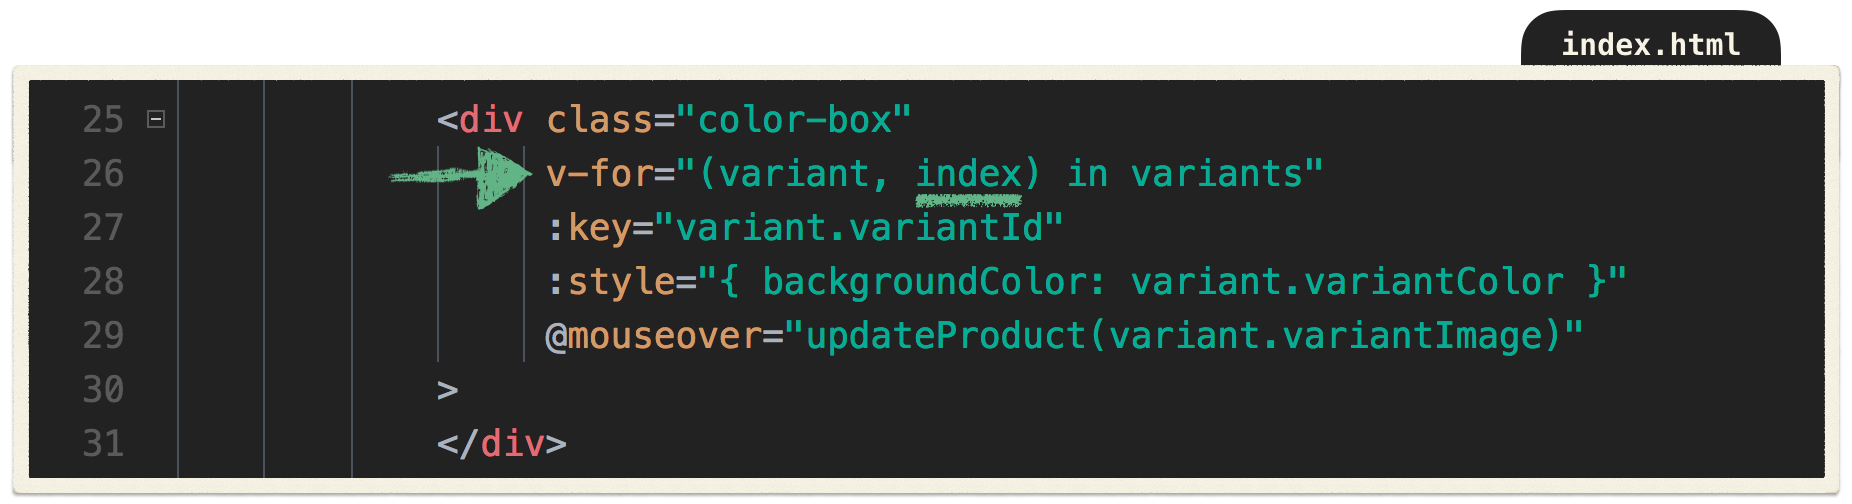
First, let’s add a variantImage to each of our variants.

Now each variant has an image with green and blue socks, respectively.
Problem
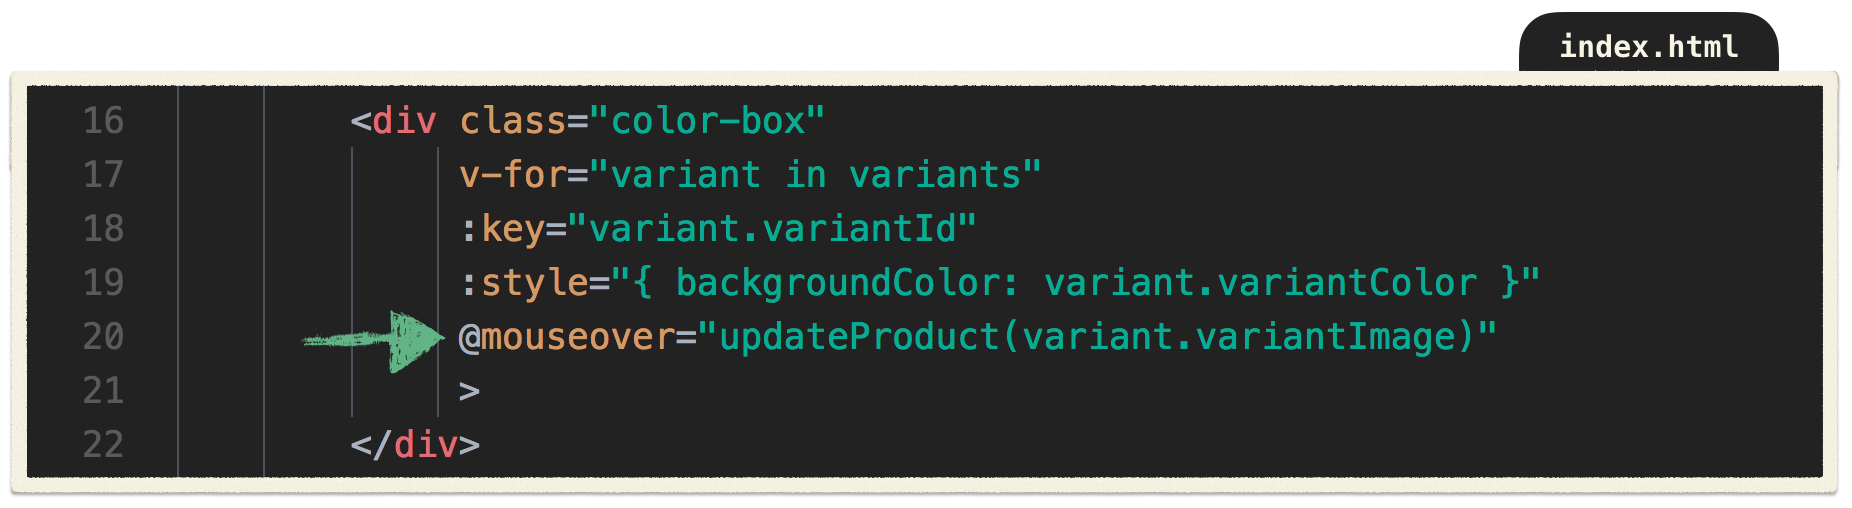
We want to be able to hover our mouse over a variant’s color and have its variantImage show up where our product image currently is.
Solution
We’ll use the v-on directive again, but this time we’ll use its shorthand @ and listen for a mouseover event.
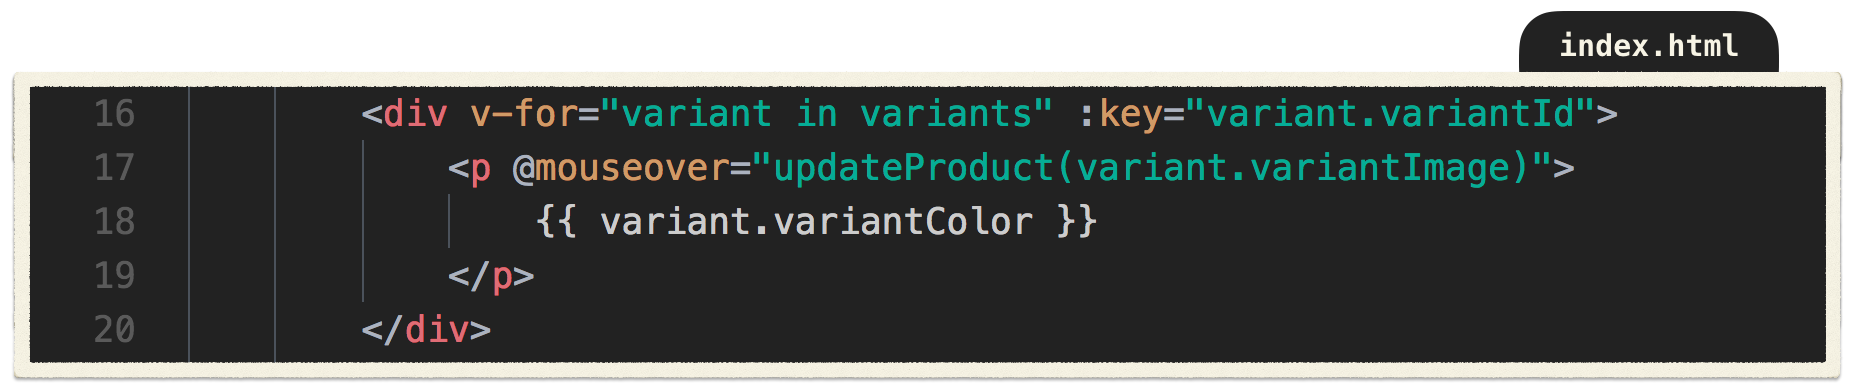
Notice that we’re passing variant.variantImage in as an argument to our updateProduct method.
Let’s build out that method.

This is very similar to what we did to increment the value of cart earlier.
But here, we are updating the value of image , and its updated value is now the variantImage from the variant that was just hovered on. We passed that variant’s image into the updateProduct function from the event handler itself:

In other words, the updateProduct method is ready to fire, with a parameter of variantImage .
When it’s called, variant.variantImage is passed in as variantImage and is used to update the value of this.image . As we just learned, this.image is image . So the value of image is now dynamically updating based on the variant that was hovered on.
ES6 Syntax
Instead of writing out an anonymous function like updateProduct: function(variantImage) , we can use the ES6 shorthand and just say updateProduct(variantImage) . These are equivalent ways of saying the same thing.
What’d we Learn
- The
v-ondirective is used to allow elements to listen for events - The shorthand for
v-onis@ - You can specify the type of event to listen for:
- click
- mouseover
- any other DOM event
- The
v-ondirective can trigger a method - Triggered methods can take in arguments
-
thisrefers to the current Vue instance’s data as well as other methods declared inside the instance
Learn by doing
Challenge:
Create a new button and method to decrement the value of cart .
Class & Style Binding
In this lesson we’ll be learning how to dynamically style our HTML by binding data to an element’s style attribute, as well as its class.
Goal
Our first goal in this lesson is to use our variant colors to style the background-color of divs. Since our variant colors are “green” and “blue”, we want a div with a green background-color and a div with a blue background-color .
Starting Code
Problem
In the previous lesson, we created an event handler that updates the product’s image based on which p tag was hovered on. Instead of printing out the variant’s color into a p tag, we want to use that color to set the style of a div’s background-color . That way, instead of hovering over text in a p tag, we can hover over colored squares, which would update the product’s image to match the color that was hovered on.
Solution
First, let’s add a class of color-box to our div , which gives it a width, height and margin. Since we’re still printing out “green” and “blue” onto the page, we can make use of those variant color strings and bind them to our style attribute, like so:
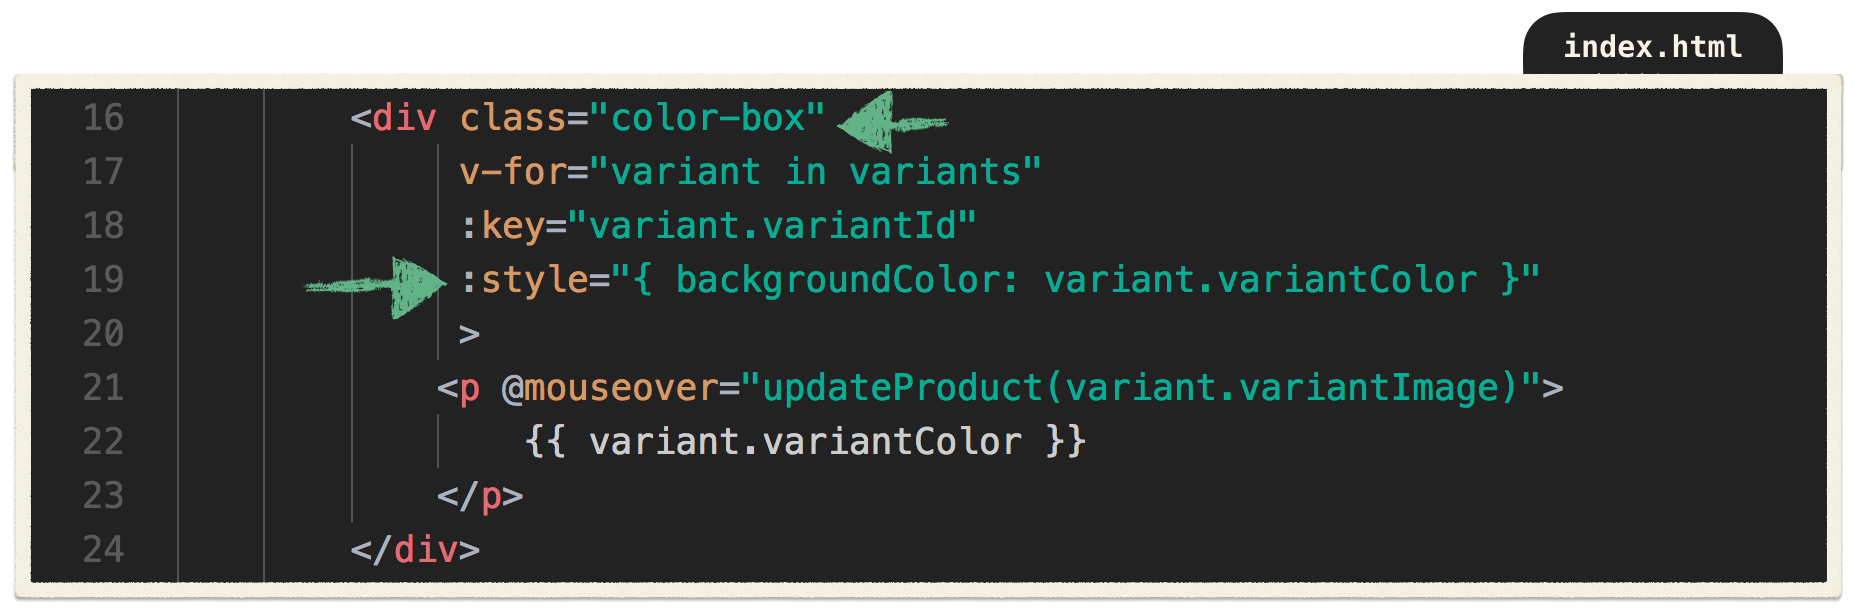
We are using an inline style to dynamically set the background-color of our divs, based on our variant colors ( variant.variantColor ).
Now that our div s are being styled by the variantColor , we no longer need to print them out. So we can delete the p tag and move its @mouseover into the div itself.
Now when we hover over the blue box and the blue socks appear, hover over the green box and the green socks appear. Pretty neat!
Now that we’ve learned how to do style binding, let’s explore class binding.
Problem
Currently, we have this in our data:

When this boolean is false , we shouldn’t allow users to click the “Add to Cart” button, since there is no product in stock to add to the cart. Fortunately, there’s a built-in HTML attribute, disabled , which will disable the button.
As we learned in our second lesson in this series, we can use attribute binding to add the disabled attribute whenever inStock is false, or rather not true : !inStock .

Now our button is disabled whenever inStock is false . But that doesn’t change the appearance ****of the button. In other words, the button still appears clickable, even though it’s not.
Solution
In a similar way to how we just bound inStock to the button’s disabled attribute, we can bind a disabledButton class to our button whenever inStock is false. That way, our button will also appear disabled.
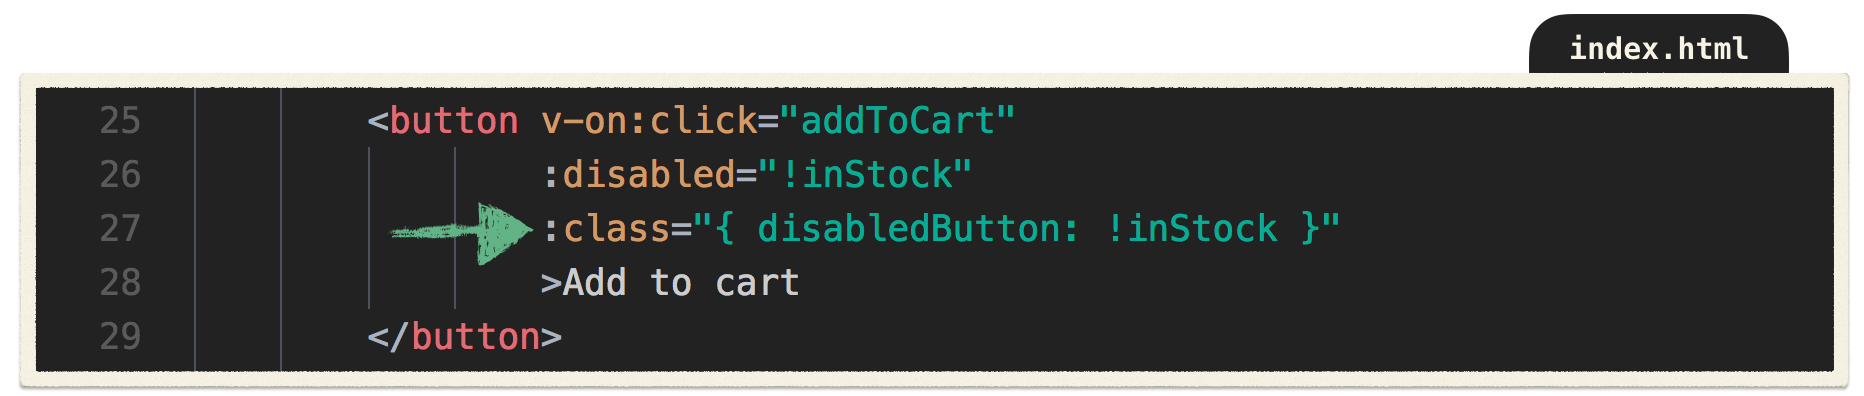
It works! The button is now grayed out when inStock = false .
Let’s break this down.

We’re using the v-bind directive’s shorthand : to bind to our button’s class . Inside the brackets we’re determining the presence of the disabled-button class by the truthiness of the data property inStock .
In other words, when our product is not in stock ( !inStock ), the disabledButton class is added. Since the disabled-button class applies a gray background-color , the button turns gray.
Great! We’ve combined our new skill class binding with attribute binding to disable our button and turn it gray whenever our product inStock is false.
What’d we learn
- Data can be bound to an element’s
styleattribute - Data can be bound to an element’s
class - We can use expressions inside an element’s class binding to evaluate whether a class should appear or not
What else should we know?
- You can bind an entire class object or array of classes to an element

Learn by doing
Challenge:
When inStock is false, bind a class to the “Out of Stock” p tag that adds text-decoration: line-through to that element.
Computed Properties
In this lesson, we’ll be covering Computed Properties. These are properties on the Vue instance that calculate a value rather than store a value.
Goal
Our first goal in this lesson is to display our brand and our product as one string.
Starting Code

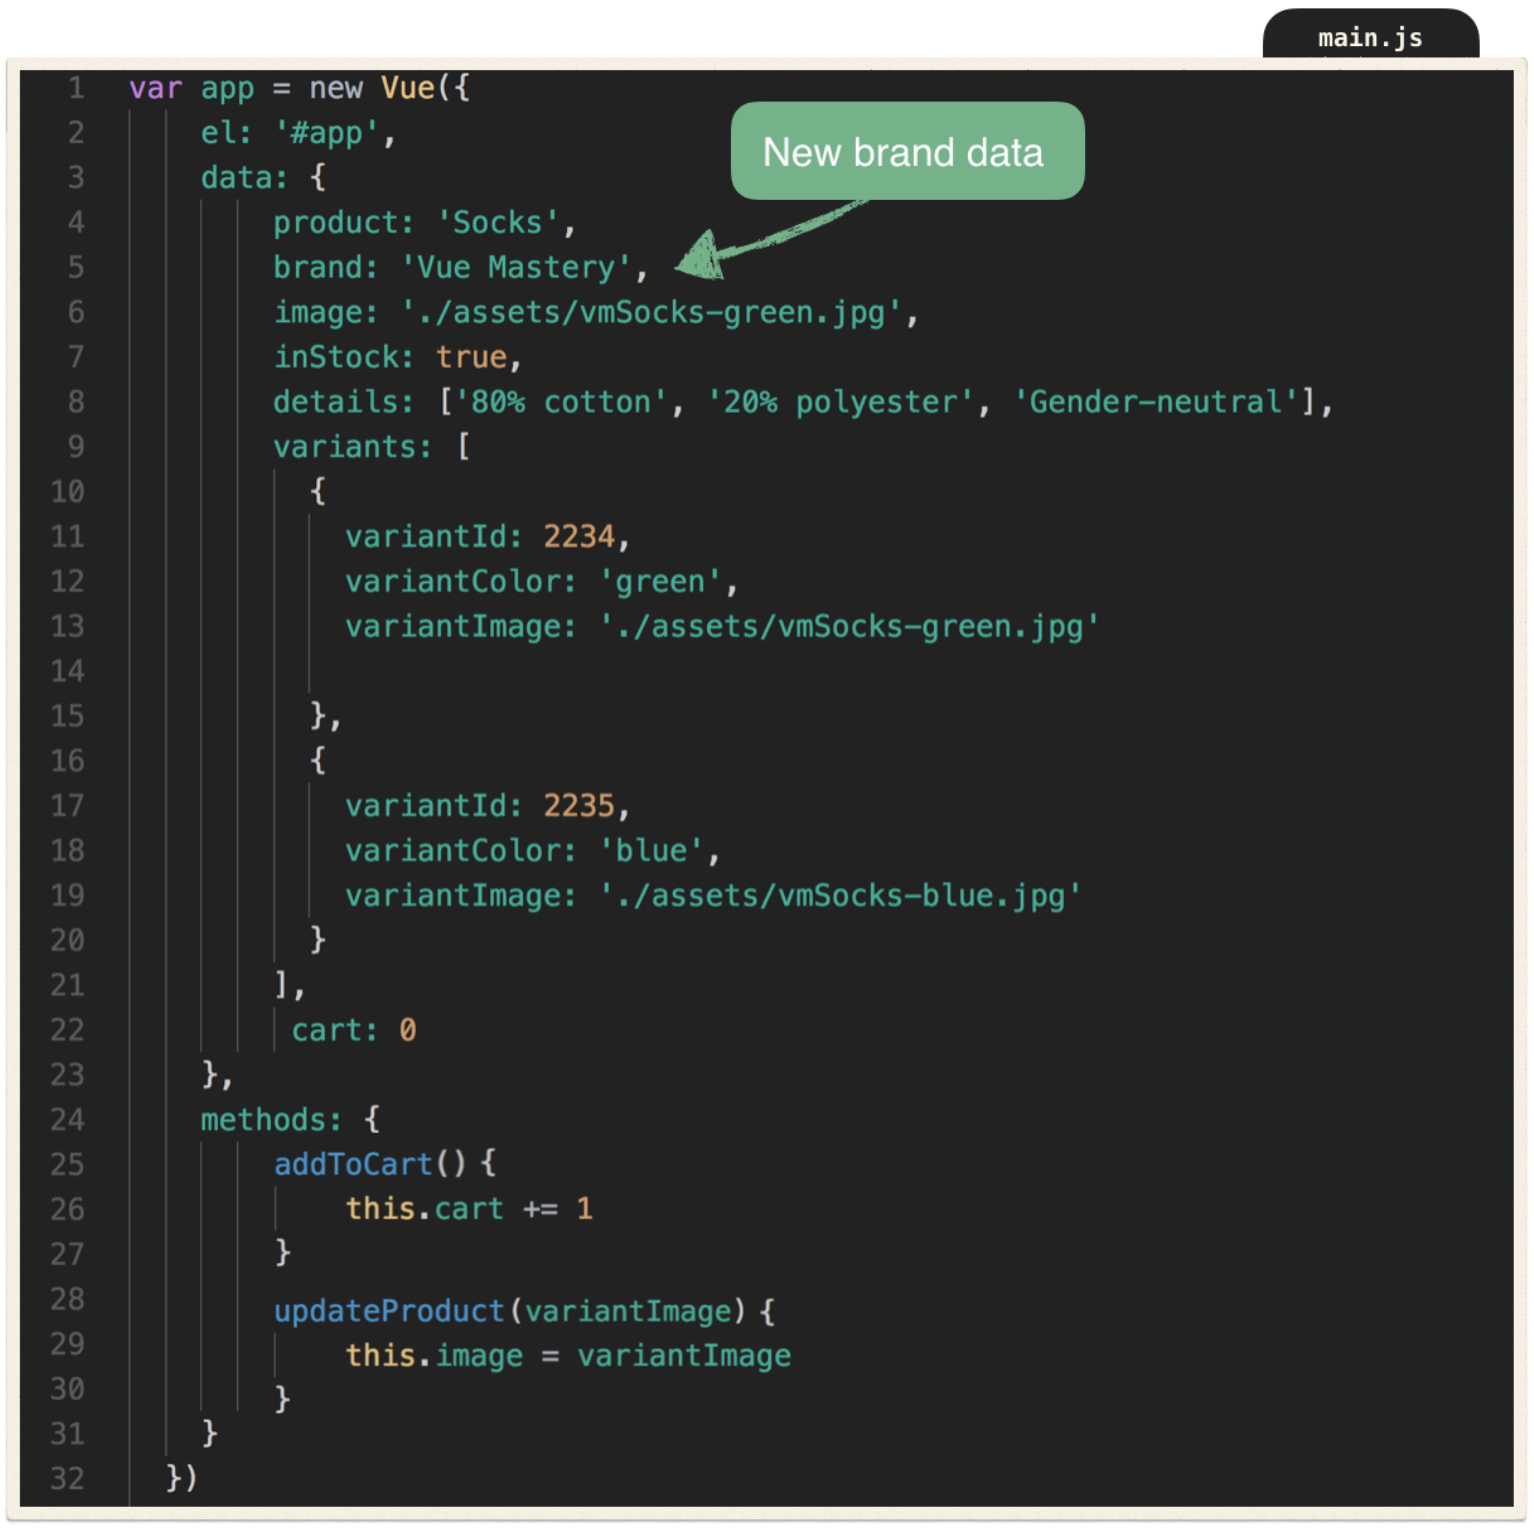
Notice we’ve added a brand .
Problem
We want brand and product to be combined into one string. In other words, we want to display “Vue Mastery Socks” in our h1 instead of just “Socks. How can we concatenate two values from our data?
Solution
Since computed properties calculate a value rather than store a value, let’s add the computed option to our instance and create a computed property called title .
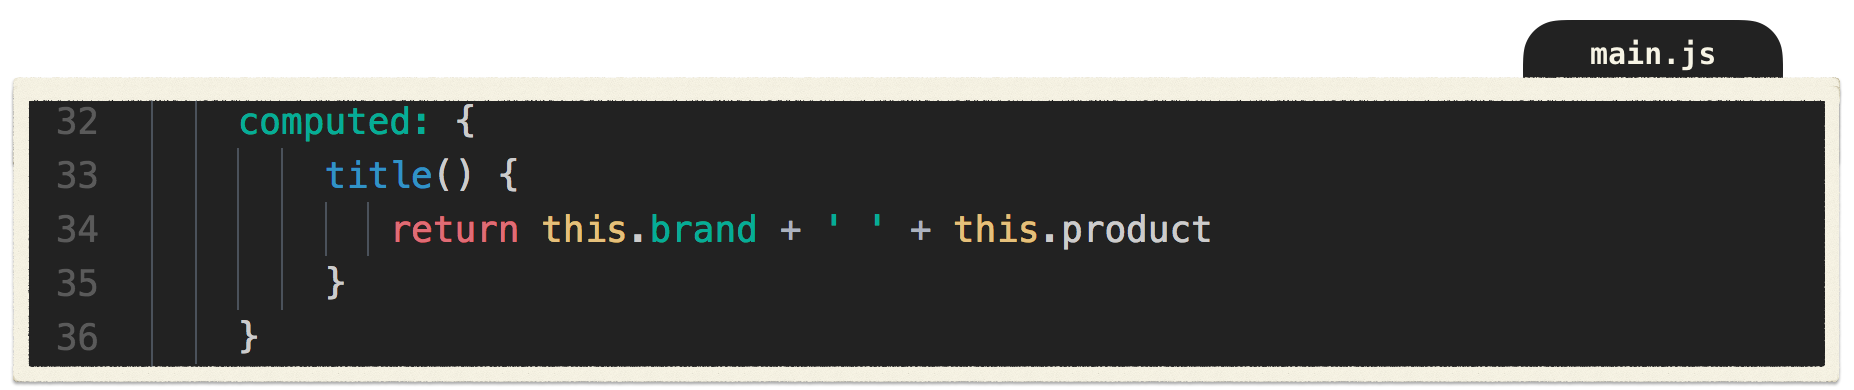
This is pretty straightforward. When title is called, it will concatenate brand and product into a new string and return that string.
Now all we need to do is put title within the h1 of our page.
So instead of:

We now have:

It works! “Vue Mastery Socks” is appearing in our h1 .

We’ve taken two values from our data and computed them in such a way that we’ve created a new value. If brand were to update in the future, let’s say to “Vue Craftery”, our computed property would not need to be refactored. It would still return the correct string: “Vue Craftery Socks”. Our computed property title would still be using brand , just like before, but now brand would have a new value.
That was a pretty simple but not entirely practical example, so let’s work through a more complex usage of a computed property.
A More Complex Example
Currently, the way we are updating our image is with the updateProduct method. We are passing our variantImage into it, then setting the image to be whichever variant is currently hovered on.
This works fine for now, but if we want to change more than just the image based on which variant is hovered on, then we’ll need to refactor this code. So let’s do that now.
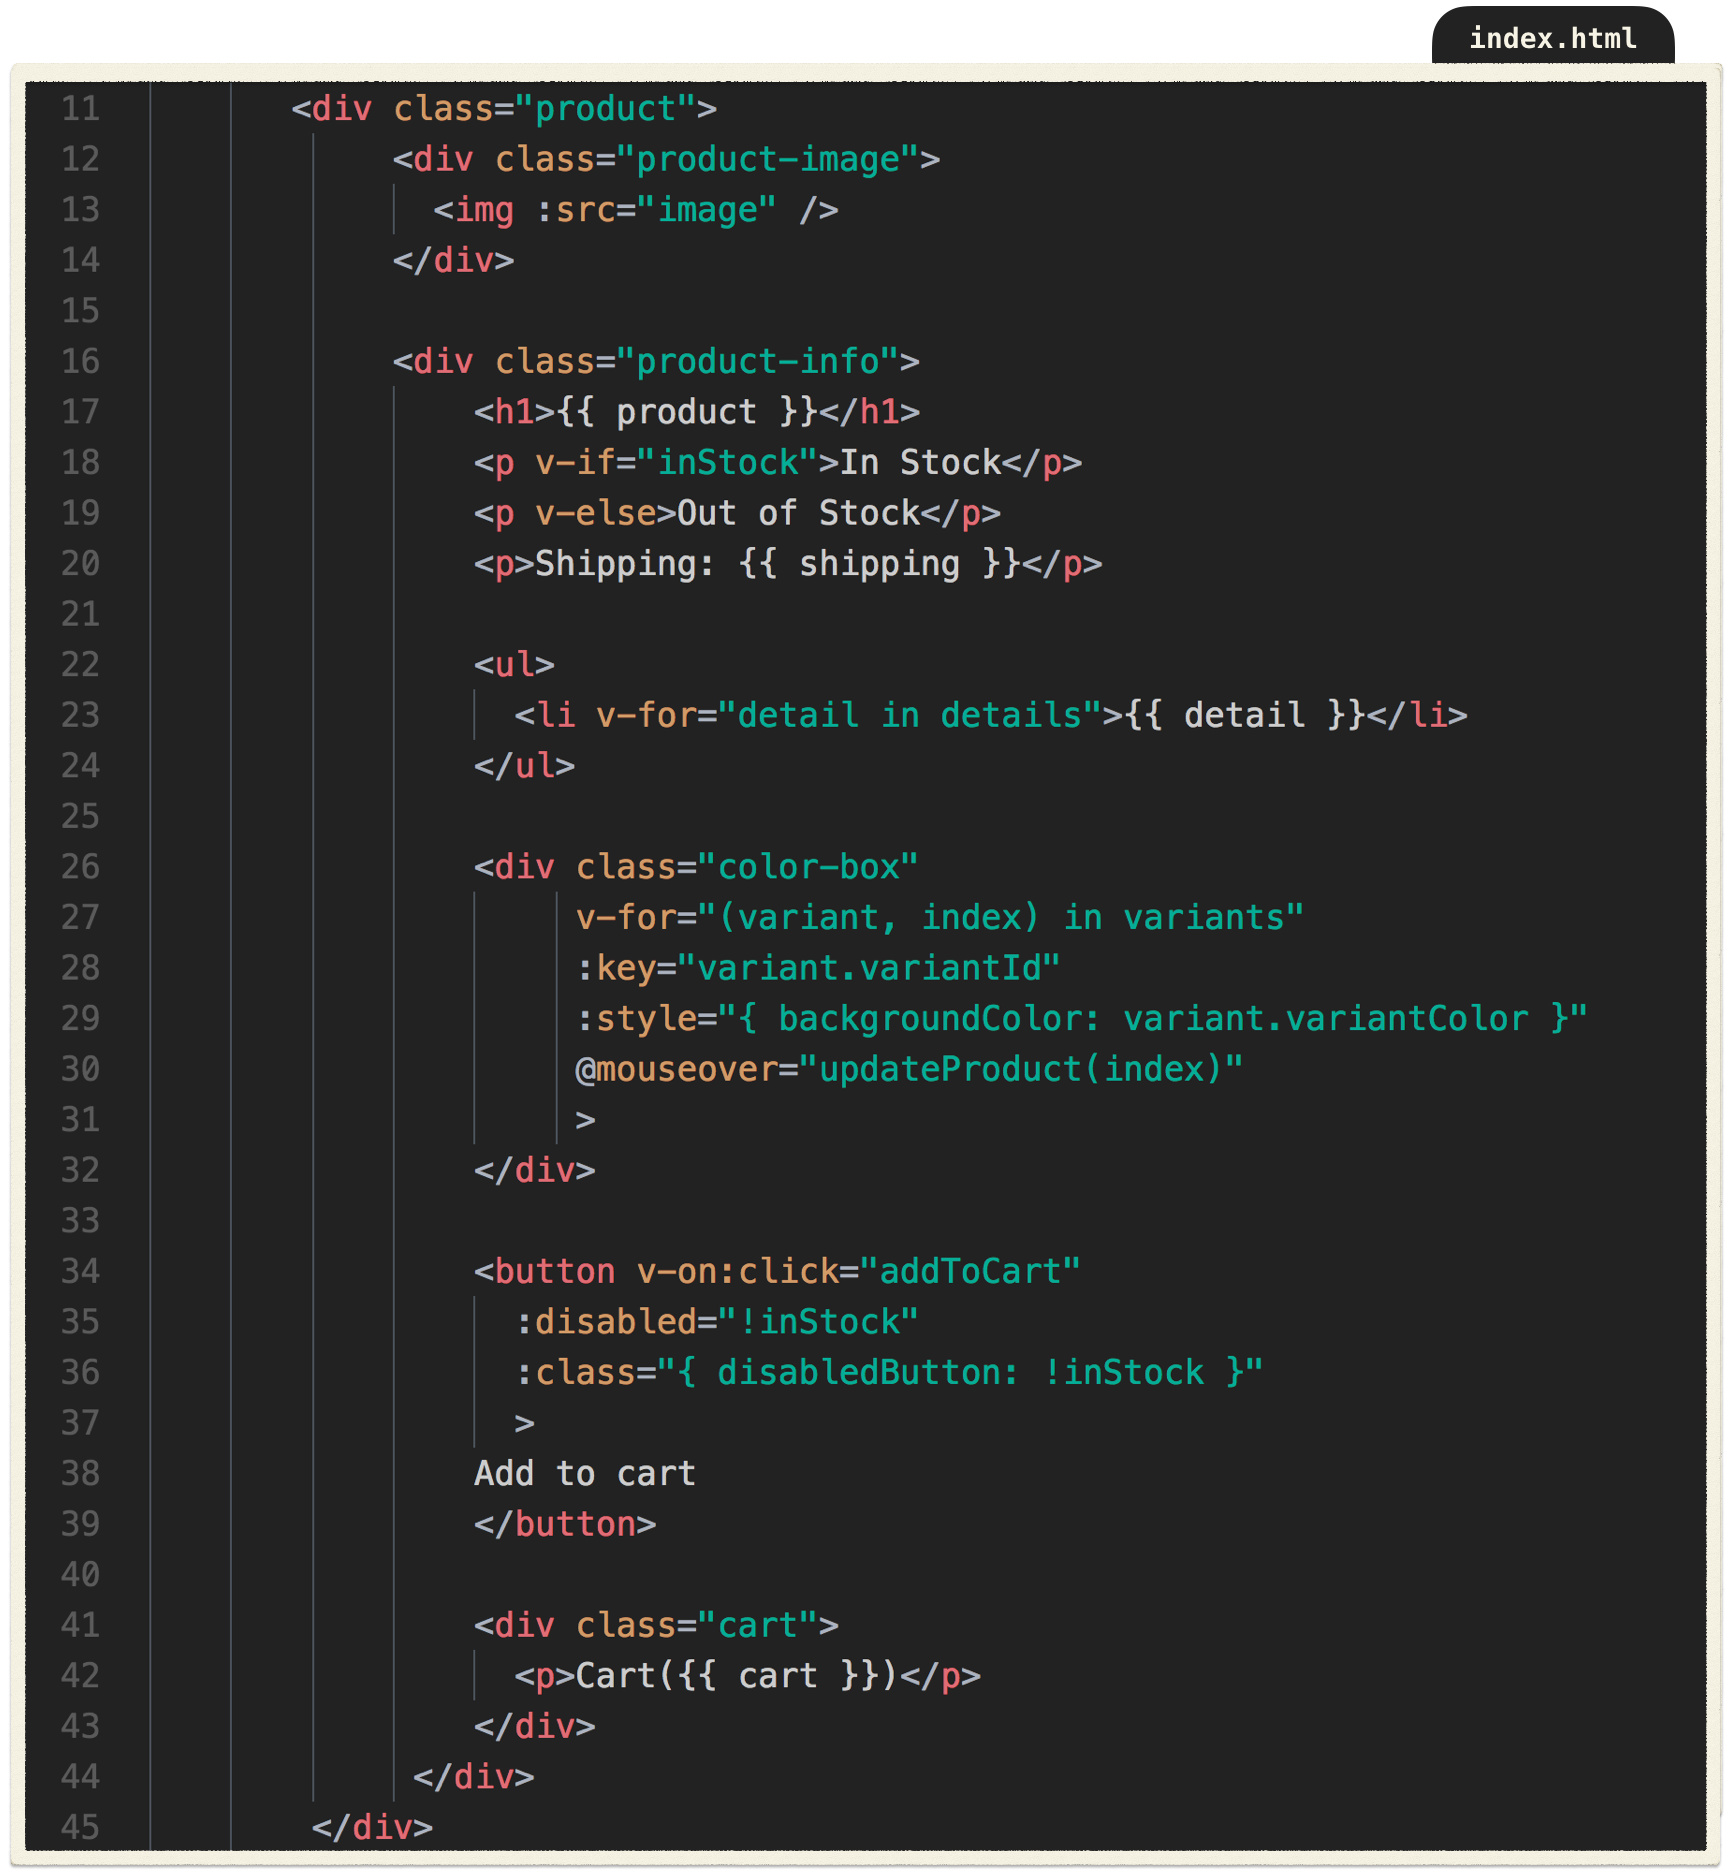
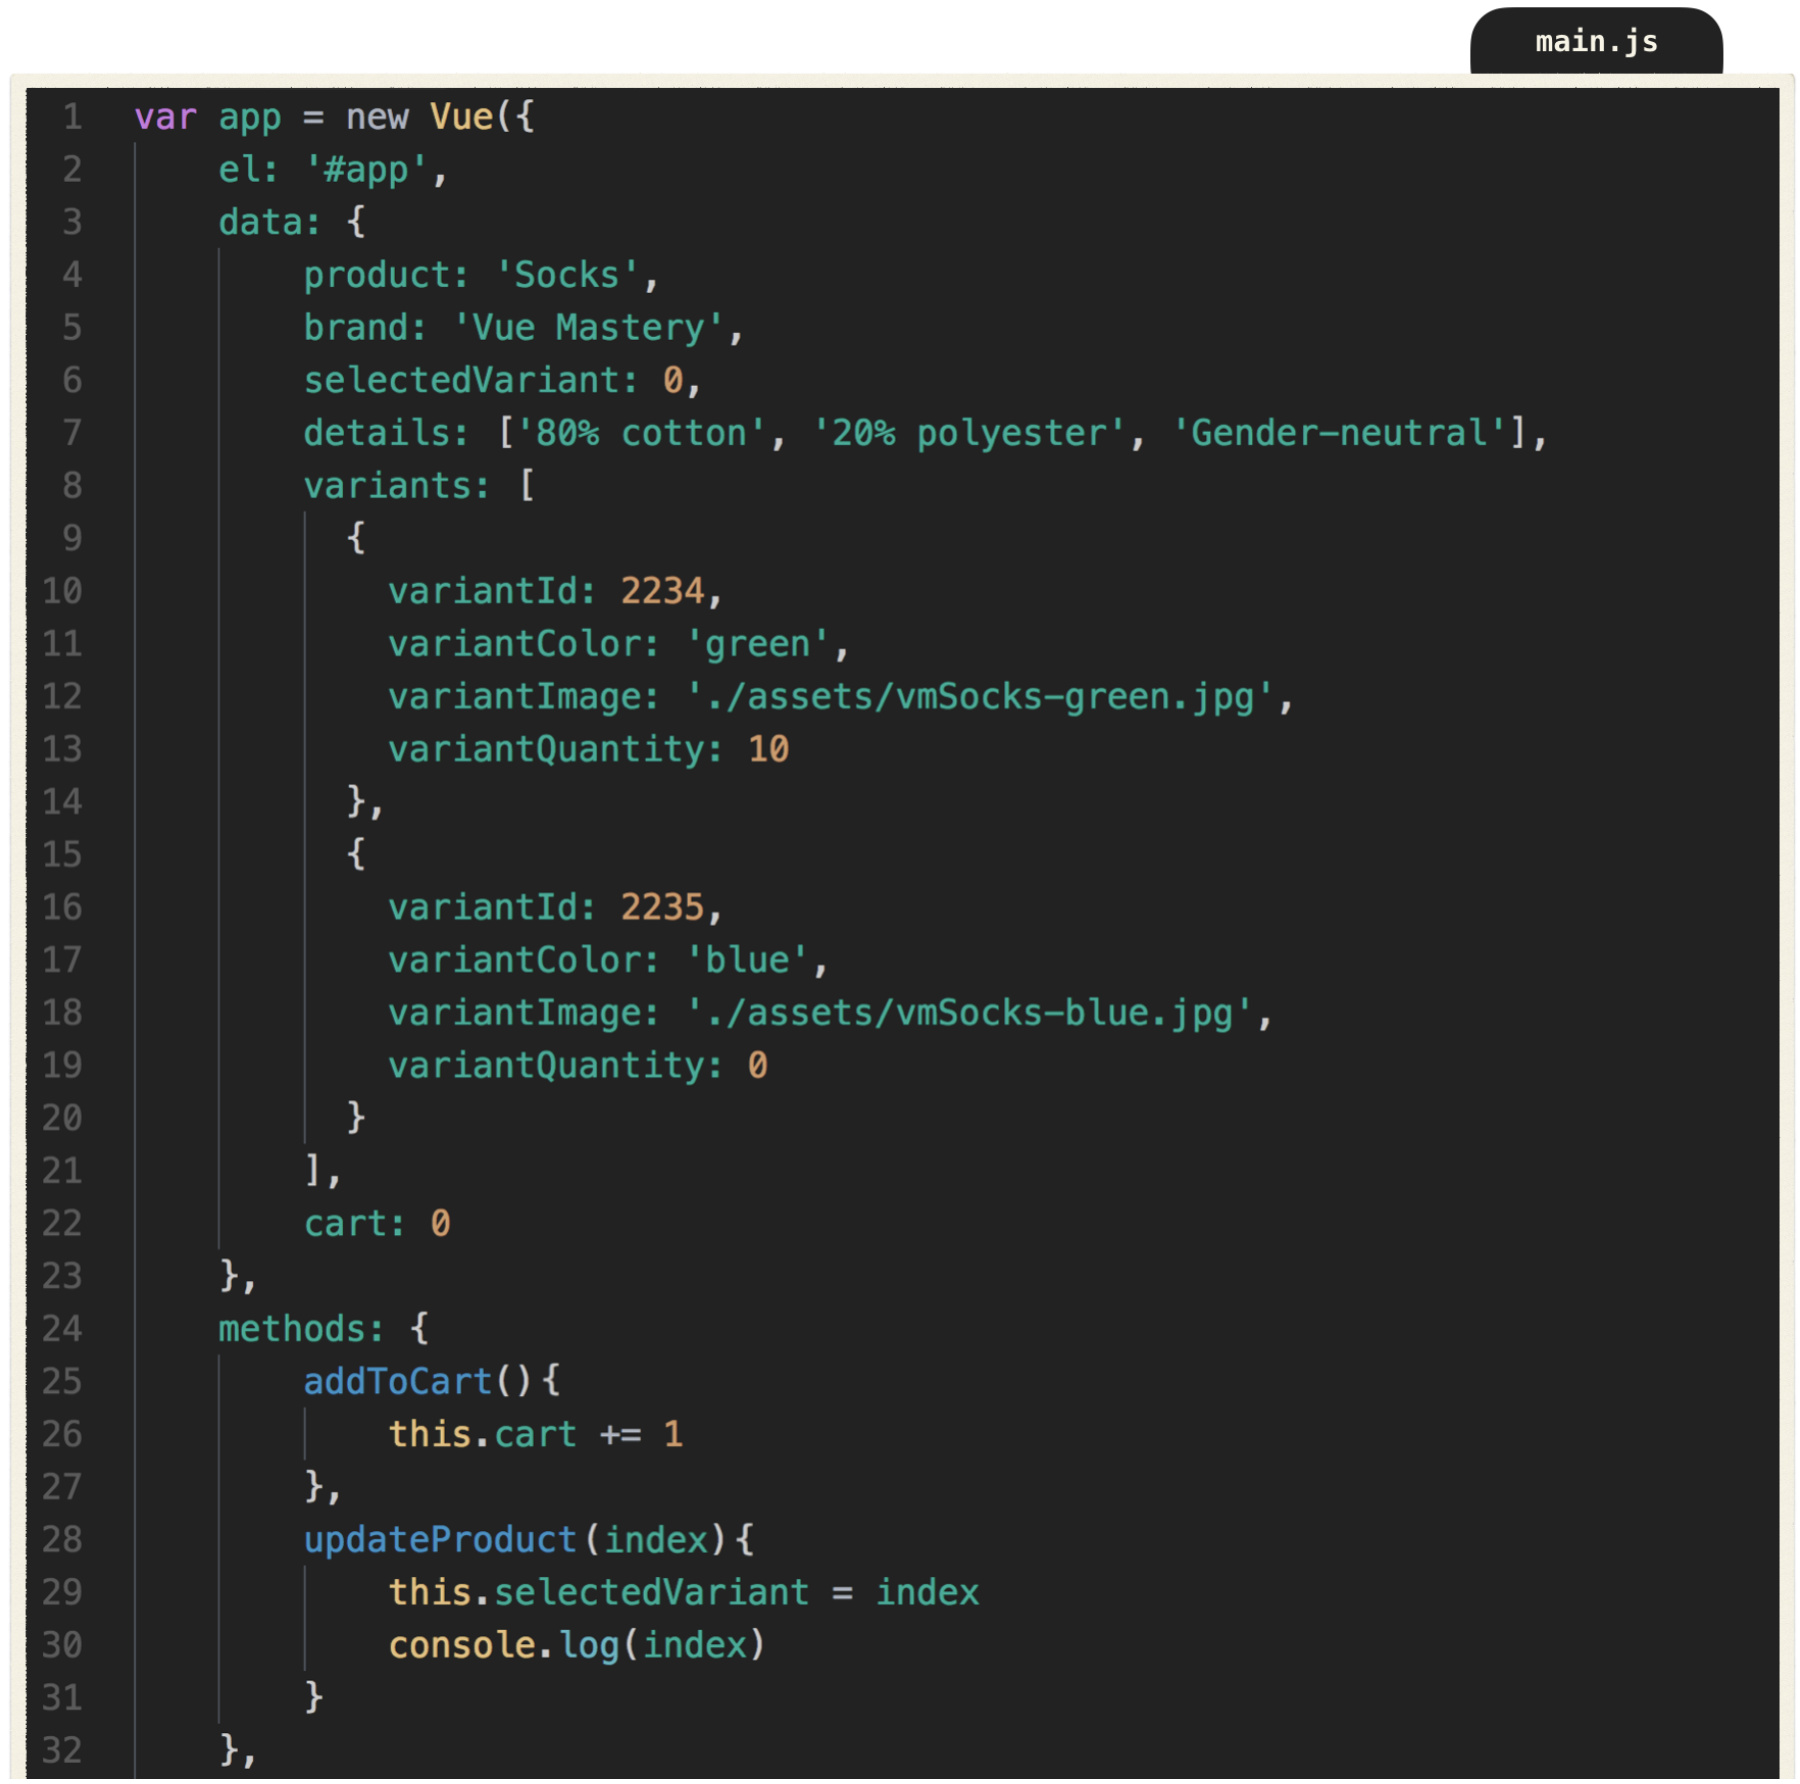
Instead of having image in our data, let’s replace it with selectedVariant , which we’ll initialize as 0.

Why 0? Because we’ll be setting this based on the index that we hover on. We can add index to our v-for here, like so.
Now instead of passing in the variantImage, we’ll pass in the index.

In our updateProduct method, we’ll pass in the index, and instead of updating this.image, we’ll update this.selectedVariant with the index of whichever variant is currently hovered on. Let’s put a console.log in here too, to make sure it’s working.

Now when we refresh and open up the console, we can see that it works. We’re logging 0 and 1 as we hover on either variant.
But notice this warning here in the console:
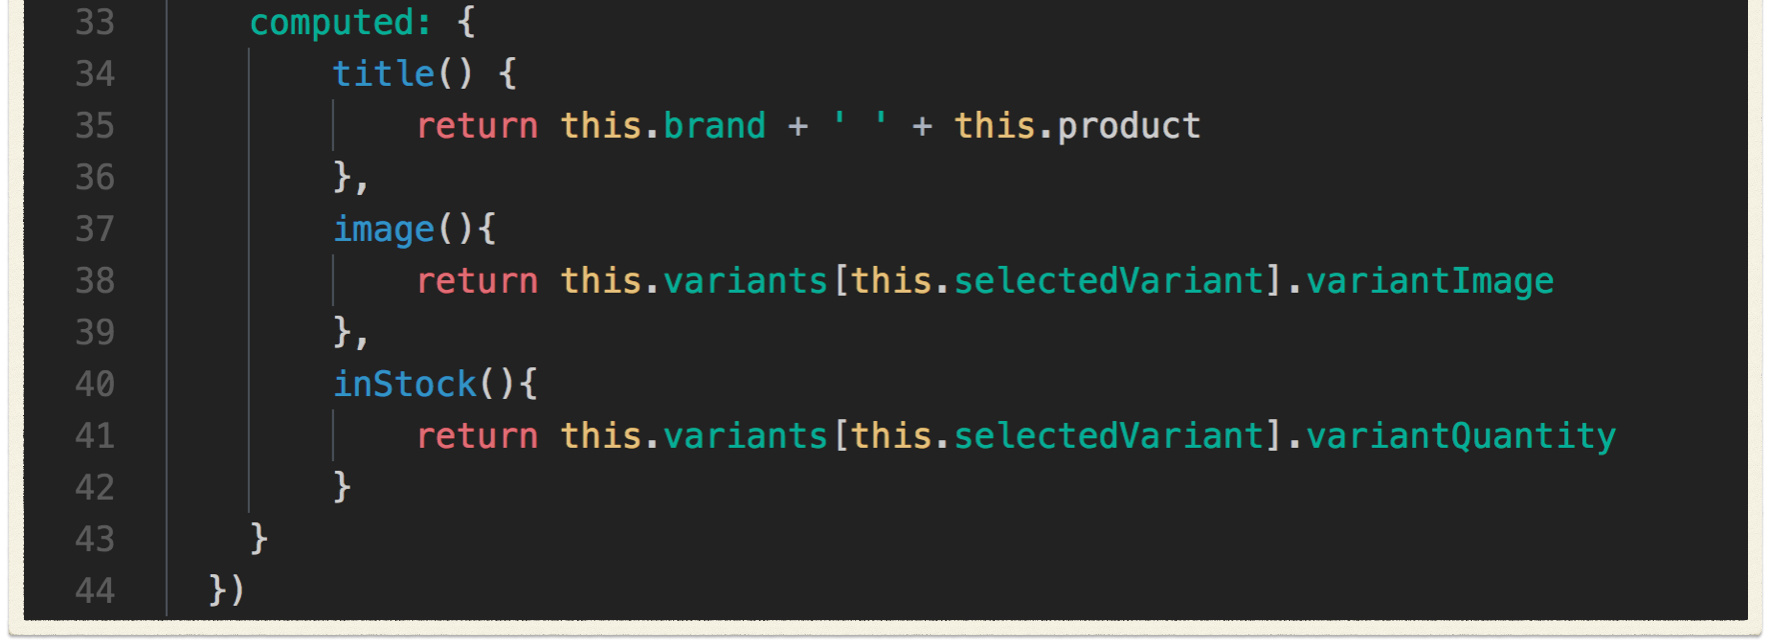
That’s because we deleted image and replaced it with selectedVariant . So let’s turn image into a computed property.

Inside, we are returning this.variants , which is our array of variants, and we are using our selectedVariant , which is either 0 or 1, to target the first or second element in that array, then we’re using dot notation to target its image.
When we refresh, our image is toggling correctly like it was before, but now we’re using a computed property to handle this instead.
Now that we have refactored the updateProduct method to update the selectedVariant , we can access other data from the variant, such as the variantQuantity they both now have.
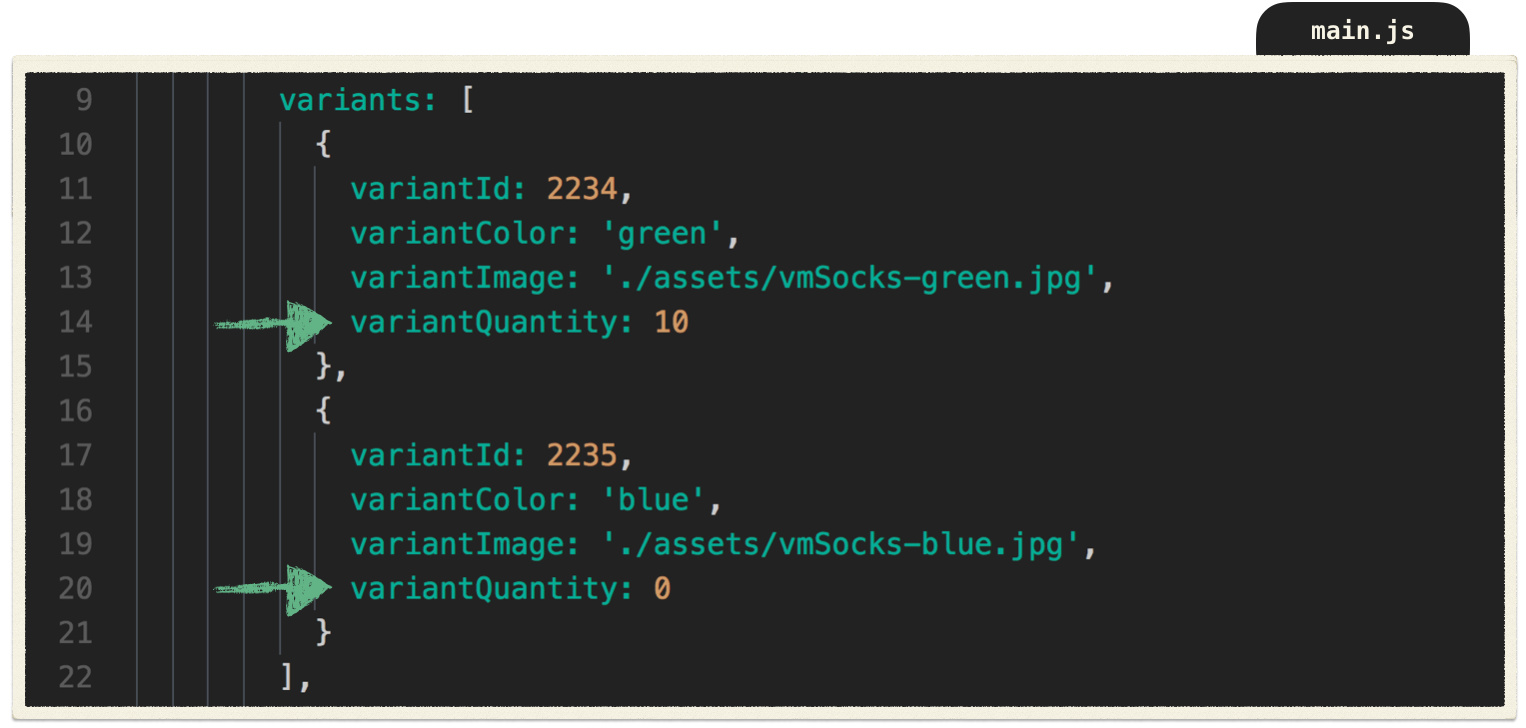
Just like we did with image , let’s remove inStock from our data and turn it into a computed property that uses our variant’s quantities.

This is very similar to our image computed property, we’re just targeting the variantQuantity now rather than the variantImage .
Now when we hover on the blue variant, which has a quantity of zero, inStock will evaluate to false since 0 is “falsey”, so we’ll now see Out of Stock appear.
Notice how our button is still conditionally turning gray whenever inStock is false, just like before.
Why? Because we’re still using inStock to bind the disabledButton class to that button. The only difference is that now inStock is a computed property rather than a data value.
What’d we learn
- Computed properties calculate a value rather than store a value.
- Computed properties can use data from your app to calculate its values.
What else should we know?
Computed properties are cached, meaning the result is saved until its dependencies change. So when quantity changes, the cache will be cleared and the **next time you access the value of inStock , it will return a fresh result, and cache that result.
With that in mind, it’s more efficient to use a computed property rather than a method for an expensive operation that you don’t want to re-run every time you access it.
It is also important to remember that you should not be mutating your data model from within a computed property. You are merely computing values based on other values. Keep these functions pure.
Learn by doing
Challenge:
Add a new boolean data property onSale and create a computed property that takes brand , product and onSale and prints out a string whenever onSale is true.
Components
Welcome
In this lesson we’ll be learning about the wonderful world of components. Components are reusable blocks of code that can have both structure and functionality. They help create a more modular and maintainable codebase.
Goal
Throughout the course of this lesson we’ll create our first component and then learn how to share data with it.
Starting Code
Problem
In a Vue application, we don’t want all of our data, methods, computed properties, etc. living on the root instance. Over time, that would become unmanageable. Instead, we’ll want to break up our code into modular pieces so that it is easier and more flexible to work with.
Solution
We’ll start out by taking the bulk of our current code and moving it over into a new component for our product.
We register the component like this:

The first argument is the name we choose for the component, and the second is an options object, similar to how we created our initial Vue instance.
In the Vue instance, we used the el property to plug into an element in the DOM. For a component, we use the template property to specify its HTML.
Inside that options object, we’ll add our template.
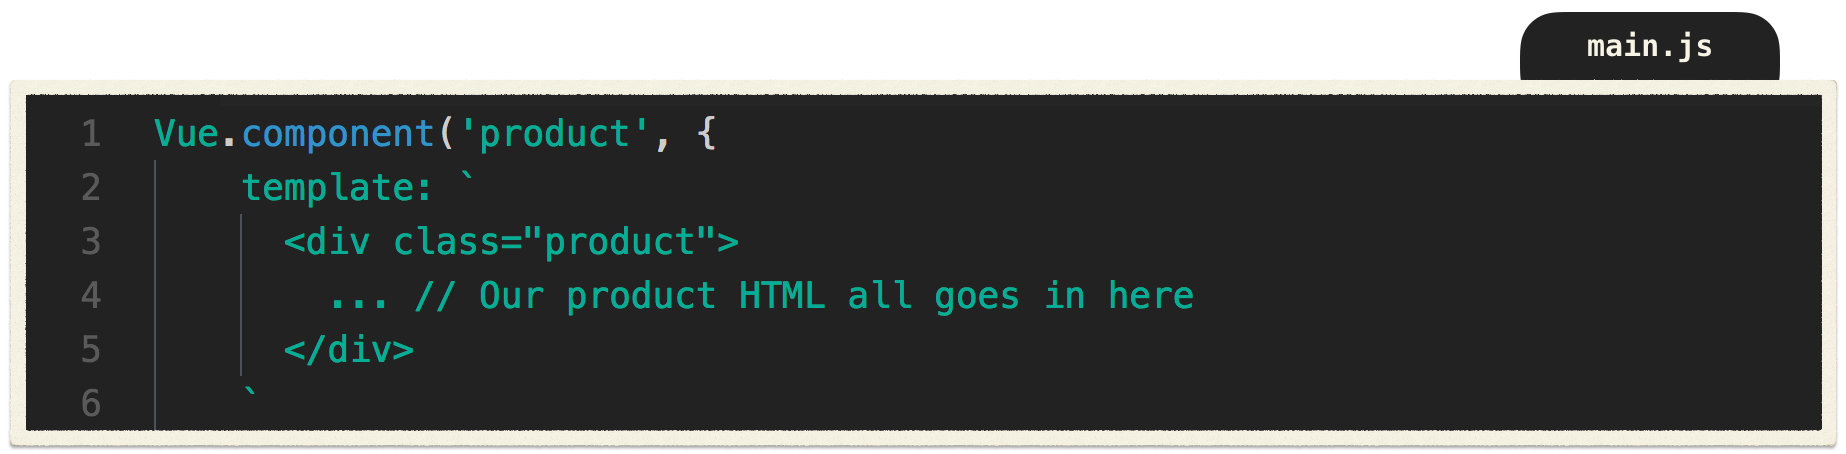
There are several ways to create a template in Vue, but for now we’ll be using a template literal, with back ticks.
If all of our template code was not nested within one element, such as this div with the class of “product”, we would have gotten this error:
Component template should contain exactly one root element
In other words, a component’s template can only return one element.
So this will work, since it’s only one element:

But this won’t work, since it’s two sibling elements:

So if we have multiple sibling elements, like we have in our product template, they must be wrapped in an outer container element so that the template has exactly one root element :
Now that our template is complete with our product HTML, we’ll add our data, methods and computed properties from the root instance into our new component.
As you can see, this component looks nearly identical in structure to our original instance. But did you notice that data is now a function? Why the change?
Because we often want to reuse components. And if we had multiple product components, we’d need to ensure a separate instance of our data was created for each component. Since data is now a function that returns a data object, each component will definitely have its own data. If data weren’t a function, each product component would be sharing the same data everywhere it was used, defeating the purpose of it being a reusable component.
Now that we’ve moved our product-related code into its own product component, our root instance looks like this:

All we need to do now is neatly tuck our product component within our index.html.

Now our product is being displayed again.
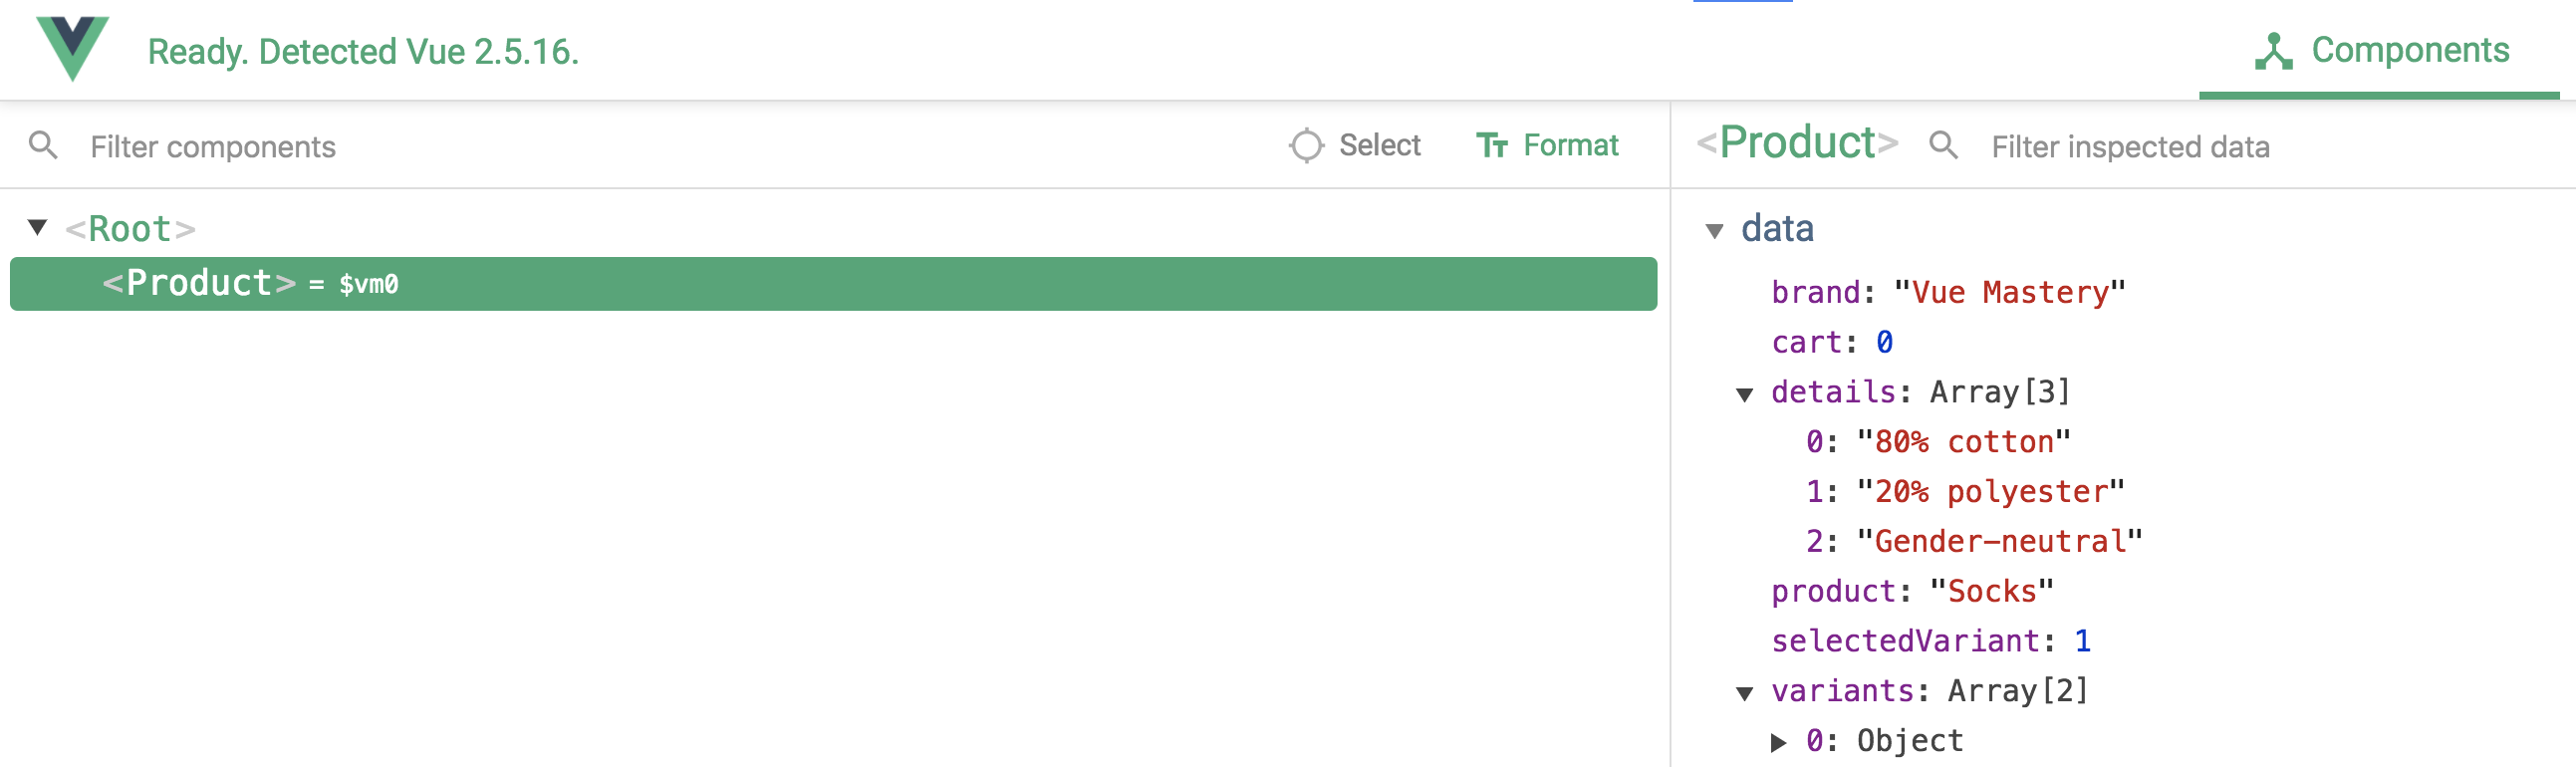
If we open the Vue dev tools, we’ll see that we have the Root and then below that, the Product component.
Just to demonstrate the handy power of components, let’s add two more product components, to see how easy it is to reuse a component.
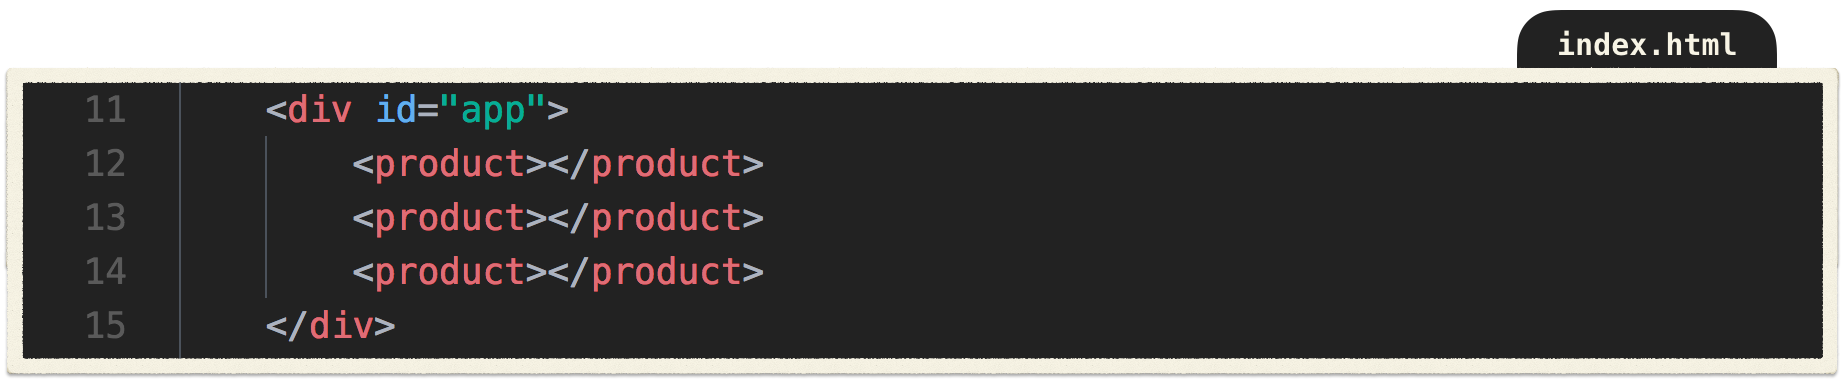
We’ll only be using one product component moving forward, however.
Problem
Often in an application, a component will need to receive data from its parent. In this case, the parent of our product component is the root instance itself.
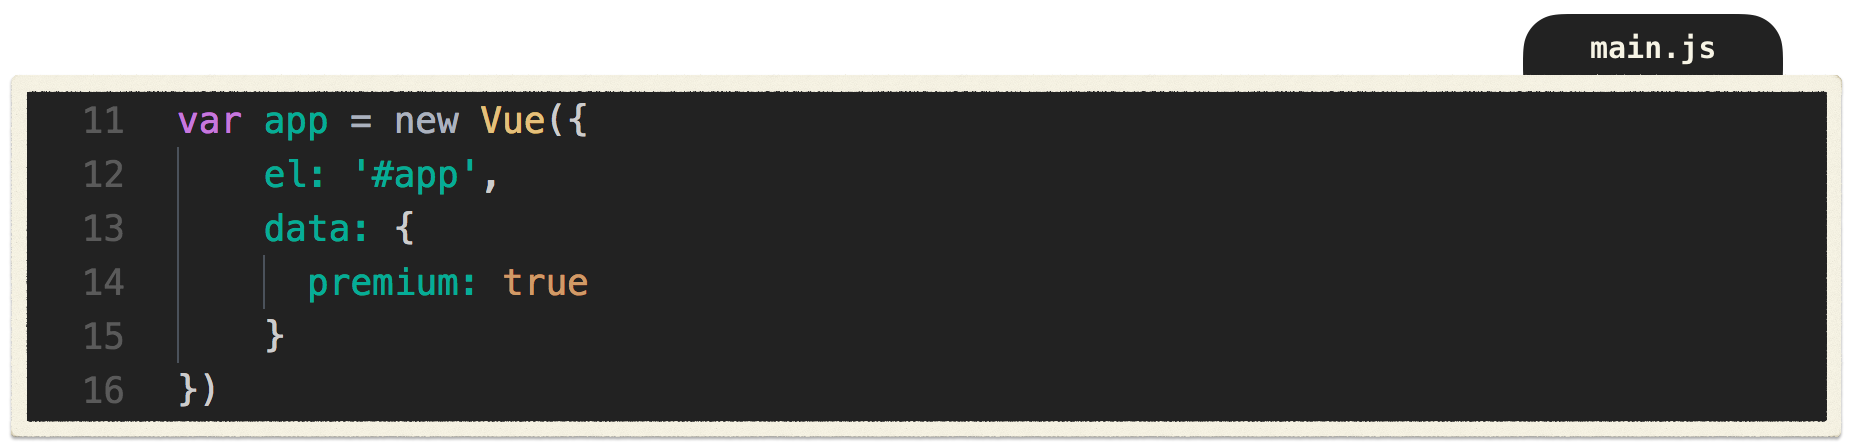
Let’s say our root instance has some user data on it, specifying whether the user is a premium account holder. If so, our instance now might look like this:
Let’s also say that if a user is a premium member, then all of their shipping is free.
That means we’ll need our product component to display different values for shipping based on what the value of premium is, on our root instance.
So how can we send premium from the root instance, down into its child, the product component?
Solution
In Vue, we use props to handle this kind of downward data sharing. Props are essentially variables that are waiting to be filled with the data its parent sends down into it.
We’ll start by specifying what props the product component is expecting to receive by adding a props object to our component.

Notice that we’re using some built-in props validation, where we’re specifying the data type of the premium prop as Boolean, and making it required.
Next, in our template, let’s make an element to display our prop to make sure it’s being passed down correctly.

So far so good. Our product component knows that it will be receiving a required boolean, and it also has a place to display that data.
But we have not yet passed premium into the product component. We can do this with a custom attribute, which is essentially a funnel on the component that we can pass premium through.

So what are we doing here?
We’ve given our product component a prop, or a custom attribute , called premium . We are binding that custom attribute : to the premium that lives in our instance’s data.
Now our root instance can pass premium into its child product component. Since the attribute is bound to premium in our root instance’s data, the current value of premium in our instance’s data will always be sent to product .
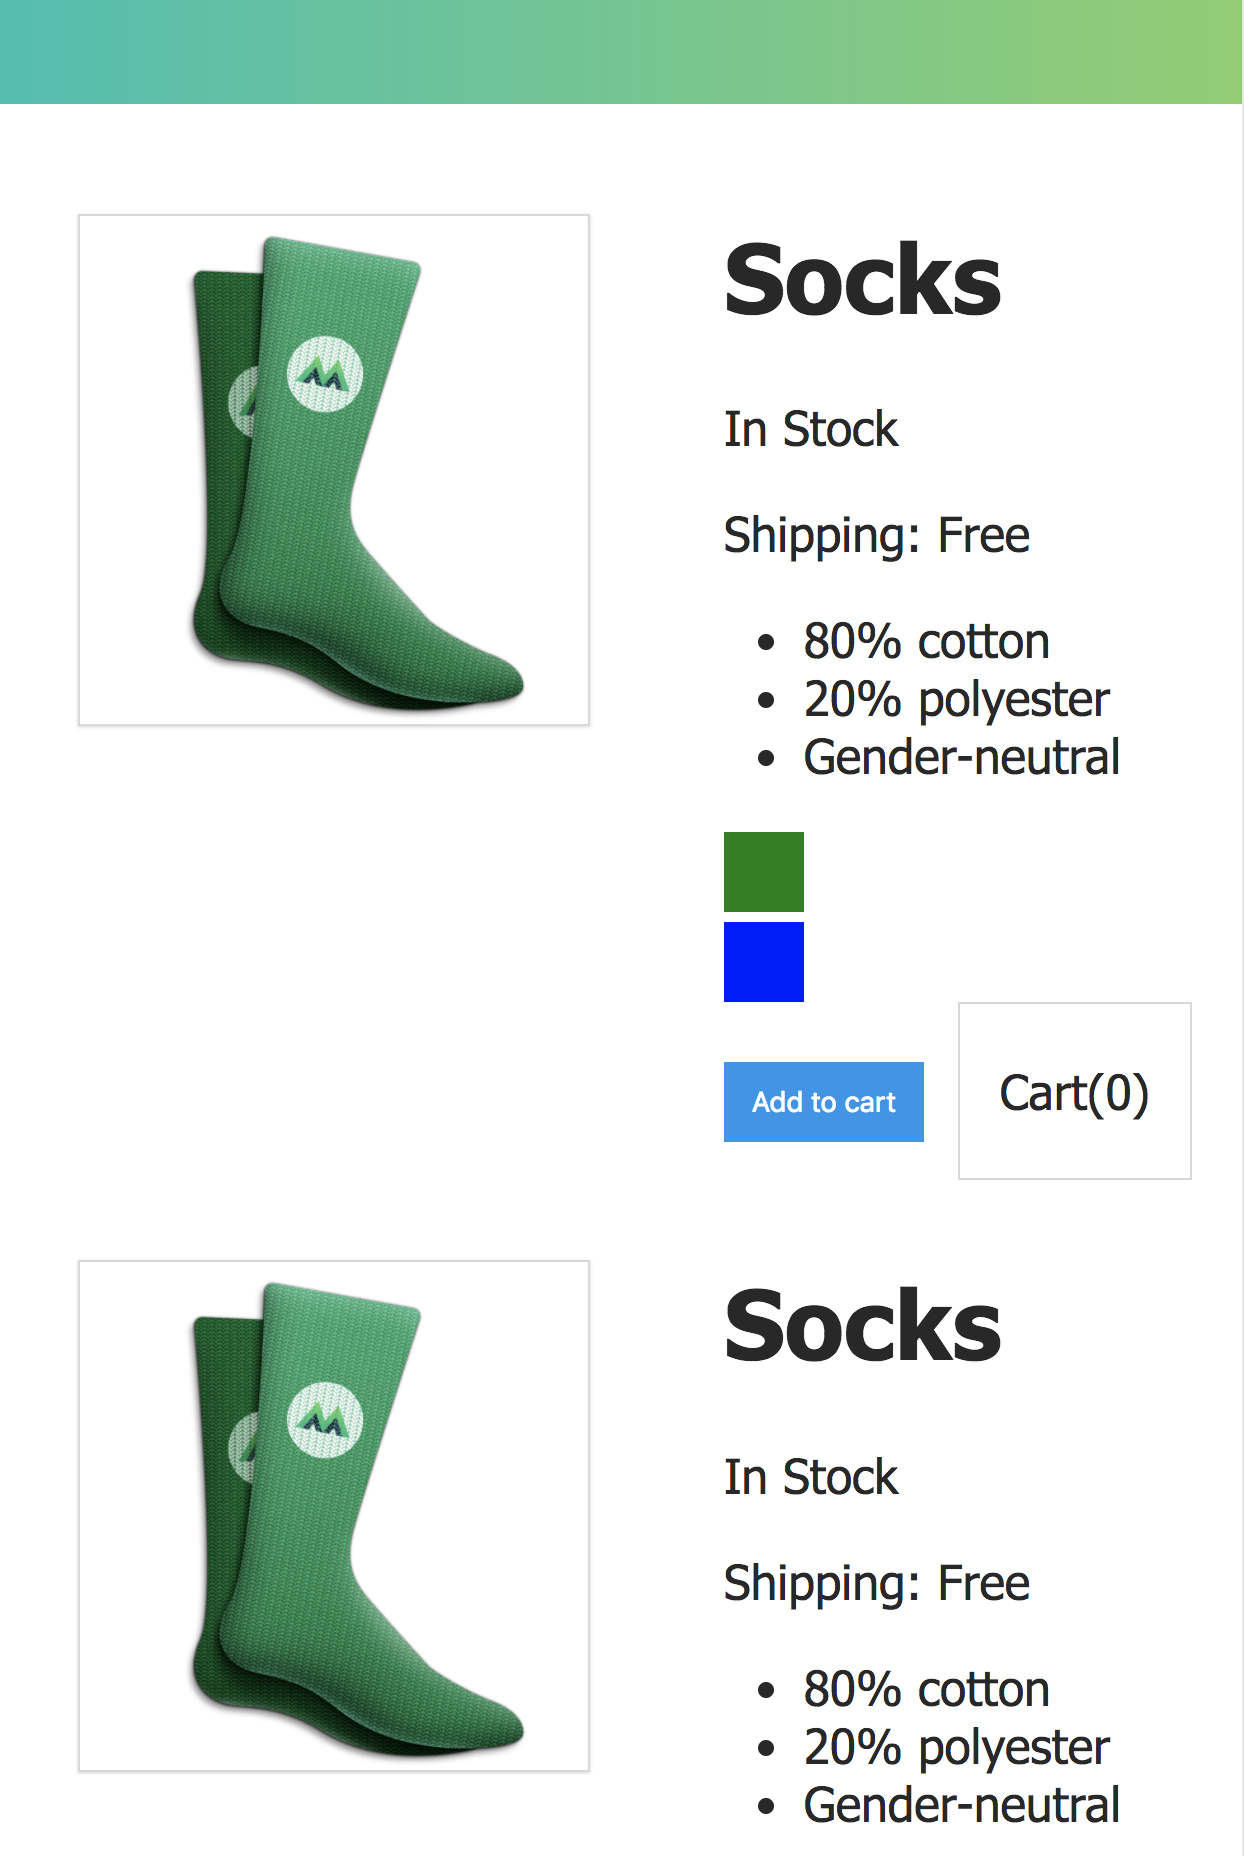
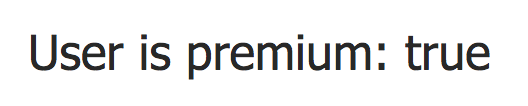
If we’ve wired this up correctly, we should see: “User is premium: true”.
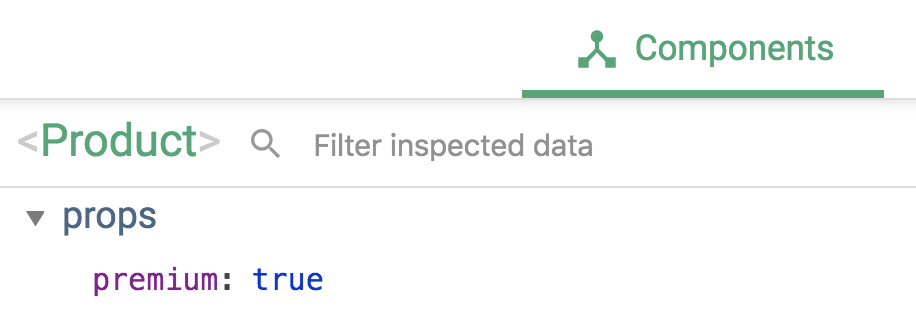
Great, it’s working. If we check the Vue dev tools, we can see on the right that product now has a prop called premium with the value of true .
Now that we’re successfully passing data into our component, let’s use that data to affect what we show for shipping. Remember, if premium is true, that means shipping is free. So let’s use our premium prop within a computed property called shipping.
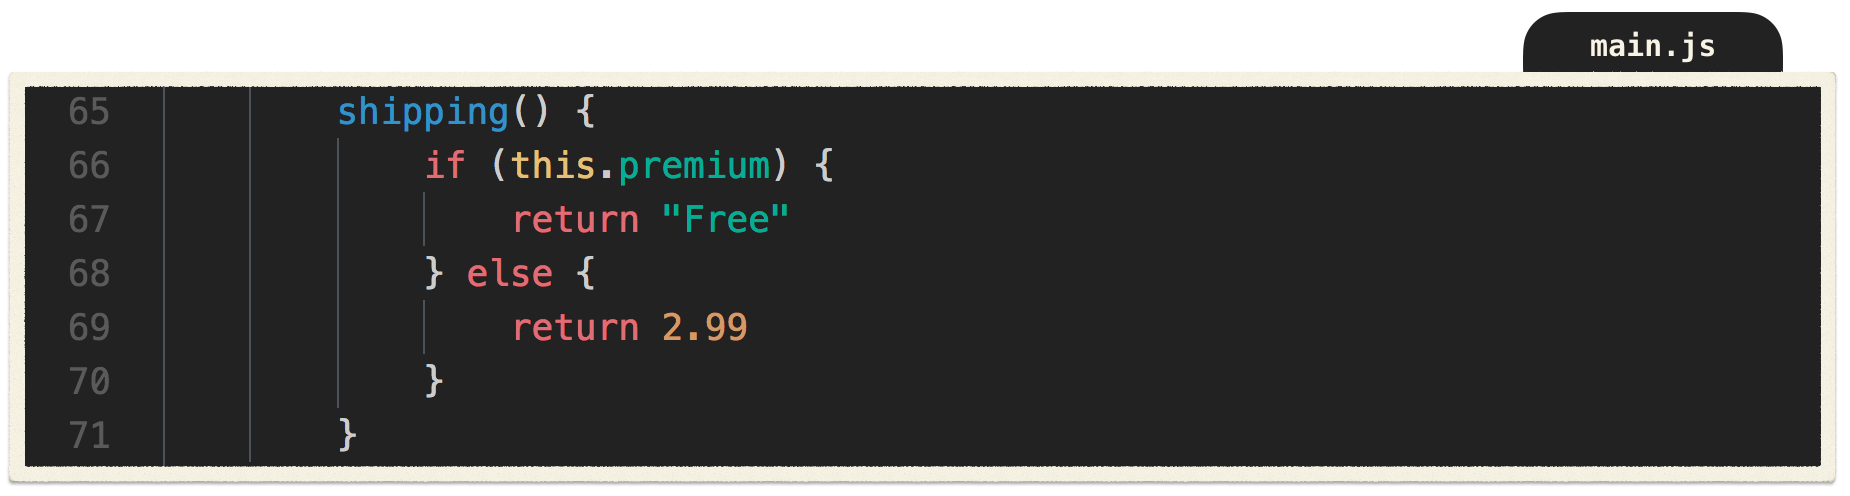
Now, we’re using our prop ( this.premium ), and whenever it’s true, shipping will return “Free”. Otherwise, it’ll return 2.99.
Instead of saying User is premium: {{ premium }} , let’s use this element to show our shipping cost, by calling our computed property shipping from here:

And now we see “Shipping: Free”. Why? Because premium is true, so shipping returned “Free”.
Awesome. So now we’ve passed data from our parent into its child component, and used that data within a computed property that displays different shipping values based on the value of our prop.
Great work!
Good to Know: You should not mutate props inside your child components.
What’d we learn
- Components are blocks of code, grouped together within a custom element
- Components make applications more manageable by breaking up the whole into resuable parts that have their own structure and behavior
- Data on a component must be a function
- Props are used to pass data from parent to child
- We can specify requirements for the props a component is receiving
- Props are fed into a component through a custom attribute
- Props can be dynamically bound to the parent’s data
- Vue dev tools provide helpful insight about your components
Learn by doing
Challenge:
Create a new component for product-details with a prop of details .
Communicating Events
In our previous lesson, we learned how to create components and pass data down into them via props. But what about when we need to pass information back up? In this lesson we’ll learn how to communicate from a child component up to its parent.
Goal
By the end of this lesson, our product component will be able to tell its parent, the root instance, that an event has occurred, and send data along with that event notification.
Starting Code
Currently, our app looks like this:
    <div id="app">
      <product :premium="premium"></product>
    </div>
Vue.component('product', {
props: {
premium: {
type: Boolean,
required: true
}
},
template: `
<div id="product">
<div class="product-image">
<img :src="image" />
</div>
<div class="product-info">
<div class="cart">
<p>Cart({{ cart }})</p>
</div>
<h1>{{ title }}</h1>
<p>Shipping: {{ shipping }}</p>
<p v-if="inStock">In Stock</p>
<p v-else>Out of Stock</p>
<h2>Details</h2>
<ul>
<li v-for="detail in details">{{ detail }}</li>
</ul>
<h3>Colors:</h3>
<div v-for="variant in variants" :key="variant.variantId">
<div class="color-box" :style="{ backgroundColor: variant.variantColor }" @mouseover="updateProduct(index)"></div>
</div>
<button :class="{ disabledButton: !inStock }" v-on:click="addToCart" :disabled="!inStock">Add to Cart</button>
</div>
</div>
`,
data() {
return {
product: "Socks",
brand: "Vue Mastery",
selectedVariant: 0,
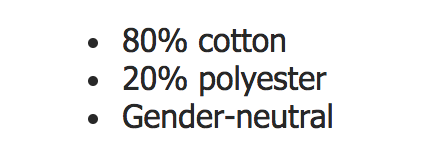
details: ["80% cotton", "20% polyester", "Gender-neutral"],
variants: [
{
varaintId: 1,
variantQuantity: 15,
variantColor: "green",
variantImage: "./assets/vmSocks-green.jpg"
},
{
variantId: 2,
variantQuantity: 0,
variantColor: "blue",
variantImage: "./assets/vmSocks-blue.jpg"
}
],
cart: 0
}
},
methods: {
addToCart() {
this.cart += 1
},
updateProduct(index) {
this.selectedVariant = index
}
},
computed: {
title() {
return this.brand + ' ' + this.product
},
image() {
return this.variants[this.selectedVariant].variantImage
},
inStock() {
if (this.quantity > 0) {
return true
} else {
return false
}
},
shipping() {
if (this.premium) {
return "Free"
} else {
return 2.99
}
}
}
})
var app = new Vue({
el: '#app',
data: {
premium: true
}
})
Problem
Now that product is its own component, it doesn’t make sense for our cart to live within product . It would get very messy if every single product had its own cart that we had to keep track of. Instead, we’ll want the cart to live on the root instance, and have product communicate up to that cart when its “Add to Cart” button is pressed.
Solution
Let’s move the cart back to our root instance.
    var app = new Vue({
      el: '#app',
      data: {
        premium: true,
        cart: 0
      }
    })
And we’ll move our cart’s template into our index.html:
      <div id="app">
        <div class="cart">
          <p>Cart({{ cart }})</p>
        </div>

        <product :premium="premium"></product>
      </div>
As expected, now if we click on the “Add to Cart” button, nothing happens.
What do we want to happen? When the “Add to Cart” button is pressed in product , the root instance should be notified, which then triggers a method it has to update the cart .
First, let’s change out the code we have in our component’s addToCart method.
It was this:
        addToCart() {
          this.cart += 1
        },
Now it’s this:
        addToCart() {
          this.$emit('add-to-cart')
        },
What does this mean?
It means: when addToCart is run, emit an event by the name of “add-to-cart”. In other words, when the “Add to Cart” button is clicked, this method fires, announcing that the click event just happened.
But right now, we have nowhere listening for that announcement that was just emitted. So let’s add that listener here:
<product :premium="premium" @add-to-cart="updateCart"></product>
Here we are using @add-to-cart in a similar way as we are using :premium . Whereas :premium is a funnel on product that data can be passed down into, @add-to-cart is essentially a radio that can receive the event emission from when the “Add to Cart” button was clicked. Since this radio is on product , which is nested within our root instance, the radio can blast the announcement that a click happened, which will trigger the updateCart method, which lives on the root instance.
@add-to-cart="updateCart"
This code essentially translates to: “When you hear that the “Add to Cart” event happened, run the updateCart method.
That method should look familiar:
      methods: {
        updateCart() {
          this.cart += 1
        }
      }
It’s the method that used to be on product . Now it lives on our root instance, and is called whenever the “Add to Cart” button is pressed.
Now when our button is pressed, it triggers addToCart , which emits an announcement. Our root instance hears the announcement through the radio on its product component, and the updateCart method runs, which increments the value of cart .
So far so good.
But in a real application, it’s not helpful to only know that a product was added to the cart, we’d need to know which product was just added to the cart. So we’ll need to pass data up along with the event announcement.
We can add that in as a second argument when we emit an event:
        addToCart() {
          this.$emit('add-to-cart', this.variants[this.selectedVariant].variantId)
        },
Now, along with the announcement that the click event occurred, the id of the product that was just added to the cart is sent as well. Instead of just incrementing the number of cart, we can now make cart an array:
cart: []
And push the product’s id into our cart array:
      methods: {
        updateCart(id) {
          this.cart.push(id)
        }
      }
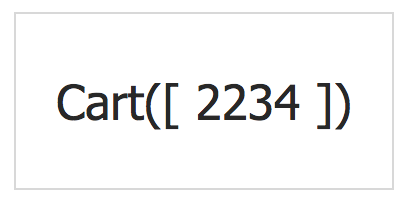
Now our array has one product within it, whose id is being displayed on the page.
But we don’t need to display the contents of our array here. Instead, we just want to display the amount of products in our array, so we can say this in our template instead:
<p>Cart({{ cart.length }})</p>
Now we’re just displaying the length of the array, or in other words: the number of products in the cart. It looks just like it did before, but instead of only incrementing the value of cart by 1, now we’re actually sending data about which product was just added to the cart.
Great work!
What’d we learn
- A component can let its parent know that an event has happened with
$emit - A component can use an event handler with the
v-ondirective (@for short) to listen for an event emission, which can trigger a method on the parent - A component can
$emitdata along with the announcement that an event has occurred - A parent can use data emitted from its child
Learn by doing
Challenge:
Add a button that removes the product from the cart array by emitting an event with the id of the product to be removed.
Forms
In this lesson we’ll be learning how to work with forms in Vue in order to collect user input, and also learn how to do some custom form validation.
Goal
We’ll be creating a form that allows users to submit a review of a product, but only if they have filled out the required fields.
Starting Code
Our app now looks like this:
index.html
      <div id="app">
        <div class="cart">
          <p>Cart({{ cart.length }})</p>
        </div>
        <product :premium="premium" @add-to-cart="updateCart"></product>
      </div>
main.js
    Vue.component('product', {
        props: {
          premium: {
            type: Boolean,
            required: true
          }
        },
        template: `
         <div class="product">

            <div class="product-image">
              <img :src="image" />
            </div>

            <div class="product-info">
                <h1>{{ product }}</h1>
                <p v-if="inStock">In Stock</p>
                <p v-else>Out of Stock</p>
                <p>Shipping: {{ shipping }}</p>

                <ul>
                  <li v-for="detail in details">{{ detail }}</li>
                </ul>

                <div class="color-box"
                     v-for="(variant, index) in variants"
                     :key="variant.variantId"
                     :style="{ backgroundColor: variant.variantColor }"
                     @mouseover="updateProduct(index)"
                     >
                </div>

                <button v-on:click="addToCart"
                  :disabled="!inStock"
                  :class="{ disabledButton: !inStock }"
                  >
                Add to cart
                </button>

             </div>

          </div>
         `,
        data() {
          return {
              product: 'Socks',
              brand: 'Vue Mastery',
              selectedVariant: 0,
              details: ['80% cotton', '20% polyester', 'Gender-neutral'],
              variants: [
                {
                  variantId: 2234,
                  variantColor: 'green',
                  variantImage: './assets/vmSocks-green.jpg',
                  variantQuantity: 10
                },
                {
                  variantId: 2235,
                  variantColor: 'blue',
                  variantImage: './assets/vmSocks-blue.jpg',
                  variantQuantity: 0
                }
              ]
          }
        },
          methods: {
            addToCart() {
                this.$emit('add-to-cart', this.variants[this.selectedVariant].variantId)
            },
            updateProduct(index) {
                this.selectedVariant = index
            }
          },
          computed: {
              title() {
                  return this.brand + ' ' + this.product
              },
              image(){
                  return this.variants[this.selectedVariant].variantImage
              },
              inStock(){
                  return this.variants[this.selectedVariant].variantQuantity
              },
              shipping() {
                if (this.premium) {
                  return "Free"
                }
                  return 2.99
              }
          }
      })

      var app = new Vue({
          el: '#app',
          data: {
            premium: true,
            cart: []
          },
          methods: {
            updateCart(id) {
              this.cart.push(id)
            }
          }
      })
Problem
We want our users to be able to review our product, but we don’t yet have a way to collect user input. We’ll need to create a form for that.
Solution
We’ll create a new component for our form, which will be called product-review since it is the component that collects product reviews. product-review will be nested within our product component.
Let’s register our new component, start building out its template, and give it some data.
    Vue.component('product-review', {
      template: `
        <input>
      `,
      data() {
        return {
          name: null
        }
      }
    })
As you can see, our component has an input element, and name within its data.
How can we bind what the user types into the input field to our name data?
Earlier we learned about binding with v-bind but that was only for one-way binding, from the data to the template. Now, we want whatever the user inputs to be bound to name in our data. In other words, we want to add a dimension of data binding, from the template to the data .
The v-model directive
Vue’s v-model directive gives us this two-way binding. That way, whenever something new is entered into the input, the data changes. And whenever the data changes, anywhere using that data will update.
So let’s add v-model to our input, and bind it to name in our component’s data.
<input v-model="name">
So far so good. Let’s add a complete form to our template.
    <form class="review-form" @submit.prevent="onSubmit">
      <p>
        <label for="name">Name:</label>
        <input id="name" v-model="name" placeholder="name">
      </p>

      <p>
        <label for="review">Review:</label>
        <textarea id="review" v-model="review"></textarea>
      </p>

      <p>
        <label for="rating">Rating:</label>
        <select id="rating" v-model.number="rating">
          <option>5</option>
          <option>4</option>
          <option>3</option>
          <option>2</option>
          <option>1</option>
        </select>
      </p>

      <p>
        <input type="submit" value="Submit">
      </p>

    </form>
As you can see, we’ve added v-model to our input , textarea and select . Note on the select we’ve used the .number modifier (more on this below). This ensures that the data will be converted into an integer versus a string.
These elements are now bound to this data:
    data() {
      return {
        name: null,
        review: null,
        rating: null
      }
    }
At the top of the form, you can see that our onSubmit method will be triggered when this form is submitted. We’ll build out the onSubmit method in a moment. But first, what’s that .prevent doing?
That is an event modifier , which is used to prevent the submit event from reloading our page. There are several other useful event modifiers, which we won’t cover in this lesson.
We’re now ready to build out our onSubmit method. We’ll start out with this:
    onSubmit() {
      let productReview = {
        name: this.name,
        review: this.review,
        rating: this.rating
      }
      this.name = null
      this.review = null
      this.rating = null
    }
As you can see, onSubmit is creating an object of our user-inputted data, stored within a variable called productReview . We’re also resetting the values of name , review and rating to be null. But we’re not done yet. We need to send this productReview somewhere. Where do we want to send it?
It makes sense for our product reviews to live within the data of the product itself. Considering product-review is nested within product , that means that product-review is a child of product . As we learned in the previous lesson, we can use $emit to send up data from our child to our parent when an event occurs.
So let’s add $emit to our onSubmit method:
    onSubmit() {
      let productReview = {
        name: this.name,
        review: this.review,
        rating: this.rating
      }
      this.$emit('review-submitted', productReview)
      this.name = null
      this.review = null
      this.rating = null
    }
We’re now emitting an event announcement by the name of “review-submitted”, and passing along with it the productReview object we just created.
Now we need to listen for that announcement on product-review .
<product-review @review-submitted="addReview"></product-review>
This translates to: when the “review-submitted” event happens, run product 's addReview method.
That method looks like this:
    addReview(productReview) {
      this.reviews.push(productReview)
    }
This function takes in the productReview object emitted from our onSubmit method, then pushes that object into the reviews array on our product component’s data. We don’t yet have reviews on our product’s data, so all that’s left is to add that now:
reviews: []
Awesome. Our form elements are bound to the product-review component’s data, that data is used to create a productReview object, and that productReview is being sent up to product when the form is submitted. Then that productReview is added to product 's reviews array.
Displaying the Reviews
Now all that’s left to do is to display our reviews. We’ll do so in our product component, just above where the product-review component is nested.
       <div>
        <h2>Reviews</h2>
        <p v-if="!reviews.length">There are no reviews yet.</p>
        <ul>
          <li v-for="review in reviews">
          <p>{{ review.name }}</p>
          <p>Rating: {{ review.rating }}</p>
          <p>{{ review.review }}</p>
          </li>
        </ul>
       </div>
Here, we are creating a list of our reviews with v-for and printing them out using dot notation, since each review is an object.
In the p tag, we’re checking if the reviews array has a length (has any productReview objects in it), and it if does not, we’ll display: “There are no reviews yet.”
Form Validation
Often with forms, we’ll have required fields. For instance, we wouldn’t want our user to be able to submit a review if the field they were supposed to write their review in is empty.
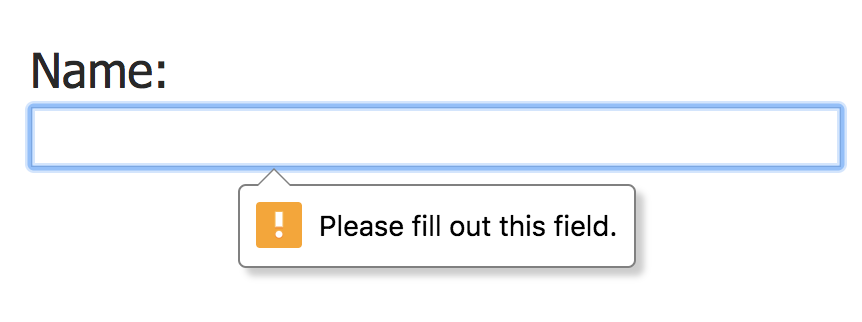
Fortunately, HTML5 provides you with the required attribute, like so:
<input required >
This will provide an automatic error message when the user tries to submit the form if that field is not filled in.
While it is nice to have form validation handled natively in the browser, instead of in your code, sometimes the way that the native form validation is happening may not be the best for your use-case. You may prefer writing your own custom form validation.
Custom Form Validation
Let’s take a look at how you can build out your own custom form validation with Vue.
In our product-review component’s data we’ll add an array for errors:
    data() {
      return {
        name: null,
        review: null,
        rating: null,
        errors: []
      }
    }
We want to add an error into that array whenever one of our fields is empty. So we can say:
    if(!this.name) this.errors.push("Name required.")
    if(!this.review) this.errors.push("Review required.")
    if(!this.rating) this.errors.push("Rating required.")
This translates to: if our name data is empty, push “Name required.” into our errors array. The same goes for our review and rating data. If either are empty, an error string will be pushed into our errors array.
But where will we put these lines of code?
Since we only want errors to be pushed if we don’t have our name , review or rating data filled in, we can place this code within some conditional logic in our onSubmit method.
    onSubmit() {
      if(this.name && this.review && this.rating) {
        let productReview = {
          name: this.name,
          review: this.review,
          rating: this.rating
        }
        this.$emit('review-submitted', productReview)
        this.name = null
        this.review = null
        this.rating = null
      } else {
        if(!this.name) this.errors.push("Name required.")
        if(!this.review) this.errors.push("Review required.")
        if(!this.rating) this.errors.push("Rating required.")
      }
    }
Now, we are checking to see if we have data filled in for our name , review and rating . If we do, we create the productReview object, and send it up to our parent, the product component. Then we reset the data values to null.
If we don’t have name , review and rating , we’ll push errors into our errors array, depending on which data is missing.
All that remains is to display these errors, which we can do with this code:
    <p v-if="errors.length">
      <b>Please correct the following error(s):</b>
      <ul>
        <li v-for="error in errors">{{ error }}</li>
      </ul>
    </p>
This uses the v-if directive to check if there are any errors. In other words, if our errors array is not empty, then this p tag is displayed, which renders out a list with v-for , using the errors array in our data.
Great. Now we’ve implemented our own custom form validation.
Using .number
Using the .number modifier on v-model is a helpful feature, but please be aware there is a known bug with it. If the value is blank, it will turn back into a string. The Vue.js Cookbook offers the solution to wrap that data in the Number method, like so:
Number(this.myNumber)
What’d we learn
- We can use the
v-modeldirective to create two-way binding on form elements - We can use the
.numbermodifier to tell Vue to cast that value as a number, but there is a bug with it - We can use the
.preventevent modifier to stop the page from reloading when the form is submitted - We can use Vue to do fairly simple custom form validation
Learn by doing
Challenge
Add a question to the form: “Would you recommend this product”. Then take in that response from the user via radio buttons of “yes” or “no” and add it to the productReview object, with form validation.
Tabs
In this lesson, we’ll learn how to add tabs to our application and implement a simple solution for global event communication.
Goal
We’ll learn how to create tabs to display our reviews and our review form separately.
Starting Code
index.html
    <div id="app">
      <div class="cart">
        <p>Cart({{ cart.length }})</p>
      </div>
      <product :premium="premium" @add-to-cart="updateCart"></product>
    </div>
main.js
    Vue.component('product', {
        props: {
          premium: {
            type: Boolean,
            required: true
          }
        },
        template: `
         <div class="product">

            <div class="product-image">
              <img :src="image">
            </div>

            <div class="product-info">
                <h1>{{ product }}</h1>
                <p v-if="inStock">In Stock</p>
                <p v-else>Out of Stock</p>
                <p>Shipping: {{ shipping }}</p>

                <ul>
                  <li v-for="(detail, index) in details" :key="index">{{ detail }}</li>
                </ul>

                <div class="color-box"
                     v-for="(variant, index) in variants"
                     :key="variant.variantId"
                     :style="{ backgroundColor: variant.variantColor }"
                     @mouseover="updateProduct(index)"
                     >
                </div>

                <button @click="addToCart"
                  :disabled="!inStock"
                  :class="{ disabledButton: !inStock }"
                  >
                Add to cart
                </button>

             </div>

             <product-review @review-submitted="addReview"></product-review>

          </div>
         `,
        data() {
          return {
              product: 'Socks',
              brand: 'Vue Mastery',
              selectedVariant: 0,
              details: ['80% cotton', '20% polyester', 'Gender-neutral'],
              variants: [
                {
                  variantId: 2234,
                  variantColor: 'green',
                  variantImage: './assets/vmSocks-green.jpg',
                  variantQuantity: 10
                },
                {
                  variantId: 2235,
                  variantColor: 'blue',
                  variantImage: './assets/vmSocks-blue.jpg',
                  variantQuantity: 0
                }
              ],
              reviews: []
          }
        },
          methods: {
            addToCart() {
                this.$emit('add-to-cart', this.variants[this.selectedVariant].variantId)
            },
            updateProduct(index) {
                this.selectedVariant = index
            },
            addReview(productReview) {
              this.reviews.push(productReview)
            }
          },
          computed: {
              title() {
                  return this.brand + ' ' + this.product
              },
              image(){
                  return this.variants[this.selectedVariant].variantImage
              },
              inStock(){
                  return this.variants[this.selectedVariant].variantQuantity
              },
              shipping() {
                if (this.premium) {
                  return "Free"
                }
                  return 2.99
              }
          }
      })


      Vue.component('product-review', {
        template: `
          <form class="review-form" @submit.prevent="onSubmit">

            <p class="error" v-if="errors.length">
              <b>Please correct the following error(s):</b>
              <ul>
                <li v-for="error in errors">{{ error }}</li>
              </ul>
            </p>

            <p>
              <label for="name">Name:</label>
              <input class="name" v-model="name">
            </p>

            <p>
              <label for="review">Review:</label>
              <textarea id="review" v-model="review"></textarea>
            </p>

            <p>
              <label for="rating">Rating:</label>
              <select id="rating" v-model.number="rating">
                <option>5</option>
                <option>4</option>
                <option>3</option>
                <option>2</option>
                <option>1</option>
              </select>
            </p>

            <p>
              <input type="submit" value="Submit">
            </p>

        </form>
        `,
        data() {
          return {
            name: null,
            review: null,
            rating: null,
            errors: []
          }
        },
        methods: {
          onSubmit() {
            if (this.name && this.review && this.rating) {
              let productReview = {
                name: this.name,
                review: this.review,
                rating: this.rating
              }
              this.$emit('review-submitted', productReview)
              this.name = null
              this.review = null
              this.rating = null
            } else {
              if (!this.name) this.errors.push("Name required.")
              if (!this.review) this.errors.push("Review required.")
              if (!this.rating) this.errors.push("Rating required.")
            }
          }
        }
      })

      var app = new Vue({
          el: '#app',
          data: {
            premium: true,
            cart: []
          },
          methods: {
            updateCart(id) {
              this.cart.push(id)
            }
          }
      })
Problem
Currently in our project, we’re displaying our reviews and the form that is used to submit a review on top of each other. This works for now, but if our page needs to display more and more content, we’ll want the option to conditionally display content, based on user behavior.
Solution
We can implement tabs so when we click on the Reviews tab, our reviews are shown, and when we click on the Add a Review tab, our form is shown.
Creating a Tabs Component
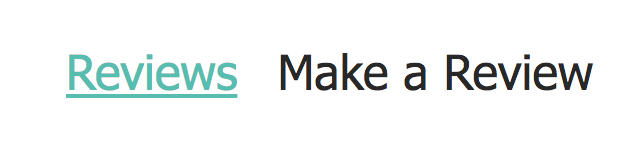
We’ll start by creating a product-tabs component, which will be nested at the bottom of our product component.
    Vue.component('product-tabs', {
      template: `
        <div>
          <span class="tab" v-for="(tab, index) in tabs" :key="index">{{ tab }}</span>
        </div>
      `,
      data() {
        return {
          tabs: ['Reviews', 'Make a Review']
        }
      }
    })
We’ll add to this component soon, but so far this is what’s happening:
In our data, we have a tabs array with strings that we’re using as the titles for each tab. In the template, we’re using v-for to create a span for each string from our tabs array.

We want to know which tab is currently selected, so in our data we’ll add selectedTab and dynamically set that value with an event handler, setting it equal to the tab that was just clicked, with:
@click="selectedTab = tab"
So if we click the “Reviews” tab, then selectedTab will be “Reviews”. If we click the “Make a Review” tab, selectedTab will be “Make a Review”.
    Vue.component('product-tabs', {
      template: `
        <div>
          <ul>
            <span class="tab"
                  v-for="(tab, index) in tabs"
                  @click="selectedTab = tab" // sets value of selectedTab in data
            >{{ tab }}</span>
          </ul>
        </div>
      `,
      data() {
        return {
          tabs: ['Reviews', 'Make a Review'],
          selectedTab: 'Reviews'  // set from @click
        }
      }
    })
Class Binding for Active Tab
We should give the user some visual feedback so they know which tab is selected.
We can do this quickly by adding this class binding to our span:
:class="{ activeTab: selectedTab === tab }"
This translates to: apply our activeTab class whenever it is true that selectedTab is equal to tab . Because selectedTab is always equal to whichever tab was just clicked, then this class will be applied to the tab the user clicked on.
In other words, when the first tab is clicked, selectedTab will be “Reviews” and the tab will be “Reviews”. So the activeTab class will be applied since they are equivalent.
Great! It works.
Adding to our Template
Now that we’re able to know which tab was selected, we can build out our template and add the content we want to display when either tab is clicked.
What do we want to show up if we click on “Reviews”? Our reviews. So we’ll move that code from where it lives on our product component and paste it into the template of our product-tabs component, below our unordered list.
    template: `
          <div>

            <div>
              <span class="tab"
                    v-for="(tab, index) in tabs"
                    @click="selectedTab = tab"
              >{{ tab }}</span>
            </div>

            <div> // moved here from where it was on product component
                <p v-if="!reviews.length">There are no reviews yet.</p>
                <ul v-else>
                    <li v-for="(review, index) in reviews" :key="index">
                      <p>{{ review.name }}</p>
                      <p>Rating:{{ review.rating }}</p>
                      <p>{{ review.review }}</p>
                    </li>
                </ul>
            </div>

          </div>
    `
Notice, we’ve deleted the h2 since we no longer need to say “Reviews” since that is the title of our tab.
But since reviews lives on our product component, we’ll need to send that data into our product-tabs component via props.
So we’ll add the prop we expect to receive on our product-tabs component:
    props: {
      reviews: {
        type: Array,
        required: false
      }
    }
And pass in reviews on our product-tabs component itself, so it is always receiving the latest reviews .
<product-tabs :reviews="reviews"></product-tabs>
Now, what do we want to show when we click on the “Make a Review” tab? The review form.
So we’ll move the product-review component from where it lives within the product component and place it in the template of our tabs component, below the div for reviews that we just added.
    <div>
      <product-review @review-submitted="addReview"></product-review>
    </div>
Conditionally Displaying with Tabs
Now that we have our template set up, we want to conditionally display either the reviews div or the review form div, depending on which tab is clicked.
Since we are already storing the selectedTab , we can use that with v-show to conditionally display either tab. So whichever tab is selected, we’ll show the content for that tab.
We can add v-show="selectedTab === 'Reviews'" to our reviews div, and that div will display whenever we click the first tab. Similarly we can say v-show="selectedTab === 'Make a Review'" to display the second tab.
Now our template looks like this:
    template: `
          <div>

            <div>
              <span class="tab"
                    v-for="(tab, index) in tabs"
                    @click="selectedTab = index"
              >{{ tab }}</span>
            </div>

            <div v-show="selectedTab === 'Review'"> // displays when "Reviews" is clicked
                <p v-if="!reviews.length">There are no reviews yet.</p>
                <ul>
                    <li v-for="review in reviews">
                      <p>{{ review.name }}</p>
                      <p>Rating:{{ review.rating }}</p>
                      <p>{{ review.review }}</p>
                    </li>
                </ul>
            </div>

            <div v-show="selectedTab === 'Make a Review'"> // displays when "Make a Review" is clicked
              <product-review @review-submitted="addReview"></product-review>
            </div>

          </div>
    `
The form can’t trigger addReview
We are now able to click on a tab and display the content we want, and even dynamically style the tab that is currently selected. But if you look in the console, you’ll find this warning:
So what’s going on with our addReview method?
This is a method that lives on our product component. And it’s supposed to be triggered when our product-review component (which is a child of product ) emits the review-submitted event.
<product-review @review-submitted="addReview"></product-review>
But now our product-review component is a child of our tabs component, which is a child of the product component. In other words, product-review is now a grandchild of product .
Our code is currently designed to have our product-review component communicate with its parent, but it’s parent is no longer the product component. So we need to refactor to make this event communication happen successfully.
Refactoring Our Code
A common solution for communicating from a grandchild up to a grandparent, or for communicating between components, is to use what’s called a global event bus.
This is essentially a channel through which you can send information amongst your components, and it’s just a Vue instance, without any options passed into it. Let’s create our event bus now.
var eventBus = new Vue()
If it helps, just imagine this as a literal bus, and its passengers are whatever you’re sending at the time. In our case, we want to send an event emission. We’ll use this bus to communicate from our product-review component and let our product component know the form was submitted, and pass the form’s data up to product .
In our product-review component, instead of saying:
this.$emit('review-submitted', productReview)
We’ll instead use the eventBus to emit the event, along with its payload: productReview .
eventBus.$emit('review-submitted', productReview)
Now, we no longer need to listen for the review-submitted event on our product-review component, so we’ll remove that.
<product-review></product-review>
Now, in our product component, we can delete our addReview method and instead we’ll listen for that event using this code:
    eventBus.$on('review-submitted', productReview => {
      this.reviews.push(productReview)
    })
This essentially says: when the eventBus emits the review-submitted event, take its payload (the productReview ) and push it into product 's reviews array. This is very similar to what we were doing before with our addReview method.
Why the ES6 Syntax?
We’re using the ES6 arrow function syntax here because an arrow function is bound to its parent’s context. In other words, when we say this inside the function, it refers to this component/instance. You can write this code without an arrow function, you’ll just have to manually bind the component’s this to that function, like so:
    eventBus.$on('review-submitted', function (productReview) {
      this.reviews.push(productReview)
    }.bind(this))
Final Step
We’re almost done. All that’s left to do is to put this code somewhere, like in mounted .
    mounted() {
      eventBus.$on('review-submitted', productReview => {
        this.reviews.push(productReview)
      })
    }
What’s mounted ? That’s a lifecycle hook, which is a function that is called once the component has mounted to the DOM. Now, once product has mounted, it will be listening for the review-submitted event. And once it hears it, it’ll add the new productReview to its data.
We’ll learn more about lifecycle hooks in our Real World Vue course.
A Better Solution
Using an event bus is a common solution and you may see it in others’ Vue code, but please be aware this isn’t the best solution for communicating amongst components within your app.
As your app grows, you’ll want to implement Vue’s own state management solution: Vuex. This is a state-management pattern and library. You’ll also learn all about Vuex in our Mastering Vuexcourse, where we’ll teach you how to build a production-level apps that can scale, from setting up your project using the Vue CLI all the way to deployment.
Learn by doing
Challenge:
Create tabs for “Shipping” and “Details” that display the shipping cost and product details, respectively.