Video
Links:
- Lesson 1
- Lesson 2
- Lesson 3
- Lesson 4
- Lesson 5
- Lesson 6
- Lesson 7
Starting project:
The starting code for our app is located on github here. Please download it to your computer.
Intro to Vuex
 The Case for State Management
Managing state in an application full of components can be difficult. Facebook discovered this the hard way and created the Flux pattern, which is what Vuex is based upon. Vuex is Vue’s own state management pattern and library. In this lesson, we’ll look at why an application might need Vuex, and how it can enhance your app.
When we talk about state, we mean the data that your components depend on and render. Things like blog posts, to-do items, and so on. Without Vuex, as your app grows, each Vue component might have its own version of state.
But if one component changes its state, and a distant relative is also using that same state, we need to communicate that change. There’s the default way of communicating events up and passing props down to share data, but that can become overly complicated.

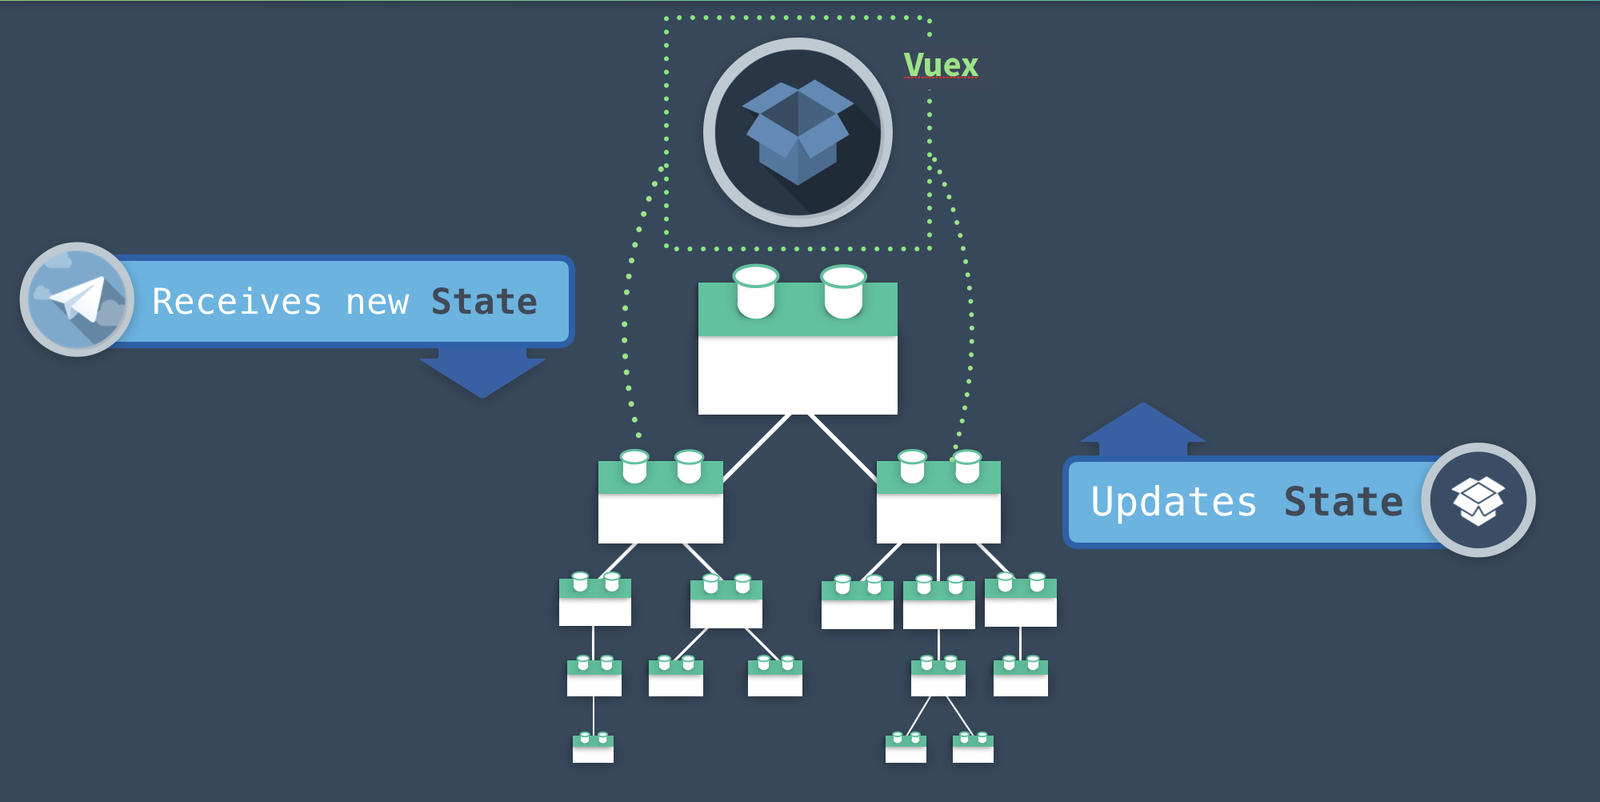
Instead, we can consolidate all of our state into one place. One location that contains the current state of our entire application. One single source of truth.
A Single Source of Truth This is what Vuex provides, and every component has direct access to this global State.
Just like the Vue instance’s data, this State is reactive. When one component updates the State, other components that are using that data get notified, automatically receiving the new value.
But just consolidating data into a single source of truth doesn’t fully solve the problems of managing state. What happens when many components alter the State in different ways, from different locations?
We need some standardization. Otherwise, changes to our State could be unpredictable and untraceable.
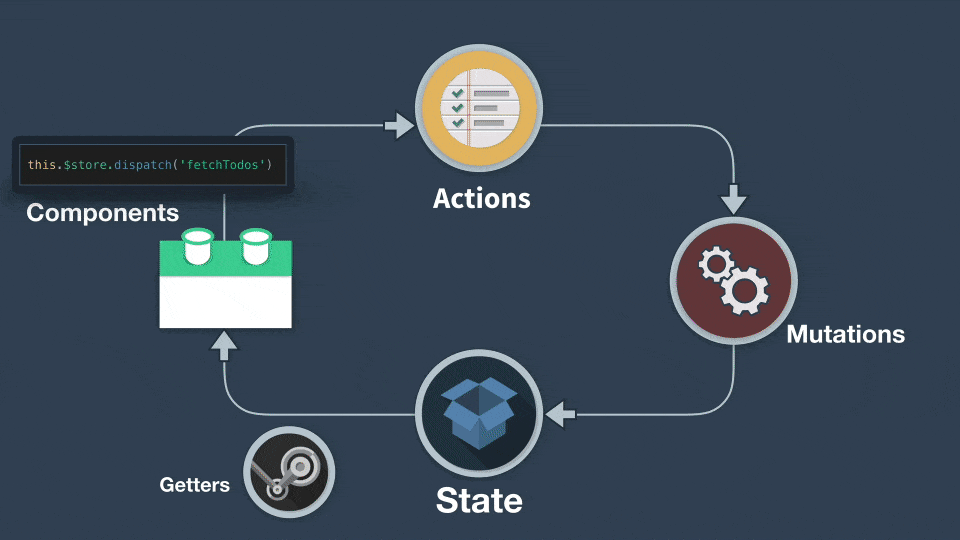
A State Management Pattern This is why Vuex provides a full state management pattern for a simple and standardized way to make state changes. And if you’re familiar with Vue, Vuex should look quite similar.
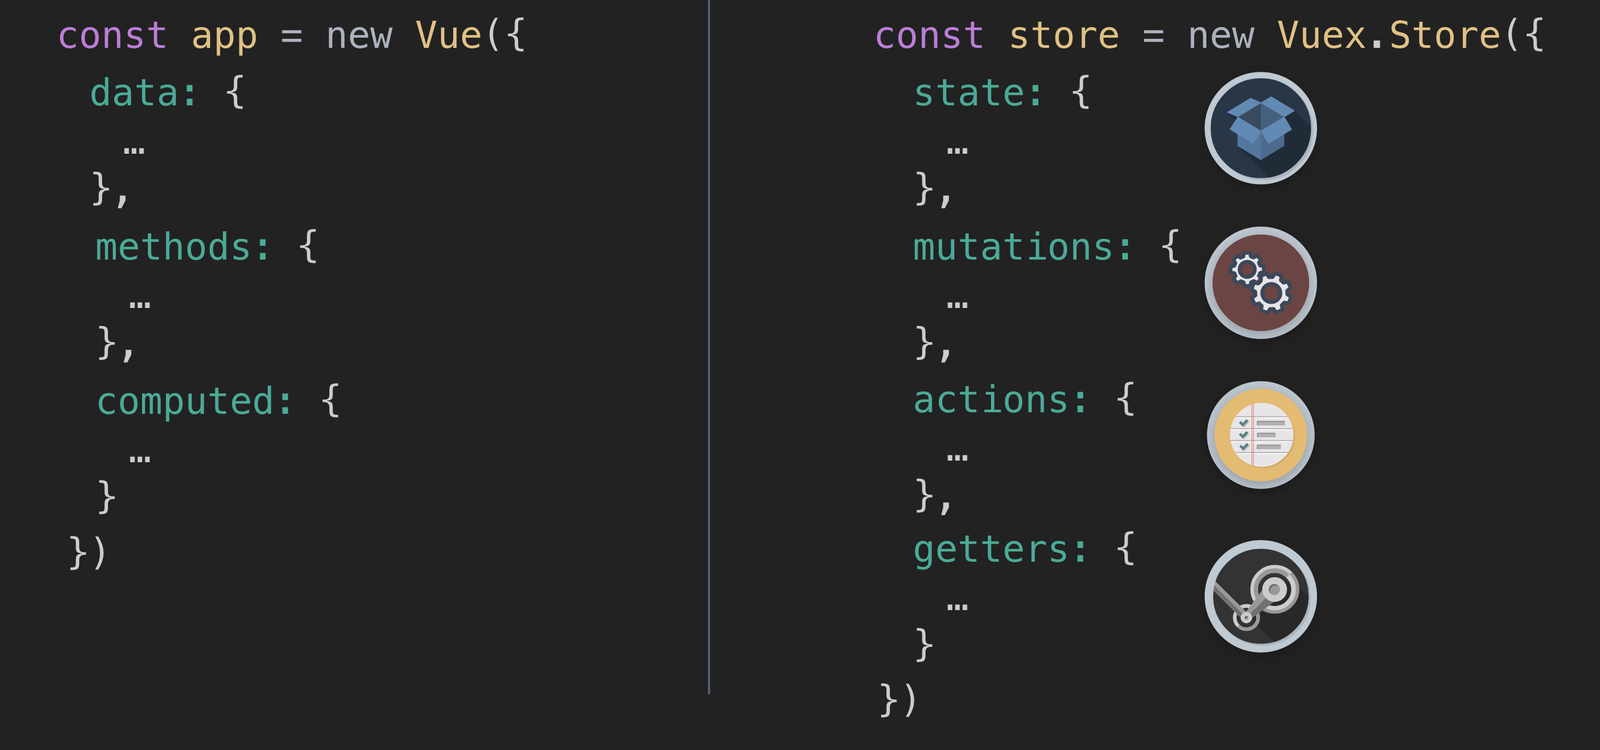
Just as Vue provides a root Vue instance created with new Vue , Vuex offers a store created with new Vuex.Store .
While the Vue instance has a data property, the Vuex store has state. Both are reactive.
And while the instance has methods, which among other things can update data, the store has Actions, which can update the state.
And while the instance as computed properties, the store has getters, which allow us to access filtered, derived, or computed state.
Additionally, Vuex provides a way to track state changes, with something called Mutations. We can use Actions to commit Mutations, and from the Vue DevTools, we can even trace back in time through a record of each mutation to the state.
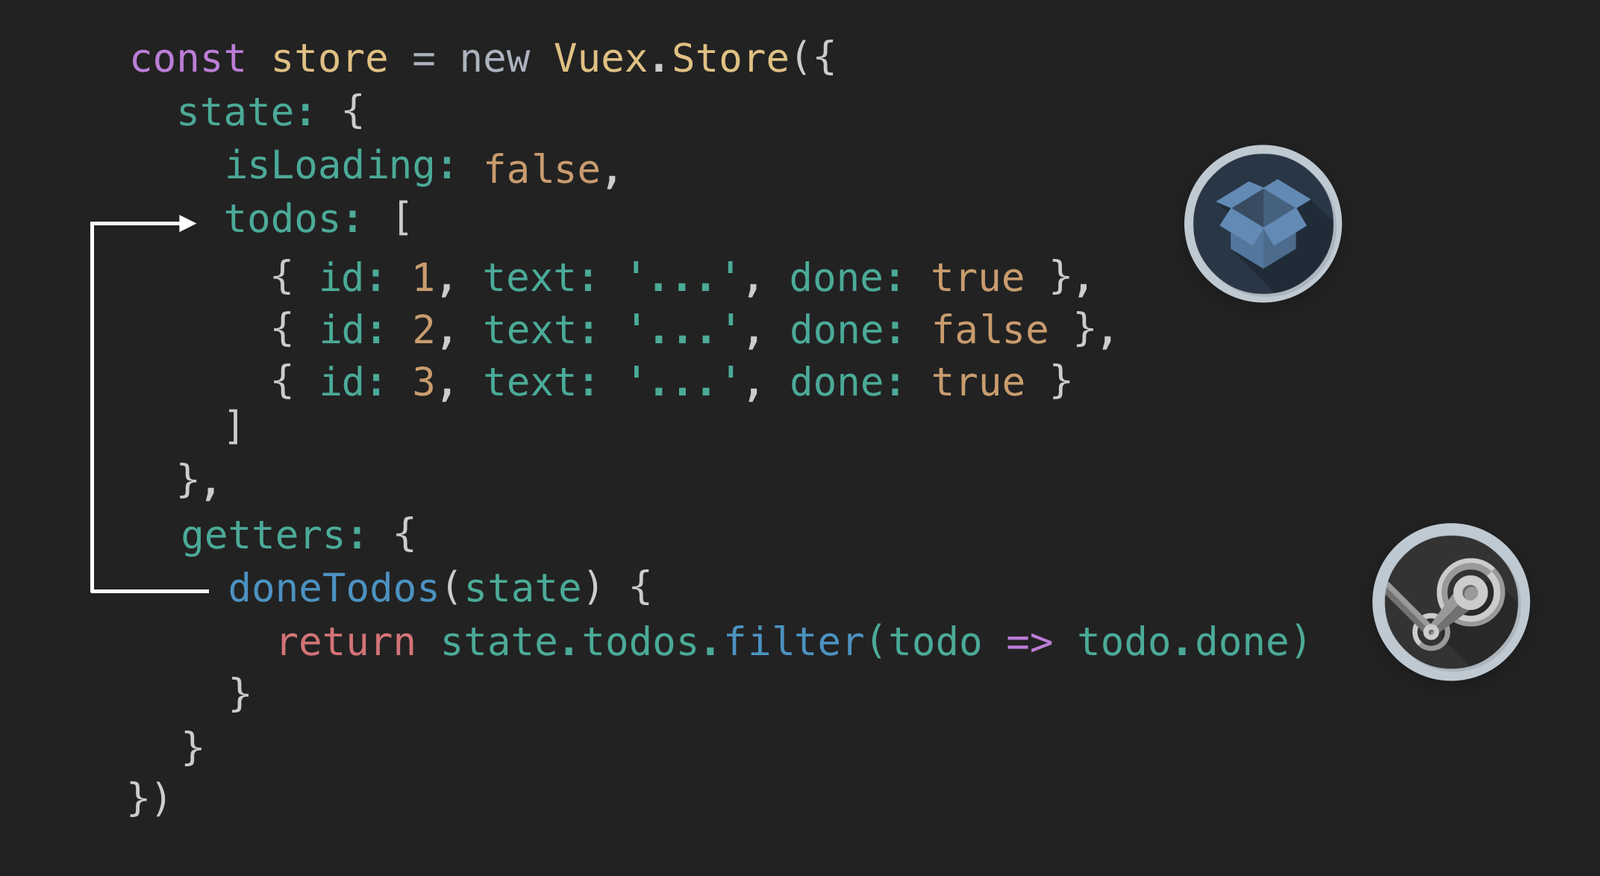
Now let’s take a look at an example Vuex Store.
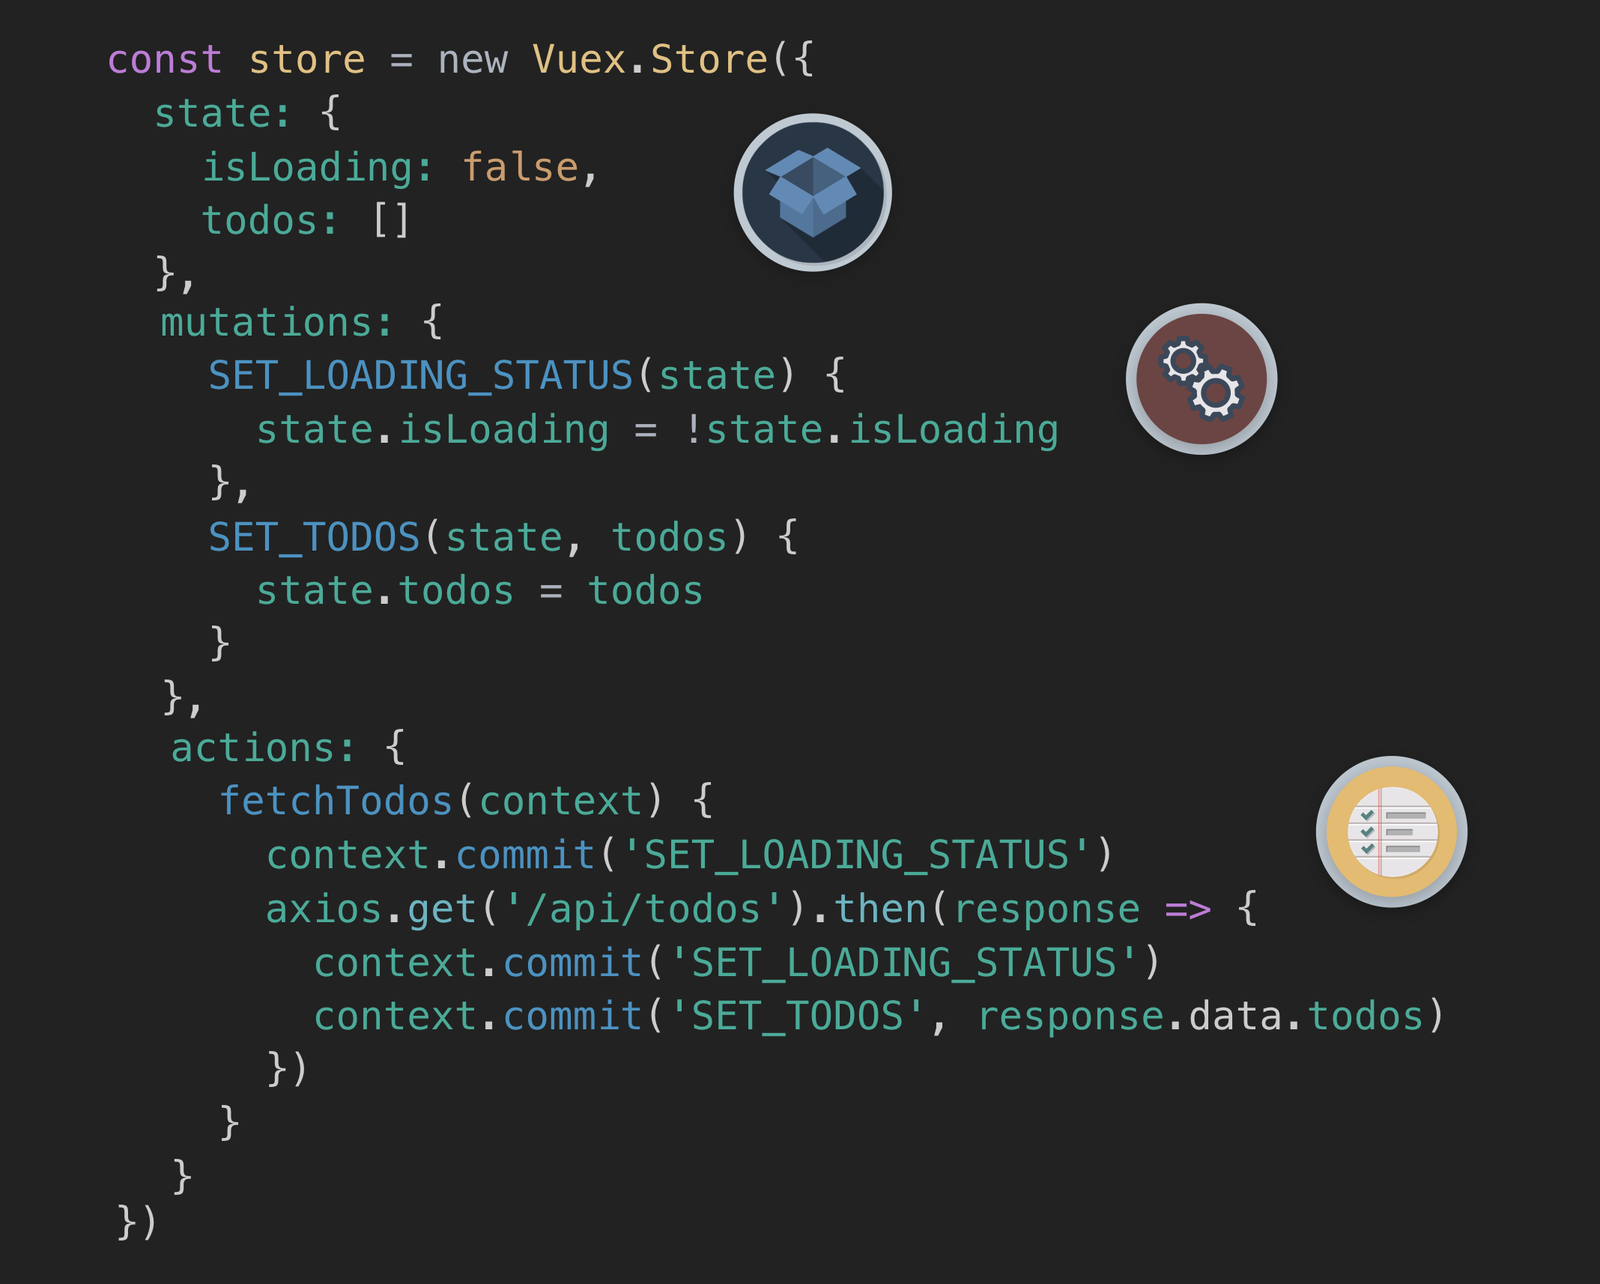
In our State , we have an isLoading property, along an array for todos.
Below that we have a Mutation to switch our isLoading state between true and false. And a Mutation to set our state with the todos that we’ll receive from an API call in our action below.
Our Action here has multiple steps. First, it’ll commit the Mutation to set the isLoading status to true. Then it’ll make an API call, and when the response returns, it will commit the Mutation to set the isLoading status to false. Finally it’ll commit the Mutation to set the state of our todos with the response from our API.
If we need the ability to only retrieve the todos that are labeled done, we can use a Getter for that, which will retrieve only the specific state that we want.
Now let’s take a look at this in motion.
Vuex in Motion
Let’s ReVue
Hopefully you now understand why you might need Vuex and how it can help enhance your application by providing a single source of truth for your State, along with a common library of Actions, Mutations and Getters.
In the next lesson, we’ll start implementing Vuex into our example application.
Mastering Vuex Orientation
Welcome back to Mastering Vuex. In this lesson, I’ll be orienting you to the example application we’ll be using throughout this course.
Prerequisites for this course include knowledge of:
- Vue CLI
- Vue Router
- Single File .vue Components
- API Calls with Axios
If you’ve been following along with our Real World Vue course, you can probably skip ahead to the next lesson, unless you want a refresher on what we built in that course, or you want to get the example app running so you can code along with us during the course.
But if you’re just joining us, join me as we get our example app running and take a tour of how it’s working.
Downloading the App
The starting code for our app is located on github here. Please download it to your computer.
Getting the app up and running
If you navigate to the project from your terminal, you can run npm install to install all of the project’s dependencies.
Since our app will be making API calls, we’ll be using json-server. This is a full fake REST API, which allows us to perform API calls that pull from a mock database. You’ll need to install the library if you haven’t already. To do so, run this command in your terminal: npm install -g json-server . We then need to run the command **** json-server --watch db.json , which turns on json-server and tells it to watch our db.json file, which is our mock database.
Now, to get our app running live, we’ll run the command: npm run serve . Our terminal will let us know which localhost port our app is running on.
Exploring the app in the browser
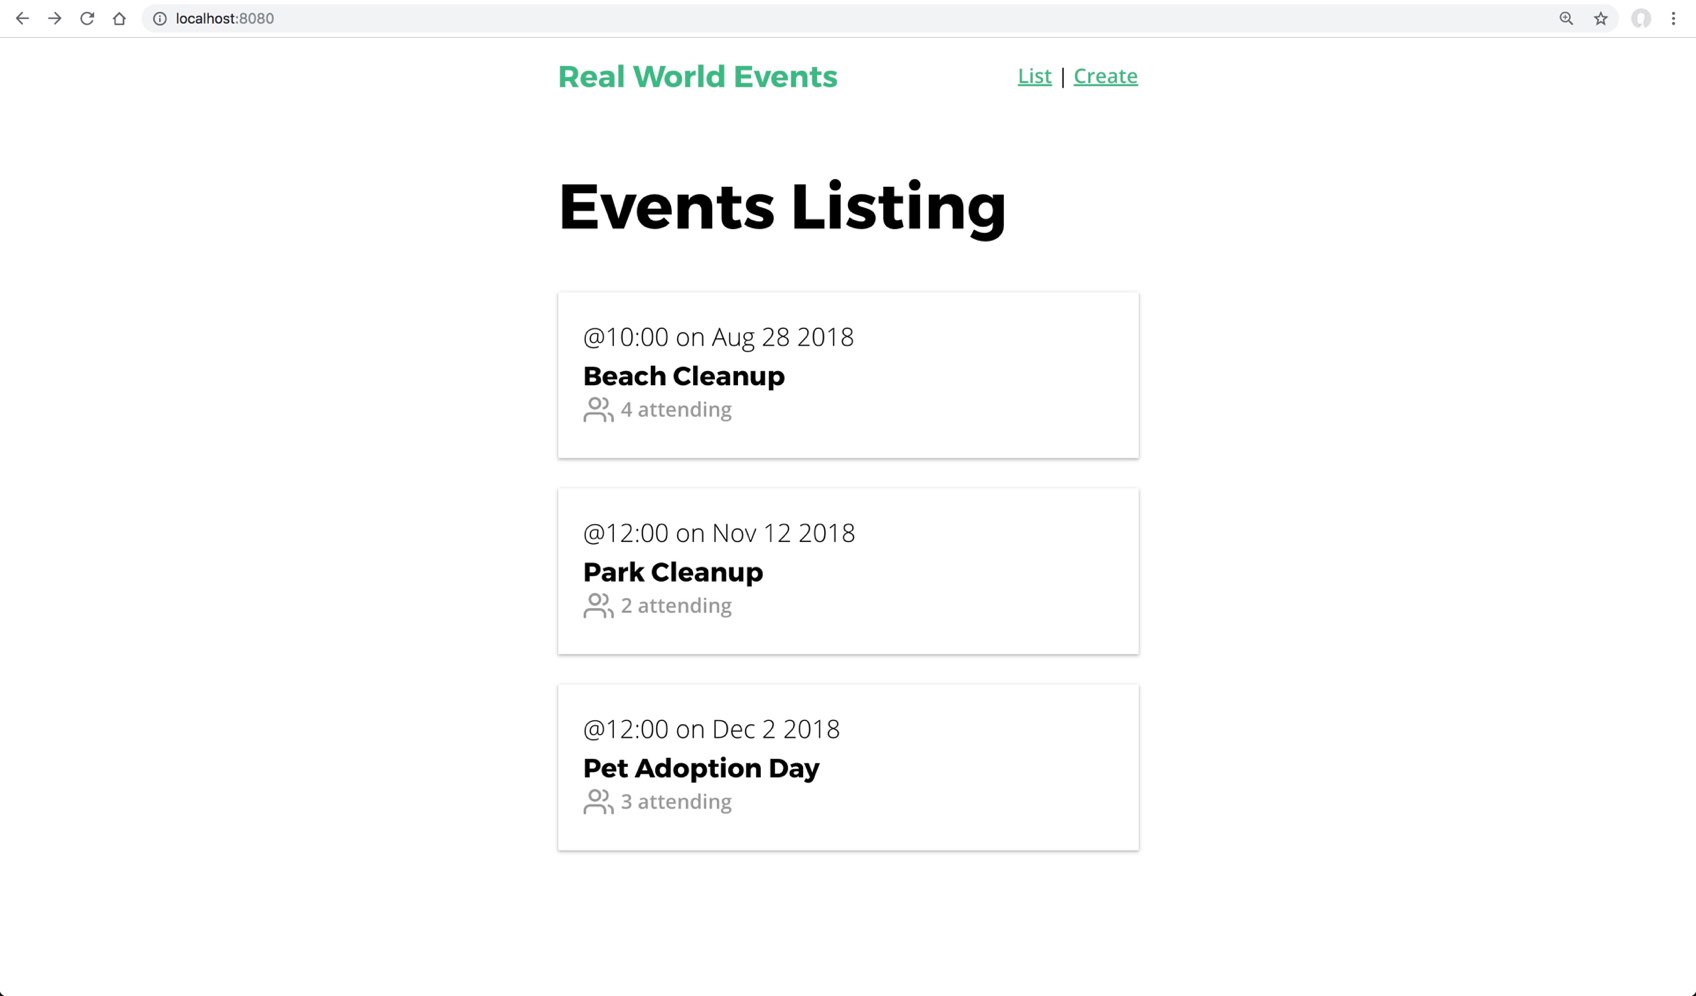
Once we pull up that localhost in our browser, we can see our app.
On the main page, we’re displaying a list of events that we’re pulling in with our API. When I click on an event, we’re taken to the event-show page, which displays the full details of that event. We’re using Vue Router for our site navigation, which also allows us to navigate between pages.
Now that we’ve seen the app running live, let’s look the project itself.
App Tour
We created the app using the Vue CLI, which gave us this directory structure.
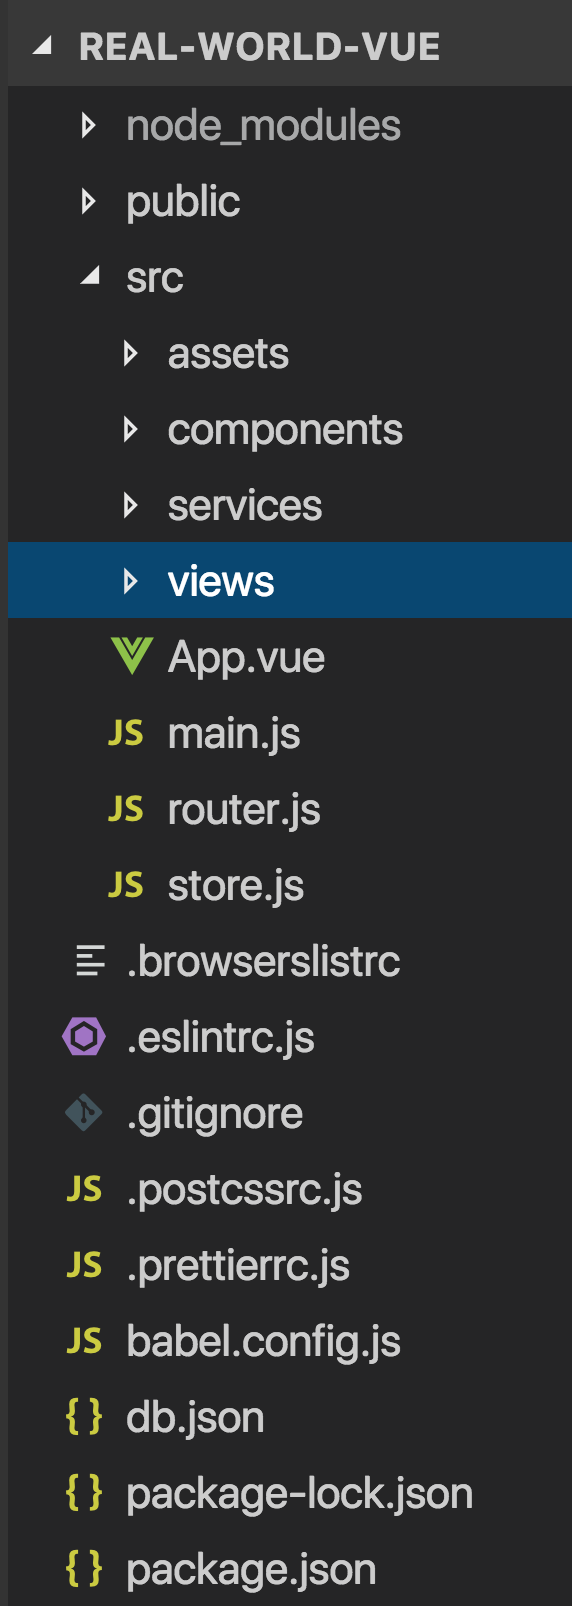
In our views folder, we have three components, which are loaded when we navigate to the route they live at.
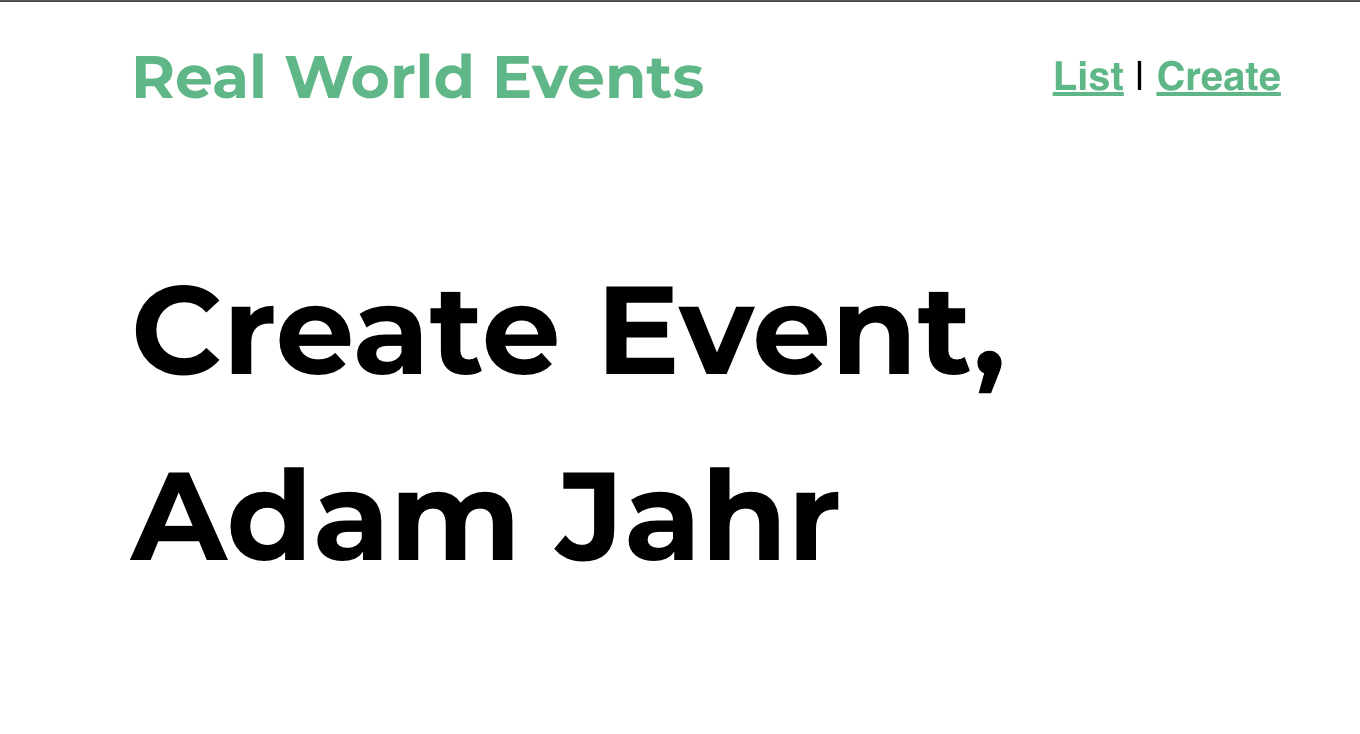
The EventCreate component currently only has a simple template.
 /src/iews/EventCreate.vue
    <template>
      <h1>Create Event</h1>
    </template>
The EventList is much more interesting.
/src/views/EventList.vue
    <script>
    import EventCard from '@/components/EventCard.vue'
    import EventService from '@/services/EventService.js'

    export default {
      components: {
        EventCard
      },
      data() {
        return {
          events: []
        }
      },
      created() {
        EventService.getEvents()
          .then(response => {
            this.events = response.data
          })
          .catch(error => {
            console.log('There was an error:', error.response)
          })
      }
    }
    </script>
When this component is created, we are making an API call to get our events with EventService.getEvents() . Then we’re setting our component’s events equal to that API call’s response. We’re also catching and logging any errors to the console.
/src/views/EventList.vue
    <template>
      <div>
        <h1>Events Listing</h1>
        <EventCard v-for="event in events" :key="event.id" :event="event"/>
      </div>
    </template>
In our template, we’re using v-for to create an EventCard component for each of our events , and passing in the event as a prop so EventCard can use it.
Let’s take a look at the EventCard component in our components folder.
/src/components/EventCard.vue
    <template>
      <router-link class="event-link" :to="{ name: 'event-show', params: { id: event.id } }">
        <div class="event-card -shadow">
          <span class="eyebrow">@{{ event.time }} on {{ event.date }}</span>
          <h4 class="title">{{ event.title }}</h4>
          <BaseIcon name="users">{{ event.attendees.length }} attending</BaseIcon>
        </div>
      </router-link>
    </template>

    <script>
    export default {
      props: {
        event: Object
      }
    }
    </script>

    <style scoped>
    ...
    </style>
It’s receiving the event object as a prop, and displaying some of its details in the template.
Notice how it’s also using the BaseIcon component.
/src/components/BaseIcon.vue
    <template>
        <div class="icon-wrapper">
          <svg class='icon' :width="width" :height="height">
            <use v-bind="{'xlink:href':'/feather-sprite.svg#' + name}"/>
          </svg>
          <slot></slot>
        </div>
    </template>

    <script>
    export default {
      name: 'Icon',
      props: {
        name: String,
        width: {
          type: [Number, String],
          default: 24
        },
        height: {
          type: [Number, String],
          default: 24
        }
      }
    }
    </script>

    <style scoped>
    ...
    </style>
This is a component that accepts a name , width and height prop, and draws an svg icon accordingly. It uses the feather-sprite.svg file (located in our public folder) as its library of icons that it draws from. To learn more about this component and how it was globally registered within our main.js file, watch our lessons on Global Components and Slots.
Understanding our API Calls
Let’s take a closer look at the API call within EventList . If you need a refresher on this topic, watch our lesson on API Calls with Axios.
/src/views/EventList.vue
    import EventService from '@/services/EventService.js'
    ...
      created() {
        EventService.getEvents()
          .then(response => {
            this.events = response.data
          })
          .catch(error => {
            console.log('There was an error:', error.response)
          })
      }
    ...
Notice how it’s using EventService to call the getEvents method. We imported this file above, from our services folder. Let’s explore that file.
/src/services/EventService.js
    import axios from 'axios'

    const apiClient = axios.create({
      baseURL: `http://localhost:3000`,
      withCredentials: false, // This is the default
      headers: {
        Accept: 'application/json',
        'Content-Type': 'application/json'
      }
    })

    export default {
      getEvents() {
        return apiClient.get('/events')
      },
      getEvent(id) {
        return apiClient.get('/events/' + id)
      }
    }
Here, we’re importing the Axios library. If you haven’t yet, you can install Axios by running this command in your terminal: npm install axios
We’re then creating a single Axios instance with apiClient . When we create it, we’re giving it a baseURL , and setting some default configurations.
As noted earlier, json-server is the db.json file as our mock “database”, which contains all of our events. So when we visit localhost:3000/events , we can see all of the events that live in the db.json file. And because json-server is a full fake REST API, we can GET events from it and POST events to it, etc.
At the bottom of the file, we’re exporting a couple methods that use our apiClient to get all of the events, or just one event (by it’s id ). We already saw how the EventList component calls getEvents in its created hook, but where are we using getEvent ?
Let’s take a look in our final view component: EventShow .
/src/views/EventShow.vue
    <script>
    import EventService from '@/services/EventService.js'

    export default {
      props: ['id'],
      data() {
        return {
          event: {}
        }
      },
      created() {
        EventService.getEvent(this.id)
          .then(response => {
            this.event = response.data
          })
          .catch(error => {
            console.log('There was an error:', error.response)
          })
      }
    }
    </script>
When it’s created , it makes the getEvent API call, passing in its prop ( this.id ), which is used to get the event by its id . The component is then setting its event data equal to the event that was retrieved (or catching and logging an error instead).
/src/views/EventShow.vue
    <template>
      <div>
        <div class="event-header">
          <span class="eyebrow">@{{ event.time }} on {{ event.date }}</span>
          <h1 class="title">{{ event.title }}</h1>
          <h5>Organized by {{ event.organizer }}</h5>
          <h5>Category: {{ event.category }}</h5>
        </div>
        <BaseIcon name="map"><h2>Location</h2></BaseIcon>
        <address>{{ event.location }}</address>
        <h2>Event details</h2>
        <p>{{ event.description }}</p>
        <h2>Attendees
          <span class="badge -fill-gradient">{{ event.attendees ? event.attendees.length : 0 }}</span>
        </h2>
        <ul class="list-group">
          <li v-for="(attendee, index) in event.attendees" :key="index" class="list-item">
            <b>{{ attendee.name }}</b>
          </li>
        </ul>
      </div>
    </template>
In the template, we’re printing out details from the event object we got back from the getEvent API call.
But where did this component get its id prop from? To understand that, let’s head over to our router.js file and explore how we’re using Vue Router.
Understanding Our Routing
If any of this feels confusing, please watch our lessons on Vue Router Basics and Dynamic Routing & History Mode.
/src/router.js
    import Vue from 'vue'
    import Router from 'vue-router'
    import EventCreate from './views/EventCreate.vue'
    import EventList from './views/EventList.vue'
    import EventShow from './views/EventShow.vue'

    Vue.use(Router)

    export default new Router({
      mode: 'history',
      routes: [
        {
          path: '/',
          name: 'event-list',
          component: EventList
        },
        {
          path: '/event/create',
          name: 'event-create',
          component: EventCreate
        },
        {
          path: '/event/:id',
          name: 'event-show',
          component: EventShow,
          props: true
        }
      ]
    })
At the top, we’re importing all of our view components, so we can use them in our routes . But first we’re telling Vue to use the Router , which we imported above as well: Vue.use(Router) .
We’re then exporting a new Router instance, which contains an array of routes objects.
    {
      path: '/',
      name: 'event-list',
      component: EventList
    },
Our root route ( '``/``' ) loads our EventList component.
    {
      path: '/event/create',
      name: 'event-create',
      component: EventCreate
    },
When we navigate to '/event/create``' , our EventCreate component is loaded.
    {
      path: '/event/:id',
      name: 'event-show',
      component: EventShow,
      props: true
    }
And when we navigate to '``/event/``' + some '``:id``' , our app loads the EventShow component. Because we have props: true , that means the dynamic segment ( :id ) will be passed into the EventShow component as a prop. Which brings us back to our original question: From where did EventShow get the id prop it uses when it makes the getEvent API call? It took it from the URL params. So if our URL was /event/1 , EventShow ’s id prop would be 1 .
But wait, there’s more…
We have one more component, NavBar , which contains router-links to our other routes: /src/components/NavBar.vue
    <template>
      <div id="nav" class="nav">
        <router-link to="/" class="brand">Real World Events</router-link>
        <nav>
          <router-link :to="{ name: 'event-list' }">List</router-link> |
          <router-link :to="{ name: 'event-create' }">Create</router-link>
        </nav>
      </div>
    </template>
    ...
And speaking of router-links, notice how there’s one in our EventCard component, too.
/src/components/EventCard.vue
    <router-link class="event-link" :to="{ name: 'event-show', params: { id: event.id } }">
    ...
    </router-link>
This allows us to click on the EventCard and have us routed to: '/event/:id``' , where id is the event.id from the EventCard we just clicked on. For example: '/event/1``' . This routes us to the EventShow component, which pulls the id of the event to show from the URL.
Let’s ReVue
As you’ve seen, our example app is using Vue Router to create a single page application where we can route between views, which trigger API calls when those components are loaded. If any of what I covered was confusing, you’ll want to watch the lessons in our Real World Vue course before diving into Vuex.
State & Getters
In the last lesson, we saw an overview of how Vuex works. In this tutorial, we’ll look at how we can access the State from our Vuex store from within our components, both directly and with the help of Getters.
Accessing State
If we take a look at our main.js file, we see we’re importing our Vuex store file, and providing it to our root Vue instance. This was set up for us because we selected Vuex when we created our project with the Vue CLI.
    import store from './store'

    new Vue({
      router,
      store, // <-- injecting the store for global access
      render: h => h(App)
    }).$mount('#app')
This makes the store globally accessible throughout our app by injecting it into every component. This way, any component can access the store and the properties on it (such as State, Actions, Mutations and Getters) by using $store .
Now let’s add some State so we can look at how to access it from a component. We can create a user object.
    state: {
      user: { id: 'abc123', name: 'Adam Jahr' }
    }
We can access this user State from anywhere in our app, but since we’ll soon be creating events that will need to know what user created them, let’s access this State from the EventCreate.vue file.
    <template>
      <h1>Create Event, {{ $store.state.user }}</h1>
    </template>
This works, but notice in the browser how we’re displaying the entire user object We can use dot notation to pinpoint the exact property from our user State that we want to display. In this case, we want to display just the name .
    <template>
      <h1>Create Event, {{ $store.state.user.name }}</h1>
    </template>
Great, now we see our user’s name. But what if we needed to use the user’s name in multiple places within our component? Sure, we could write this.$store.state.user.name all over the place… Or we could write it once, in a computed property, called userName .
    computed: {
      userName() {
        return this.$store.state.user.name
      }
    }
This way, our template becomes more readable and less redundant.
    <h1>Create an Event, {{ userName }}</h1>
    <p>This event is created by {{ userName }}</p>
And if we needed to use it in a method of our component, we could simply say this.userName .
The mapState Helper
If we need to access different parts of our State from the same component, it can get verbose and repetitive to have multiple computed properties each returning this.$store.state.something . To simplify things, we can use the mapState helper, which generates computed properties for us.
Let’s first add some more State to our Vuex Store so we can see this in action. We’ll add an array of event categories:
    state: {
      user: { id: 'abc123', name: 'Adam Jahr' },
      categories: ['sustainability', 'nature', 'animal welfare', 'housing', 'education', 'food', 'community']
    }
Now, in EventCreate.vue , we can import mapState
import { mapState } from 'vuex'
Then use it to map our State to a computed property that can retrieve our user’s name, and our categories.
    computed: mapState({
      userName: state => state.user.name,
      categories: state => state.categories
    })
Notice how we’re using an arrow function that takes in state and returns the property of the state we want, state.user.name and state.categories .
If we’re wanting to access the top-level State (not using dot notation), there’s an even simpler way to write this, like so:
    computed: mapState({
      userName: state => state.user.name,
      categories: 'categories' // <-- simplified syntax for top-level State
    })
Notice all we need to do is use the State’s string value 'categories' . This is equivalent to state => state.categories .
We could simplify the mapState syntax even more by passing an array of strings of the State values we want to map to computed properties, like so:
computed: mapState(['categories', 'user'])
Of course, now in our template we’d just need to use dot notation to access our user’s name.
<h1>Create an Event, {{ user.name }}</h1>
Object Spread Operator
As you probably noticed, mapState returns an object of computed properties. But it’s currently preventing us from adding additional, local computed properties that aren’t mapped to our Store’s State.
To do that, we can use the object spread operator, which allows us to mix in additional computed properties here.
    computed: {
      localComputed() {
        return something
      },
      ...mapState(['categories', 'user']) // <-- using object spread operator
    }
Getters
While we can access the Store’s State directly, sometimes we want to access derived state. In other words, we might want to process the state in some way when we access it.
For example, instead of accessing our State’s categories , we might want to know how many categories there are. In other words, we might want to know the categories array’s length.
From within our component, we could say:
this.$store.state.categories.length
But what if multiple components need to use this same value? By creating a Vuex Getter, we can avoid unnecessary code duplication. Also, since Getters are cached, this is a bit more performant of an option, too.
Let’s add a Getter to our Store.
store.js
    catLength: state => {
      return state.categories.length
    }
As you can see, Getters are a function that takes in the state as an argument, and allows us to return processed or filtered state.
Using our Getter Now let’s use our catLength Getter in our EventCreate component. Just like accessing State, we’ll put it in a computed property.
    computed: {
      catLength() {
        return this.$store.getters.catLength
      }
    }
If at any point the length of our categories State changes, our catLength Getter will recalculate and our computed property will update accordingly.
Passing getters to Getters If we needed to get state that we want to process along with another Getter, we can pass in getters as the second argument to a Getter. This allows us to access another Getter from within the Getter we’re creating. I know, that sounds a bit confusing.
But for a simple example, let’s say we have an array of todos in our State.
    todos: [
          { id: 1, text: '...', done: true },
          { id: 2, text: '...', done: false },
          { id: 3, text: '...', done: true },
          { id: 4, text: '...', done: false }
        ]
We could have a Getter that gets an array of the todos that are labeled done .
    doneTodos: (state) => {
      return state.todos.filter(todo => todo.done)
    }
And we can use this Getter inside another Getter if we want to find out how many remaining todos there are to complete.
    activeTodosCount: (state, getters) => {
      return state.todos.length - getters.doneTodos.length
    }
Now we are able to return the difference between the number of todos that are done from the total number of todos.
You may be wondering why we wouldn’t just write activeTodos like this instead.
    activeTodosCount: (state) => {
      return state.todos.filter(todo => !todo.done).length
    }
And we could. This example was just to demonstrate the power of passing in getters to a Getter.
Dynamic Getters
You might be wondering if we can use dynamic Getters. In other words, can we retrieve some state based upon a parameter. And the answer is yes, we can achieve that by returning a function.
For example, if we had an array of events, we could retrieve an event by id like so:
    getEventById: (state) => (id) => {
      return state.events.find(event => event.id === id)
    }
Then in our component, we’d write:
    computed: {
      getEvent() {
        return this.$store.getters.getEventById
      }
    }
And in our template, we could pass in an argument.
<p>{{ getEvent(1) }}</p>
Note that dynamic Getters like this will run each time you call them, and the result is not cached.
The mapGetters Helper
Just like we saw with accessing State, we can map Getters to computed properties on our component with the mapgetters helper.
First we’d just need to import it:
import { mapGetters } from 'vuex'
Then we can use it like so:
    computed: mapGetters([
      'categoriesLength',
      'getEventById'
    ])
Now we have an array of computed properties in our component that are mapped to our Getters.
If we want to rename these Getters, we can do so in an object:
    computed: mapGetters({
      catCount: 'categoriesLength',
      getEvent: 'getEventById'
    })
Here, this.catCount is mapped to this.$store.getters.categoriesLength and getEvent is mapped to this.$store.getters.getEventById .
Object Spread Operator And as you might imagine, if you want to mix these Getters in with local computed properties, you can use the object spread operator here, too.
    computed: {
      localComputed() { return something }
      ...mapGetters({
        catCount: 'categoriesLength',
        getEvent: 'getEventById'
      })
    }
Let’s ReVue
We looked at accessing State from our components, directly from the template, then with the help of computed properties that we can mapState to. We then looked at how Getters allow us to process State when we access it in order to get derived state. And finally how the mapGetters helper can create computed properties for our Getters.
In our next lesson, we’ll learn how to add data to our State with Actions and Mutations.
Mutations & Actions Pt. 1
Now that we have access to our Vuex State, we can start to store our application’s data there. With Vuex, we can achieve this by using a Mutation to place data in our State. In this tutorial, we’ll look at Mutations and then see how we can wrap Mutations in Actions to make them more scalable and future-proof.
Mutations
As we discovered in the Intro to Vuex lesson, we can use Mutations to update, or mutate, our State.
For a simple example, let’s say our State has a count property:
store.js
    state: {
      count: 0
    }
Now, below our state, we can write a mutation that allows us to increment that value.
store.js
    mutations: {
      INCREMENT_COUNT(state) {
        state.count += 1
      }
    }
As you can see, our INCREMENT_COUNT mutation is taking in our Vuex state as an argument and using it to increment the count .
Now, let’s commit that Mutation from within a component. Inside our EventCreate component, we’ll add a method:
    incrementCount() {
      this.$store.commit('INCREMENT_COUNT')
    },
Here, our incrementCount method simply commits the INCREMENT_COUNT Mutation that it has access to with this.$store .
If we add a button, we can click on it to trigger this Mutation.
<button @click="incrementCount">Increment</button>
Checking the Vue DevTools, we can see our count is being updated in the Vuex tab.
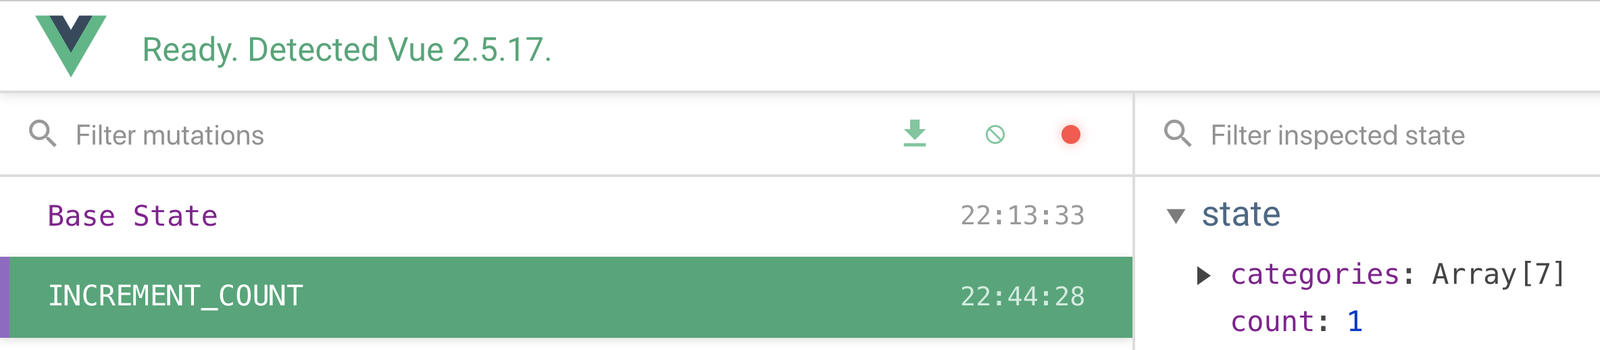
Also, notice how our Mutation was logged in the DevTools as well. If we click on Base State , we’re able to see the State of our app prior to the Mutation being committed. In other words, count reverts to 0.
This allows us to do “time-travel debugging” so we can see what the State of our application was at given points in time, and we can see how our Mutations affected our State.
Why All Caps? If you’re wondering why our Mutation is in all capital letters, that’s because it’s common within Flux-based patterns to put them in all caps. This is entirely optional, and you’ll often see Mutations written in camelCase instead. All caps does make it more immediately visually clear what Mutations are available to you when scanning your files, and more clear when you are committing a Mutation versus an Action, Getter, etc. But again, the choice is up to you (and/or your team).
Dynamic Mutations
Currently, we’re only updating our count by 1. What if we wanted to update it by a dynamic value? We can pass in a payload to a Mutation to make it dynamic.
To see this in action, let’s add an input to our template, and use v-model to bind it to a new data property called incrementBy .
<input type="number" v-model.number="incrementBy">
Note that we are using the .number modifier to typecast the input value as a number.
    data() {
      return {
        incrementBy: 1
      }
    }
Now we’ll pass in the incrementBy value from our data as a payload when we commit our Mutation.
    incrementCount() {
      this.$store.commit('INCREMENT_COUNT', this.incrementBy)
    },
In our Vuex Store, the INCREMENT_COUNT Mutation can receive that payload in its second argument and use it to update our count dynamically.
    INCREMENT_COUNT(state, value) {
      state.count += value
    }
Now whatever number is typed into the input can be used to update our count State.
Actions
While Vuex Mutations are synchronous, meaning they will happen one after the other, Actions can be asynchronous. They can contain multiple steps that actually happen in an order different from the order in which they are written. If you remember from our lesson on APIs, Axios functions asynchronously.
We can use Actions to wrap some business logic around a Mutation, or Mutations.
In our Intro to Vuex lesson, we looked at how an Action could be written to commit a Mutation that sets the isLoading State to true, then makes an API call, and when that call’s response returns, it commits a Mutation to set the isLoading State to false before committing a Mutation to set the todos State with the API’s response.

It’s important to understand that the Mutations within an Action may or may not be committed, depending on how the surrounding logic and circumstances pan out.
For a real-life example, if I asked my friend to pick up some bread from the store, the Mutation here would be PICK_UP_BREAD whereas the Action is more like pleasePickUpBread. There’s a big difference between asking for someone to do something and them actually doing it.
There could be plenty of reasons why she wouldn’t be able to commit that Mutation, so to speak. Her car may break down on the way to the store, or the store might be out of bread. So Actions are more like expressing an intent or desire for something to happen, for some change to be made to the state, depending upon some surrounding circumstances.
Now let’s see Actions in action.
Seeing them in Action
Going back to our counter example, if we only wanted to update the count if our app has a user , we could write:
    actions: {
      updateCount({ state, commit }, incrementBy) {
        if (state.user) {
          commit('INCREMENT_COUNT', incrementBy)
        }
    }
So what’s happening here?
We’ve created an Action called updateCount . It is using object destructuring to get state and commit from the Vuex context object: { state, commit } .
The context object is the first argument of any Action, and it exposes the same set of properties that are on the store instance (state, mutations, actions, getters). So you can call context.commit to commit a mutation, for example. Or say context.state.count to get the value of the count State.
Additionally, updateCount is taking in the payload value .
({ state, commit }, value)
The payload is the second argument of all Actions.
Our Action is checking to see if we have a user stored in our State. If we do, we’ll commit the INCREMENT_COUNT Mutation with the incrementBy value we’ve passed in as the payload. If we do not have a user , the Mutation will not be committed.
Now, within our component, we’d dispatch the Action, which is what commits the Mutation.
    incrementCount() {
      this.$store.dispatch('updateCount', this.incrementBy)
    },
It’s important to note that it is recommended to always commit a Mutation from within an Action. While this might initially seem like unnecessary code if your Mutation doesn’t currently need any business logic, doing so future-proofs your app and allows it to scale better. It’s much easier to add the Action now than to refactor a bunch of code throughout your app when you need to later.
Now that we understand how to commit Mutations, and wrap them in an Action, let’s add to our example app.
Adding to Our Example App
Currently in our app, we are just pulling events from our mock API. But we want a user to be able to create a new event, too, which is added, or stored, within the Vuex Store. We’ll add a Mutation and commit it from an Action.
But first, we need to install a new dependency.
Installing our Date Picker
We’re about to build out a form that is used to create a new event. But we need a date picker for our form, so let’s download a popular external library for that: vuejs-datepicker.
From our command line, we’ll write: npm install vuejs-datepicker --save
This will install the library into our project so we can start using it.
Creating Events
Let’s head over to our EventCreate component because, like it sounds, we’ll be using it to create new events. Just like how we had an input element that used v-model to bind values to our data, and a button to commit a Mutation, we’ll use this same process but in an expanded version, with a form that can collect data from our users so they can create new events.
Below is the template for our form. Notice we’re using our newly added datepicker .
        <form>
          <label>Select a category</label>
          <select v-model="event.category">
            <option v-for="cat in categories" :key="cat">{{ cat }}</option>
          </select>
          <h3>Name & describe your event</h3>
          <div class="field">
            <label>Title</label>
            <input v-model="event.title" type="text" placeholder="Add an event title"/>
          </div>
          <div class="field">
            <label>Description</label>
            <input v-model="event.description" type="text" placeholder="Add a description"/>
          </div>
          <h3>Where is your event?</h3>
          <div class="field">
            <label>Location</label>
            <input v-model="event.location" type="text" placeholder="Add a location"/>
          </div>
          <h3>When is your event?</h3>
          <div class="field">
            <label>Date</label>
            <datepicker v-model="event.date" placeholder="Select a date"/>
          </div>
          <div class="field">
            <label>Select a time</label>
            <select v-model="event.time">
              <option v-for="time in times" :key="time">{{ time }}</option>
            </select>
          </div>
          <input type="submit" class="button -fill-gradient" value="Submit"/>
        </form>
As you can see, we’re asking a series of questions and using v-model on input elements to bind the user’s responses to our data.
Let’s take a look at the script section of this component altogether, then explain it piece by piece.
    <script>
    import Datepicker from 'vuejs-datepicker'
    export default {
      components: {
        Datepicker
      },
      data() {
        const times = []
        for (let i = 1; i <= 24; i++) {
          times.push(i + ':00')
        }
        return {
          event: this.createFreshEvent(),
          times,
          categories: this.$store.state.categories,
        }
      },
      methods: {
        createFreshEvent() {
          const user = this.$store.state.user
          return {
            category: '',
            organizer: user,
            title: '',
            description: '',
            location: '',
            date: '',
            time: '',
            attendees: []
          }
        }
      }
    }
    </script>
Let’s break this down.
    import Datepicker from 'vuejs-datepicker'
    export default {
      components: {
        Datepicker
      }
At the top, we’re importing our new datepicker and registering it as a child component so we can use it in our template.
    data() {
      const times = []
      for (let i = 1; i <= 24; i++) {
        times.push(i + ':00')
      }
      return {
        ...
        times
      }
Then in our data , we’re using a small algorithm to generate an array of numbers to use for our times . Note that above in our data, { times } is the same as { times: times } . If it looks odd to put this logic here, remember that data() is a function, so you’re perfectly capable of performing some initial data-based logic within it.
    <select v-model="event.time">
      <option v-for="time in times" :key="time">{{ time }}</option>
    </select>
We’re then v-for ing through times in the template.
Now, let’s look at the rest of our data .
    return {
      event: this.createFreshEventObject(),
      categories: this.$store.state.categories,
      times
    }
We’re retrieving our categories directly from the Vuex Store, and using v-for on an option element just like with our times . But we’re doing something unique with our event data.
event: this.createFreshEventObject(),
Instead of putting an event object in our data directly, we’re calling a method that generates a fresh event object whenever this component is created.
That method looks like this:
    createFreshEventObject() {
      const user = this.$store.state.user
      const id = Math.floor(Math.random() * 10000000)
      return {
        id: id,
        category: '',
        organizer: user,
        title: '',
        description: '',
        location: '',
        date: '',
        time: '',
        attendees: []
      }
    }
We’re retrieving our user from our Vuex Store then returning an object with all of the properties for which we want to collect data, including a property that is populated with our user state. We’re also creating a random number for our id , and using that to set the id of our event.
You might be wondering why we have this method. Why not just have all these properties on our data itself? Well, when we submit an event, we want to reset this component’s event data, and this method is a handy way for us to do that. You’ll see us using it later.
If we did not reset our local event object, we could be retaining unnecessary connections between this object and the one we push into our State.
Finally, we just need to add a simple scoped style:
    .field {
      margin-bottom: 24px;
    }
The ADD_EVENT Mutation
Now in our Vuex Store, we’ll write an ADD_EVENT Mutation.
    ADD_EVENT(state, event) {
      state.events.push(event)
    },
It receives an event argument, then pushes it onto our events state.
The createEvent Action
Now, we want to wrap this in an Action, which we’ll call createEvent .
But first, we need to import our EventService.js file at the top of our store.js .
import EventService from '@/services/EventService.js'
Because we’re using it in our Action:
    createEvent({ commit }, event) {
      EventService.postEvent(event)
      commit('ADD_EVENT', event)
    })
As you can see, our Action is using the EventService we created in our API Calls with Axios lesson in order to do a POST request with postEvent(event) , which adds the event to our local json.db file.
See? We’ve added a new POST request to our EventService file:
EventService.js
    postEvent(event) {
      return apiClient.post('/events', event)
    }
It receives an event and can POST it to this endpoint, where our mock events database lives.
Our createEvent Action then commits the ADD_EVENT Mutation that we just created, which adds the event to our local events state in case our app’s UI immediately needs access to that new event state.
Now, let’s dispatch this Action from our component.
Dispatching the eventCreate Action
Returning to our EventCreate component, we can add a method that will dispatch our new Action.
    methods: {
      createEvent() {
        this.$store.dispatch('createEvent', this.event)
      },
    ...
We’ll trigger this method when our form is submitted, with:
<form @submit.prevent="createEvent">
Resetting our Event Data
Earlier I mentioned that we want to reset our component’s event data object every time a new event is submitted.
We’ll do that like so:
    createEvent() {
      this.$store.dispatch('createEvent', this.event)
      this.event = this.createFreshEventObject()
    }
Problem: But we don’t want to clear out our event until we know it’s been added to our backend. What if our user was creating an event, clicked submit, stopped onto an elevator and the event never submitted. They’d have to start creating the event all over again.
Solution: In our Action, here we can return the response from our API. And .then commit our Mutation.
    createEvent({ commit }, event) {
      return EventService.postEvent(event).then( => {
          commit('ADD_EVENT', event.data)
        })
    }
Now, when the event is successfully POSTed, we’ll commit ADD_EVENT . And we can even wait for the response to return from with our EventCreate component, like so:
    createEvent() {
      this.$store.dispatch('createEvent', this.event)
        .then(() => {
          this.event = this.createFreshEventObject()
        })
        .catch(() => {
          console.log('There was a problem creating your event.')
        })
    }
Now above, we will only reset our event data ( this.event ) if the POST request was a success.
If the POST request was not a success, we’ll log an error to the console. In a future lesson, we’ll cover how to effectively display this error to the user.
Routing to our New Event
Once we successfully create an event, we’ll want to view that event. In other words, we want to route our user to the event-show page for the event they just created.
We can use the router.push method to achieve this, and set the id params to be the id of this.event that we just created.
    createEvent() {
      this.$store
        .dispatch('createEvent', this.event)
        .then(() => {
          this.$router.push({
            name: 'event-show',
            params: { id: this.event.id }
          })
          this.event = this.createFreshEventObject()
        })
        .catch(() => {
          console.log('There was a problem creating your event.')
        })
    }
We just need to make sure we clear the event after we strip the id from it for our router params, otherwise this.event would be undefined.
Adjusting EventShow
Now we just need to adjust the EventShow component’s template so it doesn’t display our entire user object for the event organizer.
We need to now use dot notation to display event.organizer.name and do so with a ternary operator so we don’t get an error that name is undefined before the component has the data it needs as it renders.
Remember? We did this with the attendees in an earlier lesson:
<span class="badge -fill-gradient">{{ event.attendees ? event.attendees.length : 0 }}</span>
So let’s do that for our organizer name now:
<h5>Organized by {{ event.organizer ? event.organizer.name : '' }}</h5>
Let’s ReVue
In this lesson, we looked at Vuex Mutations and how to use them with Actions that can perform potentially asynchronous business logic. We then took that knowledge and added to our example app so our users can create new events, which are added to our mock database as well as our Vuex Store.
What’s Next?
In the next lesson, we’ll continue learning about Mutations and Actions and how to use them to effectively fetch our event data from an API.
Mutations & Actions Pt. 2
In our last lesson we learned how to start creating actions and mutations using Vuex with an API, which is something that happens a lot in a real world application. In this lesson, we’ll build out Vuex Mutations and Actions for our EventList & EventShow pages, and even implement some pagination.
 Problem: Loading our EventList using Vuex
In our lesson on APIs with Axios we built out an EventService , which has a getEvents method to populate our events when the EventList component is created. That component currently looks like this:
/views/EventList.vue
    <template>
      <div>
        <h1>Events Listing</h1>
        <EventCard v-for="event in events" :key="event.id" :event="event"/>
      </div>
    </template>

    <script>
    import EventCard from '@/components/EventCard.vue'
    import EventService from '@/services/EventService.js'

    export default {
      components: {
        EventCard
      },
      data() {
        return {
          events: []
        }
      },
      created() {
        EventService.getEvents()
          .then(response => {
            this.events = response.data
          })
          .catch(error => {
            console.log('There was an error:', error.response)
          })
      }
    }
    </script>
And in the browser it looks like this:
We want this component to properly use Vuex to retrieve and display events.
 Solution
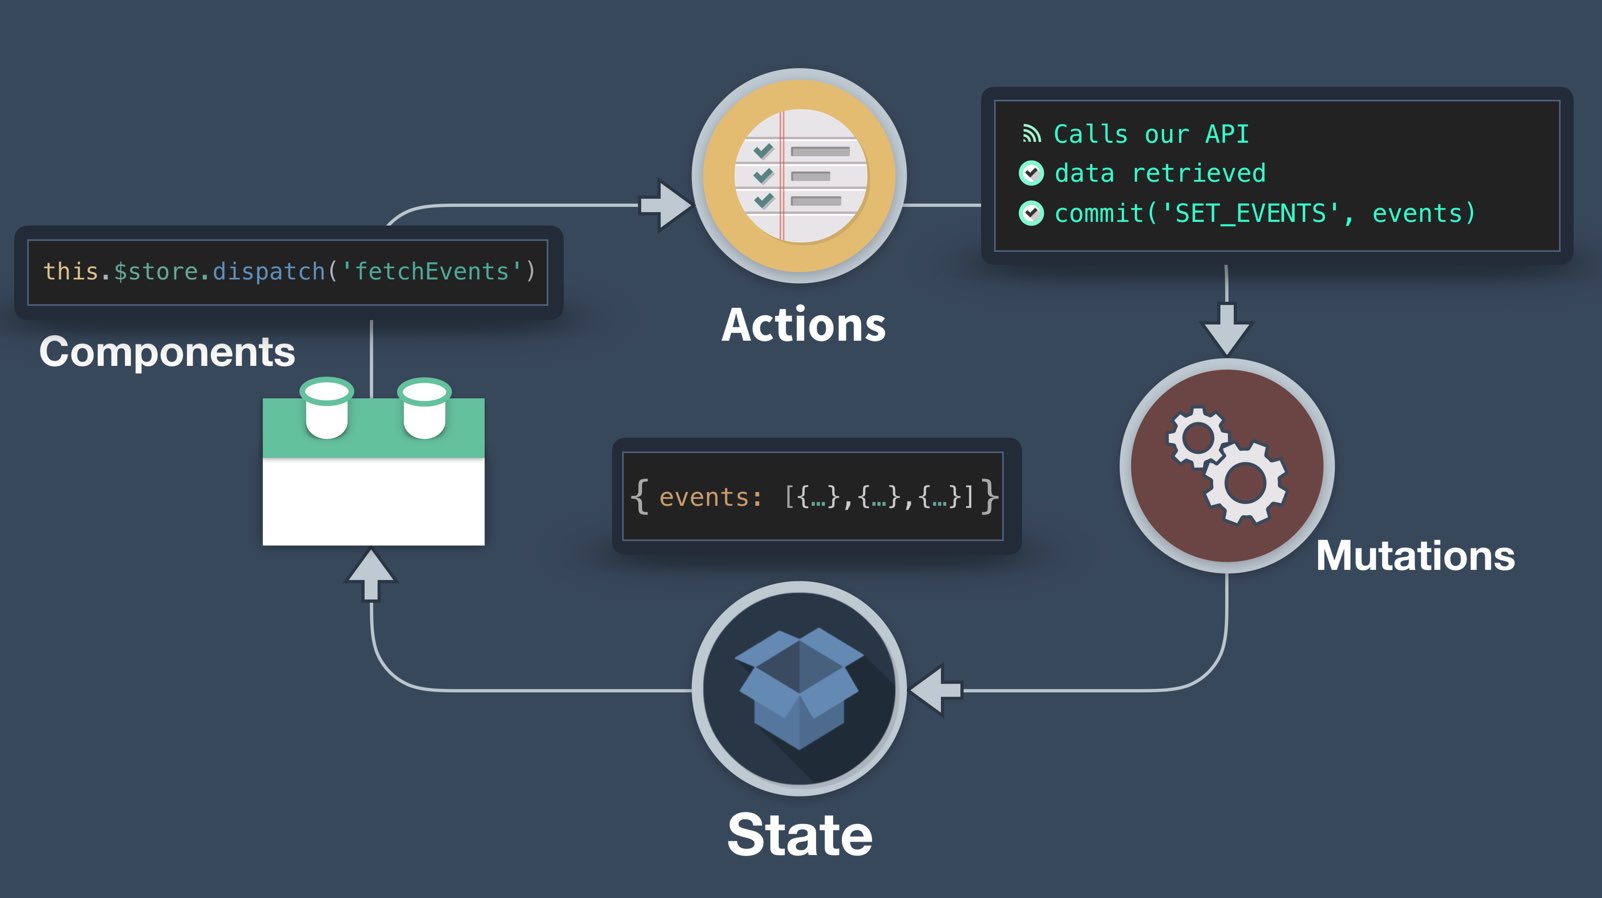
The first step to making this component use Vuex is to create a new Mutation and an Action. Here’s a diagram showing what we want to happen from inside our EventList component.
We already have events:[] inside our Vuex State (as shown below), and we’re already importing the EventService , so the new code inside our store.js is:
/ store.js
      state: {
        ...
        events: []  // already exists
      }
      mutations: {
        ...
        SET_EVENTS(state, events) {
          state.events = events
        }
      },
      actions: {

        ...
        fetchEvents({ commit }) {
          EventService.getEvents()
            .then(response => {
              commit('SET_EVENTS', response.data)
            })
            .catch(error => {
              console.log('There was an error:', error.response)
            })
        }
      }
Notice our SET_EVENTS Mutation sets all the events, and our fetchEvents action simply calls our EventService and then calls our Mutation.
Back in our EventList.vue we’ll make a bunch of small changes so it looks like this:
/views/EventList.vue
    <script>
    import EventCard from '@/components/EventCard.vue'
    import { mapState } from 'vuex'

    export default {
      components: {
        EventCard
      },
      created() {
        this.$store.dispatch('fetchEvents')
      },
      computed: mapState(['events'])
    }
    </script>
I imported the mapState helper, and removed the line that imported EventService. I also removed our data option, and our created lifecycle hook simply calls our new Action. If we look in our browser, we can see that it properly lists out our events and looks the same as above.
Problem: Pagination
Often when showing lists of data in web apps, like events, we might have thousands of events and we probably shouldn’t fetch all of them at once (It could be huge, and cause the browser to slow). Instead, we need to paginate like Google search results. Since we’re building a real-world application, let’s try our hand at implementing pagination.
Solution
The first thing to notice is that our trusty json-server actually has built-in API pagination. If we send it _limit as a parameter we can limit the number of items we show on a page, and _page will only give us the data on our particular page. Perfect!
So if we construct a URL like so: /events?_limit=3&_page=2 our API will return 3 events per page, and will give us the events to list on page 2. Let’s first modify our getEvents method in our EventService to use these two parameters.
/services/EventService.js
      getEvents(perPage, page) {
        return apiClient.get('/events?_limit=' + perPage + '&_page=' + page)
      },
Then inside Vuex, we need to modify our Action:
/store.js
      actions: {
        ...
        fetchEvents({ commit }, { perPage, page }) {
          EventService.getEvents(perPage, page)
            .then(response => {
              commit('SET_EVENTS', response.data)
            })
            .catch(error => {
              console.log('There was an error:', error.response)
            })
        },
        ...
Notice in the second argument we’re using ES2015 argument destructuring to pull out { perPage, page } . This is because the second argument with both mutations and actions is effectively a payload . The payload in both Actions and Mutations can be a single variable or a single object.
So, to call this from our EventList.vue , we’ll do the following:
/views/EventList.vue
    ...
    <script>
    import EventCard from '@/components/EventCard.vue'
    import { mapState } from 'vuex'

    export default {
      components: {
        EventCard
      },
      created() {
        this.$store.dispatch('fetchEvents', {
          perPage: 3,  // <-- How many items to display per page
          page: this.page // <-- What page we're on
        })
      },
      computed: {
        page() {  // What page we're currently on
          return parseInt(this.$route.query.page) || 1
        },
        ...mapState(['events'])
      }
    }
    </script>
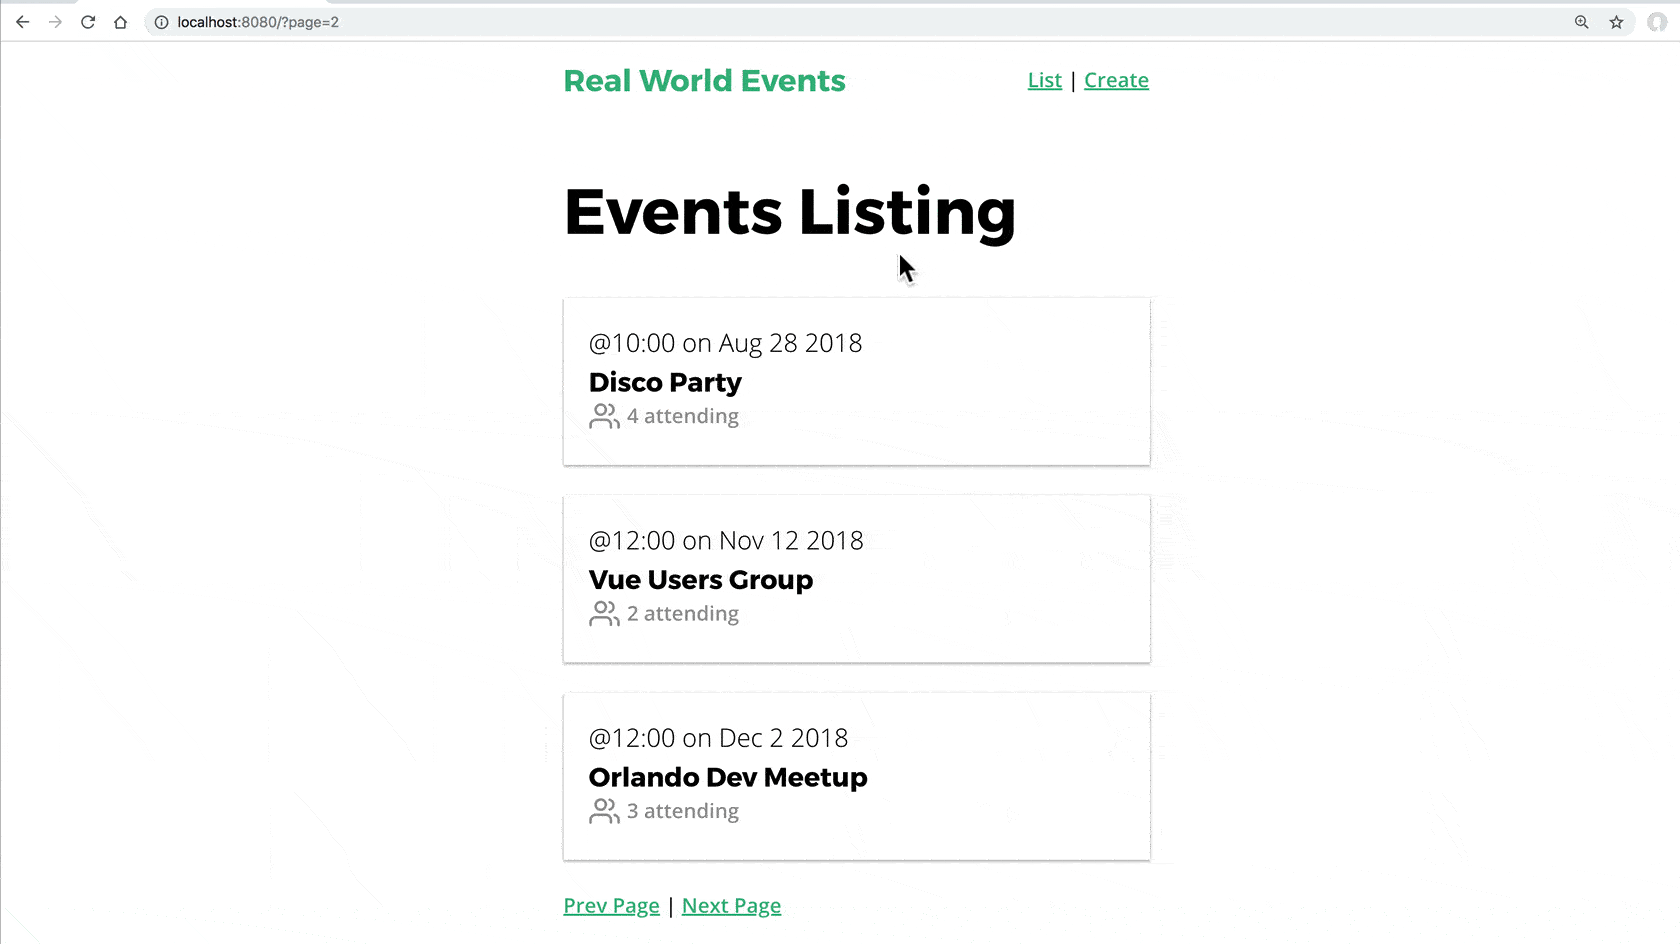
Notice our new computed property page() . It looks into the URL to see if we have a page query parameter, otherwise it assumes we’re on the first page. So if our URL is http://localhost:8080/?page=2 then this.$route.query.page is 2 . We call parseInt on the page query parameter to ensure it’s a number.
Notice our payload for the action is { perPage: 3, page: this.page } .
Lastly, let’s add some new router links in this same file’s template.
/views/EventList.vue
    <template>
      <div>
        <EventCard v-for="event in events" :key="event.id" :event="event"/>
        <template v-if="page != 1">
          <router-link :to="{ name: 'event-list', query: { page: page - 1 } }" rel="prev">Prev Page</router-link> |
        </template>
        <router-link :to="{ name: 'event-list', query: { page: page + 1 } }">Next Page</router-link>
      </div>
    </template>
Notice we have the beginnings of some pagination going on. We added a bunch of events to our db.json ****file so pagination will be more fun. You can download mine here if you want to follow along.
Let’s see if this works:
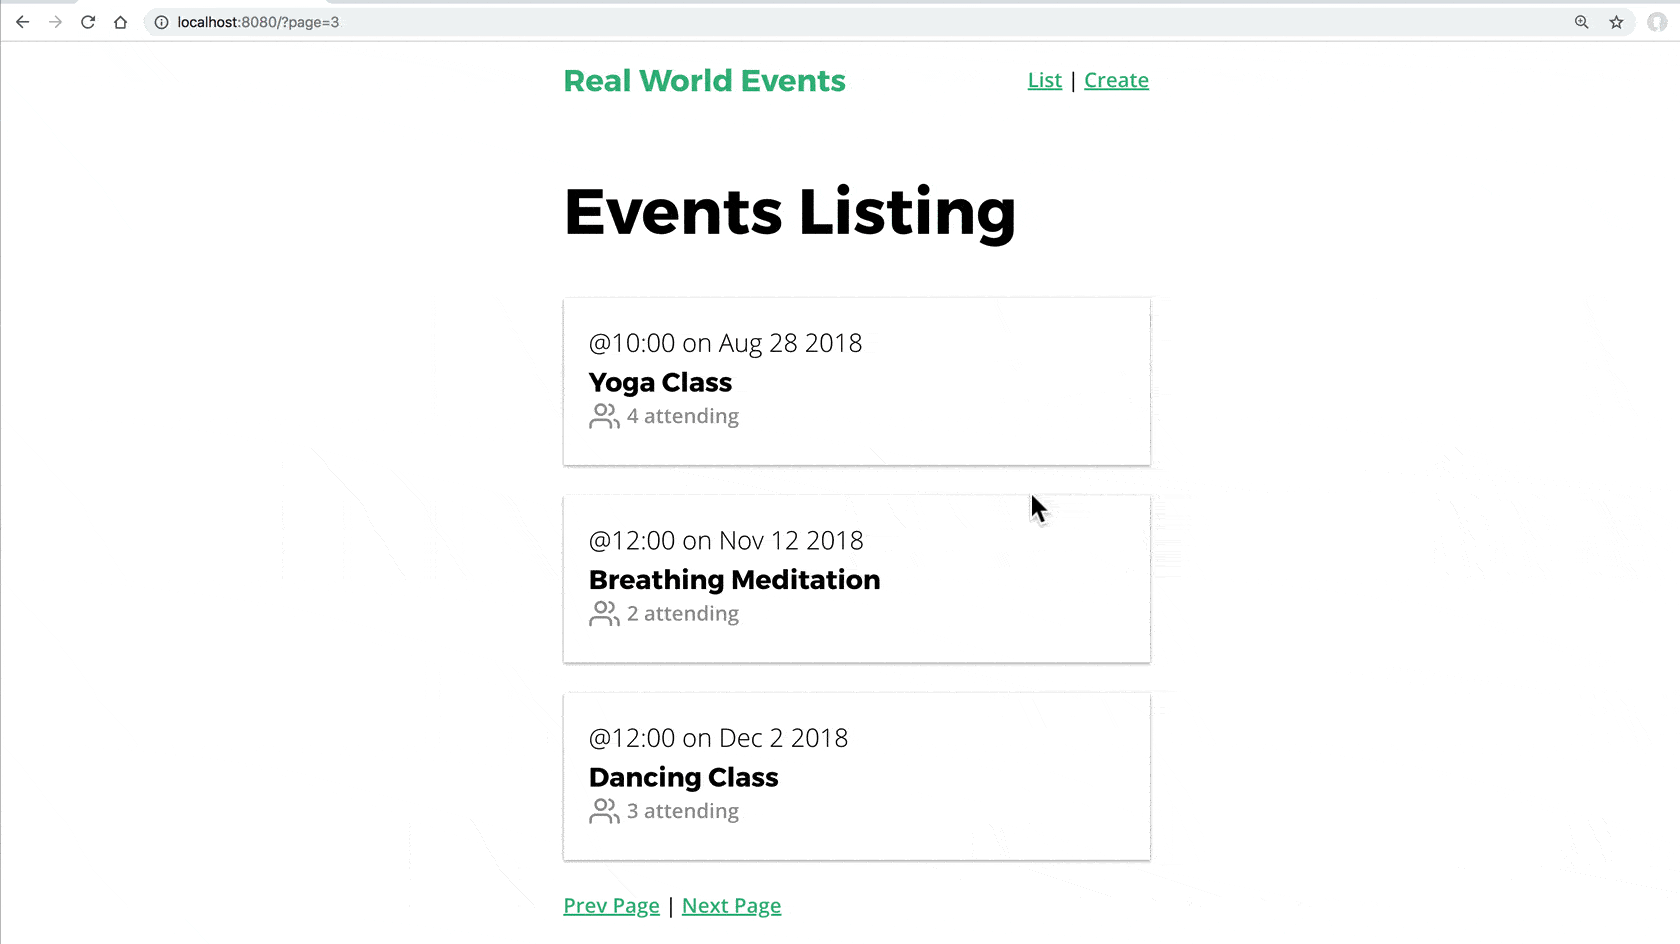
Looks like on the first page we see a limited list of events. Great, it’s kind of working. However, when we use the link to go to page two, nothing changes. But if we refresh, it does work.
Problem: The Component isn’t reloading
What’s going on here, is that our router sees that we’re loading the same ‘event-list’ named route, so it doesn’t need to reload the component. This is like clicking a navigation link twice. When someone clicks on a navigation link twice and they’re already on that page, do we want it to reload the component? No. That’s what’s going on. created() is not getting called again when we go to the second page, because it’s not reloading the component.
Inevitably, you’ll run into this as a Vue developer: where you want to reload a component with a change of query parameters.
Solution: Updating our router view
There are two ways to fix this:
- Watch the
pagecomputed property to see if it changes (which it does when we change the page), and when it does, dispatch thefetchEventaction. - Tell our router to reload components when the full URL changes, including the query parameters. We’ll do this. It’s super simple.
/App.vue
    <template>
      <div id="app">
        <NavBar/>
        <router-view :key="$route.fullPath"/>
      </div>
    </template>
    ...
Now when we switch pages, everything works as expected.
 Extra Credit
You’ll notice on our current app the “Next Page” link doesn’t disappear when we reach the last page, so we can continue to paginate onto blank pages, which obviously we don’t want to happen. For extra credit, you might want to try to implement a solution for this.
There are many ways we could cause this link to disappear. It would be easy if we knew how many events we have total. json-server is actually giving us this data on each event request listing as a header. We can see this by looking at the Chrome DevTools → Network tab, and inspecting one of our API calls. We’ll see:
There it is! Now inside our Vuex fetchEvents action we could print this with:
/store.js
    ...
        fetchEvents({ commit }, { perPage, page }) {
          EventService.getEvents(perPage, page)
            .then(response => {
              console.log('Total events are ' + response.headers['x-total-count'])
              commit('SET_EVENTS', response.data)
            })
            ...
See that console.log line? From here you’d probably want to create eventsTotal in your Vuex State, create a mutation & action for it, call the mutation from getEvents , and access that State from the EventList.vue to see if eventsTotal > (this.page * 3) . If this is true, we have a next page. Get it?
Here’s the starting code if you want to give it a try, and here’s a solution.
 A Side Note on Caching
The way we’ve been coding this triggers an API call on every page. In some apps, you may always want to fetch the latest data, so this is exactly what you’d do. However, if you’re dealing with millions of users, you’ll likely implement some sort of caching strategy so you can keep your page snappy. There are many ways to do this, both outside and inside Vue.
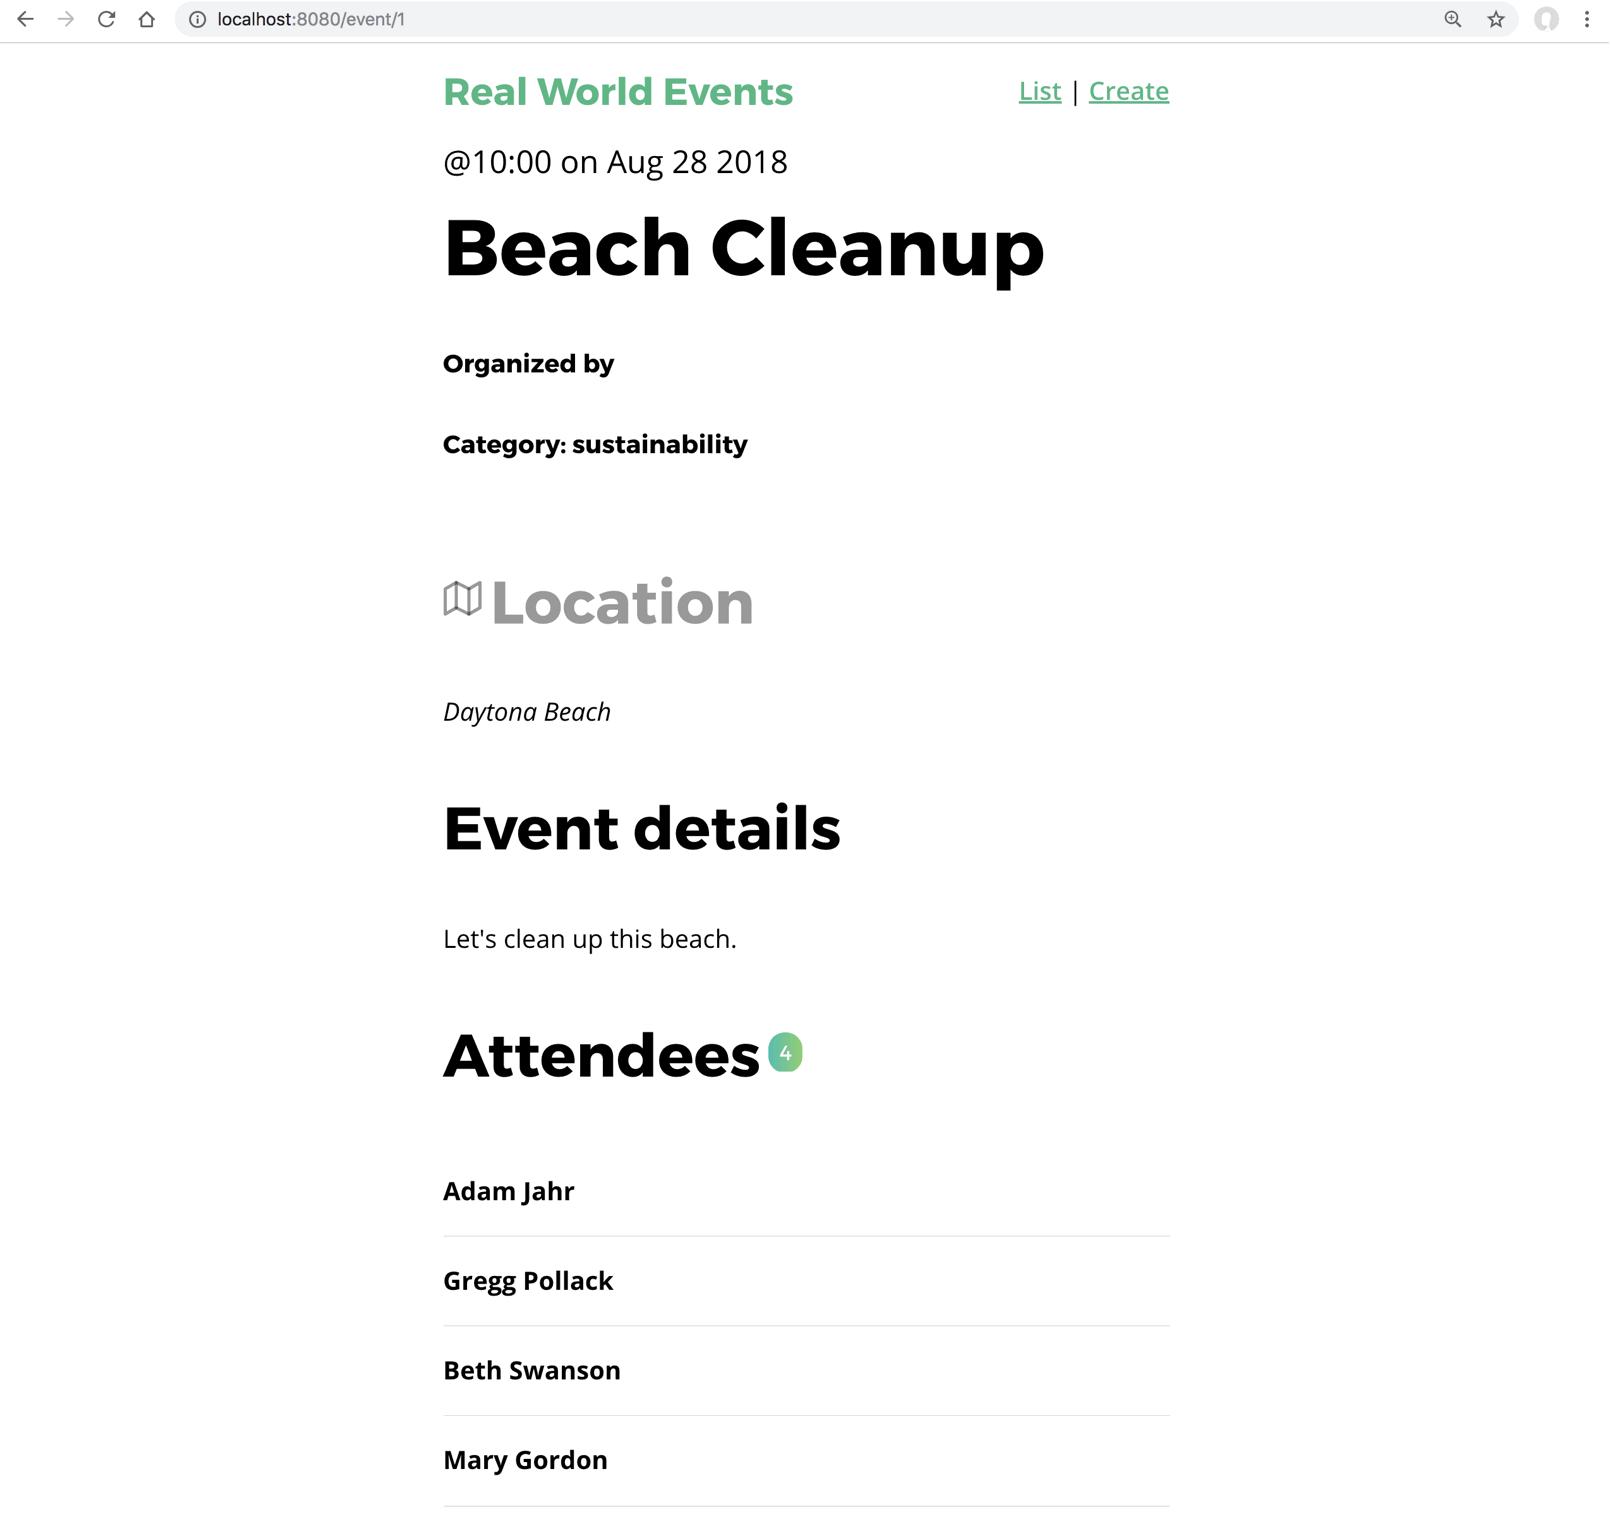
Problem: Implementing the Show Event Page
Now that we have pagination in place, when a user clicks on an event to get to the ShowEvent page, what do we do inside Vuex? Here’s what our page looks like at the moment:
Solution
Like before, we start with Vuex, this time adding a new object to our State called event to store the event that is currently being viewed. Then we’ll add a Mutation to set it, and an Action to call our API.
/store.js
    export default new Vuex.Store({
      state: {
        ...
        event: {}
      },
      mutations: {
        SET_EVENT(state, event) {
          state.event = event
        }
      },
      actions: {
        ...
        fetchEvent({ commit }, id) {
          EventService.getEvent(id)
            .then(response => {
              commit('SET_EVENT', response.data)
            })
            .catch(error => {
              console.log('There was an error:', error.response)
            })
        }
      },
      ...
Then in our EventShow component, we’ll dispatch the fetchEvent Action, and send in the id as the payload.
/views/EventShow.vue
    ...
    <script>
    import { mapState } from 'vuex'

    export default {
      props: ['id'],
      created() {
        this.$store.dispatch('fetchEvent', this.id)
      },
      computed: mapState(['event'])
    }
    </script>
And that’s all there is to it! Our EventShow page looks the same except now it’s using Vuex.
Problem: We’re Loading Data Twice
We happen to be loading all the data we need to show an event on the EventList page. If we view the EventList page first, then the EventShow page (which many users will do), it seems wasteful to do another call to the API, when we already have the data needed in hand. How might we save our code an extra call?
Solution
When we get to the ShowEvent page, we need to check if we already have this particular event in our events State array. We can use a Getter we already have in our store.js for this. We can call it from inside our fetchEvent action in store.js, like so:
/store.js
      ...
      actions: {
        ....
        fetchEvent({ commit, getters }, id) {  // Send in the getters

          var event = getters.getEventById(id) // See if we already have this event

          if (event) { // If we do, set the event
            commit('SET_EVENT', event)
          } else {  // If not, get it with the API.
            EventService.getEvent(id)
              .then(response => {
                commit('SET_EVENT', response.data)
              })
              .catch(error => {
                console.log('There was an error:', error.response)
              })
          }
        }
      },
      getters: {
        getEventById: state => id => {
          return state.events.find(event => event.id === id)
        }
      }
As you can see, at the start of this action we call our getters.getEventById(id) with the id of the event we want to display. If it is found, we commit a Mutation, otherwise we go ahead and get that single event from the API.
Obviously, if we wanted to make sure our page always had the latest data, we might want to allow our event page to always trigger a new API request, even if we fetched this event in the EventList component.
 Let’s ReVue
In this lesson we learned a bunch of ways to use Vuex in our code, specifically:
- How to fetch a list of events and a single event with Vuex.
- How to paginate with Vuex.
- How to use query parameters on our router, and ensure our components are reloaded when they change.
- How to optimize our Vuex State so we’re not reloading data twice.
In the next lesson we’ll learn about modules, to keep our Vuex code more organized.
Modules
In the previous two lessons we used Vuex to encapsulate the state of our application and standardize how that state gets modified (through actions and mutations). However, as our application gets bigger, we’re going to end up with a gigantic store.js file. This is where Vuex modules come in, allowing us to keep our Vuex code organized and easier to test.
Problem: We need to organize our code
There has to be a better way to organize our Vuex code, as we’ve just put everything in our store.js file up until this point.
Solution
Vuex has an option called modules which makes it simple to split out different parts of your state into different files. For example, if your app has events and users it doesn’t make sense to pile all the state, mutations, actions, and getters into one big /src/store.js file. Instead, we might break the functionality into two separate Vuex modules.

Later, we might have additional functionality with events having their own comments, and users having the events they can mark as “attending”. These features might also be candidates to split out into their own Vuex modules.
We can split out our Vuex code based on data models, or we can split it out based on features. How you implement this is entirely up to you.
 Back to our Example app
In our example app, let’s start by creating a store directory, and move our current store.js file inside of it. For the time being, let’s make sure our app still works after this move, by modifying our main.js to look inside our new directory. We simply need to change:
import store from './store'
to:
import store from './store/store'
Now our store.js file is importing with no problem.
 Building Our First Module
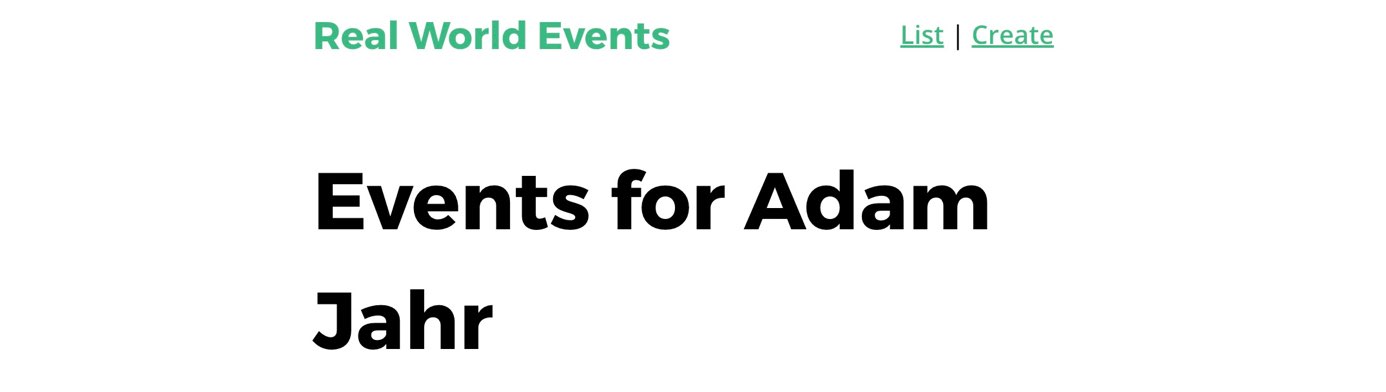
Before we actually build out our first module, I’d like to add someplace where we’re printing out our user’s name. I’m going to change our homepage title so it prints our current user’s name:
/src/views/EventList.vue
    <template>
      <div>
        <h1>Events for {{ user.name }}</h1>
        ...
    </template>
    <script>
        // omitting code
        ...mapState(['events', 'eventsTotal', 'user'])
      }
    }
    </script>
We’re not adding any new code. I just want to show you that our store.js has the following for our user data:
/src/store/store.js
    ...
    export default new Vuex.Store({
      state: {
        user: { id: 'abc123', name: 'Adam Jahr' },
        ...
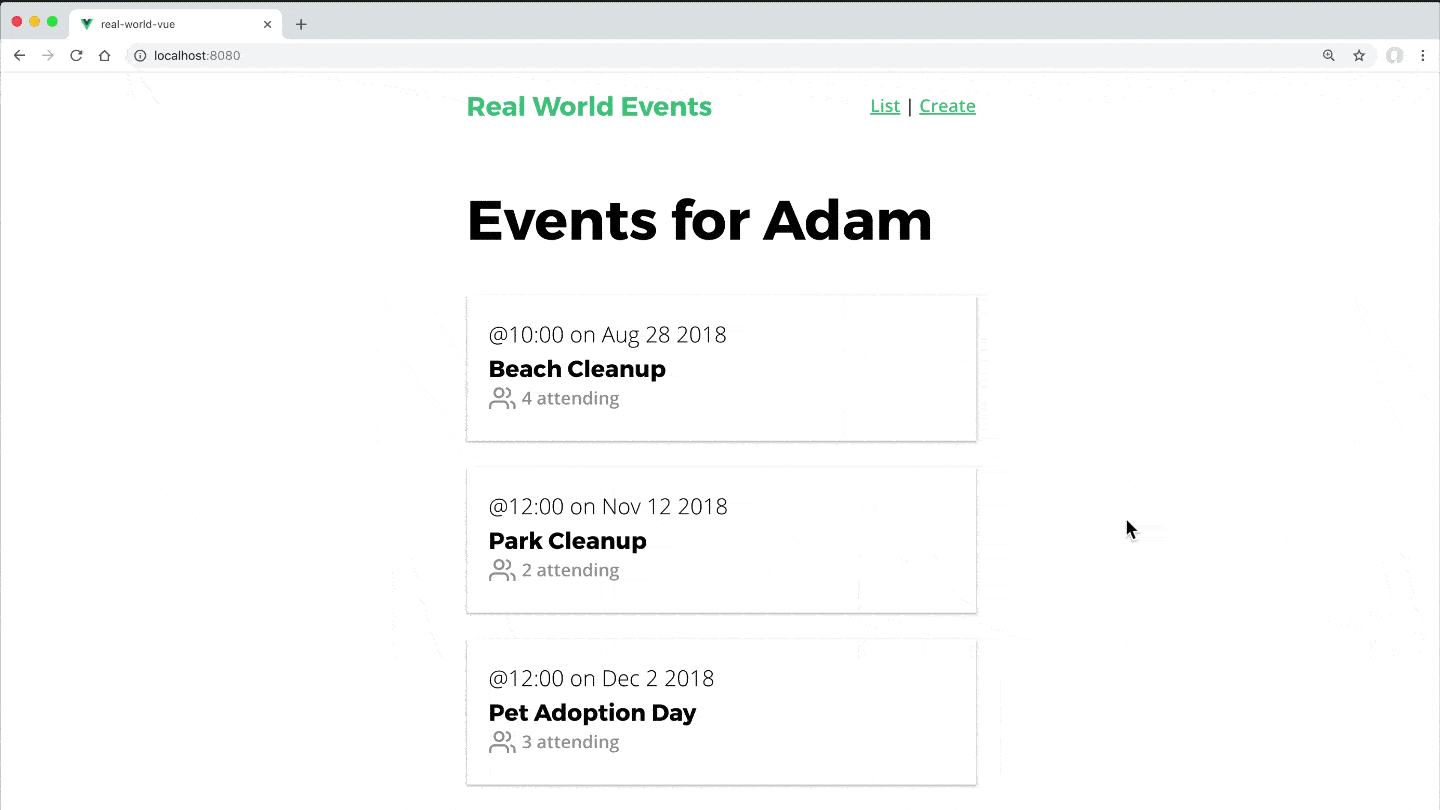
So when we call up our homepage we see:
Now let’s build out our first user module, as in the future as we build out authentication in our example app we’ll be placing a lot more code in here. To do this, we’ll create a new modules folder with a new user.js file which just contains our user state.
/src/store/modules/user.js
    export const state = {
      user: {
        id: 'abc123',
        name: 'Adam'  // I removed the last name Jahr here our title is on one line
      }
    }
Notice I removed Adam’s last name above so our title fits on one line. If you’re following along, feel free to change it to your first name.
Now in order to use this module, we need to include it inside our store.js like so:
/src/store/store.js
    ...
    import * as user from '@/store/modules/user.js'
    // This pulls in all the constants in user.js

    Vue.use(Vuex)

    export default new Vuex.Store({
      modules: {
        user  // Include this module
      },
      state: {
        categories: [
          'sustainability',
          // ...
In order to get this working in our component we need to add another .user :
/src/views/EventList.vue
    <template>
      <div>
        <h1>Events for {{ user.user.name }}</h1>
        ...
    </template>
We need to do this because our module’s state is now scoped under it’s name. There are certainly ways to get around having to type user.user and we’ll show you this in a minute.store
And now in the browser, we can see that things still work, except now we’re a little more organized.

I noticed there’s one more place in our code we need to update with our new User module.
/src/views/EventList.vue
    <script>
    ...
        createFreshEventObject() {
          const user = this.$store.state.user // <----
          const id = Math.floor(Math.random() * 10000000)
          ...
When referencing the state we need to set user to user.user , so that line needs to get updated to:
const user = this.$store.state.user.user // <----
Creating an Event Module
Next, I’m going to move all of our event State, Mutations, Actions, and Getters into its own event.js module. It’s mostly one big copy paste job, which ends up looking like this:
/src/store/modules/event.js
    import EventService from '@/services/EventService.js'

    export const state = {
      events: [],
      eventsTotal: 0,
      event: {}
    }
    export const mutations = {
      ADD_EVENT(state, event) {
        state.events.push(event)
      },
      SET_EVENTS(state, events) {
        state.events = events
      },
      SET_EVENTS_TOTAL(state, eventsTotal) {
        state.eventsTotal = eventsTotal
      },
      SET_EVENT(state, event) {
        state.event = event
      }
    }
    export const actions = {
      createEvent({ commit }, event) {
        return EventService.postEvent(event).then(() => {
          commit('ADD_EVENT', event)
        })
      },
      fetchEvents({ commit }, { perPage, page }) {
        EventService.getEvents(perPage, page)
          .then(response => {
            commit('SET_EVENTS_TOTAL', parseInt(response.headers['x-total-count']))
            commit('SET_EVENTS', response.data)
          })
          .catch(error => {
            console.log('There was an error:', error.response)
          })
      },
      fetchEvent({ commit, getters }, id) {
        var event = getters.getEventById(id)
        if (event) {
          commit('SET_EVENT', event)
        } else {
          EventService.getEvent(id)
            .then(response => {
              commit('SET_EVENT', response.data)
            })
            .catch(error => {
              console.log('There was an error:', error.response)
            })
        }
      }
    }
    export const getters = {
      getEventById: state => id => {
        return state.events.find(event => event.id === id)
      }
    }
The only new thing to notice here is that I brought over import EventService from '@/services/EventService.js' into this file, and I left the state objects the same, unlike how I changed things earlier in our user.js by removing the user property name, since we have more than one state property in this module. Now I need to use this module inside our store.js :
/src/store/store.js
    import Vue from 'vue'
    import Vuex from 'vuex'
    import * as user from '@/store/modules/user.js'
    import * as event from '@/store/modules/event.js'

    Vue.use(Vuex)

    export default new Vuex.Store({
      modules: {
        user,
        event
      },
      state: {
        categories: [ ... ]
      }
    })
Now if I look in the browser, nothing would be working yet. Our events , eventTotal , and event State must now all be accessed by event.events , event.eventTotal , and event.event . So we need to make two more file changes.
First, in EventList:
/src/views/EventList.vue
    <template>
      <div>
        <h1>Events for {{ user.name }}</h1>
        <EventCard v-for="event in event.events" :key="event.id" :event="event"/>
        ...
    </template>
    <script>
        ...
        hasNextPage() {
          return this.event.eventsTotal > this.page * this.perPage
        },
        ...mapState(['event', 'user'])
      }
    }
    </script>
As you can see above, we made three changes, and the first was the one at the bottom of the file where we changed our mapState to just access event (this is mapping to our module name which is event ). Then we just had to make sure to use event. when we accessed parts of the state.
In our EventShow.vue we’re using our event object all over the place, so we’ll solve this problem another way, instead of writing event.event.time and so on. There’s another way to use the mapState helper, which we covered in our State and Getter’s lesson.
We’ll change our computed from computed: mapState(['event']) to:
/src/views/EventShow.vue
      ...
      computed: mapState({
        event: state => state.event.event
      })
Here we’re mapping Component computed property called event to the event state in our event module.
Now everything works again as expected, and when we write event.time in our EventShow.vue file, it’s mapped to event.event .
Alternate Syntax for Modules
Lastly, I want to mention that there’s another common module syntax you’ll likely experience in the wild. Instead of importing a module like this:
/src/store/store.js
    import * as event from '@/store/modules/event.js'
    ...
and then having a module file which looks like this:
/src/store/modules/event.js
    import EventService from '@/services/EventService.js'

    export const state = { ... }
    export const mutations = { ... }
    export const actions = { ... }
    export const getters = { ... }
You also might see this same module coded up as a single object rather than 5 constants.
/src/store/modules/event.js
    import EventService from '@/services/EventService.js'

    export default {
      state: { ... },
      mutations: { ... },
      actions: { ... },
      getters: { ... }
    }
Which then is imported by doing:
/src/store/store.js
    import event from '@/store/modules/event.js'
    ...
Both syntaxes are correct, and the reason the first might be preferable is that it’s easier to create private variables and methods. However, both are correct to use.
Accessing State in Other Modules
Back in our first lesson on Actions & Mutations , we created an event Action, which looked like this and is now in our /store/modules/event.js file.
    ...
    export const actions = {
      createEvent({ commit }, event) {
        return EventService.postEvent(event).then(() => {
          commit('ADD_EVENT', event)
        })
      },
In the future we may want to access the current user from inside this Action. How could we do this? Well, if we weren’t in a module we could use the context object to access the State like this:
        createEvent({ commit, state }, event) {

          console.log('User creating Event is ' + state.user.user.name)

          return EventService.postEvent(event).then(() => {
            commit('ADD_EVENT', event)
          })
        },
However, since we’re using a module, this won’t work . The state object here is only our local module’s state. So, to get access to our user’s name, we’d do the following using rootState which, as it sounds, gives me access to the root of my Vuex state.
        createEvent({ commit, rootState }, event) {

          console.log('User creating Event is ' + rootState.user.user.name)

          return EventService.postEvent(event).then(() => {
            commit('ADD_EVENT', event)
          })
        },
Notice how with rootState.user.user.name I am accessing the root state, which gives me access to the user module, and then I can ask for the name State from the user module.
I can access rootGetters in the same way if there are Getters I want to call that are located in a different module.
Accessing another Module’s Actions
It’s also common to call another module’s actions from inside this action. To do this we simply send in dispatch from the context object and call that action’s name.
        createEvent({ commit, dispatch, rootState }, event) {

          console.log('User creating Event is ' + rootState.user.user.name)

          dispatch('actionToCall')

          return EventService.postEvent(event).then(() => {
            commit('ADD_EVENT', event)
          })
        },
Yup, we don’t need to mention what module actionToCall is in. This is because by default all our actions, mutations, and getters are located in the Global NameSpace.
Understanding the Global NameSpace
I’ll say that again: Actions, Mutations, and Getters (even inside modules) are all registered under the global namespace. This means that no matter where they’re declared, they’re called without their module name. So if you look at the following code, you’ll notice there’s no mention of any modules:
    this.$store.dispatch('someAction')
    this.$store.getters.filteredList
This is on purpose so that multiple modules can react to the same Mutation/Action type. Yup, you might find situations where you have two different modules, one for purchasing and one for logging, and they both want to listen for the “completePurchase” action. The purchasing module would actually do the purchase, and the logging module would log that the purchase took place.
The downfall of this implementation is that we could end up with naming collisions. You might want to ensure your action, mutation, and getters never conflict. This is why you might want to turn namespacing on.
NameSpacing our Modules
If you want your modules to be more self-contained, reusable, and perhaps avoid accidentally having two modules that are the same name, you could namespace your modules.
Let’s namespace our event.js module.
/src/store/modules/event.js
    import EventService from '@/services/EventService.js'

    export const namespaced = true

    export const state = {
      events: [],
        ...
With this one line of configuration, our Getters, Mutations, and Actions now must be addressed using this namespace. So in our EventList.vue:
this.$store.dispatch('fetchEvents', { ... })
becomes
this.$store.dispatch('event/fetchEvents', { ... })
and in our EventCreate.vue
this.$store.dispatch('createEvent', this.event)
becomes:
this.$store.dispatch('event/createEvent', this.event)
In our EventShow.vue:
this.$store.dispatch('fetchEvent', this.id)
becomes:
this.$store.dispatch('event/fetchEvent', this.id)
And that’s all there is to it.
Small Aside about mapActions
We haven’t mentioned the mapActions helper yet in this tutorial, but it allows you to map component methods to store.dispatch calls. So instead of:
/src/views/EventShow.vue
    import { mapState } from 'vuex'

    export default {
      props: ['id'],
      created() {
        this.$store.dispatch('event/fetchEvent', this.id)
      },
      computed: mapState({
        event: state => state.event.event
      })
    }
We can write:
    import { mapState, mapActions } from 'vuex'

    export default {
      props: ['id'],
      created() {
        this.fetchEvent(this.id)
      },
      computed: mapState({
        event: state => state.event.event
      }),
      methods: mapActions('event', ['fetchEvent'])
    }
Notice how we imported mapActions , how we use the helper with the methods: property, and how it allows us to simplify our component code. The first argument to mapActions here is the namespace, and the second is an array of methods we want our component to have an alias to.
Accessing NameSpaced Getters
Although we don’t access any of our getters from our current code, in our state & getter lesson we had the following code:
    computed: {
      getEventById() {
         return this.$store.getters.getEventById
      }
    }
Which we simplified using mapGetters :
computed: mapGetters(['getEventById'])
If we wanted to access our namespaced getter method inside our event module, we could do:
    computed: {
      getEventById() {
        return this.$store.getters['event/getEventById']
      }
    }
Which could be shortened to:
computed: mapGetters('event', ['getEventById'])
Does any of this code change with NameSpaced Modules?
Remember all this code from earlier?
        createEvent({ commit, dispatch, rootState }, event) {

          console.log('User creating Event is ' + rootState.user.user.name)

          dispatch('actionToCall')

          return EventService.postEvent(event).then(() => {
            commit('ADD_EVENT', event)
          })
        },
See the state, action, and mutation getting called? The question is, sssuming all of our modules are NameSpaced, does any of this code need to change?
rootState.user.user.name is correct, nothing that needs to change there.
dispatch('actionToCall') Only needs to change if the action it’s trying to call is not inside this module.
commit('ADD_EVENT', event) Only needs to change if the mutation it’s trying to is not inside this module, and frankly this would not be a best practice. It’s a best practice to never call mutations in other modules, and to only allow mutations to be called by actions in the same module. So I’m not going to show you how to call a mutation in another module, you should never do it.
How do I call an Action inside of an Action?
There may be times where you need to call an action inside of another action. Nothing wrong with this, it’s pretty simple. If your action is inside of your current module (or you’re not using namespaced modules) you can just do:
/src/store/modules/event.js
    ...
     actions: {
        createEvent({ commit, dispatch }, event) {
          ...
          dispatch('actionToCall')
        }
    ...
Notice how I’m including dispatch from my object context, and simply calling the action sending in a payload (which is always optional).
What if the action I want to call is in another module which is namespaced?
If you want to call an action inside another namespaced module, you’ll need to use the action’s module name, provide a payload as the second argument (null if there is none), and pass { root: true } as the third argument, like so:
/src/store/modules/event.js
    ...
     actions: {
        createEvent({ commit, dispatch }, event) {
          ...
          dispatch('moduleName/actionToCall', null, { root: true })
        }
    ...
Let’s ReVue
In this lesson we learned all about organizing our Vuex code to keep it more scalable. First, we reorganized our Vuex code into separate modules and refactored our code to use those modules. Then we talked about Vue NameSpacing, which allows us to further encapsulate our actions, mutations, and getters. Thanks for reading!