Success & Error Notifications
Within our application, we have some places in our Vuex code where we might be catching an error, like if our API call failed. Currently, we’re just logging those errors to the console. But that isn’t very helpful for our users, who should be informed when an error happens.
In this lesson, we’ll be learning how to add notifications to our Vuex store when things like errors and successful actions occur, and then we’ll explore how to display those notifications within our UI.
Problem: Need to Log and Display Notifications
These errors or successes may be happening in many different places in our app, in different components, and from different Vuex Actions.
We need a way to log them so we can share that state across our application.
Solution: A Vuex Module
Vuex is our best solution when we need shared state. In our last lesson, we learned about encapsulating Vuex code into modules. Now we need a new notification module that stores the State for our app’s success and error notifications. We’ll then display those notifications to our user.
So let’s create our notification module and make sure it’s namespaced.
 /src/store/modules/notification.js
    export const namespaced = true

    export const state = {
      notifications: []
    }
As you can see, the notifications State is an array. We’ll want to be able to add a notification into it, and we also want the ability to remove a notification from it. So we’ll add Mutations that handle those State changes.
/src/store/modules/notification.js
    let nextId = 1

    export const mutations = {
      PUSH(state, notification) {
        state.notifications.push({
          ...notification,
          id: nextId++
        })
      },
      DELETE(state, notificationToRemove) {
        state.notifications = state.notifications.filter(
          notification => notification.id !== notificationToRemove.id
        )
      }
    }
Unsurprisingly, the PUSH Mutation pushes a new notification that it receives as a payload into the notifications State array. As it does so, it adds an id property to the notification, using the nextId variable that’s at the top of this file. This will make sure each new notification has a unique id, which we’ll be using later.
The DELETE Mutation receives a messageToRemove payload, which is used to filter the notifications and remove that specific notification from the State.
Finally, we’ll want some dedicated Actions that can commit these Mutations.
/src/store/modules/notification.js
    ...
    export const actions = {
      add({ commit }, notification) {
        commit('PUSH', notification)
      },
      remove({ commit }, notificationToRemove) {
        commit('DELETE', notificationToRemove)
      }
    }
The last step is to add this module to our store.js file.
/src/store/store.js
    import * as notification from '@/store/modules/notification.js' // <-- import it

    export default new Vuex.Store({
      modules: {
        user,
        event,
        notification // <-- add it here
      },
Great. Now our notification module is ready to be used!
Adding Error Notifications
Currently, in the event module we created in the previous lesson, we have the fetchEvents Action, which makes an API call to get the events from our mock server.
/src/store/modules/event.js
    fetchEvents({ commit, dispatch }, { perPage, page }) {
      EventService.getEvents(perPage, page)
        .then(response => {
          commit('SET_EVENTS_TOTAL', parseInt(response.headers['x-total-count']))
          commit('SET_EVENTS', response.data)
        })
        .catch(error => {
          console.log('There was an error:', error.response) // <--- here
        })
    },
As you can see, if we catch an error, we’re just logging it to the console. Instead, we want to dispatch the add Action that lives in our notification module, so we can add this error to our notifications State.
That would look like this:
     ...
        .catch(error => {
          const notification = {
            type: 'error',
            message: 'There was a problem fetching events: ' + error.message
          }
          dispatch('notification/add', notification, { root: true })
        })
Notice above, we’re creating a notification object, which has a type of '``error``' and a message that describes that error.
Then we’re passing that notification in as the payload where we are dispatching the Action. Since our notification module is namespaced, we can dispatch the add Action with 'notification/add' .
The third argument here, { root: true } , is important. This tells dispatch to look for a notification/add action at the root of our store, instead of just looking for it inside the module we’re currently in.
Testing it Out
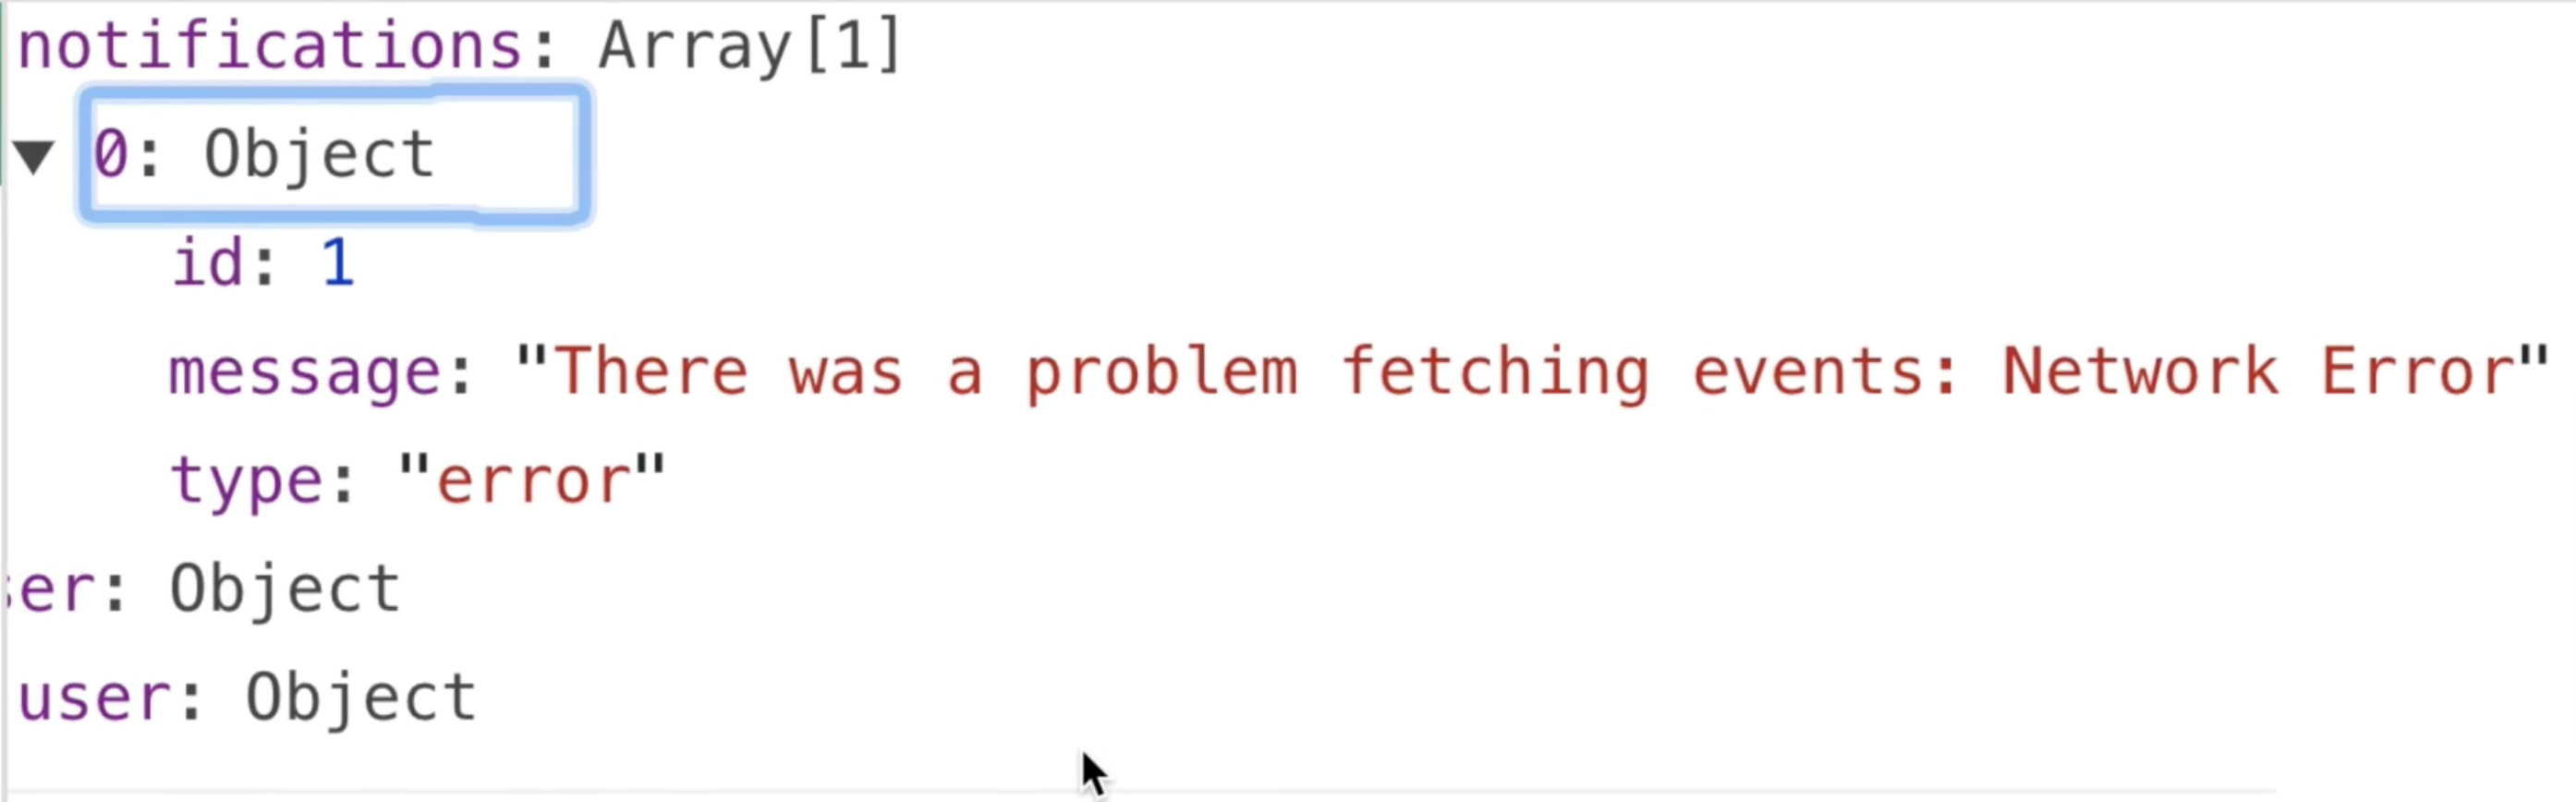
Since our EventList page is what dispatches the fetchEvents Action, we can go to that page in our browser while the json-server is not running to test this out. With no mock server running, the API call will fail, and a notification error should be added to our Vuex State.
If we check the Vuex tab of the Vue DevTools we can see an error is definitely added to our notifications State. Great!
More Error Notifications
There are a few more places in our Vuex code where errors can happen, so we’ll want to be dispatching our add Action within those, too.
Looking at our event module again, we also have the fetchEvent Action, which is just logging out errors to the console.
/src/store/modules/event.js
    fetchEvent({ commit, getters, dispatch }, id) {
        var event = getters.getEventById(id)
        if (event) {
          commit('SET_EVENT', event)
        } else {
          EventService.getEvent(id)
            .then(response => {
              commit('SET_EVENT', response.data)
            })
            .catch(error => {
              console.log('There was an error:', error.response) // <--- here
            })
        }
      }
We’ll switch that out for the same code we just added in our fetchEvents Action above.
/src/store/modules/event.js
    ...
        .catch(error => {
          const notification = {
            type: 'error',
            message: 'There was a problem fetching an event: ' + error.message
          }
          dispatch('notification/add', notification, {
            root: true
          })
        })
    ...
Now, when we get an error when our app tries to fetchEvents or fetchEvent , those errors will be added into our notification module’s State.
Success and Error Notifications
Now there’s one more place in our code where we need to add some notification-based code. The difference here is we want to add both error notifications and also success notifications.
If we look in our event module, we see we have the createEvent Action.
/src/store/modules/event.js
    createEvent({ commit }, event) {
      return EventService.postEvent(event).then(() => {
        commit('ADD_EVENT', event)
      })
    }
We can add to this Action so that when our event is posted to our mock database, we are also adding a success notification to our notification module.
/src/store/modules/event.js
    createEvent({ commit, dispatch }, event) {
      return EventService.postEvent(event)
        .then(() => {
          commit('ADD_EVENT', event)
          const notification = {
            type: 'success',
            message: 'Your event has been created!'
          }
          dispatch('notification/add', notification, { root: true })
        })
    }
This code should look quite familiar. We’re creating a notification object and passing it in as the payload when we dispatch the notification module’s add action.
Also, note that we added dispatch in the first argument from the context object so we could use it within the Action: { commit, dispatch }
So far so good. But what if this event fails to be posted to our mock database?
We can add on a catch here to handle that:
/src/store/modules/event.js
    ...
          dispatch('notification/add', notification, { root: true })
        })
        .catch(error => {
          const notification = {
            type: 'error',
            message: 'There was a problem creating your event: ' + error.message
          }
          dispatch('notification/add', notification, { root: true })
        })
        throw error
    }
Again, we’re creating a new notification and sending it along as we dispatch the add Action.
We’ll also need to throw the error so that we can propagate it up to our component. Now looking in our EventCreate component, if that error was caught, we won’t $router.push to a new route, and we won’t clear out this.event .
While we’re here, we can delete where we were console logging errors here since it’s no longer necessary.
    createEvent() {
      this.$store.dispatch('event/createEvent', this.event).then(() => {
        this.$router.push({
          name: 'event-show',
          params: { id: this.event.id }
        })
        this.event = this.createFreshEventObject()
      })
      .catch(() => { // <-- delete
        console.log('There was a problem creating your event') // <-- delete
      })// <-- delete
Displaying our Notifications
Now that we’ve added the ability for our Vuex code to create and Store notifications, we’re going to want to display those notifications in our app. We’ll make a couple components to achieve that:
- NotificationBar.vue will display the notification message itself
- NotificationContainer.vue will create a NotificationBar for every notification in the State
Let’s get started with our NotificationBar .
/src/components/NotificationBar.vue
    <template>
      <div class="notification-bar">
        <p>{{ notification.message }}</p>
      </div>
    </template>

    <script>
    export default {
      props: {
        notification: {
          type: Object,
          required: true
        }
      }
    }
    </script>

    <style scoped>
    .notification-bar {
      margin: 1em 0 1em;
    }
    </style>
As you can see, in the p tag we’re printing out the notification.message , which this component is receiving as a prop.
In order to style our success and error notifications differently, we can add a computed property that uses the type of our notification to create a class name.
    ...
      computed: {
        notificationTypeClass() {
          return `-text-${this.notification.type}`
        }
This will return ‘-text-success’ or ‘-text-error’ depending upon the type that is on our notification prop object, which will style our notification as black or red, respectively.
Now we just need to v-bind notificationTypeClass to a class on the div.
      <div class="notification-bar"
            :class="notificationTypeClass"> <-- binding computed property here
        <p>{{ notification.message }}</p>
      </div>
Nesting into NotificationContainer
Now we can create NotificationContainer, and use it to create our NotificationBar components.
/src/components/NotificationContainer.vue
    <template>
      <div class="notification-container">
        <NotificationBar
          v-for="notification in notifications"
          :key="notification.id"
          :notification="notification"
        />
      </div>
    </template>

    <script>
    import NotificationBar from './NotificationBar'
    import { mapState } from 'vuex'

    export default {
      components: { NotificationBar },
      computed: mapState('notification', ['notifications'])
    </script>

    <style scoped>
    .notification-container {
      position: fixed;
      bottom: 0;
    }
    </style>
As you can see, we’re importing NotificationBar along with mapState . Then we’re using v-for to create a NotificationBar for each of the notifications that are in our notification module’s State, which we’re mapped to within our computed property.
Note how we’re feeding in each notification as a prop when a NotificationBar is created, and using the notification.id as the unique key for each of the components that are created.
Now we just need to import NotificationContainer somewhere that can display it.
Adding NotificationContainer to our App.js
Since we want to display notifications globally, on the app level, we’ll import NotificationContainer into the root component of our app: App.vue . Then we’ll nest it in our App ’s template, like so:
/src/App.vue
    <template>
      <div id="app">
        <NavBar/>
        <NotificationContainer/>
        <router-view :key="$route.fullPath" />
      </div>
    </template>

    <script>
    import NavBar from '@/components/NavBar.vue'
    import NotificationContainer from '@/components/NotificationContainer.vue'

    export default {
      components: {
        NavBar,
        NotificationContainer
      }
    }
    </script>
Removing Notifications
Earlier, in our notification module, we added the ability to remove a notification. So when do we want that to happen? One way to achieve this is to show the notification to the user for a set amount of time, such as 5 seconds. And when that 5 seconds is up, the notification can delete itself.
Let’s look at how that could work. We can start by using mapActions to give our NotificationBar the ability to dispatch the remove Action.
/src/components/NotificationBar.vue
    <script>
    import { mapActions } from 'vuex'
    ...
      props: {
        notification: {
          type: Object,
          required: true
        },
    ...
      methods: mapActions('notification', ['remove'])
    ...
    </script>
When we dispatch the Action, it will look like this: this.remove(this.notification) . Note that we’re passing in the notification prop as the payload.
So when do we want to fire this.remove(this.notification) ? Like I said before, we can trigger it 5 seconds after the notification is displayed. Or in other words, 5 seconds after the NotificationBar component is mounted to the DOM. So let’s put it in the mounted lifecycle hook.
/src/components/NotificationBar.vue
    <script>
    ...
      data() {
        return {
          timeout: null
        }
      },
      mounted() {
        this.timeout = setTimeout(() => this.remove(this.notification), 5000)
      },
      methods: mapActions('notification', ['remove'])
    }
    </script>
Notice how we’ve added timeout data and we’re setting it to be equal to a setTimeout function, which dispatches the remove Action 5 seconds (5000ms) after the component is mounted . In other words, the component mounts, the notification is displayed, and 5 seconds later, the notification is deleted.
But why are we putting the setTimeout in our data? Couldn’t we just call it directly from the mounted hook? We’re doing it this way because we want to make sure to clear the setTimeout just before this component is destroyed, like so:
/src/components/NotificationBar.vue
    ...
      beforeDestroy() {
        clearTimeout(this.timeout)
      },
    ...
This will make sure we avoid a memory leak by not leaving the setTimeout running if this component isn’t being actively displayed. It’s considered a JavaScript anti-pattern to not clear out your setTimeouts for this reason.
Let’s ReVue
Whew… that was a lot! In this lesson, we created a new notifications module then tweaked our Vuex code to add success and error notifications to that new module’s State. We then learned how to remove those notifications. Finally, we created components that can display our notifications and trigger their removal.