Video
Материалы:
Урок 2
Урок 3
Урок 4
Урок 5
- The $route Object
- History Mode Server Configs
- Vue Router Docs
- Example App Github
- Starting Code
- Finished Code
Урок 6
Урок 7
- SVG File
- Learn about SVGs
- Vue Docs: Automatic Registration
- Webpack’s require.context
- Lesson Starting Code
- Lesson Ending Code
Урок 8
Урок 9
- Axios Library & Docs
- db.json file
- json-server library
- Starting code
- Ending code
- Vue LifeCycle Docs
- EventShow Code
Vue CLI 3 - Creating our Project
In this tutorial, we’ll be exploring Vue CLI 3, along with the Vue UI, in order to quickly scaffold our project. We’ll then take a tour of the project the CLI creates for us to get comfortable working within these files and folders later.
Why a CLI?
As you probably know, CLI stands for Command Line Interface, and the Vue CLI provides a full system for rapid Vue.js development. This means it does a lot of tedious work for us and provides us with valuable features out-of-the-box.
It allows us to select which libraries our project will be using Then it automatically plugs them into the project.
It Configures Webpack When we build our app with Webpack, all of our JavaScript files, our CSS, and our dependencies get properly bundled together, minified and optimized.
It allows us to write our HTML, CSS & JavaScript however we like We can use single-file .vue components, TypeScript, SCSS, Pug, the latest versions of ECMAScript, etc.
It enables Hot Module Replacement (HMR) So when you save your project, changes appear instantly in the browser. This configuration is based on webpack-dev-server.
Installing the CLI
In order to use the CLI, you’ll need to have Node.js version 8 or above installed (8.10.0+ is recommended).
To install the CLI, run this command in your terminal:
npm i -g @vue/cli
Once it is installed, you’ll have access to the vue binary in your command line. We’ll use this to create our project.
Creating a Vue project
There are two ways we can create our project. With the newer Vue UI, or directly from the command line, which we’ll do now with:
vue create real-world-vue
This command will start the creation of a Vue project, with the name of “real-world-vue”.
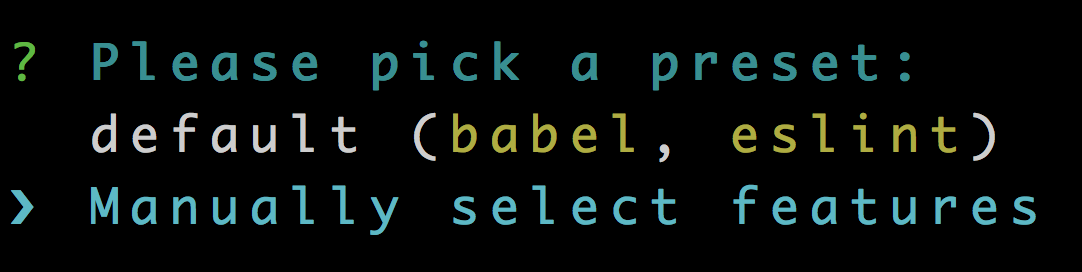
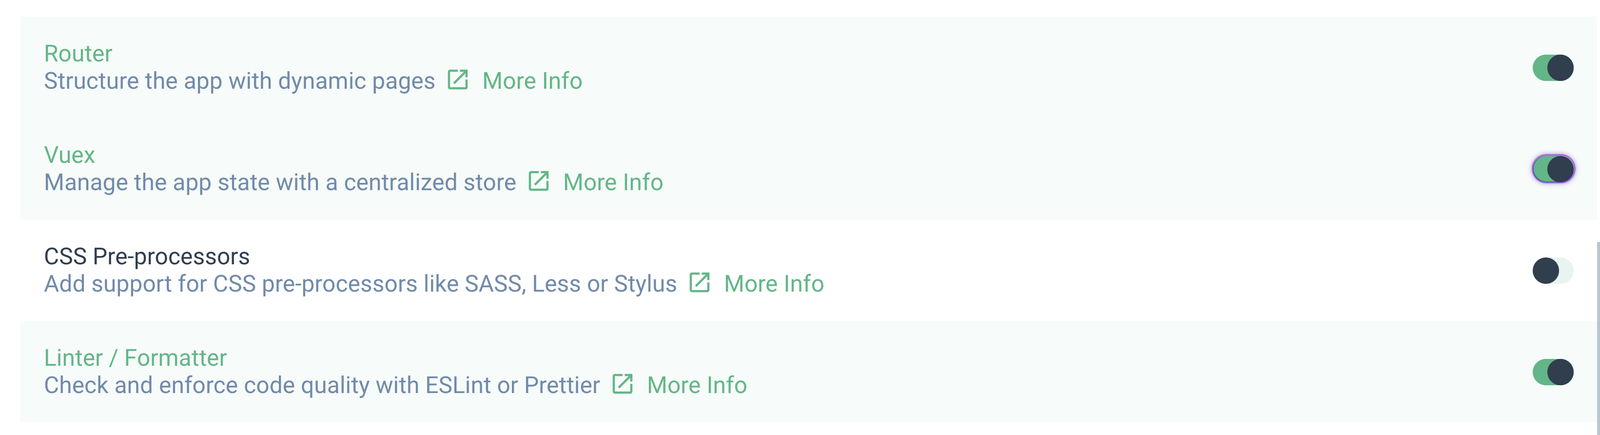
We’ll then be prompted with the option to pick a default preset or to manually select features. Using the down arrow key, we’ll highlight Manually select features , then hit enter.
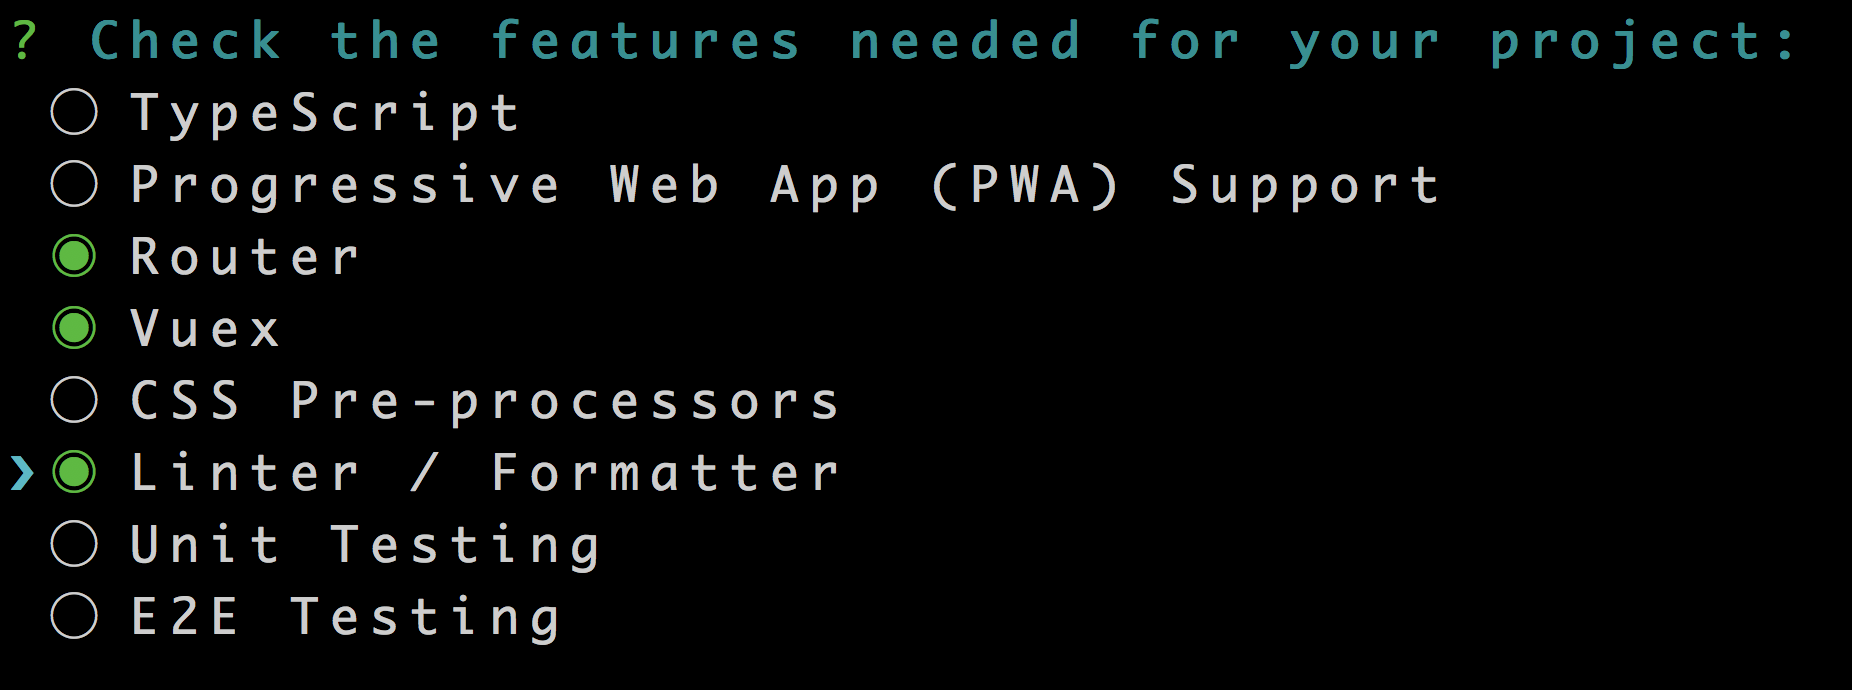
We’ll then be presented with a list of feature options. Using the down arrow key, we’ll move down and use the spacebar to select Router , Vuex and Linter / Formatter . Then hit enter.
We’ll then choose a Linter / Formatter. For this project, we’ll be using ESLint + Prettier .

We’ll add the additional feature of Lint on save .

And for the sake of this course, we’ll choose to have dedicated config files.

We have the option to save all of these settings as a preset. We’ll choose not to with N .
If you’d like to save this as a preset, however, it will be stored in a JSON file named .vuerc in your user home directory.
If you have yarn installed, you’ll be prompted to choose a package manager. I’ll choose npm.
When we hit enter, our project will be created automatically.
Serving our Project
Once our project is done being created, we can cd into. In order to view it live in our browser, we’ll run this command: npm run serve
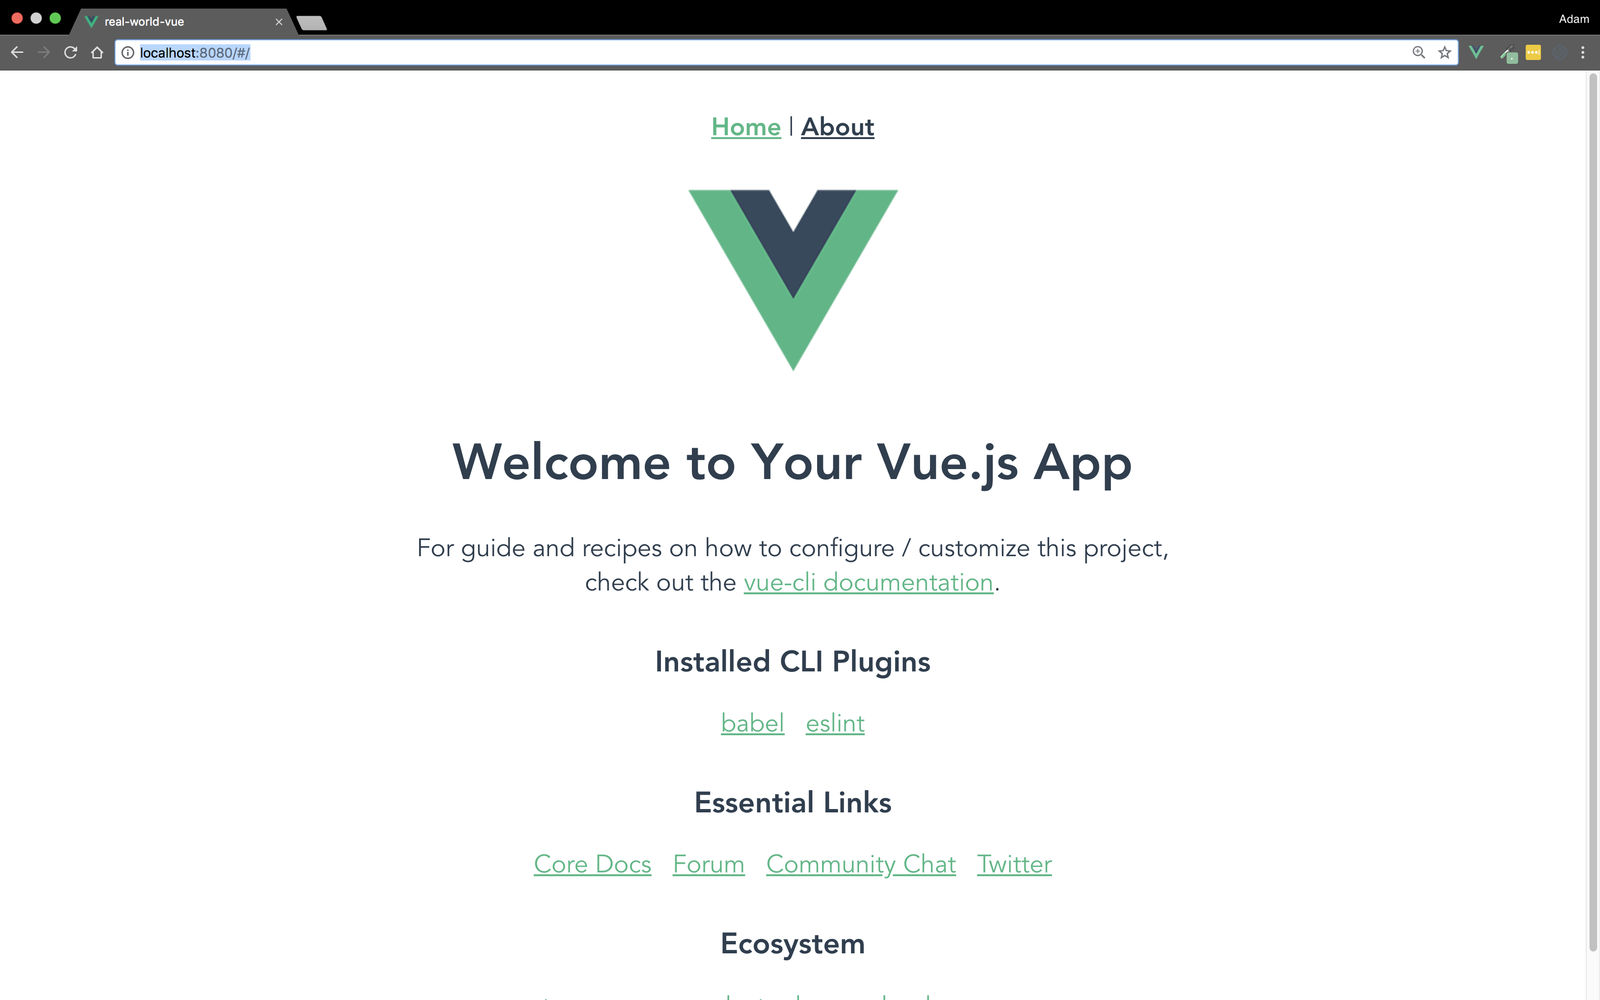
Above is our app, running live in the browser. It already has two pages, the Home page and the About page, which you can navigate between because it’s using Vue Router.
Vue UI
Now that we understand how to create a Vue project from the command line, let’s repeat this same process but with the Vue UI instead.
Since we now have access to the vue binary, we can type vue ui in our terminal, which will start up the Vue UI in our browser.
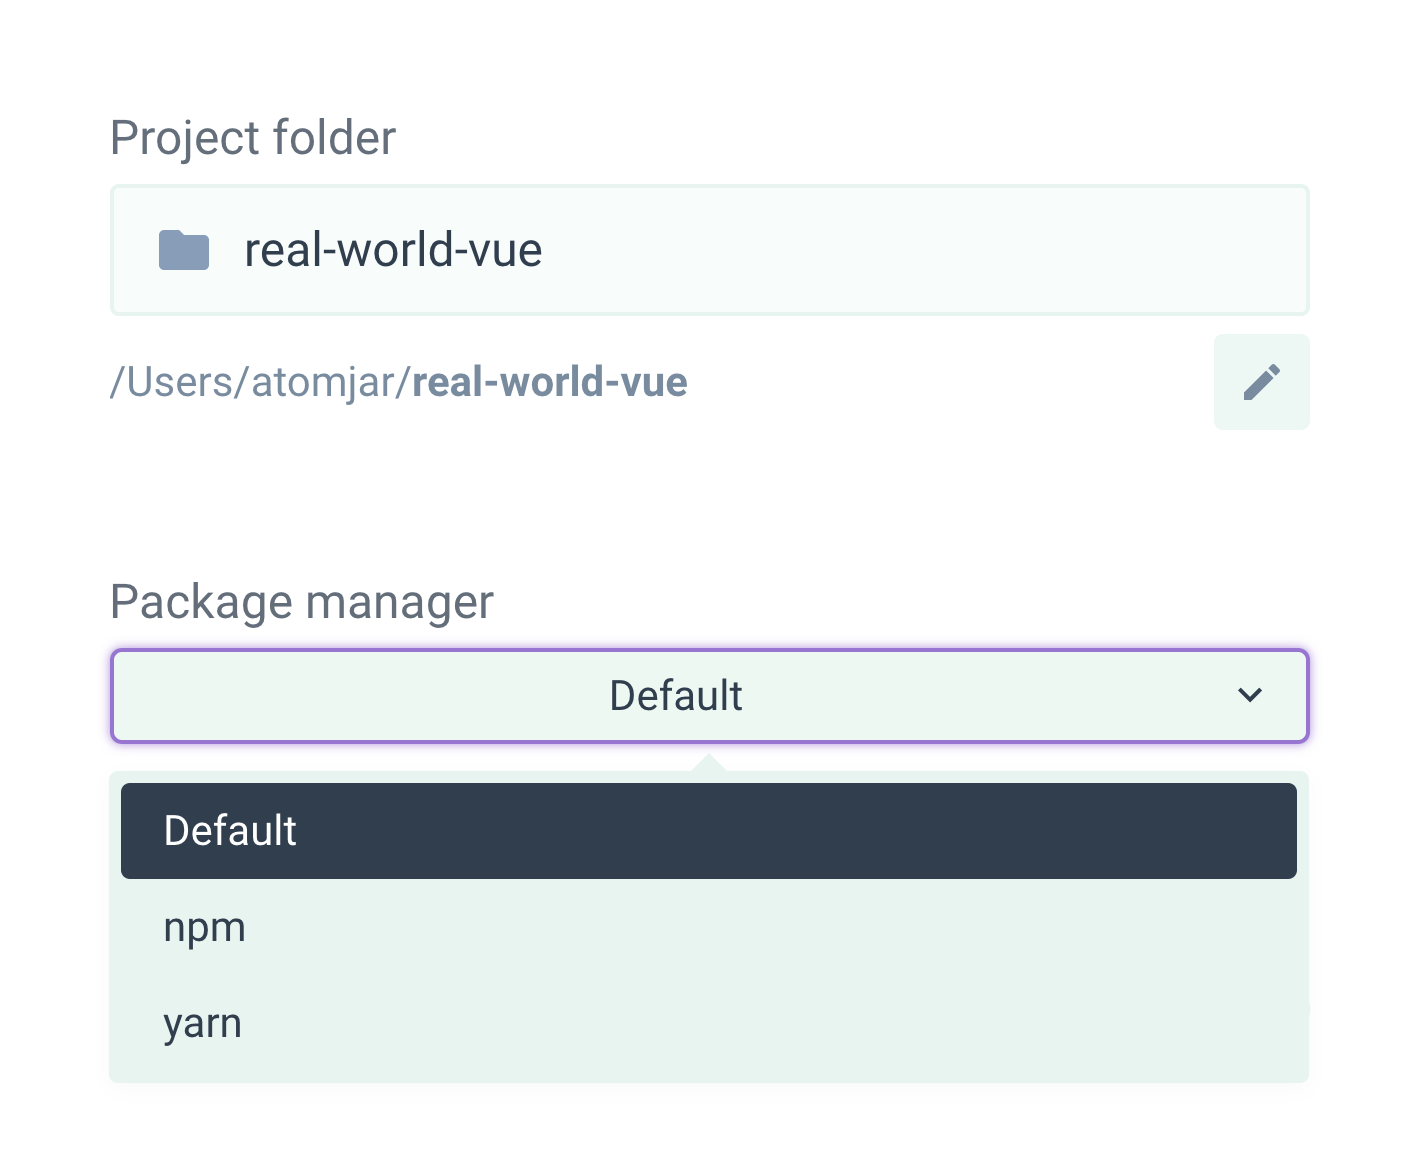
Our first step is to click the Create tab, select the location where we want to save our project, then click Create a new project here .

We’ll then give our project a name, in this case “real-world-vue”. We have the option to select a package manager, but we’ll stick with the default.
Just like from the terminal, we’ll Manually select features .

We’ll select Router , Vuex, and make sure that Babel and Linter / Formatter are also selected and choose Dedicated Config Files .
On the next page, we want to make sure Lint on save is selected, and in the right-hand dropdown, select ESLint + Prettier .

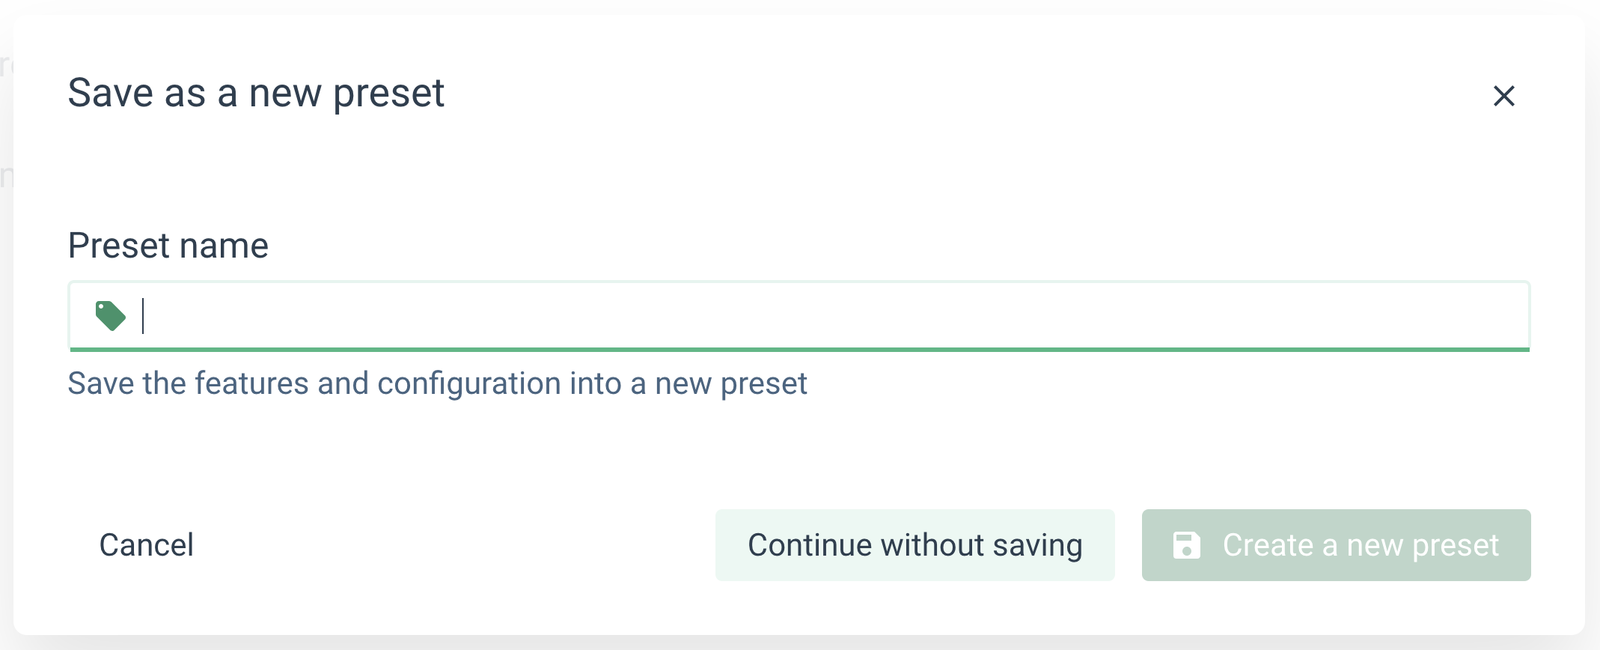
We also have the option to save these settings as a preset, but we can choose not to by clicking Continue without saving .
Now our project will be created.
Vue UI Features
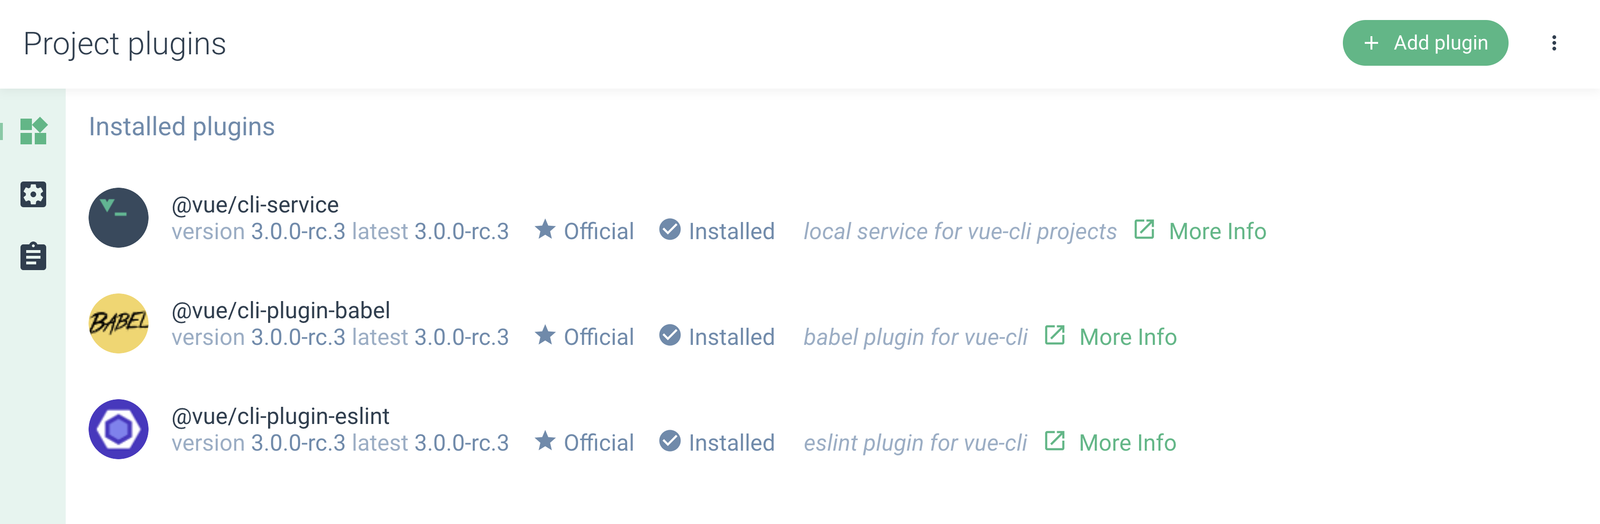
The UI provides the ability to alter our configurations, as well as run tasks, like the serve task that we ran earlier from the terminal. The difference here is that we get a lot more information about what is happening with that task.

You can also add plugins to your project from the Vue UI, which makes it very simple to add a library that you may need.
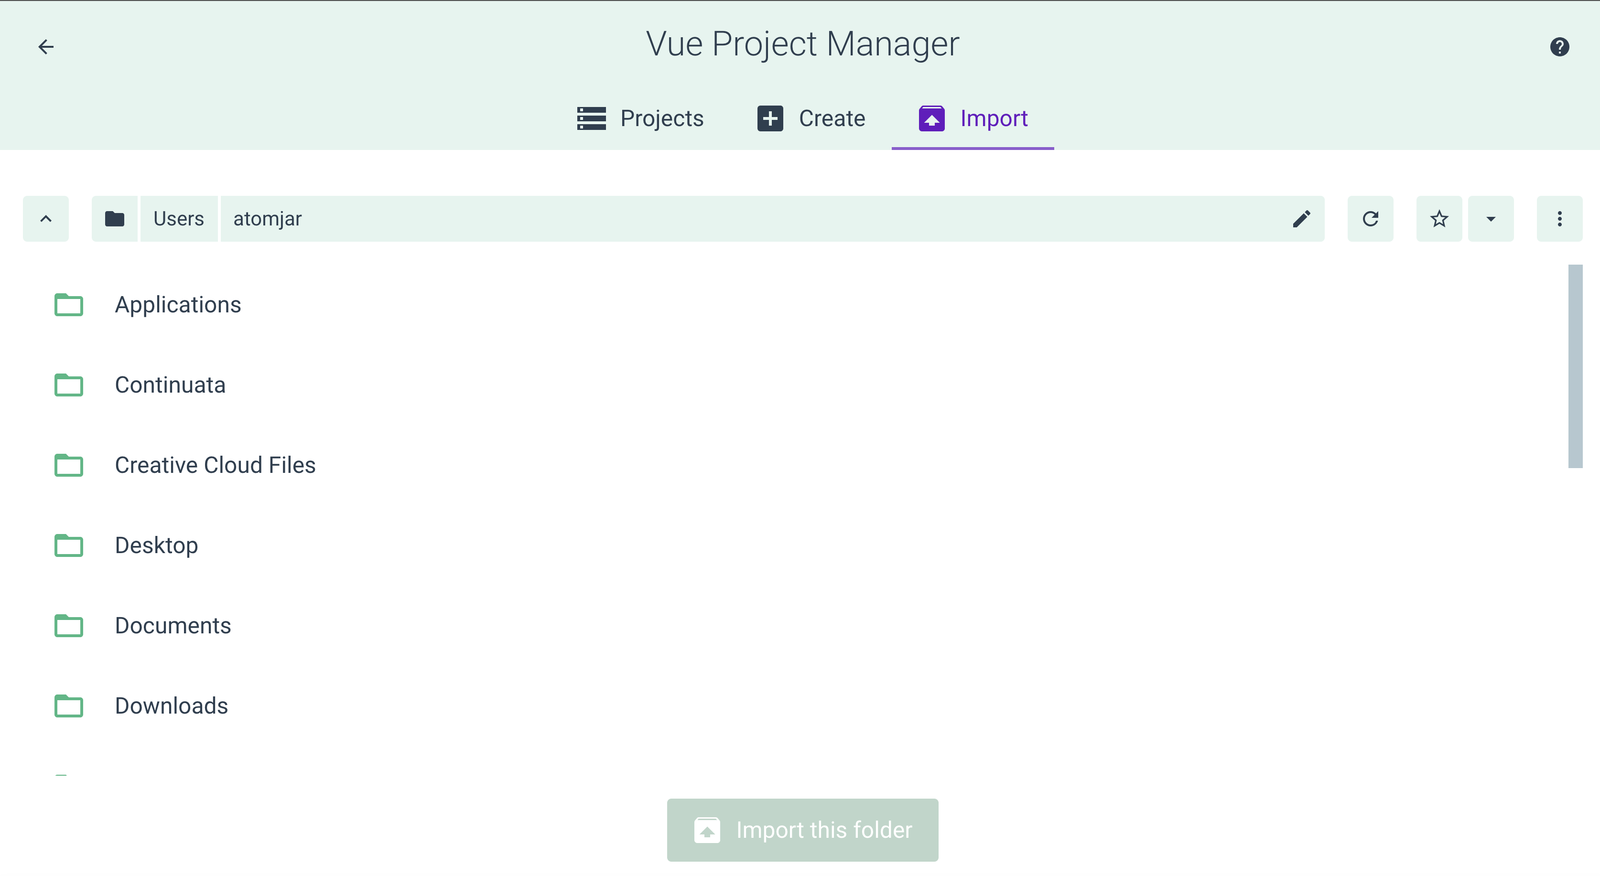
If you need to import a project that you hadn’t originally created from the Vue UI, you can easily do so from the Import tab of the Project Manager. Just locate your project, and click Import this folder .
Touring our Vue Project
Now that we know how to create our project from the terminal and also from the UI, let’s take a look at the project that was created for us.

The node_modules directory is where all of the libraries we need to build Vue are stored.
In the public directory, you place any static assets you don’t want to be run through Webpack when we build our project.
You’ll want to put the majority of your assets, such as images and fonts, in the assets directory so they can be optimized by Webpack.
The components directory is where we store the components, or building blocks, of our Vue app.
The views directory is where we store files for the different views, or pages, of our app.
The App.vue file is the root component that all other components are nested within.
The main.js file is what renders our App.vue component (and everything nested within it) and mounts it to the DOM.
Below that we have a router.js file, which we’ll cover more in the lesson on Vue Router, and the store.js file is for Vuex, which we’ll also cover in future lessons.
Finally, we have a .gitignore file where we can specify what we want git to ignore, along with a babel.config.js file and our package.json , which helps npm identify the project and handle its dependencies.
How the App is Loaded
You might be wondering now, how is the app being loaded? Let’s take a look at that process.
    import Vue from "vue";
    import App from "./App.vue";
    import router from "./router";
    import store from "./store";
    Vue.config.productionTip = false;
    new Vue({
      router,
      store,
      render: h => h(App)
    }).$mount("#app");
In our main.js file, we see that we’re importing Vue, along with our root App.js component, as well as our router and store . We are then creating a new Vue instance, telling it to use the router and store , and to render App (our root component) and mount it to the DOM, where this id of "``app``" is.
If we peek inside our Index.html file, we can see there’s a div with the id of "app" , which means this is where our App will be mounted .
<div id="app">Our App will be mounted here</div>
Let’s take a look at this process more visually:

The Build Process
Now that we understand how the App gets rendered and mounted , let’s take a look at the build process. Because remember? Webpack will be bundling our files together.
If we take a closer look at our Index.html file, we see this comment:
<!-- built files will be auto injected -->
So what does that mean?
Let’s explore that by heading back to our terminal, and running the command npm run build . This will build our project, and when it’s complete, we see it says, “The dist directory is ready to be deployed”.
Hmm. Let’s open up the dist directory that was created for us.
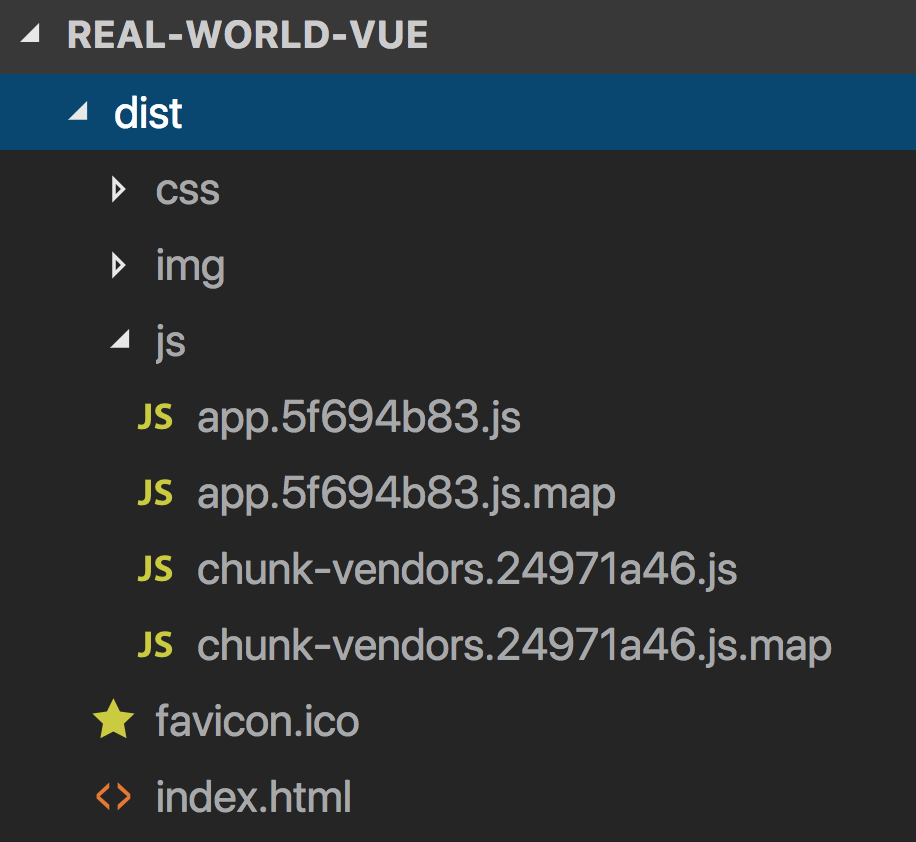
As we see here in the js directory, Webpack has packaged our app and given us these new bundled JavaScript files.
And if we open up our Index.html , we can see that there are now two script tags, which have been auto injected, where that comment **used to be (“built files will be auto injected”).
    <script src=/js/chunk-vendors.24971a46.js></script>
    <script src=/js/app.5f694b83.js></script>
The chunk-vendors.24971a46.js file contains all of our dependencies.
The App.5f694b83.js file below it contains all of our application-specific code, including the code that was in our Main.js, which renders and mounts our App .
So when our project is deployed, and the browser reads this App.5f694b83.js file, that will trigger the process we just looked at visually, where our Vue instance is created and our App is rendered and then mounted to the DOM.
What’s next?
In the next lesson, we’ll be exploring how to set up our code editor for an optimal development environment.
Optimizing your Editor
In this tutorial, we’ll be setting up the free Visual Studio Code editor for an optimized development environment. While there are many options for code editors, and you may already have a favorite one, I’ll be using VS Code during this course. The concepts covered in this lesson may be transferable to other code editors, but if you’d like to follow along exactly, you’ll start by making sure you have VS Code installed.
What are we going to learn?
We’re going to be learning how to:
- Get syntax highlighting in our .vue files
- Utilize code snippets for a faster workflow
- Configure our editor to auto-format our code
- And explore other helpful extensions that’ll improve our development experience
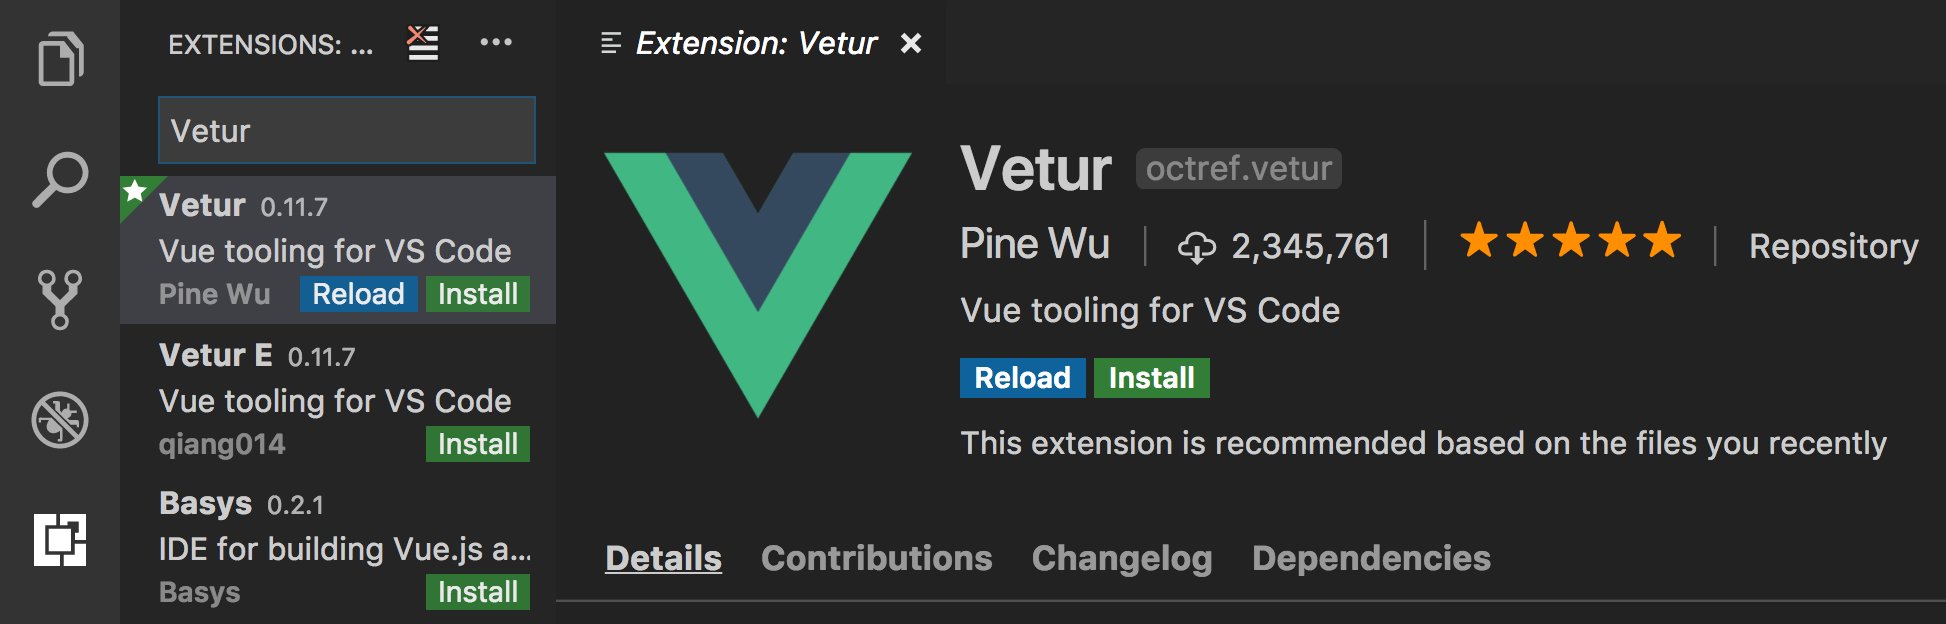
Installing Vetur
There are several features that make VS Code a great environment for Vue development, including Vetur, a plugin designed by Pine Wu, a core member of the Vue.js team.
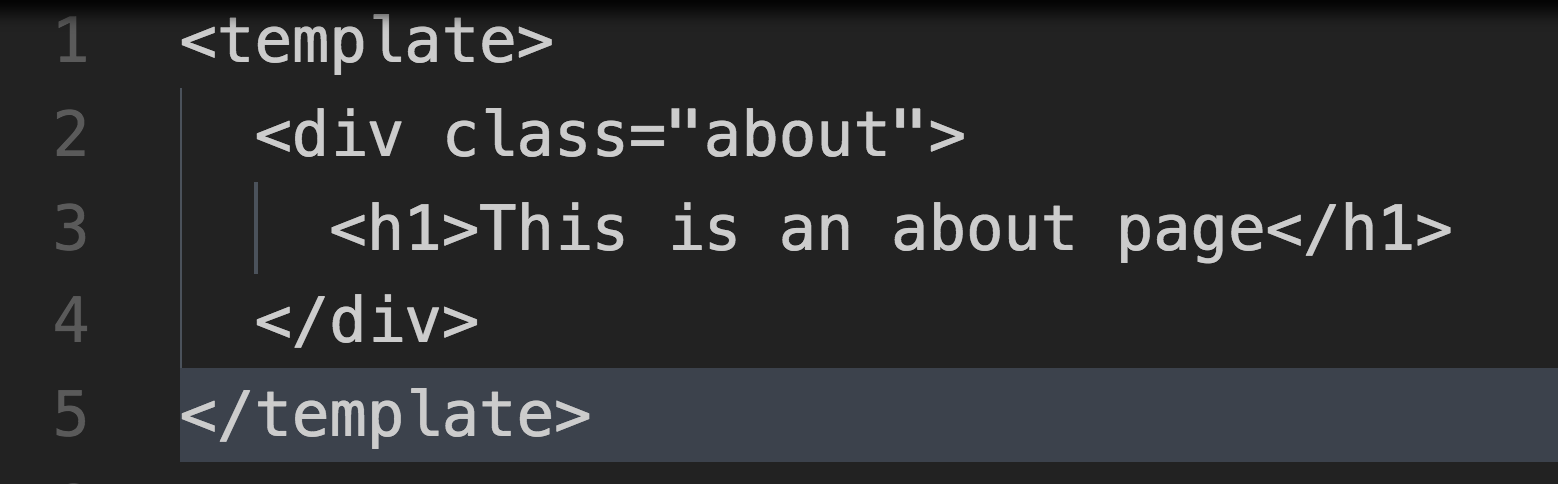
Here in VS Code, if we open up a .vue file, such as this About.vue file, we see all of this gray code. That’s because VS Code won’t automatically highlight the syntax in .vue files.
Vetur can fix this for us, and give us other features designed to improve the developer experience.
So let’s install it now. Open the extensions store.

Then search for “Vetur”, select it in the search results, and click Install . Then click Reload .
Vetur’s Features
Now that Vetur is installed, let’s take a look at its features.
Syntax Highlighting By typing command + P , and typing the name of a .vue file, we can open up the About.vue file. As you can see, now our code is getting proper syntax highlighting. Awesome - no more gray code.
Checking the Home.vue file, we can see that our JavaScript is also being highlighted correctly.
Snippets Another feature Vetur comes packaged with his code snippets. These are time-saving “snippets” of code that allow you to quickly create commonly used chunks of code.
Let’s create a new component to see this in action. We’ll name is EventCard.vue. Now, if we type the word “scaffold” into a .vue file and hit ENTER, this will auto-fill that file with the skeleton, or scaffold, of a single file .vue component.
Emmet Vetur also comes packaged with Emmet. This is a popular tool that allows you to use shortcuts to build out your code.
For example, we can type h1 and hit enter, and this will create an opening and closing h1 element.
When we type something more complex, such as div>ul>li , it will produce:
    <div>
        <ul>
            <li></li>
        </ul>
    </div>
If Emmet doesn’t appear to be working for you, you can add this to your User Settings:
    "emmet.includeLanguages": {
          "vue": "html"
      },
To learn more about how Emmet can speed up your development, go here.
Installing ESLint & Prettier
Now, we need to make sure we have ESLint and Prettier installed. In the extensions store, we’ll do a search for ESLint, then go ahead and install it. And we’ll do the same for Prettier. Once it’s installed, we’ll hit reload to reload VS Code.
Configuring ESLint
Now that these are installed, we need to add a bit of extra configuration to them.
When we created our project from the terminal, we chose to create it with dedicated config files, which gave us this .eslintrc.js file, where we can configure ESLint for this project. Had we not chosen dedicated files, we would find the ESLint configurations within our package.json.
So, in our .eslintrc.js file, we’ll add:
'plugin:prettier/recommended'
This will enable Prettier support in ESLint with the default settings.
So our file now looks like this:
    module.exports = {
      root: true,
      env: {
        node: true
      },
      'extends': [
        'plugin:vue/essential',
        'plugin:prettier/recommended', // we added this line
        '@vue/prettier'
      ],
      rules: {
        'no-console': process.env.NODE_ENV === 'production' ? 'error' : 'off',
        'no-debugger': process.env.NODE_ENV === 'production' ? 'error' : 'off'
      },
      parserOptions: {
        parser: 'babel-eslint'
      }
    }
Configuring Prettier
We also have the option to create a Prettier configuration file, to add some special settings according to our personal style or our team’s preferences.
We’ll create it here and name it .prettierrc.js .
And inside, we’ll type:
    module.exports = {
        singleQuote: true,
        semi: false
    }
This will convert double quotes to single quotes, and make sure that semicolons are not automatically inserted.
User Settings
In order to further optimize VS Code for a great development experience, we’ll add some configurations to our User Settings. To access User Settings, click on Code in the top navigational bar, then Preferences , then Settings . This will bring up a User Settings window where you can add settings in json.
First, we want to add:
"vetur.validation.template": false
This will turn off Vetur’s linting feature. We’ll be relying instead on ESLint + Prettier.
Now we want to tell ESLint what languages we want it to validate (vue, html, and javascript) and set autoFix to true on each:
    "eslint.validate": [
        {
            "language": "vue",
            "autoFix": true
        },
        {
            "language": "html",
            "autoFix": true
        },
        {
            "language": "javascript",
            "autoFix": true
        }
    ],
Then for good measure, we’ll tell ESLint to autoFixOnSave.
"eslint.autoFixOnSave": true,
And tell our editor itself to formatOnSave.
"editor.formatOnSave": true,
Testing it out
To test that this is working, we’ll add a data property to our EventCard component here, and add a quote: “I want to be single” then we’ll throw in a semicolon here, too. When we hit save, our quotes are converted into single quotes and the semicolon is removed. Awesome - it’s working.
Additional Tools
Now let’s take a look at some additional tools that can help speed up your development.
Copy Relative Path Copy Relative Path is an extension that allows you to copy the location a file lives, based on its relation to the directory to which it is linking.
Let’s search for it, install it, then see it in action.
In our Home.vue file, we see there’s a relative path here already, where we’re importing the HelloWorld component.
In order to get the relative path of a file we want to import, we’d right click on the file, then select Copy Relative Path. Now, when we paste what was copied, we see we have the accurate relative path. Notice this src. The comment here lets us know that because of the way our project is set up, we can use @ instead.
Integrated Terminal A convenient built-in feature of the VS Code editor is its integrated terminal, which you can use instead of switching over to your separate terminal. You can open it, with the keyboard shortcut: `ctrl + ``
More Snippets If you’re interested in installing some additional convenient code snippets, you can download a full suite of Vue VSCode Snippets, created by Core Vue Team Member Sarah Drasner.
Let’s search for the extension with her name, sarah.drasner. There they are. Now we can install and reload.
Let’s take a look at them in action.
If we type vif on an element in our template, that’ll give us a v-if statement, and typing von will give us a full event handler. Instead of manually typing out a data property, we can simply type vdata which will create one for us. We can do the same thing to add props with vprops . We can even use it to create the code to quickly import a libary, with vimport-lib . As you can see, these are very helpful and time-saving snippets.
Please note that if you’re using this Snippets extension, it is recommended to add a line to your User Settings:
vetur.completion.useScaffoldSnippets should be false
This will make sure these snippets aren’t conflicting with Vetur’s.
Color Themes Finally, if you’re wondering how to change your theme in VS Code, or if you’re wondering which one I’m using here, you can go to Code > Preferences > Color Theme .
As you can see, I’m using FlatUI Dark . You can change your theme color to any of these options here, or you can search for other themes in the extensions store.
If you don’t see one you want, you can also head to the Visual Studio Marketplace online. Here, you can preview tons of different plugins and themes, such as Night Owl by our friend Sarah Drasner. You can install it directly from the browser then find it in your Color Theme Preferences .
What’s next
Thanks for watching! In the next lesson, we’ll be learning all about the anatomy of single file components. See you there.
Vue Router Basics
In this lesson we’re going to introduce you to the tools that Vue uses to navigate between pages (or views) in our application. We’ll cover:
- What is Client-Side Routing?
- How to set up Vue Router?
- Named Routes, a better way to create navigation links
- Redirecting & Aliasing Routes
- Building out our example app
Let’s jump in.
Server-Side vs Client-Side Routing
When it comes to websites, typically we connect our page together with links, right? A link gets clicked, it calls back to the server for the next page, and that page gets loaded.
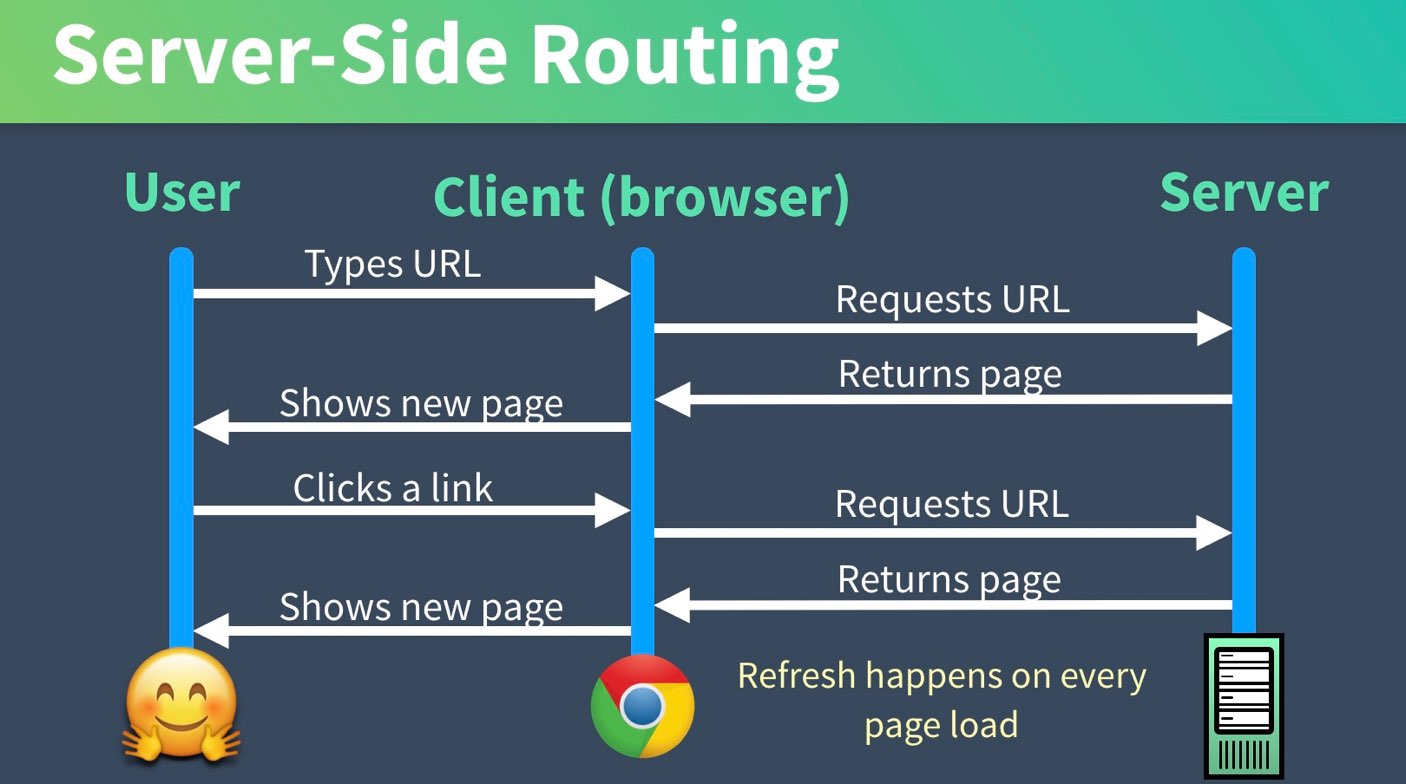
We call this “Server-side Routing” since the client is making a request to the server on every URL change.
When it comes to Vue, many choose client-side routing, meaning that the routing happens in the browser itself using JavaScript. Our webpage is loaded from a single index.html page and we can use client-side routing to dynamically present different views, depending on which link is clicked. Often the view we need to show has already been loaded into the browser, so we don’t need to reach out to the server for it.
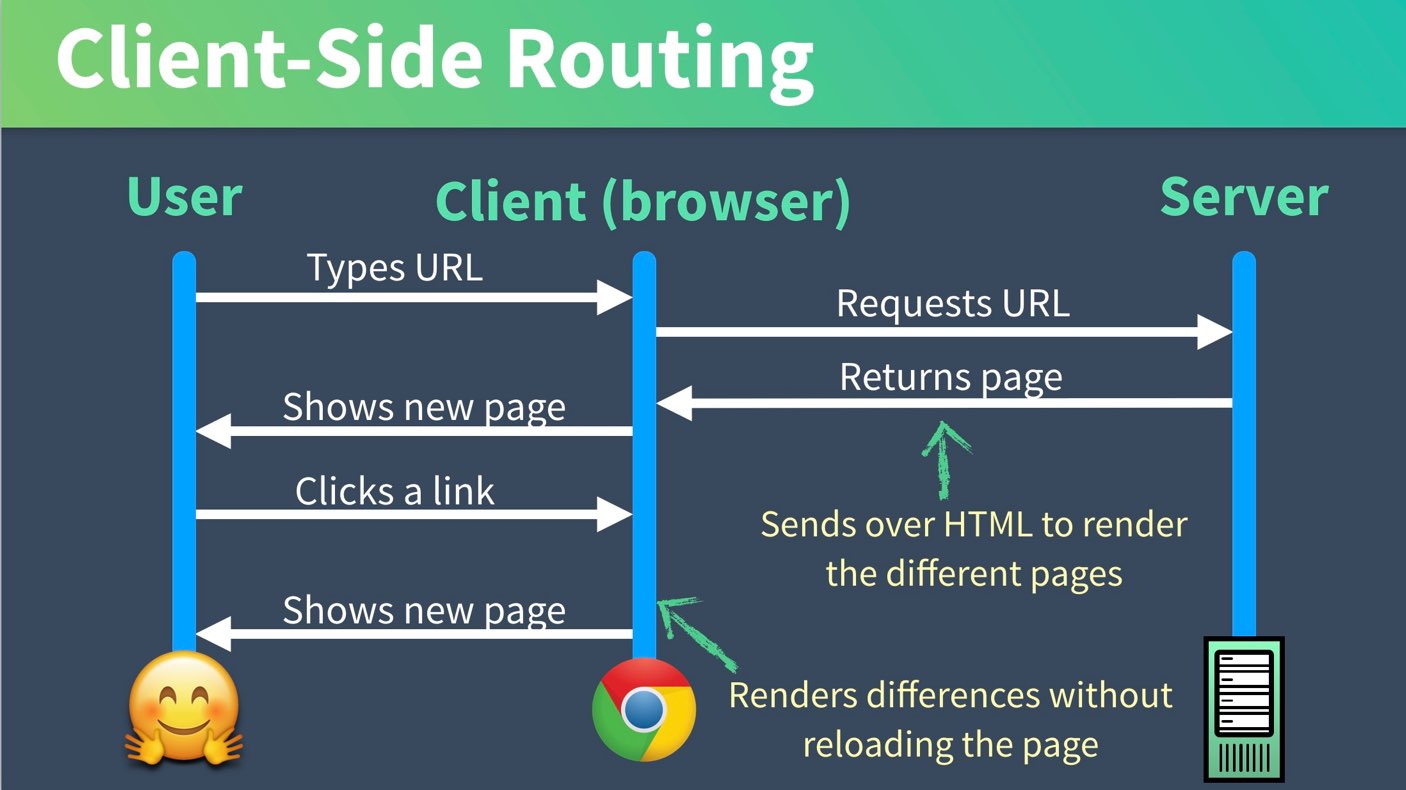
A Single Page Application (SPA) is defined as a web app that loads from a single page and dynamically updates that page as the user interacts with the app. However, if we’re using a single page application we need a way to navigate between content (client-side routing).
 Problem: How to do Client-Side Routing?
How can we implement client-side routing in a single page Vue application?
 Solution: Vue Router
Vue has its own official routing solution, called Vue Router. We set up our project with Vue Router already installed using the Vue CLI in the lesson covering Vue CLI. Let’s explore our Vue project to see how it’s using Vue Router:
package.json
All of our application’s dependencies are tracked inside our package.json file. If we take a quick look inside here we see that Vue CLI already inserted Vue Router as a dependency for our project:
      "dependencies": {
        "vue": "^2.5.16",
        "vue-router": "^3.0.1", // <----
        "vuex": "^3.0.1"
      },
This is telling our application to use a version of vue-router that is compatible with version 3.0.1 of the Vue-Router.
When we created the project with the CLI, it ran “npm install” for us, which went out to NPM, and asked it for the latest version of Vue-Router between version 3.0.1 and less than 4.0.0 (this is what “^3.0.1” means), and it installed this library inside our application’s node_modules directory.
Next, let’s see if we can figure out where our router library gets loaded. If you look at our application Vue CLI generated for us, we find that it has a /src/router.js file.
router.js
At the top of this file, you can see we are importing the vue-router library.
    import Vue from 'vue' // Include Vue
    import Router from 'vue-router' // Include Vue Router libary
    import Home from './views/Home.vue' // <--- We'll look at these in a moment
    import About from './views/About.vue'
And then we tell Vue to use the Router:
Vue.use(Router)
And then we are exporting an instance of Router with some routes defined:
    export default new Router({
      routes: [
        {
          path: '/',
          name: 'home',
          component: Home
        },
        {
          path: '/about',
          name: 'about',
          component: About
        }
      ]
    })
As you can see, routes contains an array of objects. Each object is a specific route.
The path indicates the actual route, in terms of the URL, that the user will be taken to. In this first route, there’s only the '``/``' , meaning this is the root, the homepage of our application, and what people see when they go to our domain at example.com.
The name allows us to give this route a name so we can use that name throughout our application to refer to this route.
The component allows us to specify which component to render at that route. Note that these are the same components that were imported at the top of the file. So as it is, the Home component will be rendered whenever the browser’s URL ends with a / with nothing after it.
Taking a look at the second route object, we can see it has a different path:
       {
          path: '/about',
          name: 'about',
          component: About
        },
When the browser’s URL ends with /about , the About component will be rendered. Note that the Home and About components are getting imported at the top of the file.
    import Home from './views/Home.vue'
    import About from './views/About.vue'
At this point you might be wondering (I know I was):
Question: Are About and Home “components” or “views”?
We are importing these files from the /views directory and in our src/ directory, we have both a /components and a /views folder. So, what are they?
Answer: They are components.
We place components in both the /components and /views folders. The difference is that when using Vue Router, it’s a best practice to put the components (AKA pages) that get loaded by Vue Router in the /views directory. You then keep the modular (reusable) components in your /components directory.
Side Note : If we wanted we could put all our components inside the /components directory and just refer to them there. We could also rename the /views directory to /pages, and include the files there.
So we’ve defined the two different views that our app is going to be able to navigate between, but we actually haven’t yet loaded this router into our Vue instance. Remember, our entire application gets loaded from our main.js , and if we look inside this file:
main.js
We can see that we’re importing our router.js file, which is bringing in what we exported from router.js .
import router from './router'
And in main.js you’ll notice that we tell our Vue instance to use the router we’ve imported:
    new Vue({
      router,
    ...
Since we’re using ES6, this is the same as writing:
    new Vue({
      router: router,
    ...
So far so good. Now our router is set up. But where is the functionality added to allow the user to navigate to different parts of the app?
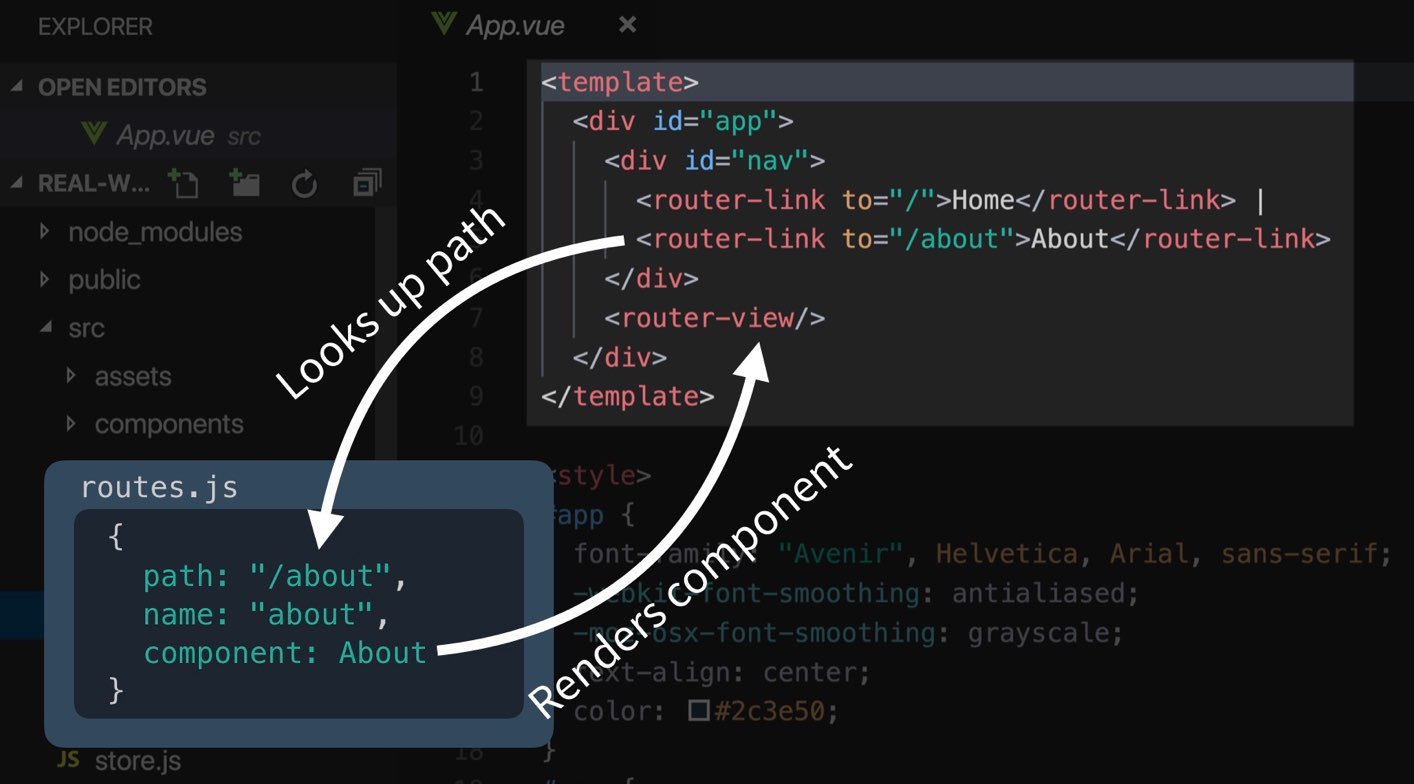
App.vue
Looking within App.vue , there’s a div with the id of “nav” and inside of it there are some router-links, which are global components we have access to.
    <router-link to="/">Home</router-link>
    <router-link to="/about">About</router-link>
And below them is:
<router-view/>
So what’s happening here? <router-link> is a component (from the vue-router library) whose job is to link to a specific route. And <router-view/> is essentially a placeholder where the contents of our component will be rendered onto the page.
So when a user clicks on the About link, they are taken to /about , and as we saw in router.js , that means the About component will load into the place where <router-view/> is shown.
To make things a little simpler to understand, I’m going to change the Home.vue file to just have the same sort of content from the About page.
Home.vue
    <template>
      <div class="home">
        <h1>This is a home page</h1>
      </div>
    </template>
Now if we jump into our browser, we can see that we can navigate between these two different routes.
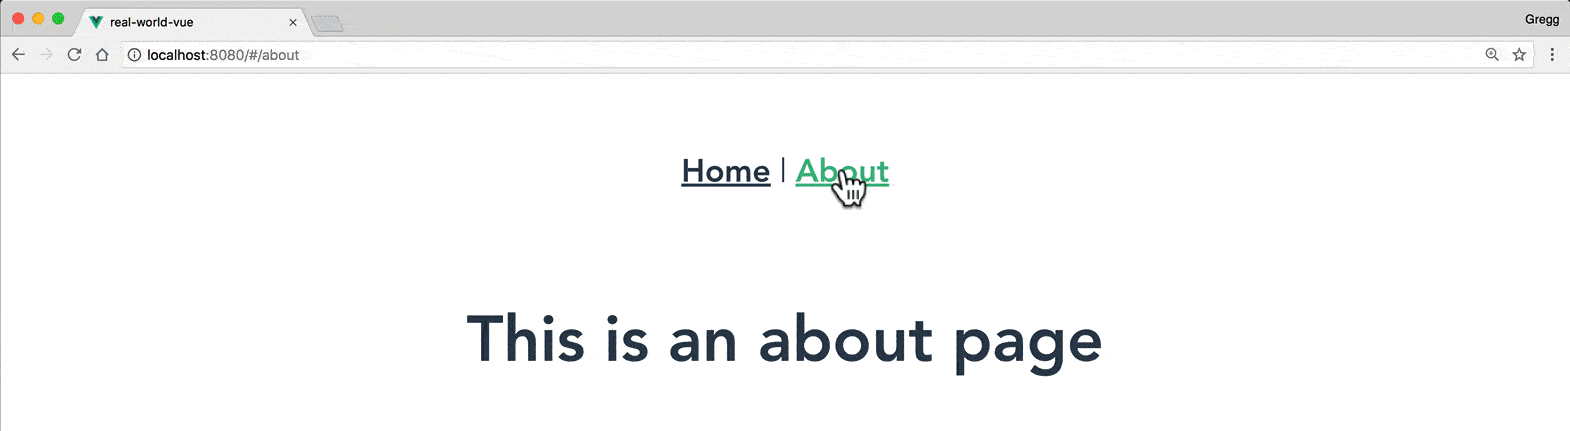
If we call up the Vue Devtools we can see our router-link components, and as we switch pages we can see the About or Home components getting switched out as needed.

Also, if we look into the network panel of our browser, we can see that indeed our application is loaded once, and no subsequent requests are asked of the server. All our templates are loaded into our browser, and we are indeed doing client-side routing.
Using Named Routes
Another way we can create router links is by using named routes. Remember how in our router.js each of our routes has a name ? We can use these names. So instead of:
    <router-link to="/">Home</router-link>
    <router-link to="/about">About</router-link>
We can write:
    <router-link :to="{ name: 'home' }">Home</router-link> |
    <router-link :to="{ name: 'about' }">About</router-link>
These have equivalent functionality, but Vue is using the name to look up the path that we want to use.
As you might imagine, if we have a huge application with lots of links to all our pages, and we want to change the path of a route, if we’re using named routes we’d only have to change that path in one place instead of everywhere in our app.
Problem: Changing Routes
Sometimes in our applications, after we ship them to production we need to change their paths. Like from /about to /about-us . How might we deal with this?
Solution #1: Redirect
Obviously the first step is to change our original route:
    const router = new VueRouter({
      routes: [
        ...
        {
          path: '/about-us',
          name: 'about',
          component: About
        }
      ]
    })
If we’re using named routes then we don’t need to change our router-link s at all. Otherwise we would have to. Then, since there might be links around the internet to our /about page, we want to make that redirect from /about to /about-us , with the following additional route.
    const router = new VueRouter({
      routes: [
        ...
        {
          path: '/about',
          redirect: { name: "about" }
        }
      ]
    })
Note we’re using the named route for the redirect. We could have also used redirect: "/about-us" to get the same functionality, but this is hard-coding a URL in one more place we’d have to change if the path changed.
Solution #2: Alias
Instead of redirecting the old path we might just want to alias it, meaning just provide a duplicate path to the same content. We could update that path and provide an alias to the old path:
    const router = new VueRouter({
      routes: [
        ...
        {
          path: '/about-us',
          name: 'about',
          component: About,
          alias: '/about' // <-----
        }
      ]
    })
Now the user can go to /about or /about-us and they’ll get the same content.
Example App
The application we’re building during this course looks like this:
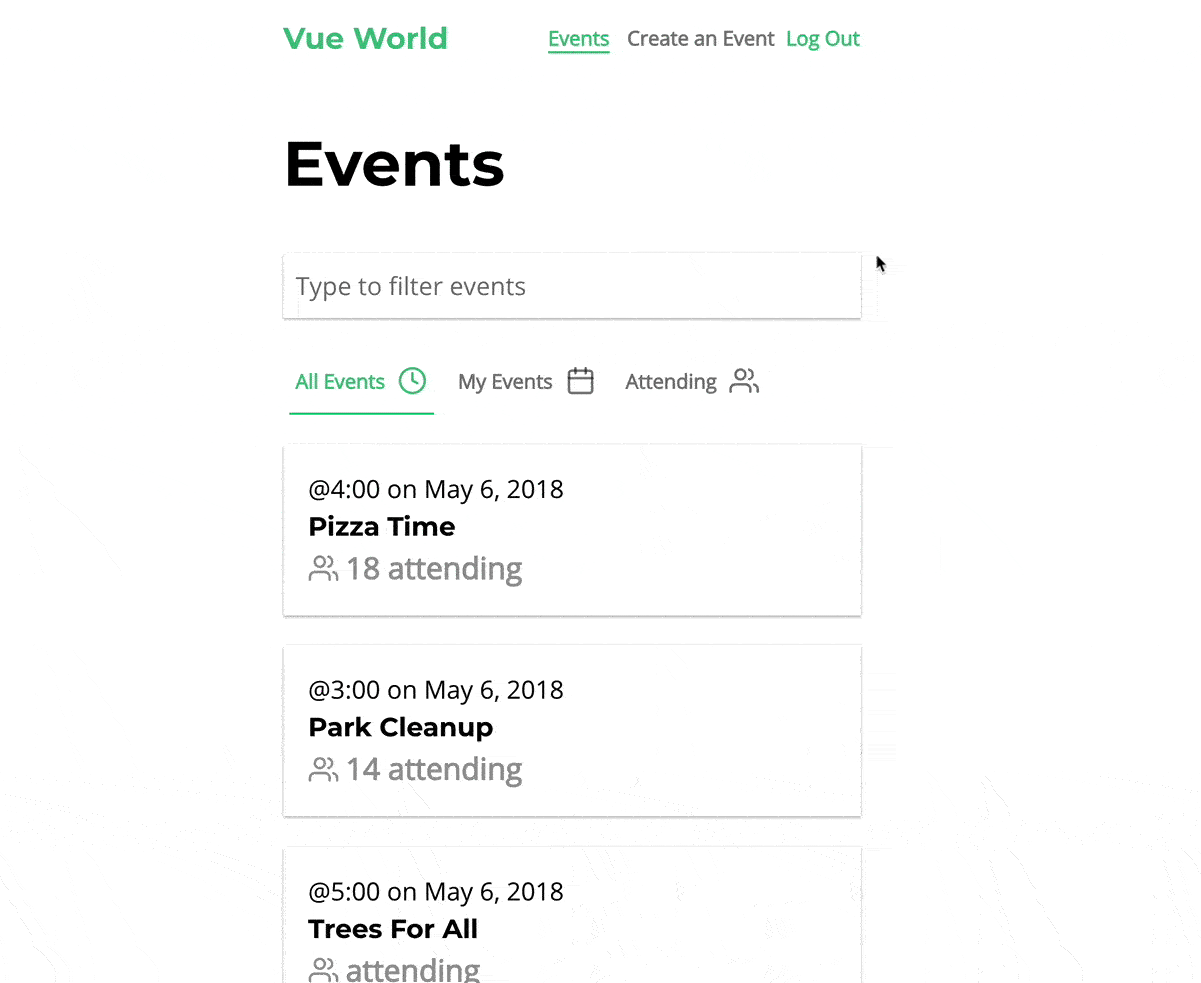
This app starts with three different pages.
- EventList.vue - A home page where we list all events. This is also the root page.
- EventShow.vue - A page that shows the details of a single event, and allows us to say we’re attending an event
- EventCreate.vue - A page where we can create an event.
I encourage you to follow along on your own computer and build alongside us. This way you can play around, I know that’s how I learn best. You can find the starting and finishing code on each lesson (if you want to start, or you get stuck) over on github. In the readme you’ll find something that looks like this:

You can download the starting code at each stage here, you can also clone / fork the repo and checkout the tag you want for the particular lesson.

Adding our View Components
I’ll start by removing the existing components in the app: deleting /components/HelloWorld.vue , /views/About.vue , and /views/Home.vue . Then we’ll create these three files:
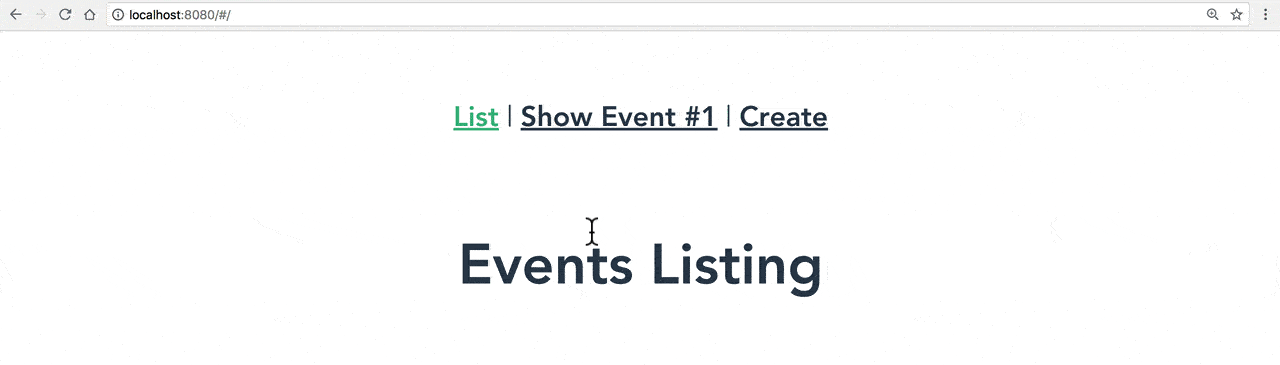
EventList.vue
    <template>
      <h1>Events Listing</h1>
    </template>
EventShow.vue
    <template>
      <h1>Showing event #1</h1>
    </template>
EventCreate.vue
    <template>
      <h1>Create Event</h1>
    </template>
Then I’m going to update my router.js file to use these files.
    import Vue from 'vue'
    import Router from 'vue-router'
    import EventList from './views/EventList.vue'
    import EventShow from './views/EventShow.vue'
    import EventCreate from './views/EventCreate.vue'

    Vue.use(Router)

    export default new Router({
      routes: [
        {
          path: '/',
          name: 'event-list',
          component: EventList
        },
        {
          path: '/event',
          name: 'event-show',
          component: EventShow
        },
        {
          path: '/event/create',
          name: 'event-create',
          component: EventCreate
        }
      ]
    })
We’ll then want to create some navigation in our App.vue
    <template>
      <div id="app">
        <div id="nav">
          <router-link :to="{ name: 'event-list' }">List</router-link> |
          <router-link :to="{ name: 'event-show' }">Show Event #1</router-link> |
          <router-link :to="{ name: 'event-create' }">Create</router-link>
        </div>
        <router-view/>
      </div>
    </template>
And if we look in our browser, we see that everything is working.
Up Next
In our next lesson we’ll learn more about Routing, diving into dynamic routes and HTML5 History mode, to get rid of that hash you might have noticed in the URL.
Dynamic Routing & History Mode
Building on what we learned in the previous lesson on Vue Router, in this lesson we’ll cover the creation of dynamic routes and how to use HTML5 History Mode to get rid of that # in our URL.
Problem: How to create dynamic routes like /users/gregg?
Often when building websites, we want to create routes that contain dynamic information, like a user’s name for instance /users/insert-name-here
Solution: Dynamic Routes
First up I’m going to create a new route, and import a new component.
router.js
    ...
    import User from './views/User.vue'
    Vue.use(Router)

    export default new Router({
      routes: [
        ...
        {
          path: '/user/:username',
          name: 'user',
          component: User
        }
      ]
    })
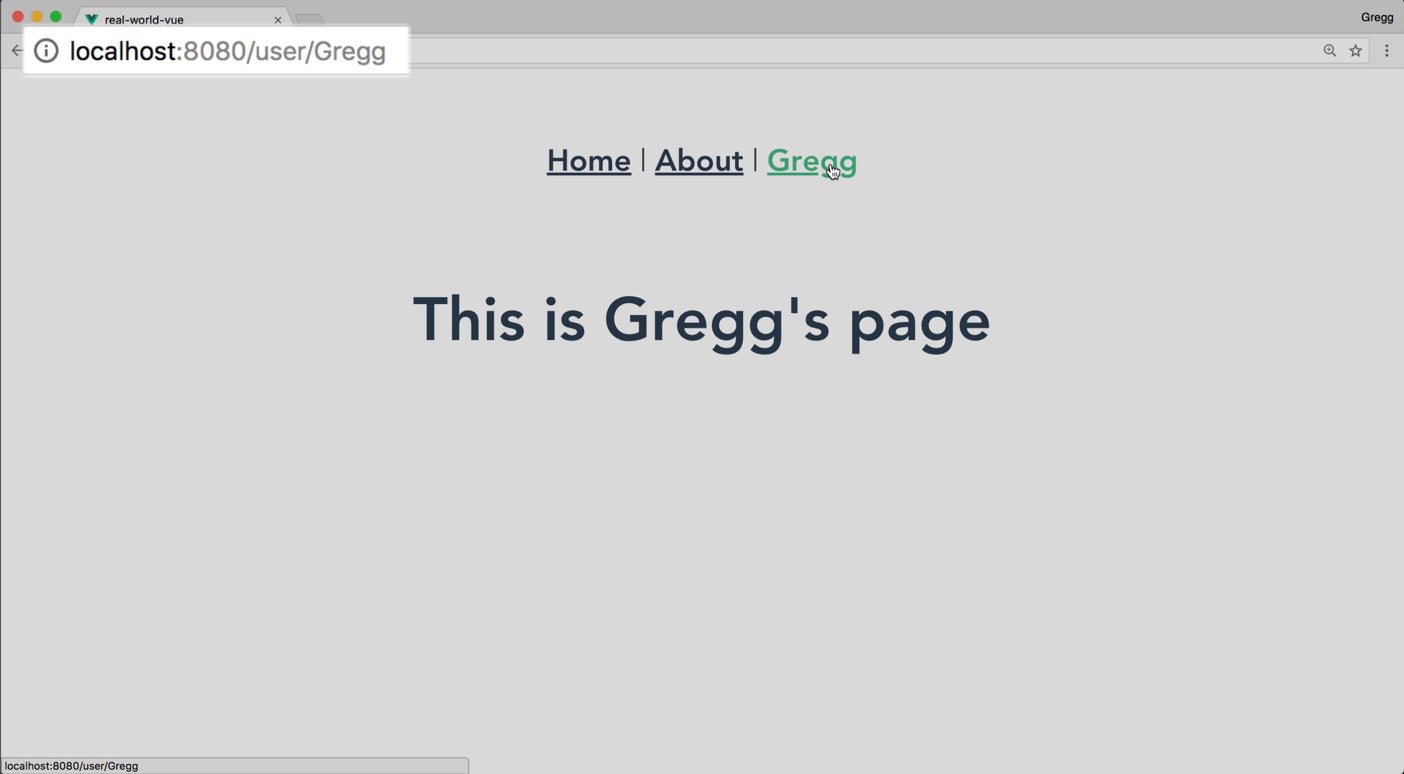
Notice with the new route above, the path has /user/:username . :username is called a dynamic segment. This tells Vue that anything after /user/ is to be treated as a dynamic route. When we create the simple template, we can access this parameter like so:
/pages/user.vue
    <template>
      <div class="user">
        <h1>This is a page for {{ $route.params.username }}</h1>
      </div>
    </template>
A $route object represents the state of the current active route. It contains data about the route including the params. To learn more about this object check out the API documentation.
Now when we visit /user/gregg, we see:

Also we can link to dynamic routes by placing parameters in our links:
<router-link :to="{ name: 'user', params: { username: 'gregg' } }">Gregg</router-link>
Using Props for Routes
Using $route.params in your component limits its flexibility. A more modular way to create your dynamic components is to set props: true in your route configuration.
router.js
    ...
    export default new Router({
      routes: [
        {
          path: "/user/:username",
          name: "user",
          component: User,
          props: true
        }
      ]
    });
This will cause the $route.params to be sent into your component as a normal prop. Inside our component, we’ll then need to receive this prop:
User.vue
    <template>
      <div class="user">
        <h1>{{ username }}</h1>
      </div>
    </template>

    <script>
    export default {
      props: ["username"]
    };
    </script>
Everything will now work the same, except that our component can now be reused as a child component elsewhere, passing in username as a prop.
The Hash
By now you’re probably noticing that there’s a hash in our URL ( http://localhost:8080/#/about-us ), and you may be wondering what that’s about. “Hash mode” is the default mode for Vue Router and it uses the URL hash to simulate a full URL so the page isn’t reloaded every time the URL changes.
Problem: I don’t want the hash
Yeah, most websites don’t use this, you don’t want it either.
Solution: History mode + server configuration
In order to remove it we need to add some configuration to our router.js :
    ...
    export default new Router({
      mode: 'history', // <----
      routes: [
       ...
      ]
    })
This tells Vue to use the browser history.pushState API to change the URL without reloading the page.
Now when we play around locally it shows the URLs exactly as we would want them, and even when we go to URLs like http://localhost:8080/about-us the proper page is loaded, which is interesting don’t you think?
Normally when you load up /about-us on a server it would look for an about-us.html file. On our application no matter what URL is called up, we must load up index.html which is where our application is loaded, and then our router will take over and load up the proper page.
This is already the default functionality on our development server, but if we go to deploy our application we’ll need to ensure our server has the proper configuration to serve up our index.html no matter what route is navigated to. The Vue Router documentation has a bunch of example configurations showing how to do this.
Side Question: You might be wondering, “why isn’t this the default functionality?”
Side Answer: the browser history.pushState API is only supported in IE10+, while the current version of Vue provides support for IE9+. #BlameIE
Caveat: Handling 404s
A side effect of this you should be aware of is that when we go to an invalid URL, we are no longer given the proper 404 file not found error. There are different ways to combat this, one of which is by creating a /views/FileNotFound.vue component, which gets loaded if none of the existing paths match. To do this we would place this catch-all route at the bottom of our routes.js :
    ...
    const router = new VueRouter({
      mode: 'history',
      routes: [
        ...
        { path: '*', component: NotFoundComponent }
      ]
    })
There’s More
We obviously aren’t going to cover all the different ways you can use routing. I recommend you consult the Vue Router documentation for more details, like nested routes, transition effects, programmatic navigation, passing props to routes, and SEO concerns.
Our Example Application
Using this knowledge, let’s update our example application so that:
- Our
EventShow.vuehas a dynamic segment,/event/:id, using props. - Let’s move our event show link into the EventList, where it will normally live.
- Our route.js uses history mode.
First let’s update our router.js:
    ...
    export default new Router({
      mode: 'history',
      routes: [
        {
          path: '/',
          name: 'event-list',
          component: EventList
        },
        {  // Notice this has to come before /event/:id
          path: '/event/create',
          name: 'event-create',
          component: EventCreate
        },
        {
          path: '/event/:id',
          name: 'event-show',
          component: EventShow,
          props: true
        }
      ]
    })
EventList.vue
    <template>
      <div>
        <h1>Events Listing</h1>
        <p>
          <router-link :to="{ name: 'event-show', params: { id: '1' } }">First Event</router-link>
        </p>
      </div>
    </template>
EventShow.vue
    <template>
      <h1>Showing event #{{ id }}</h1>
    </template>
    <script>
   export default {
      props: ['id']
    }
    </script>
Also, let’s remove the show navigation link from the App.vue
    <template>
      <div id="app">
        <div id="nav">
          <router-link :to="{ name: 'event-list' }">List</router-link> |
          <router-link :to="{ name: 'event-create' }">Create</router-link>
        </div>
        <router-view/>
      </div>
    </template>
And now when we go into our browser we see everything working!

This is all we need for now, and we’re ready to jump into the next lesson.
In the next lesson we’ll be walking through the anatomy of a Single File Vue component, and showing how to nest components inside our .vue files as we build out our example application.
Single File Vue Components
In this tutorial, we’ll get acquainted with single file .vue components and how to use them together cooperatively throughout a Vue application.
We’ll be:
- Exploring the anatomy of a vue component
- Learning how to nest components inside each other
- Implementing global and scoped styles
- Adding components to our example app
Building blocks of a Vue app
Vue components are the building blocks of a Vue app. These components are used, and reused, together to structure your application, which you can envision as a treelike structure.
So how do you create a Vue component? Let’s look at a simple example.
Anatomy of a Single File Component
In a previous lesson, I created the EventCard.vue file in the /src/components directory. If you haven’t created this component yet, you can do so now. Since I installed Vue VSCode Snippets, I can type vbase and it’ll scaffold a component for me.
Let’s play with this to explore the anatomy of a single file component.
Vue components combine markup (usually HTML), logic (JavaScript), and style (usually CSS) into one, single file. Hence the name: single-file component.
    <template>
      <div>
      // here is where we lay out the structure of our component
      </div>
    </template>

    <script>
      export default {
        // here is where we give our component the ability to behave and perform logic
      }
    </script>

    <style scoped>
    // here is where we design the appearance of our component
    </style>
Part of what makes Vue so powerful is how it’s flexible and allows you to use alternatives to the traditional HTML, JS and CSS setup. For example, you could use Pug, TypeScript and SCSS instead by adding the appropriate lang attributes.
    <template lang="pug">
    </template>

    <script lang="ts">
    </script>

    <style lang="scss" scoped>
    </style>
You’d just need to make sure you have the proper loaders setup and your Webpack is configured to handle these alternatives. Thanks to the helpful Vue CLI 3, this process is pretty simple.
For example, if we wanted to use SCSS, we’d need to make sure we install sass-loader and its peer dependency node-sass. We can quickly do this from the command line with:
npm install --save-dev sass-loader node-sass
We also have the option to install these dependencies from the Vue UI’s Dependencies tab instead.
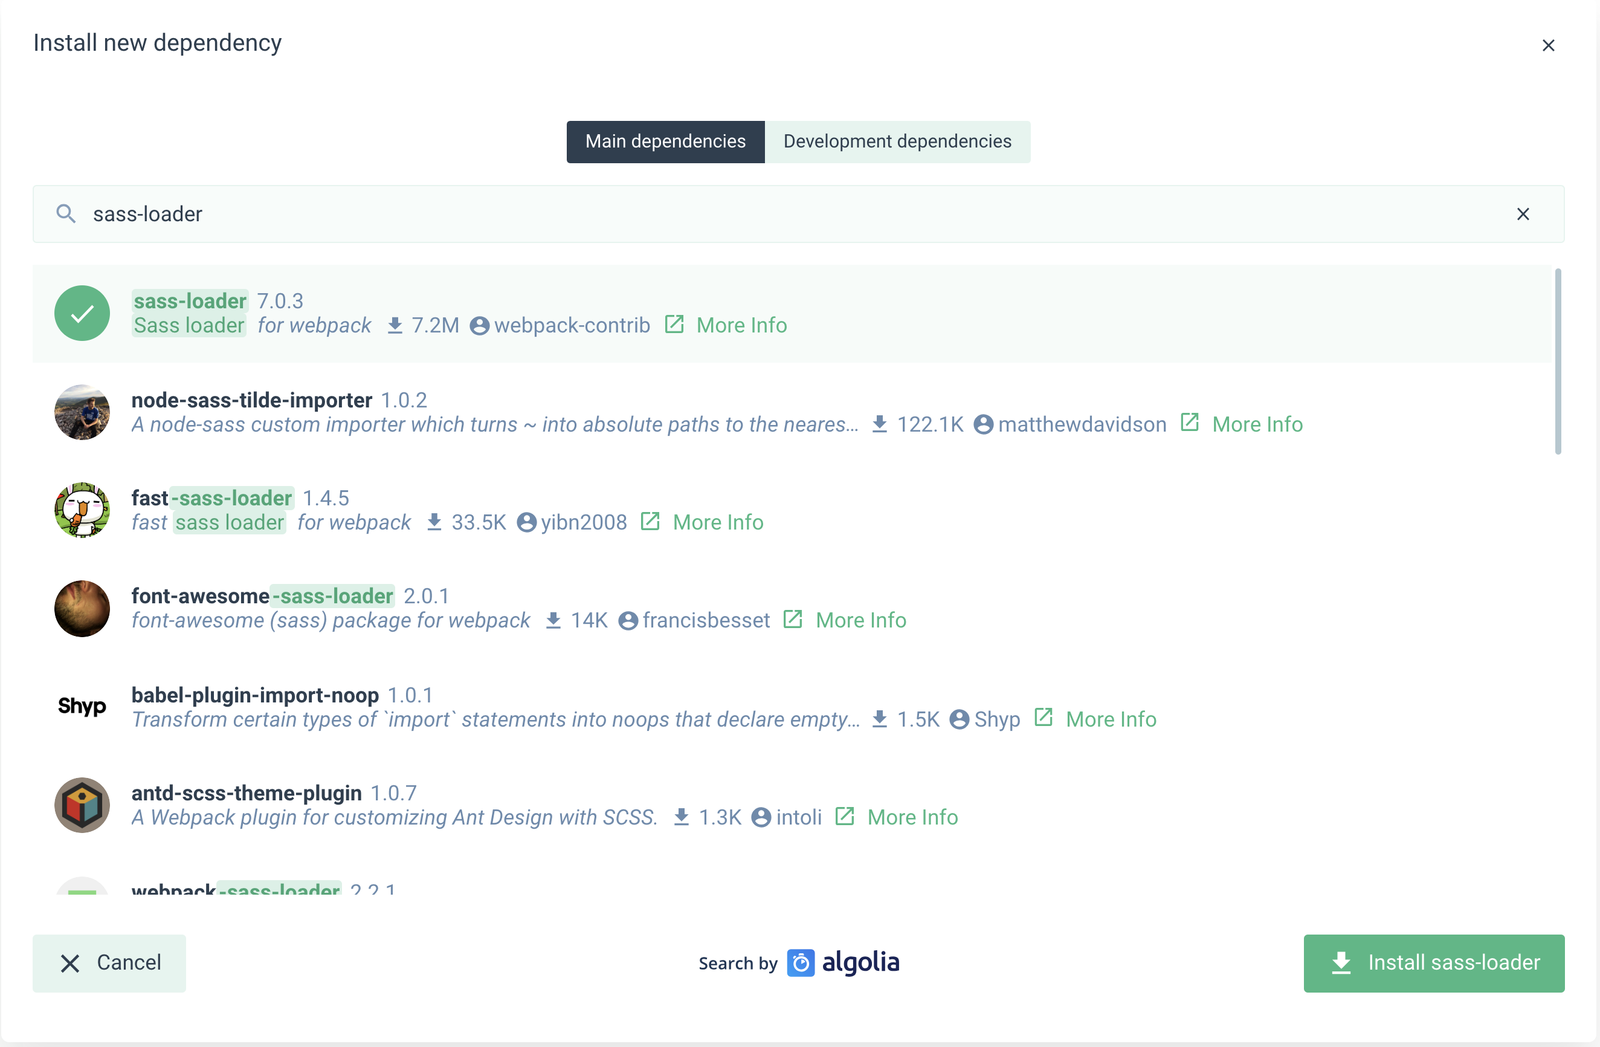
If you want to figure out what dependencies you’d need for other languages, check out the Vue Loader docs.
EventCard.vue
Taking a look at our completed app, we can see that in our EventList view, there’s a list of events. As you might imagine, these aren’t all each coded separately. Rather, they are the same EventCard component, which is being reused.
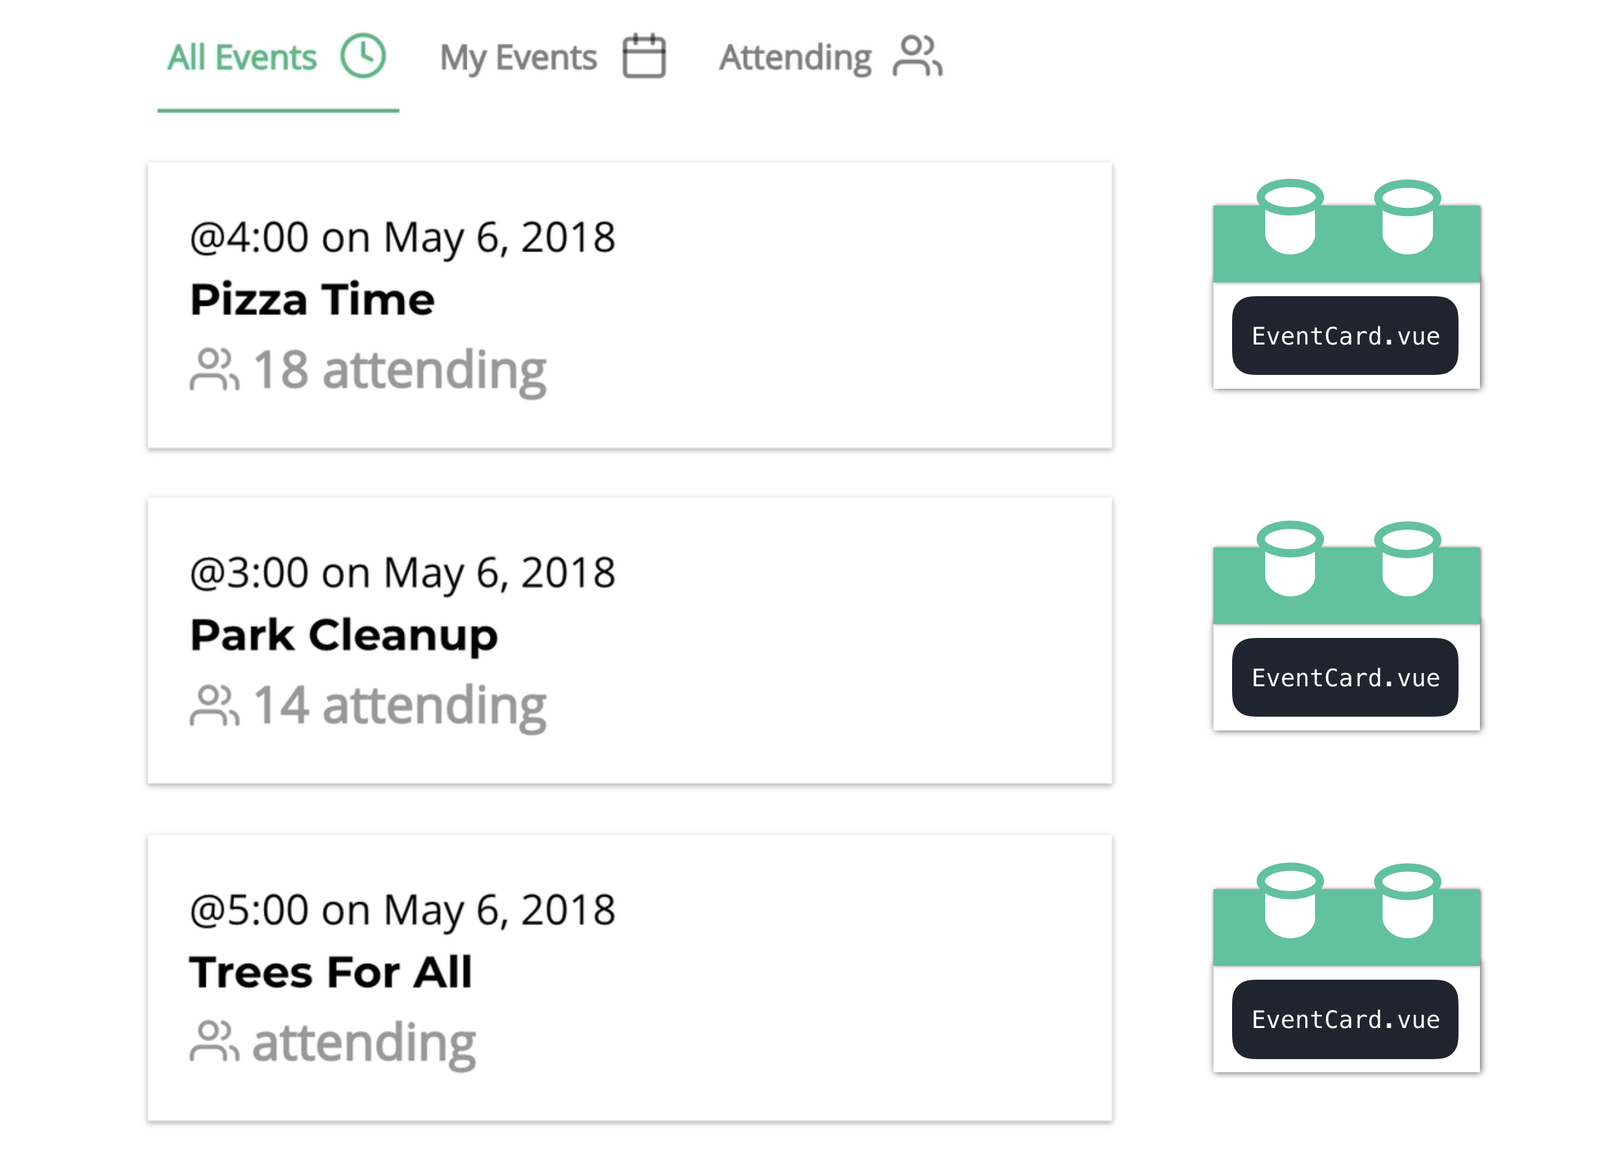
Let’s start building this EventCard component. Since we are creating an Events app, this component will be used to display details of an individual event.
First, let’s add some structure to display the title of our event.
    <template>
      <div>
        <h4>Park Cleanup</h4>
      </div>
    </template>
Now, our component will display the title “Park Cleanup”. If you’re wondering why we have a div here, that’s because a component’s template needs to have only one root element. It can’t have sibling elements, and later in this lesson we’ll be adding more elements next to our h4 element to this template.
Let’s go down to our <script> section, where we can export our component.
We’ll export it with export default which is the ES6 export statement for exporting a JavaScript module that can be imported from another location with the import statement, which we’ll get to in a moment.
    <script>
    export default {}
    </script>
Note that there’s also the option to export with *module.exports* and import with *require* .
Next, we want to give our component some data. Instead of hard-coding the event’s title in our template, we can move that title into our data.
    <script>
    export default {
      data() {
        return {
          title: 'Park Cleanup'
        }
      }
    }
    </script>
Note that we’re using the ES6 shorthand here with data() {…} , which is short for:
data: function () {...}
If you’re wondering why data is a function, you can check out our Intro to Vue.js lesson on components.
Now that we have some title data, we can access that title from our template, inside an expression.
    <template>
      <div>
        <h4>{{ title }}</h4>
      </div>
    </template>
It will still display “Park Cleanup” like before. If our title data changed to ‘Beach Cleanup’, our template would display that new value reactively.
If you need a refresher on basic Vue data reactivity, watch this lesson from our Intro to Vue.js course.
Now if we wanted to give our title some style, let’s say a green color, we’d just add that inside our style tag.
    <style scoped>
    h4 {
      color: green
    }
    </style>
Notice how the scaffold that the snippet created for us includes the scoped attribute? This is a convenient way to isolate this style to only this component. If we had not scoped this style rule, we could end up with other h4 elements in our app being styled green when we don’t want them to be.
So you might be thinking, okay cool… so far so good, but I’m not seeing this component in the browser. That’s because it needs to be nested within a view-level component. Let’s do that now.
Nesting Components
Often, components are nested within other components. We call this a parent-child component relationship. This nesting can go deeper than just one level, which means we can have a parent-child-grandchild relationship, and so on, with components inside components inside components, like Russian nesting dolls.
In our previous lesson on Vue Router, we created our routes and the pages, or view components they route to, including EventList.vue .
Just like it sounds, this component will be used to display a list of our events. So we’ll nest our EventCard.vue component inside here.
If we open up EventList.vue , we see it only has the template , so let’s add a script section and export the component.
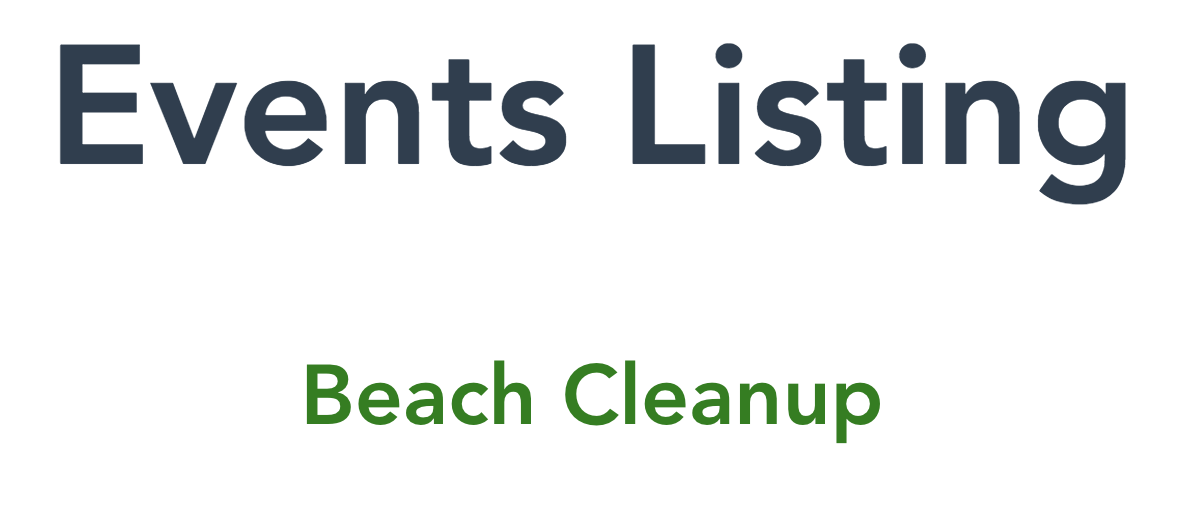
    <template>
      <div>
        <h1>Events Listing</h1>
        <router-link :to="{ name: 'event-show', params: { id: '1' } }">Show Event #1</router-link>
      </div>
    </template>

    <script>
      export default {
      }
    </script>
In order to use our EventsCard component inside here, we’ll need to import it. Using the Vue VSCode Snippet vimport , we’ll get:
import Name from './components/Name.vue'
Which we can change to:
import EventCard from '@/components/EventCard.vue'
Now we need to register this component as a child component of EventList . We can use the snippet vimport-c , which will gives us:
      components: {
        New, // change to our component
      }
We’ll change that to:
      components: {
        EventCard
      }
Note that because we’re using ES6, this is equivalent to:
      components: {
        EventCard: Eventcard
      }
Now that EventCard is properly imported and registered within its parent, EventList , we can use it within EventList 's template.
    <template>
      <div>
        <h1>Events Listing</h1>
        <EventCard/>

        <router-link :to="{ name: 'event-show', params: { id: '1' } }">Show Event #1</router-link>
      </div>
    </template>
Now, in our browser we can see “Beach Cleanup”, which means EventCard is being displayed correctly.
Next Tasks
Now that we understand how to create a component and nest it within another component, we can complete a few more tasks within our app.
- Add global app-level styles
- Flesh out our EventCard component
- Create a NavBar component
Adding Global Styles
As we saw in the EventCard component, we can scope specific styles to individual components. So you might be wondering, how do I add global styles to my app that I want to affect every component?
There are several different ways to handle this, but for the sake of this course, we’ll be adding global, app-level styles into the style section of our App.vue component. Please note that it’s recommended to only store your global styles in one place to avoid potential conflicts.
Let’s pretend our designer just sent us all of these style rules, which we’ll paste into our style section. These styles will affect our entire app.
    <style>
html {
  -webkit-text-size-adjust: 100%;
  -webkit-font-smoothing: antialiased;
  -moz-osx-font-smoothing: grayscale;
}
body {
  margin: 0;
  font-family: 'Open Sans', sans-serif;
  font-size: 16px;
  line-height: 1.5;
}
#app {
  box-sizing: border-box;
  width: 500px;
  padding: 0 20px 20px;
  margin: 0 auto;
}
hr {
  box-sizing: content-box;
  height: 0;
  overflow: visible;
}
a {
  color: #39b982;
  font-weight: 600;
  background-color: transparent;
}
img {
  border-style: none;
  width: 100%;
}
h1,
h2,
h3,
h4,
h5,
h6 {
  display: flex;
  align-items: center;
  font-family: 'Montserrat', sans-serif;
}
h1 {
  font-size: 50px;
  font-weight: 700;
}
h2 {
  font-size: 38px;
  font-weight: 700;
}
h3 {
  font-size: 28px;
  font-weight: 700;
}
h4 {
  font-size: 21px;
  font-weight: 700;
}
h5 {
  font-size: 16px;
  font-weight: 700;
}
h6 {
  font-size: 15px;
  font-weight: 700;
}
b,
strong {
  font-weight: bolder;
}
small {
  font-size: 80%;
}
.eyebrow {
  font-size: 20px;
}
.-text-primary {
  color: #39b982;
}
.-text-base {
  color: #000;
}
.-text-error {
  color: tomato;
}
.-text-gray {
  color: rgba(0, 0, 0, 0.5);
}
.-shadow {
  box-shadow: 0 1px 2px 0 rgba(0, 0, 0, 0.2), 0 1px 5px 0 rgba(0, 0, 0, 0.13);
}
.badge {
  display: inline-flex;
  height: 26px;
  width: auto;
  padding: 0 7px;
  margin: 0 5px;
  background: transparent;
  border-radius: 13px;
  font-size: 13px;
  font-weight: 400;
  line-height: 26px;
}
.badge.-fill-gradient {
  background: linear-gradient(to right, #16c0b0, #84cf6a);
  color: #fff;
}
button,
label,
input,
optgroup,
select,
textarea {
  display: inline-flex;
  font-family: 'Open sans', sans-serif;
  font-size: 100%;
  line-height: 1.15;
  margin: 0;
}
button,
input {
  overflow: visible;
}
button,
select {
  text-transform: none;
}
button,
[type='button'],
[type='reset'],
[type='submit'] {
  -webkit-appearance: none;
}
button::-moz-focus-inner,
[type='button']::-moz-focus-inner,
[type='reset']::-moz-focus-inner,
[type='submit']::-moz-focus-inner {
  border-style: none;
  padding: 0;
}
button:-moz-focusring,
[type='button']:-moz-focusring,
[type='reset']:-moz-focusring,
[type='submit']:-moz-focusring {
  outline: 2px solid #39b982;
}
label {
  color: rgba(0, 0, 0, 0.5);
  font-weight: 700;
}
input,
textarea {
  box-sizing: border-box;
  border: solid 1px rgba(0, 0, 0, 0.4);
}
textarea {
  width: 100%;
  overflow: auto;
  font-size: 20px;
}
[type='checkbox'],
[type='radio'] {
  box-sizing: border-box;
  padding: 0;
}
[type='number']::-webkit-inner-spin-button,
[type='number']::-webkit-outer-spin-button {
  height: auto;
}
[type='search'] {
  -webkit-appearance: textfield;
  outline-offset: -2px;
}
[type='search']::-webkit-search-decoration {
  -webkit-appearance: none;
}
[type='text'],
[type='number'],
[type='search'],
[type='password'] {
  height: 52px;
  width: 100%;
  padding: 0 10px;
  font-size: 20px;
}
[type='text']:focus,
[type='number']:focus,
[type='search']:focus,
[type='password']:focus {
  border-color: #39b982;
}
::-webkit-file-upload-button {
  -webkit-appearance: button;
  font: inherit;
}
[hidden] {
  display: none;
}
select {
  width: 100%;
  height: 52px;
  padding: 0 24px 0 10px;
  vertical-align: middle;
  background: #fff
    url("data:image/svg+xml;charset=utf8,%3Csvg xmlns='http://www.w3.org/2000/svg' viewBox='0 0 4 5'%3E%3Cpath fill='%23343a40' d='M2 0L0 2h4zm0 5L0 3h4z'/%3E%3C/svg%3E")
    no-repeat right 12px center;
  background-size: 8px 10px;
  border: solid 1px rgba(0, 0, 0, 0.4);
  border-radius: 0;
  -webkit-appearance: none;
  -moz-appearance: none;
  appearance: none;
}
select:focus {
  border-color: #39b982;
  outline: 0;
}
select:focus::ms-value {
  color: #000;
  background: #fff;
}
select::ms-expand {
  opacity: 0;
}
</style>
Fleshing out EventCard.vue
Our EventCard needs to be fleshed out more. We need to:
- Add more event data
- Display that data
- Style it
- Add our
router-link
So let’s do that now.
First, we’ll add more data. Since all of the data is related to the event itself, we’ll make an event object that includes the title along with an id , time , date and an array of attendees objects.
      data() {
        return {
          event: {
            id: 1,
            title: 'Beach Cleanup',
            date: 'Tue May 15 2018',
            time: '6:00',
            attendees: [
              { id: 'abc123', name: 'Adam Jahr' },
              { id: 'def456', name: 'Gregg Pollack' }
            ]
          }
        }
      }
We’ll add to our template to display that new data, using dot notation.
    <div class="event-card -shadow">
      <span class="eyebrow">@{{ event.time }} on {{ event.date }}</span>
      <h4 class="title">{{ event.title }}</h4>
      <span>{{ event.attendees.length }} attending</span>
    </div>
The eyebrow , title and -shadow classes there are from our global styles. While event-card is a style we’ll add below along with some other component-specific styles, which we can paste below.
    <style scoped>
    .event-card {
      padding: 20px;
      margin-bottom: 24px;
      transition: all 0.2s linear;
      cursor: pointer;
    }
    .event-card:hover {
      transform: scale(1.01);
      box-shadow: 0 3px 12px 0 rgba(0, 0, 0, 0.2), 0 1px 15px 0 rgba(0, 0, 0, 0.19);
    }
    .event-card > .title {
      margin: 0;
    }

    .event-link {
      color: black;
      text-decoration: none;
      font-weight: 100;
    }
    </style>
Our last step is to wrap this component in the router-link we created in the previous lesson. It currently lives in EventList , so we’ll cut it from there, paste it into EventCard , and wrap it around our outer div. Make sure to add the class of event-link here.
    <template>
      <router-link class="event-link" :to="{ name: 'event-show', params: { id: '1' } }">
        <div class="event-card -shadow">
          <span class="eyebrow">@{{ event.time }} on {{ event.date }}</span>
          <h4 class="title">{{ event.title }}</h4>
          <span>{{ event.attendees.length }} attending</span>
        </div>
      </router-link>
    </template>
Great now our EventCard is displaying all of our data in a template styled with our scoped CSS, and it can link to our EventShow view.

Creating a NavBar Component
Currently our navbar is coded directly within our App.vue file. To make our app more organized and readable, we can move that code into its own NavBar component.
So let’s copy the router-links from App.vue and move them into the template of our newly created NavBar.vue . The router-view will stay where it is since we still want to render our view components at the app level.
NavBar.vue
    <template>
      <div id="nav" class="nav">
        <router-link to="/" class="brand">Real World Events</router-link> // this is new
        <nav>
          <router-link :to="{ name: 'event-list' }">List</router-link> |
          <router-link :to="{ name: 'event-create' }">Create</router-link>
        </nav>
      </div>
    </template>
As you can see, we added an additional router-link (Real World Events) that routes to the root path (“/”). This allows a user to click this link from anywhere in the app in order to go to the home screen. In an actual app, this could be replaced with a company’s logo.
Now, in the script , we’ll make sure to export the NavBar .
    <script>
        export default {
        }
    </script>
And let’s add some styles, too.
    <style scoped>
    .nav {
      display: flex;
      justify-content: space-between;
      align-items: center;
      height: 60px;
    }
    .nav > .brand {
      font-family: 'Montserrat', sans-serif;
      font-weight: 700;
      font-size: 1.5em;
      color: #39b982;
      text-decoration: none;
    }
    .nav .nav-item {
      box-sizing: border-box;
      margin: 0 5px;
      color: rgba(0, 0, 0, 0.5);
      text-decoration: none;
    }
    .nav .nav-item.router-link-exact-active {
      color: #39b982;
      border-bottom: solid 2px #39b982;
    }
    </style>
Now we just need to import NavBar into App.vue , and list it as a component.
App.vue
    <script>
    import NavBar from '@/components/NavBar.vue'

    export default {
      components: {
        NavBar
      }
    }
    </script>
Then nest it in the template:
    <template>
      <div id="app">
        <NavBar />
        <router-view/>
      </div>
    </template>
Great! Our NavBar is working just like it was before, but now it’s isolated into its own component.
Let’s Review
We learned about:
- The anatomy of a single file Vue component
- How to nest components within other components
- How to implement scoped and global styles
What’s Next
In the next lesson, we’ll learn how to work with globally registered components as we build an svg Icon component that we can use throughout our app.
Slots
In this tutorial we’ll be learning about how slots can make our components even more flexible.
We’ll be covering:
- How to use slots for dynamic template code
- How to set default slot content
- How to use multiple, named slots
The Case for Slots
As we build a large web application, we’ll inevitably have commonly reused components. Things like:
- Display elements: icons, boxes
- Form elements: inputs, select fields, buttons
- Window elements: modals, pop-ups, notifications
We can create these as global “Base” components like we showed in the last lesson. And we can also customize and configure these components by passing props into them
But what if we need the template of a component to be dynamic. Do we pass in HTML as a prop? No. Instead, we do this with slots, which serve as a placeholder for template code that we can slot in.
Let’s take a look at a basic example of a component using slots.
A Button Component with a Slot
A button is a commonly reused component, which could be utilized in several contexts throughout an application. It could be used to submit a form, update a feed, and save a file, for example.
Instead of making a separate component for each use case:
<button>Submit</button>
<button>Update</button>
<button>Save</button>
We can make one BaseButton component, which has a slot that serves as a placeholder for the template code that describes the action the button performs.
BaseButton.vue
    <template>
    <div>
      <button><slot></slot></button>
    </div>
    </template>
Now, when we use this component, we can write:
<BaseButton>Submit</BaseButton>
“Submit” will be what appears where the slot was, like so:
<div><button>Submit</button></div>
In another context, we could say:
<BaseButton>Update</BaseButton>
And “Update” will replace the slot .
Voila! Our BaseButton ’s template can now be modified from wherever it’s being used.
Sidenote: This component is super simple for teaching purposes. We’ll code the rest of this component later in the course.
Default Slot Content
Sometimes, a component may only occasionally need to make use of its slot. In this case, you’d probably want to set some default content for your slot. Like it sounds, default content is the content that will show up on default if nothing else is added.
For example, if our BaseButton is used to submit most of the time, we can give it the default slot content of “Submit” by putting that within the slot itself.
    <template>
    <div>
      <button><slot>Submit</slot></button> // default slot content: "Submit"
    </div>
    </template>
Now, wherever we use BaseButton , it will display “Submit”.
<BaseButton/> <-- displays "Submit"
Unless we insert different content when we use it:
<BaseButton>Update</BaseButton> <-- displays "Update"
Access to Parent Properties
There may be circumstances when you need to print out data in a slot. For example:
<BaseButton>Purchase for ${{ total }}</BaseButton>
Even though total here is data on BaseButton ’s parent component, its slot has access to it, along with the other instance properties of its parent. This allows us to not only feed in template code, but also data and other properties, such as computed properties, directly into the slot.
Side Note: In some cases you may want the template code you pass into a slot to have access to data from the slot component itself (the child). This is what Scoped Slots are for, which is a more advanced topic covered in our Advanced Components course.
Back to Our Example App
Now that we understand how to use slots, let’s add a slot into our example app.
Currently, in EventCard we have a span below our BaseIcon that displays how many users are attending the event.
    <BaseIcon name="users"/>
    <span>{{ event.attendees.length }} attending</span>
This works fine, but since our icon is a “users” icon, it would be more convenient if the text that was associated with how many users are attending this event was actually displayed by BaseIcon .
Let’s add a slot to BaseIcon.
BaseIcon.vue
    <template>
    <div class="icon-wrapper">
      <svg class='icon'  :width="width" :height="height">
        <use v-bind="{'xlink:href':'/feather-sprite.svg#'+name}"/>
      </svg>
      <slot></slot> // newly added slot
    </div>
    </template>
We want the slot to be replaced with the number of attendees of our event, which is the code that currently lives in our span :
{{ event.attendees.length }} attending
Since BaseIcon now has a slot that is ready to be replaced, we can go into EventCard , remove the span, and add our attendee count in the inner HTML of BaseIcon .
<BaseIcon name="users">{{ attendees.length }} attending</BaseIcon>
When BaseIcon renders, its slot will be switched out with “2 attending” since our event currently has two attendees, and our slot can access data from the parent it’s nested within.
Named Slots
Sometimes it’s useful for a component to have multiple slots. Let’s take a look at a common UI component in modern web apps to explore this concept.
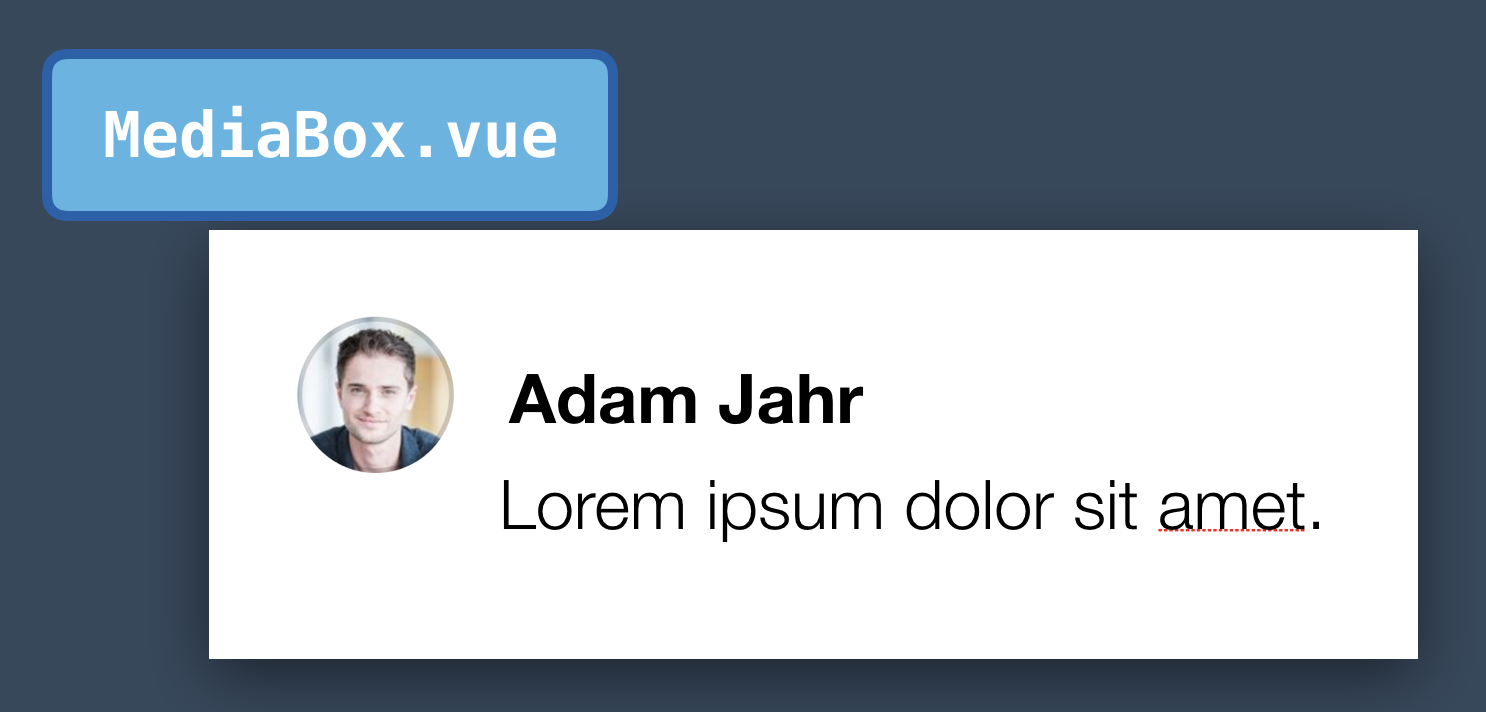
If you’ve used any large social media platform, you’ve seen a component like this. It’s often called a media object or media box. As you can see, it displays a user avatar, a heading, and a paragraph.
The user avatar can be its own component, and then we can slot in the heading and paragraph. We could start by adding two slots for them, like so:
MediaBox.vue
    <template>
      <div>
        <UserAvatar/>
        <slot></slot>
        <slot></slot>
      </div>
    </template>
But there’s a problem when we try to use this component:
    <MediaBox>
      <h2>Adam Jahr</h2>
      <p>My words.</p>
    </MediaBox>
Vue won’t know which content should be slotted into which slot. We need to be clear and specify what content goes where, and we can do this by naming our slots.
MediaBox.vue
    <template>
      <div>
        <slot name="heading"></slot>
        <slot name="paragraph"></slot>
      </div>
    </template>
Now, we can use that name in a slot attribute on the template code that will be slotted in.
    <MediaBox>
      <h2 slot="heading">Adam Jahr</h2>
      <p slot="paragraph">My words.</p>
    </MediaBox>
Great, we’re slotting in our heading and paragraph where we want them to go.
Default Slot
It’s worth noting, we could get away with only naming one of our slots:
    <template>
      <div>
        <slot></slot>
        <slot name="paragraph"></slot>
      </div>
    </template>
Vue would still know how to handle this:
    <MediaBox>
      <h2 slot="heading">Adam Jahr</h2>
      <p>My words.</p>
    </MediaBox>
The heading would go into the slot with the name of “heading”, and the paragraph would default into the unnamed slot.
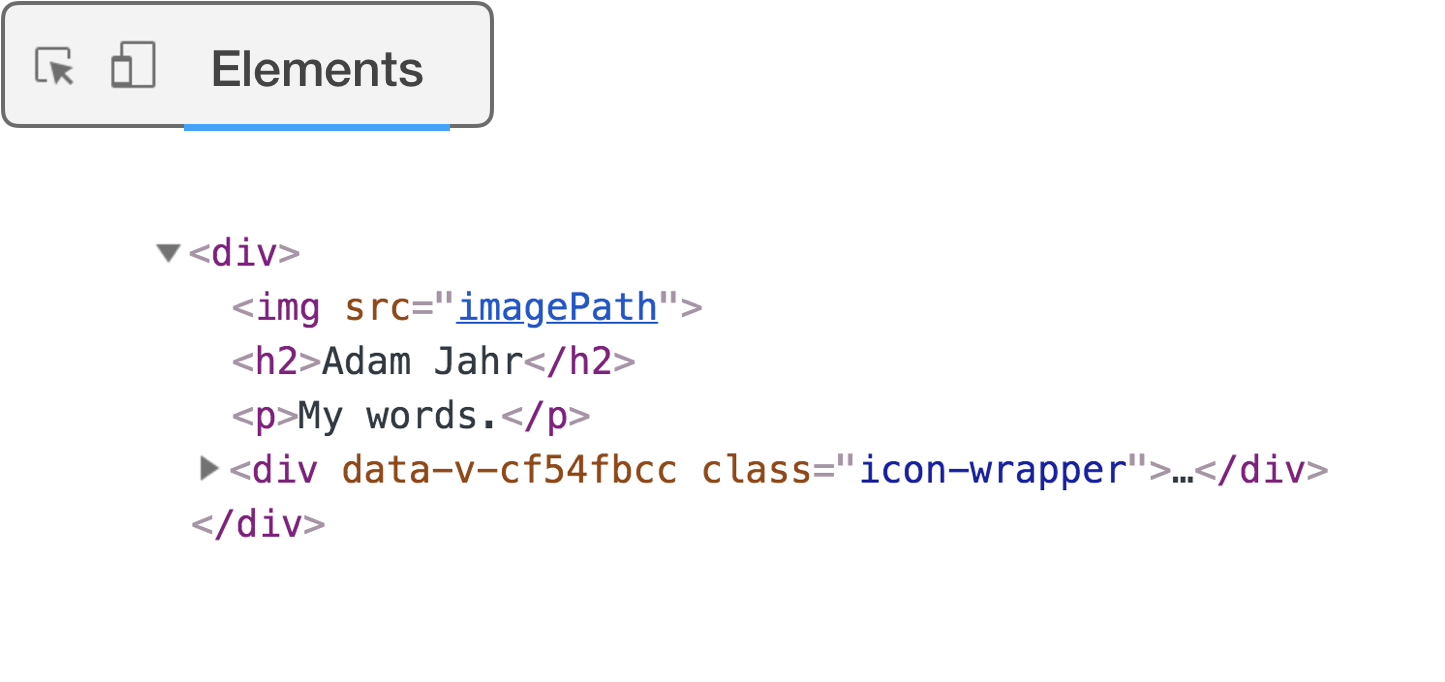
Slotting a Full Template
It’s also possible to pass in a full template like this:
    <MediaBox>
      <h2>Adam Jahr</h2>
      <template slot="paragraph">
        <p>My words.</p>
      </template>
    </MediaBox>
This could be useful if you wanted to slot in multiple elements into the same slot.
    <MediaBox>
      <h2>Adam Jahr</h2>
      <template slot="paragraph">
        <p>My words.</p>
        <BaseIcon name="book">
      </template>
    </MediaBox>
Notice above that we’re able to pass components in through a slot, too.
If we were to look at this code in the Elements tab of the console, we’ll find the template element has disappeared. This means using a template allows us to slot in multiple elements into the same slot, without adding an unnecessary wrapper element.
Great. Now we’ve used named slots to create our own super flexible UI component.
Let’s ReVue
In this lesson, we learned:
- How to use slots for dynamic template code
- How to set default slot content
- How to use multiple named slots
What’s next
In the next lesson, we’ll look at how to pull in data from an external source as we explore API calls with Axios.
API calls with Axios
It’s time to load dynamic data from an API into our Vue application! In this lesson we’ll learn how to use Axios as our API client to load remote data into our Vue app, we’ll learn to use JSON Server as a mock API server, and we’ll learn some best practices on how to keep our service code separate from the rest of our app. If you’re just joining us (or you want to refresh your codebase), here is our starting code. You can find a link to our finished code over in lesson resources.
 Static to Dynamic Data
As we mentioned in the CLI lesson, when we’re ready to deploy our application, we’ll run npm run build which will package-up our application with all our components and libraries into the dist directory. This is what we’d publish on a server, with the proper server configuration for Vue Router (mentioned in lesson 5).
However, we haven’t yet loaded any dynamic data into our application. Everything at this point has simply been static. If we look inside our EventCard.vue file we see the following hardcoded data:
    ...
    <script>
    export default {
      data() {
        return {
          event: {
            id: 1,
            title: 'Beach Cleanup',
            date: 'Tues Aug 19, 2018',
            time: '6:00',
            attendees: [
              { id: 'abc123', name: 'Adam Jahr' },
              { id: 'def456', name: 'Gregg Pollack' }
            ]
          }
        }
      }
    }
    </script>
    ...
Instead, we want to pull this dynamic event data from a database.
The most common way to load data into our Vue application is by doing an API call from the browser after Vue is loaded.
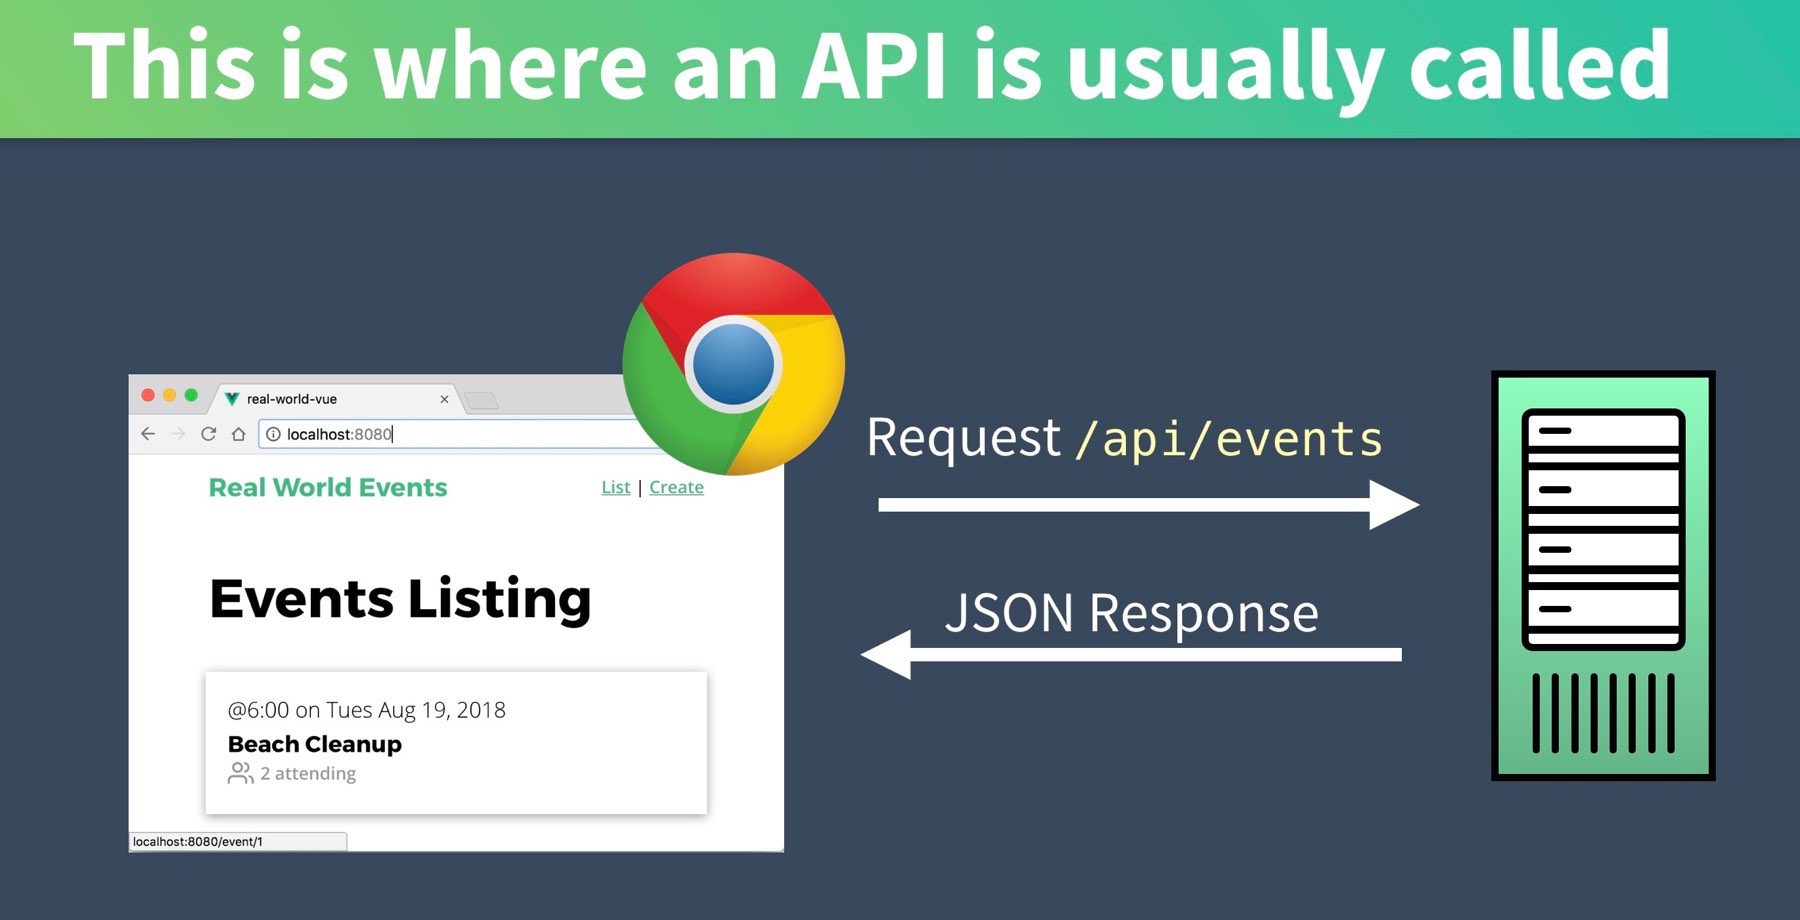
As you can see in the diagram above, API calls are made as needed when your Vue pages need dynamic data.
 The Library to Make API Calls
While Vue has an official library for routing (Vue Router), it doesn’t have an official library for making calls to APIs. There are other JavaScript libraries that do a pretty great job at doing this for you, like Axios, a promise-based HTTP client for the browser and node.js.
Axios has a whole set of features, with the ability to:
- Do GET, POST, PUT, and DELETE requests
- Add authentication to each request
- Set timeouts if requests take too long
- Configure defaults for every request
- Intercept requests to create middleware
- Handle errors and cancel requests properly
- Properly serialize and deserialize requests & responses
Yeah, it does a lot for you. Can you see why it’s better to use an external library rather than Vue creating its own?
 The Basic Get Request
Axios allows you to perform GET requests in your JavaScript like so:
    axios.get('https://example.com/events') // Call out to this URL
      .then(response =>
        console.log(response.data);  // When the response returns, log it to the console
      })
      .catch(error =>
        console.log(error);  // If an error is returned log it to the console
      })
It’s worth noting here that this code is asynchronous . This means that when the above code is executed, at no point is it going to wait. In particular, it’s not going to pause and wait until a response is received from the https://example.com/events endpoint.
When a response is returned, whenever that happens, then it will get logged to the console. If an error occurs, then it will catch the error and log it to the console.
 Goal: Load Events Using an API
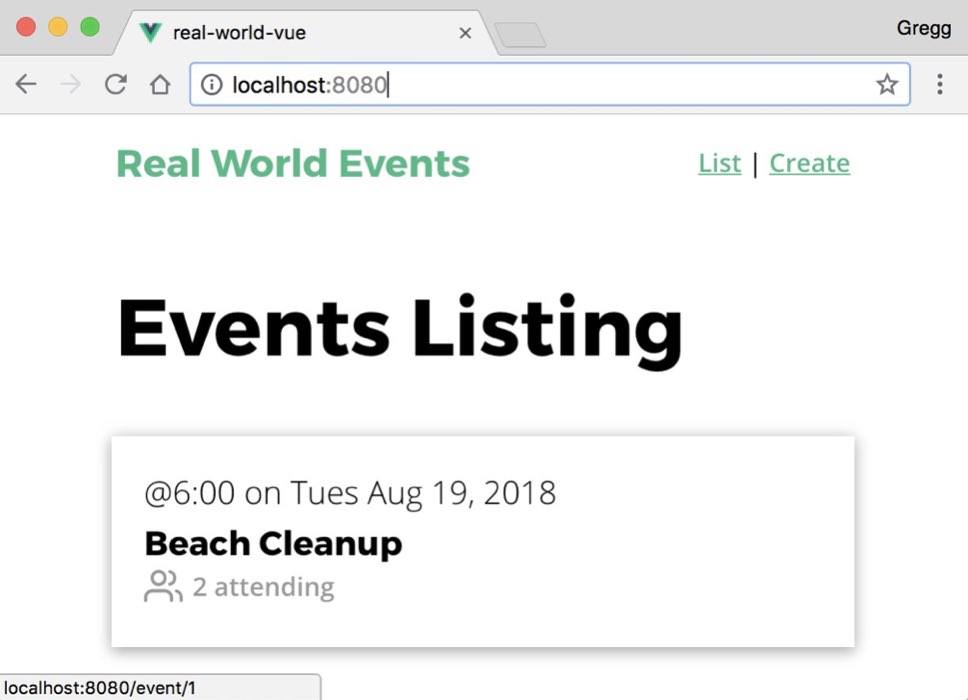
If you’ve been following along building our app, you are familiar with the following screen on the right. As you can see, we are displaying an event. Our goal for the remainder of this lesson is to load events from an API. In order to do this we’ll need to:
- Mock an API server we can call
- Install Axios
- Build the API call using Axios
- Use the event data in our component
- Reorganizing our Code
If you’d like to follow along, you’ll want to make sure your example app is up to speed. If you’re just joining us (or you want to make sure you’re at the right step) you can download the starting code here.
1. Mocking up the API Server
API backends can be built using back-end frameworks like Laravel, Ruby on Rails, Express.js, or Django, to name a few. They can also be built using services like Firebase, Parse, Back4App, or Hoodie to name a few (we will be using Firebase later on in this course). However, it can be useful to employ something simpler when we want to create a rapid prototype. Something like JSON server, which gives us a fake Full REST API in less than 30 seconds.
Before we install it, I’m going to write up the JSON data we want it to return (download this file here). Notice this has an array of events:
db.json
    {
      "events": [
        {
          "id": 1,
          "title": "Beach Cleanup",
          "date": "Aug 28 2018",
          "time": "10:00",
          "location": "Daytona Beach",
          "description": "Let's clean up this beach.",
          "organizer": "Adam Jahr",
          "category": "sustainability",
          "attendees": [
            {
              "id": "abc123",
              "name": "Adam Jahr"
            },
            {
              "id": "def456",
              "name": "Gregg Pollack"
            },
            {
              "id": "ghi789",
              "name": "Beth Swanson"
            },
            {
              "id": "jkl101",
              "name": "Mary Gordon"
            }
          ]
        },
        {
          "id": 2,
          "title": "Park Cleanup",
          "date": "Nov 12 2018",
          "time": "12:00",
          "location": "132 N Magnolia Street, Orlando, Florida",
          "description": "We're going to clean up this park.",
          "organizer": "Adam Jahr",
          "category": "nature",
          "attendees": [
            {
              "id": "ghi789",
              "name": "Beth Swanson"
            },
            {
              "id": "jkl101",
              "name": "Mary Gordon"
            }
          ]
        },
        {
          "id": 3,
          "title": "Pet Adoption Day",
          "date": "Dec 2 2018",
          "time": "12:00",
          "location": "132 N Magnolia Street, Orlando, Florida",
          "description": "Help animals find new homes.",
          "organizer": "Gregg Pollack",
          "category": "animal welfare",
          "attendees": [
            {
              "id": "abc123",
              "name": "Adam Jahr"
            },
            {
              "id": "ghi789",
              "name": "Beth Swanson"
            },
            {
              "id": "jkl101",
              "name": "Mary Gordon"
            }
          ]
        }
      ]
    }
I’m going to store this at the root of our application. Now let’s get our JSON server installed and up and running. We can install it and get the command line tool (that’s the -g ) by running:
npm install -g json-server
Now to spin up this little API server we just run:
json-server --watch db.json
When we run this line we should see:
      \{^_^}/ hi!

      Loading db.json
      Done

      Resources
      http://localhost:3000/events

      Home
      http://localhost:3000

      Type s + enter at any time to create a snapshot of the database
      Watching...
If we call up our browser and head over to http://localhost:3000/events we should see all of our events listed in json.
2. Install Axios
There are two different ways we can install Axios. Since Vue CLI has such a beautiful user interface, I’m just going to use it. I’ll fire up the Vue CLI on the command line by running:
vue ui
The first thing I see in my browser is:
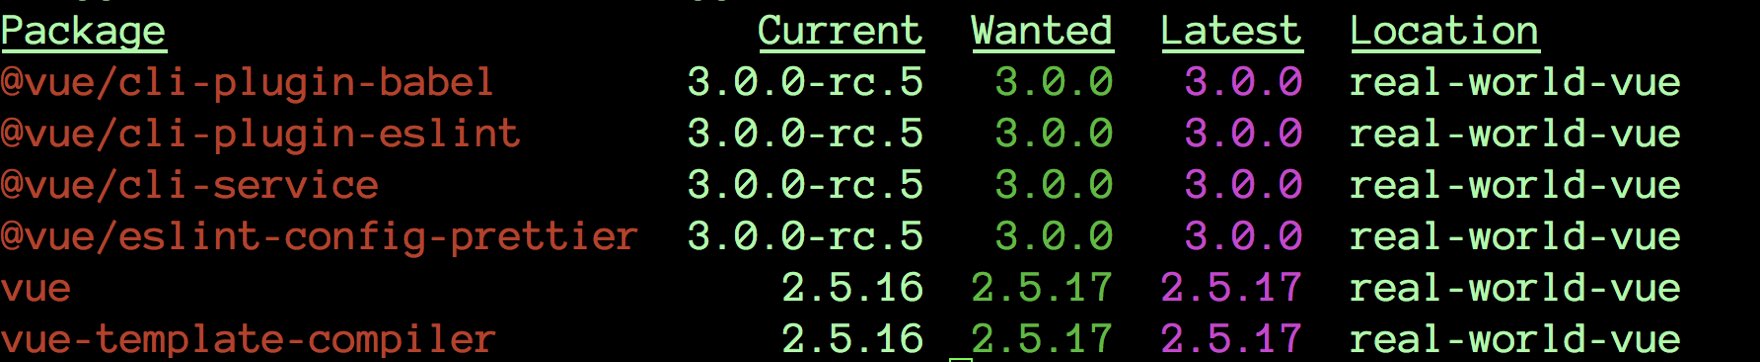
Notice how it says that the latest version of each of these plugins is 3.0.0? You might notice (when you’re going through this tutorial) that newer versions of libraries have been released (or you might not). You can click on that ![]() icon on the right to install the latest versions of these libraries. I’ll do that now.
icon on the right to install the latest versions of these libraries. I’ll do that now.
Doing this not only updates my package.json and package-lock.json files with the new plugin versions, but it installs these new versions into my /node_modules directory. Since I updated Vue CLI, I’m going to restart the server.
Next, I’m going to click on the second item in the left-hand navigation which will bring me to packages.
Looks like I have things to update here, too, which I will do now. Then I’m going to hit that “Install dependency” button on the top right and search for “Axios”. I’m going to select it and hit “Install Axios”.

If you ever want to see what the CLI User Interface is doing under the hood, just take a look back at your terminal window.
 Without the UI - Kickin it Old Style
If I wanted to do everything above right from the command line, instead of from a pretty user interface (I dunno why  ), I could check for outdated libraries by running:
npm outdated
Given the original state of my app above, this will show me:
To update each of them, all I need to run is:
npm update <package>
Or I can just update all of them by simply running:
npm update
And then I can install Axios by running
npm install axios
Now you know how to install new dependencies to your application two different ways! Whee  !
!
3. Do the actual API call using Axios
We now have the Axios library available in our Vue app, and we want our event data to be called when the list of events is loaded in our EventList.vue file:
    ...
    <script>
    import EventCard from '@/components/EventCard.vue'
    import axios from 'axios' // <--- brings in the axios library

    export default {
      components: {
        EventCard
      },
      created() {
        axios
          .get('http://localhost:3000/events')  // Does a get request
          .then(response => {
            console.log(response.data) // For now, logs out the response
          })
          .catch(error => {
            console.log('There was an error:', error.response) // Logs out the error
          })
      }
    }
    </script>
Notice how we are importing the axios library, and it looks like we’re declaring a created function. The created function is inside an object so really we’re doing this:
created: function() { ... }
This line of code is telling Vue, “When this component is first instantiated, but before it’s drawn on the page (rendered), run this code.” Created is one of many life-cycle hooks we can declare inside our Vue applications to run code at different key moments of a component’s life cycle.
Remember, this code is asynchronous, meaning that it won’t cause our browser to freeze no matter how long the API takes. When our API returns data, it will log it out to the console, or if it errors, it will log the error.
4. Use the event data in our component
Next, we want to use the data we received from our API. Let’s create an array in our EventList.vue ’s data, which we’ll use to store the retrieved data.
      data() {
        return {
          events: []
        }
      },
This is a reactive property. Thus, when data is received from our API, Vue will update the places in our code/templates where events is used.
Our next step in this file is to set the data returned from our API equal to our events array.
...
axios
.get('http://localhost:3000/events')
.then(response => {
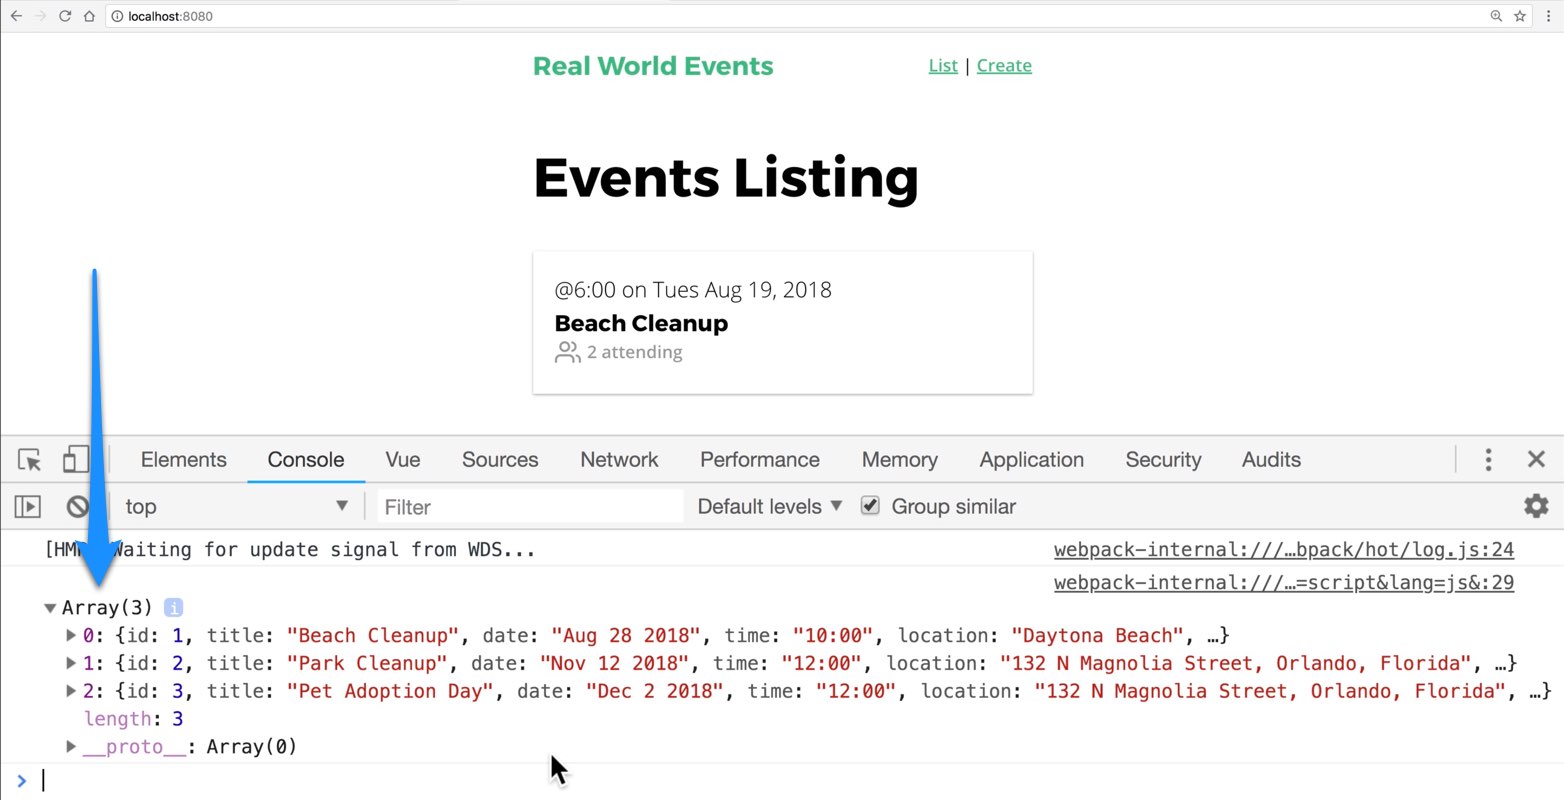
this.events = response.data // <--- set the events when returned
})
.catch(error => {
console.log('There was an error:', error.response)
})
...
Lastly, we need to change the way we display our EventCard. We want to create a new EventCard component for each event contained within our events array. We’ll do this by iterating through our events , and sending the event object in as a prop to each new EventCard:
<template>
<div>
<h1>Events Listing</h1>
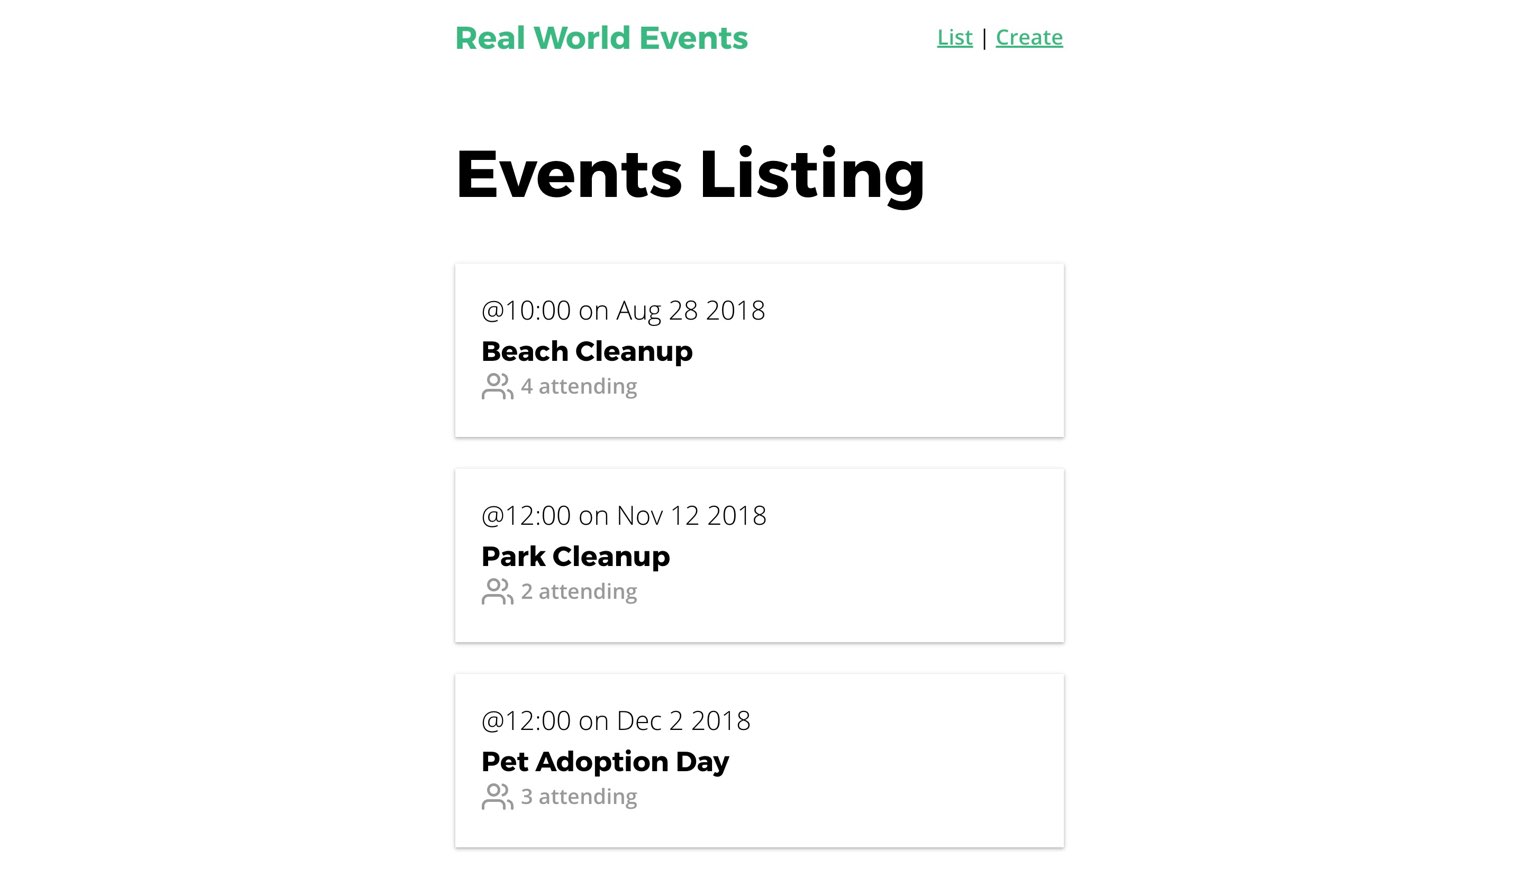
<EventCard v-for="event in events" :key="event.id" :event="event"/>
</div>
</template>
Notice above we iterate through each event using a v-for , we set a key on each one, and we pass each event to the EventCard as a prop with :event=``"``event``" .
The code all together for our EventList.vue now looks like this:
    <template>
      <div>
        <h1>Events Listing</h1>
        <EventCard v-for="event in events" :key="event.id" :event="event"/>
      </div>
    </template>
    <script>
    import EventCard from '@/components/EventCard.vue'
    import axios from 'axios'

    export default {
      components: {
        EventCard
      },
      data() {
        return {
          events: []
        }
      },
      created() {
        axios
          .get('http://localhost:3000/events')
          .then(response => {
            this.events = response.data // <--- set the events data
          })
          .catch(error => {
            console.log('There was an error:', error.response)
          })
      }
    }
    </script>
One more small step. We need to jump into our EventCard.vue and tell it to accept the event prop. It’s as simple as removing our seed data in this file and changing our script code to:
    ...
    <script>
    export default {
      props: {
        event: Object
      }
    }
    </script>
    ...
We jump into our browser, and poof, it’s working!
You might notice that when we click on one of these it always shows the same thing, regardless of which event we clicked:

To fix this we simply need to add the event.id to our router-link in EventCard.vue like so:
<router-link class="event-link" :to="{ name: 'event-show', params: { id: event.id } }">
5. Reorganizing Our Code
In the above example, I wanted to show you the most bare-bones example to get things working. However, in our application we’re going to make additional API calls. So for better separation of concerns let’s refactor our code slightly to move our Axios API calls into a service file. We’ll create a services directory where we’ll create our EventService.js . It’ll look something like this:
/src/services/EventService.js
    import axios from 'axios'

    const apiClient = axios.create({
      baseURL: `http://localhost:3000`,
      withCredentials: false, // This is the default
      headers: {
        Accept: 'application/json',
        'Content-Type': 'application/json'
      }
    })

    export default {
      getEvents() {
        return apiClient.get('/events')
      }
    }
Notice here I’m instantiating axios with some configuration and storing that in a constant. This is good because now our app will only ever have one axios instance, even if different pages use it to make API calls. I’ve also added some configuration. This is where you might need to add authorization keys if the API you want to use has security. You’ll want to consult the Axios documentation for the configuration options.
You might also notice how I put the baseURL in the configuration, so the get command becomes get('/events') , since it just adds that to the base URL.
Now back inside our EventList.vue I’ll just change two things. First I’ll replace the axios import line to import our new service:
import EventService from '@/services/EventService.js'
and then inside created we’ll use this service:
      created() {
        EventService.getEvents() // <-----
          .then(response => {
That’s all there is to it.
 Problem: Implementing the Show Event Page
At the moment when we click on an event we only see:
Let’s use our new EventService to query for this event data when it’s clicked on.
Solution: Adding another API call
To fetch the proper event when an event is clicked or when it’s linked to directly via url ( /event/3 ), we’ll start by modifying our EventShow.vue file.
    <template>
      <h1>Showing event {{ event.title }}</h1>
    </template>

    <script>
    import EventService from '@/services/EventService.js'
    export default {
      props: ['id'],
      data() {
        return {
          event: {}
        }
      },
      created() {
        EventService.getEvent(this.id) // <--- Send the prop id to our EventService
          .then(response => {
            this.event = response.data
          })
          .catch(error => {
            console.log('There was an error:', error.response)
          })
      }
    }
    </script>
You’ll notice we’re now printing the event title in our template, then in our script we import the EventService , we have a new data item called event , and in created we send the prop id to our EventService to make the proper call to our API.
Now we need to add a function to our /services/EventService.js :
    export default {
      ...
      getEvent(id) {
        return apiClient.get('/events/' + id)
      }
    }
That’s all we need, and when we look in our browser, we now see:
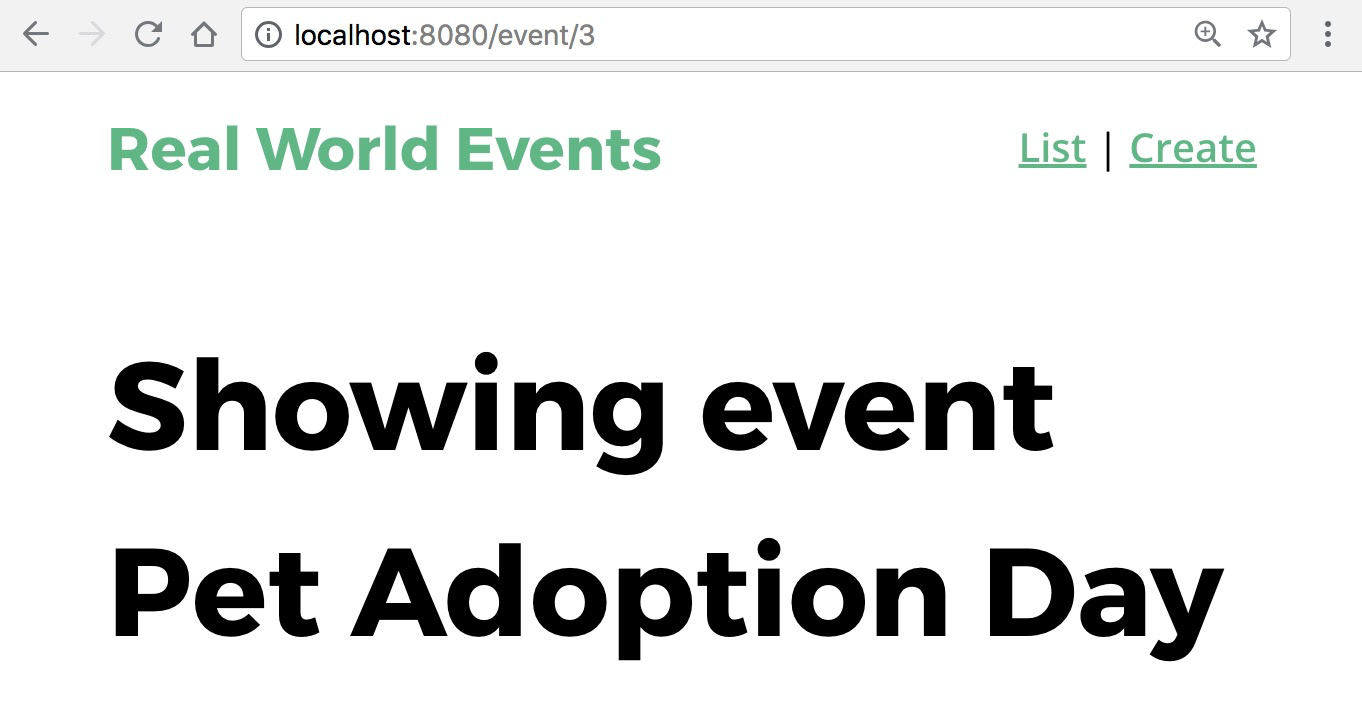
Yay, it’s pulling from our JSON Server API just the data for this event.
 Making it Pretty
At this point, let’s add some additional formatting for this page to print out more of the event information. Now here’s EventShow.vue :
    <template>
      <div>
        <div class="event-header">
          <span class="eyebrow">@{{ event.time }} on {{ event.date }}</span>
          <h1 class="title">{{ event.title }}</h1>
          <h5>Organized by {{ event.organizer }}</h5>
          <h5>Category: {{ event.category }}</h5>
        </div>
        <BaseIcon name="map"><h2>Location</h2></BaseIcon>
        <address>{{ event.location }}</address>
        <h2>Event details</h2>
        <p>{{ event.description }}</p>
        <h2>Attendees
          <span class="badge -fill-gradient">{{ event.attendees.length }}</span>
        </h2>
        <ul class="list-group">
          <li v-for="(attendee, index) in event.attendees" :key="index" class="list-item">
            <b>{{ attendee.name }}</b>
          </li>
        </ul>
      </div>
    </template>

    <script>
     ...
    </script>

    <style scoped>
    .location {
      margin-bottom: 0;
    }
    .location > .icon {
      margin-left: 10px;
    }
    .event-header > .title {
      margin: 0;
    }
    .list-group {
      margin: 0;
      padding: 0;
      list-style: none;
    }
    .list-group > .list-item {
      padding: 1em 0;
      border-bottom: solid 1px #e5e5e5;
    }
    </style>
Now my Beach Cleanup event looks like:
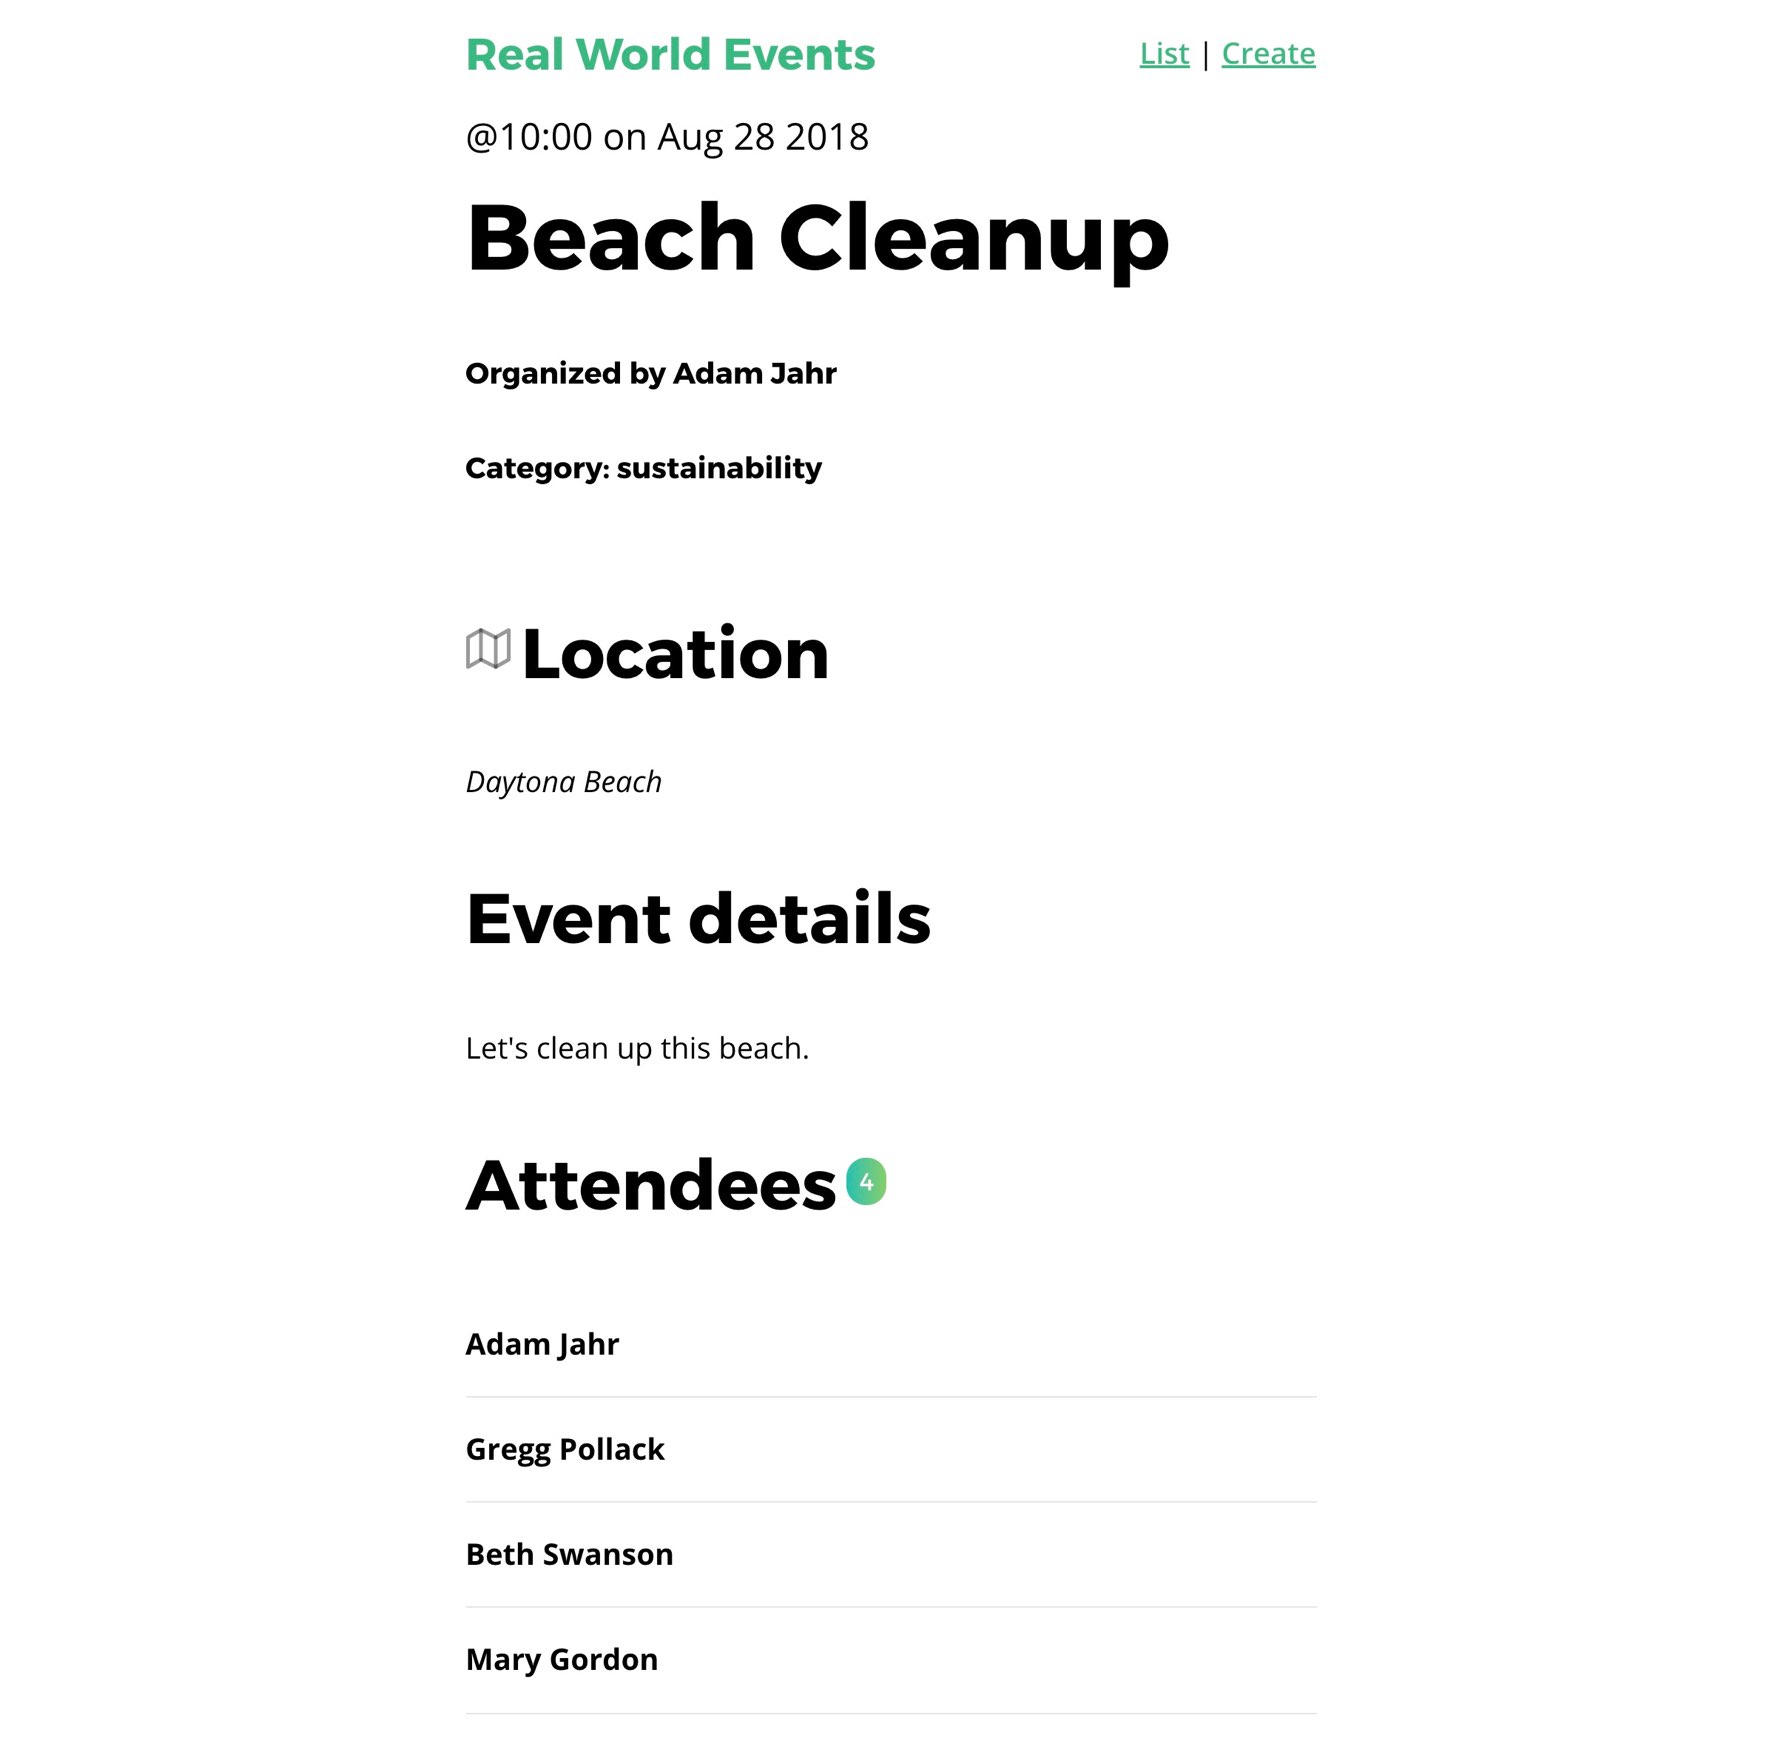
A Random Console Error
You might have noticed that there’s a random console error occurring on both our event show page, which looks something like:
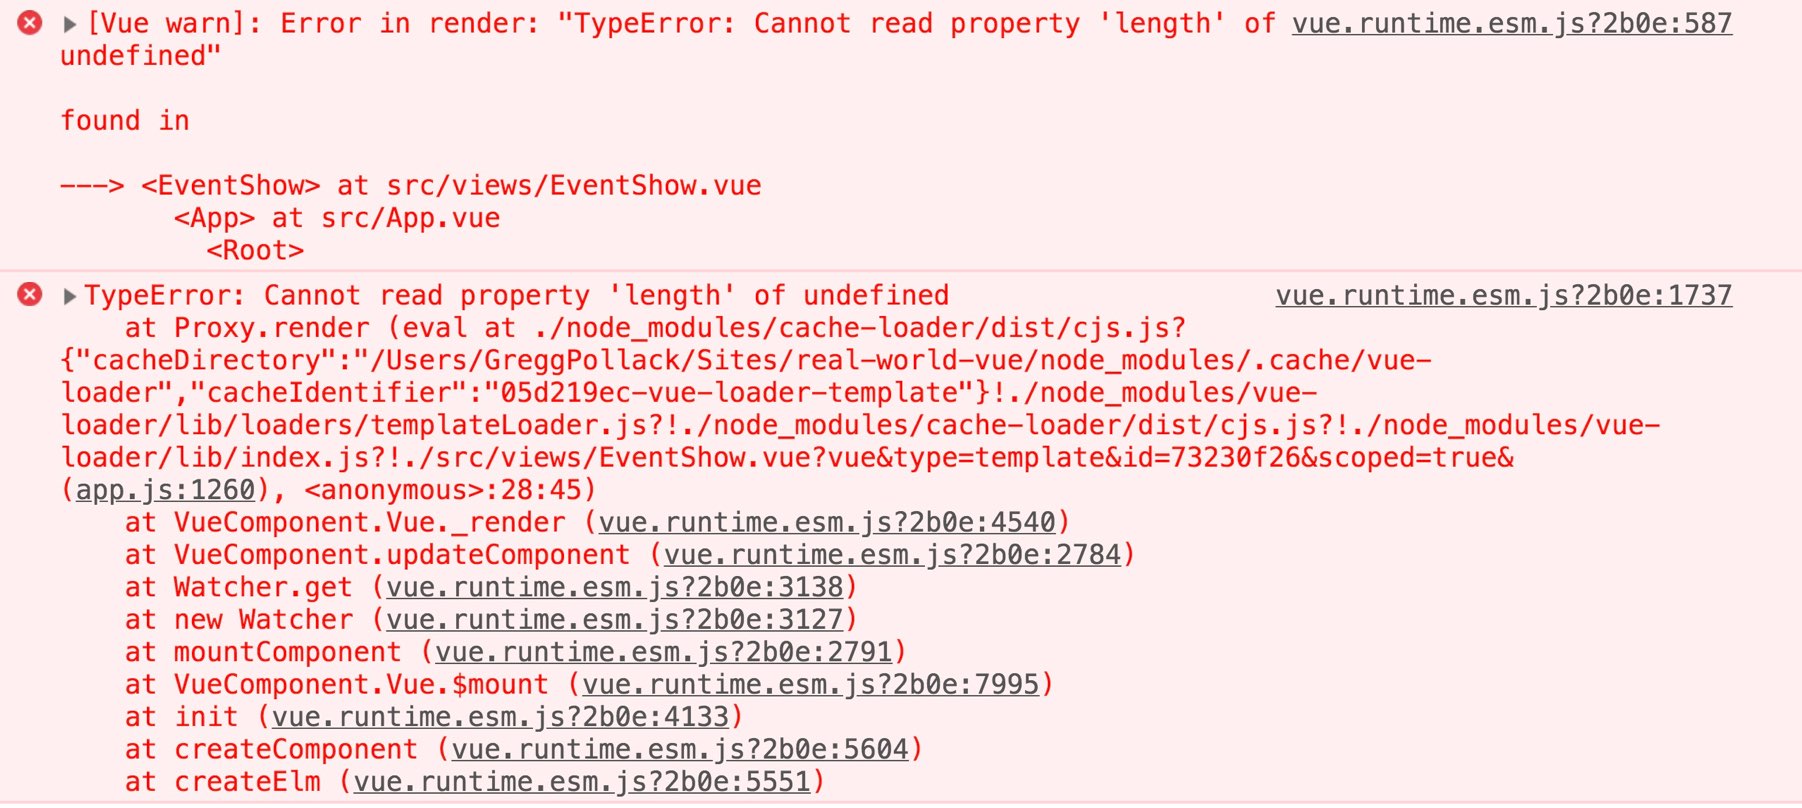
Not fun! It looks like it’s trying to call length on an undefined variable. What’s going on here, is when the page initially loads, event.attendees has not been populated from our API. So the page is loading, it’s hitting an error, but then it receives the data and the page loads normally. This is why everything seems to be working fine. However, it’d be nice to code this in a way that doesn’t throw browser errors.
Solution: Check if exists
The simplest way to solve this problem is to add a ternary if inside our template. So inside EventShow.vue we could write:
<span class="badge -fill-gradient">{{ event.attendees ? event.attendees.length : 0 }}</span>
Now if event.attendees does not exist yet we just print out 0. Poof, no more error  .
.
Obviously, there are other ways in Vue to solve this problem. We could not render the event template until our Axios call is returned. We could also ensure attendees is initialized as an empty array. We could also add a loading spinner while we’re waiting for data to return. If you Google around you’ll find many different ways to implement this. Later in this course, we’ll be using Firebase as an API, and we’ll implement a loading screen to deal with the possibility of server delays.
 Let’s ReVue
In this lesson we learned a bunch. We learned how:
- Usually in Vue we load-in dynamic data by making asynchronous API calls.
- The Axios library allows us to make API calls.
- We make calls to our API in our component’s created lifecycle hook.
- By keeping our Axios code in a service file, we can separate our concerns.
- We need to be careful about trying to log out data in our template that may not exist on initial load.