Lesson 1
Nuxt Cheat Sheet
Nuxt Documentation
Lesson2
Finished Code
Lesson3
Lesson4
vue-meta docs
Starting Code
Finished Code
Lesson5
Starting Code
Finished Code
Lesson6
db.json file
Nuxt Axios Module
asyncData context
Starting Code
Finished Code
Lesson7
Starting Code
Finished Code
Lesson8
Starting Code
Finished Code
Lesson9
Download Heroku CLI
Starting Code
Finished Code
Lesson10
Why Use Nuxt.js?
7 Problems you can avoid by using Nuxt.js for your next Vue app
Vue.js is a great choice as a framework for your application. But, there are a couple concerns you’ll likely run into:
- How do I combine and configure all my JavaScript & Vue libraries to work together effectively?
- How do I structure my application code using best practices?
- How do I make sure my application is properly indexed by search engines?
- How do I optimize my Vue application for speed?
These are some of the concerns that Sebastien and Alexandre Chopin set out to solve when they created Nuxt.js, a higher-level framework that’s built on top of Vue to help you build production-ready Vue applications.

I want to let you in 7 problems you’re going to run into building a Vue app, and tell you how Nuxt solves them.
Problem #1: Building a production-ready Vue app from scratch is difficult
Not only does Nuxt come preconfigured with Vuex, Vue Router, and Vue-Meta, but it sets your project up with intelligent defaults based on well researched best practices that Vue won’t give you out of the box.
Creating a Nuxt app is as easy as typing:

This Nuxt Starter Kit will ask you for the libraries you want to start your project with, such as CSS Lint, and which CSS framework to use.
Problem #2: No standard folder structure
As your application grows your code organization becomes more important. Vue’s default build gives you an assets and components directory, which is a good start. Nuxt.js sets you up with additional folders based on best practices, such as:
 A
A pages directory for your Application views and routes.
A layouts directory for your layout templates.
A store directory for your Vuex store files.
Nuxt ships with more folders and more default conventions which are all configurable, but you get the idea.
Since everything has its place, moving from one Nuxt application to another as a developer and getting up to speed is super simple.
Problem #3: Routing configuration can get long in a big Vue app
With Nuxt, you simply place your single file Vue components into the pages folder and Nuxt automatically generates your routes with zero configuration.

This is just one more example of how Nuxt gives you the pre-configuration you need to create production-ready Vue applications. This leads us to the next problem with big applications…
Problem #4: No standard way to configure things all together
Luckily, Nuxt ships with a production ready configuration that doesn’t lock you in. Meaning if you do you want to override any of the smart defaults or pre-configuration you can edit your nuxt.config.js file and modify any of the framework’s options.

Problem #5: Vue apps aren’t not SEO-friendly
You’re going to want certain pages of your app properly indexed by search engines so they’re easily discoverable.
One of the best solutions is to pre-render your Vue pages on the server, but this can be tricky to setup on your own. Nuxt is pre-configured to generate your application on the server, along with powering up your routes to make it easy to add SEO-related tags.
Problem #6: Vue applications on initial load can be slow
With Nuxt.js if you choose to render your application universally or statically, the pre-rendered HTML causes your page to load faster in the browser. Once it’s loaded, it’ll start running as a normal SPA. Plus with automatic code-splitting it’s only going to load the JavaScript needed to make the route function.
This makes for the optimal user experience.

Problem #7: With a Vue app you may find it difficult to change the behavior of the framework
When you are developing production-grade applications, at some point you’ll need to change the behavior of the framework. Nuxt provides a higher-order module system that makes it easy to customize every aspect of Nuxt.
 Conclusion
So there you have it, 7 problems that Nuxt solves for you. As you can see, Nuxt.js allows you to spend less time on configuration, and more time solving problems and building awesome Vue apps.
To get started with Nuxt we recommend jumping into the great documentation, and consider downloading the Vue Mastery Nuxt cheat sheet. By doing this you’ll also be notified when we start releasing additional lessons of our Nuxt course.

Creating a Nuxt App
Now that you know why to use Nuxt.js to build Vue apps, in this lesson we’ll start building a Nuxt.js app together, understand the folder structure, and start building our example application. By the end we’ll have a working app with a layout and two pages we can navigate between.
Prerequisite Knowledge
From this point forward I’m going to assume that you’re comfortable with HTML, CSS, JavaScript basics, Vue.js, Vue Router, and Vuex. If you’re not familiar with these Vue topics, I recommend you stop here and take our Real World Vue.js course and our Mastering Vuex course.
Creating our Initial Nuxt.js App
To get started creating our application we’ll be using create-nuxt-app . Create Nuxt App is a command line tool that helps you create and scaffold out your Nuxt applications. It helps you set up the default folder structure of your app, you can optionally install your preferred server-side framework like Express or Koa, and you can also install the Nuxt Axios module for easy Axios integration with your app.
To get started, make sure you’re using a version of npm that’s 5.2.0 or higher. This will ensure you have have npx installed, we’ll need this command.
Then let’s run the following in your command in the terminal:
$ npx create-nuxt-app real-world-nuxt
npx is a tool intended to help round out the experience of using packages from the npm registry — the same way npm makes it easy to install and manage dependencies hosted on the registry, npx makes it easy to use CLI tools and other executables hosted on the registry. In our case, that’s create-nuxt-app .
If Yarn is your package manager of choice you can run yarn create nuxt-app real-world-nuxt . It’ll set you up in the same way.
After running either the npx or yarn command, Create Nuxt App will prompt you with a few questions to get you setup with your app’s default configuration.
Here is how we’re going to answer for our project, and I really encourage you to code with me.
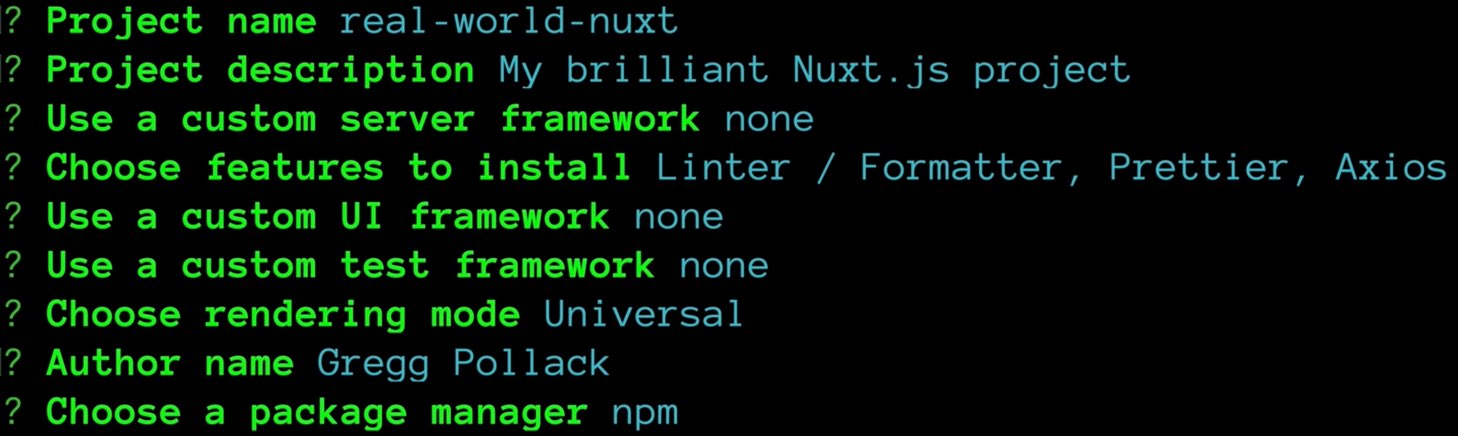
It will also create a git repository for you, and run npm install to fetch all dependencies.
To run the app that was just created in development mode, we’ll need to cd into the directory it created for us run the following command:
$ npm run dev
This will startup our Nuxt.js server in development mode. By default, the project will serve from http://localhost:3000/ . Visiting that URL will show you the scaffolded project with a link to Nuxt’s documentation.

This would be a good point to create our first git commit, and add a repo to github (or wherever you like to store your source code).
Now we’re in a good position to start building the events app. Before we get started, let’s go over the folder structure that was created for us by create-nuxt-app .
What Vue (not Nuxt) Would Have Given Us

If we had created just a Vue application using the Vue CLI, it would given us just a /src directory and inside that a components directory. This leaves us with a few questions:
- Do we put all our components in one
/componentsdirectory? - Do we create a
/viewsdirectory? - Where do our layouts go? You know, the ones with
<router-view />?
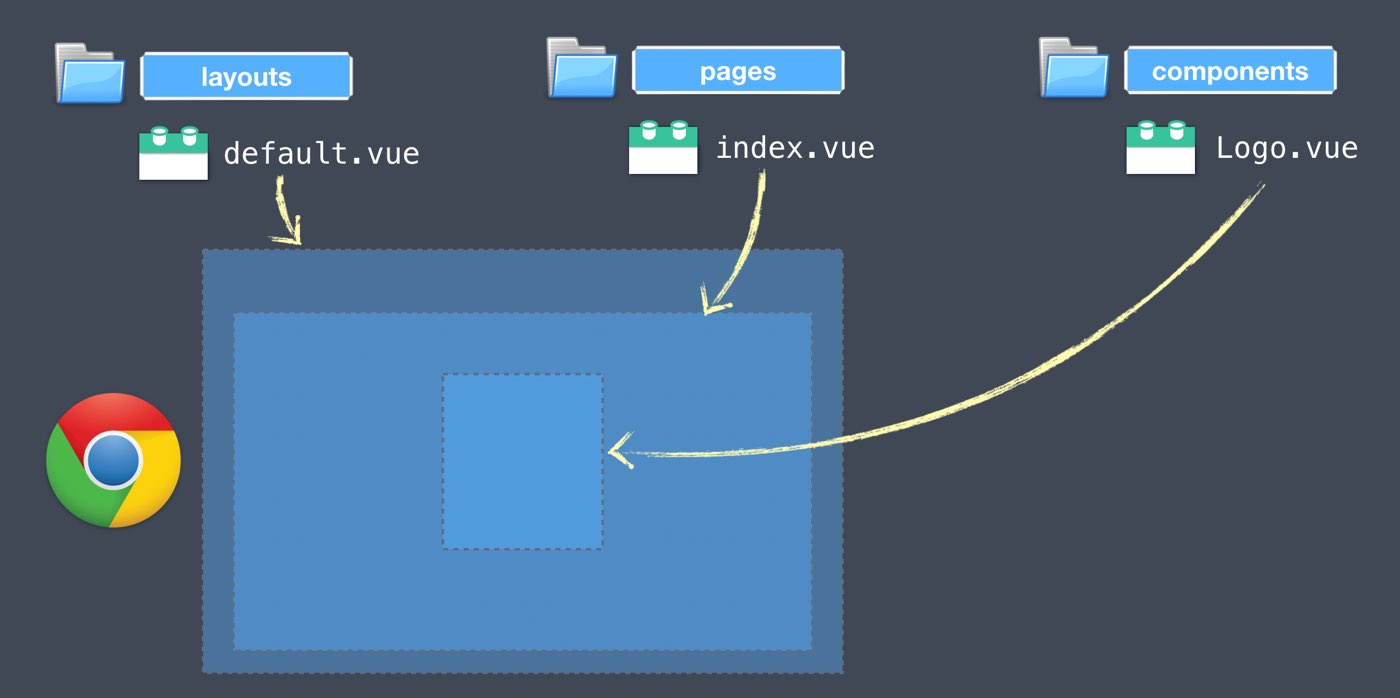
The Nuxt.js Component Folder Structure
Open the project generated by create-nuxt-app in your code editor of choice, and you’ll see a list of folders where your entire Nuxt application will live. You’ll first notice that Nuxt.js has no /src directory, these folder are in root. Three of the eight folders there are the component folders:
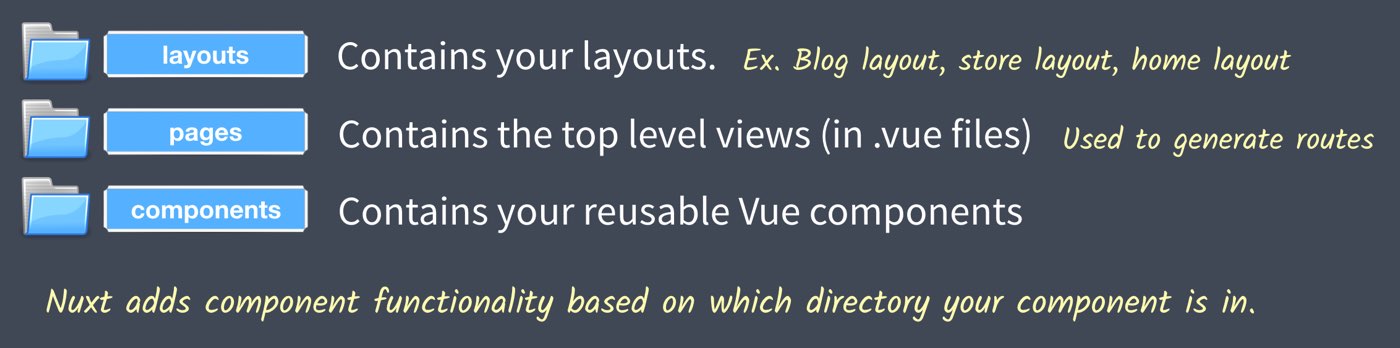
Each of these folders will contain component .vue files, and they each start out with a single default generated file, which together showed us the page we saw when we launched the development server.
Here are the remaining five folders Nuxt generated for us.
/store
A folder to contain all of your app’s Vuex Store Files. Nuxt gives you two different ways to create your store and we’ll dive deeper into how as the course progresses.
/static
Use this directory for storing static assets. For example, robots.txt or your favicon. Every single file in this directory is mapped to the server root, usually at / .
/assets
This directory contains un-compiled assets such as Stylus or Sass files, images, or fonts. By default, Nuxt uses vue-loader, file-loader and url-loader webpack loaders for strong assets serving. If you don’t want assets to be affected by webpack, use the static directory for storing those assets.
/plugins
This folder contains your JavaScript plugins that you want to run before instantiating the root Vue.js Application. This directory is helpful when using your own libraries or Vue plugins.
/middleware
Middleware lets you define custom functions that can be run before rendering either a page or a group of pages (layouts). This folder contains your application middleware for that purpose.
Finally, you’ll notice a configuration file called nuxt.config.js . We’ll get to this in a future lesson. But, for now, know that this is the single file that you’ll be using to write extra configuration, or to modify configuration that Nuxt sets up for your app by default.
Here’s a simple slide showing each of these:
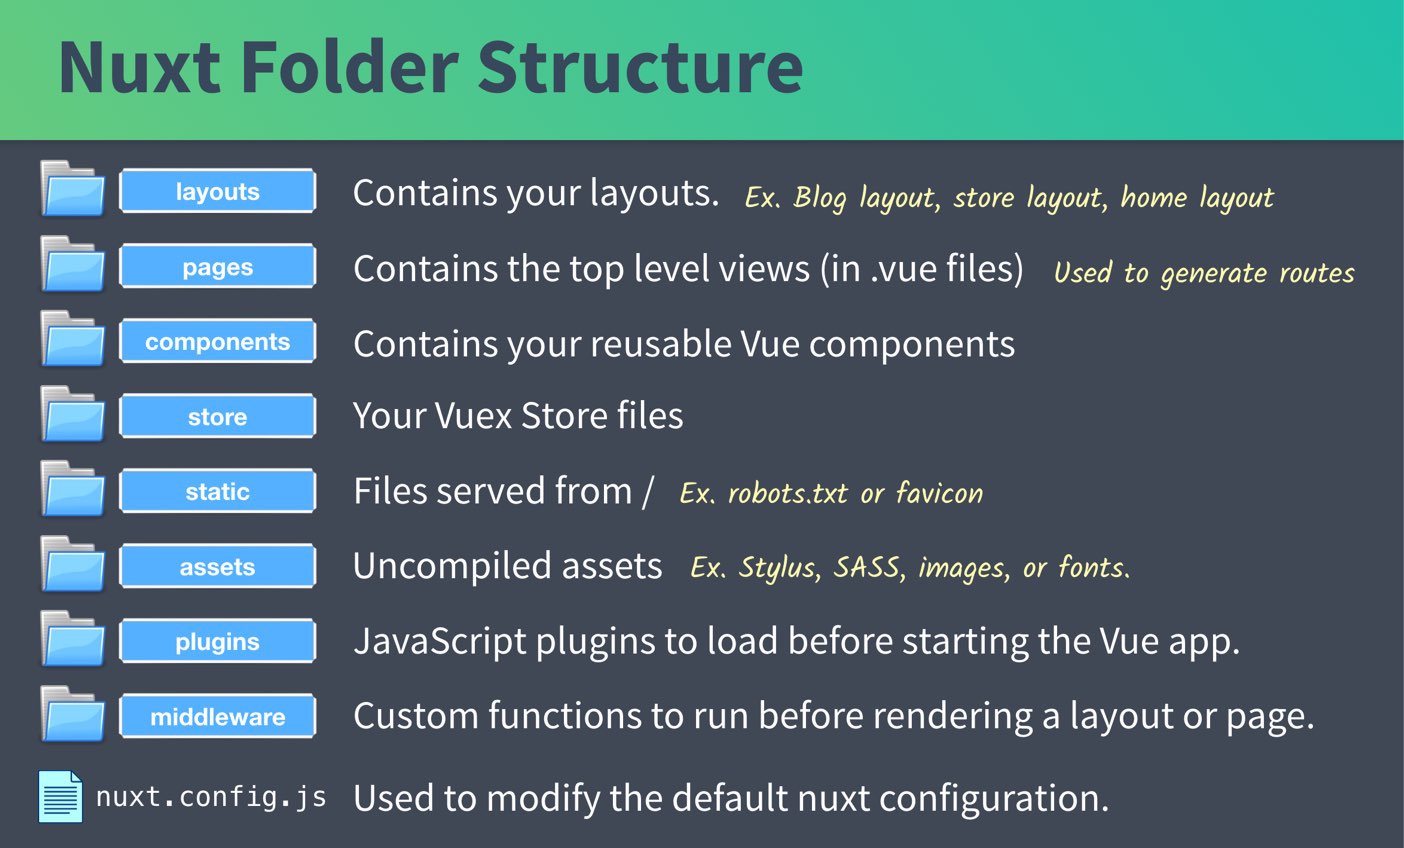
Image Assets Example
Usually we’ll want to place all our images in the assets directory where Nuxt will use vue-loader, file-loader, and url-loader for effective asset serving. For example, if we placed a logo.png file in our assets directory, to use this in a component template we would write:
 /pages/index.vue
<img src="~/assets/logo.png">
When we build our project, if our image is >= 1 kb , it will use version hashes for caching and render out:
<img src="/_nuxt/img/82f7965.png">
The 82f7965 is the hash we’re talking about. This is beneficial because if our logo.png file changes in the future, but the name itself remains the same, the hash will change, and thus the new logo will be loaded in our customer’s browsers. Without the change of hash our customer’s browser may continue to load the old image.
When we build our project, if our image is < 1 kb it will inline the image to reduce http requests, looking something like this:
<img src="data:image/png;base64,R0l...">
Obviously where I put … it would be a much longer string, which contains all the data for the image. By placing the image code right there on the screen, we avoid an extra network request to fetch the file.
Creating our First Pages & Routes
In a minute we’re going to create our first two pages with links so we can navigate between them. We’ll create an /pages/index.vue where we’ll eventually list our events, and a /pages/create.vue where we’ll create an event list. Once we create these do you think we’ll need to create a router.js ?
Nope, Nuxt autogenerates the routes for us. We don’t need to write this code:
    const router = new Router({
     routes: [
        {
          path: '/',
          component: 'pages/index.vue'
        },
        {
          path: '/create',
          component: 'pages/create.vue'
        }
      ]
    })
Steps to Build our Example App
We’ll be doing the following step by step:
- Fix the settings in VS Code.
- Copy/paste some global styles into our
/layout/default.vue. - Simplify our
/pages/index.vue. - Startup our development server and test.
- Create
/pages/create.vue. - Create a new component for navigation
/component/NavBar.vue. - Use our NavBar component in our
/layout/default.vue.
Step 1 - Fixing Settings in VS Code
If you followed along with us in Real World Vue when we setup our VS Code for editing Vue projects, you may run into a conflict between Vetur’s Prettier HTML formatting and the ESLint formatting on our project. If you have the same problem that I did, you’ll want to go into Preferences => Settings => Extensions => Vetur , and change the default HTML formatter from prettyhtml to none, as shown below:

Step 2 - Adding Styles into our /layout/default.vue
To start building our example app, we’re going to change our default layout to the following. Notice that we added an id to our <div> element, and a bunch of our own styles. You also might notice the <nuxt /> tag, which is where our /page components get rendered. It behaves a lot like our <router-view /> .
/layout/default.vue
    <template>
      <div id="app">
        <nuxt />
      </div>
    </template>

    <style>
    html {
      -webkit-text-size-adjust: 100%;
      -webkit-font-smoothing: antialiased;
      -moz-osx-font-smoothing: grayscale;
    }
    body {
      margin: 0;
      font-family: 'Open Sans', sans-serif;
      font-size: 16px;
      line-height: 1.5;
    }
    #app {
      box-sizing: border-box;
      width: 500px;
      padding: 0 20px 20px;
      margin: 0 auto;
    }
    hr {
      box-sizing: content-box;
      height: 0;
      overflow: visible;
    }
    a {
      color: #39b982;
      font-weight: 600;
      background-color: transparent;
    }
    img {
      border-style: none;
      width: 100%;
    }
    h1,
    h2,
    h3,
    h4,
    h5,
    h6 {
      display: flex;
      align-items: center;
      font-family: 'Montserrat', sans-serif;
    }
    h1 {
      font-size: 50px;
      font-weight: 700;
    }
    h2 {
      font-size: 38px;
      font-weight: 700;
    }
    h3 {
      font-size: 28px;
      font-weight: 700;
    }
    h4 {
      font-size: 21px;
      font-weight: 700;
    }
    h5 {
      font-size: 16px;
      font-weight: 700;
    }
    h6 {
      font-size: 15px;
      font-weight: 700;
    }
    b,
    strong {
      font-weight: bolder;
    }
    small {
      font-size: 80%;
    }
    .eyebrow {
      font-size: 20px;
    }
    .-text-primary {
      color: #39b982;
    }
    .-text-base {
      color: #000;
    }
    .-text-error {
      color: tomato;
    }
    .-text-gray {
      color: rgba(0, 0, 0, 0.5);
    }
    .-shadow {
      box-shadow: 0 1px 2px 0 rgba(0, 0, 0, 0.2), 0 1px 5px 0 rgba(0, 0, 0, 0.13);
    }
    .badge {
      display: inline-flex;
      height: 26px;
      width: auto;
      padding: 0 7px;
      margin: 0 5px;
      background: transparent;
      border-radius: 13px;
      font-size: 13px;
      font-weight: 400;
      line-height: 26px;
    }
    .badge.-fill-gradient {
      background: linear-gradient(to right, #16c0b0, #84cf6a);
      color: #fff;
    }
    button,
    label,
    input,
    optgroup,
    select,
    textarea {
      display: inline-flex;
      font-family: 'Open sans', sans-serif;
      font-size: 100%;
      line-height: 1.15;
      margin: 0;
    }
    button,
    input {
      overflow: visible;
    }
    button,
    select {
      text-transform: none;
    }
    button,
    [type='button'],
    [type='reset'],
    [type='submit'] {
      -webkit-appearance: none;
    }
    button::-moz-focus-inner,
    [type='button']::-moz-focus-inner,
    [type='reset']::-moz-focus-inner,
    [type='submit']::-moz-focus-inner {
      border-style: none;
      padding: 0;
    }
    button:-moz-focusring,
    [type='button']:-moz-focusring,
    [type='reset']:-moz-focusring,
    [type='submit']:-moz-focusring {
      outline: 2px solid #39b982;
    }
    label {
      color: rgba(0, 0, 0, 0.5);
      font-weight: 700;
    }
    input,
    textarea {
      box-sizing: border-box;
      border: solid 1px rgba(0, 0, 0, 0.4);
    }
    textarea {
      width: 100%;
      overflow: auto;
      font-size: 20px;
    }
    [type='checkbox'],
    [type='radio'] {
      box-sizing: border-box;
      padding: 0;
    }
    [type='number']::-webkit-inner-spin-button,
    [type='number']::-webkit-outer-spin-button {
      height: auto;
    }
    [type='search'] {
      -webkit-appearance: textfield;
      outline-offset: -2px;
    }
    [type='search']::-webkit-search-decoration {
      -webkit-appearance: none;
    }
    [type='text'],
    [type='number'],
    [type='search'],
    [type='password'] {
      height: 52px;
      width: 100%;
      padding: 0 10px;
      font-size: 20px;
    }
    [type='text']:focus,
    [type='number']:focus,
    [type='search']:focus,
    [type='password']:focus {
      border-color: #39b982;
    }
    ::-webkit-file-upload-button {
      -webkit-appearance: button;
      font: inherit;
    }
    [hidden] {
      display: none;
    }
    .error {
      border: 1px solid red;
    }
    select {
      width: 100%;
      height: 52px;
      padding: 0 24px 0 10px;
      vertical-align: middle;
      background: #fff
        url("data:image/svg+xml;charset=utf8,%3Csvg xmlns='http://www.w3.org/2000/svg' viewBox='0 0 4 5'%3E%3Cpath fill='%23343a40' d='M2 0L0 2h4zm0 5L0 3h4z'/%3E%3C/svg%3E")
        no-repeat right 12px center;
      background-size: 8px 10px;
      border: solid 1px rgba(0, 0, 0, 0.4);
      border-radius: 0;
      -webkit-appearance: none;
      -moz-appearance: none;
      appearance: none;
    }
    select:focus {
      border-color: #39b982;
      outline: 0;
    }
    select:focus::ms-value {
      color: #000;
      background: #fff;
    }
    select::ms-expand {
      opacity: 0;
    }
    .field {
      margin-bottom: 24px;
    }
    .error {
      border: 1px solid red;
    }
    .errorMessage {
      color: red;
    }
    </style>
Step 3 - Simplify /pages/index.vue
Next we’ll open our /pages/index.vue file which Vue created for us, delete everything we see there and replace it with:
/pages/index.vue
    <template>
      <div>
        <h1>Events</h1>
      </div>
    </template>
Step 4 - Startup our Development Server and Test
Now let’s try out our code so far and make sure everything is working. We’ll make sure our development server is running npm run dev , and call up our browser. You should see on http://localhost:3000/

Wonderful!
Step 5 - Create /pages/create.vue
We’re going to create our second page now, with the simple template code:
/pages/create.vue
    <template>
      <div>
        <h1>Create An Event</h1>
      </div>
    </template>
If we dive into our browser, we can indeed navigate to both pages even though we haven’t created or modified a router.js file. Nuxt.js is doing the routing for us.
Step 6 - Create a NavBar Component for Navigation
Next, we’ll delete the /component/Logo.vue file that the Nuxt generator created for us, and create our own component. Notice that we’re using the nuxt-link to generate our links instead of router-link .
/component/NavBar.vue
<template>
<div class="nav">
<nuxt-link to="/" class="brand">Real World Events</nuxt-link>
<nav>
<nuxt-link to="/">List</nuxt-link> |
<nuxt-link to="/create">Create</nuxt-link>
</nav>
</div>
</template>
<style scoped>
.brand {
font-family: 'Montserrat', sans-serif;
font-weight: 700;
font-size: 1.5em;
color: #39b982;
text-decoration: none;
}
.nav {
display: flex;
justify-content: space-between;
align-items: center;
height: 60px;
}
.nav .nav-item {
box-sizing: border-box;
margin: 0 5px;
color: rgba(0, 0, 0, 0.5);
text-decoration: none;
}
.nav .nav-item.router-link-exact-active {
color: #39b982;
border-bottom: solid 2px #39b982;
}
.nav a {
display: inline-block;
}
</style>
Now we need to use this component inside our layout, just like we would include any other component.
/layouts/default.vue
    <template>
      <div id="app">
        <nav-bar/>
        <nuxt/>
      </div>
    </template>
    <script>
    import NavBar from "~/components/NavBar.vue";
    export default {
      components: {
        NavBar
      }
    };
    </script>
    <style>
      ...
    </style>
Now that we’ve made these changes we can jump into the browser and see our Nuxt application in action.
 To Re-Vue
In this lesson we learned how to create a Nuxt.js project, about the different directories Nuxt.js creates for you, and how to start building page components and link them together. In the next lesson we’ll learn about Nuxt.js Universal mode and how server-side rendering helps our Vue apps scale.
Universal Mode
When we generated our example project in the previous lesson we had to choose between generating a Universal or SPA mode application. We selected Universal mode, and in this lesson we’ll begin to understand what benefits that gives our Nuxt.js application.
 Problem: Single Page Apps can load slow
As we talked about when introducing Vue Router in our Real World Vue course, in a normal web application when the user requests http://myapp.com/about-us the server normally returns about-us.html . However, in a single page application any route request (even /about-us ) will return index.html . This index file requires all the Vue JavaScript files, and once Vue is instantiated Vue Router will load up and render the about-us page. Visualized on a timeline it looks something like this:
This can be slower than you might want, especially on slow internet connections. Why? A browser needs to do a lot:
- Download the index.html
- Download the Vue application JavaScript
- Initialize the Vue app
- Initialize Vue Router and route to proper components
- Do any additional API calls to fetch data to render
- Render templates to the page
Once loaded and running Single Page Applications like this are pretty fast, however that initial load can be slow.
 Solution: Universal Mode
When we created our application we selected Universal Mode , which means that when our application is initially loaded, it will render the page requested on the server-side first, before sending over the initial HTML. On a timeline it looks something like this:
As you can see, the new page is shown before downloading and running any JavaScript. Once JavaScript is downloaded and run Vue is started up and the page “Hydrated,” which basically means it turns into a normal SPA (Single Page App).
You might wonder what happens with Nuxt after Vue starts in the browser, and another link (like /about-us is clicked. Here’s what that looks like:
What to notice here is that a JavaScript request is made to pull over just the JavaScript needed to render the /about-us page component. This is because Nuxt uses code-splitting by default and will split each of our pages into different JavaScript files which are loaded only when needed. This way our application isn’t downloading a ton of component code up front that may or may not ever be loaded.
However, if the user then clicks to go back to the /create page, it doesn’t do another request for JavaScript, as it had loaded this initially.
Exploring Universal Mode
To explore our example universal app, we can start up the app we created in the lesson in production mode by first running:
$ npm run build
This command is going to create compiled JavaScript files for both our server and client side, and split each of our page components into different files.
Then to start up our app in production & universal mode we run:
$ npm start
Now if we fire up our browser, and disable JavaScript, we find that the initial page HTML is completely rendering out the page. Even without Vue, the HTML page quickly gets rendered.
If we activate JavaScript and reload the page the initial html will get loaded and displayed, JavaScript files downloaded, Vue instantiated, and the page hydrated.
Then if we navigate to the /create route, we can look in DevTools and see that the JavaScript for that particular route was loaded and run. Plus if we inspect the file that gets sent over, we can see the compiled template which creates a Virtual Node.
![]() Side Note: If you’re not familiar with Virtual Nodes and want to learn more about what happens inside the code in Vue, I highly recommend checking out our Advanced Components course on Vue Mastery.
Side Note: If you’re not familiar with Virtual Nodes and want to learn more about what happens inside the code in Vue, I highly recommend checking out our Advanced Components course on Vue Mastery.
Smart Prefetching
There’s a newer feature of Nuxt.js that was released in Nuxt 2.4, called Smart prefetching which, combined with Universal mode, provides an even better user experience. With this feature (turned on by default) Nuxt.js will automatically prefetch code-split pages linked with <nuxt-link> when these links are visible in the viewport.
Notice in the video below, that when I scroll up to the navigation, the create nuxt-link becomes visible, and the JavaScript for that page is pre-loaded, even before I click on it. Now when it click on it, the JavaScript will be ready to execute immediately, instead of waiting for a network request.
To ReVue
As you can see, Universal mode helps increase the speed of initial page loading while smart prefetching increases the speed of pages that are code-split. Increased speed leads to an improved user experience, and we all want that.
SEO with vue-meta
Another killer feature of Nuxt.js is how it allows you optimize your application for Search Engines (aka. SEO). In this lesson we’ll look at the problems that Vue Single Page Applications can run into with SEO and then look at how vue-meta, a library built into Nuxt, solves this problem.
Looking back at our Single Page Application
Remember this diagram from the last lesson showing the timeline of a Single Page App?
As you can see, the content of our /create page isn’t loaded until our JavaScript is downloaded, run, and Vue Router loads up the create page. Our page is dependent on loading the JavaScript to render. There are a few problems with this:
- Search crawlers may not support newer JavaScript features.
- Google is the only engine that tries to render JavaScript.
- One JavaScript error can cause your whole site not to be indexed.
- If your page is too slow it may not be indexed at all.
- Client-rendered JS websites don’t rank high historically.
Because of this, we need a better way to do SEO.
Adding some SEO our Example App.
Let’s take a look at how we can implement some SEO in our example Nuxt application, starting with two tags. Each page in our application needs a title tag, which will be used in search engine results:
<title>Event Listing - Real World Events</title>
They also need their own description which will be used in search results:
<meta name="description" content="Where you can find all the events taking place in your neighborhood">
In case you’re wondering how these are used by search engine, here’s what our example might look like as a google search result:
Introducing vue-meta
Nuxt.js has a library built in to help manage page meta info called vue-meta , and we’ll be using it to add the title and description tags to our example application. If you’re just now joining and you want to code along, (or you get stuck), here’s a link to my github starting code.
First I’m going to jump into my /pages/index.vue file and add the following in a <script> tag:
 /pages/index.vue
    <script>
    export default {
      head() { // <-- property used by vue-meta to add header tags
        return {
          title: 'Event Listing - Real World Events', // <-- For our title tag
          meta: [
            {
              hid: 'description',
              name: 'description', // <-- for our meta description tag
              content:
                'Where you can find all the events taking place in your neighborhood'
            }
          ]
        }
      }
    }
    </script>
We can use the same syntax to give our create.vue file it’s own title and description:
/pages/create.vue
    <script>
    export default {
      head() {
        return {
          title: 'Create an Event - Real World Events',
          meta: [
            {
              hid: 'description',
              name: 'description',
              content: 'You can create a new event in your neighborhood'
            }
          ]
        }
      }
    }
    </script>
Now if we jump into the browser, inspect the HTML in DevTools, and click back and forth between the two different links, we can see our title and description switching back and forth accordingly.
This is not functionality that comes with Vue by default. There are two more things we can do to simplify and future proof this code:
- Eliminate duplication: " - Real World Events" is on every title , and this seems like unnecessary duplication.
-
Add a default description: Just in case our developers forget to add a description to a page, it’d be nice to have a default description, and we’ll make this the same description we have inside
index.vue.
Both of these changes can be made from our /layout/default.vue .
/layout/default.vue
    export default {
      head: {
        titleTemplate: '%s - Real World Events', // <-- title template
        meta: [
          {
            hid: 'description',
            name: 'description',  // <-- moved this over from index.vue
            content:
              'Where you can find all the events taking place in your neighborhood'
          }
        ]
      },
Notice the %s in the title template? This is where our page titles will be placed. We also moved over our description from our /pages/index.vue . This is where that hid value becomes important. If we didn’t have hid and we navigated to /create our page would have two descriptions, one from the layout and one from the page. However, by specifying a hid , it ensures that our page only has one unique description. Now we can update our pages:
/pages/index.vue
    <script>
    export default {
      head() {
        return {
          title: 'Event Listing'
        }
      }
    }
    </script>
We’ve shortened the title, and removed the description since it’ll use the default description from the layout. Our create.vue also needs to be updated.
/pages/create.vue
      head() {
        return {
          title: 'Create an Event', // <-- shortened the title
          ...
If we viewed the browser at this point, we’d end up seeing the same thing we saw earlier.
What happens if we turn off JavaScript?
Here’s where the magic of Nuxt Universal Mode starts to enable great SEO. See, if I jump into the browser at this point, disable JavaScript and load up either / or /create paths, the proper SEO tags are loaded just fine. This would not be the case if I was using a standard Single Page application. In that case, even if my SPA was using vue-meta, here’s what might happen:
As you can see with the diagram above, when navigating to /create , without JavaScript it’s going to load the title and description from the index.vue , not from create.vue . Since we have universal mode with nuxt.js, here’s how things work:
As you can see, Universal Mode means that all requests return HTML with the correct title and description tags baked in.
vue-meta allows you to add all sorts of SEO tags to your pages. Here’s a screenshot from their documentation.
Notice how it says “Recognized metainfo Properties”? For working with Nuxt, just assume metaInfo is the same thing as head .
To ReVue
In this lesson we learned about how Nuxt uses vue-meta to allow you to easily specify SEO header tags for your pages. We also learned how Universal Mode ensures that our pages get properly indexed by search engines since they don’t require JavaScript to be properly read.
File-based Routing
As you saw in previous lessons, with Nuxt we simply place components in the pages directory and Nuxt generates our router.js for us. You might say Nuxt by default does File-based routing . In this lesson we’ll dive deeper into File-based routing, learning how to find the router.js Nuxt creates for us (helpful for debugging), nested routes, dynamic routes, and how to override Nuxt’s default error page.
The Generated router.js
In our example application we have two files in our pages directory, a create.vue and an index.vue . If we want to inspect the router.js file that Nuxt is creating for us, we’ll want to make sure our server is running, and then look in the .nuxt directory that our server application generated.
/.nuxt/router.js
    ...
        routes: [{
          path: "/create",
          component: _2a60c538,
          name: "create"
        }, {
          path: "/",
          component: _c3751f8a,
          name: "index"
        }],
    ...
As you can see above, Nuxt.js generated our router.js based on the files in our pages directory. As we build out additional files and folder in this page directory, referencing this router.js can be useful for debugging purposed, to ensure our routes are getting setup properly.
Nested Routes
If we want to nest a route, we can simply put it inside a folder.
Now if I check back inside my router.js , I’ll see that it’s adjusted the route accordingly.
/.nuxt/router.js
    ...
        routes: [{
          path: "/event/create",
          component: _2a60c538,
          name: "event-create"
        },
    ...
This is how we nest routes, just by placing them in folders.
Problem: Viewing a specific Event
One of the most important routes to set up for our app is the individual event route. The URL will look something like the following: /event/12345 , where 12345 represents the id of the event. When a user visits that URL they’ll be able to see all of the details for that event.
Traditionally in Vue, to create a dynamic route in Vue Router, we’d use the : character followed by the name of the parameter to denote that it’s a dynamic route. This is also called a dynamic segment. It’d look something like the following:
path: '/event/:id',
However, in Nuxt we don’t have to write out a router.js, so what do we do?
 Solution: Nuxt Dynamic Routes
In Nuxt, on the other hand, you prefix the Vue component in your pages folder with an underscore ( _ ) followed by the name of the parameter to create a dynamic route.
Let’s go with id as the name of the parameter for our individual event route, so the file will be named _id.vue .
/pages/event/_id.vue
    <template>
      <div>
        <h1>Individual Event: {{ this.$route.params.id }}</h1>
      </div>
    </template>
Just like Vue, Nuxt gives you access to $route inside of your Vue component object. We can use the params object and access the name of the file that we used. In our case that would look like this.$route.params.id .
This is a good starting point for our Individual Event. If we visit http://localhost:3000/event/3 we will see:
What about SEO?
Our event pages need to have dynamic data inside their title and description tags for good SEO. Let’s use this id inside our title and description tags. In the next level we’ll switch this to use data returned from an API.
    <template>
      <div>
        <h1>Event #{{ id }}</h1>
      </div>
    </template>
    <script>
    export default {
      head() {
        return {
          title: 'Event #' + this.id,
          meta: [
            {
              hid: 'description',
              name: 'description',
              content: 'What you need to know about Event #' + this.id
            }
          ]
        }
      },
      computed: {
        id() {
          return this.$route.params.id
        }
      }
    }
    </script>
Notice that I moved this.$route.params.id to a computed property, so I wouldn’t have to type that whole thing over and over again.
 Sidenote: What if we wanted a page at
 http://locahost:3000/event ?
In this case we would create a new /event/index.vue component.
Root Dynamic Routes
We’re going to put our example app aside for a moment and think about two more examples. The first is, how would we create a root dynamic route like twitter twitter.com/vuemastery ?
To do this in Vue, we would simply create a Root Dynamic Route by creating a /pages/_username.vue component. We’d then access the username parameter through: {{ this.$route.params.username }} .
As you can see, any name can be used after the underscore, to be used as the parameter. It can be id or username, or whatever you wish.
What about child routes under a dynamic route?
For example, on twitter to find people VueMastery is following, I can navigate to: twitter.com/vuemastery/following .
In this case, the folder gets the underscore:
Customizing the Error Page
By default in our example app when we go to an invalid URL, we get this default error page:
Because of the styles we placed on our page, we’re getting that red border around our error message, and also we have “Nuxt.js” written in the bottom left. Obviously we should fix these two things. Also, it’d be nice if it had our default layout with our navigation up top.
Creating our own Error Page
To create our own error page, I copied some of the code from the Nuxt.js default error page, and creating the following file which I placed in the layouts directory. Note that even though this is in the layouts directory, it is treated as a page component and the default layout will be used.
/layouts/error.vue
    <template>
      <div>
        <svg xmlns="http://www.w3.org/2000/svg" width="90" height="90" fill="#DBE1EC" viewBox="0 0 48 48">
          <path d="M22 30h4v4h-4zm0-16h4v12h-4zm1.99-10C12.94 4 4 12.95 4 24s8.94 20 19.99 20S44 35.05 44 24 35.04 4 23.99 4zM24 40c-8.84 0-16-7.16-16-16S15.16 8 24 8s16 7.16 16 16-7.16 16-16 16z" />
        </svg>
        <div class="title">
          {{ message }}
        </div>
        <p v-if="statusCode === 404">
          <nuxt-link to="/">
            Return to homepage
          </nuxt-link>
        </p>
      </div>
    </template>
    <script>
    export default {
      name: 'NuxtError',
      props: {
        error: {  // <--- Send in the error
          type: Object,
          default: null
        }
      },
      head() {
        return {
          title: this.message // <--- Set the SEO title
        }
      },
      computed: {
        statusCode() {  // <--- Get the status code
          return (this.error && this.error.statusCode) || 500
        },
        message() {  // <--- Print the error
          return this.error.message
        }
      }
    }
    </script>
Now if we navigate to an invalid page we see:
Much better, and it has our default layout.
Bonus: Nuxt is giving proper status codes
If we look in Dev Tools at the request for an invalid page, we can see that Nuxt is indeed returning the proper 404 Not Found status code.
This is awesome, as Vue.js out of the box isn’t going to do this. Remember, with Vue in SPA mode, no matter what URL the user calls up, it’s going to return the index.html file. Thus, it won’t be configured to give proper status codes.
Why is not using proper status codes bad?
Eventually our website is going to have pages (or events) which go away. However, if search engines have indexed our pages, they may still link to old pages, which may show errors, or not found text.
Sending a 404 status code is the best way to inform search engines that this page no longer exists, and thus it will stop linking to these pages.
Nuxt is able to return this 404 status code because it uses Universal Rendering. It knows that the page doesn’t exist on the server-side, so it can return the proper status code. This is yet another reason your production applications should probably be using server side rendering.
To ReVue
In this lesson we took a deeper dive into Nuxt routing. We learned how to create nested routes, dynamic routes (with the underscore), and create our own custom error page. In the next lesson we’ll learn how to do API calls to fetch real data.
API Calls with Axios
Since we’re creating a Universal application the way we call our API needs to be slightly different. In this lesson we’ll learn how to setup a dummy db to run API calls, how to write our first API calls using Axios with Promises, and finally how to setup proper error handling.
Where the APIs get Called
Let’s take a look at where the API gets called when we want to load data for a component. Here’s where it happens on the initial load.
Then once Vue is started up the API calls start coming from the client side.
So we need a way to write the API calls in our component which works properly on the server-side and the client-side, which can be tricky. Luckily Nuxt comes to the rescue again.
Setup: A mock API for our app
In order to get started with grabbing data and displaying event, first we’ll need an API for our app to access.
Just like in the Vue course, we’ll set one up here using json-server . It lets you quickly create a mock API very quickly without setting up a server.
Before we install it, I’m going to write up the JSON data we want it to return (download this file here). Let’s store this file in the root of our application.
Now let’s get our JSON server installed and up and running. We can install it (if you haven’t from previous courses) and get the command line tool (that’s the -g ) by running:
npm install -g json-server
Now to spin up this little API server we just run:
json-server --watch db.json
When we run this line we should see:
    \{^_^}/ hi!

    Loading db.json
    Done

    Resources
    http://localhost:3000/events

    Home
    http://localhost:3000

    Type s + enter at any time to create a snapshot of the database
    Watching...
If we call up our browser and head over to http://localhost:3000/events we should see all of our events listed in json.
By default, our Nuxt app shows on port 3000 when doing development, but now the json-server that we started is now on that port. In order to start the Nuxt app on a different port you can run the dev command on a different port with the following:
PORT=3001 npm run dev
That will start your application on port 3001 and you’ll be able to make calls to the json-server API that lives on port 3000.
Setup: Installing Axios for API calls
Just like in the Real World Vue course, we’ll be using Axios to make HTTP requests to our API.
Axios is the ideal HTTP library for Nuxt. Nuxt’s primary purpose is making it easy to create Universal JavaScript apps and Axios makes it easy to make HTTP requests on both the browser and the server.
In the beginning of this course when we first set up our app using create-nuxt-app we installed the Axios module for Nuxt.
If you didn’t install it initially, then run the following command to install it in your project:
npm install @nuxtjs/axios
After that, open your nuxt.config.js file add the following lines:
nuxt.config.js
    module.exports = {
      modules: [
        '@nuxtjs/axios',
      ]
    }
Notice we’re not installing Axios itself, but rather the Nuxt Axios Module. It gives you a bunch of additional features out of the box such as:
- Integrated with Nuxt.js Progressbar while making requests
- Integrated with Proxy Module
- Auto retry requests with axios-retry
There’s a bunch more features as well that you can learn about on the official GitHub page.
Problem: How do fetch our EventList?
We want to list out all our events onto our front page, fetched from the API inside /pages/index.vue . We want to fetch the events data server-side if the first request is our event list, and fetch the events data client side if we’re navigating to this event page.
So, how do we make the API call to fetch events? Unlike Vue.js out of the box we’re not going to use the created() life-cycle hook. Nuxt gives our components in the pages directory extra hooks, including:
Solution: Nuxt’s asyncData
asyncData is called every time before loading a page component, meaning a component located inside the pages directory. It will be called server-side once (on the first request to the Nuxt app) and client-side when navigating to further routes. This method receives the contextas the first argument, can be used it to fetch some data (via API) and then Nuxt will merge the return value with the component data.
The context argument gives you access to various properties like app , $axios , params , route , error , and more. In the previous lesson we used the context object to grab the route parameters. In this lesson, we’ll use it to use axios.
Grabbing the data for our event list
In previous lessons we created an event page that lives in the index.vue page in the root of our pages folder. Let’s try using asyncData inside it to fetch events.
    <script>
    export default {
      ...
      asyncData(context) {
        return context.$axios.get('http://localhost:3000/events').then(response => {
          return {
            events: response.data
          }
        })
      }
    }
    </script>
As you can see, we use the $axios object from the context and make our get request. This returns a promise, and we specify using then what code to run when the promise returns. In this case we return an object with events which will get merged into our component data. We can simplify this code using ES6 destructuring like so:
    <script>
    export default {
      ...
      asyncData({ $axios }) {
        return $axios.get('http://localhost:3000/events').then(response => {
          return {
            events: response.data
          }
        })
      }
    }
    </script>
Notice how we are destructuring the context object to take out just the $axios module which we need.
At this point if we look in our browser, and use Vue Dev Tools we can see that the data is getting loaded properly:
Rendering our Event List
In the previous lesson, we put code right into the page component itself to render everything. But, the beauty of Vue is that you can organize your code into components. We will now create an EventCard component that we will use to display each of our events:
/components/EventCard.vue
    <template>
      <nuxt-link :to="'/event/' + event.id">
        <div class="-shadow">
          <span class="eyebrow">
            @{{ event.time }} on {{ parsedDate }}
          </span>
          <h4 class="title">
            {{ event.title }}
          </h4>
          <span>{{ event.attendees.length }} attending</span>
        </div>
      </nuxt-link>
    </template>
    <script>
    export default {
      name: 'EventCard',
      props: {
        event: Object
      },
      computed: {
        parsedDate() {
          const eventDate = new Date(this.event.date)
          return eventDate.toDateString()
        }
      }
    }
    </script>
    <style scoped>
    div {
      padding: 20px;
      margin-bottom: 24px;
      transition: all 0.2s linear;
      cursor: pointer;
    }
    div:hover {
      transform: scale(1.01);
      box-shadow: 0 3px 12px 0 rgba(0, 0, 0, 0.2), 0 1px 15px 0 rgba(0, 0, 0, 0.19);
    }
    .title {
      margin: 0;
      color: black;
    }
    a {
      text-decoration: none;
    }
    </style>
Now inside the /pages/index.vue component we need to use the EventCard component.
/pages/index.vue
    <template>
      <div>
        <h1>Events</h1>
        <EventCard
          v-for="(event, index) in events"
          :key="index"
          :event="event"
          :data-index="index"
        />
      </div>
    </template>
    <script>
    import EventCard from '@/components/EventCard.vue'
    export default {
      head() {
        return {
          title: 'Event Listing'
        }
      },
      asyncData({ $axios }) {
        return $axios.get('http://localhost:3000/events').then(response => {
          return {
            events: response.data
          }
        })
      },
      components: {
        EventCard
      }
    }
    </script>
And if we jump into the browser, we see our event listing:
Error Handling
If we turn off the API server and jump back into the browser we’ll see this error message:
This isn’t optimal. We should catch this error and provide a better error message.
      asyncData({ $axios, error }) {
        return $axios.get('http://localhost:3000/events').then(response => {
          return {
            events: response.data
          }
        }).catch(e => {
          error({ statusCode: 503, message: 'Unable to fetch events at this time, please try again' })
        })
      },
Notice we’re including the error object which we can use in our catch block to use the error page we created in the last lesson. In the browser our error page now looks like:
Much better!
To ReVue
In this lesson we setup our mock API server and learned how to make API calls using the Nuxt Axios Module using the asyncData hook which is added to our page components. We then added proper error handling to use our error component page. In the next lesson we’ll learn how to properly use async/await, implement our event show page, and get the progress bar working.
Async/Await & Progress Bar
In this lesson we’ll continue to build out our API calls, first by using Async/Await which is common to see in Nuxt applications. Then we’ll build out our event show page, adding an additional API call when we view a specific event like /event/1 . We’ll then get our progress bar working.
Async/Await
In the previous lesson our API code without data handling looked like:
However, using promises with then can start to break down when they get nested a bunch:
As you can see, using lots nested then s in your code may not be great. In a perfect world we’d have some way we could write code without nesting, maybe like this:
However, this code wouldn’t work. This is where async/await come in, providing two pieces of syntax that allow this sort of code.
So, how would our original API then code be rewritten using async/await ? Like this:
Using ES6 destructuring we can simplify this to:
      async asyncData({ $axios }) {
        const { data } = await $axios.get('http://localhost:3000/events')
        return {
          events: data
        }
      },
When we go to add error handling back into the code, we can now use a standard try and catch block like so:
      async asyncData({ $axios, error }) {
        try {
          const { data } = await $axios.get('http://localhost:3000/events')
          return {
            events: data
          }
        } catch (e) {
          error({
            statusCode: 503,
            message: 'Unable to fetch events events at this time'
          })
        }
      },
Using this syntax isn’t necessarily better than using promises with then , it’s just a matter of preference. However, if we were doing more nesting with then , using async / await might be a better choice.
Adding an API call to our Event Show Page
Now it’s time to add an API call when we view a specific event, like /event/1 to view the event with the id of 1. We’ll create some async/await code to call the API, and update our h1 and SEO tags.
/pages/event/_id.vue
    <template>
      <div>
        <h1>{{ event.title }}</h1>
      </div>
    </template>
    <script>
    export default {
      head() {
        return {
          title: this.event.title,
          meta: [
            {
              hid: 'description',
              name: 'description',
              content: 'What you need to know about ' + this.event.title
            }
          ]
        }
      },
      async asyncData({ $axios, error, params }) {
        try {
          const { data } = await $axios.get(
            'http://localhost:3000/events/' + params.id
          )
          return {
            event: data
          }
        } catch (e) {
          error({
            statusCode: 503,
            message: 'Unable to fetch event #' + params.id
          })
        }
      }
    }
    </script>
Now if we jump in the browser, we can see that our event show page is working as intended:
Implementing our Progress Bar
So, we haven’t seen a progress bar in our app, while the API is getting called, but it’s actually already working. It’s just been white, and invisible at the top of our page. Let’s make it visible by going into the nuxt.config.js and updating this one bit of configuration:
/nuxt.config.js
      ...
      /*
      ** Customize the progress-bar color
      */
      loading: { color: '#39b982' },
      ...
Also, let’s change the way we’re running our API, to provide a 2000 millisecond (2 second) delay so we can really see the progress bar working.
$ json-server --watch db.json --delay 2000
Now we can see it working in our browser:
To ReVue
In this lesson we learned about using aasync/await as an alternative to Promises with then , we used async/await` to call our API in our Event List and Event Show page, and we got the progress bar working. In the next lesson we’ll learn how to use Vuex to encapsulate our state in our Nuxt app.
Using Vuex
In the previous two lessons, we reviewed how Nuxt provides an asyncData hook to make Axios calls server or client-side before a component is loaded. As you may already know, as your application grows it becomes important to use a Vuex store to manage state. In this lesson we’ll do just that, by first organizing our API calls into a Service, and then creating a Vuex module for our events.
It’s important that you’re already familiar with Vuex before taking this lesson. If you are not, I’d recommend going through our Mastering Vuex course here on Vue Mastery.
Creating an Event Service
This should be familiar if you took the API calls with Axios lesson in our Real World Vue Course. We need to create a new folder called /services in our root directory and create a new file that looks something like this:
/services/EventService.js
    import axios from 'axios'

    const apiClient = axios.create({
      baseURL: `http://localhost:3000`,
      withCredentials: false,
      headers: {
        Accept: 'application/json',
        'Content-Type': 'application/json'
      }
    })

    export default {
      getEvents() {
        return apiClient.get('/events')
      },
      getEvent(id) {
        return apiClient.get('/events/' + id)
      }
    }
Here we’re configuring Axios and creating methods which invoke our two API calls. These each return a promise. We then simply need to use these methods in our two page components.
/pages/index.vue
    ...
    <script>
    import EventCard from '@/components/EventCard.vue'
    import EventService from '@/services/EventService.js' // <----

    export default {
      ...
      async asyncData({ error }) {
        try {
          const { data } = await EventService.getEvents()
          ...
/pages/_id.vue
    ...
    <script>
    import EventService from '@/services/EventService.js' // <----

    export default {
      ...
      async asyncData({ error, params }) {
        try {
          const { data } = await EventService.getEvent(params.id)
          ...
In our browser everything should be just the same, except now our code is a little more modular. If you’re following along, do make sure your API server and development server is running.
Setting up your VueX store with Nuxt
Several folders were created when you initially scaffolded your Nuxt app using create-nuxt-app . One of those folders was a store folder. This is where all your VueX-related code will live.
If Nuxt detects that this store folder exists it will automatically import Vuex into your project, and add the store option to the root Vue instance. By default every .js file inside the store directory is transformed to a namespaced module.
In a minute we’ll create an event``s``.js Vuex module inside of our store directory. This will create a namespaced Vuex module named even``ts for us. It’ll be this module that calls our EventService to do API calls and set our events data into it’s state. Visually it looks something like this:
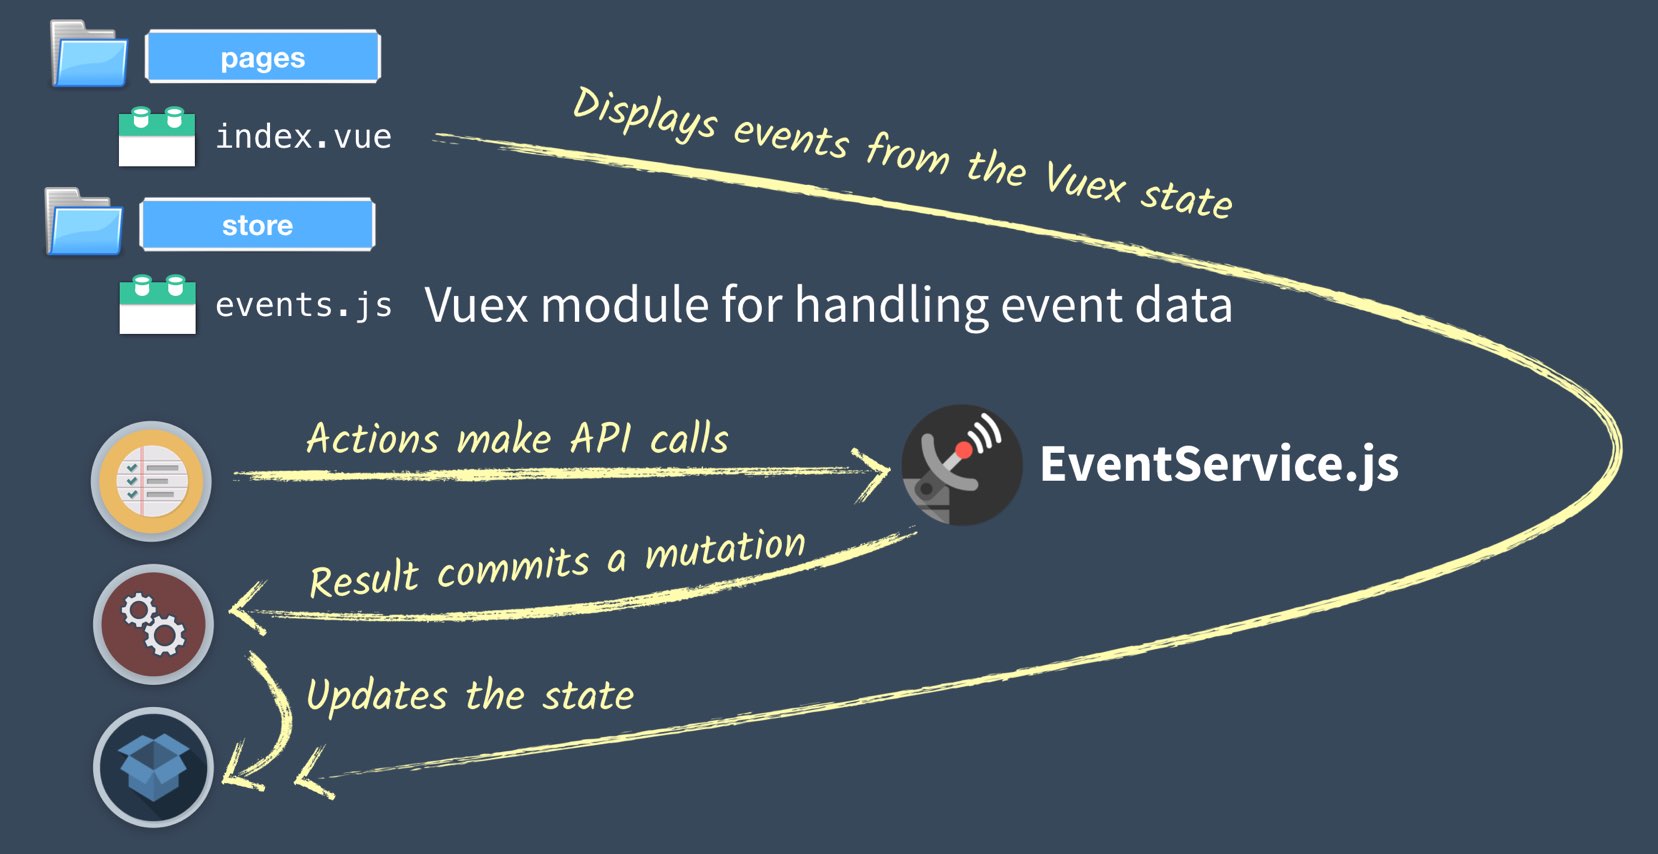
In code it looks like this:
/store/events.js
    import EventService from '@/services/EventService.js'
    export const state = () => ({
      events: []
    })
    export const mutations = {
      SET_EVENTS(state, events) {
        state.events = events
      }
    }
    export const actions = {
      fetchEvents({ commit }) {
        return EventService.getEvents().then(response => {
          commit('SET_EVENTS', response.data)
        })
      }
    }
Take note that state value should always be a function to avoid unwanted shared state on the server side. Another thing to keep in mind is that we need to return a promise from our fetchEvent action. This will help our component know when this promise is resolved so it can continue loading the page.
Next can use this Vuex module inside our index.vue component, but we’re going to need to learn another page component hook Nuxt gives us. The fetch page component hook works on the client & server-side to fill the store before rendering the page. Unlike asyncData this doesn’t have a return value that merges with component data, which we don’t need anymore.
/pages/index.vue
    <script>
    import EventCard from '@/components/EventCard.vue'
    import { mapState } from 'vuex'  // <--- To map event
    export default {
      ...
      async fetch({ store, error }) {
        try {
          await store.dispatch('events/fetchEvents')
        } catch (e) {
      ...
      },
      computed: mapState({
        events: state => state.events.events
      })
    }
    </script>
That’s all there is to it, and now we can list all events by using Vuex.
Using Vuex for the EventShow Page
Now let’s use Vuex for our other page component which loads up a single event. We’ll start by adding some code to our events Vuex module.
/store/events.js
    import EventService from '@/services/EventService.js'
    export const state = () => ({
      events: [],
      event: {}
    })
    export const mutations = {
      ...
      SET_EVENT(state, event) {
        state.event = event
      }
    }
    export const actions = {
      ...
      fetchEvent({ commit }, id) {
        return EventService.getEvent(id).then(function(response) {
          commit('SET_EVENT', response.data)
        })
      }
    }
Then we’ll just need to update our id component, and while we’re in there, let’s go ahead and add some template and style code.
/pages/event/_id.vue
    <template>
      <div>
        <div class="event-header">
          <span class="eyebrow">
            @{{ event.time }} on {{ event.date }}
          </span>
          <h1 class="title">
            {{ event.title }}
          </h1>
          <h5>Organized by {{ event.organizer ? event.organizer.name : '' }}</h5>
          <h5>Category: {{ event.category }}</h5>
        </div>

        <span name="map">
          <h2>Location</h2>
        </span>

        <address>{{ event.location }}</address>

        <h2>Event details</h2>
        <p>{{ event.description }}</p>

        <h2>
          Attendees
          <span class="badge -fill-gradient">
            {{ event.attendees ? event.attendees.length : 0 }}
          </span>
        </h2>
        <ul class="list-group">
          <li v-for="(attendee, index) in event.attendees" :key="index" class="list-item">
            <b>{{ attendee.name }}</b>
          </li>
        </ul>
      </div>
    </template>
    <script>
    import { mapState } from 'vuex'
    export default {
      ...
      async fetch({ store, params, error }) {
        try {
          await store.dispatch('event/fetchEvent', params.id)
        } catch (e) {
          error({
            statusCode: 503,
            message: 'Unable to fetch event #' + params.id
          })
        }
      },
      computed: mapState({
        event: state => state.event.event
      })
    }
    </script>

    <style scoped>
    .prompt-box {
      position: relative;
      overflow: hidden;
      padding: 1em;
      margin-bottom: 24px;
      transform: scaleY(1);
    }
    .prompt-box > .title {
      margin: 0 0 0.5em;
    }
    .prompt-box > .title > .meta {
      margin-left: 10px;
    }
    .prompt-box > .actions {
      display: flex;
      align-items: center;
    }
    .prompt-box > button {
      margin-right: 0.5em;
    }
    .prompt-box > button:last-of-type {
      margin-right: 0;
    }
    .location {
      margin-bottom: 0;
    }
    .location > .icon {
      margin-left: 10px;
    }
    .event-header > .title {
      margin: 0;
    }
    .list-group {
      margin: 0;
      padding: 0;
      list-style: none;
    }
    .list-group > .list-item {
      padding: 1em 0;
      border-bottom: solid 1px #e5e5e5;
    }
    </style>
Now when we go into our browser we can see everything work as expected, now using Vuex.
To ReVue
In this lesson we refactored our Axios API calls into an EventService, created an Events Vuex Module to call that service, and used Nuxt’s fetch hook to dispatch the action which populates our state. In the next lessons we’ll dive into nuxt.config, and then discover two different ways to deploy our Nuxt app.
Universal Mode Deployment
Up until now, we’ve only been developing locally. At some point we’ll need to deploy our application to the internet. In this lesson we’ll move our API onto the internet, build our application to ensure it’s ready for production, and deploy our application in Universal Mode.
Remembering Universal Mode
Back in lesson 3 we discussed what it means for Nuxt to run in Universal Mode. To review, once we have our application hosted on the Internet, here’s what it’ll look like when we start sending requests:

Notice that the page we’ve requested gets rendered on the server (Server-Side Rendering), and the resulting index.html is sent to the browser where it loads and displays even before Vue is started up. Once Vue is started up our application gets “Hydtrated” and goes into normal SPA (Single Page Application) mode:

This is how our application will be working once we deploy it. However, first we need to move our API server into the cloud.
Moving our API Server
Up until now we’ve been using JSON-SERVER to mock out our API locally. That’s not going to work if our server is on the internet. We need to move our API server onto the Internet.
If this website was called Laravel Mastery, Rails Mastery, Firebase Mastery, or Node Mastery we might teach you how to create a complex API server. Those are all great solutions for building an API, which you’ll want to use for a production level app. However, since this is Vue Mastery we’ll use a Typecode project called my-json-server, which lets us create fake online APIs.
All we have to do is have a github project with a db.json. We can use ours for our project:
https://github.com/Code-Pop/real-world-nuxt/blob/master/db.json
We’ll use the organization (Code-Pop) and the repo name (real-world-nuxt), in a URL we’ll construct on my-json-server:
http://my-json-server.typicode.com/Code-Pop/real-world-nuxt/
Try going to that URL, and you’ll find a link to fetch our JSON events from the db.json file, and you can even access individual events.
Perfect. To make this work with our application we only need to change one piece of code:
/services/EventService.js
    import axios from 'axios'

    const apiClient = axios.create({
      baseURL: `https://my-json-server.typicode.com/Code-Pop/real-world-nuxt`, // <---
      ...
All we have to do is change the baseURL , and now if we run our local server, it’ll work except now using our API on the Internet.
Building our Production App
Before we deploy our application it’d be good to ensure it works locally in production mode. This is a two step process.
$ npm run build
Nuxt builds your application, running it through various webpack configurations, taking all your nuxt.config.js configuration into account, and finally building a very streamlined bundle that is appropriate for production.
After running nuxt build you’ll find that the .nuxt directory, a hidden directory, has been generated and has everything that you need to run Nuxt as a server side application.
Next we’ll run our Nuxt application in production mode using node by running:
$ npm run start
This runs a node server in production from our /.nuxt/dist directory using the files it generated there. Unlike the development server if we make a change we’ll need to build and start the server again.
In this lesson we’ll focus on deploying your application. We’ll review how to deploy your Nuxt application to a server, and the tools that Nuxt gives you to help with that.
Deploying Nuxt in Universal Mode
Nuxt can be deployed on any server that can run Node. Our server needs to be able to run:
- npm install
- npm run build
- npm run start
To effectively install the dependencies, build our project using webpack, and start the node server in production mode.
Depoying Nuxt on Heroku
Heroku is one of the few hosts that you can deploy and run a node server completely free, that’s why I chose to use it for this tutorial. We’ll be deploying using the following steps:
- Install the Heroku-cli if needed, and create the app on Heroku.
- Set node server configuration.
- Add command to package.json , so Heroku knows to run
npm run build - Add Procfile so Heroku knows to start our server with:
npm run start - Push git repo to Heroku so it deploys our code.
1. Install Heroku CLI & Create App
You can follow these instructions to download and install the Heroku CLI. Once installed we need to create our application on Heroku. We do this with heroku create :

Notice Heroku gave us back two things. First is the URL where our application will be deployed (when we deploy it), and the second is the git repo we need to push our code into which will trigger Heroku to deploy it.
2. Set node server configuration
We need to tell Heroku to install the devDependencies of the project (to be able to launch npm run build ) so we’ll run this from the command line:
$ heroku config:set NPM_CONFIG_PRODUCTION=false
Also, we want our application to listen on the host 0.0.0.0 and run node in production mode:
    $ heroku config:set HOST=0.0.0.0
    $ heroku config:set NODE_ENV=production
3. Tell Heroku to run npm run build
After this initial setup, we need to tell Heroku to run npm run build via special command in the package.json file called heroku-postbuild .
/package.json
    "scripts": {
        "dev": "nuxt",
        "build": "nuxt build",
        "start": "nuxt start",
        "generate": "nuxt generate",
        "heroku-postbuild": "npm run build" // <-----
    }
4. Add Procfile
Next, Heroku uses a what’s called a Procfile (a file literally named Procfile with no extension) in order to execute and run your application. The contents of the Procfile should contain the following:
/Procfile
web: npm run start
This will tell Heroku to start your application and to direct external HTTP traffic to it.
5. Push git repo to Heroku to deploy
Finally, we can push the app on Heroku with:
$ git push heroku master
Our Nuxt app is now live and hosted on Heroku and we can see it in action on the Internet with our API also on the Internet!
Customizing your app build with nuxt.config.js
Nuxt and webpack give you lots of ways to customize and tweak the way your application is deployed. Inside the nuxt.config.js file you’ll find two configuration options you might want to learn about.
There is the build property which lets you customize the webpack configuration for how your application is built. You can tweak things like webpack loaders & plugins, minify, filenames, and directory output. There’s also the server property that lets you define the server connection variables for your application, like port, https, socket, and using the timing API.
To learn more about the build and server inside the Nuxt documentation.
To ReVue
In this lesson we moved both our API and server onto the Internet, and learned about deployment in Universal Mode. In the next lesson we’ll review static generation, another deployment mode.
Static Site Generated Deployment
In the previous lesson, we learned how to deploy your Nuxt application in Universal Mode and get it up on a node server. In this lesson, we’ll dive into a special deployment mode for Nuxt: Static Generated Deployment. Let’s understand why to use it, how to use it, and how to deploy it easily.
What Universal Mode is Great For
When the data on our webpages is changing often, universal mode works great since our pages are pre-rendered on the server every time a request comes in. But what about when the data doesn’t change as often such as:
- A blog with data only changing with new blog posts.
- A store with data only changing with new products.
- Documentation which only changes with new updates.
- A content site like Vue Mastery where data only changes when new content is pushed.
In this case it Universal Mode can be overkill when we’re pulling from the API and rendering our pages on every request.
Universal vs Static Generated Deployment
The difference between these two modes is simply where the Vue app is rendered into HTML before being sent into our client’s browser. In Universal Mode the HTML is rendered (or generated) on every request. In Static Generated Deployment the HTML is generated once (possibly from your local computer) and deployed to the server. It all starts with one command:
$ npm run generate
This command will generate our website HTML into our code’s /dist directory.
For example, the following file structure:
-| pages/
----| index.vue
----| event/
--------| create.vue
Will generate:
-| dist/
----| index.html
----| event/
------| create/
---------| index.html
What Nuxt’s Static Site Deployment deployment does for you is run through all your routes with your data and create all of the HTML routes with data in place. This way our index.html page already has our events all rendered out and our page loads with proper data before Vue even starts up (just like Universal mode)
Now, if we fire up a basic HTTP server hosting from our /dist directory, we have a statically generated app that works, except for when you hit refresh on a dynamic route.
Rendering Data for Dynamic Routes
By default, dynamic routes are ignored by the generate command. For example, if you have the following directory:
-| pages/
---| index.vue
---| event/
-----| _id.vue
Only the route / will be generated by Nuxt.js. If you want Nuxt.js to generate routes with dynamic params, you need to set an array of dynamic routes.
We can add routes for /``event``/:id in nuxt.config.js :
nuxt.config.js
    export default {
      ...
      generate: {
        routes: [
          '/event/5928101'
        ]
      }
    }
Then when we launch npm run generate you’ll see /``event/5928101``/index.html in our /dist folder.
But obviously this isn’t very scalable, we don’t want to have to add an event to this file every time any user adds one. Instead we need a way to query our API here to generate a current list of events, so we can create a static file for each individual event. We can modify our nuxt.config to generate the routes like so:
nuxt.config.js
    import EventService from './services/EventService.js'
    ...
    export default {
      ...
      generate: {
        routes: () => {
          return EventService.getEvents().then(response => {
            return response.data.map(event => {
              return '/event/' + event.id
            })
          })
        }
      }
    }
In the example above, we’re using the event``.id from the server to generate the routes. If we then look inside the dist folder, we’ll see the following.
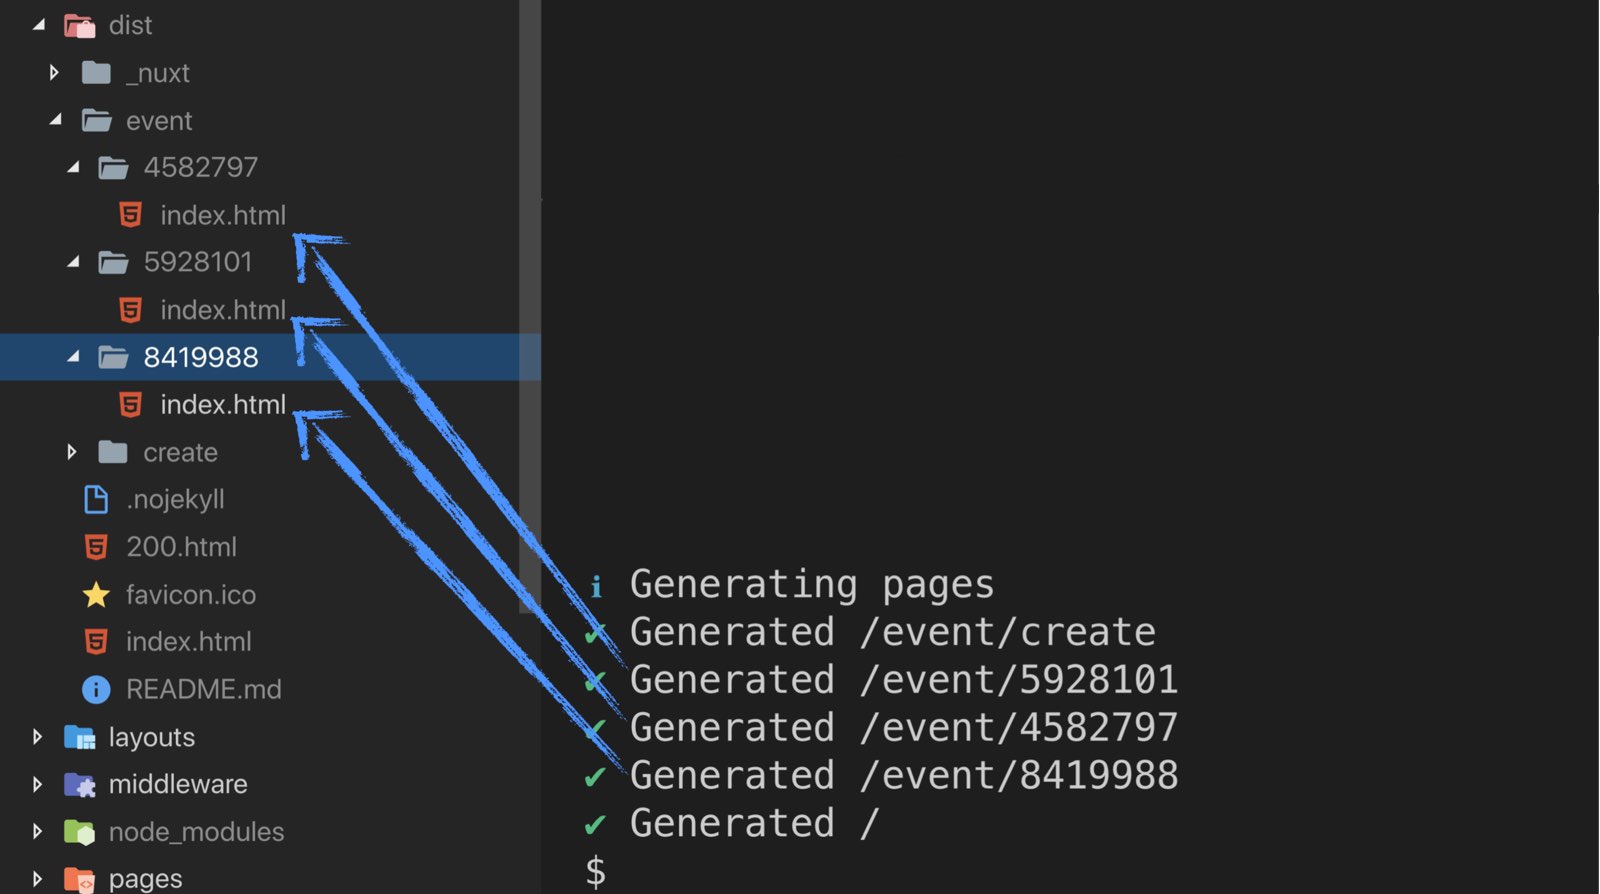
Now that all of the pages our user might land on are statically generated, so we get all the benefits of Univeral Mode, we can deploy it.
Deploying a Static Site
Since our website is now essentially just HTML, JavaScript, images, and CSS, we can deploy this to any place that can host static files. For personal websites many people deploy to Github pages. However, Netlify makes it SUPER simple to deploy a static site generated repository. If you’re interested in learning how you should just watch the video above, it’s very visual.
Wrapping Up
We hope this gives you a great overview on how to get up and running with Nuxt. There’s obviously lots more to learn, and I highly recommend you take a read through the Nuxt guide if you haven’t yet. Also, we cover lots of great Nuxt articles on the official Vue Newsletter and Podcast. Thanks for learning with me!