Code
Lesson2
Why the Composition API
There’s been some confusion over the new Vue 3 composition API. By the end of this lesson it should be clear why the limitations of Vue 2 have led to its creation, and how it solves a few problems for us.
There are currently three limitations you may have run into when working with Vue 2:
- As your components get larger readability gets difficult.
- The current code reuse patterns all come with drawbacks.
- Vue 2 has limited TypeScript support out of the box.
I will go into detail with the first two, so it’s apparent what problem the new API solves.
Large components can be hard to read & maintain.
To wrap our head around this problem lets think about a component that takes care of searching the products on our website.
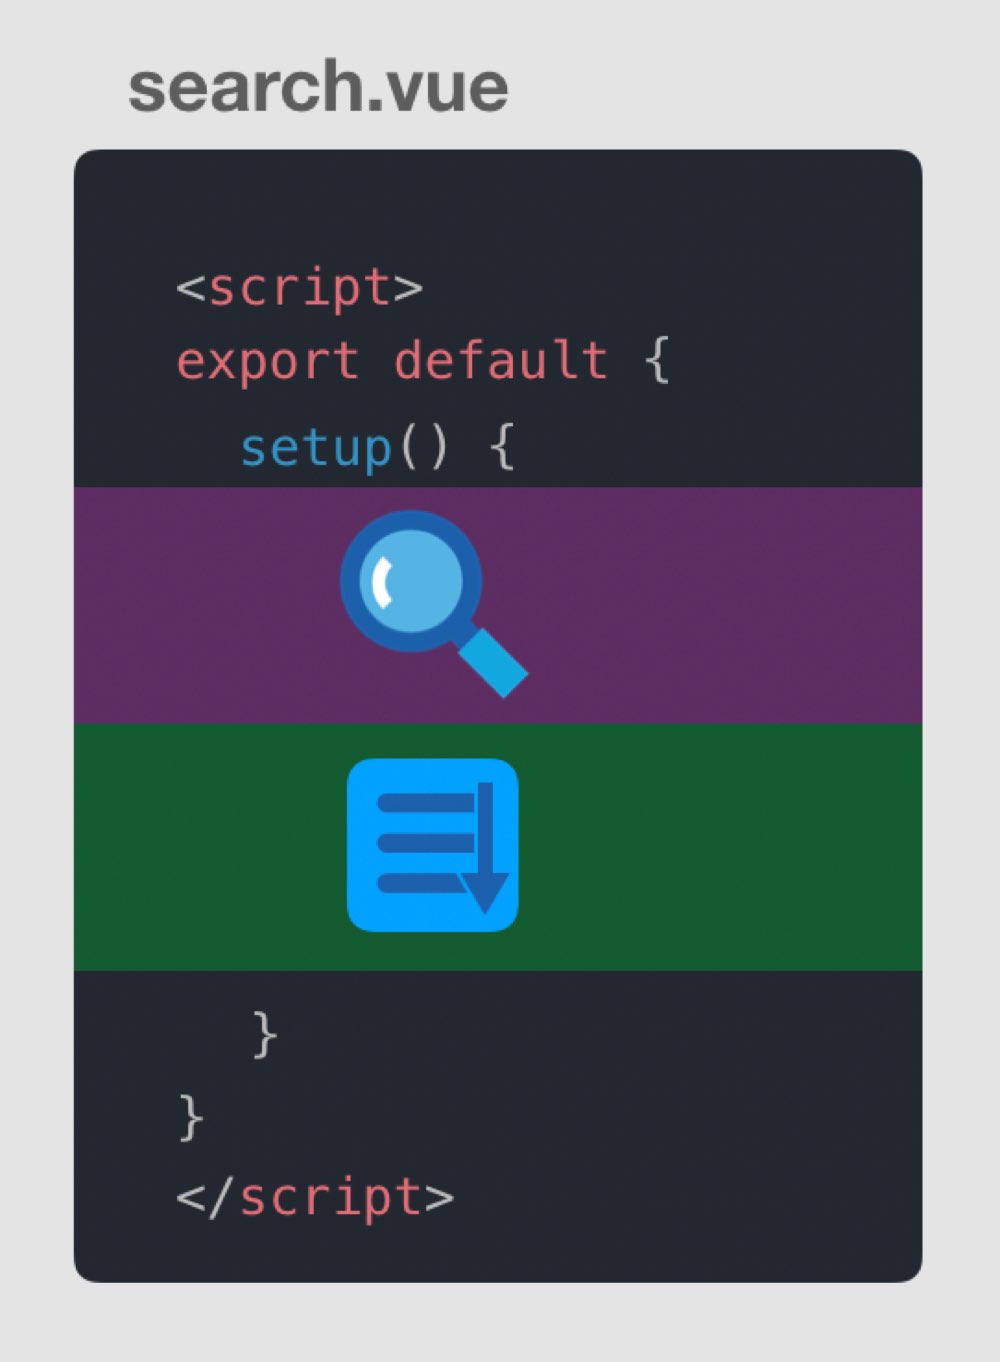
The code for this component, using the standard Vue component syntax, is going to look like this:
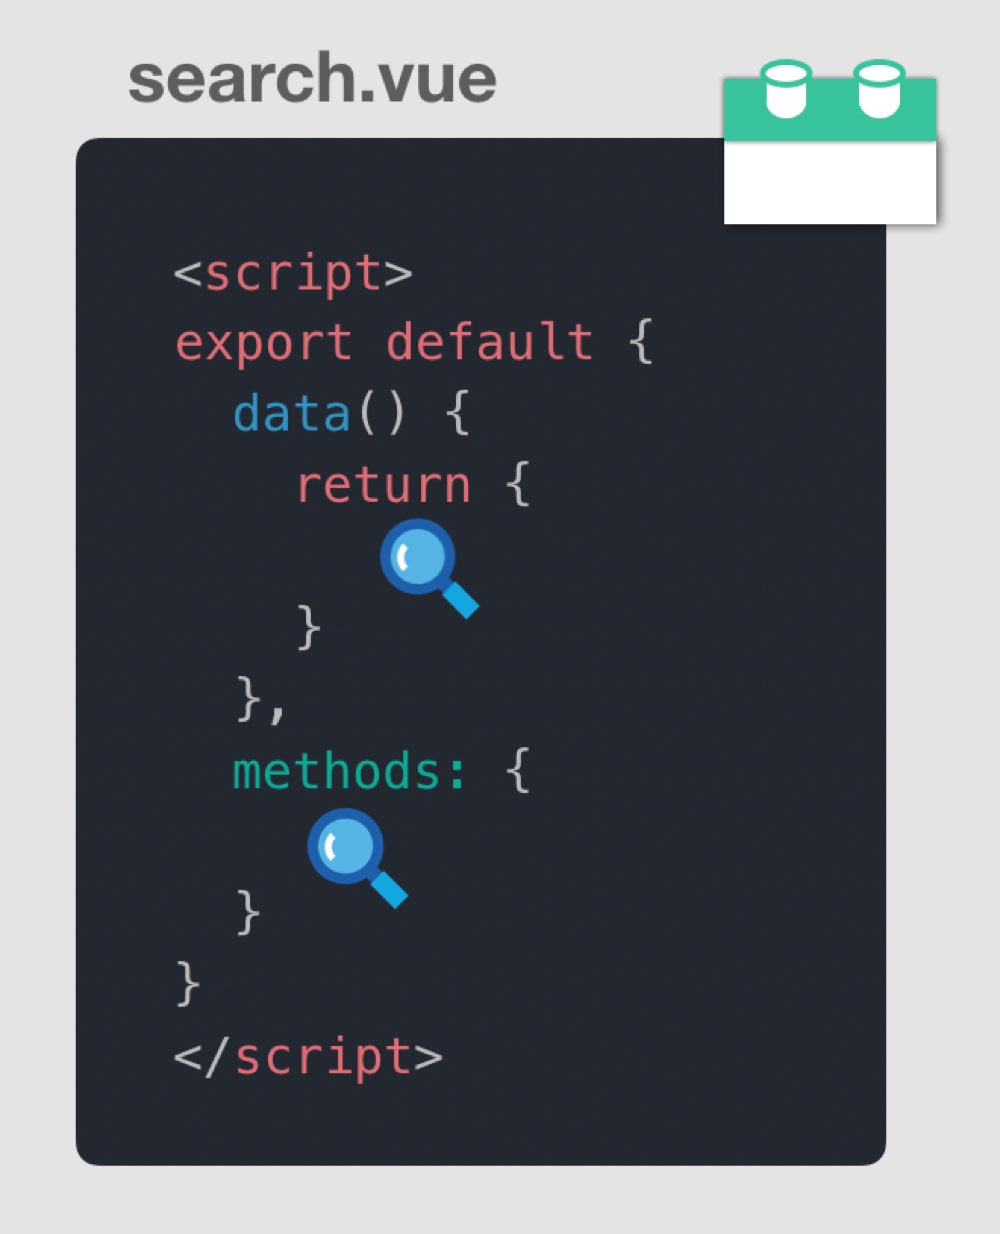
What happens when we also want to add the ability to sort the search results to this component. Our code then looks like:
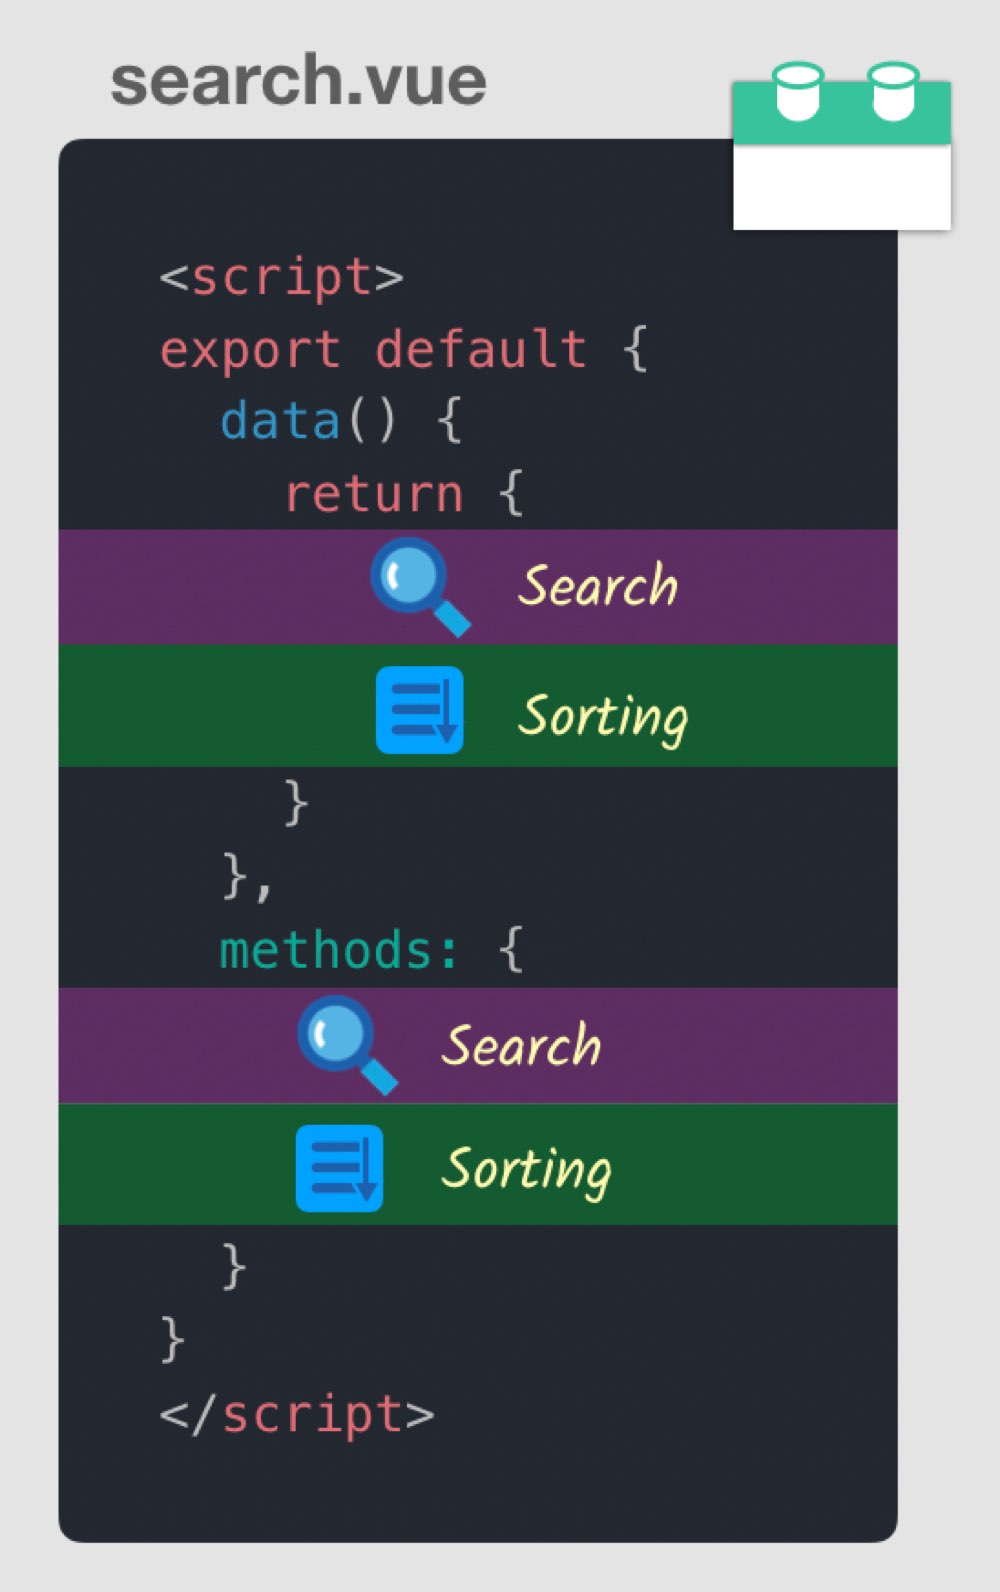
Not too bad, until we want to add search filters and pagination features to the same component. Our new features will have code fragments that we’d be splitting amongst all of our component options (components, props, data, computed, methods, and lifecycle methods). If we visualize this using colors (below) you can see how our feature code will get split up, making our component much more difficult to read and parse which code goes with which feature.
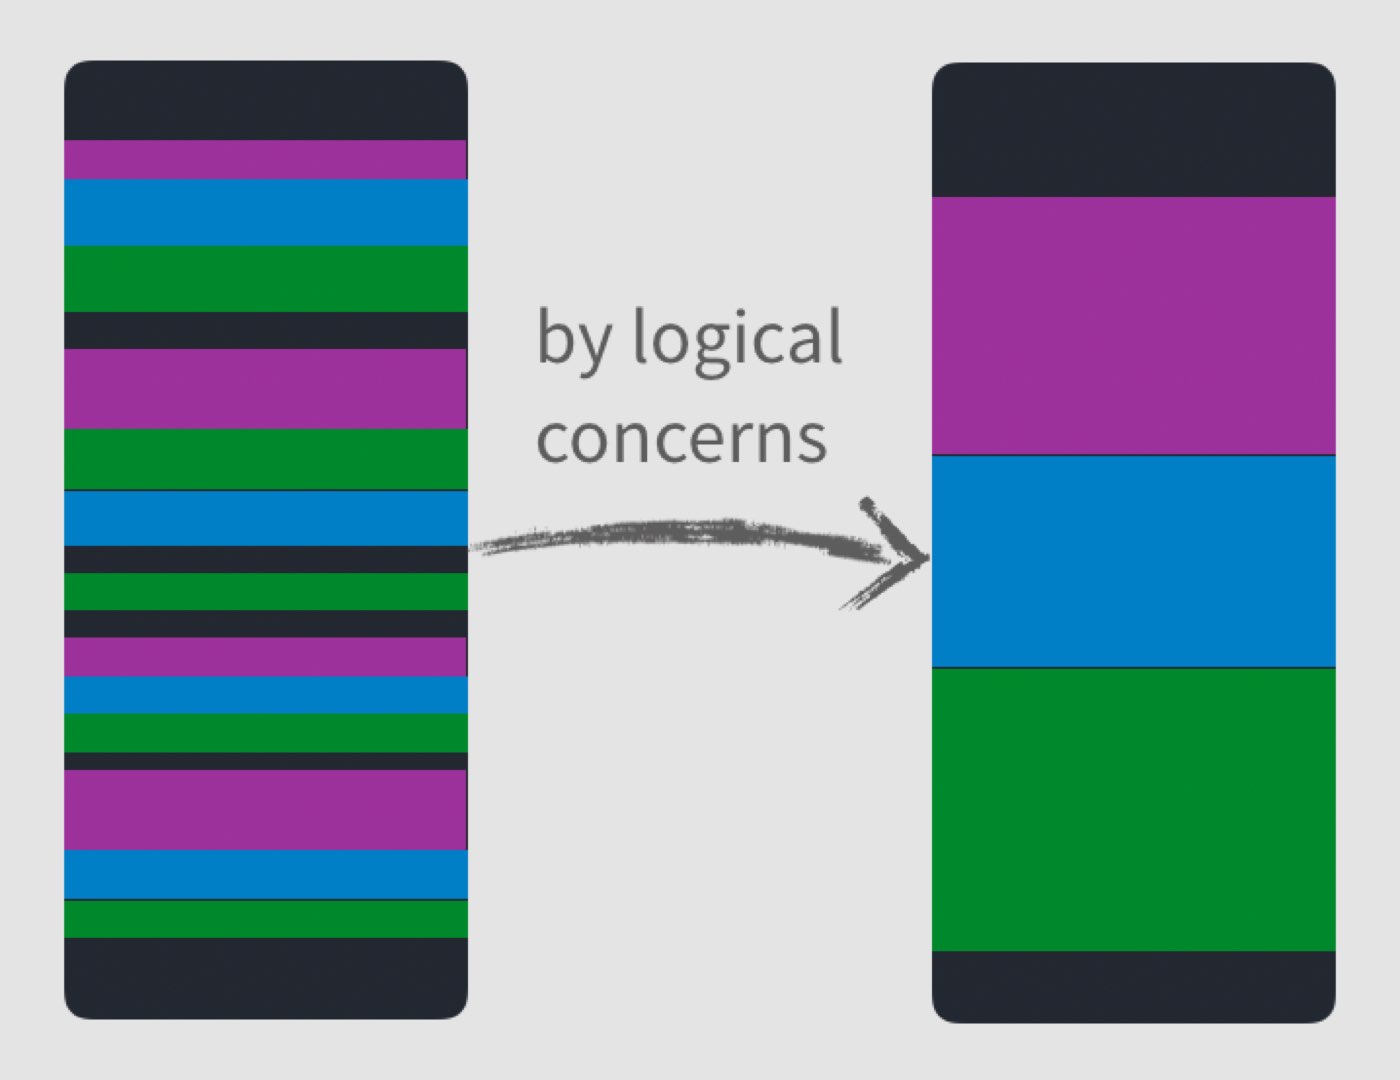
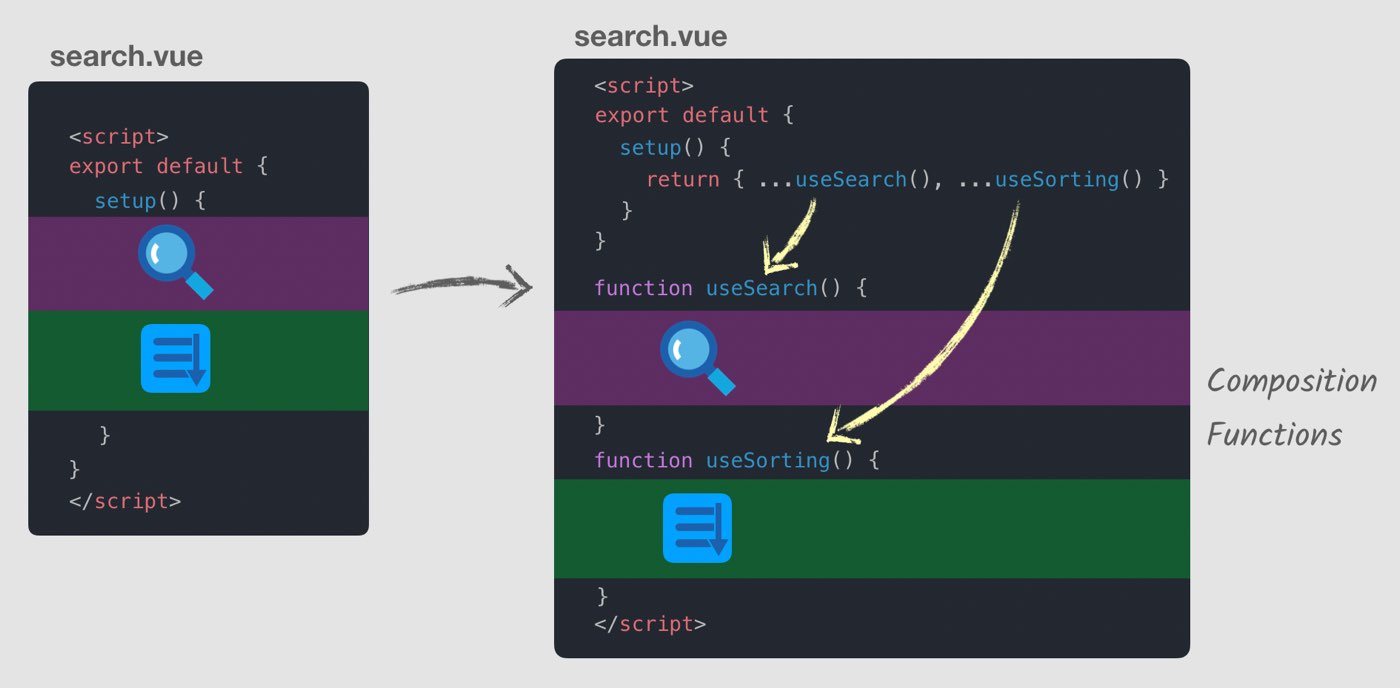
As you can imagine (with the image on the right), if we can keep our feature code together, our code is going to be more readable, and thus more maintainable. If we go back to our original example and group things together using the composition API, here’s what it’d look like:
To do this with the setup() method (as shown above), we need to use the new Vue 3 composition API. The code inside setup() is a new syntax that I’ll be teaching in later lessons. It’s worth noting that this new syntax is entirely optional, and the standard way of writing Vue components is still completely valid.
I know when I first saw this, I wondered, “Wait, does this mean I create a gigantic setup method, and put all my code in there? How can that be how this works?”
No, don’t worry, this isn’t what happens. When you organize components by features using the composition API, you’ll be grouping features into composition functions that get called from your setup method, like so:
Using this our components can now be organized by logical concerns (also known as “features”). However, this doesn’t mean that our user interface will be made up of fewer components. You’re still going to use good component design patterns to organize your applications:

Now that you’ve seen how the Component API allows you to make large components more readable and maintainable, we can move on to the second limitation of Vue 2.
There’s no perfect way to reuse logic between components.
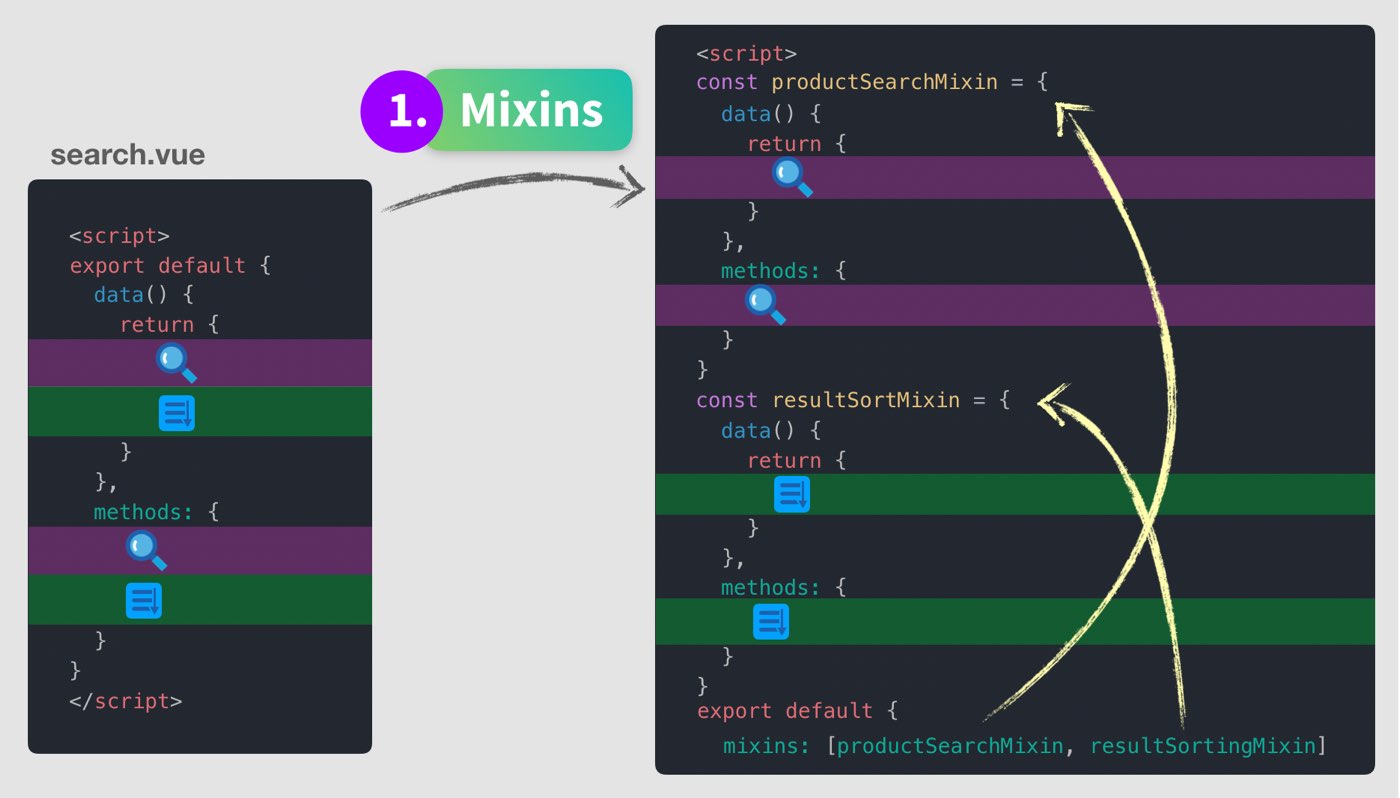
When it comes to reusing code across components there are 3 good solutions to do this in Vue 2, but each has its limitations. Let’s walk through each with our example. First, there are Mixins.
The good
- Mixins can be organized by feature.
The not so good
- They are conflict-prone , and you can end up with property name conflicts.
- Unclear relationships on how mixins interact, if they do.
- Not easily reusable if I want to configure the Mixin to use across other components.
This last item leads us to take a look at Mixin Factories , which are functions that return a customized version of a Mixin.
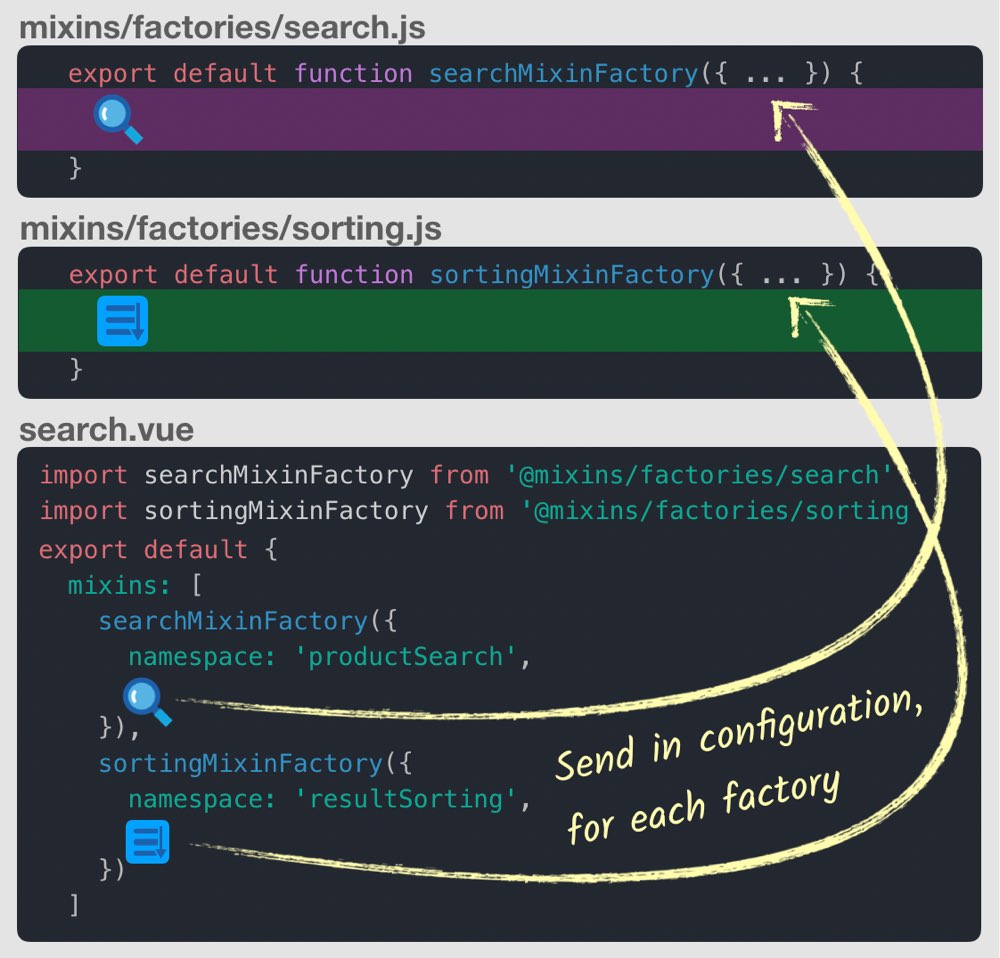
As you can see above, Mixin Factories allow us to customize the Mixins by sending in a configuration. Now we can configure this code to use across multiple components.
The good
- Easily reusable now that we can configure the code.
- We have more explicit relationships of how our Mixins interact.
The not so good
- Namespacing requires strong conventions and discipline.
- We still have implicit property additions, meaning we have to look inside the Mixin to figure out what properties it exposes.
- There’s no instance access at runtime, so Mixin factories can’t be dynamically generated.
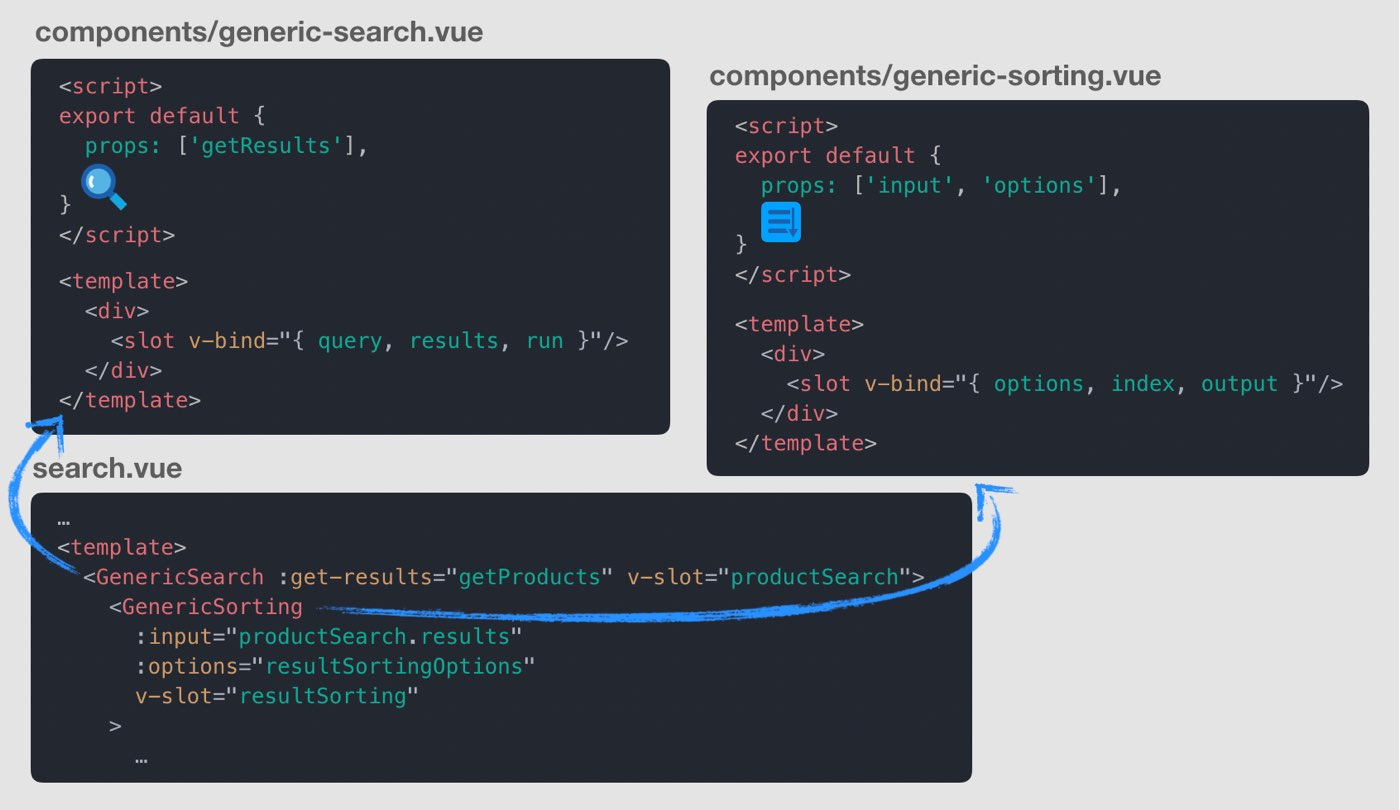
Luckily, there’s one more solution that can often be the most useful, Scoped Slots :
The good
- Addresses just about every downside of Mixins.
The not so good
- Your configuration ends up in your template, which ideally should only contain what we want to render.
- They increases indentation in your template, which can decrease readability.
- Exposed properties are only available in the template.
- Since we’re using 3 components instead of 1, it’s a bit less performant.
So as you can see, each solution has limitations. Vue 3’s composition API provides us a 4th way to extract reusable code, which might look something like this:
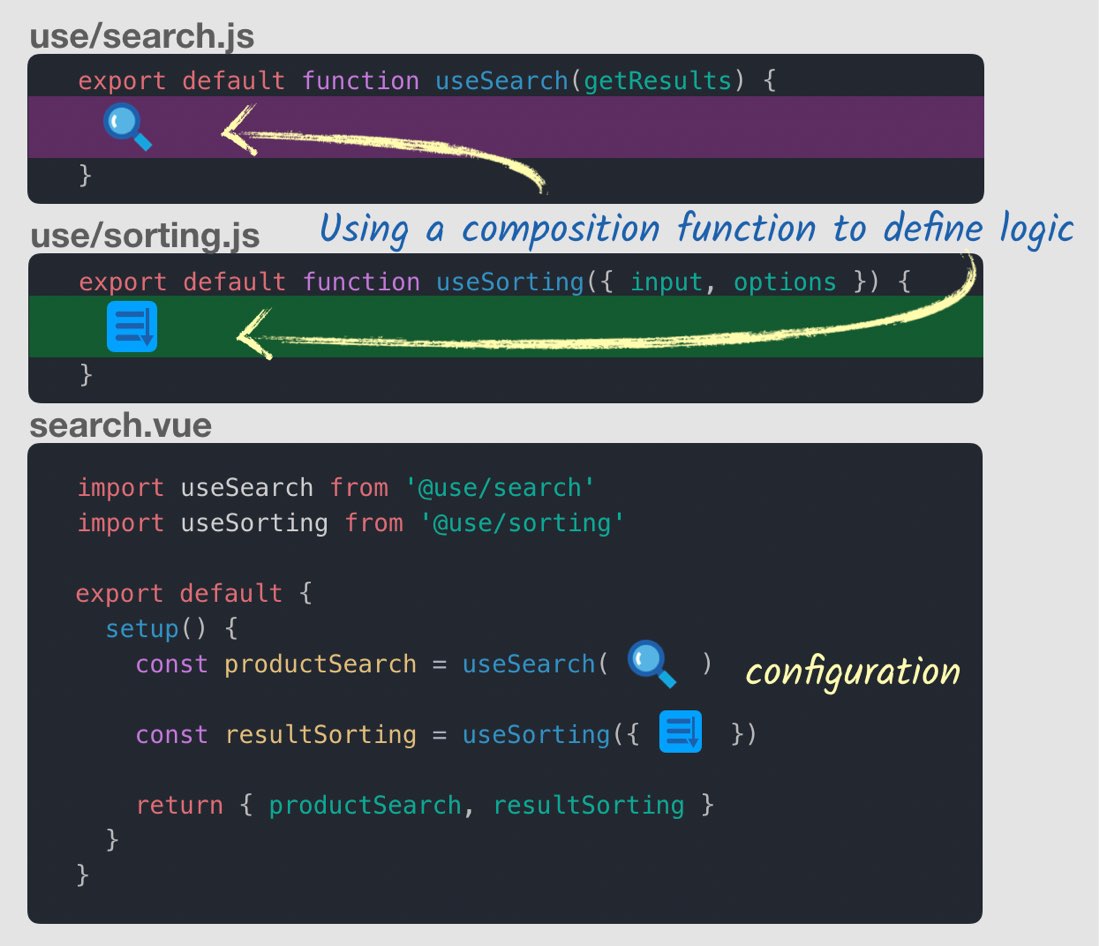
Now we’re creating components using the composition API inside functions that get imported and used in our setup method, where we have any configuration needed.
The good
- We’re writing less code, so it’s easier to pull a feature from your component into a function.
- It builds on your existing skills since you’re already familiar with functions.
- It’s more flexible than Mixins and Scoped Slots since they’re just functions.
- Intellisense, autocomplete, and typings already work in your code editor.
The not so good
- Requires learning a new low-level API to define composition functions.
- There are now two ways to write components instead of just the standard syntax.
Hopefully, the “why” behind the composition API is now clear to you, I know it wasn’t clear to me at first. In the next lesson I’ll be diving into the new syntax for composing components.
Setup & Reactive References
At this point, you’re probably wondering what the new composition API syntax looks like, and we’re about to dive in. First, we want to be clear about when you might use it, and then we’ll learn about the setup function and Reactive References or refs.
Disclaimer: If you haven’t caught on yet, the composition API is purely additive, and nothing is deprecated. You can code Vue 3 the same way you code up Vue 2.
When to use the Composition API?
When any of the following are true:
- You want optimal TypeScript support.
- The component is too large and needs to be organized by feature.
- Need to reuse code across other components.
- You & your team prefer the alternative syntax.
Disclaimer #2: The examples that follow are quite simple. Constructing components this simple using the Composition API would be unnecessary, but make it easier to learn.
Let’s start with a very simple component written using our normal Vue 2 API, which is valid in Vue 3.
<template>
  <div>Capacity: {{ capacity }}</div>
</template>
<script>
export default {
  data() {
    return {
      capacity: 3
    };
  }
};
</script>
Notice I have a simple capacity property, which is reactive. Vue knows to take each of the properties in the object returned by the data property, and make them reactive. This way, when these reactive properties get changed, components that use this property gets re-rendered. Duh, right? In the browser we see:

Using the Setup Function
In Vue 3 using the Composition API, I would start by writing that setup method we’ve seen before:
<template>
  <div>Capacity: {{ capacity }}</div>
</template>
<script>
export default {
  setup() {
    // more code to write
  }
};
</script>
The setup executes before any of the following options are evaluated:
- Components
- Props
- Data
- Methods
- Computed Properties
- Lifecycle methods
It’s also worth mentioning that the setup method does not have access “this”, unlike other Component options. In order to get access to the properties we normally would access using this, setup has two optional arguments. The first is props which is reactive and can be watched, as such:
import { watch } from "vue";
export default {
  props: {
    name: String
  },
  setup(props) {
    watch(() => {
      console.log(props.name);
    });
  }
};
The second argument is context, that has access to a bunch of useful data:
setup(props, context) {
  context.attrs;
  context.slots;
  context.parent;
  context.root;
  context.emit;
}
But let’s get back to our example. Our code needs a reactive reference:
Reactive References
<template>
 <div>Capacity: {{ capacity }}</div>
</template>
<script>
import { ref } from "vue";
export default {
  setup() {
    const capacity = ref(3);
    // additional code to write
  }
};
</script>
const capacity = ref(3) is creating a “Reactive Reference.” Basically it’s wrapping our primitive integer (3) in an object, which will allow us to track changes. Remember, previously our data() option already wrapping our primitive (capacity) inside an object.
Aside: The composition API allows us to declare reactive primitives that aren’t associated with a component, and this is how we do it.
One last step, we need to explicitly return an object with properties our template will need to render properly.
<template>
  <div>Capacity: {{ capacity }}</div>
</template>
<script>
import { ref } from "vue";
export default {
  setup() {
    const capacity = ref(3);
    return { capacity };
  }
};
</script>
This returned object is how we expose which data we need access to in the renderContext .
Being explicit like this is a little more verbose, but it’s also intentional. It helps with longer-term maintainability because we can control what gets exposed to the template, and trace where a template property is defined. We now have what we started with:
Using Vue 3 with Vue 2
It’s worth noting that you can use the Vue 3 Composition API with Vue 2 today by using this plugin. Once you install and configure it on a Vue 2 application, you’d use the same syntax I’m teaching you above with one small change. Instead of
import { ref } from "vue";
you would write
import { ref } from "@vue/composition-api";
That’s how I tested all the above code, in case you’re wondering.
Next, we’ll learn how to write component methods using this new syntax.
Methods
Now that we’ve learned how to create a Reactive Reference, the next building block of our component composition is creating methods. If you haven’t downloaded the Vue 3 Composition API Cheat Sheet yet, now would be a good time. Here’s what our current code looks like:
<template>
  <div>Capacity: {{ capacity }}</div>
</template>
<script>
import { ref } from "vue";
export default {
  setup() {
    const capacity = ref(3);
    return { capacity };
  }
};
</script>
If we wanted to add a method that would allow us to increment capacity, from a button, we might write the following in our regular component syntax:
methods: {
  increase_capacity() {
    this.capacity++;
  }
}
How might we use the new Vue 3 composition API though? Well, we start by defining a function inside our setup method, returning that method to give our component access to it, and then using it inside a button:
<template>
  <div>
    <p>Capacity: {{ capacity }}</p>
    <button @click="increaseCapacity()">Increase Capacity</button>
  </div>
</template>

<script>
import { ref } from "vue";
export default {
  setup() {
    const capacity = ref(3);

    function increaseCapacity() { // <--- Our new function
      // TBD
    }
    return { capacity, increaseCapacity };
  }
};
</script>
Yup, when we need methods, we simply create them as functions using our Composition API. However, how do you think we increment our capacity from inside the setup method? You might guess:
function increaseCapacity() {
  capacity++;
}
This wouldn’t work and it would error out. Remember, capacity is a Reactive Reference, an object that encapsulates our integer. Incrementing an object won’t work. In this case we need to increment the inner integer value our Reactive Reference encapsulates. We can do that by accessing capacity.value .
function increaseCapacity() {
  capacity.value++;
}
If we check in our browser, everything now works:

That’s all there is to it. However, if we look at the template you’ll notice that when we print out capacity:
<p>Capacity: {{ capacity }}</p>
We don’t have to write capacity.value , and you might be wondering why.
It turns out that when Vue finds a ref in a template it automatically exposes the inner value, so you should never need to call .value inside the template.
Computed Properties
Let’s learn how to create computed properties in the new Composition API syntax. First, though we’ll need to add to our example application so we now have a list of people attending our event.
<template>
  <div>
    <p>Capacity: {{ capacity }}</p>
    <button @click="increaseCapacity()">Increase Capacity</button>
    <h2>Attending</h2>
    <ul>
      <li v-for="(name, index) in attending" :key="index">
        {{ name }}
      </li>
    </ul>
  </div>
</template>
<script>
import { ref } from "vue";
export default {
  setup() {
    const capacity = ref(4);
    const attending = ref(["Tim", "Bob", "Joe"]); // <--- New Array
    function increaseCapacity() {
      capacity.value++;
    }
    return { capacity, attending, increaseCapacity };
  }
};
</script>
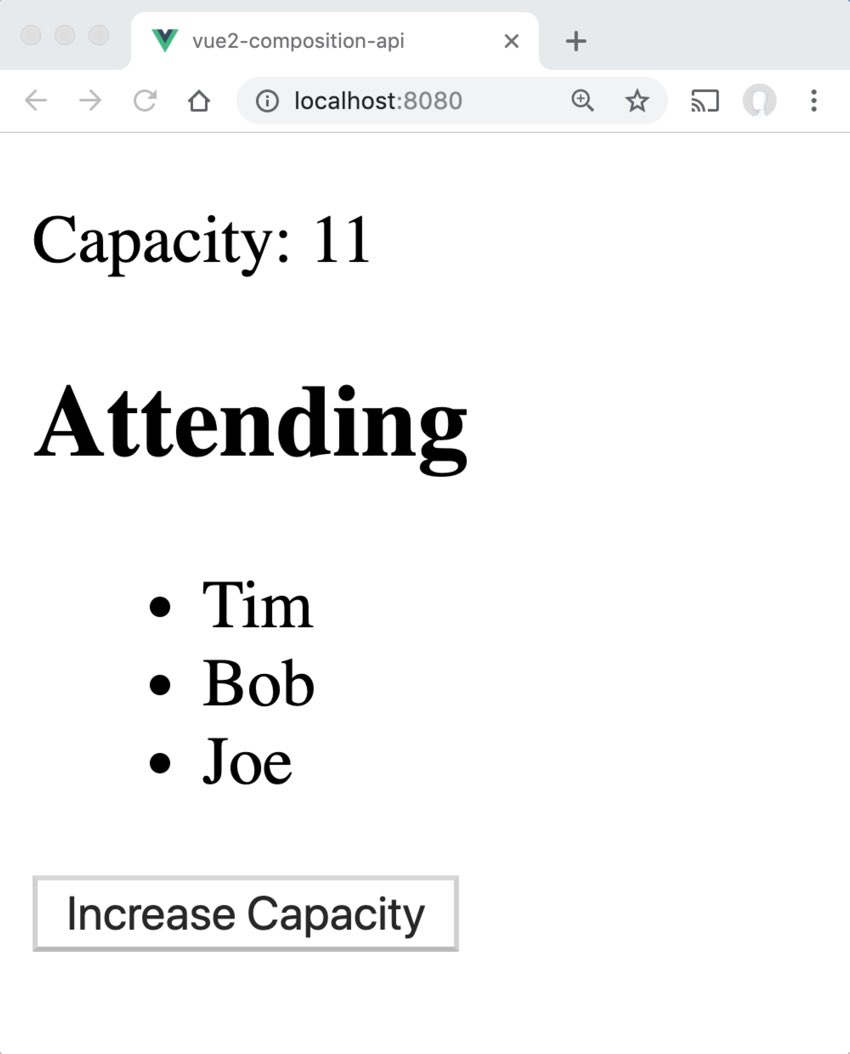
Notice we now have a new array of attendees, and we print them each out. Our website looks like:
To create the need for a computed property, let’s change how we’re printing out capacity in our template:
<template>
  <div>
    <p>Spaces Left: {{ spacesLeft }} out of {{ capacity }}</p>
    ...
Notice spacesLeft above, which will show the number of spaces left in the event based on the capacity minus the number of people attending. If we were to create a computed property using the regular component syntax, it might look like this:
computed: {
  spacesLeft() {
    return this.capacity - this.attending.length;
  }
}
But how would we create this using the new Composition API? It would look something like this:
<template>
  <div>
    <p>Spaces Left: {{ spacesLeft }} out of {{ capacity }}</p>
    <h2>Attending</h2>
    <ul>
      <li v-for="(name, index) in attending" :key="index">
        {{ name }}
      </li>
    </ul>
    <button @click="increaseCapacity()">Increase Capacity</button>
  </div>
</template>
<script>
import { ref, computed } from "vue";
export default {
  setup() {
    const capacity = ref(4);
    const attending = ref(["Tim", "Bob", "Joe"]);

    const spacesLeft = computed(() => { // <-------
      return capacity.value - attending.value.length;
    });

    function increaseCapacity() {
      capacity.value++;
    }
    return { capacity, attending, spacesLeft, increaseCapacity };
  }
};
</script>
As you can see in the code above, we imported computed from the Vue API, and then we used it, passing in an anonymous function and setting it equal to a constant called spacesLeft . We then returned this in our object from the setup function so our template received access to it. Now in our browser, here’s what we see:
The Reactive Syntax
Up until now we’ve been using Reactive References to wrap our JavaScript primitives in objects to make them reactive. However, there is an additional way to wrap these primitives in an object. Specifically using the reactive syntax.
Below you can see our example using Reactive References on the left, and on the right the alternative reactive syntax.

As it shows in the image above on the right, we created a new event constant which takes a plain JavaScript object and returns a reactive object. This may look familiar to using the data option in our regular component syntax, where we also send in an object. However, as you can see above, we can also send in our computed properties into this object. You should also notice that when we use this syntax we no longer need to write .value when accessing properties. This is because we are simply accessing the object properties on the event object. You should also notice that we’re returning the entire event object at the end of the setup function.
Note that both of these syntaxes are completely valid, and neither is deemed a “best practice.”
In order to get our code working, we’d need to update our template code as follows:
    <p>Spaces Left: {{ event.spacesLeft }} out of {{ event.capacity }}</p>
    <h2>Attending</h2>
    <ul>
      <li v-for="(name, index) in event.attending" :key="index">
       {{ name }}
      </li>
    </ul>
    <button @click="increaseCapacity()">Increase Capacity</button>
Notice how we are now calling event. to access the properties.
Destructuring?
When I first saw the following code:
return { event, increaseCapacity }
I wondered, might there be any way to destructure the event object, so that in the template I don’t always have to write event. ? I’d rather have my template written like so:
    <p>Spaces Left: {{ spacesLeft }} out of {{ capacity }}</p>
    <h2>Attending</h2>
    <ul>
      <li v-for="(name, index) in attending" :key="index">
       {{ name }}
      </li>
    </ul>
    <button @click="increaseCapacity()">Increase Capacity</button>
But how can I destructure event ? I tried the following two ways, which both failed:
    return { ...event, increaseCapacity };

    return { event.capacity, event.attending, event.spacesLeft, increaseCapacity };
Neither of these are going to work because splitting apart this object will remove it’s reactivity. To make this work, we need to be able to split apart this object into Reactive References , which will be able to maintain reactivity.
Introducing toRefs
Luckily, there is a way to do this using the toRefs method. This method converts a reactive object to a plain object, where each property is a Reactive Reference pointing to the property on the original object. Here is our completed code using this method:
    import { reactive, computed, toRefs } from "vue";
    export default {
      setup() {
        const event = reactive({
          capacity: 4,
          attending: ["Tim", "Bob", "Joe"],
          spacesLeft: computed(() => {
            return event.capacity - event.attending.length;
          })
        });
        function increaseCapacity() {
          event.capacity++;
        }
        return { ...toRefs(event), increaseCapacity };
      }
    };
Notice that I’m importing toRefs and then using it in my return statement, and then destructuring the object. This works great!
Aside
Before continuing on, I want to mention that if our code didn’t need to also return the increaseCapacity function in the return value, I could have simply written:
return toRefs(event);
This is because our setup method expects us to return an object, which is exactly what toRefs returns as well.
Modularizing
Two of the reasons we might use the component API are to organize our component by feature and reuse our code across other components. Up until now we’ve done nether with our code example, so let’s do that now. Here’s our current code, notice I’ve changed back to using Reactive References, there’s something about that syntax that just seems cleaner to me.
    <template>
      ...
    </template>
    <script>
    import { ref, computed } from "vue";
    export default {
      setup() {
        const capacity = ref(4);
        const attending = ref(["Tim", "Bob", "Joe"]);
        const spacesLeft = computed(() => {
          return capacity.value - attending.value.length;
        });
        function increaseCapacity() {
          capacity.value++;
        }
        return { capacity, attending, spacesLeft, increaseCapacity };
      }
    };
    </script>
Extracting into a Composition Function
This is just as simple as it sounds:
    <template>
      ...
    </template>
    <script>
    import { ref, computed } from "vue";
    export default {
      setup() {
        return useEventSpace(); // <--- Notice I've just extracted a function
      }
    };
    function useEventSpace() {
      const capacity = ref(4);
      const attending = ref(["Tim", "Bob", "Joe"]);
      const spacesLeft = computed(() => {
        return capacity.value - attending.value.length;
      });
      function increaseCapacity() {
        capacity.value++;
      }
      return { capacity, attending, spacesLeft, increaseCapacity };
    }
    </script>
All I’ve done is move all my code into a function which is now outside of my export default { . The setup() method now becomes the place where I tie my composition functions together.
Extracting into a file to reuse the code
If useEventSpace() is a piece of code I might want to use in multiple components, all I need to do is extract this function into it’s own file with export default:
 use/event-space.vue
    import { ref, computed } from "vue";

    export default function useEventSpace() {
      const capacity = ref(4);
      const attending = ref(["Tim", "Bob", "Joe"]);
      const spacesLeft = computed(() => {
        return capacity.value - attending.value.length;
      });
      function increaseCapacity() {
        capacity.value++;
      }
      return { capacity, attending, spacesLeft, increaseCapacity };
    }
I called my folder use for my composition functions, but you can call it whatever you like. composables or hooks are other good names.
Now my component code simply imports this composition function and uses it.
    <template>
      ...
    </template>
    <script>
    import useEventSpace from "@/use/event-space";
    export default {
      setup() {
        return useEventSpace();
      }
    };
    </script>
Adding another Composition Function
If we had another composition function, perhaps in use/event-mapping.js , to map our event and we wanted to use it here, we might write:
    <template>
      ...
    </template>
    <script>
    import useEventSpace from "@/use/event-space";
    import useMapping from "@/use/mapping";
    export default {
      setup() {
        return { ...useEventSpace(), ...useMapping() }
      }
    };
    </script>
As you can see, it’s quite simple to share composition functions across your components. Realistically I’d probably have shared data which I’d send into these functions, like the event data which was fetched from an API using Vuex.
Lifecycle Hooks
You’re probably familiar with Vue lifecycle hooks, which give us the ability to run code when a component reaches a particular state in execution. Let’s review the typical LifeCycle hooks as you know them:
- beforeCreate - Called immediately after instance is initialized, before options are processed.
- created - Called after the instance has been created.
- beforeMount - Right before mounting of the DOM begins
- mounted - Called when the instance has been mounted (browser updated).
- beforeUpdate - Called when reactive data has changed, before the DOM is re-rendered.
- updated - Called when reactive data has changed, and the DOM has been re-rendered.
- beforeDestroy - Called right before the Vue instance is destroyed.
- destroyed - Called after the Vue instance has been destroyed.
There are two newer Vue 2 LifeCycle methods you may not be familiar with:
- activated - Used for , when a component inside is toggled on.
- deactivated - Used for , when a component inside is toggled off.
- errorCaptured - Called when an error from any descendent component is captured.
For more detailed explanations check out the API documentation on LifeCycle hooks.
Unmounting in Vue 3
In Vue 3 beforeDestroy() can also be written as beforeUnmount() , and destroyed() can be written as unmounted() . When I asked Evan You about these changes, he mentioned it’s just a better naming conventions, because Vue mounts and unmounts components.
Composition API LifeCycle Methods
In Vue 3’s Composition API we can create callback hooks inside setup() by adding on to the LifeCycle method name:
import {
  onBeforeMount,
  onMounted,
  onBeforeUpdate,
  onUpdated,
  onBeforeUnmount,
  onUnmounted,
  onActivated,
  onDeactivated,
  onErrorCaptured
} from "vue";

export default {
  setup() {
    onBeforeMount(() => {
      console.log("Before Mount!");
    });
    onMounted(() => {
      console.log("Mounted!");
    });
    onBeforeUpdate(() => {
      console.log("Before Update!");
    });
    onUpdated(() => {
      console.log("Updated!");
    });
    onBeforeUnmount(() => {
      console.log("Before Unmount!");
    });
    onUnmounted(() => {
      console.log("Unmounted!");
    });
    onActivated(() => {
      console.log("Activated!");
    });
    onDeactivated(() => {
      console.log("Deactivated!");
    });
    onErrorCaptured(() => {
      console.log("Error Captured!");
    });
  }
};
You might notice that two hooks are missing. beforeCreate and created are not needed when using the Composition API. This is because beforeCreate() is called right before setup() and created() is called right after setup() . Thus, we simply put code inside setup() that would normally be in these hooks, such as API calls.
Two New Vue 3 LifeCycle Methods
There are two more additional watchers coming in Vue 3. These have not been implemented with the Vue 2 Composition API plugin (as I’m writing this), so you can’t play with them without using Vue 3 source.
- onRenderTracked - called when a reactive dependency is first being accessed in the render function, during render. This dependency will now be tracked. This is helpful to see which dependencies are being tracked, for debugging.
- onRenderTriggered - Called when a new render is triggered, allowing you to inspect what dependency triggered a component to re-render.
I’m excited to see what sort of optimization tools can be created with these two hooks.
Watch
Let’s look at another simple example using our composition API. Here’s some code that has a simple search input box, uses the search text to call an API, and returns the number of events that match the input results.
<template>
  <div>
    Search for <input v-model="searchInput" />
    <div>
      <p>Number of events: {{ results }}</p>
    </div>
  </div>
</template>
<script>
import { ref } from "@vue/composition-api";
import eventApi from "@/api/event.js";

export default {
  setup() {
    const searchInput = ref("");
    const results = ref(0);

    results.value = eventApi.getEventCount(searchInput.value);

    return { searchInput, results };
  }
};
</script>
With this code, here what happens when we use the form:
As you can see, it doesn’t seem to be working. This is because our API calling code, specifically results.value = eventApi.getEventCount(searchInput.value); is only getting called once, during the first time setup() is run. It doesn’t know to fire again, when our searchInput gets updated.
Solution: Watch
To fix this we need to use watch. This will run our function on the next tick while reactively tracking its dependencies, and re-run it whenever the dependencies have changed. Like so:
setup() {
  const searchInput = ref("");
  const results = ref(0);

  watch(() => {
    results.value = eventApi.getEventCount(searchInput.value);
  });

  return { searchInput, results };
}
So the first time this gets run it uses reactivity to start tracking searchInput , and when it gets updated it will re-run our API call which will update results . Since results is used in our template our template will be re-rendered.
If I want to be more specific as to which source I want to watch for changes, I can specify it in the watcher definition, like so:
watch(searchInput, () => {
  ...
});
Also, if I need access to the new value and old value of the item being watched I can write:
watch(searchInput, (newVal, oldVal) => {
  ...
});
Watching Multiple Sources
If I want to watch two Reactive References I can send them inside an array:
watch([firstName, lastName], () => {
  ...
});
Now if either are changed, the code inside will re-run. I can also get access to both of their old and new values with:
watch([firstName, lastName], ([newFirst, newLast], [oldFirst, oldLast]) => {
  ...
});
Sharing State
Now that we’ve learned the basic syntax of the Composition API, let’s use it to extract some reusable code from a component. When working with API calls, quite often there’s a lot of code and functionality that we might want to build around a call. Specifically things like loading state, error state, and try / catch blocks. Let’s look at this code and then extract it properly using the Composition API.
I’ve built out the code sample from the previous lesson:
 /src/App.js
<template>
  <div>
    Search for <input v-model="searchInput" />
    <div>
      <p>Loading: {{ loading }}</p>
      <p>Error: {{ error }}</p>
      <p>Number of events: {{ results }}</p>
    </div>
  </div>
</template>
<script>
import { ref, watch } from "@vue/composition-api";
import eventApi from "@/api/event.js";
export default {
  setup() {
    const searchInput = ref("");
    const results = ref(null);
    const loading = ref(false);
    const error = ref(null);
    async function loadData(search) {
      loading.value = true;
      error.value = null;
      results.value = null;
      try {
        results.value = await eventApi.getEventCount(search.value);
      } catch (err) {
        error.value = err;
      } finally {
        loading.value = false;
      }
    }
    watch(searchInput, () => {
      if (searchInput.value !== "") {
        loadData(searchInput);
      } else {
        results.value = null;
      }
    });
    return { searchInput, results, loading, error };
  }
};
</script>
Taking a look in the browser it looks like:
Now with Shared State
This is a pretty common pattern in a Vue application where I have an API call and I need to account for the results, loading, and error state. How might I extract this to use the composition API? Well first I might create a new file and extract the common functionality.
/composables/use-promise.js
import { ref } from "@vue/composition-api";
export default function usePromise(fn) { // fn is the actual API call
  const results = ref(null);
  const loading = ref(false);
  const error = ref(null);
  const createPromise = async (...args) => { // Args is where we send in searchInput
    loading.value = true;
    error.value = null;
    results.value = null;
    try {
      results.value = await fn(...args); // Passing through the SearchInput
    } catch (err) {
      error.value = err;
    } finally {
      loading.value = false;
    }
  };
  return { results, loading, error, createPromise };
}
Notice how this function holds the reactive references as well as a function that wraps the API call, along with any arguments that need to be passed into the API call. Now to use this code:
/src/App.js
<template>
  <div>
    Search for <input v-model="searchInput" />
    <div>
      <p>Loading: {{ getEvents.loading }}</p>
      <p>Error: {{ getEvents.error }}</p>
      <p>Number of events: {{ getEvents.results }}</p>
    </div>
  </div>
</template>
<script>
import { ref, watch } from "@vue/composition-api";
import eventApi from "@/api/event.js";
import usePromise from "@/composables/use-promise";
export default {
  setup() {
    const searchInput = ref("");
    const getEvents = usePromise(search =>
      eventApi.getEventCount(search.value)
    );

    watch(searchInput, () => {
      if (searchInput.value !== "") {
        getEvents.createPromise(searchInput);
      } else {
        getEvents.results.value = null;
      }
    });
    return { searchInput, getEvents };
  }
};
</script>
That’s all there is to it, and we get the same functionality shown above.
Notice in particular how easy it is to have reactive state (loading, error, and results) that lives inside my use-promise.js file which gets used inside my component. Now when I have another API call I can use-promise.
Caveat
When I ran this by members of the Vue core team, they called attention to …getEvents . Specifically that I shouldn’t be destructuring the object. Without destructuring the data is namespaced under getEvents which makes it more encapsulated and clear where the data is coming from in the component using it. It might look like:
<template>
  <div>
    Search for <input v-model="searchInput" />
    <div>
      <p>Loading: {{ getEvents.loading }}</p>
      <p>Error: {{ getEvents.error }}</p>
      <p>Number of events: {{ getEvents.results }}</p>
    </div>
  </div>
</template>
<script>
...
export default {
  setup() {
    ...
    return { searchInput, getEvents };
  }
};
</script>
However, when I ran this in the browser I got the following results:
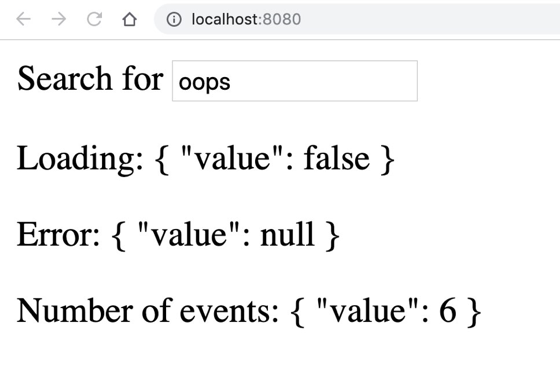
It looks like Vue 2 with the composition API isn’t properly recognizing my Reactive References and calling .value like it should. I could fix this by adding .value manually orr by actually using Vue 3. I tested the code with Vue 3 and sure enough, it saw the Reactive References and properly displayed the .value .
Thank you for working through our first Vue 3 course. Next up I’ll be working on a Vue 3 Reactivity course, explaining some of the core concepts of Vue 3’s new Reactivity engine.
Suspense
When we code up Vue apps we use API calls a lot to load in back-end data. When we are waiting for this API data to load, it’s a good user interface practice to let the user know that the data is loading. This is especially needed if the user has a slow internet connection.
Typically in Vue we’ve used lots of v-if and v-else statements to show one bit of html while we’re waiting for data to load and then switch it out once data is loaded. Things can get even more complex when we have multiple components doing API calls, and we want to wait until all data is loaded before displaying the page.
However, Vue 3 comes with an alternative option inspired by React 16.6 called Suspense . This allows you to wait for any asynchronous work (like making a data API call) to complete before a component is displayed.
Suspense is a built in component that we can use to wrap two different templates, like so:
<template>
  <Suspense>
    <template #default>
      <!-- Put component/components here, one or more of which makes an asychronous call -->
    </template>
    <template #fallback>
      <!-- What to display when loading -->
    </template>
  </Suspense>
</template>
When Suspense loads it will first attempt to render out what it finds in <template #default> . If at any point it finds a component with a setup function that returns a promise, or an Asynchronous Component (which is a new feature of Vue 3) it will instead render the <template #fallback> until all the promises have been resolved.
Let’s take a look at a very basic example:
<template>
  <Suspense>
    <template #default>
      <Event />
    </template>
    <template #fallback>
      Loading...
    </template>
  </Suspense>
</template>
<script>
import Event from "@/components/Event.vue";
export default {
  components: { Event },
};
</script>
Here you can see I’m loading my Event component. It looks similar to previous lessons:
<template>
...
</template>
<script>
import useEventSpace from "@/composables/use-event-space";
export default {
  async setup() {
    const { capacity, attending, spacesLeft, increaseCapacity } = await useEventSpace();
    return { capacity, attending, spacesLeft, increaseCapacity };
  },
};
</script>
Notice in particular that my setup() method marked as async and my await useEventSpace() call. Obviously, there’s an API call inside the useEventSpace() function, that I’m going to wait to return.
Now when I load up the page I see the loading … message, until the API call promise is resolved, and then the resulting template is displayed.
Multiple Async Calls
What’s nice about Suspense is that I can have multiple asynchronous calls, and Suspense will wait for all of them to be resolved to display anything. So, if I put:
<template>
  <Suspense>
    <template #default>
      <Event />
      <Event />
    </template>
    <template #fallback>
      Loading...
    </template>
  </Suspense>
</template>
Notice the two events? Now Suspense is going to wait for both of them to be resolved before showing up.
Deeply Nested Async Calls
What’s even more powerful is that I might have a deeply nested component that has an asynchronous call. Suspense will wait for all asynchronous calls to finish before loading the template. So you can have one loading screen on your app, that waits for multiple parts of your application to load.
What about errors?
It’s pretty common that you need a fallback if an API call doesn’t work properly, so we need some sort of error screen along with our loading screen. Luckily the Suspense syntax allows you to use it with a good old v-if , and we have a new onErrorCaptured lifecycle hook that we can use to listen for errors:
<template>
  <div v-if="error">Uh oh .. {{ error }}</div>
  <Suspense v-else>
    <template #default>
      <Event />
    </template>
    <template #fallback>
      Loading...
    </template>
  </Suspense>
</template>
<script>
import Event from "@/components/Event.vue";
import { ref, onErrorCaptured } from "vue";
export default {
  components: { Event },
  setup() {
    const error = ref(null);
    onErrorCaptured((e) => {
      error.value = e;
      return true;
    });
    return { error };
  },
};
</script>
Notice the div at the top, and the v-else on the Suspense tag. Also notice the onErrorCaptured callback in the setup method. In case you’re wondering, returning true from onErrorCaptured is to prevent the error from propagating further. This way our user doesn’t get an error in their browser console.
Creating Skeleton Loading Screens
Using the Suspense tag makes creating things like Skeleton loading screens super simple. You know, like these:

Your skeleton would go into your <template #fallback> and your rendered HTML would go into your <template #default> . Pretty simple!
Teleport
Vue’s component architecture enables us to build our user interface into components that beautifully organize our business logic and presentation layer. However, there are some instances where one component has some html that needs to get rendered in an alternative location. For example:
- Styles that require fixed or absolute positioning and z-index. For example, it’s a common pattern to place UI components (like modals) right before the
</body>tag to ensure they are properly placed in front of all other parts of the webpage. - When our Vue application is running on a small part of our webpage (or a widget), sometimes we may want to move components to other locations in the DOM outside of our Vue app.
Solution
The solution Vue 3 provides is the Teleport component. Previously this was named “Portal”, but the name was changed to Teleport so not to conflict with the future <portal> element which might some day be a part of the HTML standard. The Teleport component allows us to specify template html (which may include child components) that we can send to another part of the DOM. I’m going to show you some very basic usage, and then show you how we might use this in something more advanced. Let’s start by adding a div tag outside of our Vue app, in our basic Vue CLI generated app:
/public/index.html
    ...
    <div id="app"></div>
    <div id="end-of-body"></div>
  </body>
</html>
Then let’s try teleporting some text to this #end-of-body div from inside our Vue application to slightly outside the application.
/src/App.vue
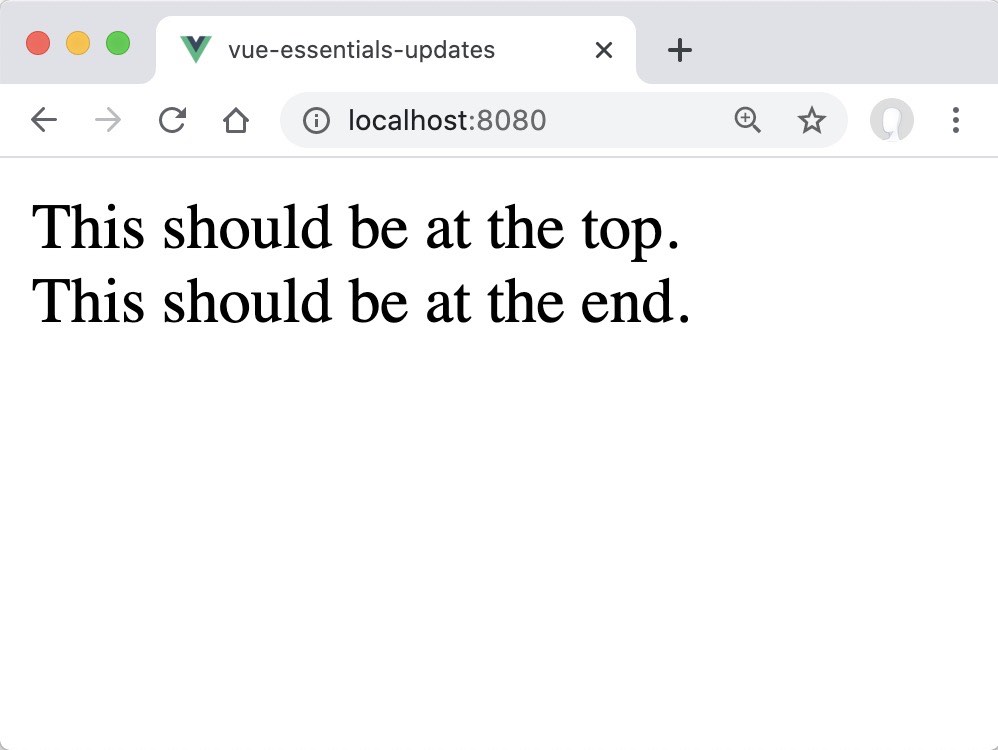
<template>
  <teleport to="#end-of-body">
    This should be at the end.
  </teleport>
  <div>
    This should be at the top.
  </div>
</template>
Notice the teleport line where we specify the div we want to move our template code to, and if we did this right, the text at the top should be moved to the bottom. Sure enough, it does:
Teleport Options for To
Our to attribute simply needs to be a valid DOM query selector. Aside from using the id like I did above, here are three more examples.
Class selector
<teleport to=".someClass">
Data selector
<teleport to="[data-modal]">
Using a data attribute our target div might look like:
Dynamic selector
If you needed you could even bind a dynamic selector, adding the colon.
<teleport :to="reactiveProperty">
Disabled State
Modals and other pop-ups often start hidden until they are displayed on the screen. For that reason, teleport has a disabled state where the content stays inside the original component. It’s not until teleport is enabled that it will be moved to the target positioning. Let’s update the code to be able to toggle showText , like so:
<template>
  <teleport to="#end-of-body" :disabled="!showText">
    This should be at the end.
  </teleport>
  <div>
    This should be at the top.
  </div>
  <button @click="showText = !showText">
     Toggle showText
  </button>
</template>
<script>
export default {
  data() {
    return {
      showText: false
    };
  }
};
</script>
As you can see, the content inside teleport gets moved from inside the component, to outside the component as we toggle:
If we inspect the source realtime, we can see that the content is actually being moved in the DOM from place to place.
Automatically Saving the State
When teleport goes from disabled to enabled, the DOM elements are re-used, so they completely retain the existing state. This can be illustrated by teleporting a playing video.
<template>
  <teleport to="#end-of-body" :disabled="!showText">
    <video autoplay="true" loop="true" width="250">
      <source src="flower.webm" type="video/mp4">
    </video>
  </teleport>
  <div>
    This should be at the top.
  </div>
  <button @click="showText = !showText">
      Toggle showText
  </button>
</template>
<script>
export default {
  data() {
    return {
      showText: false
    };
  }
};
</script>
As you can see in the video below, the state of the video as it moves between locations remains the same.

Hiding the Text
If the content we had inside teleport was a modal, we probably wouldn’t want to show it until it was active. Right now “This should be at the end.” is displaying inside our component, even when showText is false. We can disable this from showing by simply adding a v-if.
<template>
  <teleport to="#end-of-body" :disabled="!showText" v-if="showText">
      This should be at the end.
  </teleport>
  ...
Now our text only shows up when showText is true, and thus teleported to the bottom of the page.
Multiple Teleports into the Same Place
This made me wonder, what happens when you teleport two things into the same place? I can can see (especially with modals) how you might want to teleport more than one thing. Let’s give it a try with our overly simple example, simply creating a showText2.
<template>
  <teleport to="#end-of-body" :disabled="!showText" v-if="showText">
    This should be at the end.
  </teleport>
  <teleport to="#end-of-body" :disabled="!showText2" v-if="showText2">
    This should be at the end too.
  </teleport>
  <div>
    This should be at the top.
  </div>
  <button @click="showText = !showText">
      Toggle showText
  </button>
  <button @click="showText2 = !showText2">
      Toggle showText2
  </button>
</template>
<script>
export default {
  data() {
    return {
      showText: false,
      showText2: false
    };
  }
};
</script>
You can see from the video below that it works as you’d expect, adding the content as it’s toggled. It’s interesting to see that it’s simply appending the element based on which one is clicked first.

Conclusion
As you can see, using teleport provides you a way to keep your code in the same component, while moving pieces of it into other parts of your page. Aside from the obvious solution of using this for modals which need to appear on top of the rest of the page, and placed right above your </body> tag, I’m excited to see how else this Vue 3 feature is used in practice.
For a more detailed written description, check out the RFC.